
Is your Windows 10 or Windows 11 computer or device unable to load the operating system successfully? Is Windows reporting missing or damaged system files? If that’s the case, you should try to boot from a recovery drive and use the Startup Repair tool. It’s a very helpful tool that can repair your system and save you from having to reset or reinstall the operating system. Here’s how it works:
What is Startup Repair & What does it do on your computer?
Startup Repair is a tool designed to fix problems like missing or damaged system files used to load the Windows operating system. It can’t detect or fix hardware failures, nor does it help against virus attacks and the damage they do. Instead, it scans your computer or device for system issues (corrupt system files, invalid boot files) and then tries to fix the problem.

Startup Repair running on a Windows 11 computer
Obviously, this tool is safe, as it’s made by Microsoft itself, and it comes in handy when Windows fails to boot correctly.
How to launch Startup Repair
Obviously, your computer or laptop can’t boot Windows properly, which is why you’re trying to run Startup Repair. So, you can’t rely on your operating system to launch it. But, in order to use this tool, you can and should boot your Windows computer from a recovery drive, a System Repair disc, or a Windows installation drive.
Either one will work, and you can create any of them on a working Windows 10 or Windows 11 computer. If you don’t know how to do that, here are some tutorials that will guide you through the required steps:
- How do you create a USB Windows 10 recovery drive?
- How to create a System Repair disc in Windows 10 and Windows 11
- Windows 10 Media Creation Tool: Create a setup USB stick or ISO
- Windows 11 Media Creation Tool: Create a setup USB stick or ISO
Before we go any further, you should know that the steps you’ll have to follow and the options you’ll get are the same in both operating systems — Windows 10 and Windows 11 — so, to keep things simple, we’ll only use screenshots taken in Windows 11.
Once you have a recovery drive, a System Repair disc, or a Windows installation drive ready, boot from it. To do that, plug it in and start your computer or device. Immediately after your PC starts, press the boot device selection key from your keyboard. It’s usually the F12, F11, or the Escape key, but it could also be another one, depending on the manufacturer of your computer’s mainboard.
Doing that will make your computer display a boot priority selection menu. Use the arrow keys on your keyboard to select the USB recovery drive or the System Repair disc. Then, press Enter.
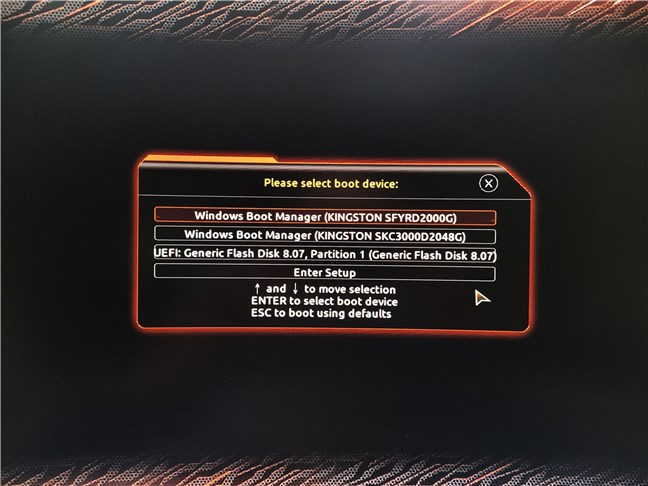
Boot your computer from a Recovery Drive, System Repair disc, or Windows installation media
TIP: Here’s how to boot from a USB drive on your PC.
How to launch Startup Repair from a USB recovery drive or a System Repair disc
Once your PC boots, you might be asked to choose the keyboard layout you want. If this happens, click or tap on the layout that matches your keyboard. To navigate between all the available keyboard layouts, press “See more keyboard layouts.”

Choose your keyboard layout
The list of available keyboard languages is quite long, and you may have to scroll until you find the layout you want to use. Then, on the next screen, click or tap on Troubleshoot (Reset your PC or see advanced options).
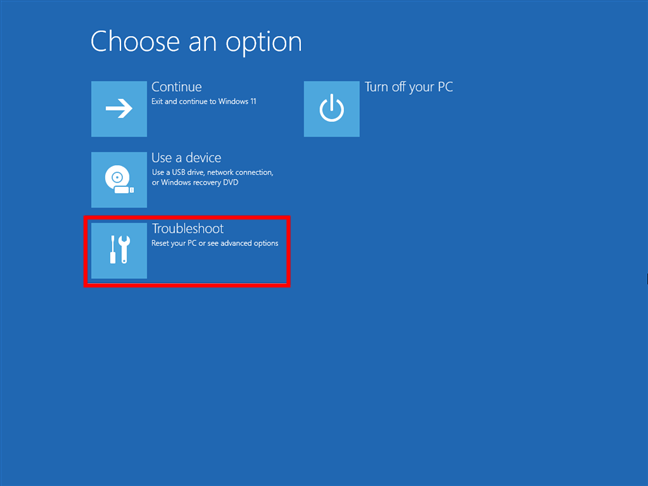
Select Troubleshoot
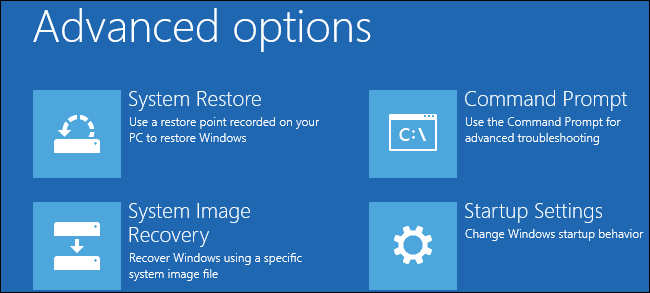
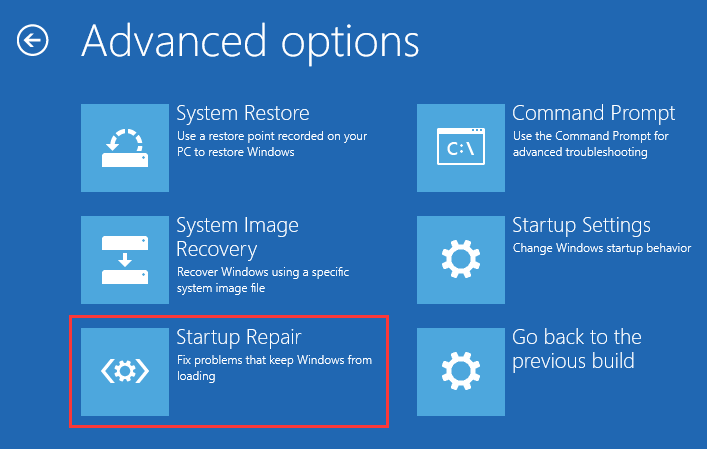
On the Advanced options screen, click or tap on Startup Repair (Fix problems that keep Windows from loading).

Launch Startup Repair
Now scroll to the “How to use Startup Repair in Windows 10 and Windows 11” section of this guide to see what happens next.
How to launch Startup Repair from a Windows installation drive
If you’ve chosen to boot your computer or laptop using a Windows installation drive, wait for the Windows Setup wizard to load. Select the language, time and currency format, and keyboard or input method you prefer, and press Next.
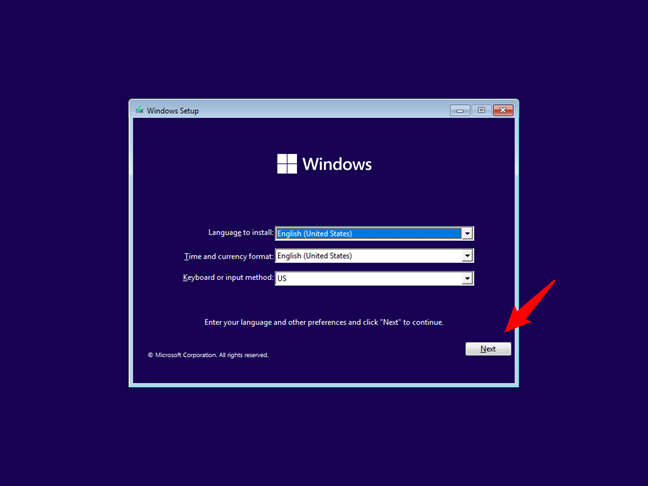
Complete the first step of the Windows Setup
On the second step, click or tap on Repair your computer at the bottom-left corner of the wizard. Alternatively, you can also press R on your keyboard.
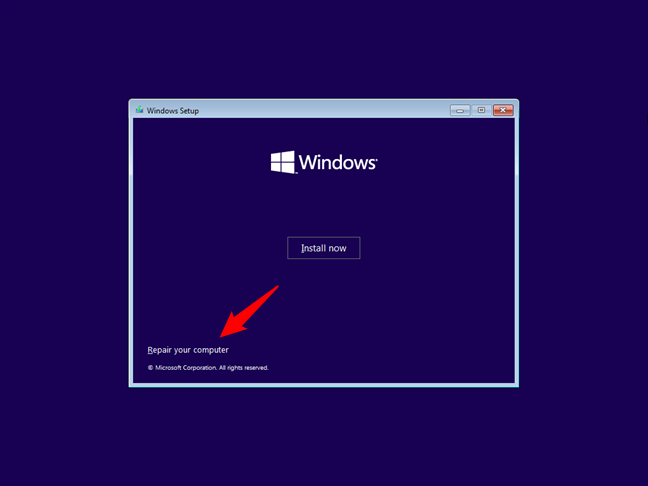
Repair your computer
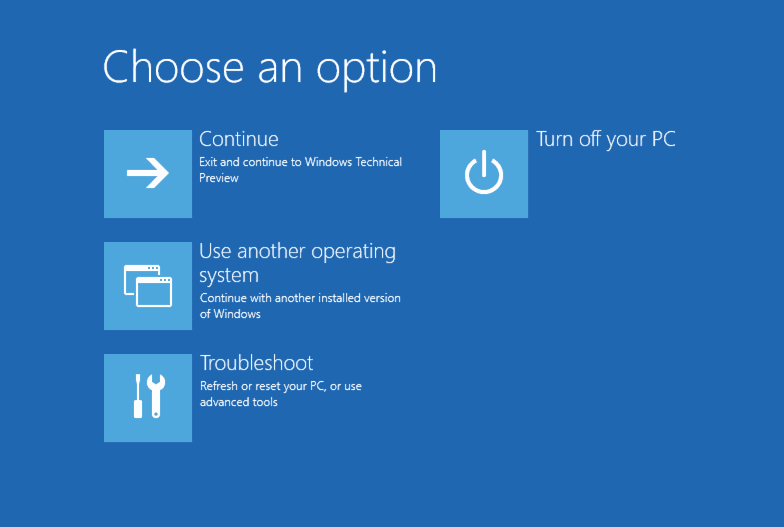
On the Choose an option screen that shows up next, click or tap on Troubleshoot.

Choose Troubleshoot
This loads the Advanced options screen. On it, press the Startup Repair option to “Fix problems that keep Windows from loading.”
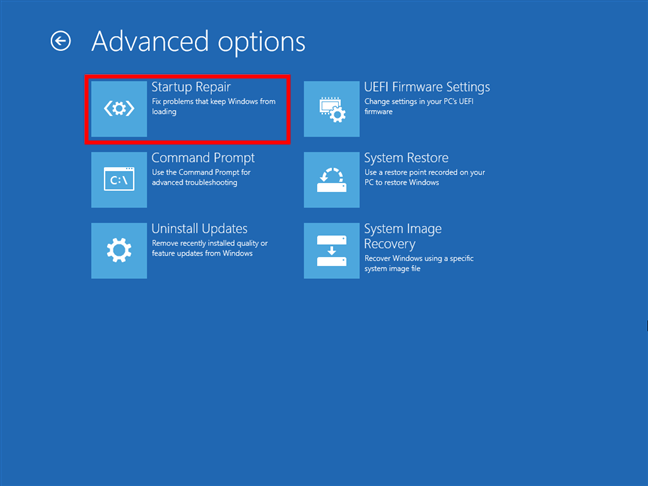
Initiate the Startup Repair
Next, here’s what the Startup Repair tool does:
How to use Startup Repair for Windows
Regardless of how you started Startup Repair, it will now automatically begin “Diagnosing your PC.”
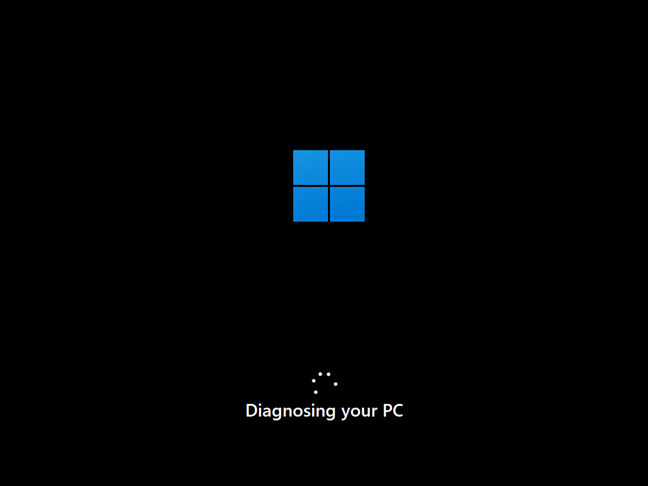
Startup Repair is Diagnosing your PC
After a while, if problems have been found, Startup Repair will attempt to repair them.

Startup Repair is Attempting repairs
If Startup Repair manages to repair your problems, you are informed, and you can restart your Windows computer or device and use it normally again.
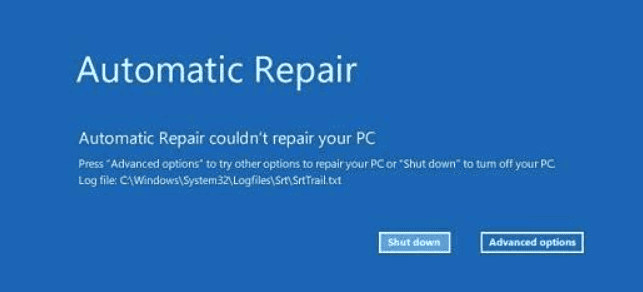
On the other hand, if it can’t repair the problems, Startup Repair will tell you about it, and you’ll have the option to access the Advanced options screen again, where you can find other troubleshooting tools. Or… you can simply Shut down your computer.
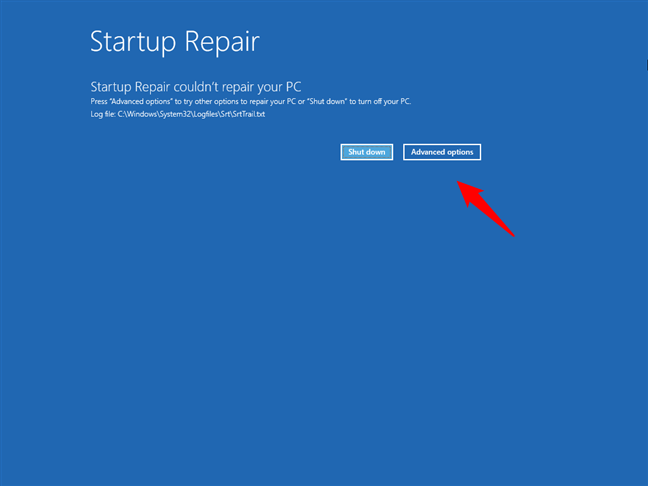
Startup Repair couldn’t repair your PC
In case you’re wondering about “How long should a Startup Repair take?” we can tell you that it should all be over in a few minutes on a modern computer with a solid-state drive. However, on a slow PC that still uses a hard-disk drive and a lot of boot issues, the whole process will take longer than that.
TIP: If nothing seems to work to make your computer boot normally, your MBR or EFI Bootloader might be broken. In that case, you might want to try troubleshooting them using the bcdboot or bootrec tools. You’ll find instructions here: Repair the EFI Bootloader or the MBR (Master Boot Record) for Windows.
Did you fix your computer using Startup Repair?
As you can see from this guide, Startup Repair is very easy to use. The slightly more complicated part is booting from the recovery media and starting the tool. And that’s why we have created this guide. Hopefully, many of you, our readers, will be able to solve your issues with Windows 10 or Windows 11 not loading correctly. Let us know in the comments section below if you have any other questions.
Is your Windows 10 system getting stuck on “Getting Windows ready don’t turn off your computer” every time you restart your system?
Then read the article to find out the best possible solutions to fix PC stuck on getting Windows ready after restart prompt or turning off or installing Windows operating system.
As per the users, the Windows PC or laptop gets stuck on the screen, and after waiting for a long time still, nothing changes.
Well, this is a very irritating problem and occurs while trying to turn on, turn off, or restarting the Windows 10 computer.
To fix various Windows errors, we recommend Advanced System Repair:
This software is your one stop solution to fix Windows errors, protect you from malware, clean junks and optimize your PC for maximum performance in 3 easy steps:
- Download Advanaced System Repair rated Excellent on Trustpilot.
- Click Install & Scan Now to install & scan issues causing the PC problems.
- Next, click on Click Here to Fix All Issues Now to fix, clean, protect and optimize your PC effectively.
What Does the Error Means Getting Windows Ready Don’t Turn Off your Computer?
Getting Windows-ready stuck error means Something went wrong with your system, and therefore it cannot perform certain actions and gets stuck on the loading screen. It appears your PC might be processing tasks in the background, like starting the Windows update process, downloading and installing files, changing application and modules settings, and much more. And depending on the number of programs installed on the PC, the system may take some time to complete the tasks.
Many users encountered the error in their Surface Pro 4 system and showed the error message Getting Windows ready. Don’t turn off your computer.
The error appears in many different cases.
- Getting Windows 10 ready restarting loop/infinite loop/update loop/boot loop
- Windows 10 system install stuck at getting ready
- Getting Windows ready after every restart
- Windows 10 update stuck on getting things ready
These are some of the common variations of Getting Windows Ready stuck error. If your Windows 10 is taking forever and stuck in the getting ready loop, follow the solutions below.
So without wasting time lets head to the solutions..!
How to Fix Getting Windows Ready Don’t turn Off Your Screen Error?
Many times a simple restart is sufficient to fix Windows 10 “getting Windows ready stuck” loop, so it is worth restarting your PC/laptop and checking if this works for you.
But if not, then try the below-given fixes accordingly.
Solution 1: Wait for Some Time at least 2-3 hours
Yes, this is what Microsoft’s support technicians advise. So, it would be best if you were patient, actually, when the computer displays “Getting Windows ready. Don’t turn off your computer”.
The system might be downloading and installing files or dealing with some background tasks. The computer sometimes might take a while for your system to finish these jobs.
So, to let your computer boot normally, the very first thing you need to do is wait. At least wait 2-3 hours, and if it is not yet fixed, then follow the next solutions.
Solution 2: Shut down Your PC and Power Reset Your PC
Well, this is a working solution and worked for many users to fix “Getting Windows ready, don’t turn off your computer”.
So here it is advised to power reset your computer; doing this will clear entire information in the computer memory without any damage to the data. Despite this, it also works to get out of the loop to fix Getting Windows Ready Stuck loop.
Follow the steps to do so:
- First, turn off the computer, even if you are stuck on getting ready screen
- Next, unplug entire peripheral devices (like external hard drive, USB flash drive, headphones, etc.) from your system.
- Now on your computer, press and hold the power button for 30 seconds.
- And unplug the power cable from your PC. But if a laptop and the laptop battery is removable, then unplug the battery.
- Next, plug the power cable back into the computer and reinsert the laptop battery
- Lastly, turn on your computer and laptop
It is expected now “getting Windows ready stuck” problem is resolved, or else head to the next solution.
Solution 3: Run System File Checker
If the above solutions fail to fix getting Windows ready stuck or the Windows 10 takes forever to start, then try running the System File Checker tool.
It might happen you are getting the error due to the corrupted Windows system files, and due to this, Windows is stuck on getting ready for an update or installation after a restart.
So, follow the steps to run an SFC scan:
- First, insert an installation disc or the USB drive into your Windows 10 PC and restart your system from the drive.
- After that, head to Repair, your computer > get in Choose an option screen > select Troubleshoot.
- Now on the Advanced options page > click Command Prompt
- And as the cmd window opens,> type the sfc /scannow> hit Enter
- Next, wait for the scanning process to finish.
And as the scanning process is finished > restart your computer. Check if this works for you to fix getting Windows ready Windows 10 loop error.
Solution 4: Uninstall Recently Installed apps and Delete the Problematic Files
Check if you have installed any recent software, then this might be what caused the “Getting Windows ready, don’t turn off your computer” stuck problem.
It might happen that the software installed is not compatible with your Windows 10 OS and, as a result, start causing the problem.
Well, to uninstall the recently installed apps, try running the third-party uninstaller as this remove the software completely without leaving any registry entries or the junk files.
Get Revo Uninstaller to uninstall the application completely
Also, check if some of the problematic files are causing the issues, then try deleting the files by following the steps given below:
- First, restart the computer > you can see the Windows Boot Options page.
- Then in Windows Boot Options menu > select Troubleshoot > Advanced Options > Command Prompt.
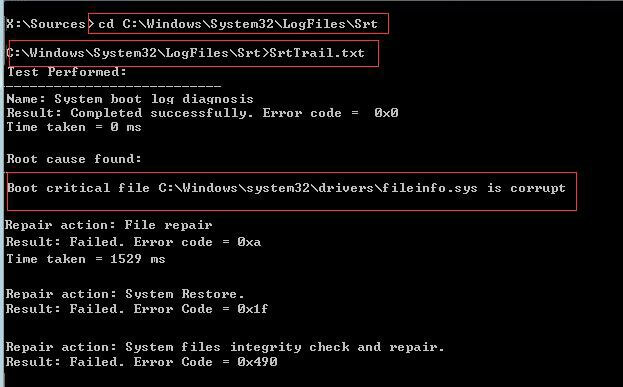
- Then in the command prompt > type the command C: cd Windows\System32\LogFiles\Srt. SrtTrail.txt > hit Enter
- Check if you see something like Boot critical file c:\windows\system32\drivers\vsock.sys is corrupt, > then using the Command Prompt move to the specified location use and type delete command for deleting the problematic file.
Solution 5: Uninstall the Recently Installed Update in Safe Mode
Microsoft randomly releases various updates to improve Windows 10 performance and make it more secure. But it might happen the incorrect Windows update confuses the Windows 10 to get stuck in the update loop.
And if you are facing the Getting Windows ready don’t turn off your computer error after installing or while installing the update, then it is advised to uninstall the update in safe mode.
Follow the steps given:
- Hold the Shift key and restart the PC or laptop. And open the Start Menu > click on the Power button to open Power options
- Now press and hold the shift key and click Windows will automatically start in Advanced boot options
- Click Startup Settings > press the F4 key to start the system in Safe Mode.
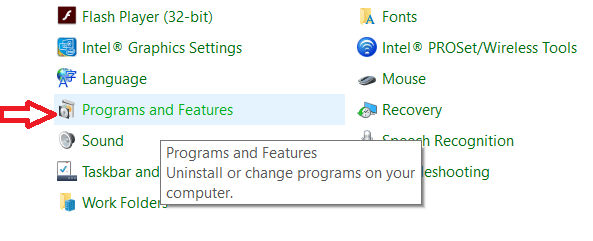
- Now in Windows 10 Safe Mode > right-click Start > go to Control Panel > go to Programs and Features.
- Next in the left panel click View installed update. And choose the recently installed updates and uninstall them one by one.

- Lastly, restart your Windows 10 computer.
And check if getting Windows ready stuck is resolved or not, or move to the next solution.
Solution 6: Perform a Startup Repair
Performing the Windows startup repair may work for you to fix your computer stuck in getting Windows ready every reboot.
- Here you need to enter the Windows Recovery Environment (WinRE) with the Windows installation disc.
- Then in WinRE > go to the Advanced options > select Startup Repair: Fix problems that keep Windows from loading.
- Now wait for the repair process to finish
And check if the Windows 10 stuck on getting Windows ready problem is fixed. If not, you may encounter the error “startup repair couldn’t repair your PC” or “automatic repair couldn’t repair your PC” error message.
So, in this case, it is best to perform a system restore.
Solution 7: Perform a System Restore
If none of the above-given solutions works for you, then the only option left is to perform a System Restore in Windows 10.
Follow the steps to do so:
- First, boot in Safe Mode.
- Press Windows + R keys then in the Run box > type rstrui.exe > hit Enter
- Then choose to roll back to the earlier time when your computer functions well > click Next
- And wait for the process to finish
It is estimated now the Getting Windows ready. Don’t turn off your computer problem is resolved and you start using Windows 10 system with ease.
Solution 8: Perform a Clean Installation
It is estimated the above-listed solutions may work for you but if not, then the only option left to fix getting windows ready stuck error is to perform a clean Windows installation.
Before starting with the clean reinstallation steps, it is recommended to back up the important data from the system partition and keep your license key ready.
Now for performing the Windows 10 clean installation, make sure to create a Windows 10 installation media with the Media Creation tool.
And as you are unable to access your system therefore you need to create an installation media on a different PC/laptop. After doing so, follow the steps given below:
- Connect Windows 10 installation media to your system > and restart it. Make sure to hit the suitable key or change the boot priority in BIOS to boot from Windows 10 installation media.
- Now select the preferred language > click Next.
- Then click on Install Now> follow the onscreen instructions. Please note that performing a clean install will delete entire files from the drive, so make sure to back up all the sensitive data first.
Additionally, make sure to choose the correct drive for performing a clean install. And as the setup process is finished, the problem of getting windows ready stuck is resolved.
Well, for many users performing Windows 10 also reset works. And resetting Windows 10 is an easy process than a clean install.
Follow the steps to reset Windows 10:
- Follow the above step 1 and 2.
- Then click on Repair your computer.
- Now choose to Troubleshoot > Reset this PC > Remove everything.
- Then choose your Windows installation > select Only the drive where Windows is installed > remove my files.
- Next click on the Reset button to start the Windows 10 resetting installation.
Please Note: Both the resetting and clean install will delete entire files from the system drive and reinstall Windows.
You can use any of the above-given steps.
FAQ: Learn More About Getting Windows Ready Stuck
1 — Why is my computer stuck on getting Windows Ready?
Commonly it happens due to the slow or poor internet connections, your OS is refreshed and requires the update to download and install, the old and slow computer and sometimes due to the corrupted Windows system files.
2 — How do I stop getting Windows ready don’t turn off my computer Win 10 problem?
Well, there are a number of troubleshooting steps that you need to try when you get stuck on getting Windows ready problem on Windows 10. Follow the below-given solutions:
- Wait for at least 2-3 hours
- Shutdown and power reset your PC
- Uninstall recently installed software
- Uninstall recently installed Windows 10 updates
- Perform a startup repair
- Perform a system restore.
3 — What happens if I turn off my computer when it says getting Windows ready?
If you restart or shutdown the PC forcible then the task performing in the background will stop, and the system will be restored to the last state the PC was in before. In simple words, restarting or shutting down the PC during the download or installation process will cause downloading the package again.
Best & Easy Solution To Fix “Getting Windows Ready Stuck” Error
If after following the above-given solutions you are still struggling with the PC stuck on getting Windows ready, Don’t turn off your computer screen, then it is worth giving a try to the PC Repair Tool.
This is an advanced and multifunctional tool that, just by scanning once, detects and fixes internal corruption and easily repairs the corrupted Windows system files.
Despite this, it also fixes other Windows PC errors like BSOD errors, registry errors, application errors, DLL errors & others. It not only fixes errors but also optimizes the Windows PC performance like a new one.
Get PC Repair Tool, to fix Getting Windows Ready Stuck Error
Conclusion:
So, this is all about the “Getting Windows ready, don’t turn off your computer” problem on Windows 10. I tried my best to list down the complete possible workarounds to fix PC stuck on getting Windows ready stuck.
I hope, one of the solutions given managed to fix Getting Windows ready stuck error on Windows 10. Make sure to follow the fixes given carefully.
If there is anything that I missed out, or you have any suggestions or queries then feel free to share with us on our social media handles – Facebook and Twitter page.
Good Luck..!
Hardeep has always been a Windows lover ever since she got her hands on her first Windows XP PC. She has always been enthusiastic about technological stuff, especially Artificial Intelligence (AI) computing. Before joining PC Error Fix, she worked as a freelancer and worked on numerous technical projects.
Use the ASO menu to troubleshoot problems in Windows 11, 10, and 8
Updated on March 29, 2023
What to Know
- Hold Shift while restarting your PC to start ASO, or if you can log in to Windows, find the option in Settings.
- Advanced Startup Options is just a menu of options; select a tool from the menu to use it.
- Options include reinstalling Windows, uninstalling Windows updates, running commands, and more.
This article shows how to use the Advanced Startup Options in Windows 11, 10, and 8.
How to Access the Advanced Startup Options Menu
There are a number of ways to get to the Advanced Startup Options menu. The easiest method depends on the situation you’re in that’s prompting the need to use one of these tools.
If you can access Windows normally, the quickest way to start Advanced Startup Options is through Settings:
- Windows 11: Settings > System > Recovery
- Windows 10: Settings > Update & Security > Recovery
- Windows 8: PC Settings > Update and Recovery > Recovery.
Take a look at the tutorial we linked to above if that’s not possible or if you need more help.
How to Use the Advanced Startup Options Menu
ASO is just a menu of tools—it doesn’t, itself, do anything. Choosing one of the available tools or other menus from Advanced Startup Options will open that tool or menu.
In other words, using Advanced Startup Options means using one of the available repair or recovery tools.
Some items available through this menu are nested inside other menus. If you need to back up, use the left arrow with the circle around it, which you’ll find to the left of the menu heading at the top of the screen.
What Is the Advanced Startup Options Menu Used For?
The tools available from the Advanced Startup Options menu can be used to run almost all of the repair, refresh/reset, and diagnostic tools available in Windows 11, 10, and 8 operating systems, even if Windows won’t start.
It also contains the Startup Settings menu which, among other things, is used to start Windows in Safe Mode.
The Advanced Startup Options Menu
Below is every icon or button you’ll see on this menu in Windows 11, Windows 10, and Windows 8. We’ll call out any differences between these versions of Windows.
If the menu item leads to another area of the menu, we’ll explain that. If it starts some recovery or repair feature, we’ll give a short description and link to more detailed information on that feature if we have it.
If you’ve configured a dual-boot system, you may also see Use another operating system (not shown here) on the main Advanced Startup Options menu.
Continue
Continue is available on the main Choose an option screen and says Exit and continue to Windows 11 (or Windows 10/8.1/8).
When you choose Continue, Advanced Startup Options will close, your computer will restart, and Windows will start in normal mode.
Obviously, if Windows isn’t starting properly, the very fact that brought you to Advanced Startup Options, then heading right back into Windows probably won’t be helpful.
However, if you found yourself on the ASO menu some other way, or are done with some other repair or diagnostic process, Continue is the quickest way out of Advanced Startup Options and back into Windows.
Use a Device
Use a device is available on the main Choose an option screen and says Use a USB drive, network connection, or Windows recovery DVD.
When you choose Use a device, a menu by that name appears, allowing you to boot from the various sources on your computer that are shown.
On most computers, you’ll see options for USB storage devices, DVD or BD drives, network boot sources (even if you don’t really have one of those set up), etc.
Only UEFI systems will have a Use a device option on Advanced Startup Options.
Troubleshoot
Troubleshoot is available on the main Choose an option screen and says Reset your PC or see advanced options.
In Windows 8, it says Refresh or reset your PC, or use advanced tools.
The Troubleshoot option opens up yet another menu, containing the Reset this PC and Advanced options items, both of which we discuss below.
The Troubleshoot menu is where all the repair and recovery features found in Advanced Startup Options are located, and is what you’ll want to choose if you want to do anything other than exit the ASO menu.
On some UEFI systems, you may also have a UEFI Firmware Settings option (not shown here) on the Troubleshoot menu.
Turn Off Your PC
Turn off your PC is available on the main Choose an option screen.
This option is pretty self-explanatory: it completely powers off your PC or device.
Reset This PC
Reset this PC is available from the Troubleshoot screen and says Lets you choose to keep or remove your files, and then reinstalls Windows.
Select Reset this PC to start the Reset This PC process, where you’re given two additional options, Keep my files or Remove everything.
The first option, great for when your computer is running slow or is buggy, removes all installed software and apps and resets all Windows settings, but nothing personal will be removed, like documents, music, etc.
The second option, much like a «factory reset» and great for starting over completely or before getting rid of your computer, removes everything, including installed apps and programs, settings, personal files, etc.
Reboot vs. Reset: What’s the Difference?
There is a complete walkthrough of the reset process available, including more on which choice is best.
In Windows 8, the first option above is called Refresh your PC and the second Reset your PC, both of which are available directly from the Troubleshoot screen.
Advanced Options
Advanced options is available from the Troubleshoot screen.
The Advanced options option opens up yet another menu which contains the following items: System Restore, System Image Recovery, Startup Repair, Command Prompt, and Startup Settings, all of which we explain below in their own sections.
In Windows 10, if you’re part of the Insider testing program, you’ll also see a Go back to the previous build option.
The Advanced options menu is most similar to the System Recovery Options menu found in earlier versions of Windows.
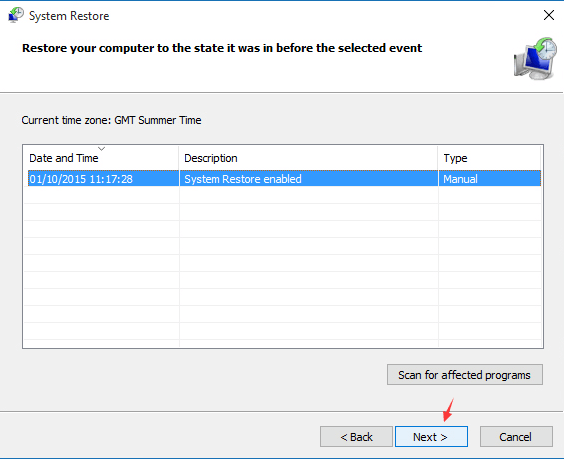
System Restore
System Restore is available from the Advanced options screen and says Use a restore point recorded on your PC to restore Windows.
The System Restore option starts System Restore, the same time-machine-like «undo» tool you may have used or seen from within Windows.
A huge advantage of having the ability to use System Restore from the Advanced Startup Options menu is that you’re doing so from outside of Windows 11/10/8.
For example, if you suspect some driver or registry issue is preventing Windows from starting properly, but find yourself in the unfortunate situation of not being able to start Windows so that you can then start System Restore, this option becomes very valuable.
System Image Recovery
System Image Recovery is available from the Advanced options screen and says Recover Windows using a specific system image file.
The System Image Recovery option starts the Re-image your computer feature of System Image Recovery, which is used to restore a previously-saved complete image of your computer.
This is a great option if you’ve unsuccessfully tried other tools available on the Advanced Startup Options menu. Of course, to use this, you or your computer maker must have proactively created a system image to re-image from.
Startup Repair
Startup Repair is available from the Advanced options screen and says Fix problems that keep Windows from loading.
The Startup Repair option starts, you guessed it, an automated startup repair procedure. If Windows 11, 10, or 8 isn’t starting properly, like due to a BSOD or a serious «missing file» error, Startup Repair is an excellent first troubleshooting step.
Early versions of Windows 8 referred to Startup Repair as Automatic Repair.
Command Prompt
Command Prompt is available from the Advanced options screen and says Use the Command Prompt for advanced troubleshooting.
The Command Prompt option starts Command Prompt, the command-line tool you may be familiar with from within Windows.
Most commands that are available from the Command Prompt in Windows are also available in the Command Prompt included here as part of Advanced Startup Options.
When using the Command Prompt from Advanced Startup Options, be sure to verify the correct drive you’re executing commands on. In most Windows installations, the drive Windows is installed on is designated as C while inside Windows, but as D while in the ASO menu.
This is because the C drive letter is given to a 350 MB system reserved partition that’s normally hidden when you’re in Windows, leaving D to be assigned to the drive Windows is installed on. If you’re not sure, use the dir command to inspect the folders.
Startup Settings
Startup Settings is available from the Advanced options screen and says Change Windows startup behavior.
Choosing the Startup Settings option will restart your computer and bring up Startup Settings, a menu full of various special ways to boot to Windows, including Safe Mode.
The Startup Settings menu is most similar to the Advanced Boot Options menu in previous versions of Windows.
Startup Settings isn’t available from Advanced Startup Options when accessed in certain ways. If you don’t see Startup Settings but need access to the startup modes on that menu, see How Do I Start Windows in Safe Mode? for help.
Advanced Startup Options Menu Availability
The Advanced Startup Options menu is available in Windows 11, Windows 10, and Windows 8.
Some of the diagnostic and repair options available from Advanced Startup Options are also available in Windows 7 and Windows Vista from System Recovery Options.
In Windows XP, few of these tools are available, but what are can be reached from Recovery Console or via a Repair Install.
FAQ
-
If Windows is stuck in an automatic repair loop and keeps restarting, make sure you’re booting to the correct drive, boot into Safe Mode, run the Fixboot and Chkdsk commands, or run Startup Repair from USB/DVD. If you still have problems, perform a System Restore, reset your PC, reinstall Windows, or replace your hard drive.
-
Press and hold F8 on your keyboard as your computer starts up (before the Windows logo appears) to boot directly into the Advanced Startup Options menu.
Thanks for letting us know!
Get the Latest Tech News Delivered Every Day
Subscribe
If a Windows 10 or Windows 11 computer encounters a startup error, it may activate an automatic repair process called “Preparing Automatic Repair.” This function is designed to identify and resolve problems that are preventing the operating system from starting correctly. However, sometimes the repair process itself can get stuck in a loop when the computer tries to fix a problem but fails to do so. This often leads to users seeing a “Diagnosing Your PC” message with no progress.
What Does Preparing Automatic Repair Mean?
| Feature | Description |
|---|---|
| Purpose | Diagnose and potentially fix issues preventing your computer from booting up normally. |
| Trigger | Automatic Repair is triggered when Windows detects errors during startup that might stop your computer from functioning properly. |
| Process | – Scans system files for corruption. – Attempts to repair corrupted files or identify the cause of the boot failure. |
| Outcome | – Successful repair: Windows boots up normally. – Repair failure: You’ll see an error message or be presented with recovery options. |
| Possible Causes of Automatic Repair | – Corrupted system files – Missing device drivers – Malware infection – Hardware problems (less common) |
| Duration | The time to complete Automatic Repair can vary greatly, ranging from a few minutes to over an hour depending on the severity of the problem. |
Resolving the Preparing Automatic Repair loop mainly involves a series of troubleshooting steps. These steps may include running system restores, booting in safe mode, undoing recent updates, checking for hardware issues, and if necessary, resetting the PC or performing a clean installation of Windows. For users grappling with such a loop, the goal is to break the cycle and restore normal boot functions without losing important data.
Understanding and Fixing the ‘Preparing Automatic Repair’ Issue
Sometimes, your Windows computer may get stuck in a “Preparing Automatic Repair” loop, preventing you from booting into the operating system. This issue can be frustrating, but there are several troubleshooting steps you can take to address it.
What is Automatic Repair?
Automatic Repair is a built-in Windows feature designed to automatically diagnose and fix problems that prevent the operating system from starting correctly. When your computer encounters critical errors, it will attempt to launch Automatic Repair.
Why Does the ‘Preparing Automatic Repair’ Loop Happen?
Here are some common reasons:
- Corrupted System Files: Missing or damaged system files can prevent your computer from booting correctly.
- Hard Drive Issues: Errors on your hard drive can cause problems during the booting process.
- Incorrect Boot Order: If your computer is configured to boot from the wrong device, it may get stuck in a loop.
- Recent Updates or Changes: New software installations or Windows updates can sometimes interfere with the boot process.
Troubleshooting Steps
Here’s how to break the “Preparing Automatic Repair” loop:
- Force Shutdown and Restart: Power off your computer by holding the power button for a few seconds. Restart it, and see if it boots normally. Repeat this step a few times.
- Access Advanced Startup Options: If the problem persists, try to boot into Advanced Startup Options:
- Force-shutdown the computer three times during startup to trigger this mode.
- Select “Troubleshoot” -> “Advanced Options.”
- Startup Repair: From Advanced Options, select “Startup Repair” and let Windows attempt an automatic fix.
- System Restore: Use a previously created restore point to return your system to an earlier working state.
- Reset Your PC: This option reinstalls Windows while giving you the choice to keep or delete your personal files.
Advanced Fixes (if the above steps fail)
- Rebuild Boot Configuration Data (BCD): This involves using Command Prompt within the recovery environment.
- Run CHKDSK: Use the CHKDSK utility to check for and fix disk errors.
| Troubleshooting Method | Instructions |
|---|---|
| Force Shutdown and Restart | Hard press the power button for a few seconds, then restart. Repeat this process 2-3 times. |
| Access Advanced Startup Options | Force-shutdown during startup three times to trigger this mode. Select “Troubleshoot” -> “Advanced Options” |
| Startup Repair | Select “Startup Repair” from Advanced Options and let Windows attempt a fix. |
| System Restore | Use a restore point from Advanced Options to revert to an earlier state. |
| Reset Your PC | Select “Reset this PC” from Advanced Options (choose keep or delete files). |
Important: If you’re not comfortable with advanced troubleshooting, consider seeking professional technical assistance to avoid further damage to your system.
Key Takeaways
- Automatic Repair is a Windows feature designed to fix boot-up issues.
- A loop can occur when Automatic Repair fails to resolve the problem.
- Troubleshooting can involve various repair strategies and may require a fresh installation.
Understanding Automatic Repair
When Windows encounters a problem during startup, Automatic Repair kicks in as a first-line remedy. This built-in tool attempts to fix common issues that prevent the system from booting properly.
Automatic Repair Loop
Sometimes, instead of solving startup issues, Automatic Repair can fall into a continuous loop, leaving users stuck. This loop often manifests as a persistent “Preparing Automatic Repair” or “Diagnosing Your PC” message. In other cases, the loop might end with “Automatic repair couldn’t repair your PC,” after which the system attempts to restart and enters the loop again. The root of this problem often lies in corrupt system files, registry errors, or faulty hardware drivers.
Common triggers of the Automatic Repair loop can include:
- Sudden power losses or improper shutdowns
- Malware or viruses
- Corrupted boot or system files
- Faulty updates or driver installations
What to Do If “Preparing Automatic Repair” Doesn’t Work
| Difficulty | Action | Description |
|---|---|---|
| Easy | Force Restart | 1. Hold down the power button for at least 10 seconds to completely shut down your computer. 2. Wait for a few seconds and then press the power button again to restart. |
| Easy | Boot into Safe Mode | 1. While your computer restarts, try repeatedly pressing a function key like F4, F5, or F8 depending on your device to enter the boot menu (consult your manufacturer’s manual if unsure). 2. Look for an option like “Safe Mode” and select it to boot with minimal programs and drivers. 3. In Safe Mode, you might be able to troubleshoot the issue or perform a system restore. |
| Moderate | Disable Automatic Repair (For Advanced Users) | Warning: This method involves editing system files and carries some risk. Only proceed if you are comfortable. 1. You’ll need a Windows installation media or recovery drive. Boot from the media and choose “Repair your computer” option. 2. Navigate to Troubleshoot > Advanced Options > Command Prompt. 3. Type the following command and press Enter: bcdedit /set {default} bootstatus policy ignore 4. Restart your computer. Automatic Repair should be skipped. 5. Now you can try other troubleshooting methods or reinstall Windows. |
| Difficult | Refresh/Reset PC or Reinstall Windows | If the above methods fail, you may need to reset your PC. This will erase your data and reinstall Windows. 1. Boot into the Windows Recovery Environment (refer to instructions for “Disable Automatic Repair”). 2. Choose “Troubleshoot” and then “Refresh this PC” or “Reset this PC”. “Refresh” keeps your personal files but removes apps and settings. “Reset” removes everything. 3. Alternatively, you can choose “Reinstall Windows” to completely wipe your drive and install a fresh copy of Windows. Important: Back up your data before using these options. |
Components of Automatic Repair
When Automatic Repair is initiated, it runs through several diagnostic and repair tasks to fix known startup problems. Its components include:
- Startup Repair: It tries to fix problems that are keeping Windows from loading.
- System Restore: This feature rolls back the system to an earlier point where everything was working correctly.
- Boot File Repair: Automatic Repair checks and fixes issues with boot files, Boot Configuration Data (BCD), and the boot sector.
The Automatic Repair tool may perform tasks such as:
- Checking the disk for errors
- Scanning and repairing damaged system files
- Restoring registry from a backup
Under the hood, tools like “BCDEdit” might be used to configure the boot loader or to set “RecoveryEnabled” to NO, which can help stop the loop issue for advanced users. The repair processes are part of the Windows Recovery Environment (WinRE), a specialized recovery service offered by the Windows operating system.
Table: Automatic Repair Functions
| Function | Description |
|---|---|
| Startup Repair | Fixes problems preventing Windows from booting |
| System Restore | Restores system to an earlier point in time |
| Boot File Repair | Fixes issues with boot files and configurations |
These integral parts work in tandem to diagnose the boot issue, fix the problems, and help the computer to start properly. If Automatic Repair fails, it might be necessary to pursue advanced troubleshooting, which could include command-line repairs, resetting the PC, or in extreme cases, reinstalling Windows.
Resolving Automatic Repair Issues
When a Windows PC encounters a problem during boot or suffers from system instabilities, Automatic Repair is a built-in troubleshooting feature designed to tackle these issues. This section focuses on methods to resolve Automatic Repair problems and keep your computer functioning smoothly.
Diagnostic and Repair Tools
Safe Mode: Start your computer in Safe Mode to run essential diagnostics without interference from third-party software. This mode can help identify and solve driver or software conflicts that might cause Windows startup problems.
- In Safe Mode:
- Chkdsk (Check Disk): Utilize this command to check the integrity of your hard drive and fix file system errors.
- Sfc /scannow (System File Checker): Deploy this tool to repair missing or corrupted system files.
- Fixboot: Apply this command when the boot sector needs repair.
- Memory Diagnostics: Run this tool to check for memory issues.
Advanced Recovery Options
Reset Your PC: This option reinstalls Windows but gives you the choice to keep or remove your personal files. It can correct deep-seated system errors without affecting your personal data when chosen accordingly.
- When your PC boots to the Automatic Repair screen:
- Insert the installation media and choose to boot from it.
- Navigate to Troubleshoot > Reset this PC. Choose Keep my files for a less drastic option or Remove everything to fully reset.
System Restore: If you have previously set up a Windows restore point, use System Restore to revert your PC’s system files, settings, and apps to a previous state where things worked correctly.
- To access System Restore:
- Steps:
- Select Advanced options from the Automatic Repair screen.
- Click on System Restore and follow the prompts to select a restore point.
- Steps:
Disable Automatic Repair: Sometimes, disabling Automatic Repair can stop the loop and allow access to further troubleshooting.
- To disable Automatic Repair:
- Launch Command Prompt and enter:
bcdedit /set {current} recoveryenabled no
- Launch Command Prompt and enter:
Preventive Measures and Maintenance
Regular maintenance can often prevent issues from occurring in the first place. Below are some strategies to keep your system running well:
- Backup: Regularly back up important files and system states to avoid data loss.
- Updates: Make sure to install the latest Windows updates to improve security and system stability.
- Anti-malware Protection: Use reliable anti-virus software to prevent and remove malware, which can cause serious system issues.
- Drivers and Hardware: Keep hardware drivers up to date and check for hardware failures that might affect your computer’s ability to run properly.
Adhering to these guidelines and using the tools Windows provides can significantly reduce the occurrence of boot errors and Automatic Repair loops.
Frequently Asked Questions
When faced with issues related to ‘Preparing Automatic Repair’ on a Windows computer, it can be quite stressful. This section aims to address common concerns and provide actionable solutions.
How do I resolve the ‘Preparing Automatic Repair’ boot loop on Windows 10?
If your Windows 10 device continuously restarts to ‘Preparing Automatic Repair,’ a forced shutdown is your first step. Press and hold the power button for 10 seconds to shut down. Turn on the PC after a minute. If this doesn’t work, boot from Windows installation media, select ‘Repair your computer,’ and choose ‘Startup Repair.’
What should I do when my computer is stuck on ‘Preparing Automatic Repair’ on Windows 11?
With a Windows 11 computer stuck on the repair screen, a similar approach to Windows 10 applies. Hold the power button to perform a hard shutdown. After restarting, if the issue persists, use recovery media to access the Windows Recovery Environment and choose ‘Startup Repair’ or ‘System Restore.’
Why does my laptop continuously boot into automatic repair, and how can I fix it?
This loop often indicates system file issues or hardware conflicts. To fix it, access the recovery options by using installation media. From there, try ‘Startup Repair.’ If that doesn’t solve the problem, a ‘System Restore’ or ‘Command Prompt’ to run ‘chkdsk’ might be necessary.
My screen is black after my PC attempted to initiate ‘Preparing Automatic Repair.’ What are the next steps?
A black screen signifies a more severe issue, but it can sometimes be fixed with a hard reset. If that doesn’t resolve the problem, external devices might be causing conflicts. Unplug all peripherals and restart the computer. If there’s still no display, boot from installation media and select ‘Repair your computer.’
How long should I wait during ‘Preparing Automatic Repair’ before taking action?
Typically, give it about 10 to 15 minutes. If the process hasn’t moved on from ‘Preparing Automatic Repair’ within this time frame, you’re likely experiencing a loop or freeze, which requires a manual restart and potentially further troubleshooting steps.
What are the steps to disable the automatic repair feature on my Windows 7 computer?
Disabling automatic repair on Windows 7 isn’t recommended, but it can be done for troubleshooting. Start your computer and press ‘F8’ before Windows starts to load. Choose ‘Disable automatic restart on system failure.’ Be mindful that disabling this feature stops Windows from fixing certain issues automatically.
Microsoft provides regular updates to Windows 10 operating system, now Microsoft developers are mainly focused on Windows 11. But this does not mean that they will let Windows 10 behind. There are many Windows 10 users who prefer not to allow Windows 10 operating system to get updated, that’s because there are plenty of updates rolled out every now and then and these updates consume more time to get install on the system. Mind you, you should always keep updating your Windows 10 OS due to security patches, it will also clear bugs and errors that your previous update was mainly having.
Sometimes it happens that while updating your Windows 10 operating system, the updates get stuck and do not move further at all. It accompanies the message as “Getting Windows ready” but nothing happens and the screen is stuck there for hours and hours, it also advises not to turn off your computer. This can be a frustrating situation, especially when you want to access your computer on an urgent basis.
")
But don’t you worry as we got you all covered up. We have managed to provide you an effective guide that will help you to fix the “Getting Windows ready” stuck error, make sure to read the article till the end.
")
See also: Can’t See Other Computers on the Network (Windows/macOS/Linux)
Without wasting much of your time, let’s quickly begin!
What is the “Getting Windows ready” stuck error?
When you try to update your Windows 10 operating system, it shows a message as “Getting Windows ready, Don’t turn off your computer”. The message itself suggests not to turn off your computer, you wait for hours and hours but the screen still stucks there and does not move further. This is known as the “Getting Windows ready” stuck error.
What causes the “Getting Windows ready” error to occur?
“Getting Windows ready” error is related to the system update and encounters when you try to update your Windows 10 operating system. It is hard to point out a single reason why it occurs. Following are some valid reasons that can cause the error to occur:
- Corrupted system files during the upgrade process.
- Windows installed an update bug.
- Incomplete Windows downloaded updates.
- Security software.
- Software compatibility
- Network issues.
Now that you have got an idea about what is “Getting Windows ready” error is and why it occurs. We can finally head towards the actual troubleshooting methods.
How to “Fix Getting Windows Ready” Error?
Below are the troubleshooting methods that will help you to fix the error. It advised that if one method works for you stick to it, else move on to the next method.
Waiting for Update to Respond
Here, Microsoft advised its users who have encountered the error to wait for some time or maybe an hour or more. When your Windows 10 PC displays the error, your system could be processing some final tasks in the background like downloading and installing the required files, altering the apps and modules, setting system new system files, and etc.
When this task will get completed, the screen will move further and your system will boot like normal. So wait for 2-3 hours as advised by Microsoft, if still there’s no response, move onto the next method.
Disconnect the Internet Connection
Windows getting ready error might be happening due to the network issue. The update might be having some trouble communicating with Microsoft servers which might be causing the screen to be frozen. If that’s the case, disconnect your system from the internet.
")
If you are using Wi-Fi or modem: Turn off the router or modem directly so that your system will disconnect from the internet connection.
If you are using an ethernet cable: Unplug the ethernet cable directly from the system.
If the error was causing due to the network, the error will get resolved and the screen will move further.
Shut Down the System and Perform Power Reset
Don’t worry, there’s nothing harm in shutting down the PC, it will clear the memory without damaging the disk. If you ever encounter any corruption issues in the future, performing a hard reset is the solution. Here’s how to do that:
Step 1: Press the Power button in order to Turn off your computer.
Step 2: Disconnect the all the computer accessories or peripherals such as USB drives, external hard drives, headphones or earphones, printers, etc. You can also consider unplugging the power cables of the peripherals. Also, unplug the power cables from your PC. In case you are using the laptop, remove the battery if it’s detachable.
Step 3: Press and hold the Power button for 20-30 seconds in order to drain all the charge from the capacitors.
Step 4: Connect back the power cables in the PC or battery of the laptop.
Step 5: Press the power button like normally on a PC.
See if the error is resolved or not.
Fix the Error Using Windows Recovery Environment
If disconnecting the internet or performing a hard reset doesn’t fix the error then we will try it by fixing it by Windows recovery mode. Follow each method mentioned below.
Run System File Checker
This will help you to fix reboot issues caused by corrupted files.
Step 1: Perform a hard reset twice when you see the Windows logo to open Automatic Repair. Select Choose an option >Troubleshoot > select Command Prompt in Advanced Options page.
")
Step 2: In the Command Prompt, type the following code and press Enter.
sfc /scannow
System file checker will detect the issues and try to fix them if possible, reboot your computer.
Run Check Disk Utility
With the Check Disk Utility, you can be able to fix issues related to the drives, let’s see if this helps to fix the issue.
Step 1: Open WinRE >Troubleshoot > select Command Prompt in Advanced Options page.
Step 2:Type the following command and press Enter.
chkdsk D: /R
Step 3: If Command Prompts asks to dismount the drive, press Y and press Enter.
You can replace D with another drive in the command. This process can take up to an hour to complete.
Uninstall Recently Installed Updates in Safe Mode
The recently installed update might be causing the issues, preventing your system not boot.
Step 1: Go to the Advanced options page and click on Startup Setting.
")
Step 2: Press F4 to boot your computer in Safe Mode.
Step 3: Your system will successfully boot into Safe Mode, visit the start menu, and open Control Panel.
Step 4: Visit Programs and Features and click on View installed update located in the left panel.
Step 5: Select the installed update and right-click on it to instantly the update.
")
restart your computer to boot your system normally.
Uninstall Latest Quality Updates
This is another way to uninstall the recent Windows updates.
Step 1: Select Uninstall Updates in the Advanced options.
Step 2: Now select Uninstall the latest quality update.
Your system will roll back to the previous update automatically and you will be able to boot your system normally.
Run Startup Repair
When Startup Repair functions run it detects the issues and fixes them automatically, it is used when your system fails to boot into the normal Windows 10 operating system.
Step 1: Visit Troubleshoot.
Step 2: Select Advanced options.
Step 3: Click on Startup Repair: Fix problems that keep windows from loading
")
The process is automatic. If you use more than one operating system then select the right Windows 10.
Reset your PC
If nothing working you can reset your PC using Automatic Repair. Here, you don’t have to worry about the data, as you have the option to keep your files and then perform a reset.
Step 1: Open WinRE, and select Advanced Options.
Step 2: Select Troubleshoot > Reset this PC.
Step 3: Select Keep this PC if you won’t keep your data, else select Remove everything.
")
After resetting your PC, it will perform just like new by keeping your data.
What if Nothing Works?
All the troubleshooting methods mentioned above are valid fixes. At this point, the “Getting Windows ready” stuck error should be get resolved and you should be able to boot your system into the Windows 10 operating system normally.
But if nothing is working out despite trying everything, you can re-install the entire Windows 10 operating system from scratch. This fixes all the issues and that you are facing currently. before performing a complete re-installation of Windows 10, make sure you backup your precious data or you might end up getting it lost permanently.
That’s it for now, hope this helps! We are glad to know your thoughts in the comment section below. Till then, stay tuned for more info.
See next: Windows 10: How to Turn on or Fix Bluetooth