
Printers are essential devices in many homes and workplaces, but they can sometimes run into problems when used with Windows operating systems. This article covers common printer problems in Windows, including printer not found, print jobs stuck in the queue, printer spooler crashes, and more, along with step-by-step troubleshooting solutions for each issue.
Problems adding or installing printers on ARM PCs
Microsoft is aware of some ARM PCs not being able to add or install a printer when using an installer provided by the printer manufacturer. The installer might be included with the printer or downloaded from the printer manufacturer’s website.
-
To fix this issue, follow the instructions in the article Add or install a printer in Windows instead of using the manufacturer’s installer. If the printer manufacturer has different guidance, follow the guidance from the printer manufacturer.
-
An example ARM PC is Copilot+ PCs. To check if a Windows device is an ARM PC, select Start and then select Settings > System > About . Under Device specifications, ARM devices have ARM based processor listed next to System type.
Run the Windows printer troubleshooter
If you are using a Windows 11 device, start by running the automated printer troubleshooter in the Get Help app. It will automatically run diagnostics and attempt to fix most printer problems. If you are using an older version of Windows or a mobile device, please skip to Most common printer problems section.
Run the troubleshooter in Get Help
If the printer troubleshooter in Get Help app is unable to resolve your printer issue, click on the specific printer problem you are experiencing in the Most common printer problems section below and follow the steps to fix them. If your problem is not listed, go to the General troubleshooting section and follow the steps listed in there.
General troubleshooting
Please try the following general troubleshooting steps to help solve the problem.
Sometimes power cycling your printer can resolve the issue. Turn off your printer and unplug it, wait 30 seconds, plug your printer back in, and then turn the printer back on.
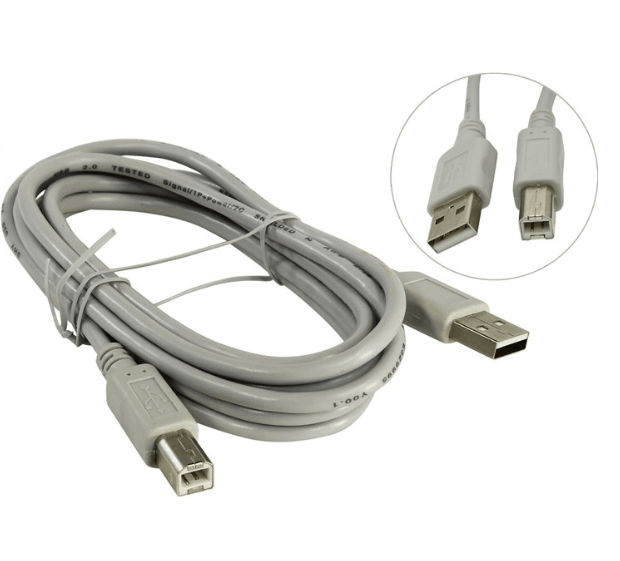
Check the cables (for wired printers). Make sure that the printer’s USB cable is properly connected from the printer to your PC. If your USB isn’t recognized, see Automatically diagnose and fix Windows USB problems.
Check the wireless connection (for wireless printers). Do one of the following:
-
Make sure the printer’s wireless option is turned on and available. Many printers have a button that displays a blue wireless icon when a wireless connection option for the printer is available. To learn where this button is located on your printer and to find instructions about how to turn it on, see the instructions that came with the printer or check the manufacturer’s website for instructions.
-
Run the printer’s wireless connectivity test. Many printers have a menu option to test the printer’s wireless connectivity. Read the instructions that came with the printer or check the printer manufacturer’s website for instructions about how to do this.
-
If those check out and you’re still having problems, your PC may not be connecting to your wireless network. To learn more, see Why can’t I get online? For more advanced help, see Fix network connection issues in Windows.
-
If you’re having trouble connecting to a Bluetooth printer, see Fix Bluetooth problems in Windows.
Notes:
-
If you use wireless access points, extenders, or multiple wireless routers with separate SSIDs, make sure you’re connected to the same network as the printer for your PC.
-
If your printer’s status displays «Printer in error state,» there may be a problem with the printer itself. If these first two steps did not resolve the error, check the printer for low paper or ink, and be sure the cover isn’t open and the paper isn’t jammed.
Try removing and reinstalling the printer.
Remove your printer:
-
Select the Start button, then select Settings > Bluetooth & Devices > Printers & scanners .Open Printers & scanners settings
-
Select the printer you want to uninstall.
-
Select the Remove button. Then confirm you’re sure you want to remove this device by selecting Yes.
Reinstall your printer:
If your printer is turned on and connected to the network, Windows should find it easily. Available printers can include all printers on a network, such as Bluetooth and wireless printers, or printers that are plugged into another computer and shared on the network. You might need permission to install some printers. To reinstall your printer, follow these steps:
-
Select the Start button, then select Settings > Bluetooth & Devices > Printers & scanners .Open Printers & scanners settings
-
Make sure your printer is turned on and connected. Then select the Add device (or Refresh) button.
-
Please wait a moment while Windows searches for the printers that are connected to the device (locally or wirelessly). Windows will then display a list of printers connected to your device. If you see your printer listed, select the Add device button for your printer. If you don’t see your device listed, select Add manually.
Notes:
-
If you use wireless access points, extenders, or multiple wireless routers with separate SSIDs, make sure you’re connected to the same network as the printer for your PC to find and install it.
-
If you have a new wireless printer that hasn’t been added to your home network, read the instructions that came with the printer and check the printer manufacturer’s website to learn more and to get up-to-date software for your printer.
Tip: You can print a test page to make sure the printer is working correctly. If you’ve installed the printer but it doesn’t work, check the manufacturer’s website for troubleshooting information or driver updates.
Reinstall your printer manually:
If the system cannot install the printer automatically, you can reinstall it manually. When you select Add manually, you will then see five options to Find a printer by other options. Select the option that applies best for your situation and then follow the steps provided. All of the options can apply for a printer that is connected wirelessly or through your network. However, if your printer is connected directly to your computer locally, select Add a local printer or network printer with manual settings and then select Next.
Reinstall a local printer manually:
After selecting Add a local printer or network printer with manual settings, follow these steps:
-
Select Use an existing port and then select the port the printer is connected to. Then select Next. If the printer is connected via USB, select it from the list. There are also options for parallel (LPT) and serial (COM) ports.
-
You will now see options to install the printer driver. If the printer came with a disc that includes the driver, select Have Disk. Otherwise, select Windows Update.
-
Please wait while Windows updates the list of printers. Then select the printer manufacturer from the left column, and the printer model from the right column. Then select Next.
Note: If there are multiple versions of a driver for your device, you might be asked which version of the driver to use. In most cases, you should select Replace the current driver. However, if you’re confident the installed driver is correct, select Use the driver that is currently installed.
-
Type a name for your printer, and then select Next. This name is only for your personal reference, so you can choose any name you prefer.
-
Select Do not share this printer. (If you want to share your printer with other devices on your network, select Share this printer and enter the name and location.) Select Next.
-
Select Print a test page to confirm that the printer is working and then select Finish.
If the previous troubleshooting step is not successful, you may need to clear spooler files and restart the spooler service. The print spooler is a file that manages the printing process. To clear and reset the print spooler:
-
In the search box on the taskbar, type services, and then select Services in the list of results.
-
Select the Standards tab, and then double-click Print Spooler in the list of services.
-
Select Stop, and then select OK.
-
In the search box on the taskbar, enter %WINDIR%\system32\spool\printers, select %WINDIR%\system32\spool\PRINTERS in the list of results, and then delete all files in the folder.
-
In the search box on the taskbar, search for services, and then select Services in the list of results.
-
Select the Standards tab, and the double-click Print Spooler in the list of services.
-
Select Start, select Automatic in the Startup Type box, and then select OK.
Most common printer problems
Below you will find the most common printer problems users have experienced and the steps to troubleshoot them.
If the windows do not detect the printer, follow the below troubleshooting steps to resolve:
Check the printer connection: Ensure the printer is turned on.
Check the USB cable for wired printers: Make sure that the printer’s USB cable is properly connected from the printer to your PC. If your USB isn’t recognized, see how to diagnose and fix Windows USB problems.
Check the wireless connection:
-
Make sure the printer’s wireless option is turned on and available. Many printers have a button that displays a blue wireless icon when a wireless connection option for the printer is available. To learn where this button is located on your printer and to find instructions about how to turn it on, see the instructions that came with the printer or check the manufacturer’s website for instructions.
-
Run the printer’s wireless connectivity test. Many printers have a menu option to test the printer’s wireless connectivity. Read the instructions that came with the printer or check the printer manufacturer’s website for instructions about how to do this.
-
If those check out and you’re still having problems, your PC may not be connecting to your wireless network. To learn more, see Why can’t I get online? For more advanced help, see Fix network connection issues in Windows.
-
If you’re having trouble connecting to a Bluetooth printer, see Fix Bluetooth problems in Windows.
-
Try plugging the USB cable into a different port or test the network connection.
Notes:
-
If you use wireless access points, extenders, or multiple wireless routers with separate SSIDs, make sure you’re connected to the same network as the printer for your PC.
-
If your printer’s status displays «Printer in error state,» there may be a problem with the printer itself. If these first two steps did not resolve the error, check the printer for low paper or ink, and be sure the cover isn’t open, and the paper isn’t jammed.
Run Windows printer troubleshooter:
-
Go to Settings > System > Troubleshoot > Other troubleshooters.
-
Select Run next to Printer and follow the on-screen instructions.
Update printer drivers:
-
Select Start > Device Manager.
-
Locate the printer, right-click, and select Update driver.
-
Select Search automatically for drivers.
-
If the driver isn’t found, visit the manufacturer’s website to download the latest drivers manually. For more information, see how to download and install the latest printer drivers.
Restart printer spooler service:
-
Open Services (Press Win + R, type services.msc).
-
Locate Print Spooler, right-click, and select Restart.
Reinstall the printer:
-
Remove the printer by going to Settings > Bluetooth & devices > Printers & scanners, select the printer, and click Remove.
-
Select Add device next to Add a printer or scanner and follow the prompts to reinstall the printer. For more information see how to install or add a printer.
If the documents are stuck in the print queue and aren’t printing or if the new print jobs do not proceed due to stuck tasks, follow the below troubleshooting steps.
Manually clear the print queue:
-
Select Start > Settings > Bluetooth & devices >Printers & scanners.
-
Select your printer and on the page that opens, select Open print queue.
-
Click on … (ellipsis) and select Cancel all if there are any pending jobs.
Restart print spooler:
-
Open Services (Press Win + R, type services.msc).
-
Locate Print Spooler, right-click, and select Restart.
Clear the spool folder:
-
Stop the print spooler service.
-
Open File Explorer and navigate to C:\Windows\System32\spool\PRINTERS.
-
Delete all files inside the folder (this will clear the print queue).
-
Restart the print spooler service.
If the printer appears as Offline in Windows even though it is powered on and connected, follow the below troubleshooting steps to resolve.
Set the printer to default:
-
Go to Settings > Bluetooth & devices > Printers & scanners.
-
Select the printer and click Set as default.
Note: If you don’t see the Set as default option, you might need to turn off Let Windows manage my default printer option first under Printer preferences. For more information, see how to set a default printer in Windows.
Check printer queue:
-
Select Start > Settings > Bluetooth & devices >Printers & scanners.
-
Select your printer and on the page that opens, select Open print queue.
-
Click on … (ellipsis) and select Cancel all if there are any pending jobs.
Make sure printer is connected to same Wi-fi network as your device:
-
To find out if your printer is connected to Wi-Fi, see if your printer’s built-in menu has options for checking its Wi-Fi connection, or check the printer’s manual for instructions about how to add it to a Wi-Fi network.
Power Cycle the Printer:
-
Turn off your printer, unplug it for a minute, and then turn it back on.
-
Reconnect the printer to your computer and check the status.
Restart Print Spooler:
-
Open Services (Press Win + R, type services.msc).
-
Locate Print Spooler, right-click, and select Restart.
If the printer stops working due to a paper jam, follow the below troubleshooting steps.
-
Power off the printer.
-
Open the printer’s access panel and remove the jammed paper.
-
Make sure no small pieces of paper are left inside.
-
Reload the paper tray and ensure it’s not overloaded.
-
Restart the printer.
Follow the below troubleshooting steps if the printer is printing slowly.
Adjust Print Quality Settings:
-
Go to Settings > Bluetooth & devices > Printers & scanners.
-
Click on the printer and select Printer preferences.
-
Go to Paper/Quality tab and set the Print quality to a lower setting like Draft or Normal for faster printing.
Switch to a Wired Connection:
-
If printing via Wi-Fi, try switching to a USB or Ethernet connection to rule out network latency.
Update Firmware:
-
Check the printer manufacturer’s website for firmware updates. Updating firmware can resolve performance issues.
Reduce Print Job Complexity:
-
Large or complex documents with high-resolution images can slow down printing. Consider simplifying the content or lowering the image quality before printing.
Print spooler is a file that manages the printing process. If the print spooler service repeatedly crashes or stops working, follow the below troubleshooting steps to resolve.
Clear the Print Queue:
-
Select Start > Settings > Bluetooth & devices >Printers & scanners.
-
Select your printer and on the page that opens, select Open print queue.
-
Click on … (ellipsis) and select Cancel all if there are any pending jobs.
Check for Conflicting Drivers:
-
Uninstall any unnecessary or old printer drivers in Device Manager.
-
Reinstall the latest drivers for your current printer model. For more information, see how to install latest printer drivers.
Run System File Checker:
-
Open Command Prompt as an administrator.
-
Type sfc /scannow and press Enter. This will scan and repair any corrupted system files that could be affecting the print spooler.
If the printed documents appear faded, streaked, or blurry, follow the below troubleshooting steps.
Check the Print Settings
-
Go to Settings > Bluetooth & devices > Printers & scanners.
-
Select your printer, and then select Printing preferences.
-
Make sure the Print Quality is set to the highest available setting, and check that the Paper Type matches the paper you’re using.
Check Ink or Toner Levels:
-
Ensure your ink or toner cartridges are not running low. Go to the printer software to check cartridge levels or visually inspect them on the printer itself.
-
Replace cartridges if they are low or empty.
Clean the print head:
-
Access your printer’s Maintenance or Tools section from the printer’s control panel or via its software on your PC.
Select the option to Clean the Print Head or Nozzles. This helps clear any blockages affecting print quality.
Use the Correct Paper:
-
Ensure that you’re using the right type and size of paper for your print job. Poor-quality or incompatible paper can cause smudging or low print clarity.
If the printer works but doesn’t print from a specific app (e.g., Word, Excel), follow the below troubleshooting steps.
-
Ensure the app you are trying to print from is up to date.
-
Reinstall the app.
-
Try printing to another printer or exporting to PDF to see if the issue is app-related.
-
Restart both the app and the printer.
-
Check for specific app-related printer settings (like margins or paper size).
If you’re experiencing problems with installing printer drivers or if the printer isn’t functioning properly due to driver issues, follow these troubleshooting steps.
Download the correct driver:
-
Visit the printer manufacturer’s official website.
-
Select the correct model and download drivers that match your Windows version (e.g., Windows 10/11, 32-bit or 64-bit).
Uninstall old drivers:
-
Open Device Manager, locate the printer, right-click and select Uninstall.
-
Go to Control Panel > Programs > Uninstall a program to remove any printer-related software.
Reinstall Drivers:
-
Restart your computer, then run the driver installer and follow the prompts to complete installation.
If you cannot access shared printers on a network, follow these troubleshooting steps.
-
Ensure the printer is set to share in Settings > Bluetooth & devices > Printers & Scanners.
-
Verify that file and printer sharing is enabled on the network.
-
Ensure all devices are connected to the same network.
-
Check firewall settings and antivirus software, which may block printer sharing.
-
Add the shared printer manually: Select Start > Settings > Bluetooth & devices > Printers & scanners. Select Add device.
Your printer stopped working after Windows 10 Update? You’re certainly not alone – hundreds of users are reporting it. The good news is, it’s not hard to fix at all…
Here are 5 fixes that have helped other users resolve the printer stopped working after Windows 10 Update problem. You may not have to try them all; just work your way down the list until you find the one that works for you.
- Power cycle your printer
- Make sure your printer is connected
- Update your printer driver
- Reset the print spooler
- Run Windows Troubleshooter
Fix 1: Power cycle your printer
Power cycling is often an effective way to fix mysterious glitches on different devices. So you can give it a try to see if this fixes the problem for you.
Here is how to power cycle your printer:
1) Turn off your printer and unplug it from the power socket.
2) Wait 30 seconds.
3) Plug your printer back in and turn the printer back on.
4) Test to see if your printer works properly. If yes, then great! If the issue remains, please try Fix 2, below.
Fix 2: Make sure your printer is connected
If your printer is not properly connected, your printer probably won’t work. So you should make sure it is well connected.
Once you have confirmed the connection, check to see if the printer not printing problem is fixed. If yes, then you’ve solved the problem. If it still doesn’t work, please try Fix 3, below.
Fix 3: Update your printer driver
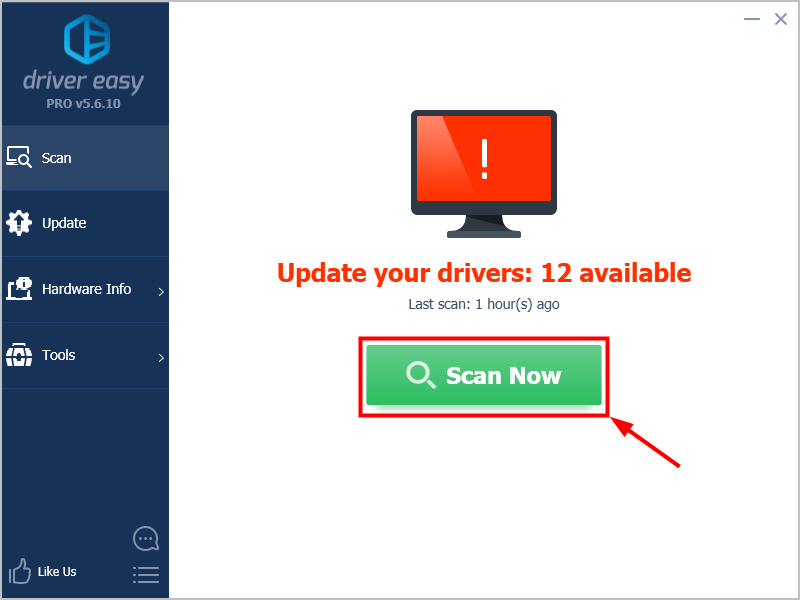
This problem may occur if you are using the wrong printer driver or it’s out of date. So you should update your printer driver to see if it fixes your problem. If you don’t have the time, patience or skills to update the driver manually, you can do it automatically with Driver Easy.
Driver Easy will automatically recognize your system and find the correct drivers for it. You don’t need to know exactly what system your computer is running, you don’t need to be troubled by the wrong driver you would be downloading, and you don’t need to worry about making a mistake when installing. Driver Easy handles it all.
You can update your drivers automatically with either the FREE or the Pro version of Driver Easy. But with the Pro version it takes just 2 steps (and you get full support and a 30-day money back guarantee):
1) Download and install Driver Easy.
2) Run Driver Easy and click the Scan Now button. Driver Easy will then scan your computer and detect any problem drivers.
3) Click Update All to automatically download and install the correct version of ALL the drivers that are missing or out of date on your system (this requires the Pro version – you’ll be prompted to upgrade when you click Update All).
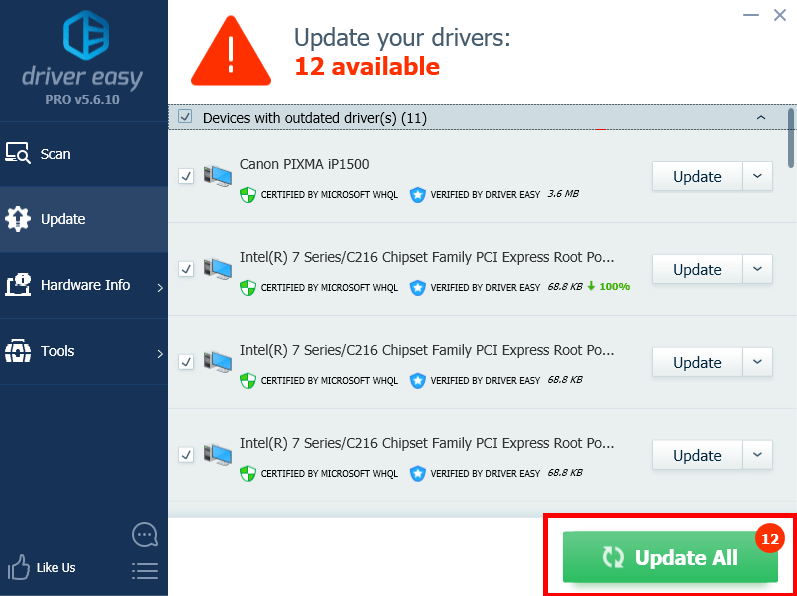
4) Restart your computer for the changes to take effect.
5) Check to see if the printer stopped working issue has been resolved. If yes, then congrats! If the problem still persists, please move on to Fix 4, below.
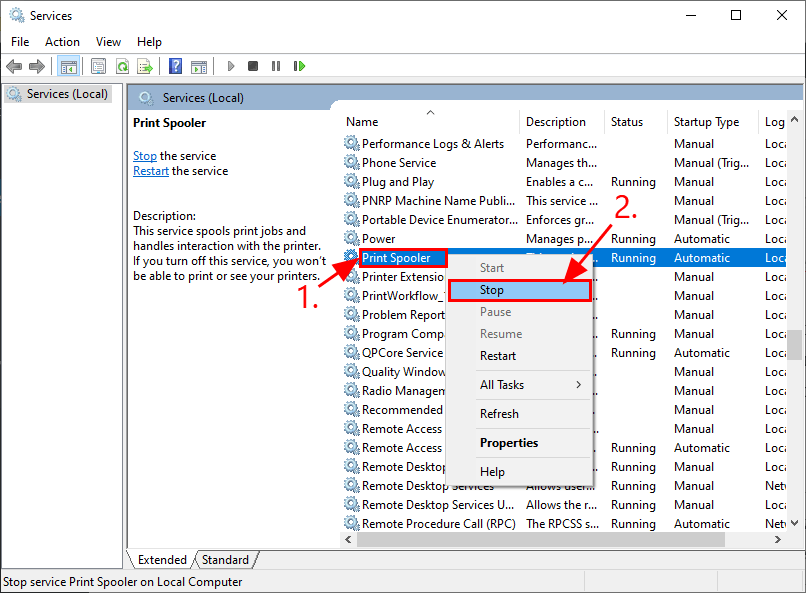
Fix 4: Reset the print spooler
A print spooler is a software program in Windows that manages the print jobs being sent to the printer. If your printer suddenly stops working, you can reset the spooler service to see if solves the problem.
Here is how to do it:
1) On your keyboard, press the Windows logo key and R at the same time, then type services.msc and press Enter.
2) In the Services window, scroll down until you find Print Spooler, then right-click on it and click Stop.
3) On your keyboard, press the Windows logo key and R at the same time, then type %WINDIR%\system32\spool\printers and press Enter.
4) Select all the files within the folder and delete them. This is to clear the print queues.
5) Go back to the Services window, locate Print Spooler and double-click on it.

6) Click Start, then in Startup Type, select Automatic and click OK to save the changes.

7) Check to see if your printer works properly. If it still doesn’t work, please move on to Fix 5, below.
Fix 5: Run Windows Troubleshooter
Windows comes with a number of ‘troubleshooters’ that are designed to detect the hardware components on your computer and solve the issues for you. So you can run the printer troubleshooter to see if it can detect the problem and hopefully sort it out.
1) On your keyboard, press the Windows logo key and type troubleshoot, then click on Troubleshoot settings once it pops up as a search result.
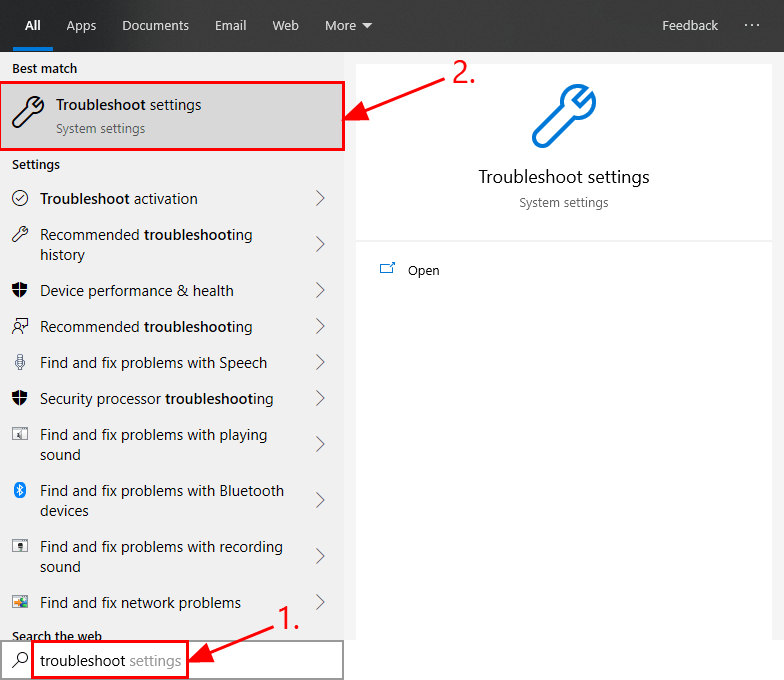
2) In the Troubleshoot window, scroll down to the Get up and running section, click on Printer > Run the troubleshooter.

3) Wait for Windows to diagnose the problem and follow the on-screen instructions to resolve the printing not working situation.
Hopefully you have successfully fixed the printer stopped working after Windows 10 Update by now. If you have any ideas, suggestions or questions, please leave us a comment below. Thanks for reading!
28
28 people found this helpful
Все способы:
- Способ 1: Использование средства устранения неполадок
- Способ 2: Запуск службы диспетчера печати
- Способ 3: Отключение брандмауэра Windows
- Способ 4: Очистка очереди печати принтера
- Способ 5: Комплексное решение проблемы
- Шаг 1: Удаление фирменного ПО принтера
- Шаг 2: Удаление драйвера и очистка очереди печати
- Шаг 3: Вход в безопасный режим
- Шаг 4: Проверка и удаление файлов из папки «Spool»
- Шаг 5: Проверка реестра
- Шаг 6: Повторная установка принтера в Windows 10
- Вопросы и ответы: 0
Способ 1: Использование средства устранения неполадок
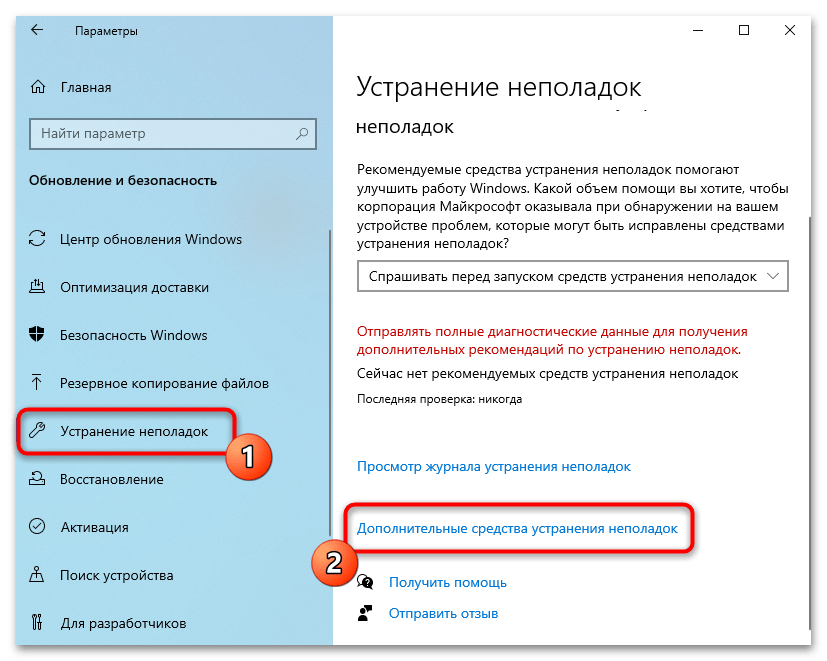
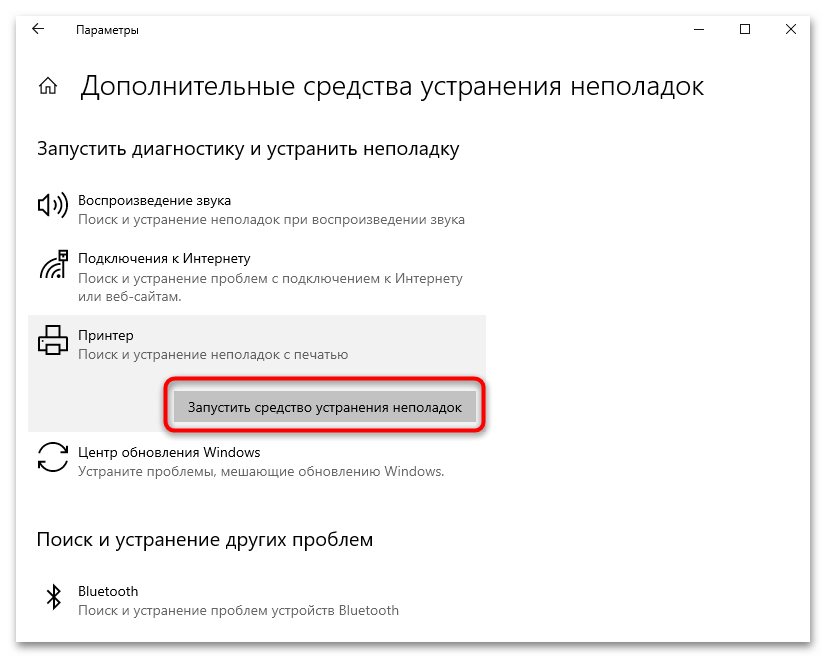
Каким бы банальным ни был совет, но использование стандартного средства устранения неполадок в Windows 10 часто помогает решить различные проблемы с печатью, даже в тех случаях, когда речь идет о сетевых устройствах. Главное — использовать этот инструмент на всех компьютерах, куда подключен проблемный принтер. Весь процесс проверки неполадок выглядит так:
- Откройте «Пуск» и слева нажмите по значку с шестеренкой, чтобы перейти в «Параметры».
- Прокрутите список с разделами и левой кнопкой мыши нажмите по «Обновление и безопасность».
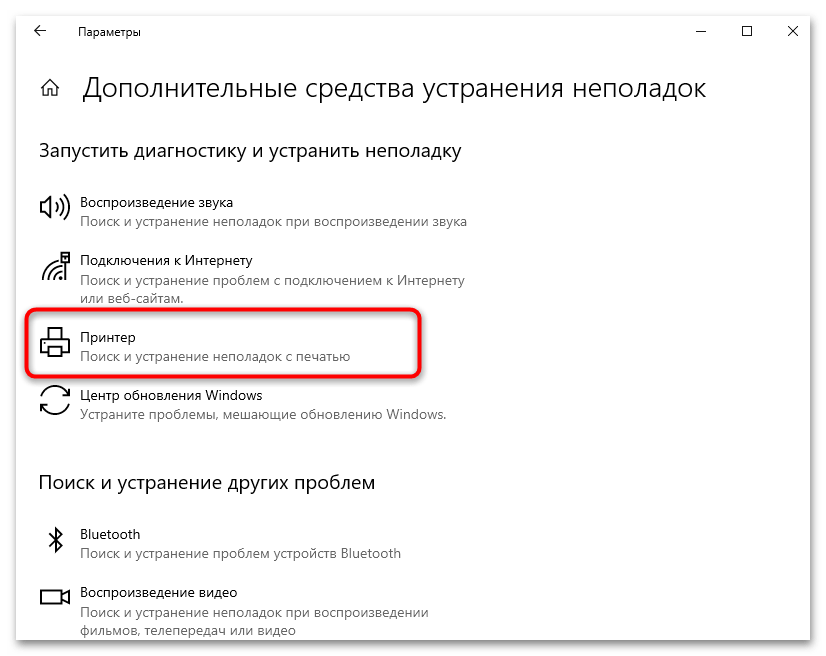
- Слева выберите категорию «Устранение неполадок», затем внизу нажмите по ссылке «Дополнительные средства устранения неполадок».
- В списке самых частых вы точно найдете «Принтер», поэтому кликните по этой плитке тоже ЛКМ.
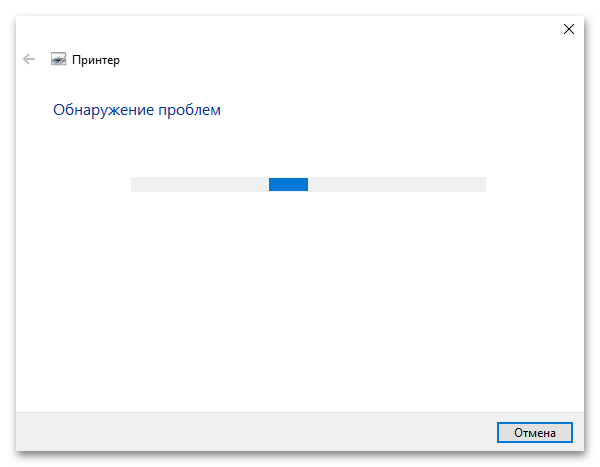
- Для начала сканирования используйте кнопку «Запустить средство устранения неполадок».
- Ожидайте завершения первого этапа проверки, из списка выберите проблемное устройство и продолжайте взаимодействие со средством. То же самое повторите на всех остальных компьютерах.
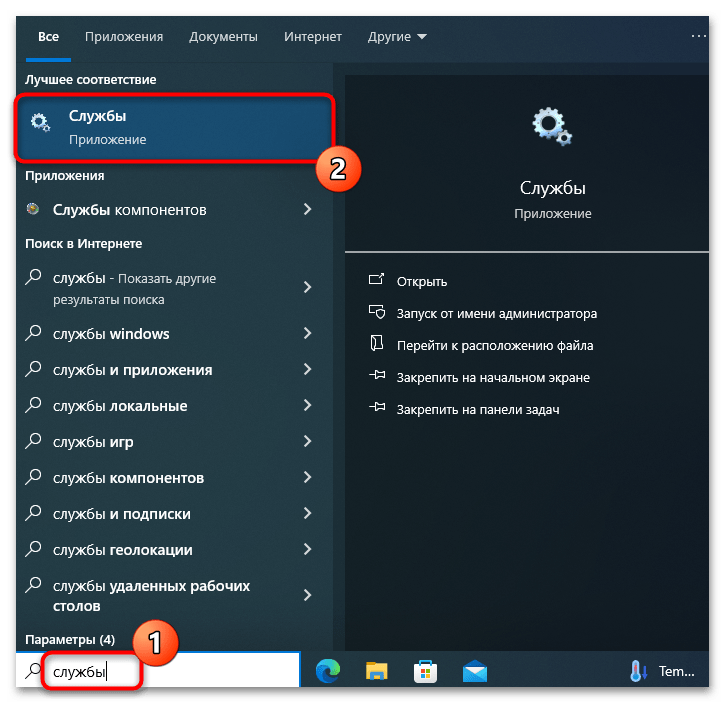
Способ 2: Запуск службы диспетчера печати
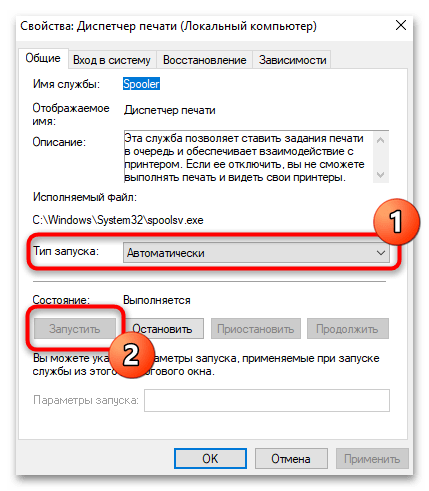
Одна из распространенных причин появления ошибки «Подсистема печати сервера не выполняется» в Windows 10 — отключенная служба диспетчера печати. Она должна быть обязательно активной как на ПК, к которому физически подключен принтер, так и на всех остальных, имеющих сетевой доступ.
- Для ручной проверки службы откройте «Пуск», через поиск отыщите приложение «Службы» и запустите его.
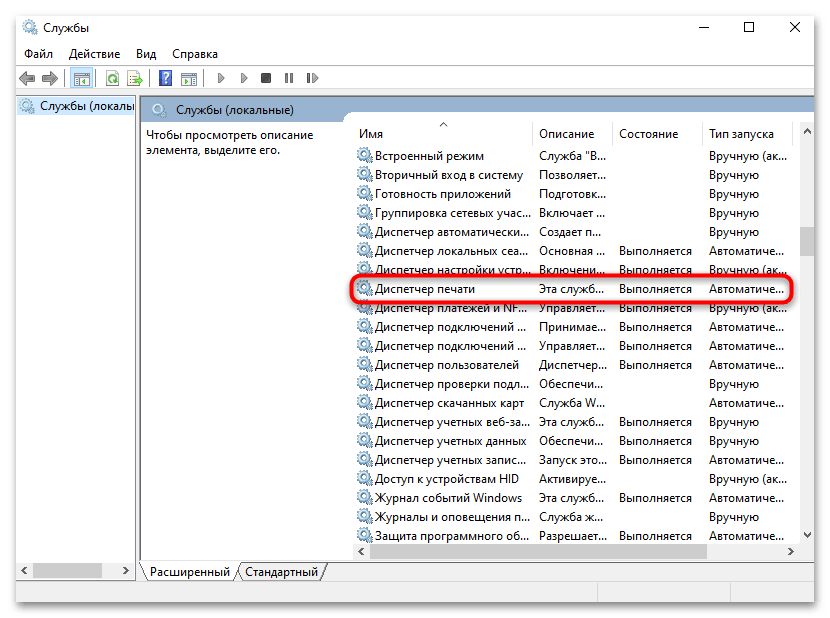
- Список служб по умолчанию отсортирован в алфавитном порядке, поэтому прокрутите его, чтобы отыскать «Диспетчер печати». Дважды нажмите по данной службе левой кнопкой мыши, чтобы открыть ее «Свойства».
- Установите тип запуска как «Автоматически», а также запустите службу, если она сейчас остановлена. Примените изменения и повторите то же самое на всех остальных компьютерах, связанных с рассматриваемой ошибкой.
Способ 3: Отключение брандмауэра Windows
Рассматриваемая проблема относится только к сетевым принтерам. Может возникнуть вследствие блокирования подключения или отправки файлов со стороны стандартного межсетевого экрана. Решений тут может быть несколько, но лучшим методом проверки этой теории станет отключение брандмауэра на всех ПК, где возникает такая проблема. В Windows 10 для этого есть системное меню, где можно при помощи одного переключателя ограничить действие брандмауэра. Детально об этом читайте в другой статье на нашем сайте по ссылке ниже.
Подробнее: Отключаем брандмауэр в Windows 10

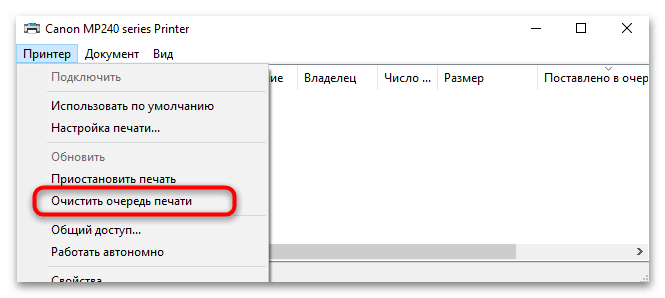
Способ 4: Очистка очереди печати принтера
Застрявшие в очереди документы редко становятся причиной, по которой возникает ошибка «Подсистема печати сервера не выполняется», однако ситуация может усугубиться в тех случаях, когда пользователь пробовал отправить сразу несколько документов или использовал разные принтеры. Всегда рекомендуется держать очередь печати очищенной, чтобы никакие существующие задачи, выполнить которые невозможно, не мешали корректной распечатке новых документов. В Windows 10 поддерживается два разных метода очистки очереди печати, более детально о которых вы узнаете в материале ниже.
Подробнее: Очистка очереди печати в Windows 10
Способ 5: Комплексное решение проблемы
Ошибка «Подсистема печати сервера не выполняется» может быть связана с глобальными проблемами ОС в плане распознавания и работы с сетевыми принтерами. Проблема появляется даже из-за одной неправильной записи в реестре или оставшихся следов старой версии драйвера принтера. Поэтому мы предлагаем комплексное решение, подразумевающее последовательную проверку разных частей Windows 10 с полной переустановкой принтера на ПК, включая и его сетевое подключение. Однако учитывайте, что будут внесены изменения непосредственно в операционную систему, поэтому предварительно рекомендуется создать точку восстановления, о чем детальнее написано по следующей ссылке.
Читайте также: Создание резервной копии Windows 10
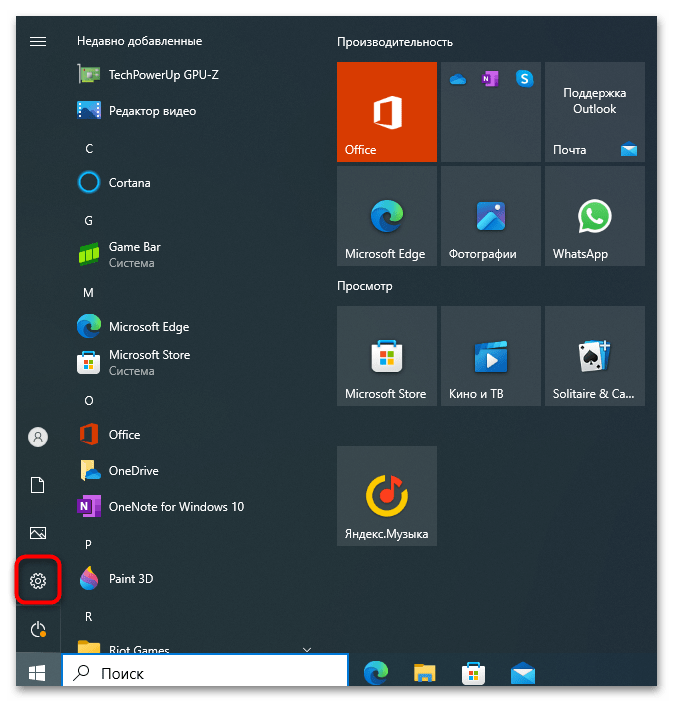
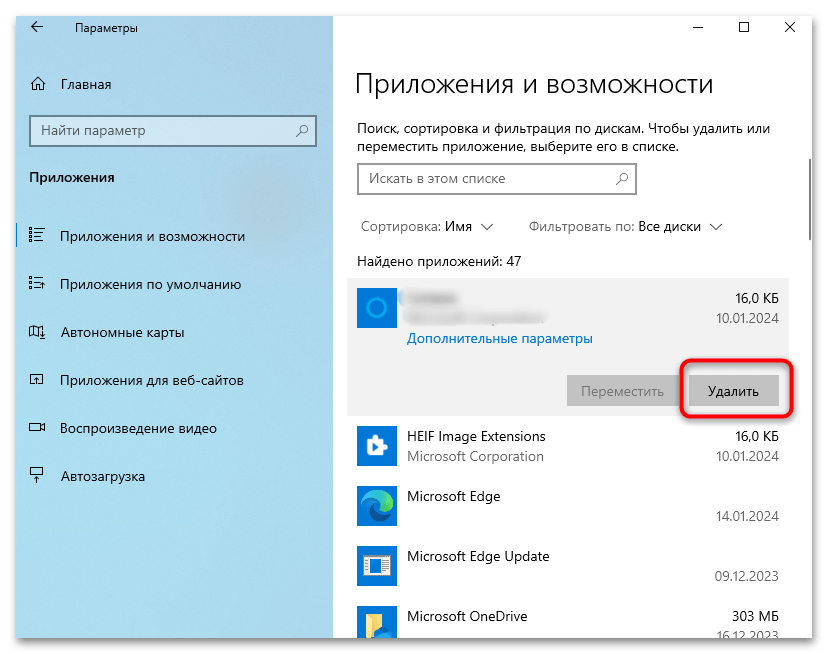
Шаг 1: Удаление фирменного ПО принтера
Первоочередно избавьтесь от всех программ и вспомогательных утилит, связанных с проблемным принтером. Для этого не требуются какие-то сторонние инструменты, поскольку отыскать и деинсталлировать подобные приложения можно непосредственно с помощью стандартного средства операционной системы, что и будет продемонстрировано ниже.
- Откройте «Пуск» и перейдите в «Параметры», кликнув по значку с изображением шестеренки.
- Выберите раздел «Приложения».
- Используйте поиск по списку установленных программ, чтобы отыскать те, которые связаны с принтером. В большинстве случаев достаточно ввести «Canon», «HP» или любое другое название подключенного печатающего оборудования.
- Отыскав такой софт, щелкните по каждому из них левой кнопкой мыши, нажмите «Удалить» и следуйте отобразившимся инструкциям. Удалите все связанные с принтером программы, после чего переходите далее.

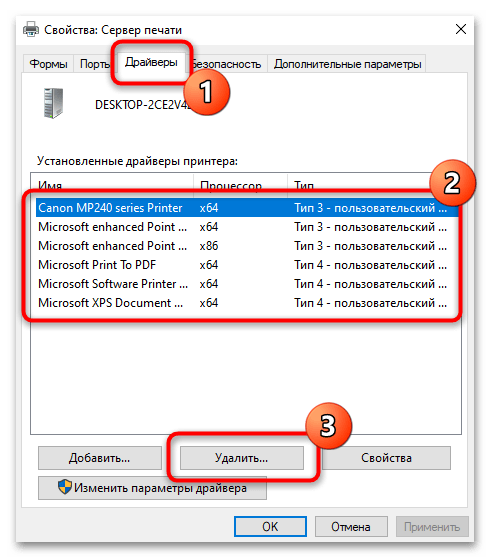
Шаг 2: Удаление драйвера и очистка очереди печати
Конечно, удаление только вспомогательного ПО никаким образом не повлияет на полную очистку следов использования принтера в операционной системе. Обязательно нужно избавиться и от драйвера. Есть несколько действенных методов, позволяющих успешно справиться с поставленной задачей. Информацию по каждому из них вы найдете в материале ниже, сможете выбрать оптимальный и удалить драйвер модели принтера, с которой возникает ошибка «Подсистема печати сервера не выполняется».
Подробнее: Удаляем драйвер принтера в ОС Windows 10
Следующая задача вам уже знакома, если вы выполняли предыдущие рекомендации. Понадобится снова открыть очередь печати и удалить ее для всех устройств, а не только для того принтера, удалением которого мы сейчас занимаемся. Для этого есть специальное окно от «Диспетчера печати». Вместо него еще можно отыскать файлы с параметрами очереди печати, и удалить их тоже. Тут снова рекомендуем обратиться к уже знакомому материалу со всеми необходимыми инструкциями.
Читайте также: Очистка очереди печати в Windows 10

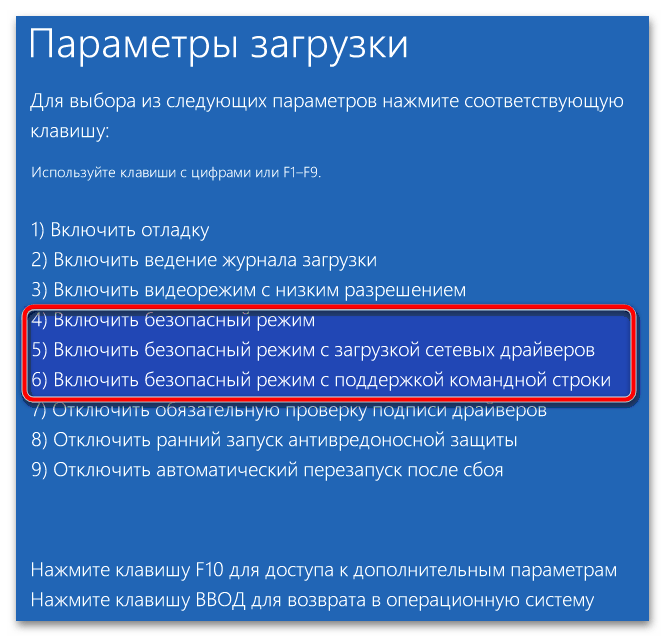
Шаг 3: Вход в безопасный режим
Определенные действия, которые будут выполнены в дальнейших этапах, реализуемы исключительно в безопасном режиме Windows 10. Поэтому после выполнения предыдущих этапов нужно перейти именно в него. Это своеобразная перезагрузка ПК, но с выбором дополнительных параметров. Есть несколько доступных вариантов того, как можно оказаться в безопасном режиме. Самый простой — перезагрузка с выбором дополнительных действий.
Подробнее: Переход в безопасный режим в Windows 10
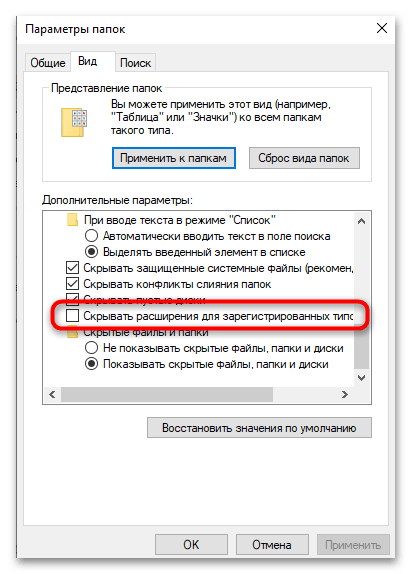
Шаг 4: Проверка и удаление файлов из папки «Spool»
В первую очередь займемся проверкой папки «Spool», которая в Windows 10 связана с печатью. Понадобится удалить лишние файлы и оставить только те, которые должны быть по умолчанию. Для простого поиска элементов, которые будут упомянуты в дальнейшем, рекомендуется сразу включить отображение расширений файлов.
Подробнее: Включение отображения расширения в Windows 10
Вместе с этим отметим, что вы можете получить ошибку «Отказано в доступе», когда попробуете открыть папку «Spool» или внести в ней изменения. Если такое произойдет, понадобится для корневого каталога, то есть для самой папки «Spool» назначить себя владельцем. Для этого воспользуйтесь универсальной инструкцией из материала ниже.
Читайте также: Устранение ошибки «Отказано в доступе» в Windows 10
Как только подготовительные действия завершены, откройте папку по пути C:\Windows\System32\spool и начните поочередный просмотр всего ее содержимого. Для удобства предоставляем следующую инструкцию с разбором всех необходимых элементов. Если нужно будет удалять что-то лишнее, вы об этом обязательно узнаете из этой же инструкции.
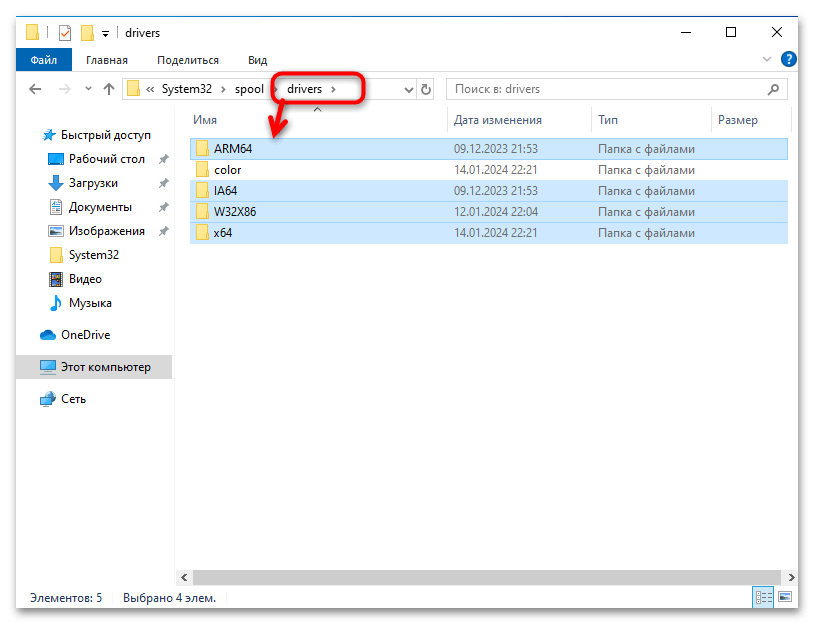
- После перехода в папку «Spool» в первую очередь откройте каталог «Drivers». Удалите все его содержимое, кроме папки «Color». Другие файлы и каталоги — все это отправляется в «Корзину».
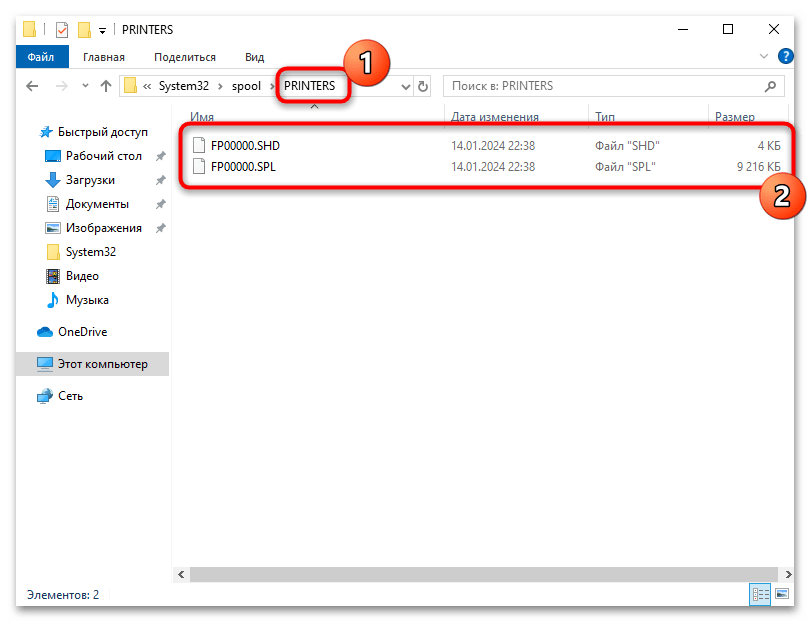
- Далее откройте директорию «PRINTERS». Тут будет несколько файлов, а также возможно наличие отдельных каталогов. Удалите абсолютно все из этой папки, оставив ее пустой.
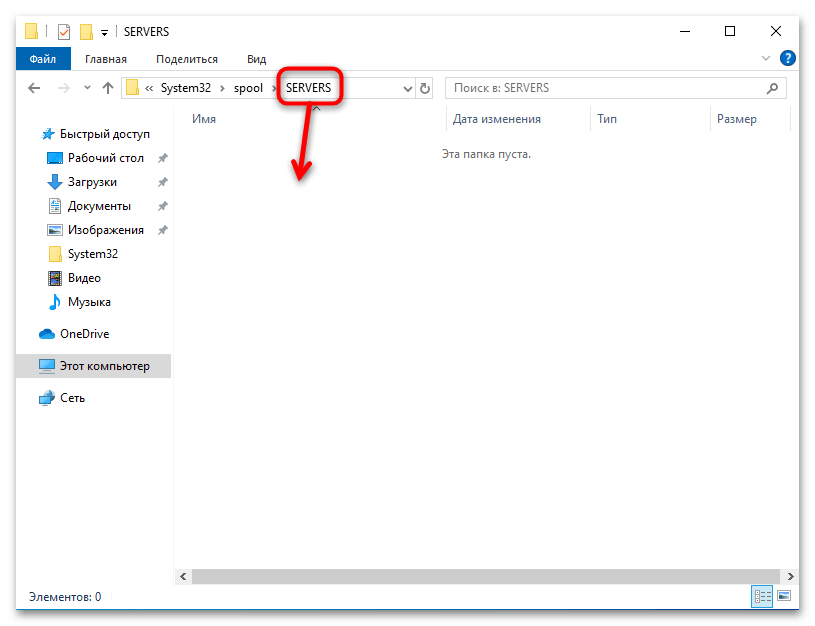
- Каталог «SERVERS» тоже должен быть пустым. При наличии других файлов и папок повторите удаление.
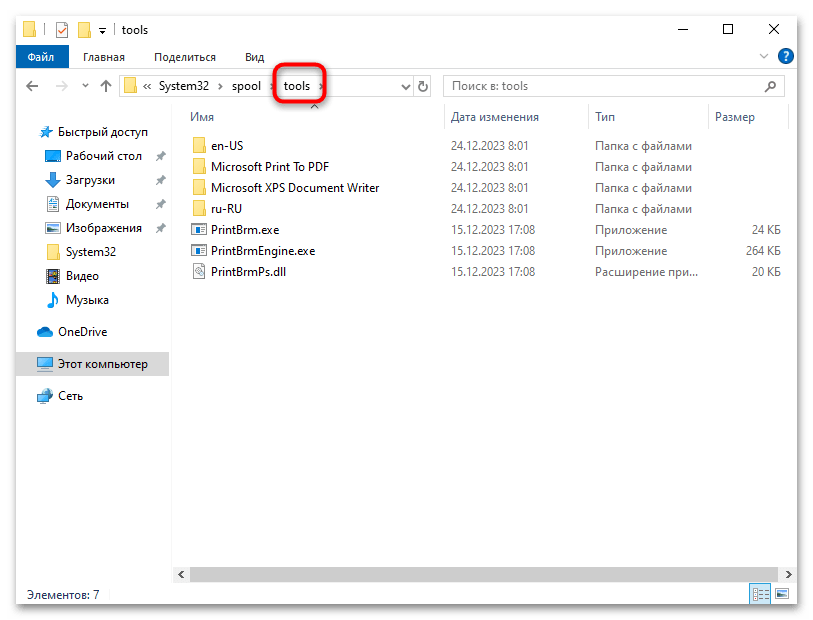
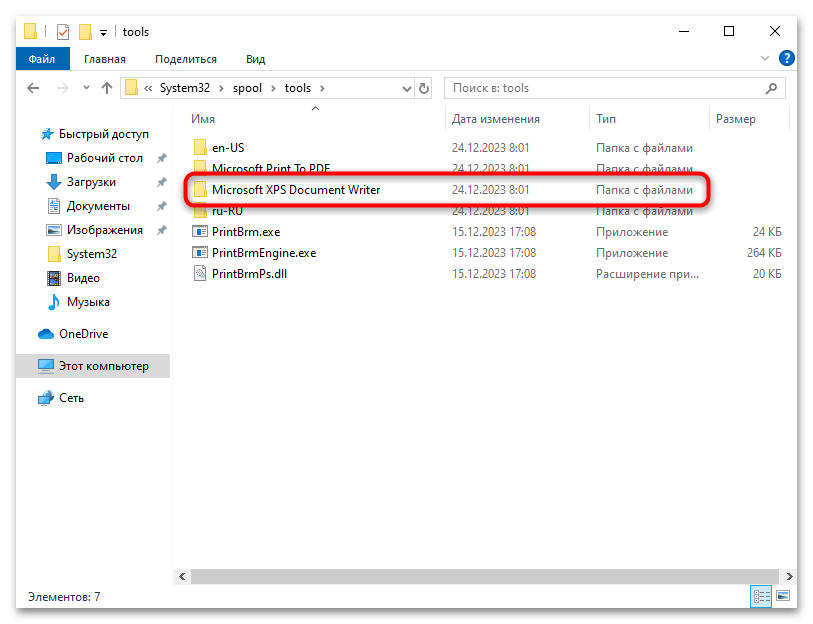
- Теперь откройте «Tools». На этом каталоге остановимся немного детальнее. В первую очередь его стандартное содержимое должно иметь такой вид: папки «en-US», «Microsoft XPS Document Writer» и «ru-RU», а также файлы — «PrintBrm.exe», «PrintBrmEngine.exe», «PrintBrmPs.dll». Если видите тут что-то еще, удаляйте лишнее.
- Откройте для проверки содержимого каталог «Microsoft XPS Document Writer».
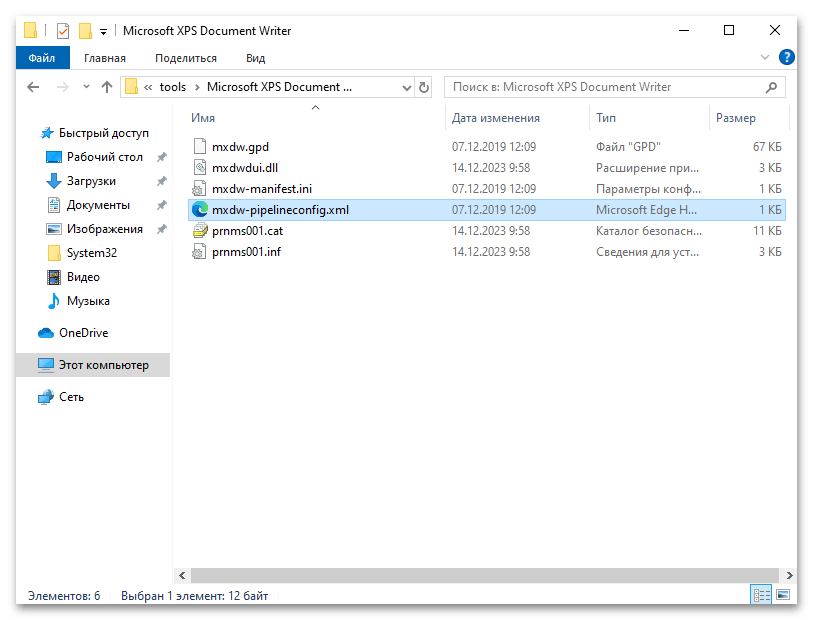
- В нем должно быть пять файлов: «mxdwdui.dll», «mxdwdui.gpd» («mxdwd.gpd»), «mxdwdui.ini» («mxdwd-manifest.ini»), «prnms001.cat» и «prnms001.inf». Остальное тоже удаляйте.
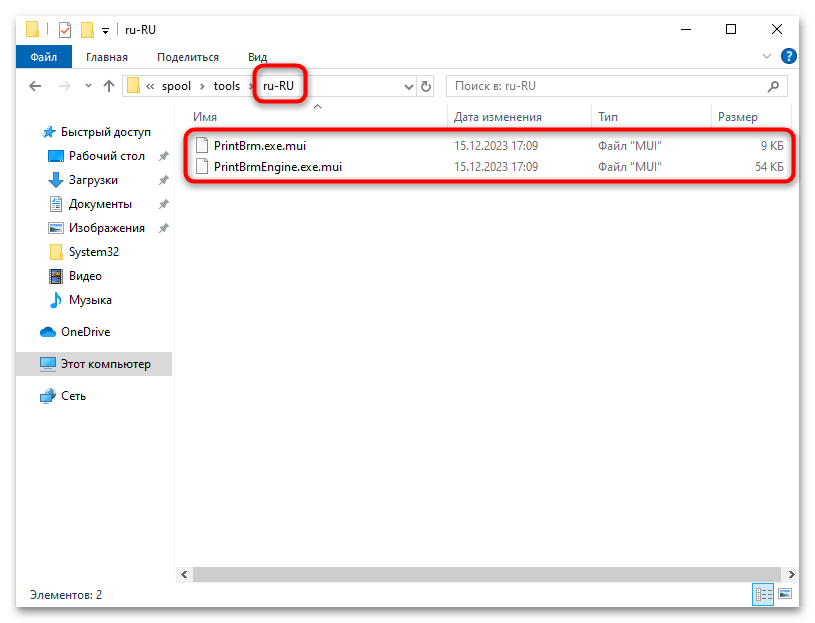
- Вернитесь к предыдущему каталогу и откройте «ru-RU». Стандартное содержимое каталога выглядит как: «PrintBrm.exe.mui» и «PrintBrmEngine.exe.mui». Все другие файлы сотрите.
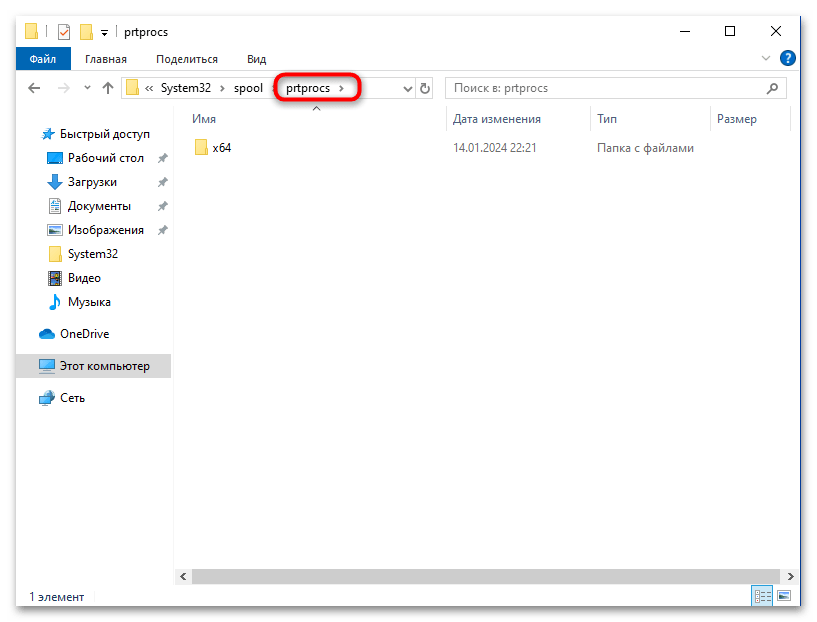
- В папке «prtprocs» вы найдете только одну папку — «x64» или «x32», что зависит от разрядности Windows. Никакие другие файлы и каталоги тут быть не должны.
Повторимся, что при работе с любым из элементов в папке «Spool» может возникнуть ошибка с тем, что вам будет отказано в доступе. Вам следует получить права на папку, чтобы завершить удаление, поскольку это является обязательным этапом подготовки ОС к повторной установке принтера и решению проблемы «Подсистема печати сервера не выполняется».
Шаг 5: Проверка реестра
Примерно такую же проверку и очистку нужно выполнить с реестром. Времени это займет немного больше, поскольку придется перемещаться по разным путям, сравнивать названия файлов и их значения, удалять лишнее и править то, что не соответствует стандартным параметрам. Снова предлагаем обратиться к последовательной инструкции, которая поможет разобраться с этой задачей.
- Отыщите «Редактор реестра» через «Пуск» и обязательно запустите его от имени администратора.
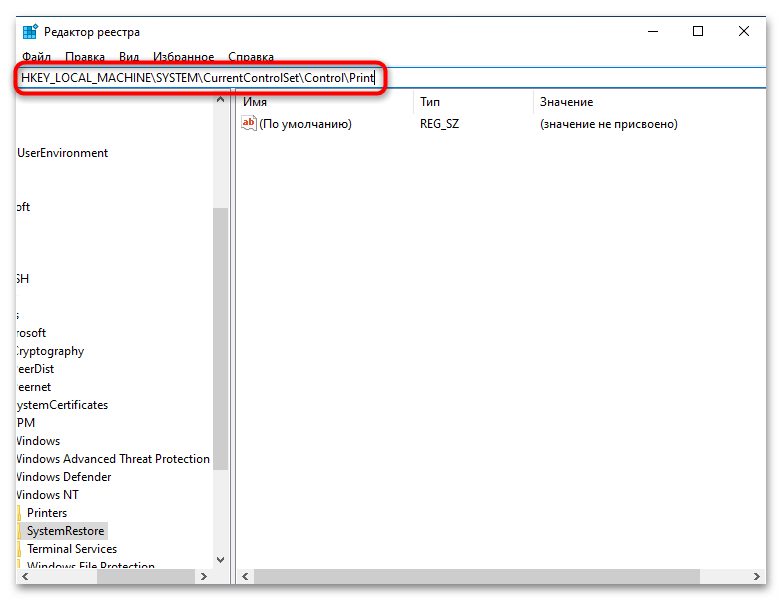
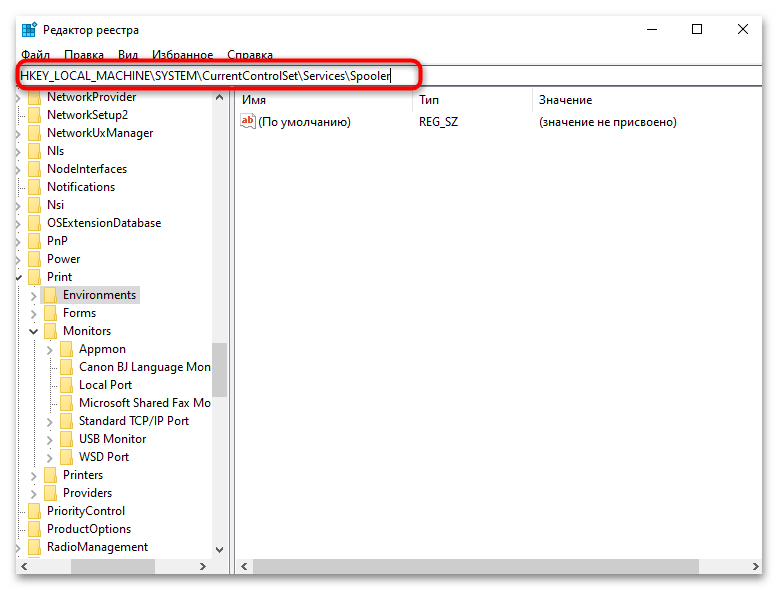
- В первую очередь перейдите по пути
HKEY_LOCAL_MACHINE\SYSTEM\CurrentControlSet\Control\Print, вставив его в адресную строку сверху. - Отыщите папку «PendingUpgrades», нажмите по ней правой кнопкой мыши и из контекстного меню выберите действие «Удалить». Пока что она нам не понадобится, а в будущем будет создана автоматически, когда подключим принтер заново.
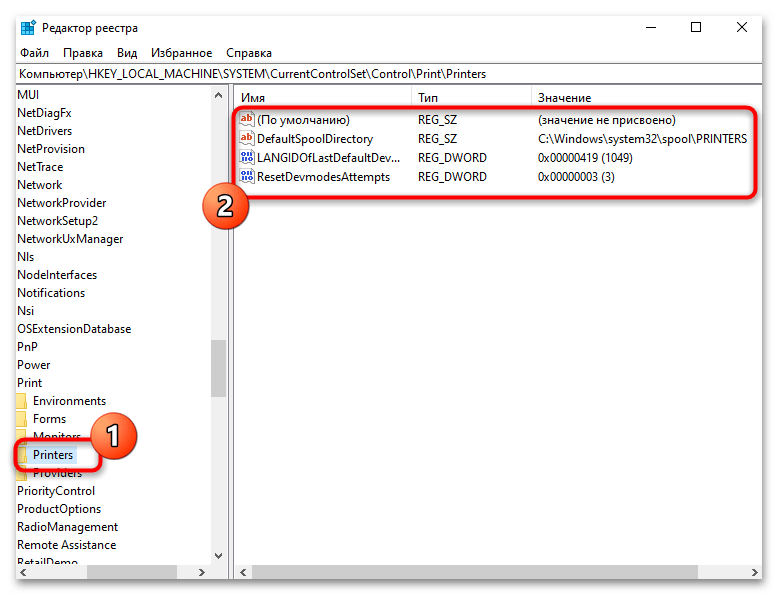
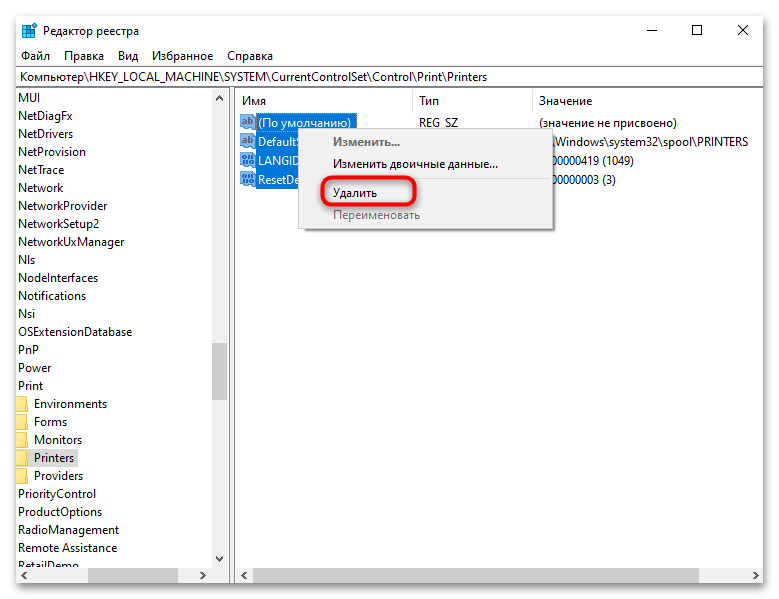
- Разверните папку «Printers» и проверьте ее содержимое. Если здесь присутствуют любые записи, их потребуется удалить.
- С зажатой левой кнопкой мыши выделите все параметры, затем вызовите контекстное меню и снова выберите «Удалить».
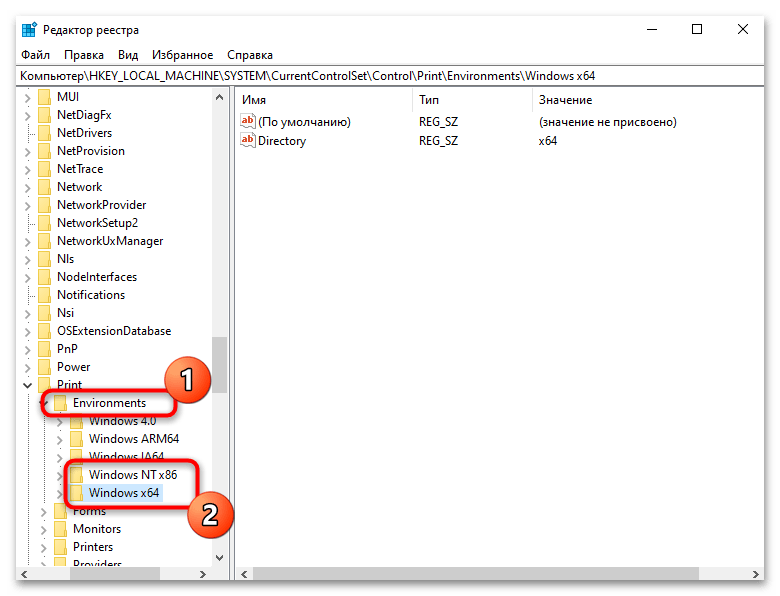
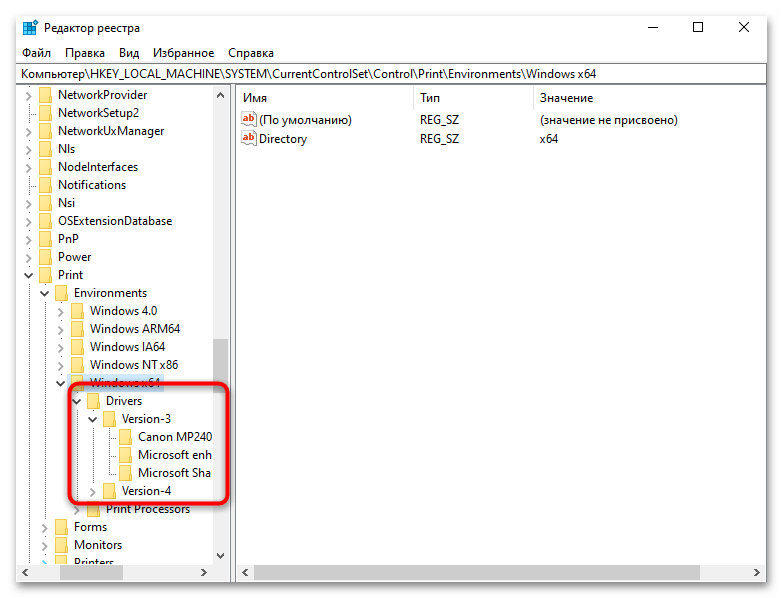
- Разверните папку «Environments» по расположению, в которое был осуществлен переход ранее. Обладателям Windows 10 x32 понадобится открыть папку «Windows NT x86». Если речь идет о x64, то выберите «Windows x64».
- Разверните «Drivers» и «Version-X», где для X могут быть разные числа. Скорее всего, это будет 2, 3 или 4.
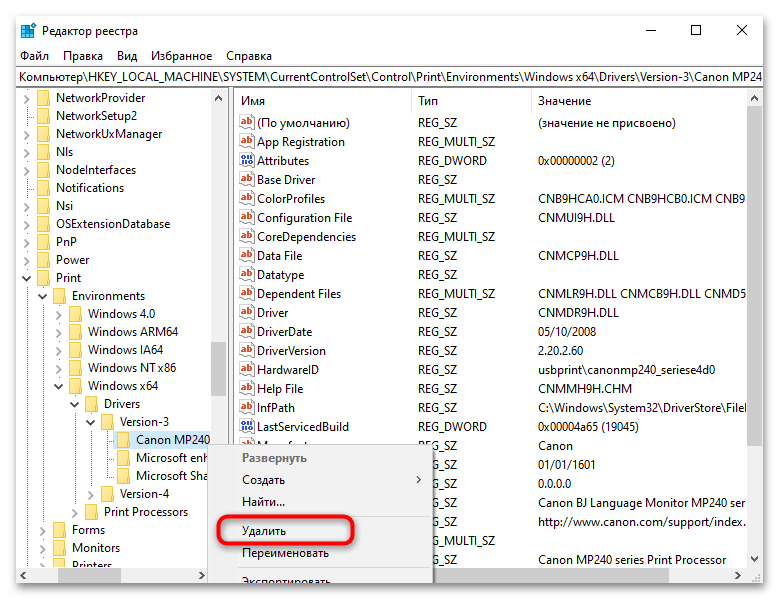
- В одной из папок «Version-X» должен быть каталог с названием вашего принтера, который ранее был удален. Щелкните по этому каталогу тоже правой кнопкой мыши и выберите «Удалить».
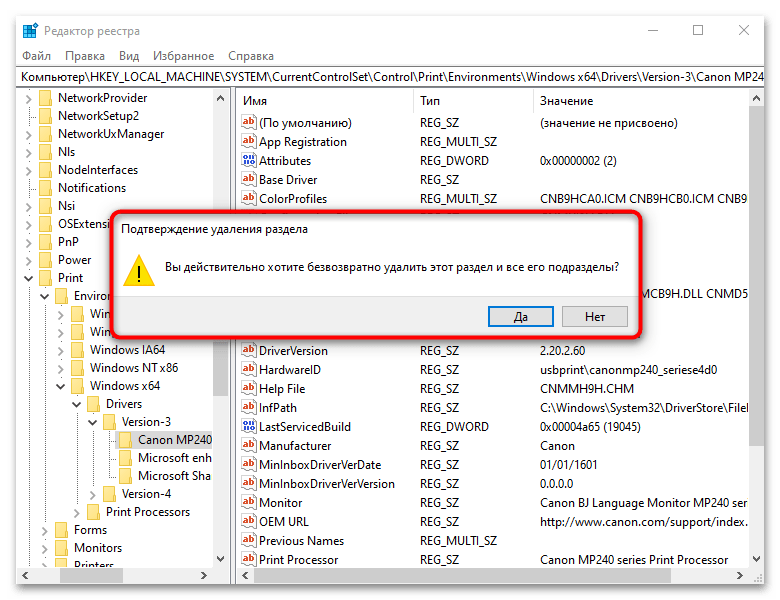
- При появлении уведомления с подтверждением нажмите «Да», чтобы завершить удаление раздела.
- Сверните предыдущие разделы, чтобы проще было открыть «Print Processors». Тут необходимо оставить исключительно каталог «winprint», а другие удалите, если они присутствуют.
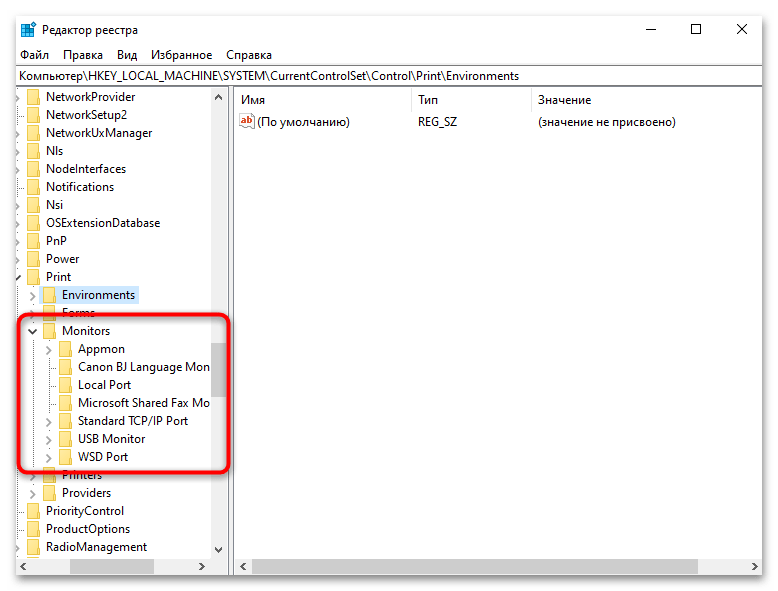
- В завершение по данному расположению рассмотрим папку «Monitors». Тут будет несколько разделов: «Local Port», «Standard TCP/IP Port», «USB Monitor», «WSD Port», «Microsoft Office Live Meeting 2007», «Document Writer Monitor», «Microsoft Shared Fax Monitor». Если присутствуют другие, удалите их точно так же, как делали и с другими папками.


С первым расположением закончено. Вы проверили все необходимые папки, удалили лишние настройки и упоминания о проблемном принтере. Однако на этом работа с реестром еще не завершена, следуйте инструкции ниже, чтобы разобраться с еще одним расположением и хранящейся в нем информацией.
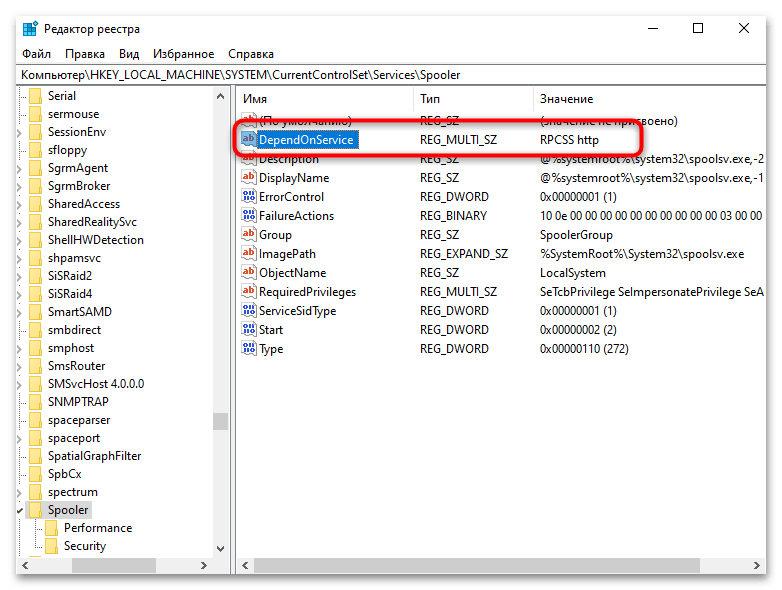
- В ту же самую адресную строку сверху вставьте путь
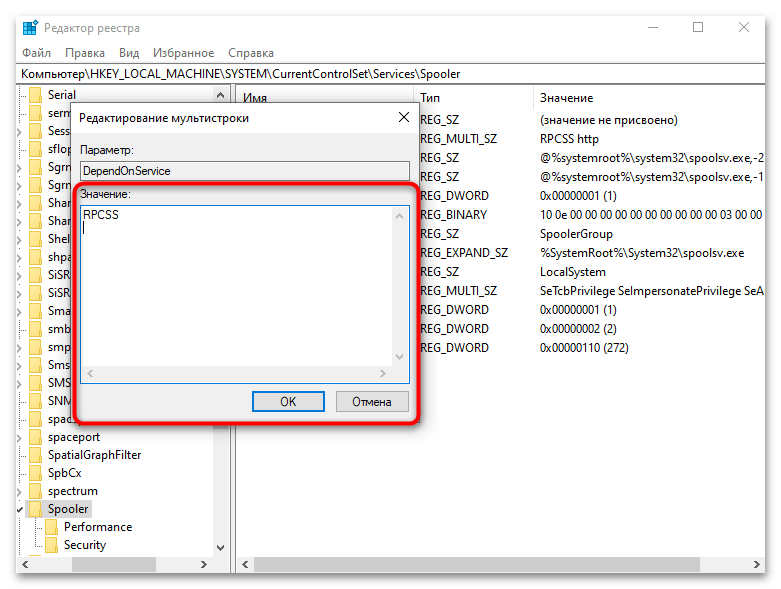
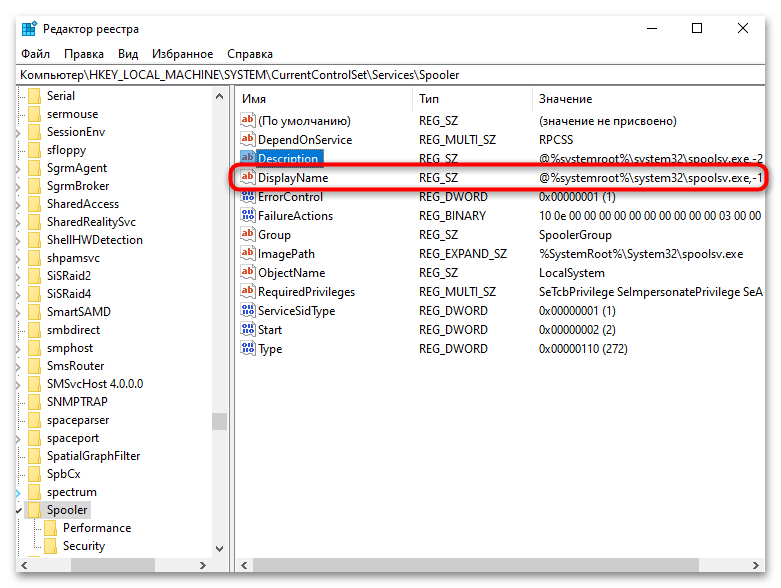
HKEY_LOCAL_MACHINE\SYSTEM\CurrentControlSet\Services\Spooler, чтобы перейти по нему и начать просмотр присутствующих там параметров и их значений. - Посмотрите на параметр с названием «DependOnService». Его значение должно содержать исключительно «RPCSS». Если в нем присутствует еще какая-то информация, дважды нажмите по параметру для его редактирования.
- Удалите все лишнее из строк ниже и нажмите «ОК», чтобы сохранить изменения.
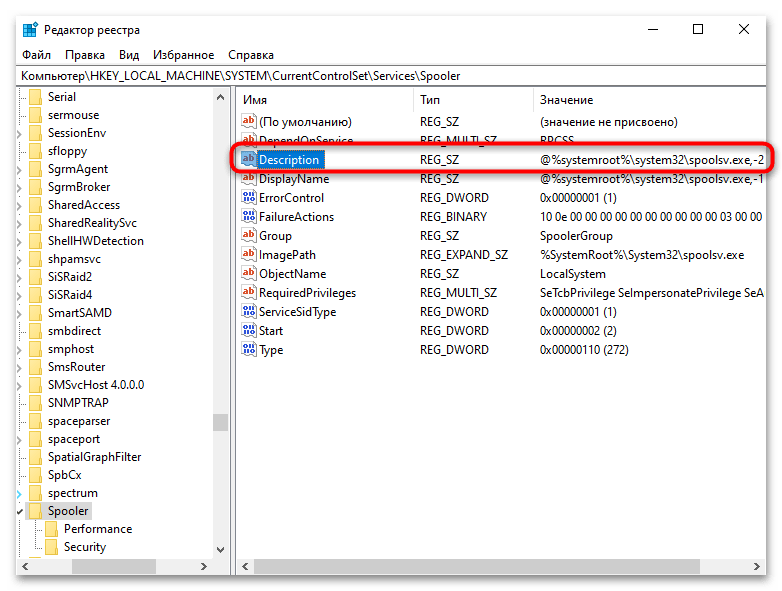
- Продолжайте точно в таком же ключе проверять значение параметров. Найдите «Description» и посмотрите на его значение. Оно должно быть
@%systemroot%\system32\spoolsv.exe,-2. Если оно отличается, дважды кликните по параметру и вставьте нужный путь. - Точно так же проверьте имя «DisplayName», значение для которого должно быть
@%systemroot%\system32\spoolsv.exe,-1. - Переходите далее и тут же найдите параметр «ImagePath». По умолчанию значение имеет вид
%SystemRoot%\System32\spoolsv.exe. Соответственно, если у вас оно другое, замените на указанное. - Больше всего вопросов с параметром «RequiredPrivileges», поскольку его значение довольно массивное. Отыщите его и щелкните дважды по строке левой кнопкой мыши, чтобы открыть полное окно со «Свойствами».
- В области «Значение» должны быть только следующие строки: «SeTcbPrivilege», «SeImpersonatePrivilege», «SeAuditPrivilege», «SeChangeNotifyPrivilege», «SeAssignPrimaryTokenPrivilege», «SeLoadDriverPrivilege». Все лишнее удалите, отсутствующие значения вставьте и сохраните изменения.


Как видно, ничего сложного в поиске параметров и сравнении значений нет. Все свободно редактируется, но изменения вступят в силу только после перезагрузки компьютера. Поэтому приступайте к продолжению выполнения этого этапа, поскольку еще придется проверить некоторые пути и параметры в них.
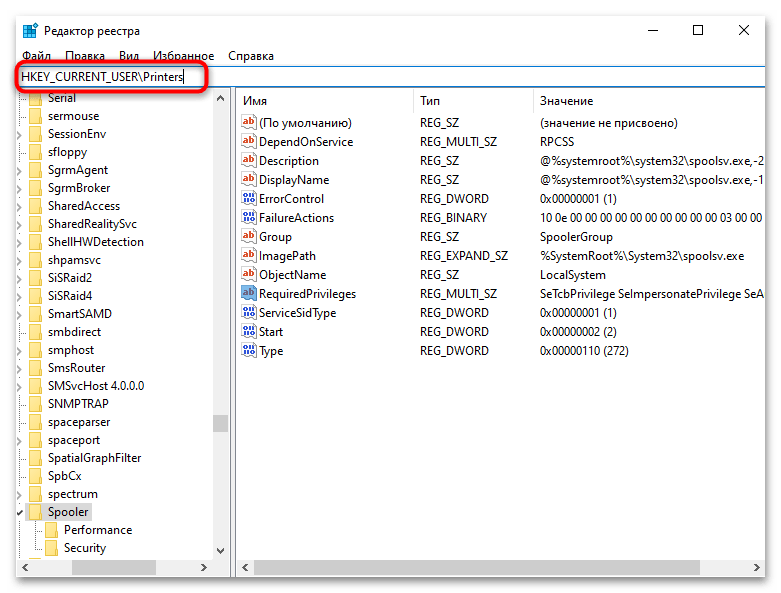
- В адресную строку сверху вставьте путь
HKEY_CURRENT_USER\Printersи перейдите по нему. - Тут обратите внимание на наличие папок с такими названиями: «Connections», «DevModePerUser», «DevModes2», «Settings».
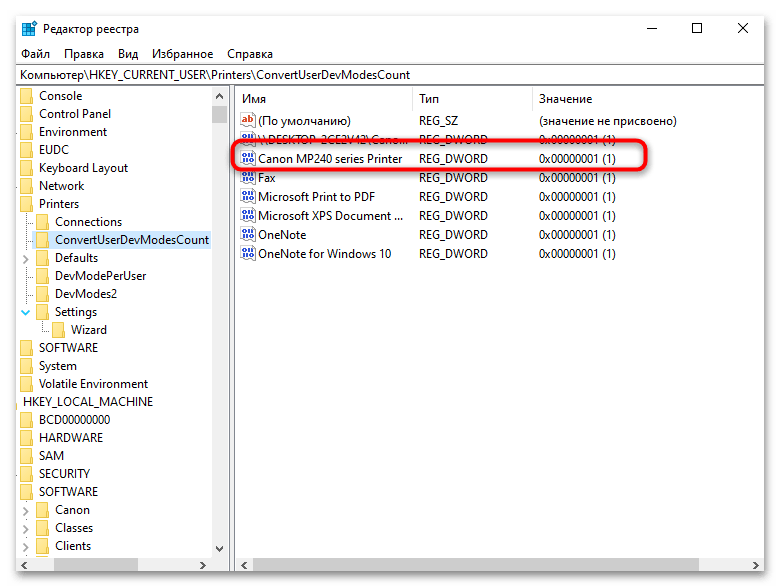
- Перейдите в каждую из этих папок и проверьте наличие параметров с названиями принтера, который ранее был деинсталлирован из системы. Удалите из каждой папки все подобные записи точно так же, как это происходило с другими параметрами в реестре.
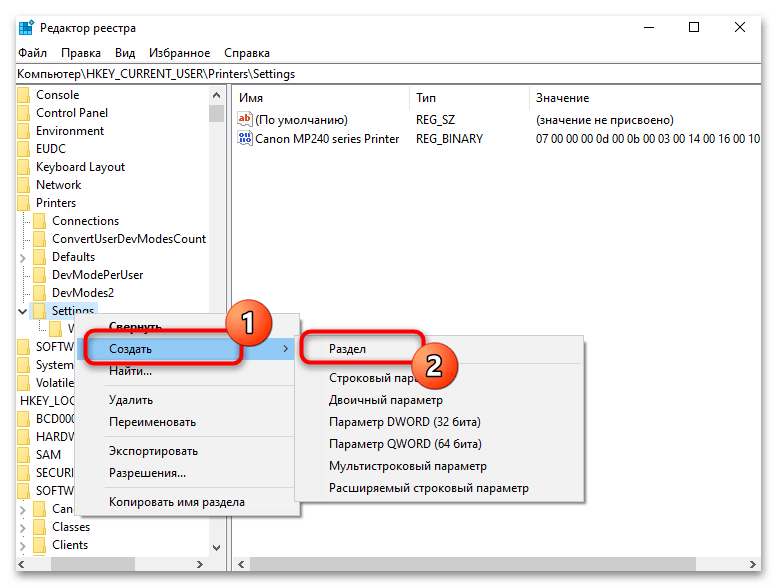
- Разверните каталог «Settings» и проверьте, присутствует ли тут папка «Wizard».
- В случае ее отсутствия требуется кликнуть по «Settings» правой кнопкой мыши, создать новый раздел и задать для него соответствующее название.
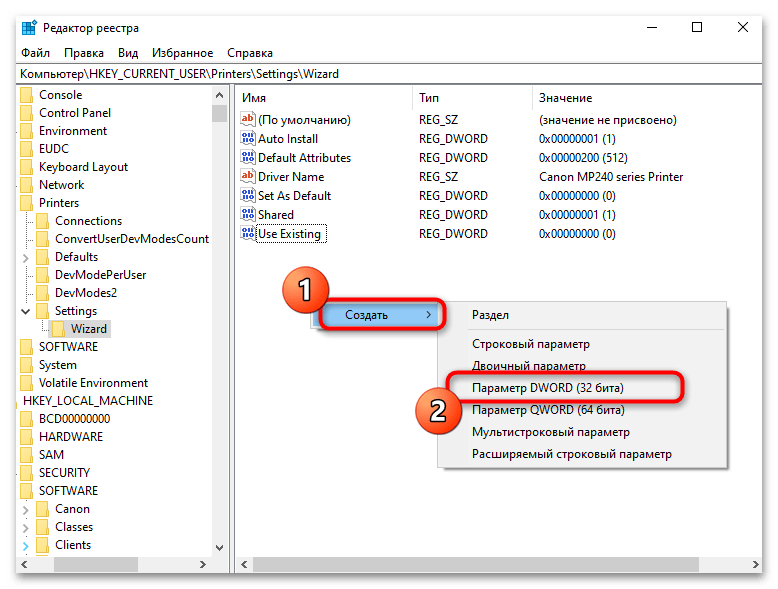
- В папке «Wizard» должно находиться несколько разных строковых и DWORD-параметров. Сравните их с присутствующими и создайте те, которых по умолчанию нет.
- Для этого в правой части окна кликните ПКМ, наведите курсор на «Создать» и выберите «Параметр DWORD (32 бита)» или «Строковый параметр».

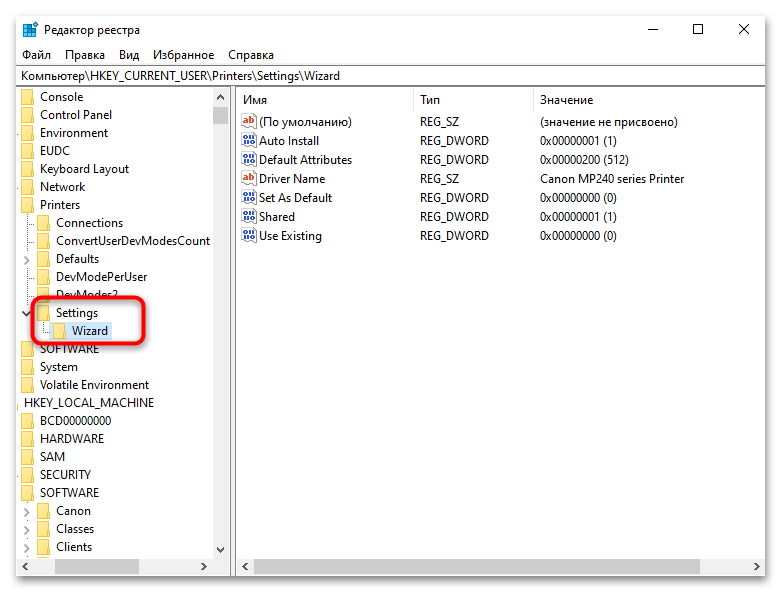
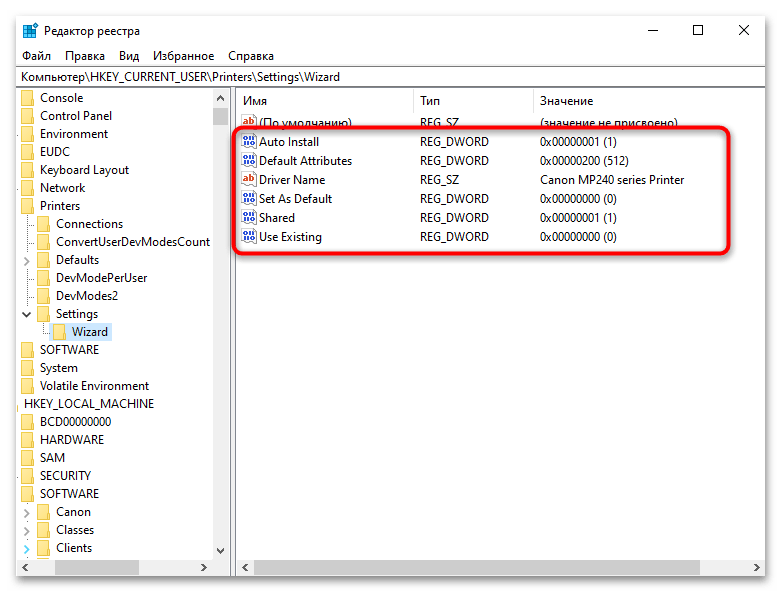
Теперь что касается присутствующих параметров. Ниже представлен их список со значениями, а вы, отталкиваясь от него, проверьте наличие этих параметров и их значения. Отсутствующие создайте так, как это было показано выше.
- DWORD (32 бита) — «Use Existing» со значением «0».
- DWORD (32 бита) — «Set As Default» со значением «1».
- Строковый параметр — «Driver Name» — присутствующее значение удалить, оставив пустым.
- DWORD (32 бита) — «Shared» со значением «1».
- DWORD (32 бита) — «Auto Install» со значением «1».
- DWORD (32 бита) — «Locate Type» со значением «1».
Как только разберетесь с этими параметрами, не закрывайте «Редактор реестра» и переходите к следующему этапу. Осталось проверить всего несколько путей и наличие в них разделов с параметрами. Сделаем это в рамках одной, завершающей инструкции данного этапа.
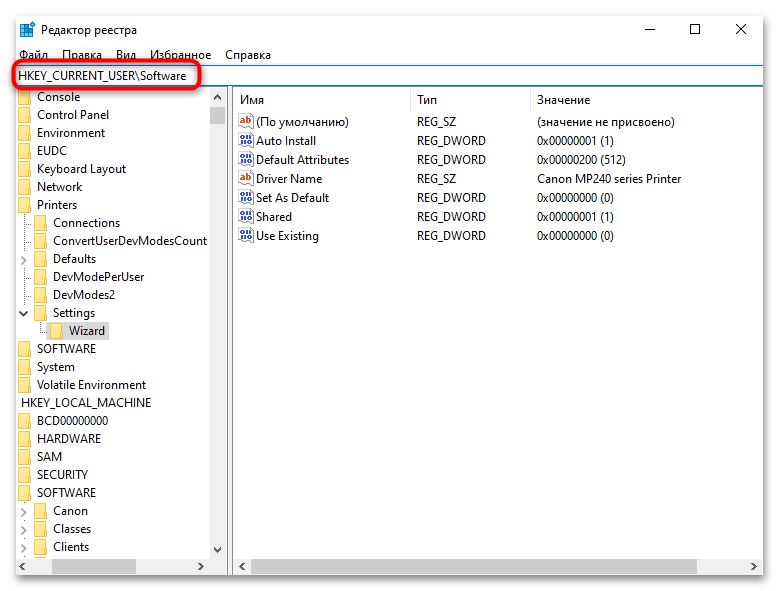
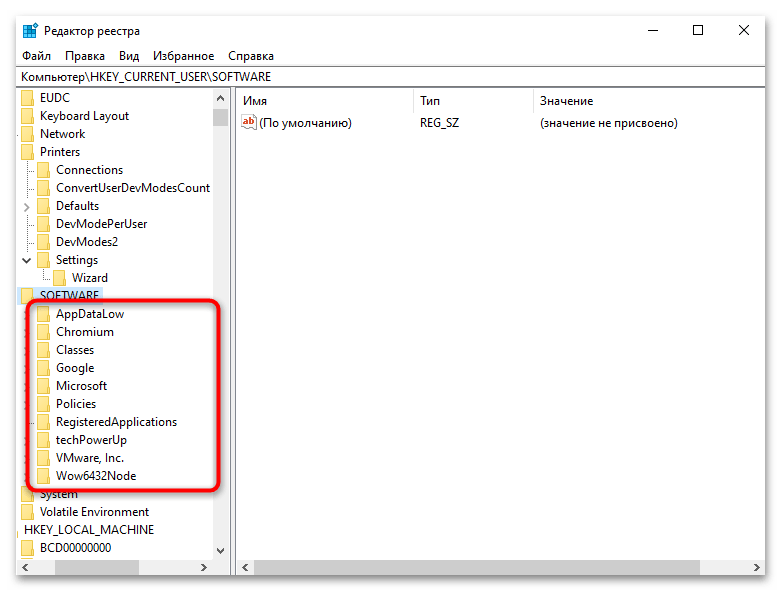
- Перейдите по пути
HKEY_CURRENT_USER\Software, вставив его в адресную строку вверху. - Проверьте наличие в этом каталоге разделов с названиями вашего принтера («Canon», «HP» и другие).
- Если такие присутствуют, кликните по каждому из них правой кнопкой мыши и выберите действие «Удалить».
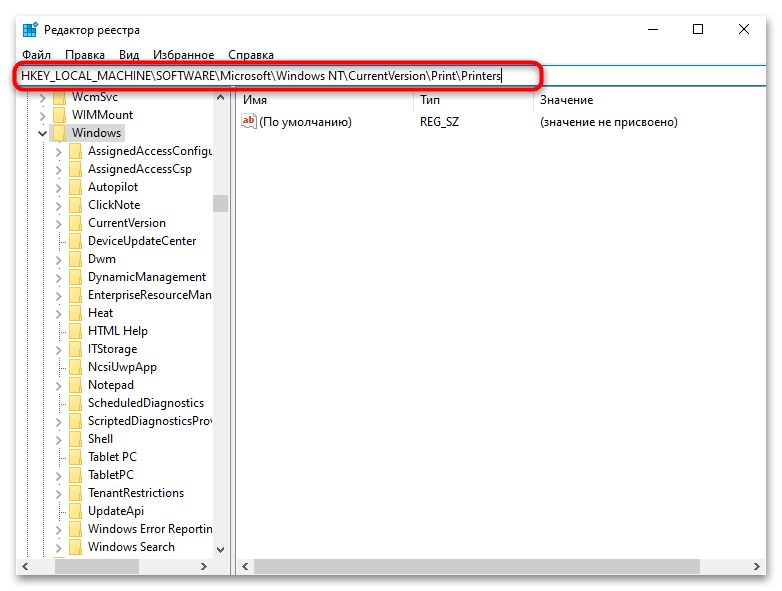
- Переходите по пути
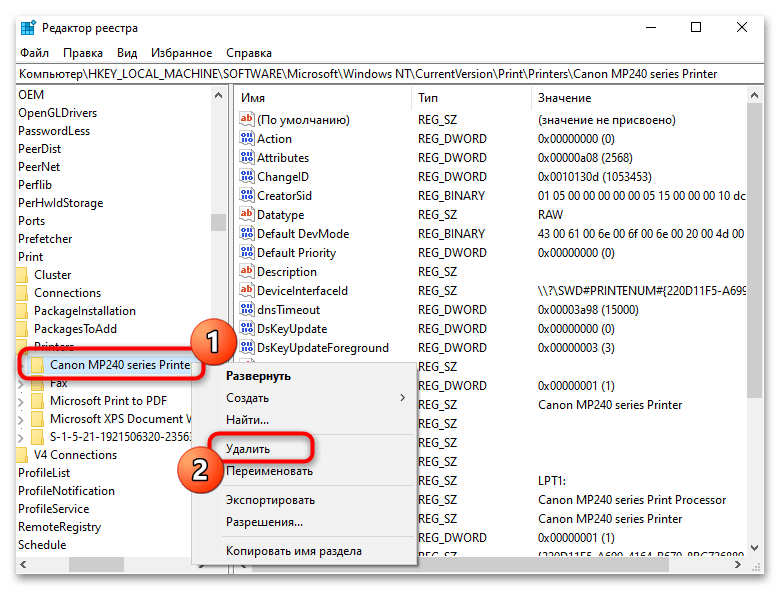
HKEY_LOCAL_MACHINE\SOFTWARE\Microsoft\Windows NT\CurrentVersion\Print\Printers. - Тут уже будет папка с полным названием вашей модели принтера. Тоже кликните по ней ПКМ и подтвердите удаление.
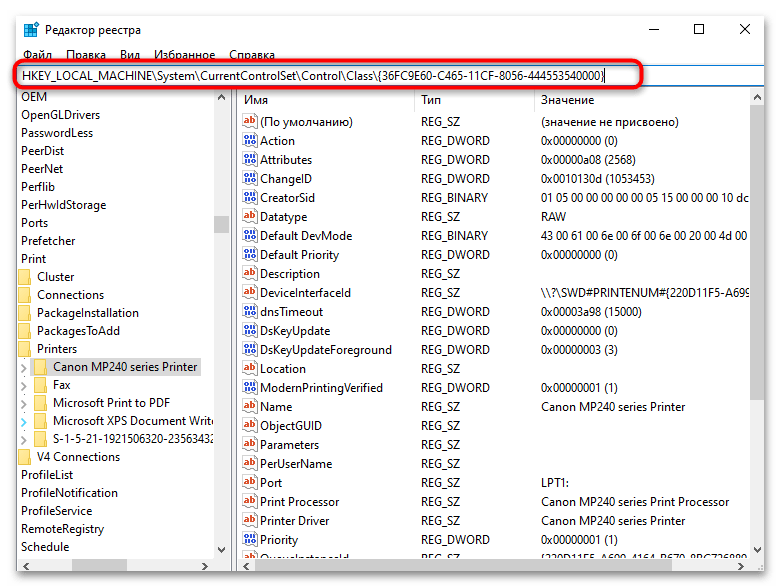
- Остается проверить только одно расположение на наличие фильтров. Вставьте в адресную строку путь
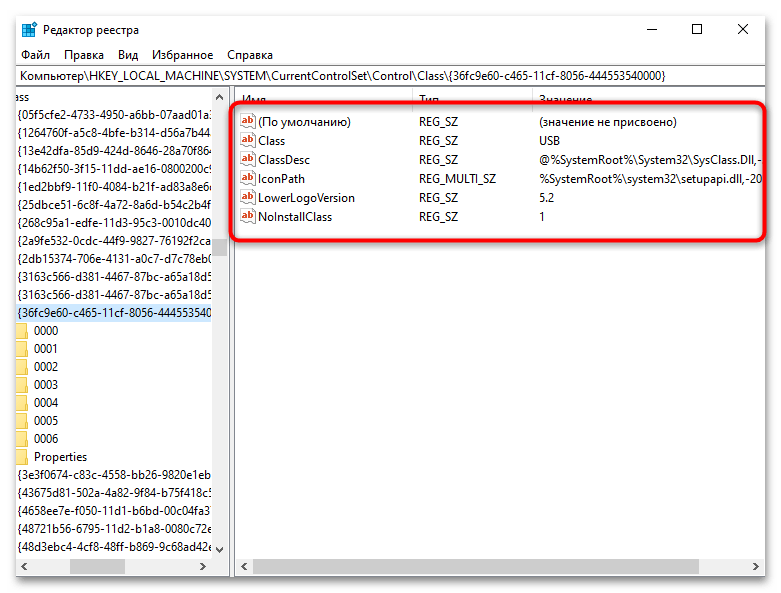
HKEY_LOCAL_MACHINE\System\CurrentControlSet\Control\Class\{36FC9E60-C465-11CF-8056-444553540000}. - Проверьте параметры справа. Если среди них присутствуют «LowerFilters» и «UpperFilters», то каждый из этих фильтров необходимо удалить.

Это все, что нужно было выполнить в реестре. Удаление ненужных параметров и создание стандартных, которые по умолчанию могли отсутствовать, помогут наладить нормальное взаимодействие Windows 10 с принтерами и позволят установить новое устройство без проблем. Можете закрывать окно реестра и переходить к следующему этапу, который станет последним в решении рассматриваемой проблемы.
Шаг 6: Повторная установка принтера в Windows 10
Как только все предыдущие этапы завершены, обязательно перезагрузите компьютер в его нормальном режиме и приступите к повторной установке принтера, с которым ранее наблюдались проблемы. Сначала его необходимо подключить к компьютеру. Если речь идет о физическом подсоединении к главному ПК, используйте идущий в комплекте провод, как это уже делали ранее.
Читайте также: Как подключить принтер к компьютеру
Второй этап — установка драйвера. Лучше всего его скачивать с официального сайта, однако если встроенная библиотека драйверов в Windows предлагает ПО для вашей модели печатающего оборудования, можно воспользоваться и ей. Больше информации по этой теме вы найдете в отдельном тематическом руководстве, щелкнув по заголовку ниже.
Подробнее: Как скачать драйвер для принтера
Что касается сетевых устройств, то подключение будет немного отличаться. После выполнения всех предыдущих инструкций по очистке ОС от следов использования принтера запросите повторное подключение и сначала убедитесь, что на физическом ПК все те же действия по решению проблемы тоже были реализованы. Далее понадобится осуществить стандартное сетевое подключение, о котором читайте в материале ниже.
Читайте также: Подключение и настройка принтера для локальной сети
Наша группа в TelegramПолезные советы и помощь
UPDATED 1/14/2025: On Windows 10, trying to print and getting the document stuck in the queue can be frustrating. Also, if you try to cancel the job, it could stay stuck deleting forever.
Although there could be many reasons you cannot print, including connection problems or physical issues with the printer, it’s usually an issue with the Windows 10 “print spooler.” This service spools print jobs and handles the interactions with the printer, and sometimes, it will stop working, even after restarting your device and printer.
If you experience this problem, you can fix this printer issue by resetting the print spooler on the computer using the Services console or Command Prompt.
This guide will teach you how to fix the print spooler on Windows 10 to fix a printer.
- Fix print spooler from Services
- Fix print spooler from Command Prompt
Fix print spooler from Services
To fix the print spooler service to continue printing on Windows 10, use these steps:
-
Open Start on Windows 10.
-
Search for services.msc and click the top result to open the Services console.
-
Right-click the Print Spooler service and select the Properties option.

-
Click the General tab.
-
Click the Stop button.

-
Use the Windows key + R keyboard shortcut to open the Run command.
-
Type the following path to the printers folder and press Enter:
-
C:\Windows\System32\spool\printers
-
Click the Continue button (if applicable).
-
Select everything in the “printers” folder (“Ctrl + A”) and hit the Delete button to remove the contents.
-
On the “Printer Spooler Properties” page, click the General tab.
-
Click the Start button to restart the service.
-
Click the OK button.


Once you complete the steps, you can try to print a document one more time, and the printer should work as expected.
Fix print spooler from Command Prompt
To fix print spooler problems from Command Prompt, use these steps:
-
Open Start.
-
Search for Command Prompt, right-click the top result, and select the Run as Administrator option.
-
Type the following commands (one line at a time) to stop the print spooler, delete the printers folder content, restart the printer spooler, and press Enter:
net stop spooler
del /Q /F /S "%systemroot%\System32\Spool\Printers\*.*"
net start spooler


After you complete the steps, you should be able to send a print job to the printer, and this time the printer should work.
While this guide focuses on Windows 10, the ability to reset the “Print Spooler” has existed for a long time, so you should be able to follow the same steps on Windows 8.1, Windows 7, and older versions.
Update January 14, 2025: This guide has been revised to ensure accurate steps.
Why You Can Trust Pureinfotech
The author combines expert insights with user-centric guidance, rigorously researching and testing to ensure you receive trustworthy, easy-to-follow tech guides. Review the publishing process.
If you are in an office environment or an educational institution, then you must know how important printers are! In these places, printers help you take hard copies of documents and files as needed. This printing process is not very easy as you think. For a smooth printing process, the printing and spooling service must run on your Windows 10 PC. The printing spooling service will add the paper to the printing queue. And, the connected printer will take up the task and complete the process by printing the content on paper. This data is transferred to print by a USB cable, Ethernet, or Wi-Fi connection. When your printer, does not print paper, you will end up with an error printing Windows 10 message. If you are struggling with how to proceed with this printing error message on your Windows 10 PC, this guide will shed some light on it. So, continue reading!

Table of Contents
The Error Printing message is generally caused by a loose connection or outdated printer drivers. When this dialogue box appears on your screen, it could be accompanied by an error code for reference or no code. Make sure to not confuse this issue with the Missing or Damaged ink cartridge errors. These are the different steps that you can use on your Windows 10 computer to solve the Error Printing message errors.
What Causes Error Printing Message?
We have listed the possible reasons that may cause the said error message in your PC.
- Windows 10 network printer error
- Windows cannot connect to the printer
- Status error printing
- Printer in error state
- Error printing wireless printer
- Printer error 0x00000709 in Windows 10
- Error printing HP/Brother/Canon/Epson
- Error printing Windows 10/11/7
- Printing issues with Windows 10 update
- Error printing PDF Windows 10
- Error printing restarting Windows 10
What Causes Printer Status Error Printing on Windows 10?
Here are some indispensable reasons that cause error printing message on your Windows 10 PC. Read them carefully to find which one troubles you.
- Printer is not turned on
- Printer is not connected to your computer
- The Wi-Fi or USB connection is not set properly
- A loose connection or outdated USB drivers also causes trouble
- Few essential services are not running on your PC
Here are some amazing hacks that will help you fix error printing message. But, before following the below-mentioned methods, reboot your Windows 10 PC to resolve any temporary glitches associated with the device. If you did not attain any fix for the issue after rebooting your computer, follow the below-mentioned methods.
Method 1: Troubleshoot Hardware Issues
Paper and ink are two essential components in the printing process. You have to place the paper on the tray and this will be pulled out of the device. Once the paper is printed, it will be again pulled out of the device. If any of these factors do not meet, then you will face the discussed problem.
- If there is any damage to the paper tray, the device will fail to pull the paper, and result in an error printing Windows 10 message. Check if the paper tray is empty and broken. Replace the paper tray if broken.
- If you find the tray is knocked out of its position, you can fix this easily by placing the paper tray in proper position. On the other hand, if the tray is broken, seek professional help to repair it.

Method 2: Troubleshoot Printer Connection
When you face printer status error printing error, the device wants to tell users that there is something wrong with the communication established between the printer and the system through the USB cable or network connection. To solve printer status error Windows 10 issue ensure whether the following steps are satisfied or not.
1. To restart your printer, switch off the power supply of the printer & then switch it ON again.
2. Now again check the connection of your printer.
3. If you have connected your printer using a USB cable, make sure your cable is working properly and the connections to the ports are fitted tight. You could also switch the USB port to see if this resolves the problem.
4. If you have connected your printer through wired networks, check whether the connection to your cable is properly done or not. Also, you can check whether the signal to your printer is flashing or not.
5. If the connection of your system with the printer is made through a wireless network, make sure your printer is connected to your computer network & the wireless icon will lit-up to show that you are connected.

Also Read: Windows Cannot Connect to the Printer [SOLVED]
Method 3: Run Printer Troubleshooter
The easiest and quickest way to solve any problem with a device or a feature is to run the troubleshooter associated with it. Windows 10 includes a troubleshooter tool for a wide variety of issues, and printer problems are also one of them. The printer troubleshooter automatically performs several actions like restarting the print spooler service, clearing corrupt spooler files, checking whether the existing printer drivers are outdated or corrupt, etc.
1. Press Windows + I keys to open Settings.
2. Now, click on Update & Security.

3. Switch to the Troubleshoot settings page by clicking on the same from the left-hand panel.
4. Select Printer under the Get up and running menu and follow the on-screen instructions to run the printer troubleshooter.

Check if you have fixed error printing Windows 10 issue.
Method 4: Verify Printer Port Settings
Few users have suggested that printer status error Windows 10 can be resolved by tweaking some printer port settings as instructed below.
1. Hit the Windows key and type Control panel. Then, click on Open.

2. Set View by > Category, then click on the View devices and printers option.

3. Now, right-click on your printer and select Properties.

4. Switch to the Ports tab and find the port to which your device is connected.
5. Then, click the checkbox that hosts the USB pin of the printer.
6. Save the changes by clicking Apply and OK.
Note: It is also quite possible that your printer is working just fine, but you have been sending the print request to the wrong printer. This might be the case if there are multiple printers installed on your computers. Set the one you are trying to use as the default printer to resolve the issue. Hence, right-click on your printer and select Set as default printer.

Also Read: Fix Printer Driver is unavailable on Windows 10
Method 5: Disable Print Spooler Service
A print spooler is a mediating file/tool that coordinates between your computer and the printer. The spooler manages all the print jobs you send to the printer and lets you delete a print job that is still being processed. Problems might be encountered if the Print Spooler service is corrupted or if the temporary files of the spooler become corrupt. Restarting the service and deleting these temporary files should help in fixing error printing Windows 10 problems on your computer.
1. Before we delete the print spooler files, we will need to halt the Print Spooler service that constantly runs in the background. To do so, hit the Windows key and type Services. Then, click on Open.

2. Scan the list of Local Services to find the Print Spooler service. Once found, right-click on the Print Spooler service and select Properties from the context menu (or double-click on a service to access its Properties)

3. Click on the Stop button to stop the service.
Note: Minimize the Services window instead of closing as we will need to restart the service after deleting the temporary files.

4. Now, open up the Windows File Explorer by hitting the Windows + E keys together and navigate to the following path.
C:\WINDOWS\system32\spool\printers
Note: You can also launch the run command box, type %WINDIR%\system32\spool\printers command and hit Enter key to reach the required destination directly.

5. Press Ctrl + A keys simultaneously to select all the files in the printers folder and hit the delete key on your keyboard to delete them.
6. Maximize/switch back to the Services application window and click on the Start button to restart the Print Spooler service.

You should now be able to fix printer status error printing message and be able to print your documents without any issues.
Method 6: Change Print Spooler Service Recovery Options
Any incorrect recovery settings configuration of the print spooler service may also cause printer status error printing with your device. Therefore, you need to make sure that recovery settings are correct otherwise Printer spooler will not start automatically.
1. Open the Services window as you did in the previous method.
2. Locate Print Spooler then right-click on it and select Properties.

3. Switch to the Recovery tab and ensure that three failure tabs are set to Restart the Service.

4. Click Apply followed by OK to save the settings. Now see if you’re able to fix printer status error Windows 10.
Also Read: How to Get Your Printer Back Online in Windows 10
Method 7: Update Printer Drivers
Every computer peripheral has a set of software files associated with it to communicate with your computer and the OS effectively. These files are known as device drivers. These drivers are unique for each device and manufacturer. Also, it is important to have the correct set of drivers installed to use an external device without facing any issues. Drivers are also constantly updated to stay compatible with the new Windows versions. If your drivers are not updated to their latest versions, update them by following our guide How to Update Device Drivers on Windows 10.

Method 8: Roll Back Printer Driver Updates
Sometimes, the current version of printer drivers may cause any conflicts and in this case, you have to restore previous versions of installed drivers. This process is called rollback of drivers and you can easily roll back your computer drivers to their previous state by following our guide How to Rollback Drivers on Windows 10.

Wait until the previous versions of drivers are installed on your Windows 10 PC. Once done, check if you have fixed error printing Windows 10 issue.
Also Read: How to Print When You Don’t Have a Printer
Method 9: Reinstall Printer Drivers
Incompatible drivers must be reinstalled to resolve error printing message problems. You are advised to reinstall device drivers only if you cannot attain any fix by updating them. Steps to reinstall drivers are very easy and you can do so by using a third-party application or by implementing the steps manually as instructed in our guide How to Uninstall and Reinstall Drivers on Windows 10

After reinstalling printer drivers, check if you can hear audio from Logitech speakers.
Method 10: Reinstall Printer Drivers in Compatibility mode
Few users have suggested that re-installing printer drivers in compatibility mode have helped them fix printer status error printing issue. Here are a few instructions regarding the same.
1. Click on the Windows key and type Device manager. Then, click on Open.

2. Expand Print queues then right-click on your Printer device and select Uninstall device.

3. If you’re prompted to confirm then again click on the Uninstall button.
4. Now go to your printer driver download webpage (e.g. HP) and download the latest drivers for your printer.
5. Right-click on the setup file and select Properties.

Note: If the drivers are in a zip file make sure to extract all the files and then right-click on the .exe file.
6. Switch to the Compatibility Tab and click on Run this program in Compatibility mode.
7. From the drop-down select Windows 7 or 8 and then click on Run this program as an administrator.

8. Finally, double-click on the setup file and wait for the drivers to be installed on your device.
9. Once finished, reboot the PC and see if you can fix printer status error Windows 10 issue.
Method 11: Update Windows
Also, if there are any bugs in your PC, they can only be fixed after a Windows update. Microsoft releases regular updates to fix all these bugs thereby fixing error printing Windows 10 issue. Hence, ensure if you have updated your Windows Operating System and if any updates are pending in action, use our guide How to Download and Install Windows 10 Latest Update

After updating your Windows Operating System, check whether printer status error Windows 10 issue is resolved.
Also Read: Windows Cannot Connect to the Printer [SOLVED]
Method 12: Reconnect Printer
If all these steps do not work to fix printer status error Windows 10, you might need to completely uninstall the existing drivers and the printer and then reinstall them. The process of doing the same is simple but rather lengthy but this seems to fix error printing message on your Windows PC. Anyway, below are the steps to remove and add your printer back.
1. Open the Settings application by pressing the Windows + I keys together and select Devices as shown.

2. Move to the Printers & scanners settings in the left pane.
3. Find the problematic printer in the right-side panel and single click on it to access its options. Select Remove Device, let the process complete, and then close Settings.

4. Type Print Management in the Windows search bar and click Open to launch the application.

5. Double-click on All Printers (in the left panel or right panel, both are fine) and press Ctrl + A to select all connected printers.

6. Right-click over any printer and select Delete.

7. Now, it is time to add the printer back, but first, unplug the printer cable from your computer and perform a restart. Once the computer boots back on, properly reconnect the printer.
8. Follow the above steps 1 and 2 to open the Printer & Scanner settings.
9. Click on the Add a printer & scanner button at the top of the window.

10. Windows will now automatically start looking for any connected printers. If Windows successfully detects the connected printer, click on its entry in the search list and select Add device to add it back otherwise, click on The printer that I want isn’t listed hyperlink.

11. In the following window, select the appropriate option by clicking on its radio button (For example, select My printer is a little older. Help me find it if your printer doesn’t use USB for connection or select Add a Bluetooth, wireless, or network discoverable printer to add a wireless printer) and click on Next.

12. Follow the on-screen instructions to reinstall your printer.

Now that you have successfully reinstalled your printer, try printing a test page to ensure everything is right back on track.
1. Open up Windows Settings and click on Devices.
2. On the Printers and Scanners page, click on the printer you just added back and would like to test, followed by a click on the Manage button.

3. Finally, click on the Print a test page option. Muffle your ears & listen carefully for the sound of your printer printing a page and rejoice.

Recommended:
- Fix Unable to Install GarageBand on iOS
- Fix Error Code 0x80d0000a in Windows 10
- Fix Photoshop Dynamiclink Not Available in Windows 10
- Where is the WPS Button on Canon Printer?
We hope that this guide was helpful and you could fix error printing in Windows 10. Let us know which method worked for you the best. Also, if you have any queries/suggestions regarding this article, then feel free to drop them in the comments section.