

Тема безопасности сервера Windows не раз поднималась, в том числе и в этом блоге. Тем не менее мне хотелось бы еще раз освежить в памяти старые методы защиты и рассказать о малоизвестных новых. Разумеется, будем использовать по максимуму встроенные средства.
Итак, предположим, что у нас есть небольшая компания, которая арендует терминальный сервер в удаленном дата-центре.
При проектировании любой защиты следует начинать с модели угроз — от кого или чего, собственно, будем защищаться. В нашей типовой конфигурации я буду строить оборону от внешних злобных хакеров, от некомпетентных (а может, и немного злонамеренных) пользователей. Начнем с внешнего периметра обороны — фаервола.
За тобой как за огненной стеной
Во времена Windows 2003 встроенный фаервол представлял собой жалкое зрелище, и в случае невозможности применения сторонних средств приходилось использовать IPSec. Пример такой настройки разобран, например, в материале Secure Windows Servers using IPSec Firewall.
Сейчас, с появлением WFP (Windows Filtering Platform) дела стали получше. В принципе, с этим фаерволом так или иначе сталкивался, наверное, каждый системный администратор Windows, поэтому настройка удаленного доступа к серверу только с определенных IP не должна вызывать затруднений. Я обращу внимание на некоторые «фишки», которые используются редко.
По умолчанию фаервол блокирует все входящие соединения, кроме явно разрешенных, но исходящие разрешает все, кроме явно запрещенных. Политику эту можно изменить, открыв управление фаерволом через wf.msc и выбрав «Свойства».

Настройка фаервола.
Теперь, если мы захотим запретить пользователям терминального сервера выходить с этого сервера в интернет — у нас это получится.
Стоит отметить, что при настройке правил доступа к серверу (входящие подключения) явно создавать правила для исходящего трафика не нужно. В терминах iptables — established и related всегда разрешены.
Для ценителей командной строки настройку фаервола можно производить в контексте netsh advfirewall. Почитать про команды можно в материале «Брандмауэр Windows 7 в режиме повышенной безопасности», я же добавлю, что блокировка входящих и исходящих подключений включается командой:
netsh advfirewall set currentprofile firewallpolicy blockinbound,blockoutbound
Еще одной особенностью фаервола windows является то, что любая программа или настройка меняет его правила без уведомлений. Например, отключили вы все правила на нашем дедике, рядом появился второй, вы сделали между ними локальную сеть, настроили общий доступ и… внезапно у вас включается smb для всех и вся со всеми вытекающими последствиями.
Выхода, по сути, два с половиной (напомню, мы пока говорим только про встроенные средства): регулярно проверять, не изменились ли правила, и использовать старый добрый IPSec или — как по мне, самый разумный вариант — настраивать фаервол групповой политикой. Настройка производится в Конфигурация компьютера — Конфигурация Windows — Параметры Безопасности — Монитор брандмауэра Защитника Windows в режиме повышенной безопасности.

Настройка фаервола групповой политикой.
Также при помощи фаервола windows можно реализовать простой fail2ban. Достаточно включить аудит неудачных попыток входа и при нескольких неудачах подряд блокировать IP источника. Можно использовать самописные скрипты, а можно уже готовые средства, о которых я писал в статье «Как дать шифровальщикам потопить компанию».
Если же встроенного фаервола не хватает и хочется использовать что-то более серьезное, то можно установить стороннее ПО. Жаль, что большинство известных решений для Windows Server — платные. Другим вариантом будет поставить перед сервером роутер. Понятно, что такая установка подойдет, если мы используем colocation, а не аренду сервера где-то далеко-далеко за рубежом. Если же зарубежный дата-центр — это наш выбор, то можно использовать виртуализацию — например, встроенный Hyper-V — и установить в виртуалку привычный GNU\Linux или FreeBSD.
Возникает вопрос: как сделать так, чтоб виртуалка имела прямой выход в интернет, а сервер — нет? Да еще чтобы MAC-адрес сервера не светился хостеру и не требовал тем самым покупки еще одного IP-адреса.
Осторожно! Дальнейшие действия лучше проводить через IP-KVM!
Для этого виртуальную машину нужно снабдить двумя сетевыми адаптерами. Один — для непосредственного подключения к интернету, для него мы сделаем виртуальный коммутатор типа «внешний» и снимем галочку, разрешающую операционной системе взаимодействие с этим коммутатором. Этой самой галочкой мы лишим сервер прямого доступа в интернет (настройку виртуальной машины-фаервола лучше произвести заранее), и его MAC не будет светиться хостеру.

Настройка внешнего виртуального коммутатора.
Другой виртуальный коммутатор следует сделать типа «внутренний» для взаимодействия виртуальной машины и сервера. На нем уже нужно настроить локальную адресацию. Так получится создать виртуальный роутер, стоящий перед сервером и защищающий его.
Заодно на этой виртуальной машине можно настроить любимый VPN до офиса или удаленных сотрудников, не заморачиваясь с ролью «Маршрутизация и удаленный доступ» или со встроенным IPSec, как я рассказывал в статье «Как я базы 1С в Германии прятал». Главное, не забыть проверить автозапуск этой виртуальной машины при старте системы.
Подключаться к такому серверу можно при помощи обычного RDP или использовать HTML5 клиенты с двухфакторной аутентификацией. Стоит на случай брутфорса озаботиться и решениями fail2ban, и блокировкой учетной записи на некоторое время при нескольких неудачных попытках авторизации подряд.
Снаружи сервер мы более-менее защитили, перейдем к защите внутренней.
Защита внутренняя: остановить и не пущать
Конечно, для защиты сервера изнутри очень хочется поставить какой-нибудь антивирус — мало ли что пользователи сервера накопируют или накачают из интернета. Но на практике антивирус на сервере может принести больше вреда, чем пользы. Поэтому я обычно использую механизмы блокировки запуска ПО не из белого списка — в частности, механизм SRP (software restriction policies), о котором я тоже упоминал в статье «Как дать шифровальщикам потопить компанию».
Остановлюсь чуть подробнее на одном подводном камне, о котором часто забываем при включении SRP со стандартными настройками, когда блокируется все, кроме папок Windows и Program Files. Действительно, это отфильтровывает почти всех зловредов. Но не очень работает со злонамеренностью сотрудников, ведь в системных папках есть подпапки с правом на создание объектов пользователями. Например, можно посмотреть на папку C:\Windows\Temp.

Разрешения на папку, которая попадет в белый список.
И такая папка не одна. Можно, конечно, проводить аудит системных папок самостоятельно, а можно довериться людям, которые это уже сделали. Например, специалист Stefan Kanthak в своем блоге (по ссылке есть тестовый вирус EICAR, антивирус может сработать) в довольно агрессивной манере проходится по антивирусам и методам защиты Windows и заодно предлагает уже собранный пакет настроек SRP, который будет блокировать и такие подозрительные папки. По запросу автор предоставляет и программу для конвертирования этих настроек реестра в файлы локальных политик.
Если вы предпочитаете использовать механизм AppLocker c более гибкими настройками, то вам может помочь решение AaronLocker.
Редакция не рекомендует использовать и устанавливать скрипты и прочие программы из интернета без предварительного их изучения.
Если AppLocker появился уже довольно давно, а возраст SRP перевалил за 15 лет, то относительно свежей альтернативой является WDAC (Windows Defender Application Control). Действительно, со времен Security Essentials встроенный «антивирус» обзавелся многими интересными возможностями. Например, WDAC — модуль, который отвечает за политики доступа к приложениям и библиотекам. Ранее он являлся частью Device Guard (защита компьютера, в том числе с применением технологий виртуализации), и немного про его настройку рассказывалось в материале «Принцип работы S Mode в Windows 10 и настройка Device Guard своими руками». Подробнее со всеми тонкостями можно ознакомиться в официальной документации, мне же остается добавить несколько минусов, отличающих его от классических решений вроде SRP и AppLocker:
- Графической настройки нет, все через командлеты PowerShell.
- Нет настроек в срезе пользователя, только для компьютера.
- Настройка делается довольно непривычно — подготавливается файл в формате xml, который затем приводится к бинарному, и распространяется по компьютерам.
Зато возможна настройка в срезе приложения: например, если вы хотите дать доступ к cmd.exe вашему скрипту, а не стороннему вирусу — это можно реализовать. Да еще и политику можно применить до загрузки системы, при помощи UEFI.

Блокировка хрома через WDAC.
В целом из-за тягостной настройки сложилось впечатление, что WDAC больше позиционируется не сам по себе для управления компьютерами, а как средство, позволяющее интегрироваться с централизованными MDM-системами вроде Microsoft Intune. Но при этом разработка старых добрых SRP прекращена в Windows 10 1803.
Если говорить про Защитник Windows, нельзя не упомянуть про Credential Guard и Remote Credential Guard.
Первое средство использует опять же виртуализацию, запуская компонент LSA (Local Security Authority) в изолированном от операционной системы процессе, что сильно усложняет процесс кражи хешей паролей и билетов Kerberos. Подробнее про технологию можно почитать в официальной документации. Для работы процессор должен поддерживать виртуализацию, а также в системе должна быть включена безопасная загрузка (Secure Boot) и модуль TPM для привязки учетных данных к оборудованию. Включить Credential Guard можно через групповую политику Конфигурация компьютера — Административные шаблоны — Система — Device Guard — Включить средство обеспечения безопасности на основе виртуализации.

Включение Credential Guard.
Второе средство служит для защиты передаваемых учетных данных (особенно админских!) для удаленного подключения, например, по тому же RDP. Ранее для этих целей предлагался механизм Restricted Admin Mode, но он ограничивал подключение только одним сервером. Подключившись к серверу, нельзя было просто так использовать ресурсы сети, права администратора применялись только к одному серверу а-ля системный аккаунт Local System.
Remote Credential Guard позволяет передавать учетные данные с локальной машины удаленному серверу без явного ввода пароля, что, помимо расширенной безопасности, даст и удобство подключения к серверам (SSO). Почитать подробнее можно в документации, ну а я добавлю, что для работы механизма достаточно включить его поддержку на сервере — например, через реестр командой:
reg add HKLM\SYSTEM\CurrentControlSet\Control\Lsa /v DisableRestrictedAdmin /d 0
А потом подключаться к серверу командой:
mstsc.exe /remoteGuard
Теперь учетные данные в безопасности, а сервер достаточно защищен. Правда, в материале я осознанно не касался вопросов защиты от злонамеренного хостера, но тут все сводится в общем-то к одному — к шифрованию дисков.
Только зарегистрированные пользователи могут участвовать в опросе. Войдите, пожалуйста.
Расскажите, а как вы защищаете свои удаленные серверы?
45.05% Использую VPN и сплю спокойно.41
27.47% RDP на нестандартном порту, сложные пароли и блокировка учеток при брутфорсе25
2.2% Все перечисленное в статье мне знакомо и используется.2
13.19% Нет у меня никаких удаленных серверов: сбои интернета — помеха работе!12
7.69% Работаем на сбрученном дедике, зачем защита?7
4.4% Другое (расскажу в комментариях).4
Проголосовал 91 пользователь. Воздержались 22 пользователя.
Многие программы, которые устанавливаются на виртуальный сервер, и работают через сетевые протоколы, могут использовать не стандартные порты для обмена пакетами. Брандмауэр по умолчанию будет блокировать запросы от подобных программ. К примеру, это могут быть игровые серверы, или бухгалтерские программы.
Если же подобные программы выдают ошибку из-за закрытого порта, то его можно открыть используя оснастку Windows Firewall. В операционной системе Windows 2012 кликаем правой кнопкой мышки на Start и из контекстного меню выбираем Control Panel Переходим в System and Security далее Windows Firewall.
Или же, для версий ОС Windows 2016 и 2019, можно воспользоваться комбинацией клавиш Win+R и в окне Open прописать команду firewall.cpl.
В появившемся окне, с левой стороны, нажимаем на Advanced Settings и переходим к добавлению правил.
В новом окне, с левой стороны, выбираем вкладку Inbound Rules после этого в правой части окна, в колонке Actions выберем пункт New Rule…
После этого в появившимся окне New Inbound Rule Wizard, в пункте Rule Type, выбираем значение Port, и нажимаем Next.
После этого нужно указать нужный нам протокол, и нужный нам порт. В нашем случае это TCP и порт 40000. И нажимаем Next.
В следующем окне выберем Allow the connection и нажмем Next.
В пункте Profile отмечаем нужные профили брандмауэра и нажимаем Next.
В последнем окне Name, вводим имя и если нужно описание для данного правила, и жмем Finish.
Теперь необходимо таким же образом добавить UDP. С левой стороны, выбираем вкладку Inbound Rules после этого в правой части окна, в колонке Actions выберем пункт New Rule… И так далее по инструкции.
Если Вам будет необходимо добавить диапазон портов, то их можно добавить через тире.
Например: 40000-41000
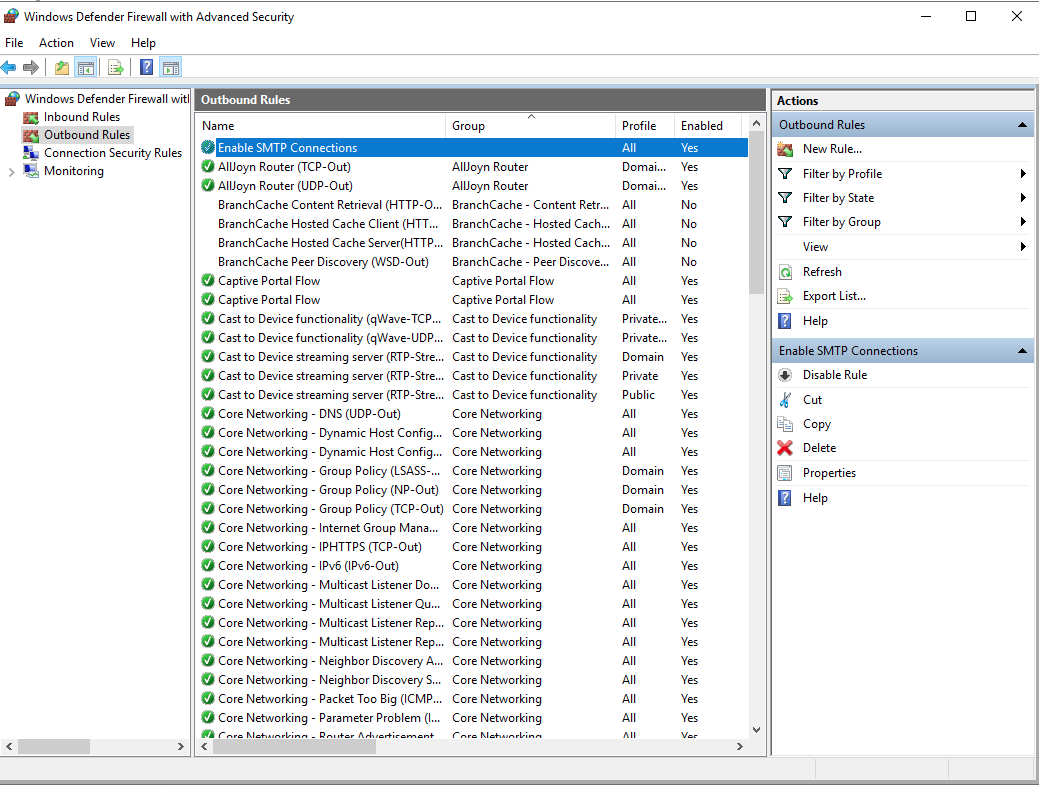
Теперь мы можем наблюдать добавленные правила в списке правил для входящих подключений.
После запуска приложения, которое использует те порты, что были добавлены Вами, должно запуститься без ошибок.
Так же для этого можно использовать Power Shell и потратить менее времени.
К примеру можем использовать тот же 40000 порт.
Для протокола TCP:
netsh advfirewall firewall add rule name="New-Port" protocol=TCP localport=40000 action=allow dir=IN; Для протокола UDP:
netsh advfirewall firewall add rule name="New-Port" protocol=UDP localport=40000 action=allow dir=IN; По такой же аналогии можно открывать необходимые порты.
Introduction
Firewalls are a critical component of securing modern networks with internet access. Without firewalls in place, malicious actors could easily access and infect devices on a network. Properly configured firewalls substantially reduce undesirable communications.
This article explains how to create firewall rules using the Windows Firewall with Advanced Security console and Windows PowerShell on Windows Server 2016 / 2019 / 2022.
What is a Firewall?
A firewall controls the flow of data packets in and out of a network. It acts like a barrier, similar to how a physical firewall prevents the spread of fire between compartments. The firewall allows or blocks connections according to configured firewall rules.
Computers behind a firewall cannot receive data until it passes the filters. This greatly enhances security and reduces unauthorized access risks. Benefits of firewalls:
- Protect devices by blocking undesired traffic
- Notify administrators of connection attempts
- Log activity for monitoring
- Prevent spread of infections
- Reduce hacking risks
How Windows Server 2016 / 2019 / 2022 Firewalls Work
The Windows firewall acts as a barrier between local network devices and external networks. When a connection is attempted to a server, the firewall intercepts the traffic and evaluates it against the defined rules.
Only network packets that match the configured rules are allowed through. For example, a rule could allow TCP traffic on port 80 while blocking other ports. Carefully configured rules optimize security while allowing desired connections.
Windows provides inbound rules to control incoming traffic and outbound rules to filter outgoing traffic. Rules can be tailored for each network profile.
Windows Firewall with Advanced Security
Windows Firewall with Advanced Security provides the management interface for configuring Windows firewall settings. It comes built-in to Windows Server without needing additional licensing or hardware.
There are three default firewall profiles:
- Domain – For corporate networks with detected domain controllers
- Private – For home or office networks behind a gateway device
- Public – For untrusted public networks with internet access
Profiles allow custom rules per network type. You can enable, disable, or configure profiles independently.
Accessing the Firewall Console
To open the Windows Firewall with Advanced Security console:
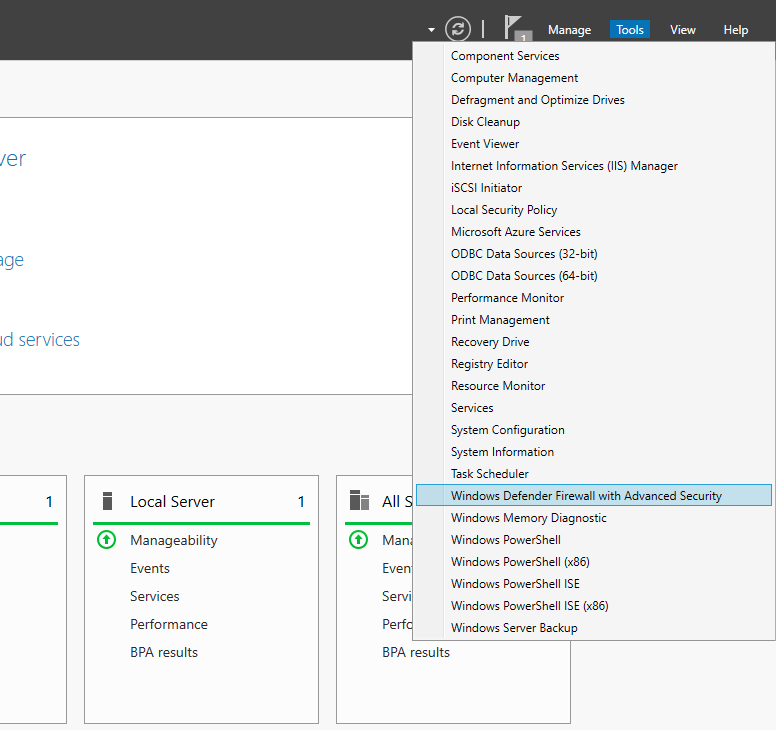
- Open Server Manager > Tools > Windows Firewall with Advanced Security
- Search for “firewall” in the Start menu and launch the Windows Firewall shortcut
- Run wf.msc in the Run command (Win + R)
The left menu allows configuring inbound rules, outbound rules, connection security, and monitoring.
Configuring Firewall Rules
Firewall rules control whether to allow or block specific network connections. Rules can filter by:
- Program path
- Port and protocol
- Predefined service
- Source/destination IP
- Network interface
- And more…
Follow these steps to create an inbound firewall rule:
1. Open the Firewall console and select Inbound Rules
2. Click New Rule to launch the rule wizard
3. Select the rule type – Program, Port, Predefined, or Custom
4. Choose All Programs or a Program path
5. Choose Action (allow or block) or allow if connection is secured
6. Choose profiles
7. Name the rule and click Finish
Repeat the wizard for outbound rules. Once created, rules can be edited or disabled from the console.
Rules can also be created from PowerShell. For example:
PS C:\Users\Administrator> New-NetFirewallRule -DisplayName "Allow SSH" -Enabled True -Direction Inbound -Action Allow -Protocol TCP -LocalPort 22Monitor active connections under the Monitoring tab.
Conclusion
The Windows Firewall provides a flexible and granular rule-based firewall solution for Windows Server 2016, 2019 and 2022. The advanced interface allows creating detailed rules to filter incoming and outgoing traffic as needed. Monitor activity to verify your rules are working correctly. Careful configuration enhances security while allowing desired connections.
Windows Server 2019 contains a firewall program called Windows Defender Firewall with Advanced Security. The firewall filters incoming and outgoing traffic on your Windows Server 2019 instance to safeguard it from common network attacks. By default, the firewall is configured to allow access to all pre-installed system programs.
However, several programs may use multiple different ports for operation, and these will be automatically blocked because they don’t match with the rules in your firewall configuration. In this case, you need to open the specific port on Windows Server.
Prerequisites
- Deploy a Windows Server 2019 Instance on Vultr
- A Remote Desktop Connection App
Establish a connection to your server by logging in through any remote desktop app or click the console on your Vultr dashboard to access your server. After you connect you can start configuring your Windows server 2019 firewall rules.
Turn Windows Firewall ON
By default, Windows Defender Firewall is turned on, but in any case, you should confirm the current status and turn on firewall. To do this, click the tools node under server manager and select Windows Defender Firewall with Advanced Security from the drop down list.
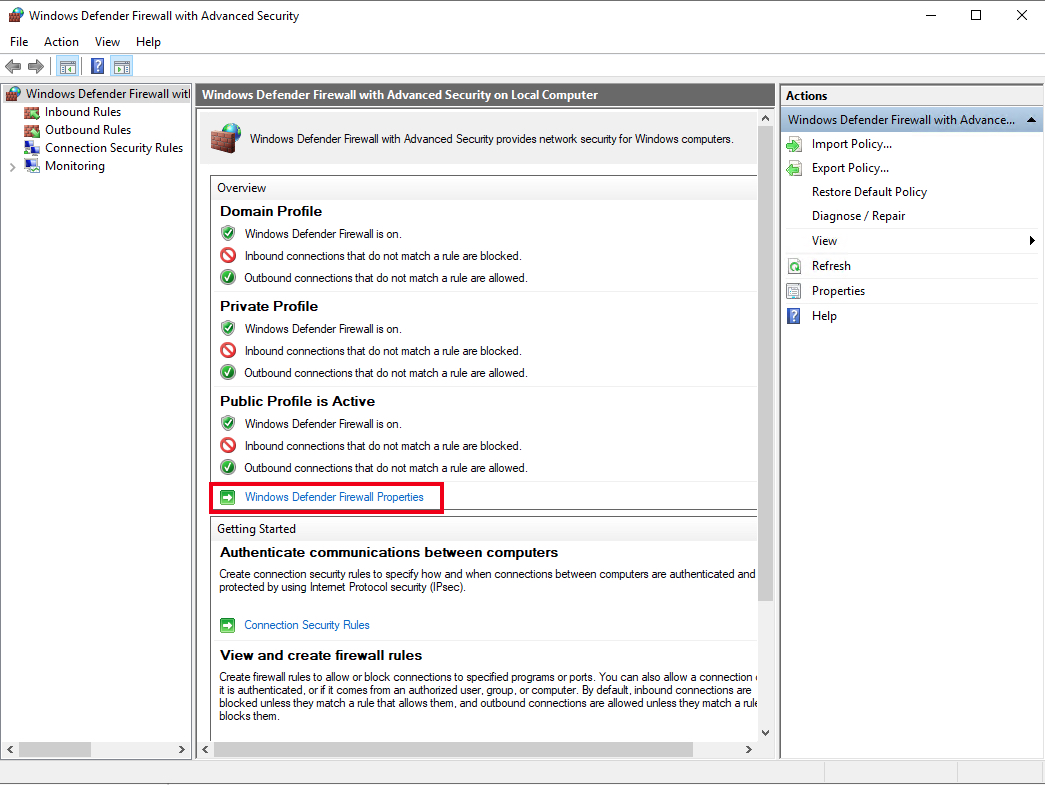
From the open group policy management window, check the current status of Windows Firewall profiles if it is set to ON; otherwise, click the Windows Defender Firewall properties option and turn the service on per profile.
Firewall Rules
Windows Firewall rules allow you to either permit or block specific incoming and outgoing network packets on your server. You can choose multiple parameters for each inbound or outbound rule. A rule can consist of a TCP or UDP port, program name, service, or a protocol to filter for every server profile.
Windows server profiles are grouped into, Domain, Private and Public. Domain represents your server’s connection to a corporate domain network, Private applies to your home or workplace network connection, and Public represents non-secure public network locations.
Open an Inbound Port (Incoming connections)
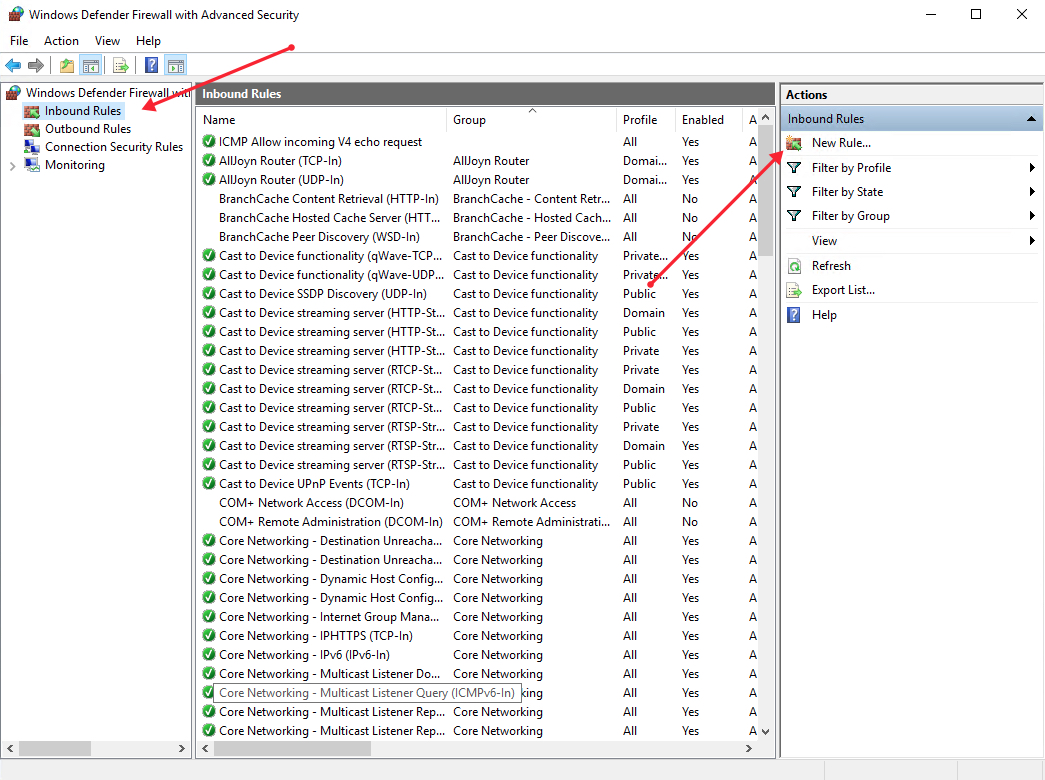
Launch windows defender firewall from the tools sub-menu under server manager. Then, select Inbound Rules on the left panel of the Firewall console.
A list of current rules will be displayed. Now, on the left Inbound Rules sub-menu under actions, click New Rule.
Select Port as the rule type in the rule wizard and click Next.

Now, choose whether the new rule applies to a TCP or UDP port on your server. Then, select specific ports and enter your target port number, you can enter a ports range, or multiple ports separated by - and , respectively, then click Next.
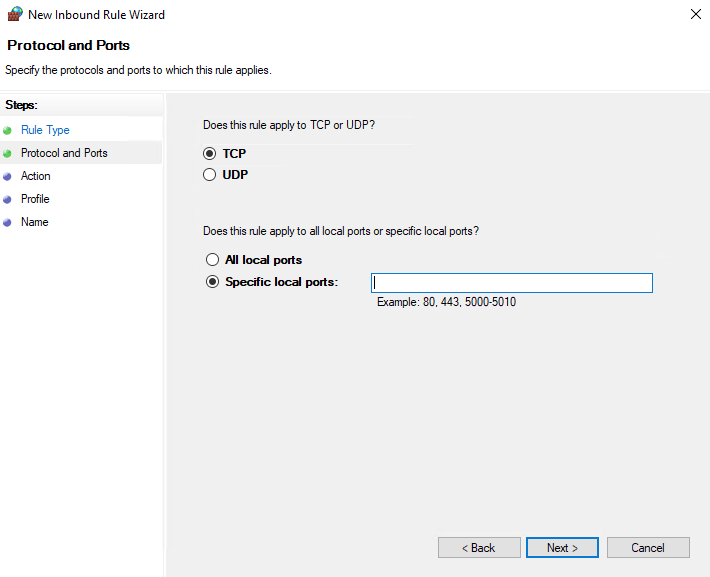
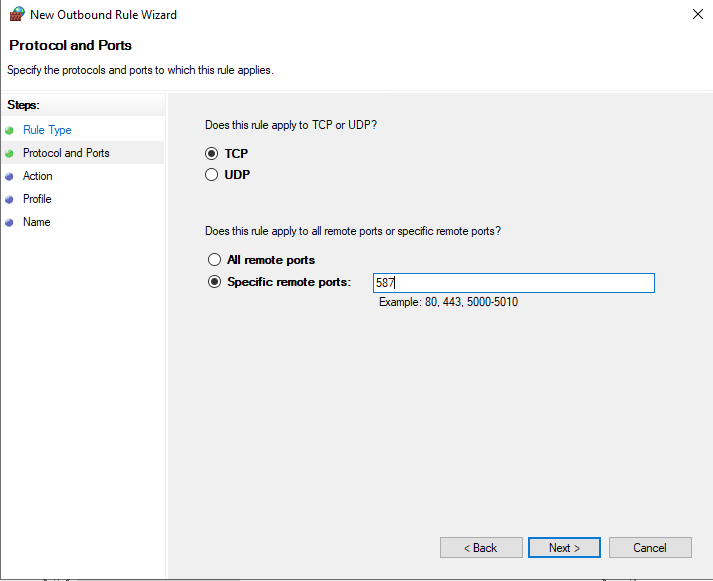
Define your TCP or UDP port rule.
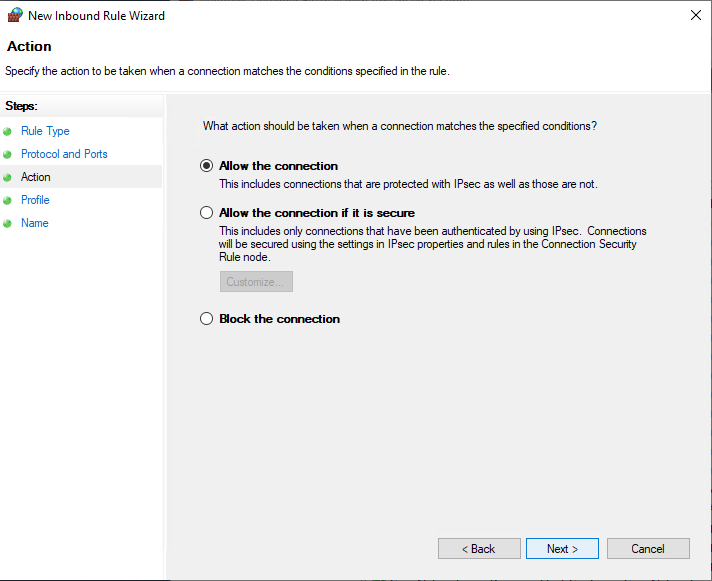
Allow the connectionwill allow incoming connections to the specified server portAllow the connection if it is securewill authenticate with IP security and either deny or allow the connection. For example,httpsconnections will be allowed andhttpblocked.Block the connectionwill block all incoming connections to your server through the specified port
In this case, choose Allow the connection to open the port.
Click Next to assign the new rule to one or more profiles. You can select between Domain, Private, and Public, or choose all to apply the firewall rule on multiple profiles.
Next, give your new firewall rule a custom name and description for easy identification. Then, Click finish to enable the new rule. Your new Inbound (Incoming) port rule will be enabled, and all connections to the server that match the port will be accepted.
Open an Outbound Port (Outgoing connection)
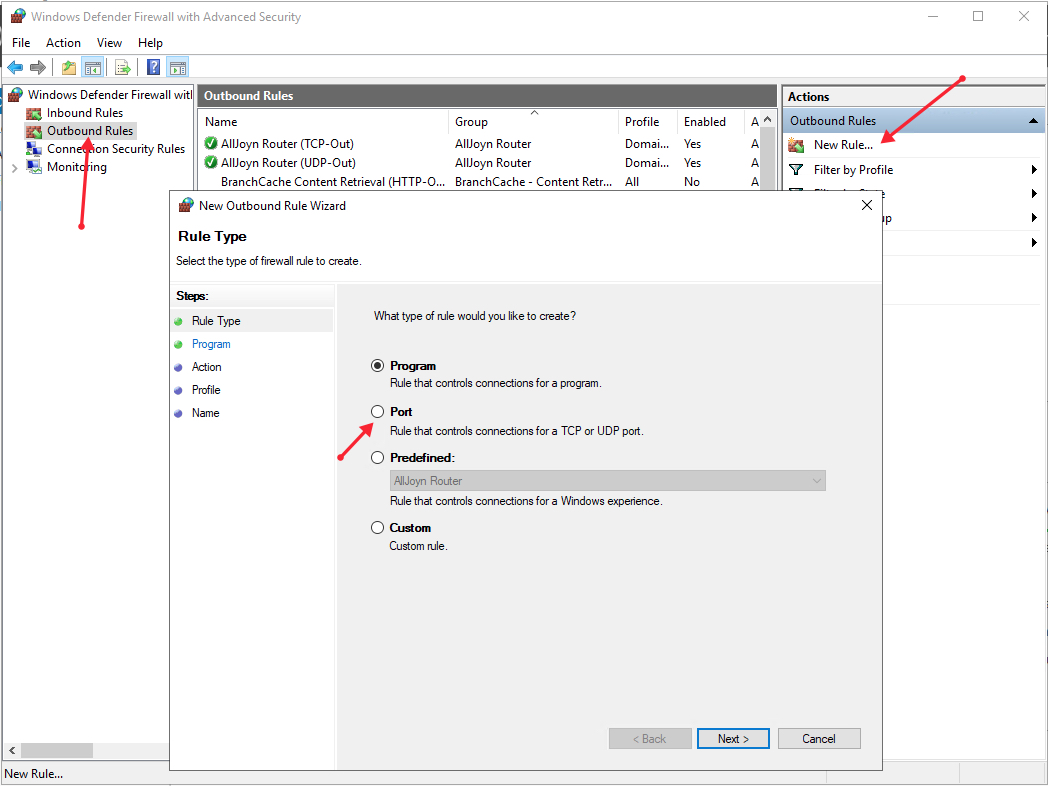
From the Windows Defender Firewall console, click Outbound Rules on the left pane, and a list of available outgoing connection rules will be displayed.
Now, click New Rule on the right pane under the outbound rules node.
In the new outbound rule wizard, select Port as the rule type and click Next.
Now, let’s choose whether the new rule applies to a TCP or UDP port. Then, select specific remote ports and enter the target server port number; you can enter a range of ports, a single port, or multiple different ports you intend to open.
Next, on the Action page, select Allow the connection, then click next to select the server profile on which the rule should be enabled.
Give the new outbound rule a name and description that uniquely describes it. Then, click Finish to enable the outbound rule for the target port to be open on all selected server profiles.
Open a Port through Windows PowerShell
From the Windows start menu, open PowerShell. Then, edit the following command and replace it with your settings.
New-NetFirewallRule -Enabled:True -LocalPort 21 -Protocol TCP -Direction Inbound -Profile Domain -Action Allow -DisplayName example opening a port rule" New-NetFirewallRuleCreates a new Firewall rule.EnabledThis enables the new rule, by default, it will be set to True.LocalPortYour target port number.ProtocolSpecifies the protocol associated with your port number.DirectionSets your target direction to either Inbound (Incoming) or Outbound (Outgoing).ProfileAssigns the new rule to a server profile; you can choose domain, private, or public.Actiondefines the state for the new firewall rule, enter allow.DisplayNamesets a custom name for the new firewall rule
Your Output should be similar to the one below.
PS C:\Users\Administrator> New-NetFirewallRule  -Enabled:True  -LocalPort 21  -Protocol TCP  -Direction Inbound  -Profile Domain  -Action Allow  -DisplayName "example opening a port rule"


Name                  : {427a1b12-ece6-4d54-847d-de482b227c6c}
DisplayName           : example opening a port rule
Description           :
DisplayGroup          :
Group                 :
Enabled               : True
Profile               : Domain
Platform              : {}
Direction             : Inbound
Action                : Allow
EdgeTraversalPolicy   : Block
LooseSourceMapping    : False
LocalOnlyMapping      : False
Owner                 :
PrimaryStatus         : OK
Status                : The rule was parsed successfully from the store. (65536)
EnforcementStatus     : NotApplicable
PolicyStoreSource     : PersistentStore
PolicyStoreSourceType : Local
Congratulations, you just opened a network port on your Windows Server 2019. The server will accept incoming and outgoing connections through the selected ports, but the firewall will block connections from a profile that doesn’t match the port rule.
Configure and Manage Windows Firewall for Your Windows Server. In the realm of robust server management, the Windows Firewall emerges as a pivotal apparatus, unwaveringly shielding our Windows Server against diverse potential vulnerabilities, all while facilitating precise regulation of communication streams. As an elemental constituent of the Windows Server operating system, adeptly configuring and proficiently managing the Windows Firewall necessitates a nuanced comprehension of its functionalities. This article undertakes meticulous and exhaustive scrutiny of the multifaceted facets underpinning the configuration and management of the Windows Firewall within our Windows Server environment, furnishing invaluable discernments to fortify our server’s fortifications and fine-tune its operational efficiencies.
Configure and Manage Windows Firewall for Your Windows Server

Windows Firewall is a built-in security feature in the Windows operating system that acts as a barrier between a computer or network and potential threats from the internet or local network. It monitors and controls incoming and outgoing network traffic, helping to protect the system from unauthorized access and malicious activity. The next section of the article tells us more on how to turn off the Windows firewall.
Configuring Windows Firewall Using the GUI
Windows’s built-in graphical user interface (GUI) tools are the quickest way to manage the firewall for home and work users. One example of a GUI tool is the Windows Defender Firewall Control panel.
Using the Windows Defender Firewall Control Panel
The Windows Defender Firewall Control Panel, an integral facet of the Windows operating system, empowers users to orchestrate a robust line of defence for their systems. Through this accessible interface, users meticulously govern inbound and outbound traffic, fortifying their network security while maintaining seamless communication integrity. Below are several ways to launch the Windows Defender Firewall Control Panel:
Method 1
Navigate to Control Panel → System and Security → Windows Defender Firewall.
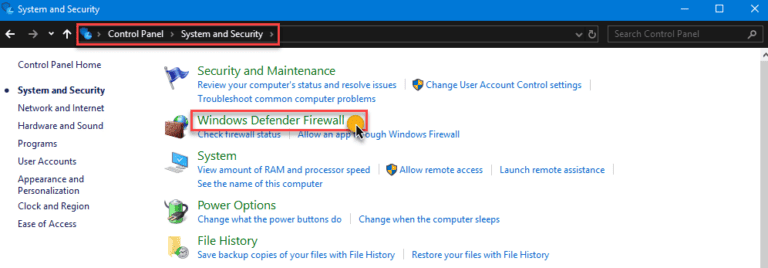
Method 2
Click on Start and type Windows Defender Firewall. Click on the Windows Defender Firewall link.

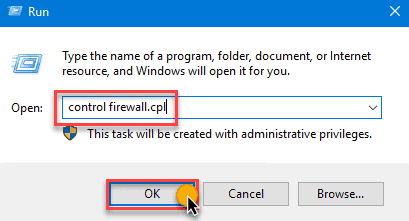
Method 3
Open the Run dialog box, type in firewall.cpl, and click OK.
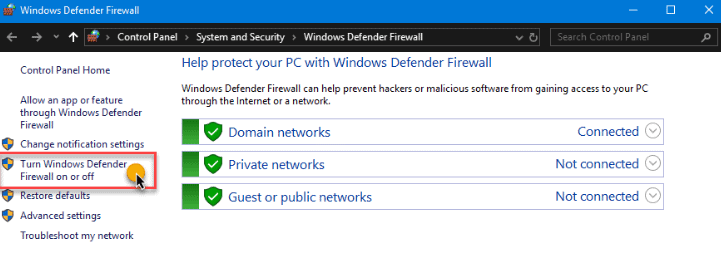
We should recognize the list of network profiles—Domain, Private, and Guest or public networks in the Windows Defender Firewall Control Panel. Click the Turn Windows Defender on or off link on the left-hand side.
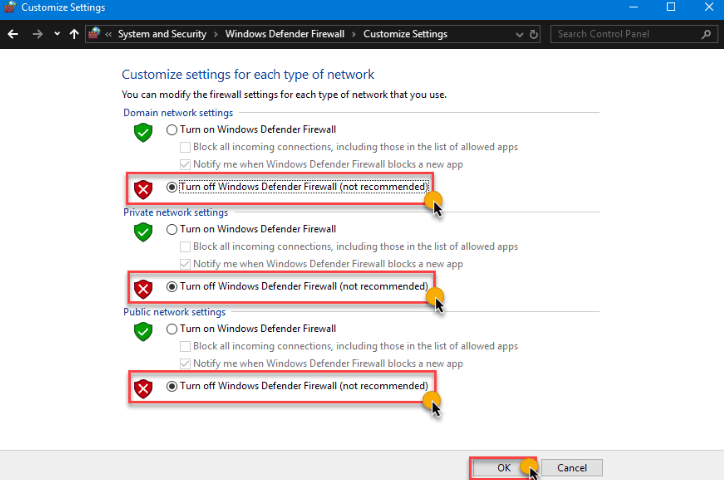
We turn off the Windows firewall for each network profile on the Customize Settings page. The Windows Firewall is disabled on all network profiles in the example below.
Using the Group Policy Management Console
By deploying a group policy object (GPO), systems administrators turn off the Windows Firewall for selected or all computers in the domain. Once deployed, disabling Windows Firewall is automated as the configuration enforces it via policy on all computers in scope.
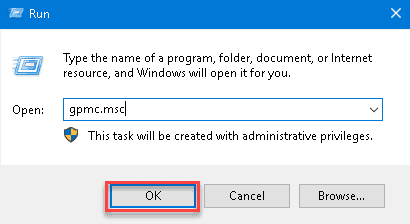
In this case, we are using the Group Policy Management Console (GPMC) on the server to create a GPO. To do so, run the gpmc.msc command in the Run dialog.
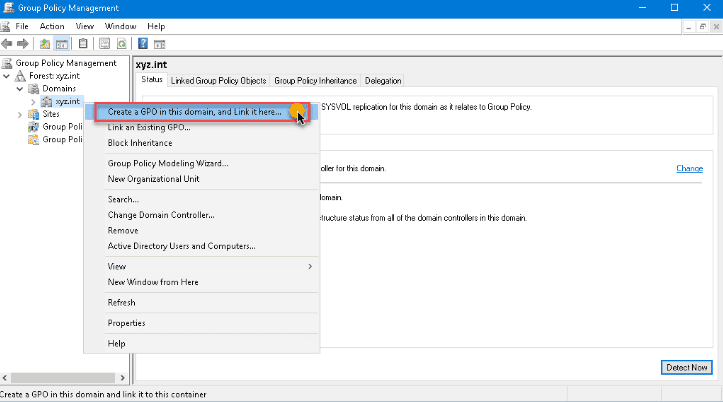
Expand the forest in the Group Policy Management console and select the domain where we create the GPO. Once we have created the GPO in the domain right-click on it, and click Create a GPO in this domain, and Link it here…
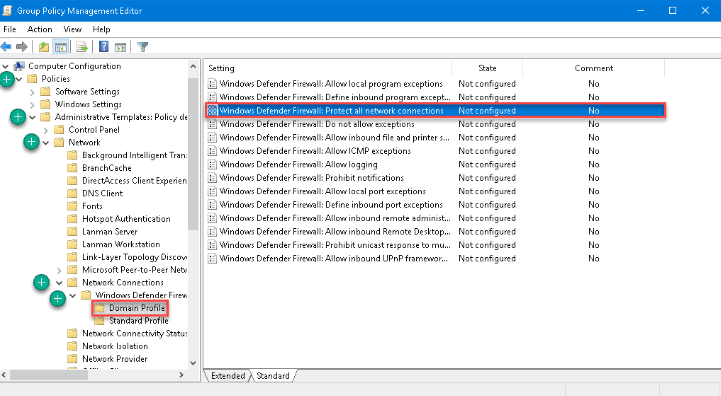
The New GPO dialog box pops up. Type a name for the GPO that we create. Right click the new GPO and then select Edit. The GPO opens in the Group Policy Management Editor. Then, expand these folders:
- Computer Configuration
- Policies
- Administrative Templates
- Network
- Network Connections
- Windows Defender
- Firewall
- Domain Profile
Here we see the list of all Windows Firewall profiles that we implement in our domain. For this example, in the settings list on the right pane, double-click on Windows Defender Firewall: Protect all network connections to open its properties.
Once the settings property is open, change the value by selecting Disabled, then click OK.

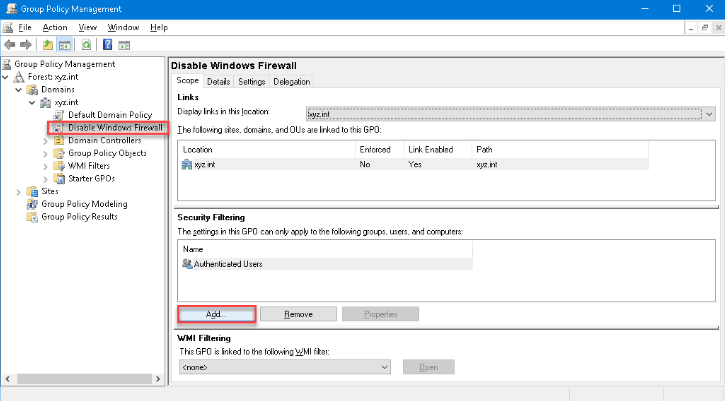
Apply the same option once more to the settings for the Standard Profile. Now that we have created the GPO, we need to deploy the GPO to the domain computers. Select the Disable Windows Firewall GPO in the Group Policy Management to apply the GPO. Then, click the Add button under the Security Filtering section in the Scope tab.
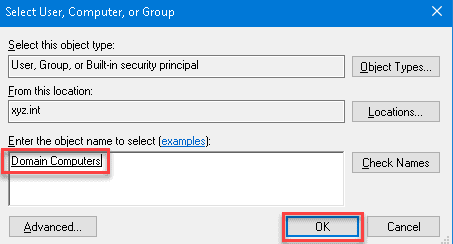
Look for Domain Computers in the Select User, Computer, or Group dialog box, then click OK. Doing so ensures that we apply a GPO to all computers that are members of the Domain Computers group.
The system turns off the firewall the next time the client computers get the policy update.
Now that the GPO has been created and deployed, we test whether the GPO is working by forcing a policy update. Run the gpupdate /force on the client computer to test the policy update.
Try our Active Directory & Office 365 Reporting & Auditing Tools
Try us out for Free. 100’s of report templates available. Easily customise your own reports on AD, Azure AD & Office 355.
Configuring Windows Firewall Using the CLI
Most, if not all, of Windows GUI functions have command-line equivalents. Using the command line interface (CLI) is sometimes quicker than going to different Windows locations using the GUI options. Additionally, the command-line options enable users to script or automate the task. Here are some examples:
Managing Windows Firewall with the Netsh Command
A legacy but valuable handy utility called netsh is useful to manage network configurations on a computer or, in this case, disable the Windows Firewall. Using netsh advfirewall set, we manage Windows Firewall individually on each location or all network profiles.
- netsh advfirewall set currentprofile state – this command manages the presently active network profile firewall.
- netsh advfirewall set domainprofile state – manages the firewall on the Domain network profile only.
- netsh advfirewall set privateprofile state – manages the firewall on the Private network profile only.
- netsh advfirewall set publicprofile state – this command will only manage the firewall on the Public network profile.
- netsh advfirewall set all profiles state – this command will manage all network profiles simultaneously.
Integrating netsh commands increases the opportunity for exact firewall configuration and management for experienced users seeking granular control, ultimately bolstering the server’s resistance to changing cyber threats.
Using the Set-NetFirewallProfile PowerShell Cmdlet
					Set-NetFirewallProfile -All -Enabled True
Set-NetFirewallProfile -Profile  -Enabled False
The command below turns off the firewall on the Public, Private, and Domain network profiles:
Set-NetFirewallProfile -Profile Domain,Private,Public -Enabled False
Without specifying any profile names, the example below shows how to disable Windows Firewall on all network profiles by using the –All parameter switch.
Managing Windows Firewall Remotely Using PowerShell
When we need to manage firewalls on many computers, it is inefficient to log into each computer and run the commands manually. Especially in a network environment, we disable remotely using PowerShell.
Note: This procedure requires us to enable Windows Remote Management or WinRM on the target computer. In most cases, WinRM is available for domain-joined computers for remote management purposes.
If we plan to disable Windows Firewall on one remote computer at a time, we use the Enter-PsSession cmdlet to issue the commands to the remote computer.
					Enter-PsSession -ComputerName WINSRV01
Set-NetFirewallProfile -All -Enabled False
The above process is good only if we work on a few remote computers. But, if we have many computers where we need to turn them off, we need an approach more adapted to scripting. For that, we use the Invoke-Command cmdlet.
					$computers = @('WINSRV01','WINSRV02')
$computers | ForEach-Object {
	Invoke-Command -ComputerName $_ {
		Set-NetFirewallProfile -All -Enabled False
	}
}
As we see from the above snippet, we store the remote computers’ names in the $computers variable as an array. Then, PowerShell loops through each remote computer to run the Invoke-Command cmdlet and issue the Set-NetFirewallProfile -All -Enabled False command.
Windows Firewall with Advanced Security
The distinction between Windows Firewall and Windows Firewall with Advanced Security lies in their complexity and capabilities. Windows Firewall functions as a primary, user-friendly firewall by regulating incoming and outgoing network traffic using predefined rules, while Windows Firewall with Advanced Security provides advanced users and administrators with a more intricate toolset, enabling highly customized configurations encompassing criteria such as IP addresses, protocols, users, and services, making it particularly suitable for complex network environments.
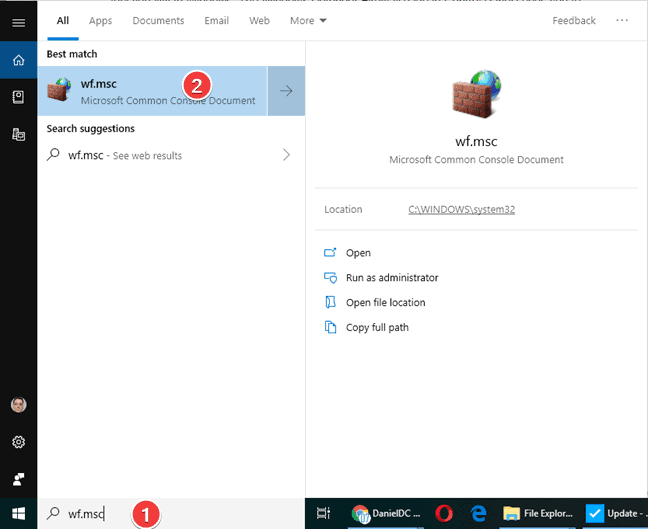
In all three Windows versions, looking for the executable file for Windows Defender Firewall with Advanced Security is the simplest way to launch it. Click or press on the result after typing wf.msc into the Windows search box.
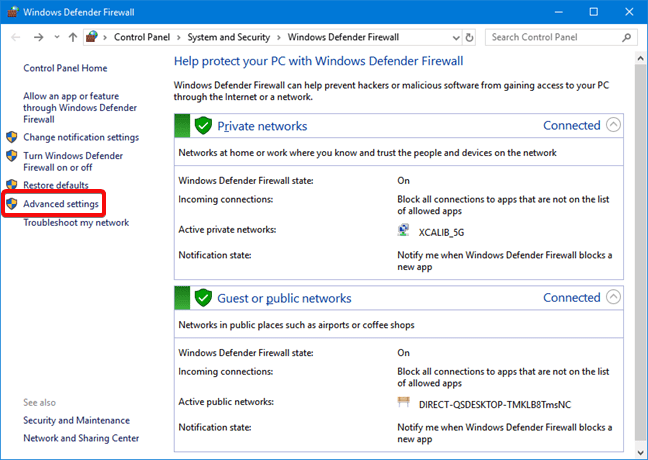
In the Control Panel, we access the Windows Defender Firewall with Advanced Security by clicking System and Security -> Windows Defender Firewall and clicking or tapping Advanced settings.
Within the Windows operating system, a shortcut to access Windows Defender Firewall with Advanced Security is conveniently located in the Start Menu by following this route: Start Menu → Windows Administrative Tools → Windows Defender Firewall with Advanced Security.
Advantages of Windows Firewall with Advanced Security
The tool grants us entry to all functionalities within the Windows Defender Firewall. Here are several advantages of its utilization:
- Diminishes the vulnerability to network-based security breaches. While not a comprehensive security solution, Windows Defender Firewall curtails the likelihood of a triumphant network assault.
- Verifies entry to our device, employing IPsec (Internet Protocol Security) to ensure data integrity and confidentiality.
- Furnishes firewall capabilities sans extra expenditures. As an integral component of Windows, Windows Defender Firewall provides firewall functionality without financial outlay or the need for additional software installation.
Windows Defender Firewall with Advanced Security confers these advantages through its featured mechanisms:
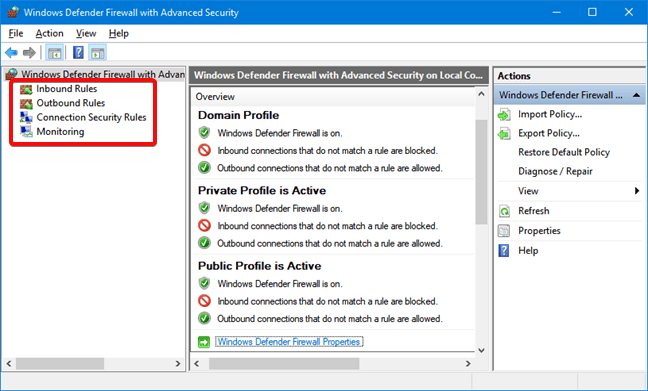
- Inbound and Outbound Rules: These rules enable precise control over incoming and outgoing network traffic, allowing customization based on port numbers, programs, and IP addresses.
- Connection Security Rules: By defining encryption parameters and authentication methods, these rules establish secure communication channels, enhancing network security.
- Monitoring: The firewall offers comprehensive monitoring tools that track events like rule matches and connection attempts, aiding in timely threat detection and response.
Thank you for reading how to Configure and Manage Windows Firewall for Your Windows Server. We shall conclude,
Configure and Manage Windows Firewall for Your Windows Server Conclusion
In conclusion, mastering the configuration and management of the Windows Firewall on our Windows Server is paramount in upholding a secure and optimally performing server environment. The Windows Defender Firewall Control Panel provides an accessible gateway to safeguarding communication integrity and thwarting potential vulnerabilities. Additionally, for those aiming for a heightened degree of control, integrating netsh commands offers an advanced avenue to fine-tune firewall settings, culminating in a comprehensive approach that fortifies our server’s defence against a dynamic digital landscape.
Try InfraSOS for FREE
Try InfraSOS Active Directory, Azure AD & Office 365 Reporting & Auditing Tool
-
Free 15-Days Trial - SaaS AD Reporting & Auditing Solution