Разбираясь, что именно на диске занимает наибольшее количество места, вы можете захотеть найти только большие файлы. Один из способов сделать это — использовать сторонние программы, о которых в отдельной статье Как узнать, чем занято место на диске в Windows, но можно обойтись и без них.
В этой инструкции о том, как найти только большие файлы в Windows 10 средствами системы, не скачивая каких-либо дополнительных утилит.
- Поиск больших файлов в проводнике
- С помощью командной строки
- Большие папки в Параметрах Windows 10
- Видео
Использование проводника для поиска больших файлов
Первый способ — использовать проводник, в нём есть возможность быстрого поиска всех файлов, размер которых превышает 1 Гб, либо, при желании — 100 Мб, а можно задать нужный размер и вручную.
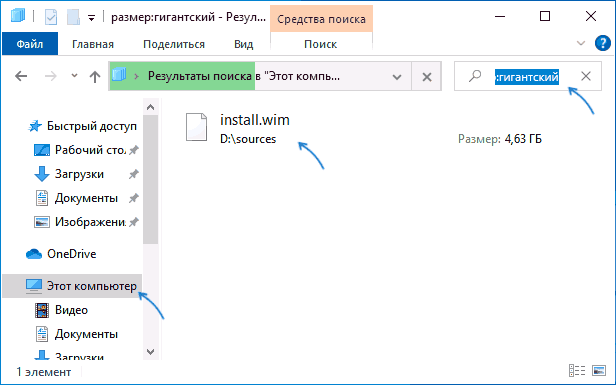
- Откройте проводник, а в нём — выберите расположение (в панели слева), где нужно найти большие файлы, можно выбрать отдельный HDD или SSD, или целиком «Этот компьютер».
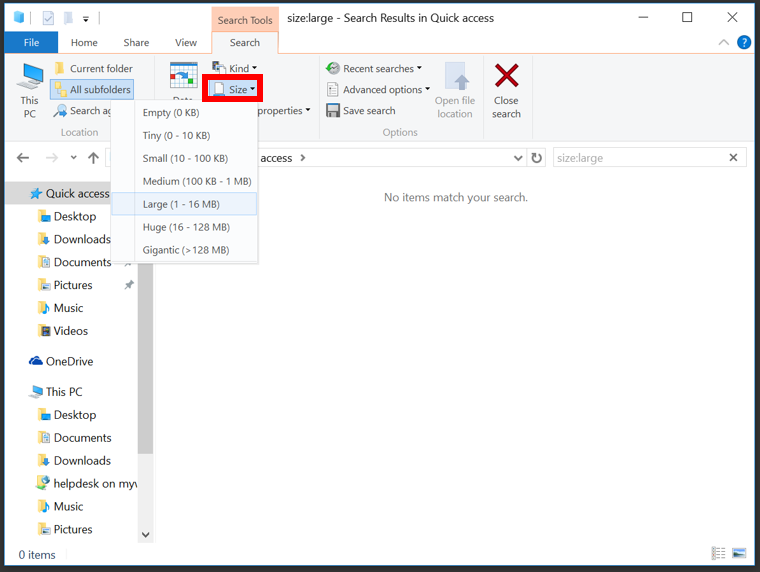
- В поле поиска справа вверху окна проводника введите (без кавычек): «размер: гигантский» для файлов более 1 Гб или «размер: большой» для файлов более 100 Мб.
- Нажмите Enter и дождитесь появления результатов поиска в окне проводника.

Ещё одна возможность при использовании проводника — ввод в качестве фильтра для поиска «размер: >500Мб» (число мегабайт можно менять на своё) для поиска файлов, размер которых превышает указанный.
Перейти в папку с каким-либо из найденных файлов можно, нажав по нему правой кнопкой мыши и выбрав пункт «Расположение файла», а уже там выполнять действия по удалению, если это необходимо. Внимание: для удаления системных файлов (при условии, что оно возможно) используйте специально предназначенные для этого встроенные средства Windows 10 или стороннее ПО, подробнее: Лучшие программы для очистки диска компьютера.
Поиск больших файлов с помощью командной строки
Ещё одна возможность — специальные команды в командной строке, которые, по сути, делают то же самое, что только что было продемонстрировано при использовании проводника.
- Запустите командную строку, лучше от имени администратора — так вы получите меньше сообщений об ошибках при доступе к системным папкам.
- Перейдите в ней на нужный диск, например, введите cd C:\ и нажмите Enter для перехода в корень диска C. Для перехода в корень не системного диска, просто введите его букву с двоеточием, например, D:
- Введите команду
forfiles /s /c "cmd /c if @fsize GTR 1073741824 echo @path"
- В результате будет выдан список расположений файлов, размер которых превышает указанный.

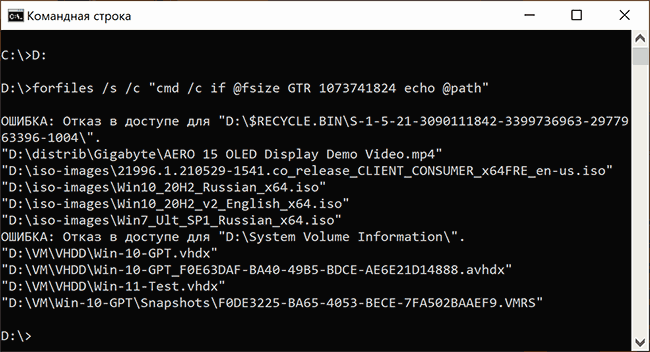
В примере в качестве размера используется 1 Гб, число получилось из 1024 (Кб) умноженного на 1024 дважды.
Просмотр информации о больших папках в параметрах Windows 10
Если зайти в Параметры Windows 10, в раздел «Система» — «Память», там вы увидите сведения о занятом месте на диске и список категорий, а при нажатии на пункт «Показать больше категорий» информация станет более детальной.
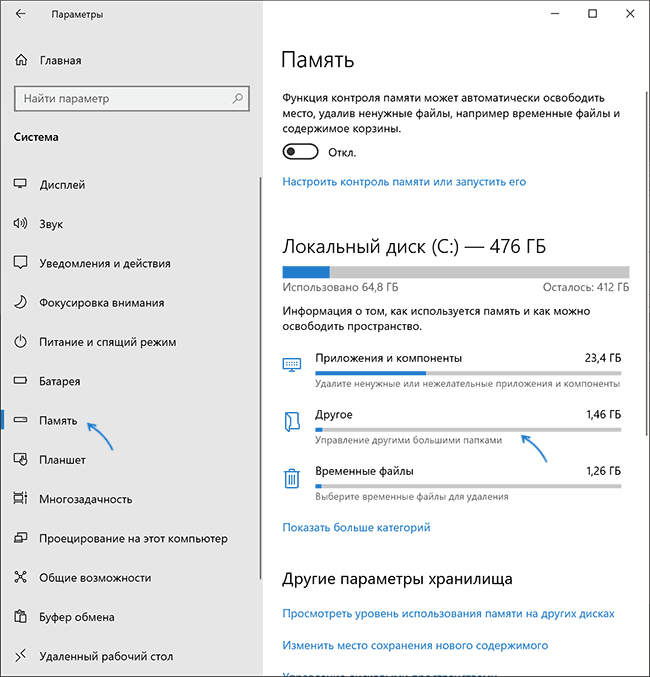
При клике по каждому пункту в категориях для него будет доступна более детальная информация о занятом месте, а в контексте поиска больших папок, не относящихся напрямую к установленными программам или системным файлам, оптимальным будет нажать по пункту «Другое» для отображения нужных сведений.
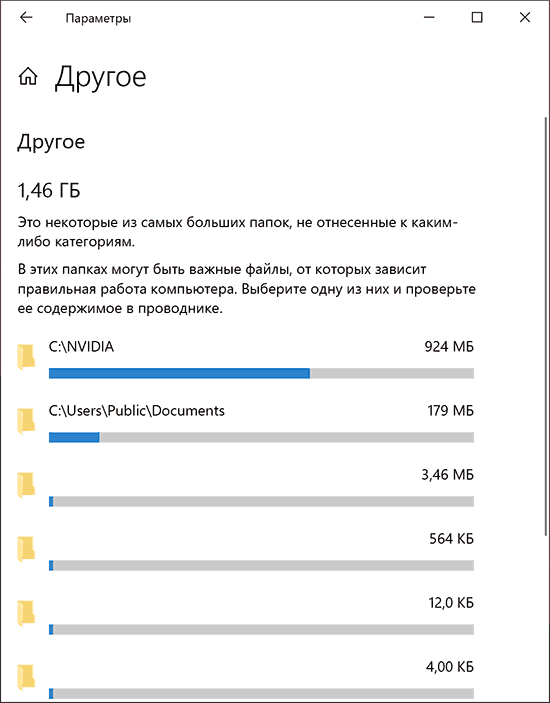
Например, из изображения выше видно, что папка NVIDIA в корне диска C у меня занимает около гигабайта, причём это не сами драйверы видеокарты, а лишь установщики, которые мне уже не нужны — удаляем.
Видео
Надеюсь, инструкция оказалась полезной. Напомню, я специально не включал в неё какие-либо сторонние средства для этих задач, про них на сайте доступен отдельный материал.
Last Updated :
17 Mar, 2025
Running out of space on your Windows 11 PC? You’re not alone! Whether it’s a forgotten movie download, an old backup, or a massive game installation, large files can quietly eat up your storage and slow down your system. The good news? Windows 11 makes it easier than ever to track down these space hogs and reclaim your disk space.
In this post, we’ll walk you through three simple methods to find large files on your computer. So without further ado, let’s deep dive into the methods to find large files in Windows 11.
Methods to Find Large Files on Windows 11
Here in this we have listed the top 3 easy methods that will help you to find the large files in your Windows 1. So keep reading the guide to find the best one.
Method 1: How to Find Large Files on Windows 11 Using File Explorer
Step 1: Open Windows File Explorer
- Open File Explorer by pressing (Windows Key + E).
Step 2: Go to the Drive
- Navigate to the drive you want to search (e.g., C:).
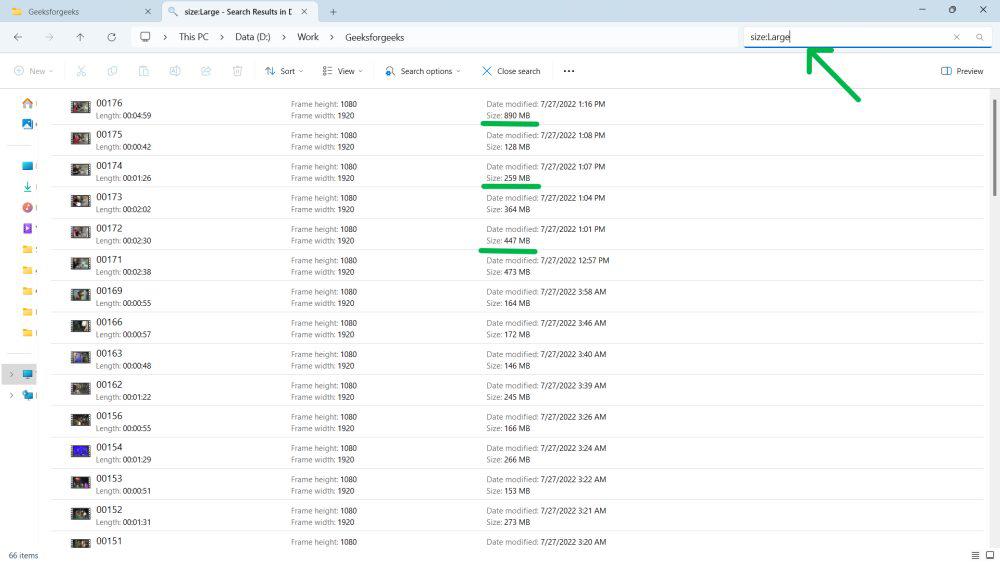
Step 3: Search by Size
- In the search bar, type size:Large (128MB-1GB), size:Huge (1GB-4GB), or size:Giganti c (>4GB).
Step 4: Sort the Files
- Sort by size ( View > Sort by > Size ) to see the biggest offenders first.
How to Find Large Files in Windows 11 by File Type
Step 1: Open File Explorer
- Open File Explorer (Windows Key + E).
Step 2: Go to Drive
- Navigate to the drive you want to search (e.g., C:).
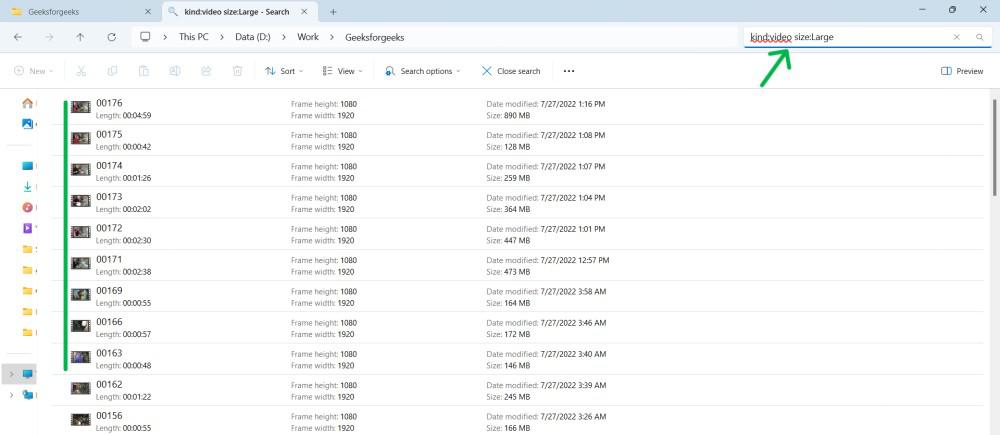
Step 3: Search for File
- In search bar, Type kind:video size:Large. This will show you all the video files that are larger than 128 MB.
Tip: Use file types for targeted searches: type *.iso for ISOs , * .mp4 for videos , etc.
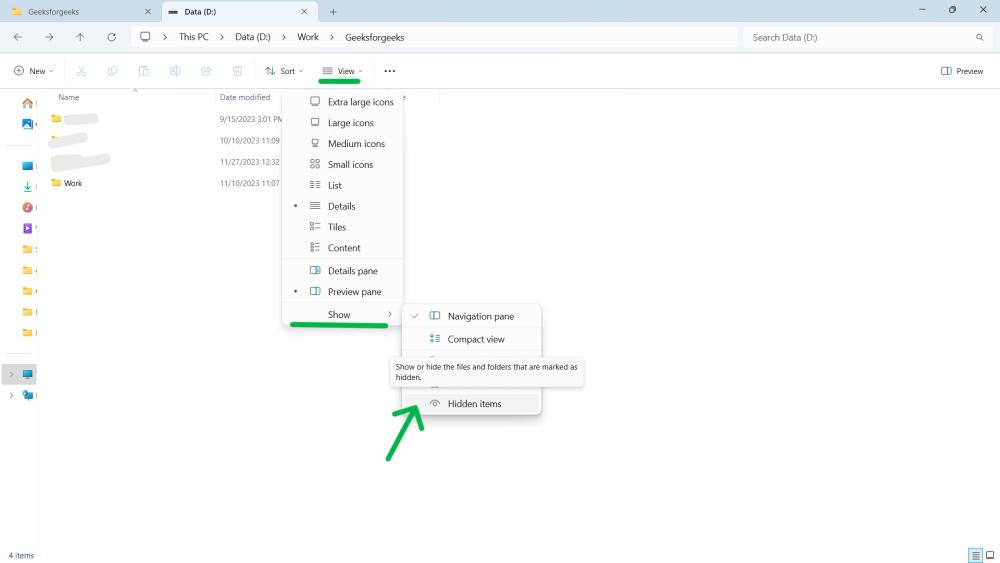
How to Use the Hidden Files Feature?
Click on the View tab, select Show from the dropdown menu and ensure that Hidden items is checked.
Method 2: How to Find Large Files on Windows 11 Using PowerShell
Step 1: Open PowerShell in WIndows
- Press Win + S then on search bar type «Windows PowerShell»
Step 2: Use Sort Command
- Type this command
gci -r| sort -descending -property length | select -first 20 name, length
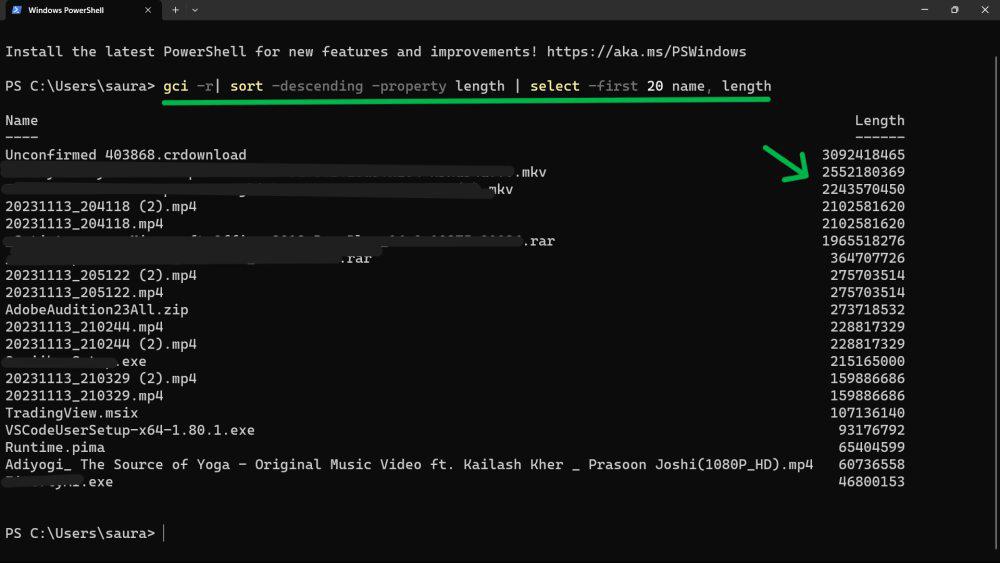
Command displays the 20 top files in descending order, replace 20 with the number of files to see.
To find by length use this command:
- Type Get-ChildItem-Recurse | Where-Object { $_.Length -ge 1073741824 } | Select-Object -ExpandProperty FullName to find files over 1GB .
- Adjust the 1073741824 value ( 1GB in bytes) to your desired size threshold.
Method 3: How to Find Large Files on Windows 11 Using Command Prompt
Step 1: Opne CMD
- Press Win + S then on search bar type » Command Prompt »
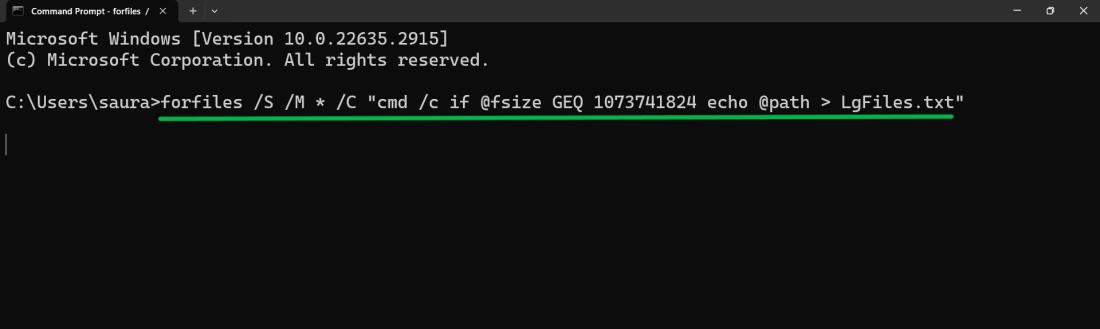
Step 2: Use FortFile Command
- Type this command
forfiles /S /M * /C «cmd /c if @fsize GEQ 1073741824 echo @path > LgFiles.txt
Replace size(bytes) with your desired size threshold in bytes (e.g., 1073741824 for 1GB).
Step 3: Check Large File
- Check the «LgFiles.txt» file for your identified large files.
Conclusion
Finding and managing large files on your computer doesn’t have to be a daunting task. By using the methods outlined in this guide, you can easily locate large files on Windows 11 and take control of your storage space. Whether you prefer using built-in tools or third-party applications, these Windows 11 large file search techniques will help you keep your system running smoothly and efficiently.
If you quickly want to free up memory space on your Windows machine, the best way to do that is to find large files on your Windows 10 PC and get rid of them if they’re no longer useful. The question though is how do you go about searching for large files on your computer?
Windows provides you with multiple ways to find all the large files that are stored in your drives. Either you can use the built-in tools on your machine to look for these files or you can grab a third-party app that will do the task for you. Either way, you’ll find the files that occupy a significant portion of your memory space.

Once such files are found, it’s then up to you what you want to do with them. If deleting them permanently isn’t something you’d like to do straight away, you can move them over to cloud storage or to an external hard drive.
Also, be sure to check out our YouTube video from our sister site Online Tech Tips where we go through some of the options mentioned below in this article.
Find Large Files In Windows 10 Using File Explorer
File Explorer comes with a lot of hidden features to let you organize, sort, and find files on your computer. One of its abilities is to help you find files that are of a specific size on your computer. Using this feature, you can locate those memory-hogging files and get them removed from your PC.

Before you do that, though, you’ll need to first enable the hidden files option. This is to ensure that Explorer looks for large hidden files in addition to searching for the normal files.
However, be cautious when dealing with hidden files. Most of the time, these are system and app-related files which, if you delete, will cause your apps to malfunction and even lead your entire system to crash. Before you delete anything, just make sure you know what it is and you’ll be fine.
Open the Start Menu and search for Show hidden and click on Show hidden files and folders.

When the dialog box opens, click on the View tab at the top. You’ll see various File Explorer options that you can modify.
Find the option that says Show hidden files, folders, and drives and put a checkmark in it. Then click on the OK button to save your changes.
Double-click on This PC on your desktop to launch File Explorer. When the utility launches, click on the search box given at the top-right corner.

A new menu item will be added to the top of your screen. Click on the newly added item that says Search to view further options.
Select the Size option and then select an appropriate option from the list. It’ll let you find large files available on your PC.

If what you consider as a large file isn’t available in the default menu, type in size:>1GB (replace 1GB with your size) in the search box and hit Enter. It’ll only look for files that are larger than your specified size.
When the search results appear, right-click anywhere blank and select Sort by followed by Size and Descending. This’ll ensure the largest file is shown at the top of the results.

Search For Large Files In Windows 10 With Command Prompt
If you’re more of a geeky person, you can use the Command Prompt utility to retrieve a list of all the files larger than a specified size value. The files list can be exported to a text file for you to then actually find those files on your machine.
Press Windows + R, type in cmd, and hit Enter to launch the utility.
When it launches, type in the following command and hit Enter. It’ll find all the files that are larger than 1GB in size. You can modify the value in the command so it finds files that you think are large.
forfiles /S /M * /C “cmd /c if @fsize GEQ 1073741824 echo @path > largefiles.txt

Open the newly created largefiles.txt file and it’ll have a list of all the large files sitting on your computer.

Use Largest Files Finder To Find Large Files On Windows 10
File Explorer and Command Prompt aren’t the only tools to find large files on your Windows 10 computer. There are a few third-party apps as well that can help you find such files.
Largest Files Finder is one of those apps that help you find the top 100 largest files on your computer. It claims to be only taking a minute to scan drives sized up to 200GB. Also, it doesn’t require any installation and works straight out of the box.
- Download and launch the app on your computer.
- Soon as it launches, it automatically starts searching for large files on your computer. When it’s done, you can review the results for yourself.

If you want to delete any files from the search results, you can do so with ease from within the app. Simply right-click on any of the files and select Delete.
Find Largest Files On Windows 10 With TreeSize Free
TreeSize Free has been around for quite a long time and it helps you find space hogging files on your Windows computers. It requires a small installation but then it works like a charm.
- Download, install, and launch the app on your computer. Make sure to run it with admin rights so it can search the folders that it can’t otherwise.
- You’ll see a tree of your folders along with the space they occupy on your screen. You can double-click on any folder to view its subfolders and their sizes.

You can then sort the directories by the Size column so that the largest files are always shown at the top.
It has a few customizable options as well should you want to use them. Feel free to play around with any options you think will make it easier to find large files on your computer.
Related Posts
- How to Fix a “This file does not have an app associated with it” Error on Windows
- How to Fix an Update Error 0x800705b4 on Windows
- How to Resolve “A JavaScript error occured in the main process” Error on Windows
- How to Fix the Network Discovery Is Turned Off Error on Windows
- How to Change Folder Icons in Windows
List of the best ways to find the largest files in Windows. Sort files from largest to smallest, and locate big files on a computer, hard drive, inside a folder, and all its subfolders or entire network.
List of the top methods to find the largest files:
- Find Largest Files on Computer, HDD (SSD), Folder, or Network
- Search Large Files in Windows Explorer
- Delete Huge Files in PowerShell
- Find and Remove Big Files Using the Native Windows Disk Usage Analyzer
- Eliminating Large Duplicate Files
Many new computers and laptops use fast SDD drives in order to reduce weight and improve performance. Those SSD drives are excellent, but to reduce cost the manufacturers put in small-capacity ones as they are pricey. SSD or eMMC drives usually have 256GB and can go as low as 32 GB. That is small and you may quickly run out of disk space on your system drive. Fortunately, you can follow the steps below to clear out unnecessary files and free up disk space. In the first example, we will use File Explorer ( Windows Explorer ) to locate large files. Take a look at the second example if you want to find the largest folders too.
You can be sure that you have huge files that you do not need and that still reside in a long-forgotten folder. Such files could be installation files of already installed applications, log files, temp files, and old Windows update files. Here’s how to find your largest files.
Find the Largest Files on a Computer, HDD (SSD), Folder, or Network
This is a simpler and way more versatile solution than using File Explorer. It requires installing a free tool. If you do not like installing applications it has a free portable version that you can use too. Download and install Folder Size
- Start the tool select the drive that you want to analyze and press the “Scan Selected Drive” button. It is the one with the green arrow next to the drive list. You can also use “Scan folder…” or “Scan multiple locations…”
- From the toolbar select the “Largest files” report.
- Click the drive or folder for which you want to view the largest files in the tree view on the left
- You will find all the largest files in the currently selected drive or folder listed in the right panel
- Review the files and delete the ones that you don’t need
Find the Largest Files
Largest Files Report
Largest Files Report
You can access the Largest Files Report from the toolbar. There you can choose the type of report for the details view. By default, the application displays the “Files and folders” report which is similar to the one of Windows Explorer but provides details for the sizes of the folders, the count of files and sub-folders inside, and many more. To activate the Largest Files report, click the arrow next to the currently active report and select “Largest files”.
The report in this mode looks like the one in the picture above but lists the top 100 largest files in the selected folder and all its sub-folders. The additional column displays the path for every file.
Selecting a different folder from the folders list on the left instantly updates the report with the largest files inside it. There is no need to scan anything further.
Search Large Files in Windows Explorer
You can find large files in Windows 11, 10, 8, or 7 using File Explorer only. You do not need to install any additional tools. Follow the steps below to get rid of big files that you don’t need. If you want a simpler and more flexible approach take a look at the next paragraph in which I provide a powerful free solution too. Probably you have noticed that folder sizes are not available in File Explorer. You can use a free Folder Size Explorer tool to view them.
Steps to Find Large Files
- Open File Explorer (aka Windows Explorer)
- Select “My Computer” or “This PC” to search your entire computer. If you only want to look at a drive or folder then click on them instead.
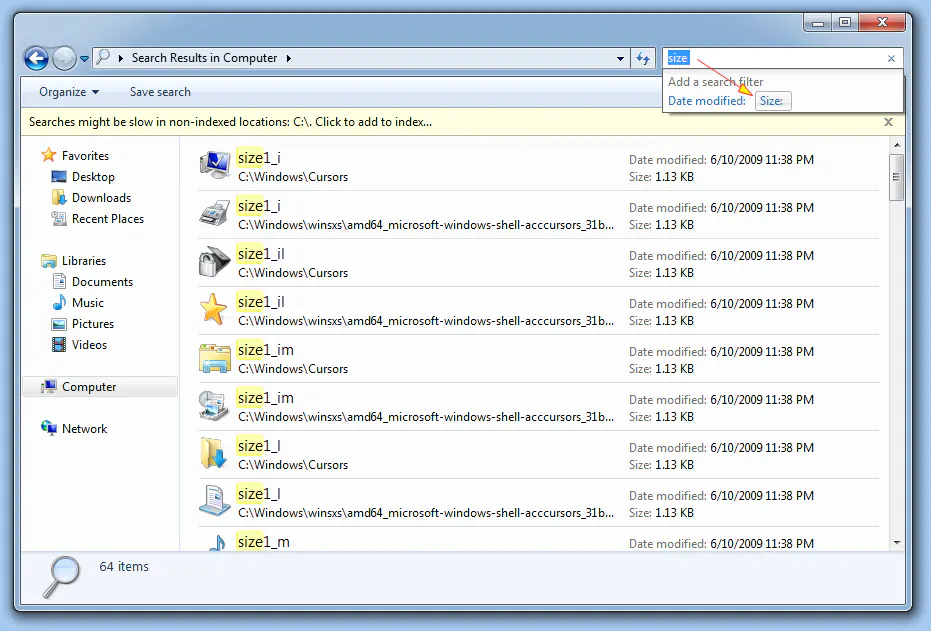
- Type “size:” in the search box.

Find Largest Files in Windows Explorer
- Select the sizes that you want to search for. You have the options to search for “Empty”, “Tiny”, “Small”, “Medium”, “Large”, “Huge”, and “Gigantic”. Select the “Gigantic” option to find the largest files first.
File Explorer Serch
You may have to wait a bit for File Explorer to search your whole computer. Wait until the green status bar at the top fills up. The search may take some time depending on the size and speed of your drive.
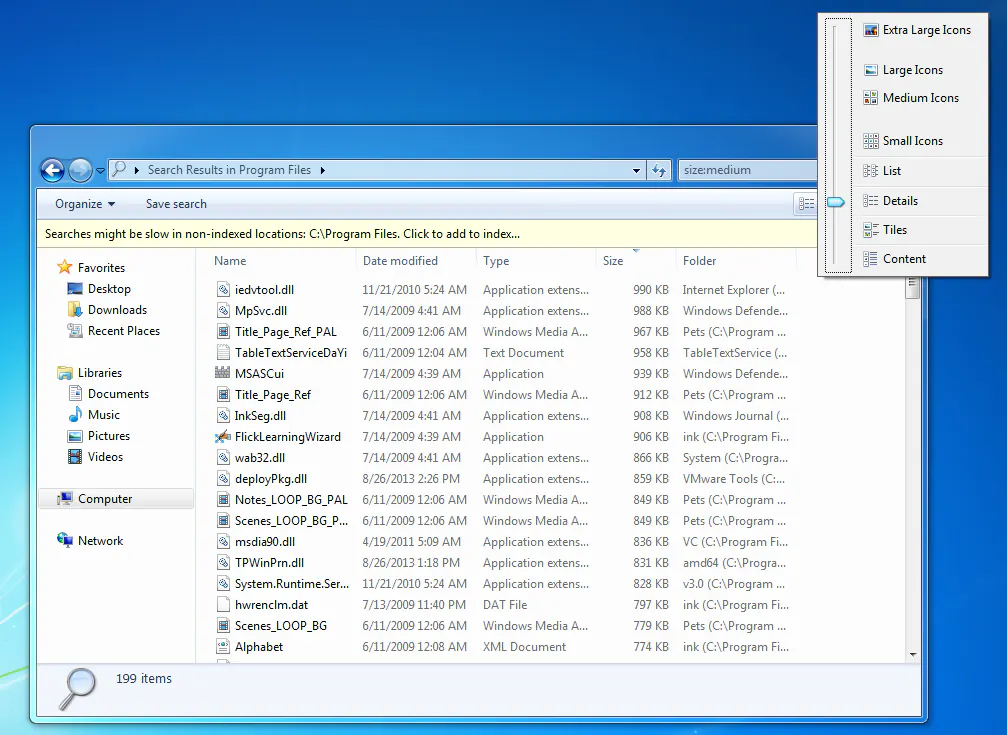
- Click the “Change View” icon at the top-right and select “Details”

Gigantic Files Details
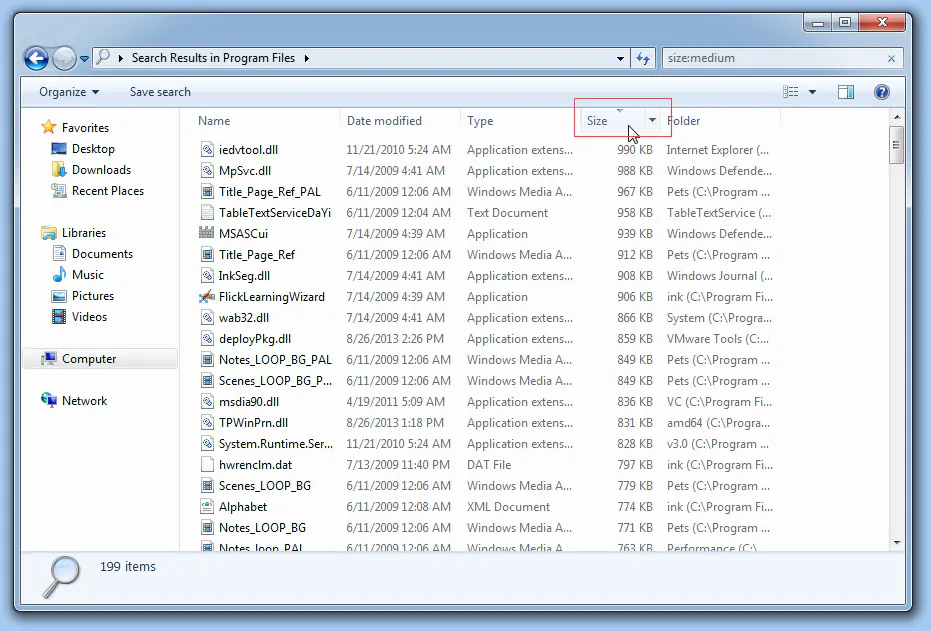
- Click the Size column to sort the files from largest to smallest.
Sort Files From Largest to Smallest
Review the Largest Files List
Look through the list of the largest files and delete the ones that you don’t need. Most important, be careful not to delete important files. Undoubtedly, if you are not sure about a file just Google it. Certainly, you don’t want to delete important data or break a program by deleting its files. Overall, things that you can safely delete are your files. Certainly, you can easily decide if you need them or not. For example, these are music, videos, photos, old documents, etc. Unquestionably, the other type of files that you can easily get rid of is the temp and log files. Those are usually .tmp, .log, .$$$, etc. Old application installer files are something that you don’t need either. You can easily spot them as they have an installer icon and a .exe extension.
Finding Large Files in File Explorer Verdict
While you can find large files in Windows Explorer, the feature is a bit clumsy. Certainly, the fact that you have to choose a size range like “Huge”, “Gigantic” etc. is a bit unpractical. Obviously, after you get rid of the “Gigantic” files, you have to perform a new search for the “Huge” files. Then you have to search again for “Large” files and so on. For this reason, follow the instructions in the next paragraph for a simpler and much more visually pleasing solution,
Delete Huge Files in PowerShell
Follow these simple steps to find large files using Windows PowerShell:
- Open PowerShell by clicking the Start button and typing PowerShell
- Use the CD command to navigate to the drive or folder that you want to search.
CD c:\your_folder - Execute the following command:
Get-ChildItem -re -in * |

?{ -not $_.PSIsContainer } |

sort Length -descending |

select -first 10 - Review the listed large files
The filter block “?{ -not $_.PSIsContainer }” is designed to exclude directories. Subsequently, the sort command will arrange all the remaining entries by size in descending order. Finally, the select clause will permit only the first 10 entries, ensuring that only the largest 10 are displayed.
You can use an even simpler variant of the above script: gci -r | sort Length -desc | select fullname -f 10
In conclusion, while utilizing Windows PowerShell to identify large files offers a powerful method, it’s crucial to approach it with caution. The command-line interface presents a direct and efficient means of sorting through files by size. However, it’s essential to recognize the potential risks associated with executing scripts in PowerShell. Operating within the console requires a level of familiarity with scripting and commands, as well as a meticulous approach to avoid unintended consequences, such as accidentally deleting critical data. Therefore, before executing any commands, ensure you have a thorough understanding of PowerShell scripting and exercise caution to prevent any inadvertent loss of important files.
Find and Remove Big Files Using the Native Windows Disk Usage Analyzer
Accessing the Disk Usage Analyzer
- Press the Windows key on your keyboard or click on the Windows icon in the taskbar to open the Start menu.
- Type “Disk Usage Analyzer” in the search bar and press Enter.
- Alternatively, you can navigate to Settings > System > Storage to access the Disk Usage Analyzer.
Analyzing Disk Usage
- Once you’ve opened the Disk Usage Analyzer, you’ll see a list of available drives on your system, along with their respective storage usage.
- Select the drive you want to analyze by clicking on it. The tool will begin scanning the selected drive to calculate its storage usage.
Viewing Large Files
- After the scanning process is complete, the Disk Usage Analyzer will display a breakdown of disk usage, showing the largest files and folders first.
- Look for sections labeled “Large Files” or similar, which typically list the biggest files on your disk. In the example below it is the option – “Large or unused files”.
- You can click on these sections to expand them and view more detailed information about individual files.

Windows Disk Space Analyzer Largest Files
Identifying Big Files
- Scroll through the list of large files to identify those consuming the most disk space.
- Pay attention to the file names, sizes, and locations to determine which files you may want to delete or move to free up space.
- You can also sort the files by size to quickly find the largest ones.
Managing Huge Files
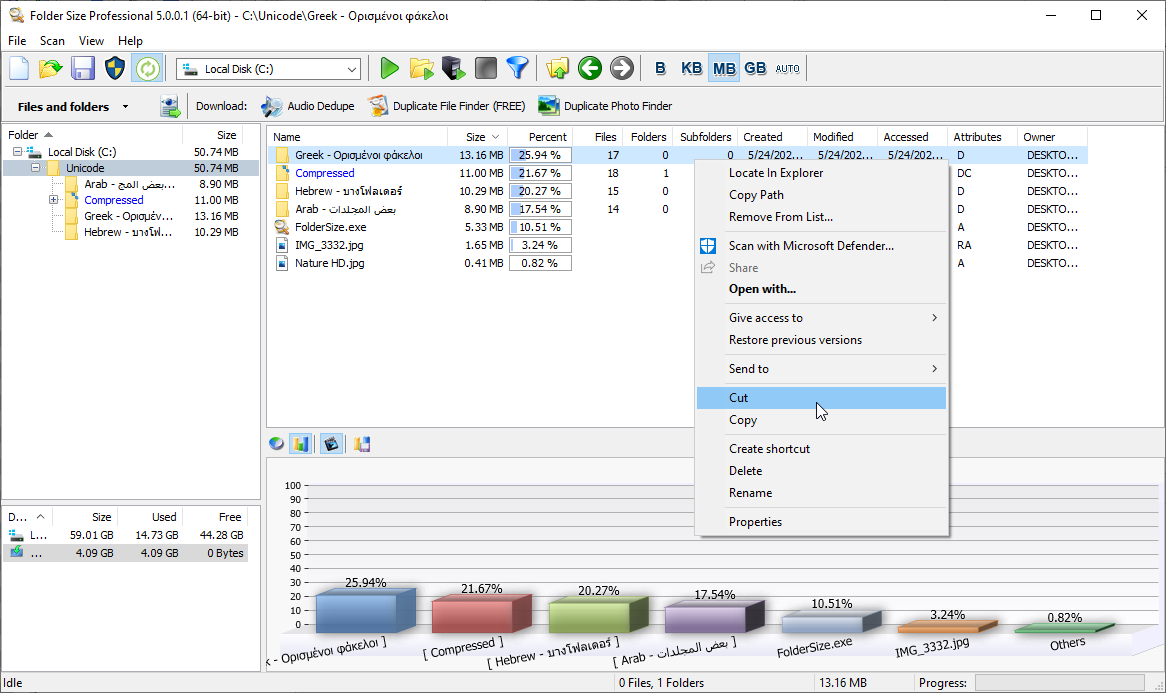
- Once you’ve identified the huge files that you no longer need, you can take action to manage them.
- Right-click on a file to access options such as delete, cut, copy, or move.
- Alternatively, you can open the file’s location in File Explorer to further examine its contents or perform additional actions.
Freeing Up Disk Space
- After deleting or moving extensively long files, you can check the Disk Usage Analyzer again to see how much space you’ve freed up.
- Repeat the process for other drives or folders as needed to optimize your disk usage and keep your system running smoothly.
Conclusion:
The native Windows Disk Usage Analyzer is a valuable tool for quickly identifying and managing large files on your computer. By following the steps outlined in this guide, you can efficiently locate big files, reclaim disk space, and maintain optimal performance for your Windows system.
Eliminate Large Duplicate Files
Remove Long Duplicate Documents and Files
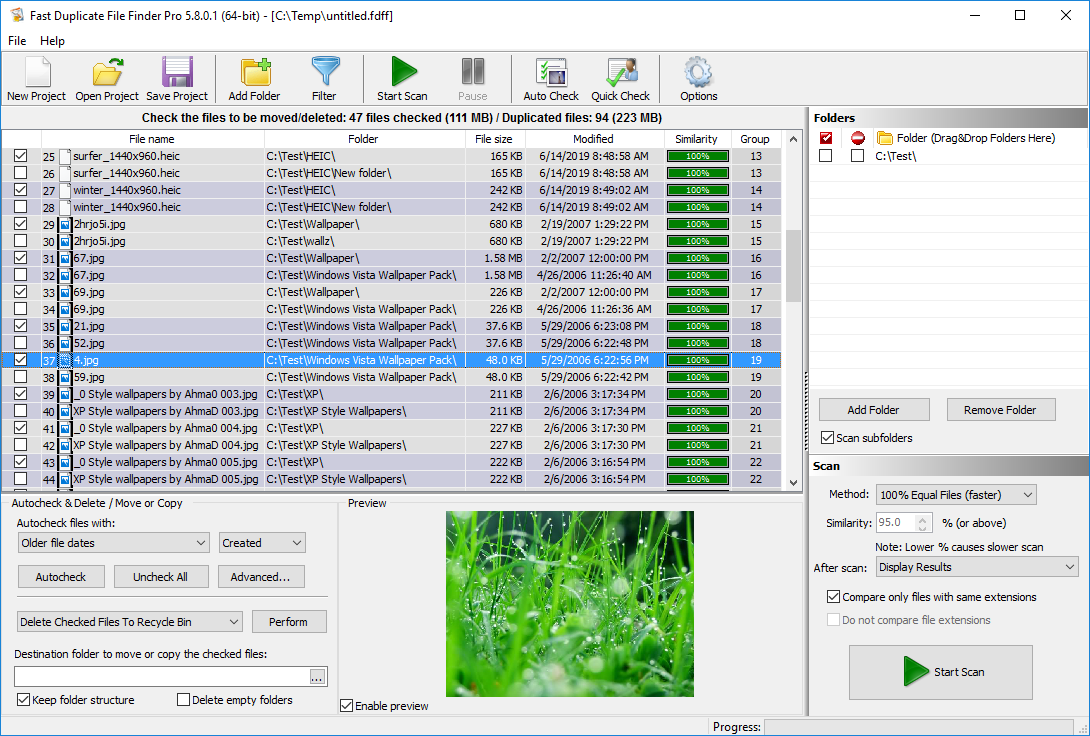
To free up additional disk space you can delete your duplicate files too. Use the Free Duplicate Finder to remove repeating files. That tool can find duplicate files even if they are in different locations and with different names. It can find similar documents and archives and also files with similar names. This is the winner of the best duplicate file finders list.
Duplicate Cleaner
Delete Lengthy Duplicate Photos in Your Image Library
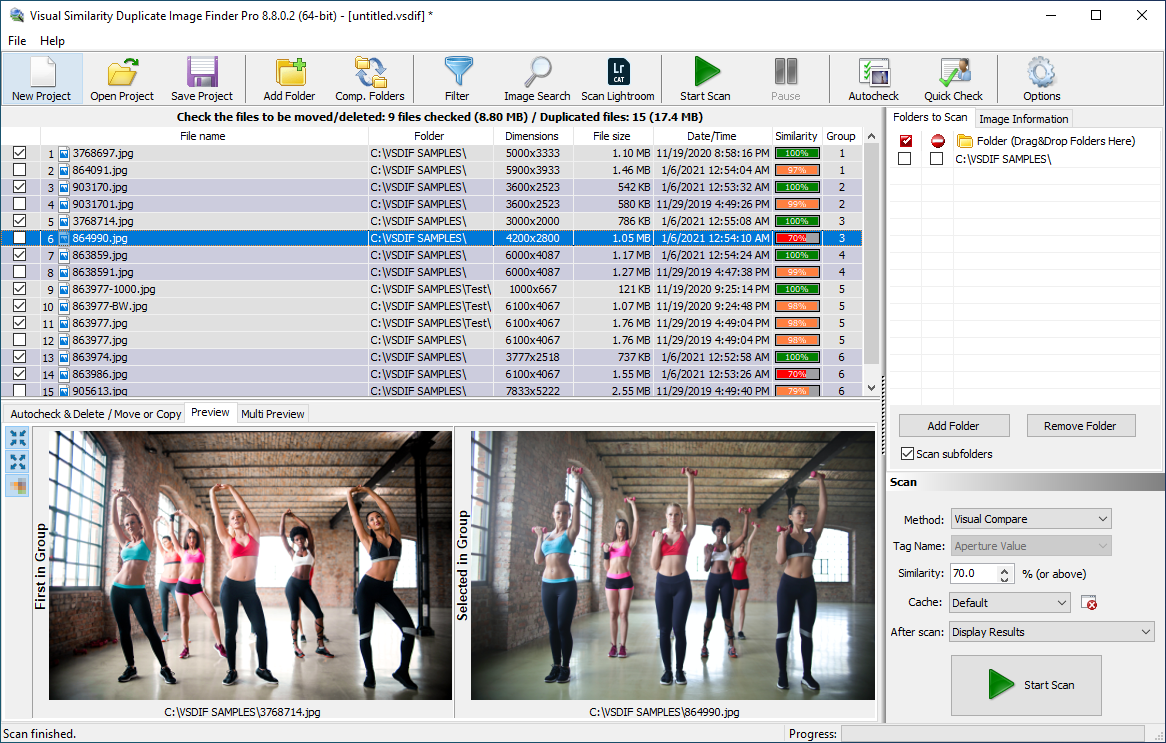
Undoubtedly, you should check your image library for duplicates too. Image files are quite large and occupy a lot of disk space. Unfortunately, the common duplicate finders can not find similar images. Please note that even if two photos are almost the same they are not duplicates – they are similar. Even if exactly the same photo is stored in different image formats, the common duplicate finders will not identify it. Therefore, You should use a dedicated tool like Visual Similarity Duplicate Image Finder for that. It is the number one choice in the list of the best duplicate photo finder tools.
Duplicate Image Finder
Eliminate Huge Duplicate Songs from Your Audio Collection
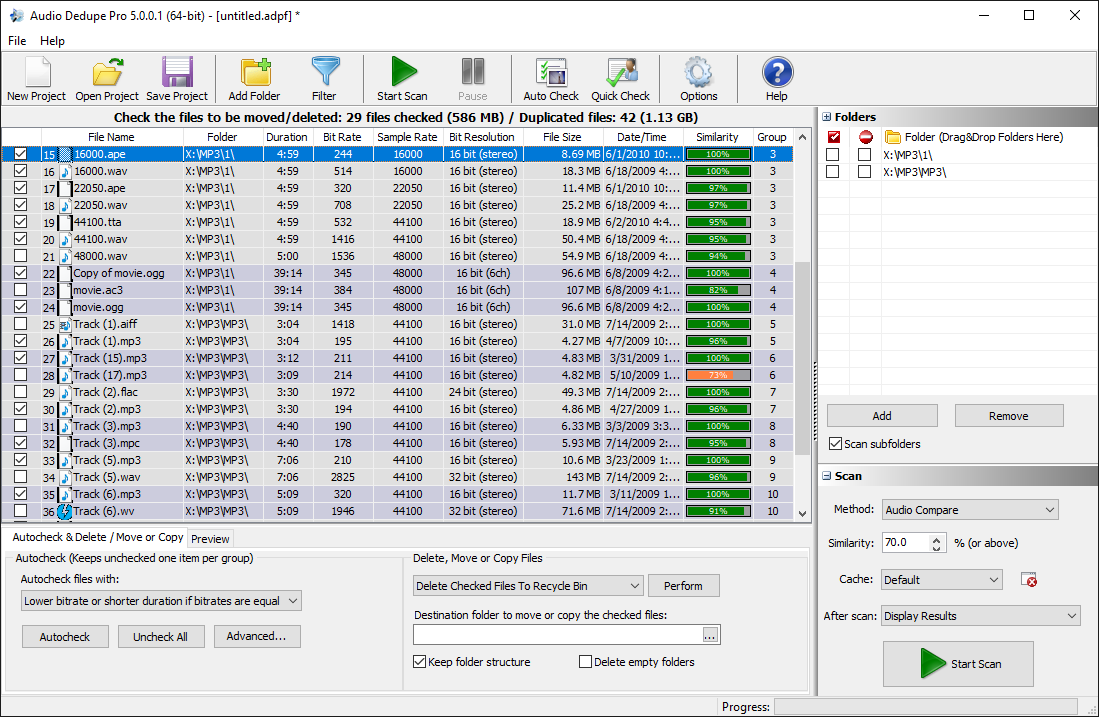
Finally, you should check your audio collection for repeating songs too. Similar to the example with the photos above, if a song is stored in different audio formats the common duplicate finders will not detect it. Audio Dedupe is a tool that can find similar and duplicate songs. It will listen to your songs in order to determine if they are similar or duplicate. Audio files are quite large so you can save a lot of disk space by deleting repeating songs.
Remove Duplicate Songs
Share this information with your friends and family. They will thank you for providing these tools that help with the free disk cleanup process.
Conclusion
In conclusion, we’ve explored the best methods to find large files on your Windows PC. Therefore, aiding in the optimization of disk space. Whether you’re using File Explorer, PowerShell, or dedicated tools like Folder Size, each approach offers its own advantages. You can choose one based on simplicity and functionality. However, it’s essential to exercise caution, particularly when working with PowerShell scripts. Those can lead to inadvertent deletions and could result in the loss of important data. Additionally, eliminating large duplicate files further enhances storage efficiency. Certainly, tools like Free Duplicate Finder and Visual Similarity Duplicate Image Finder streamline this process. By implementing these strategies, you can efficiently declutter your system. As a result, you will reclaim valuable disk space and ensure optimal performance for your Windows PC.
You are here
Occasionally, you may want to perform an advanced search to find large files somewhere on your computer. Choose a Windows version to get started.
Windows 10 (Similar to Windows 
Windows 7
Windows 10
1. To ensure that all files will display, first unhide hidden folders.
- Type «Show hidden» and click on the «Show Hidden Files and Folders» option.
- In the «View» tab of the window that opens, under «Files and Folders,» check «Show hidden files, folders, and drives.» Reverse this process when you’re finished.
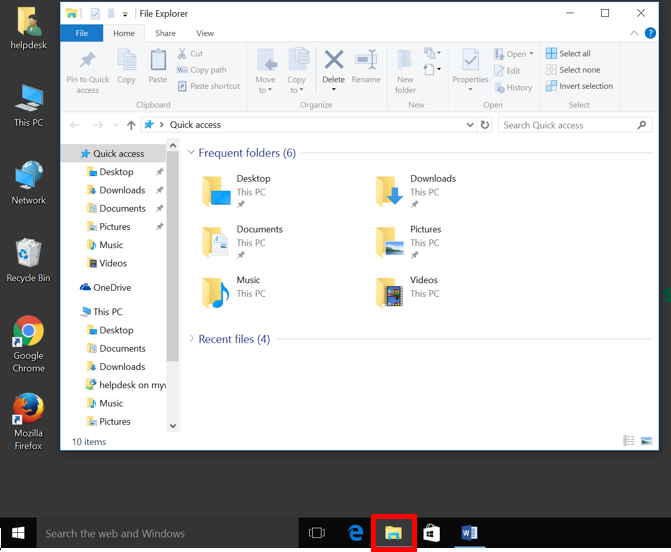
2. Open Windows Explorer by clicking the folder icon on your taskbar.
3. Locate the search bar in the upper right. When you click it, you’ll notice a new «Search Options» tab appear at the top of the window. This will give you advanced search options.
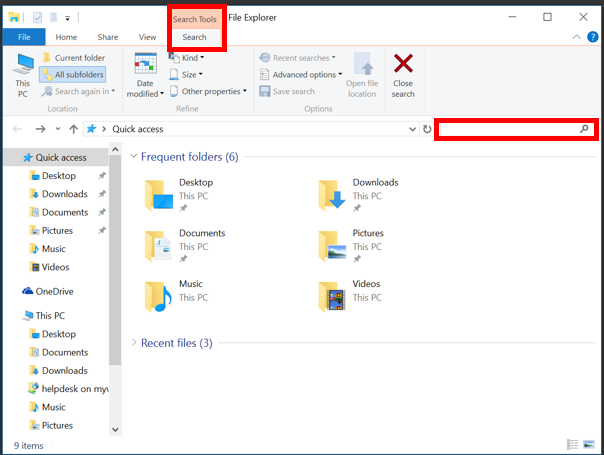
4. Click the «Size» drop-down menu and choose the file size range you’d like to search for.
Windows 7
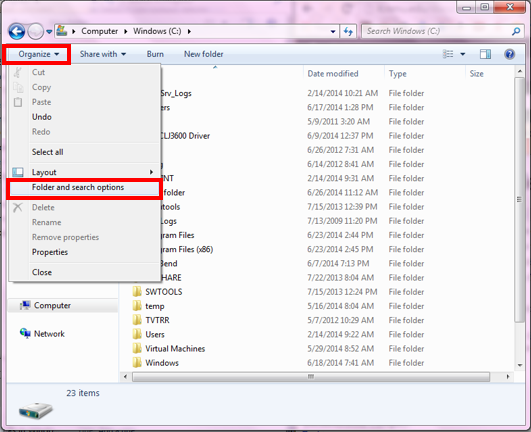
1. In the Start Menu, click the «Computer» option.
2. Click the «Windows (C)» drive to open it.

3. Click the «Organize» button in the upper left corner of the window and select «Folder and search options.»
4. Under the «General» tab, check the «Show all folders» checkbox.
4. Under the «View» tab, select the radio button «Show hidden files, folders, and drives.»
5. Click «Apply» then «OK.»
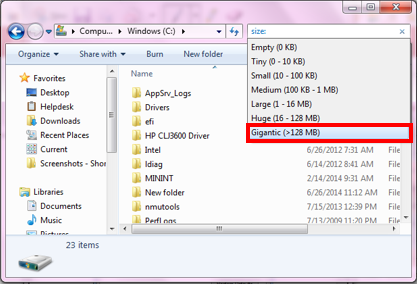
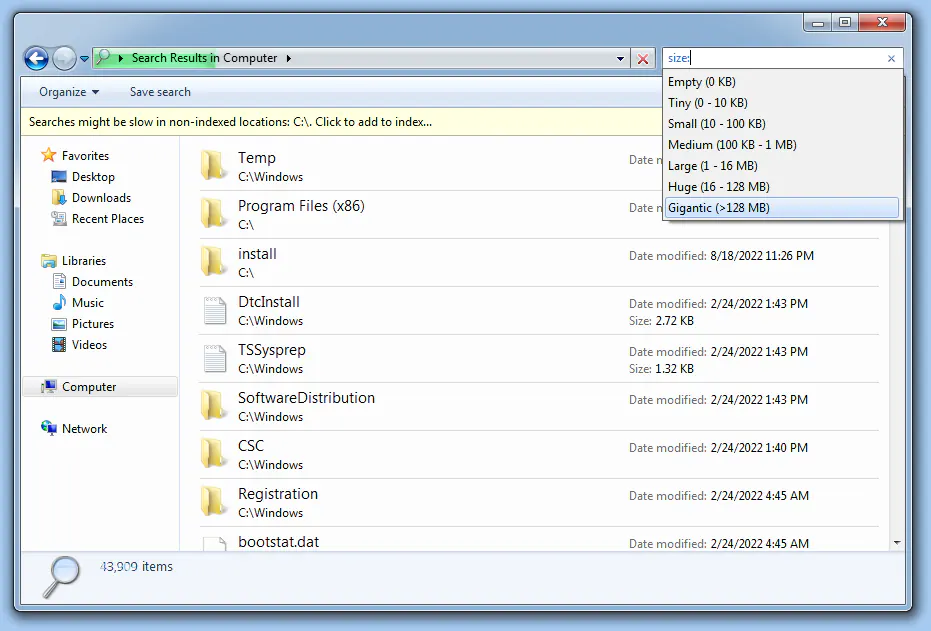
6. Make sure the «Windows (C)» drive is selected, and click in the search field in the upper right corner of the window, then click the «Size» link.
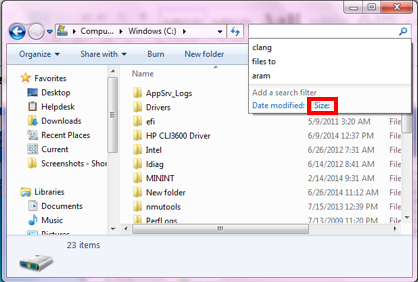
7. Click on «Gigantic (> 128 MB)» in the menu if looking for files of that size or larger. The search will take some time and show a green progress bar in the address field since it is searching the entire C: drive.