
Способ 1: Параметры системы
В параметрах Windows 10 есть специальный раздел, в котором можно не только активировать функцию «Ночной свет», но и изменить ее настройки. Об этом — далее по тексту:
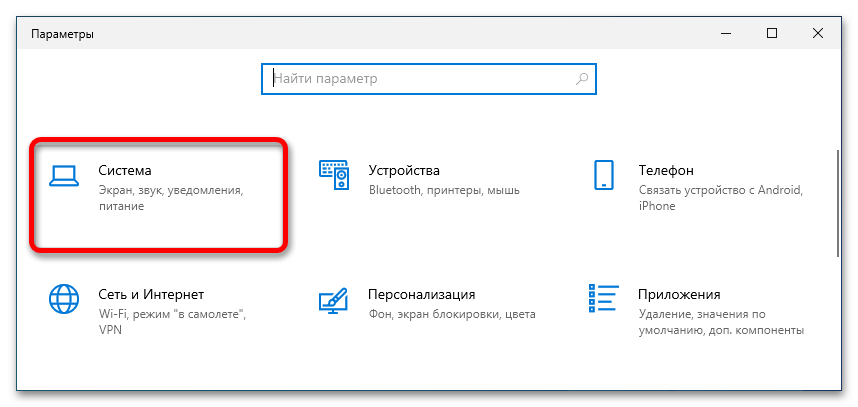
- Откройте окно «Параметров» любым доступным способом. Проще всего это сделать через контекстное меню кнопки «Пуск». Для этого щелкните по ней правой кнопкой мыши и выберите в списке опций соответствующий пункт.
Читайте также: Как открыть «Параметры» в Windows 10
- В появившемся окне проследуйте в раздел «Система», кликнув левой кнопкой мыши по соответствующему элементу меню.
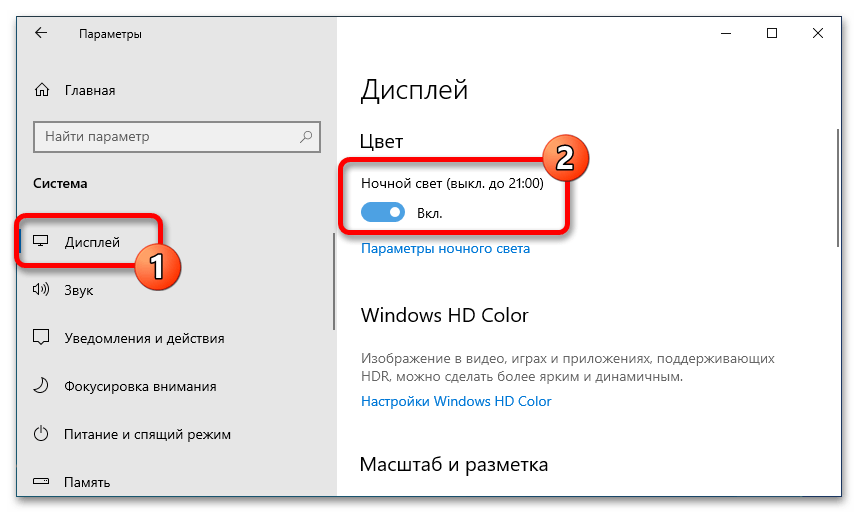
- Находясь во вкладке «Дисплей», активируйте функцию «Ночной свет», переведя ее переключатель в активное положение.
- При необходимости вы можете настроить работу этой функции. Делается это в специальном меню. Щелкните по ссылке «Параметры ночного света», чтобы открыть его.
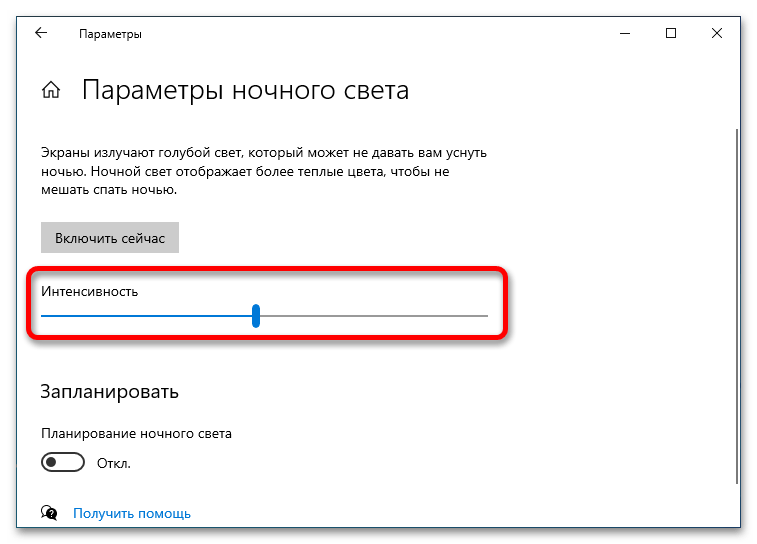
- Воспользуйтесь ползунком, чтобы настроить интенсивность «Ночного света». Чем ближе он будет находиться к левому краю, тем ниже будет его насыщенность.
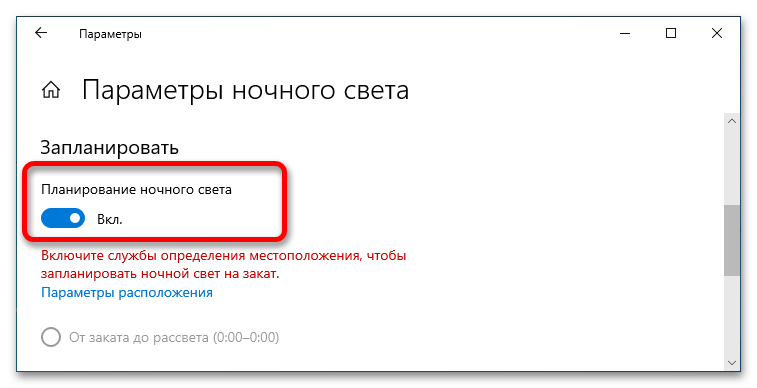
- Установите переключатель «Планирование ночного света», чтобы вручную можно было выставить часы, когда функция будет активироваться автоматически.

Если служба определения местоположения у вас активирована, можете выбрать значение по умолчанию — «От заката до рассвета».

В противном случае поставьте переключатель в положение «Установить часы» и из соответствующих выпадающих меню «Включить» и «Выключить» определите интервал, когда функция «Ночной свет» будет работать.


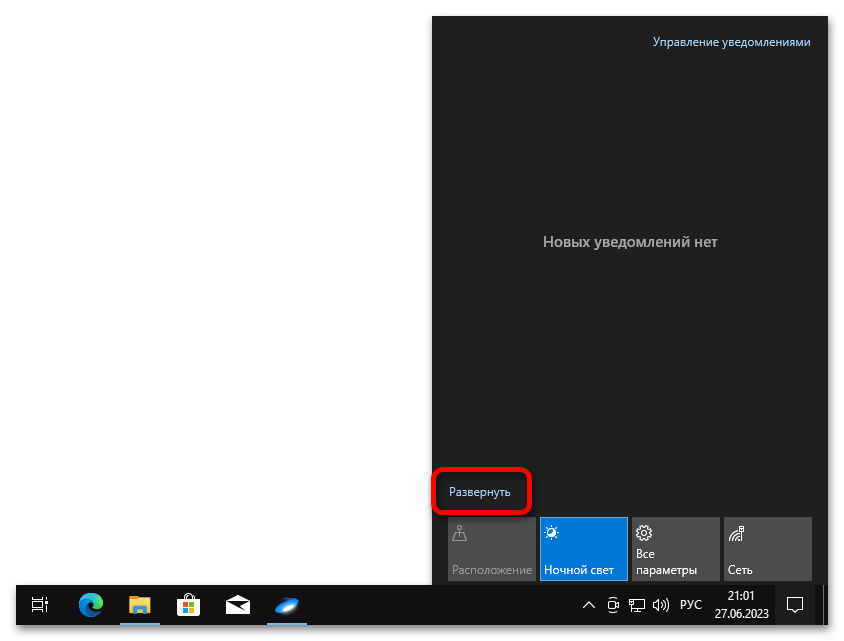
Способ 2: Панель уведомлений
Активировать функцию «Ночной свет» можно не заходя в параметры системы, а кликнув по соответствующему значку на панели уведомлений. Сначала разверните ее, нажав по иконке диалога в правой части панели задач, а затем в появившемся интерфейсе кликните по плитке «Ночной свет», чтобы активировать эту функцию.
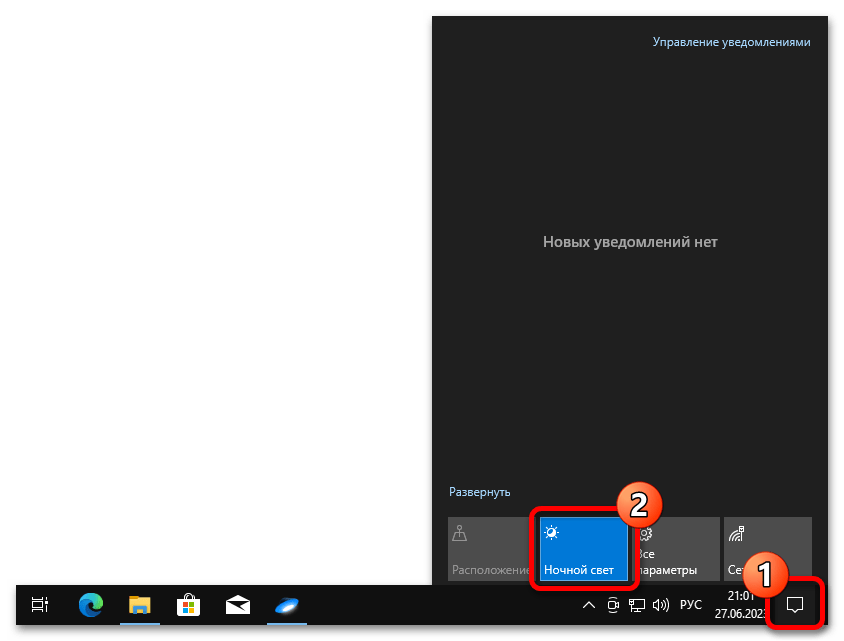
Если соответствующий элемент у вас отсутствует, тогда разверните весь список функций, нажав по строке «Развернуть».
Обратите внимание! Этот способ не позволяет настроить работу «Ночного света», а только активирует ее. Но достаточно единожды задать параметры в настройках системы, чтобы они применялись в обоих способах активации функции.
Наша группа в TelegramПолезные советы и помощь
Applies ToPrivacy Windows 11 Windows 10
В Windows наличие средства отслеживания глаз в составе устройства или системы позволяет управлять компьютером только глазами, наслаждаться более иммерсивными игровыми впечатлениями, помогать людям с трудностями чтения и многое другое. Некоторые приложения и службы запрашивают разрешение на доступ к устройству отслеживания движений глаз, и вы всегда можете контролировать, каким приложениям предоставляется доступ к нему, в параметрах Windows.
Корпорация Майкрософт хочет сообщить вам об этих новых возможностях отслеживания глаз, чтобы вы могли решить, подходят ли они вам при использовании устройства с Windows. На этой странице описываются доступные вам параметры устройства отслеживания движения глаз и то, как они работают.
Выбор приложений, которые могут получать доступ к устройству отслеживания взгляда
В Windows 11
-
Перейдите в раздел Пуск > Параметры > конфиденциальности & безопасности > eye tracker.
-
Убедитесь, что включены параметры Разрешить доступ к eye tracker на этом устройстве и Разрешить приложениям доступ к вашему средство отслеживания глаз .
-
Убедитесь, что включены отдельные параметры для приложений и служб, которые вы хотите использовать.
В Windows 10
-
Перейдите в раздел Пуск > Параметры > Конфиденциальность > eye tracker.
-
Убедитесь, что параметры Разрешить доступ к eye tracker на этом устройстве и Разрешить приложениям доступ к вашему средство отслеживания глаз включены.
-
В разделе Выберите приложения, которые могут получить доступ к вашему средство отслеживания глаз, убедитесь, что включены отдельные параметры для приложений и служб, которые вы хотите использовать.
Примечания:
-
Когда приложению требуется получить доступ к устройству отслеживания движения глаз впервые, оно запрашивает разрешение. Если вы предоставите приложению разрешение, но позже передумаете, вы можете отключить доступ этого приложения к eye tracker, выполнив описанные выше действия.
-
Некоторые приложения могут не работать должным образом, если вы заблокируете их доступ к устройству отслеживания движения глаз на вашем устройстве.
Исключения для параметров конфиденциальности устройства отслеживания движения глаз
Если приложение обращается к средству отслеживания глаз с помощью службы, которая отличается от той, которая предоставляется Windows, оно не будет отображаться в списке приложений на странице Eye tracker и не будет зависеть от параметра Eye tracker на устройстве. Чтобы разрешить или заблокировать подобное приложение, измените параметры в приложении, если оно доступно, или удалите приложение.
Нужна дополнительная помощь?
Нужны дополнительные параметры?
Изучите преимущества подписки, просмотрите учебные курсы, узнайте, как защитить свое устройство и т. д.
If you spend a lot of time staring at computer screens, you might want to enable Eye Protection in Windows 10. This feature is designed to reduce eye strain by filtering out blue light. Blue light can cause problems for your eyes, including blurred vision and headaches.
By enabling Eye Protection, you can help protect your eyes from these effects.
To enable Eye Protection, open the Settings app and go to System>Display. Scroll down to the “Advanced display settings” section and click on “Color filters”.
Select “On” from the drop-down menu and then choose “Eye Protection”. Your screen will now be filtered to reduce blue light exposure.
✅How to Reduce Blue Light with Windows 10 – Protect your eyesight!
- 1) Open the Settings app by clicking on the Start Menu and then selecting the gear icon
- 2) Click on System
- 3) Select Display from the left menu
- 4) Scroll down to the “Advanced display settings” section and click on “Color filters”
- 5) Select “On” under Eye Protection
- This will enable Windows 10’s built-in eye protection feature which will help reduce eye strain caused by staring at a screen for too long
Blue Light Filter Windows 10
If you spend a lot of time staring at screens, you may have noticed some eye strain or fatigue. That’s because the blue light emitted by most electronics is pretty harsh on our eyes. But there’s an easy fix: blue light filters.
Blue light filters reduce the amount of blue light that reaches your eyes, making it easier to look at screens for long periods of time. They’re built into many devices these days, including phones, tablets, and computers. And Windows 10 has a built-in blue light filter that you can enable with just a few clicks.
Here’s how to enable the blue light filter in Windows 10:
Open the Settings app by pressing the Windows key + I on your keyboard.
Click “System.”
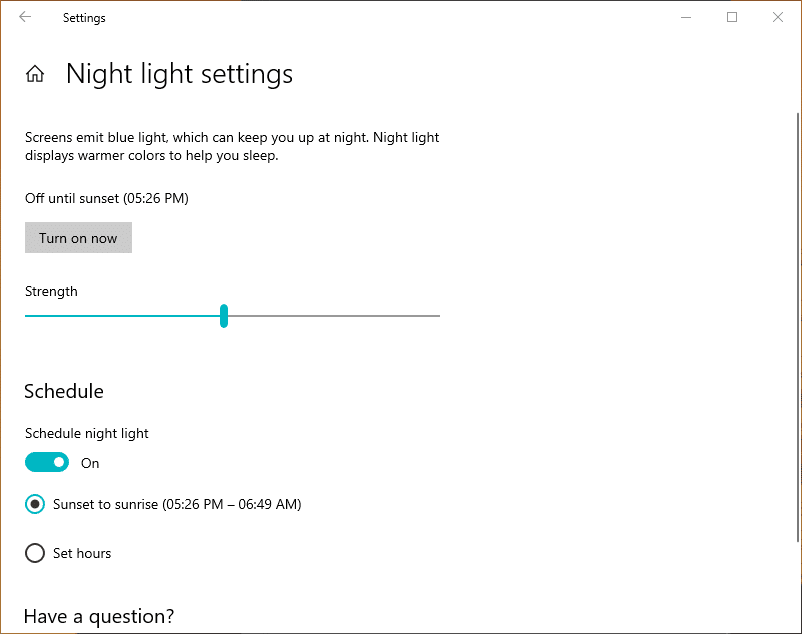
Under “Display,” scroll down and click “Night light settings.”
If you don’t see the “Night light” option here, your computer doesn’t support this feature and you’ll need to use third-party software instead (more on that below).
Turn on Night Light by moving the slider to the right.
You can also schedule when Night Light should turn on and off automatically.
And that’s it! Now your screen will emit less blue light in the evenings, making it easier on your eyes.
Night Mode Windows 10
Assuming you are referring to the Night Light setting in Windows 10:
Windows 10 has a built-in feature called Night Light that reduces the amount of blue light emitted from your screen at night. This can help you sleep better and reduce eye strain.
To turn on Night Light, go to Settings > System > Display. Under “Brightness and color,” move the slider to the left to make your screen less bright. Then, under “Night light,” select Turn on now or Schedule night light.
If you’re like most people, you probably have your computer’s “eye protection” feature turned on. This is the blue light filter that’s designed to reduce eye strain and fatigue. But what if you want to turn it off?
Here’s how:
1. Go to Start > Settings > System > Display.
2. Scroll down to the “Advanced display settings” section and click on “Color management.”
3. Click on the “Advanced tab.”
4. Under “Device profile,” select the “sRGB IEC61966-2.1” option and click “Apply.”
5. Close the window and enjoy your eye-strain-free experience!
Blue Light Filter Windows 10 Multiple Monitors
If you work at a computer all day, you may want to consider using a blue light filter. Blue light can be harmful to your eyes and can cause eye strain. It can also disrupt your sleep if you are exposed to it before bed.
There are a few different ways to reduce the amount of blue light that your monitor emits. One is to use a blue light filter. These filters attach to the front of your monitor and help to block out some of the blue light.
Another option is to change the color temperature of your display. This can be done in the settings menu on most monitors. By reducing the color temperature, you will also be reducing the amount of blue light that is emitted.
If you have multiple monitors, you may want to consider using a blue light filter on just one of them. This way, you can still have access to all of your information without being bombarded by blue light all day long.
Blue Light Filter Windows 11
Windows 11 has a blue light filter that can be turned on in the settings. This will help reduce the amount of blue light that is emitted from the screen, which can be harmful to your eyes. The filter can be customized to your preference, and you can also set it to turn on automatically at certain times of the day.
Credit: fossbytes.com
How Do I Protect My Eyes on Windows 10?
If you frequently use computers, it’s important to take steps to protect your eyes. Here are some tips for reducing eye strain when using a Windows 10 computer:
1. Adjust your display settings.
You can change the size, contrast and brightness of your screen to make it more comfortable to look at. To do this, go to Start > Settings > System > Display.
2. Take frequent breaks.
Every 20 minutes or so, look away from your screen and focus on something else at least 20 feet away for 20 seconds. This will help reduce eye fatigue.
3. Use artificial tears if your eyes feel dry.
Over-the-counter artificial tears can help relieve dryness and discomfort caused by staring at a screen for long periods of time.
4. See your doctor if you have persistent symptoms of digital eye strain, such as headaches, blurry vision or excessive tearing.
Does Windows 10 Have Eye Protection?
Windows 10 does have eye protection in the form of Night Light. Night Light is a feature that reduces blue light emissions from your screen in order to help you sleep better at night. Blue light can interfere with your body’s natural circadian rhythm and make it harder to fall asleep.
Night Light filters out the blue light, making it easier for you to sleep.
How Do I Turn on the Blue Light Filter in Windows 10?
You can turn on the blue light filter in Windows 10 by following these steps:
1. Open the Settings app. You can do this by clicking the Start button and then selecting the “Settings” option.
2. Click on the “System” icon. This will take you to the main settings page for your system.
3. Select “Display.”
This will take you to the display settings page.
4. Under the “Brightness and color” section, you’ll see an option for “Night light.” Click on it to expand the options.
5. Make sure that the toggle next to “Night light” is set to On.
6. Now, under the “Schedule night light” section, you can choose when you want the filter to be active. By default, it is set to come on automatically from sunset to sunrise; however, you can also manually set specific hours or have it always on if you prefer.
Is There a Blue Light Filter on Pc?
Most PCs do not come with a blue light filter pre-installed. However, there are many free and paid programs that can be downloaded in order to add this feature. Blue light filters work by blocking out some of the blue light that is emitted from screens.
This can help reduce eye strain, fatigue, and even insomnia.
Conclusion
If you’re looking for a way to protect your eyes from the harmful blue light emitted by your computer screen, you can do so by enabling eye protection in Windows 10. Here’s how:
1. Open the Settings app and go to System > Display.
2. Scroll down to the “Night light” section and click the toggle switch to turn it on.
3. By default, Night light will automatically turn on at sunset and off at sunrise, but you can also manually set it to come on at a specific time by clicking the “Schedule” button.
4. If you want more control over when Night light is enabled, click the “Advanced options” link.
From here, you can set custom color temperature and brightness levels, as well as have it come on based on your current location (which is handy if you travel often).
Ever felt the problem of watery eyes when you work on your laptop screen for long hours? That’s because your eyes get strained due to the blue light when you keep looking at a computer screen. That’s a common problem faced not only on computer screens but on smartphones as well. To tackle the problem, a software feature called the blue light filter exists on Windows 10.
Microsoft added the Windows 10 blue light filter back in 2016. The feature adjusts the color temperature of your screen to decrease the amount of blue light coming out of it.
The goal is to address the problem of people having eye strains, and sometimes headaches while using their computers. In later updates of Windows 10, Microsoft has started calling the feature Night Light. For the uninitiated, the eye saver mode in Windows 10 can be found while digging the Settings app.
Now, before going ahead and discussing it further, let me tell you the need for options/programs to decrease the blue light. “Can’t I just decrease the brightness and reduce the strain?” – You’d ask.
Even after decreasing the brightness, blue light emissions from the screen are still high enough to swell your eyes with water. There’s a receptor cell named Melanopsin beside rods and cones in our retina. Melanopsin is blue light sensitive. Well, I think that’s enough biology, let’s tell you about the Blue Light Settings in Windows 10.
How to enable the Blue Light filter on Windows 10?
Windows 10 Blue Light Filter setting is very easy to set up and use. This means that it comes with a cleaner and fewer configuration options. You get the option to adjust the screen’s color temperature automatically, toggling it on and off, and set personalized hours.
To enable the Blue Light filter in Windows 10, you need to follow these steps:
- Simply open the Settings app on your Windows 10 PC. Now, navigate to the System > Display page.
- Near the top, you’ll find a Night Light toggle below the Colour tab. Now, turn this toggle to On.
- After enabling Windows 10 Blue Light filter, you need to click on Night light settings for further options.

- The Blue light settings page tells you that displays emit blue light, and Windows 10 can show warmer color to make it easier to sleep at night. Here, click on the Turn on now button if you haven’t done it already.
- After that, you can find the slider option to set the color temperature or strength of the blue light filter in Windows 10.
If you go all the way to 100%, your PCs screen will turn dark orange. So, it’s recommended to keep the strength near 50%.
- Furthermore, you can also schedule the Night Light feature to automatically kick in as the sun sets in your regions (requires you to enable location permissions).
- If you want, you can set custom hours for the Night Light feature to work.
So, guys, this how you can enable the blue light filter in Windows 10 and save your eyes. Now, if you don’t want to tweak any settings, you can also enable and disable the Night Light feature directly from the Action Center.

How to enable the blue light filter in Windows 7?
Microsoft’s old offerings, including Windows 7, Windows 8/8.1, don’t have any sort of eye saver mode built-in. But this doesn’t mean you can’t do anything about it.
You can download this highly useful app called F.lux that enables the blue light filter for PC running the older Windows versions. The app comes loaded with various features, including presets, color filters, to customize the blue light filter as per your needs.
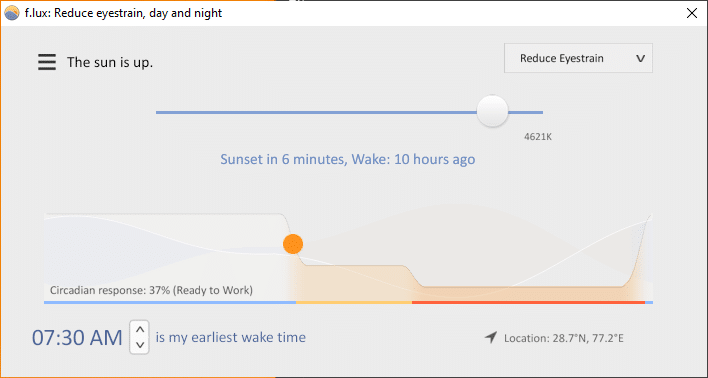
You can also disable the filter for specific apps. For instance, when you’re editing images in Photoshop or Lightroom. The change in color temperature might affect your edit drastically.
Anyway, it’s a great tool, and you can even use it on your Windows 10 machine as well.
Did you find this Windows 10 tip interesting? Don’t forget to tell us your views and comments.
Also, check out our article on How To Fix Windows 10 Brightness Control Not Working Issue in detail here!
Frequently Asked Questions
1. Is blue light harmful?
Yes, blue light emitted from screens can prove to be harmful in the long term.
2. What is a blue light filter?
A blue light filter is a screen overlay that decreases the amount of blue light coming from a screen.
3. Is blue light filter good for eyes?
If you tend to have a lot of screen time, or use devices in a dark environment, blue light filter can prove to be quite useful.
Fossbytes co-founder and an aspiring entrepreneur who keeps a close eye on open source, tech giants, and security.
Get in touch with him by sending an email — [email protected]