
Learn what the file attribute letters in Windows and File Explorer attribute columns mean. Discover relations between file permssions and file attributes. We have listed everything about file attributes in Windows, DOS, and other operating systems.
- What Are File Attributes?
- File Attributes in Windows Explorer and Folder Size
- List of All File Attributes
- How are file attributes related to file permissions?
What Are File Attributes?
File attributes are specific properties assigned to files and folders within an operating system. They define their behavior and how the system and applications handle them. These attributes are flags or settings that control various aspects of a file’s accessibility, visibility, and functionality. Understanding file attributes is essential for anyone managing files on a computer. They can significantly impact how files are used, displayed, and protected.
File attributes are crucial in file management, security, and system performance. They help protect important data, optimize storage, and control how files are accessed and displayed. By understanding and properly managing file attributes, you can ensure that your files are used effectively.
Attributes can be modified manually through the file properties dialog in Windows or via command-line tools like attrib. Properly configuring file attributes allows you to tailor the behavior of your files to your needs. Whether you’re ensuring the security of sensitive information or optimizing the storage of large files.
File Attributes in Windows Explorer and Folder Size
File attributes play a vital role in how files are managed, displayed, and secured on your system. They help you understand more about each file’s properties, such as whether it’s hidden, read-only, compressed, or encrypted. These attributes are usually represented by specific letters (such as R for Read-Only, H for Hidden, and S for System). They can be viewed in file management tools like Windows Explorer and the MindGems Folder Size tool.
Understanding File Attributes in Windows Explorer
In Windows Explorer, file attributes are typically displayed in the attributes column. You can quickly see which files are marked with specific properties. For example:
R = Read-Only: Indicates files that cannot be modified or deleted without changing the attribute.
H = Hidden: Marks files that are not visible by default in Explorer.
S = System: Flags essential system files that should not be altered.
A = Archive: Used to mark files that have changed since the last backup.
However, while Windows Explorer provides basic visibility into file attributes, it does have limitations. By default, it does not display hidden and system files. That can make it difficult to get a complete picture of what’s stored on your system. To view these files, you must adjust the settings. Set “Show hidden files, folders, and drives” and uncheck “Hide protected operating system files.”. Even then, navigating through and managing these files can be cumbersome.
The Power of Folder Size for Viewing File Attributes
The MindGems Folder Size tool offers a more robust and comprehensive solution for managing and viewing file attributes. Unlike Windows Explorer, Folder Size allows you to view all file attributes without needing to change any settings. This tool provides a complete view of your files, including hidden and system files. That is crucial for thorough file management and maintenance.

File Attributes in Windows
Here’s why Folder Size is superior to Windows Explorer when it comes to handling file attributes:
Comprehensive Attribute Display
Folder Size lists all file attributes in a clear and accessible manner. Whether a file is hidden, a system file, or has other specific attributes, Folder Size makes it easy to see and manage these properties. The tool ensures that no file is overlooked, giving you full control over your data.
Advanced Filtering and Sorting
With Folder Size, you can filter and sort files based on their attributes. This feature is particularly useful for identifying and managing files that might be hidden or compressed. That helps you optimize your storage space more effectively. Sorting files by attributes allows for quick identification of files that require special attention. Such are those that are system-critical or potentially taking up unnecessary space.
Detailed File Information
Folder Size goes beyond just listing file attributes. It provides in-depth details about each file, including size, date modified, and file type, all in one interface. This comprehensive overview helps you make informed decisions when managing your files. That is especially true when it comes to freeing up space or securing sensitive data.
User-Friendly Interface
The Folder Size tool is designed to be intuitive and easy to use. It is easy even for those who may not be familiar with more advanced file management techniques. The visual representation of file and folder sizes is very helpful. Combined with the clear display of attributes, makes it simple to navigate through your data. As a result, identify where space is being used.
Real-Time Updates
As you manage your files, Folder Size provides real-time updates, ensuring that the information you see is always current. This feature is essential for keeping your system organized. Also for quickly responding to changes, such as new files being added or old ones being deleted.
System Performance Optimization
By providing a clear view of all file attributes, including those that Windows Explorer might hide, Folder Size allows you to better optimize your system’s performance. For example, identifying and managing large compressed files, or recognizing system files that shouldn’t be modified, can help prevent system slowdowns and ensure that your disk space is being used efficiently.
Why Choose Folder Size Over Windows Explorer?
While Windows Explorer is a basic tool that comes with every Windows installation, it falls short in several areas when it comes to advanced file management. Folder Size, on the other hand, is designed specifically to address these shortcomings:
Visibility: Folder Size gives you full visibility into all files, including those that are hidden or system-protected, without requiring any configuration changes.
Efficiency: The ability to sort, filter, and view detailed file information in one place saves time and makes file management more efficient.
Space Management: By understanding file attributes and their impact on storage, you can better manage disk space, particularly when dealing with large volumes of data.
Security: Folder Size helps you keep track of important files and their attributes, ensuring that sensitive data is properly encrypted or protected from unauthorized changes.
In summary, while Windows Explorer offers basic file management capabilities, it lacks the depth and flexibility required for more advanced tasks. The Folder Size tool by MindGems provides a powerful alternative, offering a complete view of your files and their attributes, along with the tools you need to effectively manage and organize your data. Whether you’re looking to optimize disk space, secure sensitive information, or simply keep your system running smoothly, Folder Size is the ideal solution.
Download: Folder Size
List of All File Attributes
File attributes can vary depending on the operating system, but in Windows, some of the most common attributes include:
R = Read-Only:
When a file is marked as read-only, most programs won’t allow it to be deleted or altered. This is fairly straightforward. For example, if you attempt to delete a read-only file in DOS, you’ll receive an “Access denied” message. However, Windows Explorer might still delete it without any issues. Some programs take a middle-ground approach. They’ll permit you to modify or delete the file, but only after confirming that’s what you want to do.
H = Hidden:
This attribute is also straightforward—files marked as hidden won’t be visible under normal circumstances. For instance, when you use the “DIR” command in DOS, hidden files won’t show up. You have to use a specific flag, as shown in the earlier example.
S = System:
This attribute flags files that are essential to the operating system. It is indicating that they should not be tampered with or removed. It’s similar to the read-only flag but carries more importance. Additionally, it acts as a “super-hidden” attribute—even if you set your system to show hidden files, system files marked with this attribute will remain hidden unless you specifically disable the “Hide protected operating system files” option.
D = Directory:
This attribute differentiates between regular files and subdirectories within the current directory. While, in theory, you could change a file to a directory by altering this bit, doing so in practice would cause issues, as directory entries need to follow a specific format.
A = Archive:
This attribute serves as a communication tool between file-modifying applications and backup software. Most backup programs offer an incremental backup option. It lets you back up only the files that have changed since the last backup. The archive bit helps with this—when backup software archives a file, it clears this bit. Any subsequent modifications to the file should set the archive bit again. The next time a backup is performed, the software checks the archive bits to determine which files need to be backed up. While this system works well in most cases, it’s not foolproof. Therefore, you shouldn’t rely on it entirely to ensure your critical files are backed up.
C = Compressed:
When a file or folder is marked as compressed, the data is stored in a way that reduces its size. That frees up storage space. Compression is handled by the file system (such as NTFS), and the data is automatically decompressed when accessed. While this can save significant space, especially for large files, it comes with some limitations. One major restriction is that compressed files and folders cannot be encrypted using the native NTFS encryption (EFS). This is because both compression and encryption alter the way data is stored, and these two processes are incompatible. Therefore, if you need to secure your data, you must choose between compression and encryption.
E = Encrypted:
Encryption is a security measure that encodes the data in a file or folder. It can only be accessed by authorized users. On Windows systems, this is usually handled by the Encrypting File System (EFS). When a file is encrypted, it’s protected against unauthorized access, even if someone physically obtains the storage device. However, like compression, encryption has its own limitations. Encrypted files and folders cannot be compressed. This is because encryption needs to maintain the integrity and security of the data. That conflicts with the way compression alters the data structure to reduce its size.
N = Not Indexed:
The Not Indexed attribute, is often seen as “N” or sometimes “I,”. It indicates that the file or folder should not be indexed by the Windows Search service. Indexing speeds up searches by creating a database of the contents of files on your system. However, you might choose to mark certain files as “Not Indexed”. That will protect their privacy or reduce the size of the search index database. Files marked with this attribute won’t appear in search results as quickly as indexed files. In some cases, they might not appear at all, depending on the search method used.
L = Reparse Points:
A reparse point is a special attribute in the NTFS file system used to extend the file system’s functionality. Reparse points are used by features like symbolic links, junction points, and mounted drives. When a file or folder has the “L” attribute, it means it contains a reparse point. Therefore it acts as a pointer to another location in the file system. This can be useful for redirecting file paths or linking to files in different directories. Reparse points are critical for certain system operations and advanced file management techniques. Unfortunately, they can complicate file operations like copying or moving files, as they don’t behave like standard files or folders.
O = Offline:
The Offline attribute marks files or folders that are not available for immediate access. That is because they have been moved to a different storage tier. For example a remote location, such as a network drive or cloud storage. These files are still listed in the file system, but they may not be physically present on the local disk. When you try to access an offline file, the system may need to retrieve it from its remote location. Unfortunately, that can cause delays. This attribute is commonly used in environments with limited storage. Therefore, less frequently accessed files are offloaded to save space on the primary drive.
P = Sparse File:
A sparse file in the NTFS file system that allows for efficient storage of large empty files. Specifically, those that contain a lot of empty space (zeroes). Instead of storing the zeroes physically on the disk, the file system only stores the actual data. Instead, the empty space is recorded as a placeholder. This can drastically reduce the amount of disk space used by certain types of files. Those are disk images or database snapshots. Sparse files are beneficial in situations where you need to allocate large amounts of space without actually using it all. Certainly, they can be more complex to manage and may not be fully supported by all backup software.
I = Not Content Indexed:
The Not Content Indexed attribute, is similar to “N” for Not Indexed. It specifically prevents the contents of a file or folder from being indexed by the Windows Search service. “Not Indexed” attribute may apply broadly to the file or its metadata. “Not Content Indexed” focuses on the actual data within the file. This is useful for files containing sensitive or personal information that you don’t want to appear in search results. Additionally, marking files as not content-indexed can reduce the load on the indexing service. That improves overall system performance in environments with large amounts of data.
T = Temporary:
The Temporary attribute marks files or folders as temporary. It indicates that they are expected to be used only for a short time. Temporary files are often created by applications during installation, updates, or while performing specific tasks. These files are intended to be deleted once they are no longer needed. Marking a file as temporary can help the operating system or application manage it more efficiently. The file system may choose to prioritize these files for deletion when disk space runs low. However, if not properly managed, temporary files can accumulate and consume significant amounts of storage space over time.
How are file attributes related to file permissions?
File attributes and file permissions are both mechanisms used to manage access to files and directories, but they serve slightly different purposes and function in different ways.
1. File Attributes
File attributes are metadata associated with a file or directory that define specific behaviors or characteristics. These attributes might control how the file is treated by the operating system or applications. Common file attributes include:
- Read-Only: The file cannot be modified.
- Hidden: The file is not visible in the standard directory listing.
- System: The file is used by the operating system and should not be altered by users.
- Archive: Indicates that the file has been modified since the last backup.
- Immutable (Linux-specific): The file cannot be modified, deleted, or renamed.
2. File Permissions
File permissions, on the other hand, are rules associated with a file or directory that determine which users can access the file, and in what way. Permissions generally fall into three categories:
- Read (r): Allows the user to read the contents of the file or directory.
- Write (w): Allows the user to modify or delete the file or directory.
- Execute (x): Allows the user to execute the file, if it is a script or program, or to traverse the directory.
Permissions are usually applied to three different sets of users:
- Owner: The user who owns the file.
- Group: A group of users who are granted similar access rights.
- Others: All other users.
Relationship Between File Attributes and File Permissions
File attributes and file permissions are related in the sense that they both control access to files, but they do so at different levels and in different ways:
- Complementary: Attributes and permissions work together to define how a file can be accessed or modified. For instance, even if a user has write permissions on a file, if the file is marked as read-only (an attribute), the user will not be able to modify it.
- Hierarchical Control: File permissions tend to provide a more granular level of control compared to attributes. While attributes can enforce broad rules (e.g., “this file is hidden”), permissions can specify exactly who can read, write, or execute a file.
- Operating System Specific: Different operating systems handle attributes and permissions differently. For example, Linux has both file permissions (using the
chmodcommand) and attributes (using thechattrcommand), while Windows primarily uses attributes and a different permissions model.
Example (Linux System):
- Permissions: A file might have permissions set to
rwxr-xr--, meaning the owner can read, write, and execute, the group can read and execute, and others can only read. - Attributes: If the file is marked with the
immutableattribute, even the owner will be unable to modify or delete it, regardless of the write permission.
In summary, file attributes and permissions work together to control how files are accessed and manipulated. Attributes tend to enforce broader or more restrictive rules, while permissions provide detailed control over what specific users can do with the file.
1. Overview of file properties
Under Windows platform, the attributes of files are divided into general attributes and security attributes.
When the user modifies the general attributes of the target file, the secret label obtains the general attributes of the file through GetFileAttributes(); Reset the general attributes of the original file through SetFileAttributes(), which ensures that the general attributes of the file will not be lost.
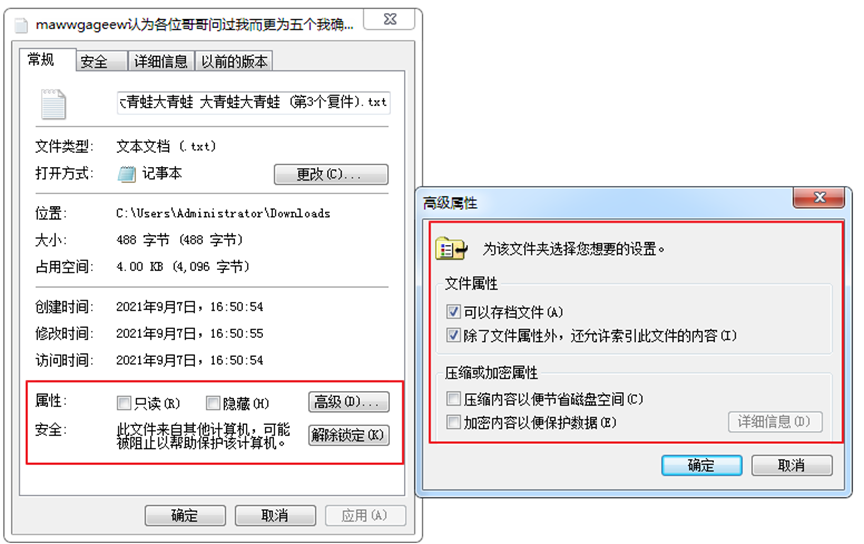
Windows — file general properties
When the user modifies the security attribute of the target file, the secret label obtains the security attribute information of the file through the core function GetNamedSecurityInfo(); Set the security attributes of the original file through the core function SetNamedSecurityInfo(), so as to ensure that the security attributes of the file will not be lost.
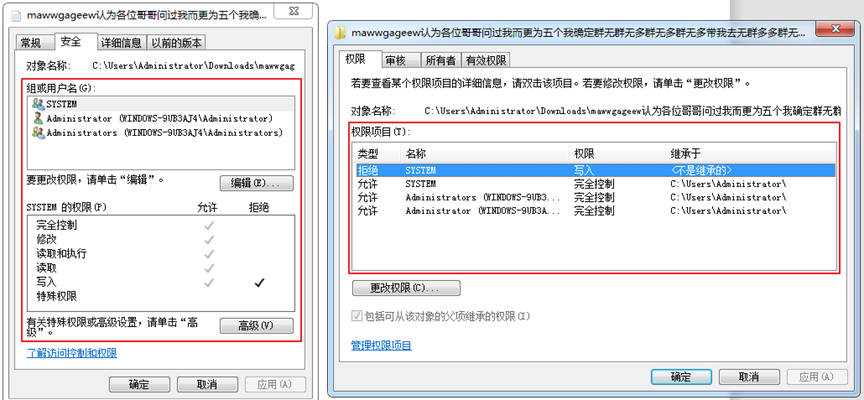
Windows file security properties
2. Detailed explanation of Windows file properties
Windows disk partition formats are divided into NTFS and FAT32. The general attributes of files exist under NTFS and FAT32 disk partitions; For the security attribute of the file, it only exists under the NTFS partition.
2.1 Windows files — general properties
The main function of the GetFileAttributes function is to return the file general attributes of the specified directory or file.
Function prototype:
DWORD GetFileAttributes(LPCTSTR lpFileName);
Function parameters:
lpFileName: the name of the specified file or directory
Note: for ANSI version, the directory name cannot exceed 260 characters.
Return value:
When successful, the return value is the attribute of the file or directory, and the return value can be one or more attributes;
In case of failure, the return value is INVALID_FILE_ATTRIBUTES.
Note: GetFileAttributesEx function:
In addition to the above file attribute content, you can also get the file creation date, last read-write date, file size and other information.
The main function of the SetFileAttributes function is to set the general attributes of a file or directory.
Function prototype:
BOOL SetFileAttributes(

    LPCTSTR lpFileName,

    DWORD dwFileAttributes);
Function parameters:
lpFileName: enter a parameter for the file or directory where the file attribute needs to be set.
dwFileAttributes: DWORD data is used to represent file attributes in the file system, and multiple file attributes are connected by «|» operation
Return value:
Return BOOL value, indicating whether it is successful.
In MSDN, a file has 15 attributes in total. Depending on the partition format of the disk, the attributes of the file will be different.
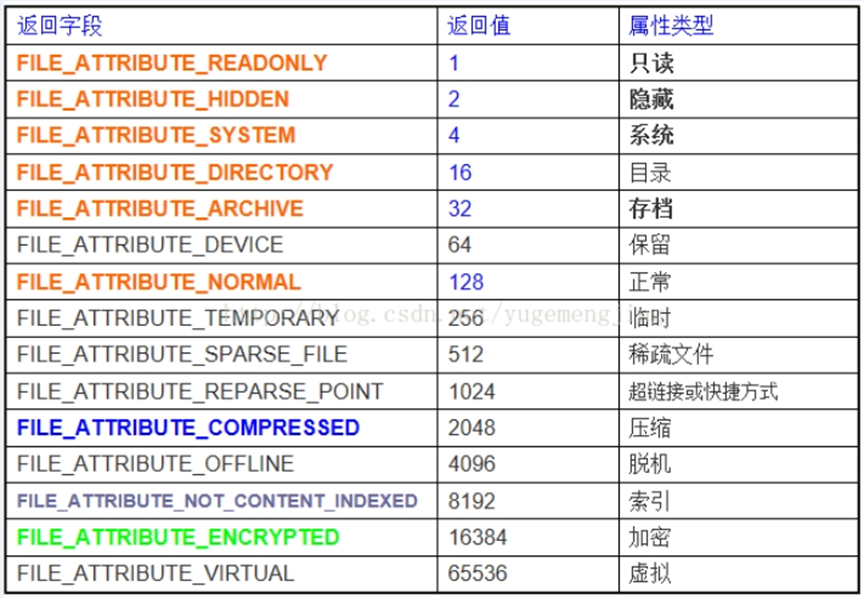
Windows file property return value
The attributes marked in orange are the public attributes of files in Windows system, among which «read only», «hidden», «system» and «archive» are the four basic attributes of files. compressed,content_ Indexed and encrypted only exist in NTFS partitions.
2.2 Windows files — Security Attributes
In Windows NT, users are divided into many groups. Groups have different permissions. Of course, users in a group can also have different permissions. Let’s talk about common user groups in NT.
Administrators: Administrators group. By default, users in administrators have unrestricted full access to the computer / domain. The default permissions assigned to this group allow full control of the entire system. Therefore, only trusted people can be members of this group.
Power Users: advanced users group. Power Users can perform any other operating system tasks except those reserved for the Administrators group. The default permissions assigned to the Power Users group allow members of the Power Users group to modify settings for the entire computer. However, Power Users do not have permission to add themselves to the Administrators group. In permission settings, the permissions of this group are second only to Administrators.
Users: ordinary user group. Users in this group cannot make intentional or unintentional changes. As a result, users can run authenticated applications, but not most legacy applications. The users group is the most secure group because the default permissions assigned to the group do not allow members to modify operating system settings or user data. The users group provides the most secure program running environment. On NTFS formatted volumes, the default security settings are designed to prevent members of this group from endangering the integrity of the operating system and installed programs. Users cannot modify system registry settings, operating system files, or program files. Users can shut down the workstation, but not the server. Users can create local groups, but can only modify the local groups they create.
Guests: guest group. By default, guests have the same access rights as members of ordinary Users, but guest accounts have more restrictions.
Everyone: all users, all users on this computer belong to this group.
The following table shows the security information of operating general security objects through Windows API functions.
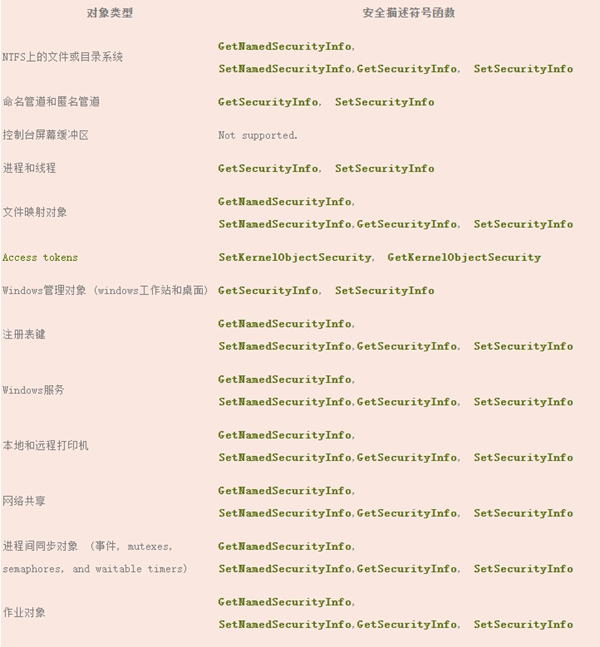
Information table of Windows operating various types of security objects
2.2. 1) read file — Security Attributes
The main function of the GetNamedSecurityInfo() function is to obtain the file security properties of the specified directory or file.
Function prototype:
DWORD GetNamedSecurityInfo(

LPTSTR pObjectName,                        // object name

SE_OBJECT_TYPE ObjectType,                 // object type

SECURITY_INFORMATION SecurityInfo,        // Message type

PSID *ppsidOwner,                          // Owner's SID

PSID *ppsidGroup,                          // Previous group SID

PACL *ppDacl,                              // DACL

PACL *ppSacl,                              // SACL

PSECURITY_DESCRIPTOR *ppSecurityDescriptor // SD

);
Return value:
Return BOOL value, indicating whether it is successful. 0: successful
==============================================================
Example:
PACL pOldDacl=NULL;

std::string file_path = "D:\dandao\1.txt";

PACL pNewDacl=NULL;

DWORD dRet;

PSECURITY_DESCRIPTOR pSID=NULL;

dRet = GetNamedSecurityInfo((LPTSTR)UTWS(file_path),

SE_FILE_OBJECT,  //File security properties

DACL_SECURITY_INFORMATION,//The message type is security type

NULL,NULL,&pOldDacl,NULL,&pSID);//Get the security attributes of the file, and store the information in pOldDacl

if(dRet== ERROR_SUCCESS)  return OK;
=============================================================
2.2. 2 write file — Security Attributes
The main function of the SetNamedSecurityInfo() function is to set the file security attribute of the specified directory or file.
Function prototype:
DWORD SetNamedSecurityInfo(

LPTSTR pObjectName,                        // object name

SE_OBJECT_TYPE ObjectType,                 // object type

SECURITY_INFORMATION SecurityInfo,        // Message type

PSID *ppsidOwner,                          // Owner's SID

PSID *ppsidGroup,                          // Previous group SID

PACL *ppDacl,                              // DACL

PACL *ppSacl,                              // SACL

PSECURITY_DESCRIPTOR *ppSecurityDescriptor // SD

);
Return value:
Return BOOL value, indicating whether it is successful. 0: successful
2.2. 3 modify file — Security Attributes
Windows API call process: getnamedsecurityinfo() — > fill explicit_ ACCESS ->
Setentriesinacl() — > setnamedsecurityinfo() — > release DACL and SID.
==============================================================
Example:
PACL pOldDacl=NULL;

PACL pNewDacl=NULL;

DWORD dRet;

std::string file_path = "D:\dandao\1.txt";

EXPLICIT_ACCESS eia;

PSECURITY_DESCRIPTOR pSID=NULL;

dRet = GetNamedSecurityInfo((LPTSTR)UTWS(file_path),

SE_FILE_OBJECT,  //File security properties

DACL_SECURITY_INFORMATION,//The message type is security type

NULL,NULL,&pOldDacl,NULL,&pSID);

//Create an ACE, modify the security attributes of the file, and write the information to the eia

ZeroMemory(&eia,sizeof(EXPLICIT_ACCESS));

eia.grfAccessPermissions = 0x1F01FF;

(0x1F01FF:Full authority of the representative; 0 x1200A9:Readable and executable; 0 x1701BF: Readable, writable, executable and modifiable)

eia.grfAccessMode = GRANT_ACCESS; //Permission mode

eia.grfInheritance = SUB_CONTAINERS_AND_OBJECTS_INHERIT;//Inheritance relationship

eia.Trustee.TrusteeForm = TRUSTEE_IS_NAME;

eia.Trustee.pstrName = L"everyone";

// Add the new ACE to the DACL. At this time, PNewDacl stores the new security attribute information

dRet = SetEntriesInAcl(1,&eia,pOldDacl,&pNewDacl);

if(dRet=ERROR_SUCCESS) return OK;

// Update the modified DACL

dRet = SetNamedSecurityInfo((LPTSTR)UTWS(file_path),

SE_FILE_OBJECT,  //File security properties

DACL_SECURITY_INFORMATION,//The message type is security type

NULL,NULL,NULL,pNewDacl, NULL);

if(dRet=ERROR_SUCCESS)  return OK;

//Release DACL and SID

if(pNewDacl)LocalFree(pNewDacl);

if(pSID)LocalFree(pSID);
=================================================================
Introduction
Creating a secure local file in a Windows x86 console application where only the application has access can be challenging. If you’re facing issues with security settings or API file handling errors, don’t worry. This article will guide you step-by-step to build a secure mechanism that prevents unauthorized access to files created during the execution of your application.
Understanding the Security Model
When developing a Windows application, security is paramount, especially if your program handles sensitive data. Windows uses access control lists (ACLs) to manage permissions for files, which determine who can read, write, or execute a file. By default, files created by administrators may still be accessible to other users unless specified otherwise in the security settings.
Why Access Issues Occur
The issues you are experiencing, particularly the access permissions where even admin users can access the files, stem from how security descriptors and access control lists are implemented. When your application runs as an administrator, it inherits those permissions, meaning it has broader access to the system than typically intended. If your application attempts to operate under a different security context or if the security attributes are not set up properly, the intended restrictions may fail, leading to complications.
Step 1: Setting Up the Security Attributes
Let’s walk through a refined solution to establish create secure file access control in your application.
Initialize Security Attributes
Define your security attributes correctly to ensure only your application can access the file. Here’s a modified version of your CreateRestrictedFile function:
#include <windows.h>
#include <sddl.h>
#include <iostream>

bool CreateRestrictedFile(std::wstring &localFilePath) {
    wchar_t filePath[MAX_PATH];
    if (SHGetFolderPath(NULL, CSIDL_LOCAL_APPDATA, NULL, 0, filePath) != S_OK) {
        std::cerr << "Failed to get folder path. Error: " << GetLastError() << std::endl;
        return false;
    }

    localFilePath = std::wstring(filePath) + L"\temp.hex";

    SECURITY_ATTRIBUTES sa;
    SECURITY_DESCRIPTOR sd;
    if (!InitializeSecurityDescriptor(&sd, SECURITY_DESCRIPTOR_REVISION)) {
        std::wcerr << L"Failed to initialize security descriptor. Error: " << GetLastError() << std::endl;
        return false;
    }

    // Define an empty DACL
aCL *dacl = NULL;
    DWORD dwRes;
    if (SetSecurityDescriptorDacl(&sd, TRUE, dacl, FALSE) == 0) {
        std::wcerr << L"SetSecurityDescriptorDacl Error: " << GetLastError() << std::endl;
        return false;
    }

    // Set security attributes
    sa.nLength = sizeof(SECURITY_ATTRIBUTES);
    sa.lpSecurityDescriptor = &sd;
    sa.bInheritHandle = FALSE;

    // Creating a secure file
    HANDLE hFileSecure = CreateFile(
        localFilePath.c_str(),
        GENERIC_READ | GENERIC_WRITE,
        0,
        &sa,
        CREATE_ALWAYS,
        FILE_ATTRIBUTE_TEMPORARY,
        NULL
    );

    if (hFileSecure == INVALID_HANDLE_VALUE) {
        std::cerr << "Failed to create .hex file. Error: " << GetLastError() << std::endl;
        return false;
    }
    return true;
}
Step 2: Managing User Access
The key to ensuring that only your application can access the file lies in properly configuring your DACL. Denying access to other users is crucial, requiring more intricate security settings than the default application settings. Here’s how to ensure proper user SID management and deny access:
Deny All Access Except Specific SID
You need to set a DACL that specifically denies access to all users except the application:
- Obtain the SID for your application.
- Configure the DACL to deny access to other user accounts.
Using the EXPLICIT_ACCESS structure allows you to specify the permissions better:
EXPLICIT_ACCESS ea[2];
The first entry grants full access to your application, while the second entry denies access to all users. Make sure to apply these settings correctly during your file creation.
Step 3: Use CreateFile with Proper Parameters
Make sure to use the CreateFile function with zero sharing to prevent file access from other processes. Ensure no sharing flags are set:
CreateFile(
    localFilePath.c_str(),
    GENERIC_READ | GENERIC_WRITE,
    0, // No sharing
    &sa,
    CREATE_ALWAYS,
    FILE_FLAG_DELETE_ON_CLOSE,
    NULL
);
Step 4: Test and Verify
Once you implement these changes, run your application to check if the local file can be created without unauthorized access. Test access with another admin account to ensure that permissions are appropriately restricted.
Frequently Asked Questions (FAQ)
Can I run the application without admin privileges?
Yes, it’s essential to minimize application privileges where possible. Code can still create files securely without necessarily requiring administrator rights.
How do I test file accessibility?
Use another user account on your Windows PC to check whether the created file is accessible. This helps ensure your DACL settings are correctly configured.
What if the API still returns an error?
Ensure that the file handle is valid and accessibility permissions are set correctly. Review the API documentation for guidance on proper file formats and expected access protocols.
Conclusion
Creating a secure file in a Windows x86 application requires careful management of access permissions through security descriptors and DACL settings. By following the steps outlined above, you can create a local file that remains secure from unauthorized access, fulfilling your application’s needs while minimizing security risks.
File attributes are some settings options that determine whether a user or the operating system has permission to access and modify the files or not. It is quite a simple and straightforward approach to changing the file state.
Changing file attributes help you to safeguard your files from unwanted issues.
If other people have access to your computer, you need to ensure no one modifies your files. You can simply set the files to read-only mode to prevent others from modifying them. You can set the file attributes to be hidden so that no one can find them.
Well, in this article, I will guide you to change the file attributes on Windows 10/11. So without wasting any time, let’s get started!
Types of File Attributes
There are different types of attributes for files that you can find. But you can use a few from the properties menu of that file.
Here is the list of different file attributes:
| Attributes | What they do |
|---|---|
| Archive (A) | It shows if the file has been modified since the last update |
| Hidden (H) | You can hide any files from displaying on the File Explorer |
| System (S) | Which indicates the file is crucial to the operating system |
| Read-only (R) | It only gives permission to read the file |
| Compressed (C) | It will compress the files automatically if the attribute is enabled |
| Encrypted (E) | When enabled, your files will be encrypted |
| Directory (D) | This will indicate the file as a subdirectory |
| Offline (O) | Your files will be moved to the offline storage |
| Temporary (T) | It indicates if the file is used for temporary storage |
Check out the easiest way to Fix Windows 11 File History Element Not Found Error.
There are three file attribute-changing methods available out there. All of them are pretty easy but using the properties contextual menu is the most popular one. You can use any of them to change the file attributes.
Here are the methods to change the file attributes:
This is the most used method among all. You will need a minute to change the attributes of your files.
Here is how you can change file attributes using the properties menu:
Here’s a complete guide on how to Disable File Compression on Windows 11/10.
2. Use Powershell
You can use Windows Powershell to change the file attributes. There are some cmdlets available that you can use to view, set, or remove them.
Here are the steps to change file attributes using Powershell:
- Press Windows + X and open Windows Powershell.
- Run the following cmdlet to view file attributes on Powershell. *
Get-ItemProperty -Path path_to_file
- Run the following cmdlet to view all available information and combine the output. *
Get-ItemProperty -Path path_to_file | Format-list -Property * -Force
- Run the following cmdlet to change file attributes. *
Set-ItemProperty -Path path_to_file -Name IsReadOnly -Value True
Quick Note: replace the ReadOnly with Archive, Hidden, Normal, and System, according to your need
*Note: replace the path_to_file with your actual file path.
Read more on how to Password Protect a File or Folder in Windows 11.
3. Use Command Prompt
The command prompt can change the file attributes using the command attrib. It comes prebuilt in the command prompt.
Here is how you can change attributes of files using Command Prompt:
- Type Windows + R to open Windows Run.
- Type cmd and hit Enter.
- Use the following command to change the attribute to Read-only. *
attrib +R path_to_file
- Type the following command to remove the Read-only attribute. *
attrib -R path_to_file
You can replace the R with other attributes according to your need. R or Read-only is used as an example.
*Quick Note: replace the path_to_file with your actual file path.
Related guide: Enable or Disable Offline Files in Windows 11.
Frequently Asked Questions
How do I change file attributes on a Mac?
You can change the file attributes on Mac by following the method:
Select a file > Get Info > click the drop-down arrow > select a user group > change the attributes.
What are 4 common file attributes for Windows?
In the file system directories, file attributes are maintained. You can typically find four common file attributes that are, Read-only, Hidden, System, and Archive.
How can files be protected?
You can use different methods to access any files. However, the most straightforward way of protecting the files is to associate Identity-dependent access with all the files and directories, called an access-control list, aka ACL. It shows the names of the users and the access to files that associate with each user.
Final Thoughts
That’s all from me. You can quickly change the file attributes by following any of those three methods. No matter which way you choose, your job will be done in no time.
Thanks for reading this article. Feel free to share any queries in the comment section below. I’ll try my best to resolve that.
Signing out.
Farhan Max
Farhan Max is a tech geek with a particular interest in computer hardware. He’s been fascinated by gaming since childhood and is now completing his undergraduate studies while researching and testing the latest tech innovations. Alongside his love for all things geeky, Farhan is also a skilled photographer.
Managing file attributes in Windows 10 and 11 is a straightforward process that allows us to customize how files behave on our system. We can modify these attributes to suit various needs, such as setting a file to read-only to prevent accidental modifications or hiding sensitive files from plain sight. The attributes can also be changed to system files for advanced users who need to control file indexing or compression settings.

Windows 10 and 11 have several ways to add, change, or remove file attributes, making it convenient for users of varying skill levels. Whether through the file’s Properties dialog, the File Explorer’s Details pane, or even using PowerShell for more advanced operations, we have an array of options. It’s important to proceed with caution when altering system files, but for personal files, changing attributes is a great way to manage data security and organization.
Let’s walk through the key methods available to us for altering file attributes. We’ll focus on ensuring these alterations are done safely and efficiently, providing you with the know-how to customize your file settings like a pro. From hiding files to archiving them, each attribute serves a purpose, and understanding how to manipulate them widens our control over our digital environment.
Note: Before making changes to file attributes, ensure you back up important files to prevent any loss of data.
Contents
- 1 Understanding File Attributes in Windows
- 1.1 File Attribute Types
- 1.2 How to View File Attributes
- 1.3 Importance of File Permissions
- 2 Changing File Attributes Using File Explorer
- 2.1 Using the Properties Window
- 2.2 Understanding the Details Pane
- 3 Advanced Methods: Command Prompt and PowerShell
- 3.1 Using Attrib Command in CMD
- 3.2 Leveraging PowerShell for Attribute Management
Understanding File Attributes in Windows

File attributes are a form of metadata in Windows that describe the characteristics and handling rules of a file. They play a crucial role in file management and security.
File Attribute Types
Common Windows File Attributes:
- Read-only (R): Files cannot be modified.
- Hidden (H): Files are not visible by default in File Explorer.
- System (S): Identifies important system files, not typically modified by users.
- Archive (A): Marks files that need to be archived.
When changing these attributes, we use the command line with parameters such as +r, +h, and +s to modify the read-only, hidden, and system attributes, respectively.
How to View File Attributes
To view a file’s attributes, we open File Explorer and navigate to the desired file. Right-click the file and select Properties. The Details tab in the file’s properties window displays its attributes. It’s in this tab where we often interact with metadata like file type and ownership. To see attributes listed numerically, as in +r or +h, we might use the command line.
Importance of File Permissions
File permissions ensure the security of the system by controlling who can access or modify files. Users need the proper permissions from an administrator to change certain attributes. In professional settings, we often find that user-specific permissions, granted based on usernames and group membership, are strict, affecting who can adjust file attributes or take ownership. This management of permissions is critical to maintain file integrity and confidentiality.
Changing File Attributes Using File Explorer
In this section, we’ll show you how to adjust a file’s attributes such as making it read-only or hidden, directly through File Explorer in Windows.
Using the Properties Window
To change file attributes using the Properties window, we begin by locating the file in File Explorer.
Right-click on your desired file, then choose Properties from the context menu. Once the Properties window is open, navigate to the General tab.
Here, we’re presented with options to alter the file’s status, including setting it to Read-only or Hidden. To apply changes, simply check or uncheck the boxes next to these attributes and click OK or Apply.
Understanding the Details Pane
Within the Properties window, the Details tab offers us a deeper look at a file’s metadata. This is where you can view and manage attributes like title, subject, tags, and even ratings. For music files, details such as album and genre can be added or edited here. Hovering over the value next to each attribute reveals a text box where you can add or edit the information. If you wish to remove properties and personal information, there’s an option at the bottom of this tab. Selecting it brings up a pop-up window, therein you can choose which data to strip from the file.
Advanced Methods: Command Prompt and PowerShell
When managing file attributes in Windows 10 or 11, users have powerful options beyond the graphical user interface. We can use the Command Prompt and PowerShell to efficiently handle file attributes. These methods give us more control and are ideal for automating processes in scripts.
Using Attrib Command in CMD
In the Command Prompt window, attrib.exe lets us modify file and folder attributes using the attrib command. Here’s the basic syntax we use:
| Command | Description | Example |
| attrib [+|-][attribute] [path] | To add or remove a specific attribute, such as read-only (R) or hidden (H). | attrib +R filename.txt |
| attrib [path] /S /D | Applies the command to files and directories in the specified path and all subdirectories. | attrib +H /S /D C:\folder\* |
For example, to remove the read-only attribute from all video files on a drive, our command in cmd would look like:
attrib -R G:\*.mp4 /S
Leveraging PowerShell for Attribute Management
In PowerShell, file attributes are handled using Get-ItemProperty and Set-ItemProperty. We inspect and change the properties with these cmdlets. For example, to view a file’s attributes, we use:
Get-ItemProperty -Path “C:\path\to\file.txt” -Name Attributes
Changing attributes is straightforward, too. If we wanted to set the ‘ReadOnly’ attribute using PowerShell, we could execute:
Set-ItemProperty -Path “C:\path\to\file.txt” -Name IsReadOnly -Value $true
This command makes ‘file.txt’ read-only. To rename a file while changing attributes, combine the Rename-Item cmdlet with Set-ItemProperty. Remember, PowerShell commands are potent. They provide precise control over file attributes and allow for scripting complex tasks, making them ideal for repetitive tasks and bulk changes.