
В этой статье мы разберем методику использования функционала File Server Resource Manager (FSRM) на файловом сервере Windows Server 2012 R2 для детектировании и блокировки работы вирусов-шифровальщиков (троянов-энкодеров, Ransomware или CryptoLocker). В частности, разберемся, как установить службу FSRM, настроить детектирование определенных типов файлов и, в случае детектирования таких файлов, заблокировать доступ пользователя к каталогу на файловом сервере.
Содержание:
- Детектирование шифровальщиков с помощью FSRM
- Настройка SMTP параметров FSRM для отправки email уведомлений
- Создание группы расширений файлов, создаваемых шифровальщиками
- Настройка File Screen Templates
- Применение шаблона File Screen к диску или папке
- Автоматическая блокировка доступа пользователя, зараженного шифровальщиком
- Тестирование защиты FSRM
Детектирование шифровальщиков с помощью FSRM
Если компонент File Server Resource Manager еще не установлен на сервере, его можно установить с помощью графической консоли Server Manager или из командной строки PowerShell:
Install-WindowsFeature FS-Resource-Manager -IncludeManagementTools
Проверим, что роль установилась:
Get-WindowsFeature -Name FS-Resource-Manager
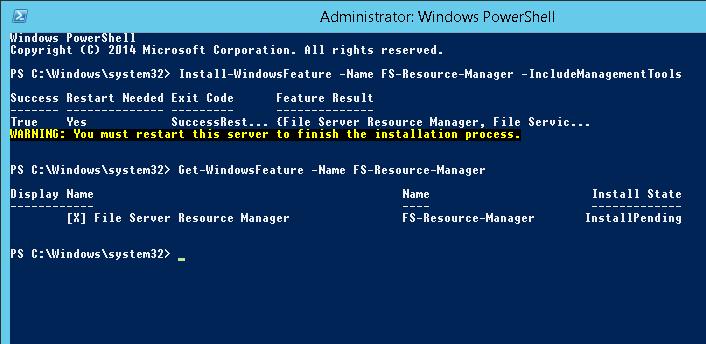
После установки компонента сервер нужно перезагрузить.
Настройка SMTP параметров FSRM для отправки email уведомлений
Следующий этап — конфигурация SMTP параметров службы FSRM, благодаря которым администратор может настроить отправку email уведомлений на свой ящик. Для этого запустите консоль fsrm.msc, щелкните ПКМ по корню консоли File Server Resource Manager и выберите пункт Configure Options.
Укажите адрес SMTP сервера, почтовый ящик администратора и имя отправителя.
Совет. Если у вас отсутствует внутренний почтовый сервер, можно настроить пересылку через SMTP релей на внешние ящики.
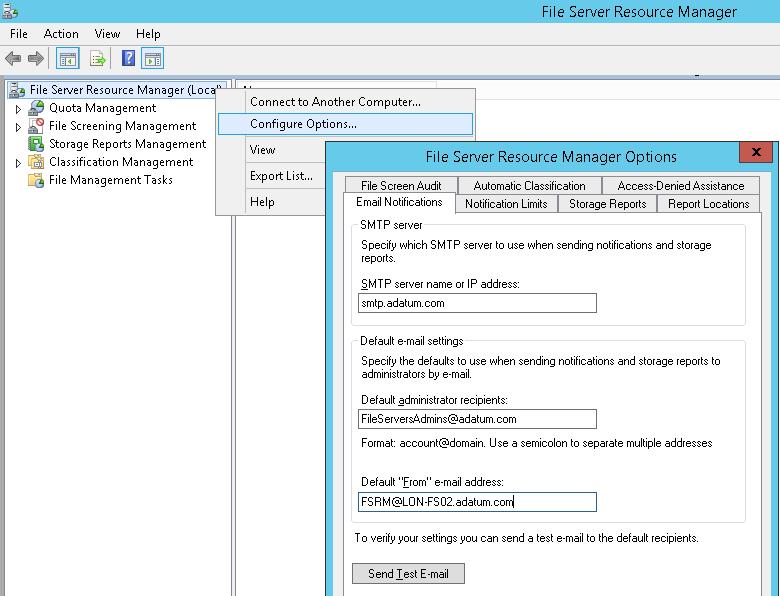
Проверить корректность настройки SMTP сервера можно, отправив тестовое письмо с помощью кнопки Send Test E-mail.
Настроить параметры SMTP службы FSRM также можно выполнить с помощью Powershell:
Set-FsrmSetting -AdminEmailAddress "[email protected]" –smtpserver smtp.adatum.com –FromEmailAddress "[email protected]"
Создание группы расширений файлов, создаваемых шифровальщиками
Следующий шаг – создать группу файлов, в которой будут содержаться известные расширения и имена файлов, которые создают шифровальщики в процессе работы.
Этот список можно задать из консоли FSRM. Для этого разверните раздел File Screening Management -> File Groups и в меню выберите Create File Group.
Нужно указать имя группы (к примеру, Crypto-files) и внести все известные расширения в список с помощью поля Files to include.
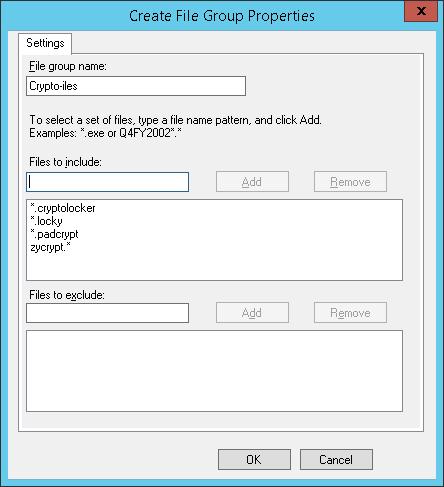
Список известных расширений файлов, создаваемых шифровальщиками довольно большой, поэтому намного проще создать его с помощью PowerShell.
В Windows Server 2012 создать группу файлов с помощью PowerShell можно так:
New-FsrmFileGroup -Name "Crypto-files" –IncludePattern @("_Locky_recover_instructions.txt","DECRYPT_INSTRUCTIONS.TXT", "DECRYPT_INSTRUCTION.TXT", "HELP_DECRYPT.TXT", "HELP_DECRYPT.HTML", "DecryptAllFiles.txt", "enc_files.txt", "HowDecrypt.txt", "How_Decrypt.txt", "How_Decrypt.html", "HELP_RESTORE_FILES.txt", , "restore_files*.txt", "restore_files.txt", "RECOVERY_KEY.TXT", "how to decrypt aes files.lnk", "HELP_DECRYPT.PNG", "HELP_DECRYPT.lnk", "DecryptAllFiles*.txt", "Decrypt.exe", "AllFilesAreLocked*.bmp", "MESSAGE.txt","*.locky","*.ezz", "*.ecc", "*.exx", "*.7z.encrypted", "*.ctbl", "*.encrypted", "*.aaa", "*.xtbl", "*.abc", "*.JUST", "*.EnCiPhErEd", "*.cryptolocker","*.micro","*.vvv")
В Windows Server 2008 R2 придется воспользоваться утилитой filescrn.exe:
filescrn.exe filegroup add /filegroup:"Crypto-files" /members:"DECRYPT_INSTRUCTIONS.TXT|DECRYPT_INSTRUCTION.TXT| DecryptAllFiles.txt|enc_files.txt|HowDecrypt.txt|How_Decrypt.txt| How_Decrypt.html|HELP_TO_DECRYPT_YOUR_FILES.txt|HELP_RESTORE_FILES.txt| HELP_TO_SAVE_FILES.txt|restore_files*.txt| restore_files.txt|RECOVERY_KEY.TXT|HELP_DECRYPT.PNG|HELP_DECRYPT.lnk| DecryptAllFiles*.txt|Decrypt.exe|ATTENTION!!!.txt|AllFilesAreLocked*.bmp| MESSAGE.txt|*.locky|*.ezz|*.ecc|*.exx|*.7z.encrypted|*.ctbl| *.encrypted|*.aaa|*.xtbl|*.EnCiPhErEd|*.cryptolocker|*.micro|*.vvv| *.ecc|*.ezz|*.exx|*.zzz|*.xyz|*.aaa|*.abc|*.ccc|*.vvv|*.xxx| *.ttt|*.micro|*.encrypted|*.locked|*.crypto|*_crypt|*.crinf| *.r5a|*.XRNT|*.XTBL|*.crypt|*.R16M01D05|*.pzdc|*.good| *.LOL!|*.OMG!|*.RDM|*.RRK|*.encryptedRSA|*.crjoker| *.LeChiffre|*.keybtc@inbox_com|*.0x0|*.bleep|*.1999| *.vault|*.HA3|*.toxcrypt|*.magic|*.SUPERCRYPT|*.CTBL|*.CTB2|*.locky"
Совет. Список известных расширений файлов различных шифровальщиков можно составить самостоятельно, или воспользоваться готовыми периодически обновляемым списками, ведущимися энтузиастами:
_https://www.bleib-virenfrei.de/ransomware/
_https://fsrm.experiant.ca/api/v1/combined
Во втором случае актуальный список расширений файлов для FSRM можно грузить прямо с веб сервера с помощью Invoke-WebRequest
new-FsrmFileGroup -name "Anti-Ransomware File Groups" -IncludePattern @((Invoke-WebRequest -Uri "_https://fsrm.experiant.ca/api/v1/combined").content | convertfrom-json | % {$_.filters})
Либо воспользоваться готовым файлом: crypto_extensions.txt. Данный файл можно сохранить на диск и обновить с его помощью созданную группу файлов FSRM:
$ext_list = Get-Content .\crypto_extensions.txt
Set-FsrmFileGroup -Name "Crypto-files" -IncludePattern ($ext_list)
Настройка File Screen Templates
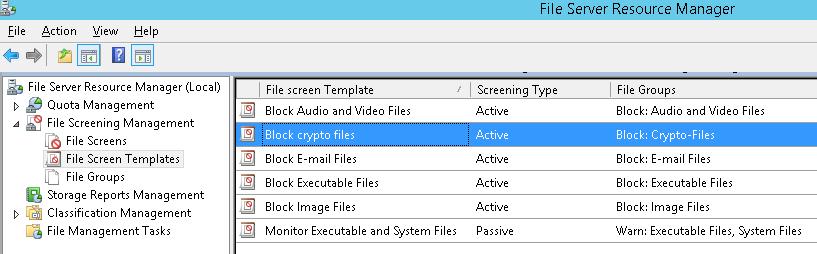
Создадим новый шаблон File Screen Template, в котором определяются действия, которые FSRM должен выполнить при обнаружении указанных файлов. Для этого в консоли FSRM перейдите в раздел File Screen Management -> File Screen Templates. Создадим новый шаблон Create File Screen Template.
На вкладке настроек укажем имя шаблона “Block_crypto_files”, тип скрининга – Active screening (запрещается создавать указанные типы файлов) и в списке групп файлов выбрать Crypto-Files.
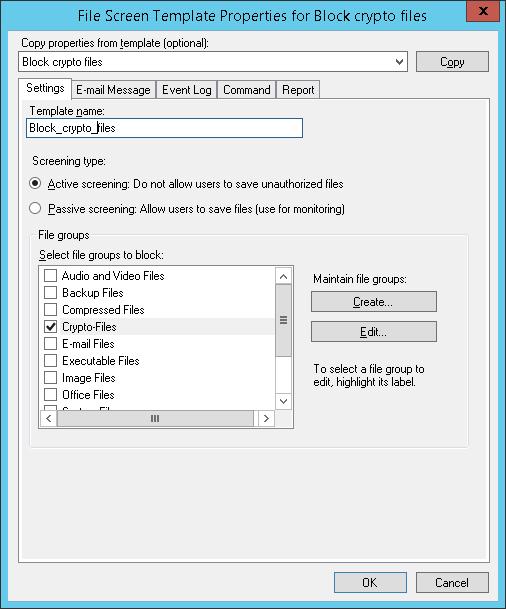
На вкладке E-mail Message включим отправку почтовых уведомлений, настроив текст оповещения по-своему вкусу.
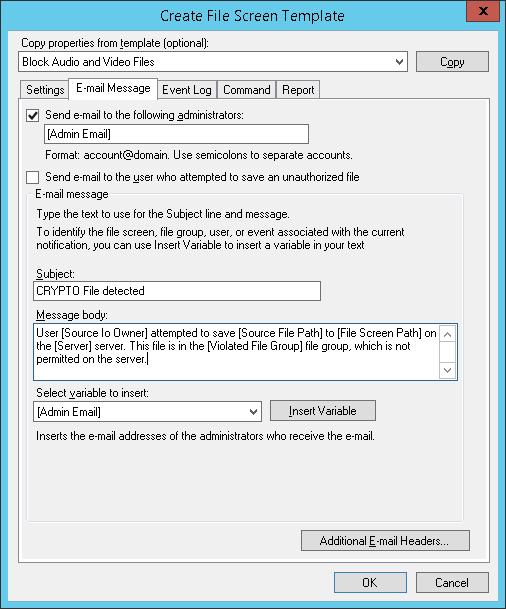
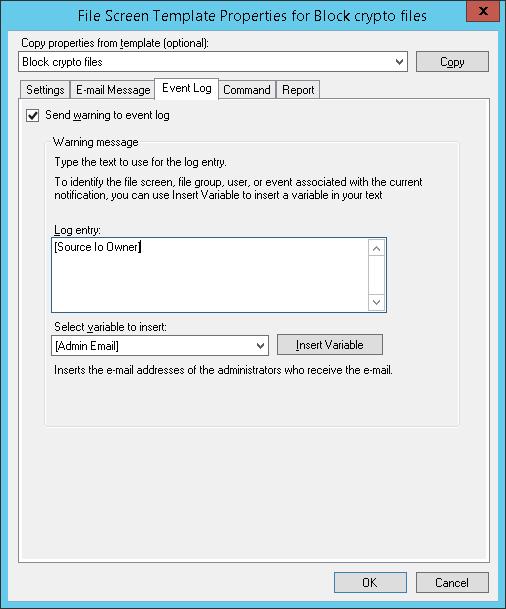
На вкладке Event Log включим запись события в системный журнал. С указанием записывать только имя пользователя: [Source Io Owner]
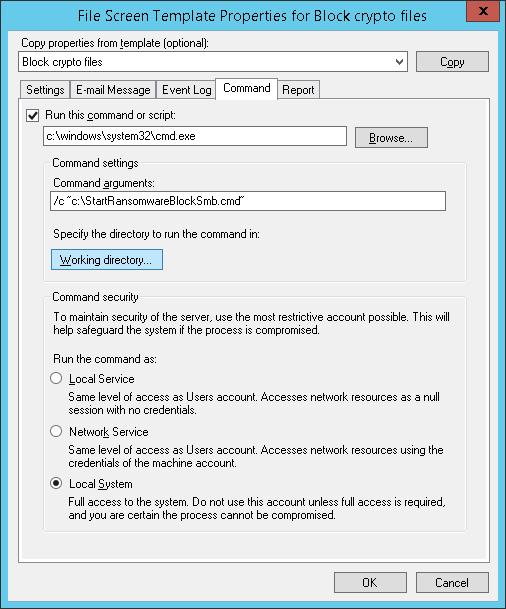
На вкладке Command можно указать действие, которое нужно выполнить при обнаружении такого типа файла. Об этом чуть ниже.
Сохраните изменения. В списке шаблонов должен появится еще один.
Применение шаблона File Screen к диску или папке
Осталось назначить созданный шаблон к диску или сетевой папке на сервере. В консоли FSRM создадим новое правило Create File Screen.
В поле File screen path нужно указать локальный диск или путь к каталогу, для которого мы хотим включить систему защиты от шифровальщика, а в списке шаблонов выбрать созданный ранее шаблон Block_crypto_files.

Автоматическая блокировка доступа пользователя, зараженного шифровальщиком
Осталось настроить действие, которое FSRM будет выполнять при обнаружении файлов, созданных шифровальщиками. Мы воспользуемся готовым скриптом: Protect your File Server against Ransomware by using FSRM and Powershell (https://gallery.technet.microsoft.com/scriptcenter/Protect-your-File-Server-f3722fce). Что делает этот скрипт? При попытке записать «запрещенный» тип файла в сетевой каталог, FSRM запускает данный скрипт, который анализирует журнал событий и на уровне шары запрещает запись пользователю, из-под осуществлялась попытка записать запрещенный тип файла. Таким образом, мы заблокируем доступ зараженного пользователя к сетевой папке.
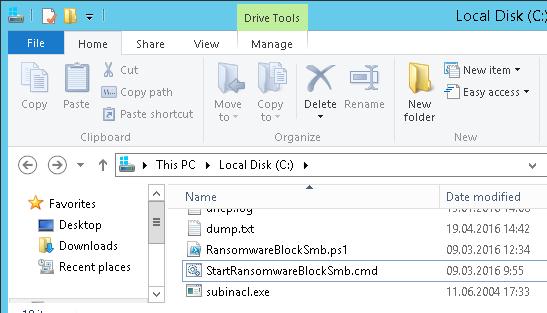
Скачайте указанный скрипт и распакуйте его в корень каталога C:\ на файловом сервере. В эту же папку скопируйте утилиту SubInACL (нужна для изменения разрешений на сетевой каталог). В каталоге должны оказаться следующие файлы:
- RansomwareBlockSmb.ps1
- StartRansomwareBlockSmb.cmd
- subinacl.exe
Примечание. В PS скрипте пришлось изменить строки:
$SubinaclCmd = "C:\subinacl /verbose=1 /share \\127.0.0.1\" + "$SharePart" + " /deny=" + "$BadUser"
и
if ($Rule -match "Crypto-Files")
Осталось в настройках шаблона “Block crypto files” на вкладке Command указать, что должна запуститься командная строка с аргументом StartRansomwareBlockSmb.cmd:
Run this command or script:
c:\windows\system32\cmd.exe
Command arguments:
/c “c:\StartRansomwareBlockSmb.cmd”
Команда должна выполняться с правами локальной системы (Local System).
Тестирование защиты FSRM
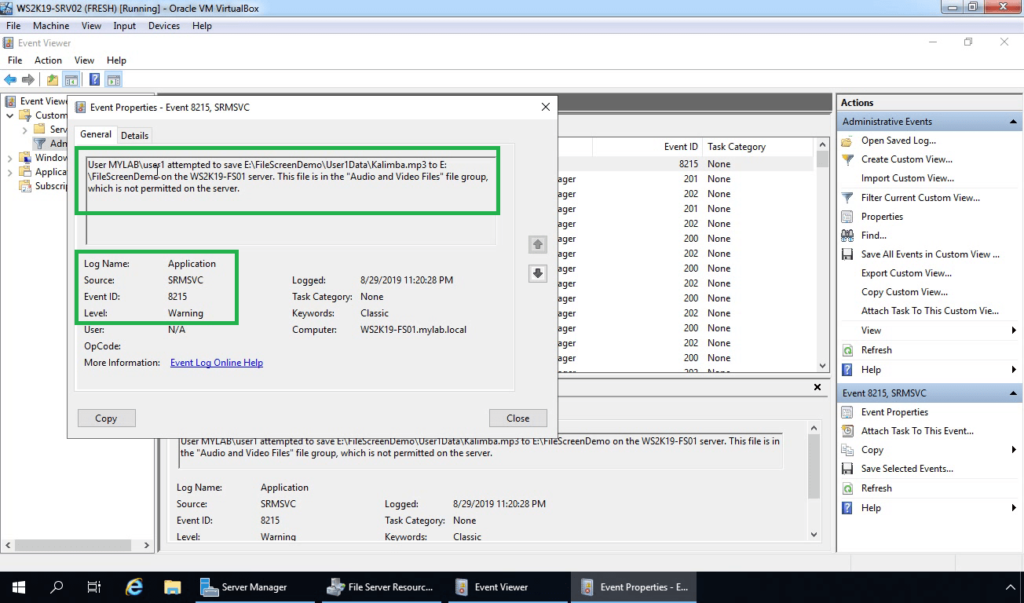
Протестируем, как работает защита FSRM от шифровальщиков. Для чего в защищаемом каталоге создадим файл с произвольным расширением, и попробуем изменить его на запрещенное .locky.
При попытке сохранить запрещенный файл FSRM запишет в журнал событие:
Event ID: 8215
Source: SRMSVC
Скрипт RansomwareBlockSmb.ps1на основании данных из события запретит текущему пользователю доступ к данному каталогу, выставив в разрешениях на шару персональный deny:
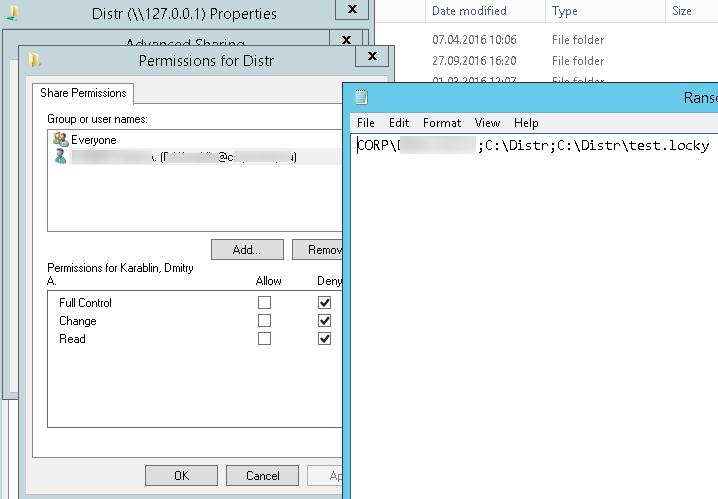
Защита работает! В корне диска в логе можно посмотреть каталог и пользователя, из-под которого пытался запустится шифровальщик.
Если нужно обеспечить еще более высокий уровень зашиты, можно перейти от черного списка файлов к белому, когда на файловом сервере можно сохранять только файлы разрешенных типов.
Итак, мы рассмотрели, как с помощью FSRM автоматически блокировать доступ к сетевым каталогам пользователям, компьютеры которых заражены вирусом-шифровальщиком. Естественно, использование FSRM в таком режиме не может дать 100% гарантию защиты файлов на серверах от этого класса вирусов, но как один из эшелонов защиты, методика вполне себе пригодна. В следующих статьях мы рассмотрим еще несколько вариантов противодействия вирусам-шифровальщикам:
- Как восстановить файлы пользователя из снимков VSS после заражения шифровальщиком
- Блокировка вирусов и шифровальщиков с помощью Software Restriction Policies
In this post, you will be learning about How to Install and Configure File Screening using File Server Resource Manager (FSRM) on Windows Server 2019.
Why File Screening?
File screening management is a feature that allows you to control the type of files that users can save and send notifications when users try to save a blocked file.
Test lab setup:
- WS2K19-DC01: Domain Controller and DNS.
- WS2K19-FS01: File Server.
- WS10-CLI01: Windows 10 Client Machine.
Install FSRM role on the file server:
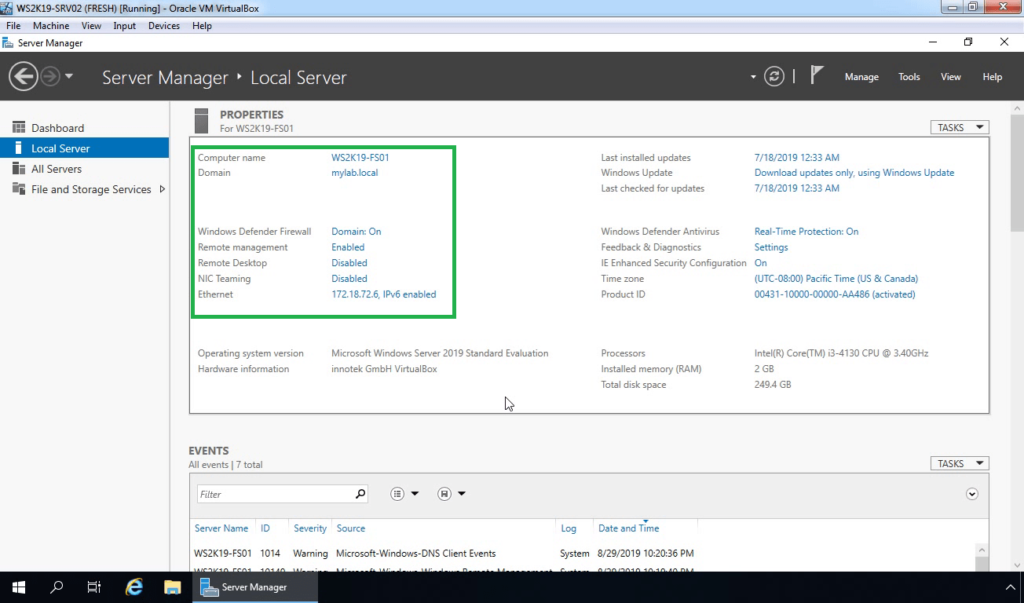
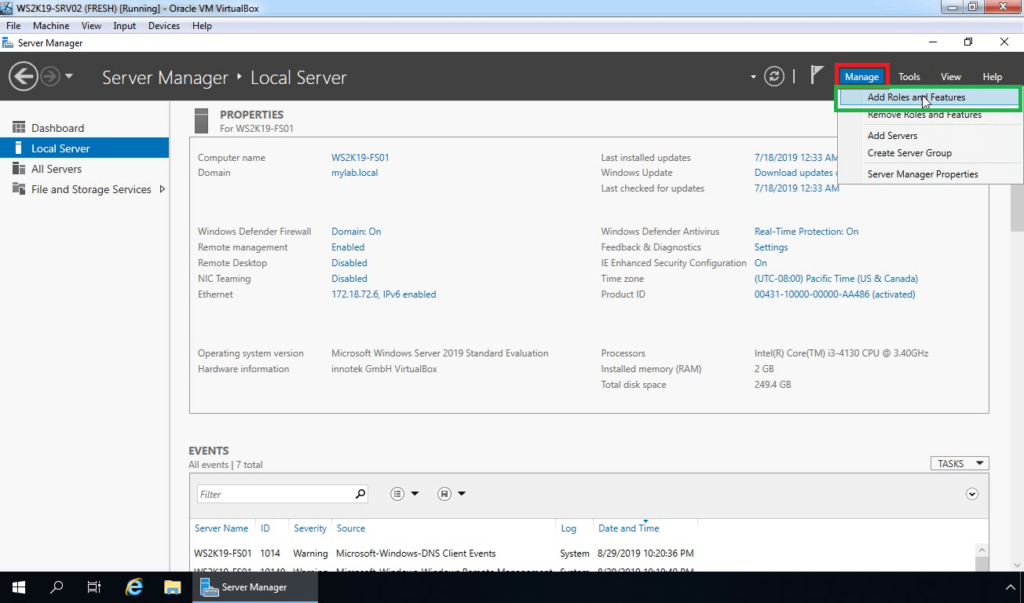
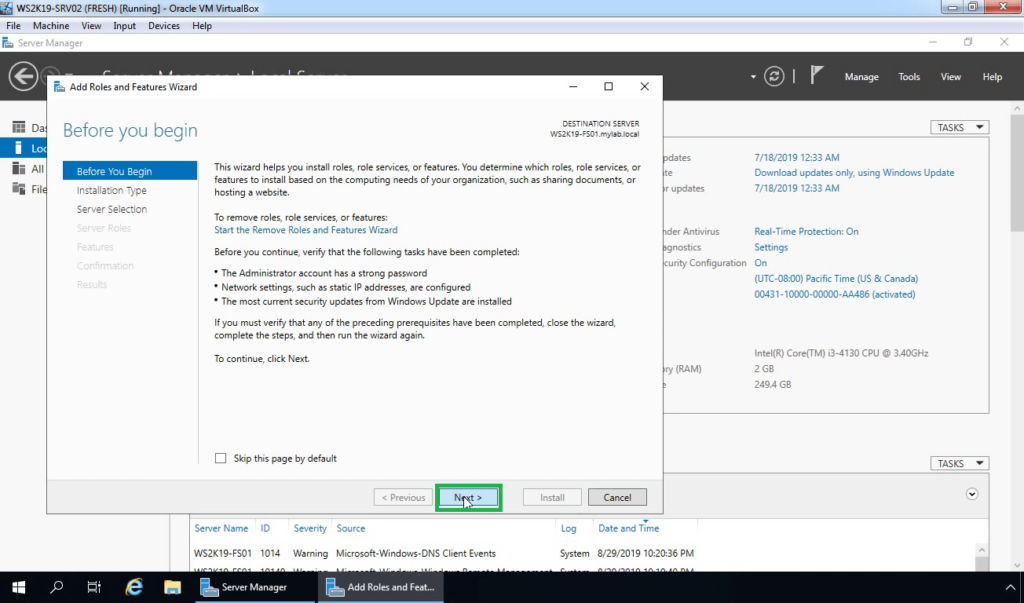
1. Open Server Manager Console.
2. On Server Manager dashboard, click on Manage and select Add Roles and Features.
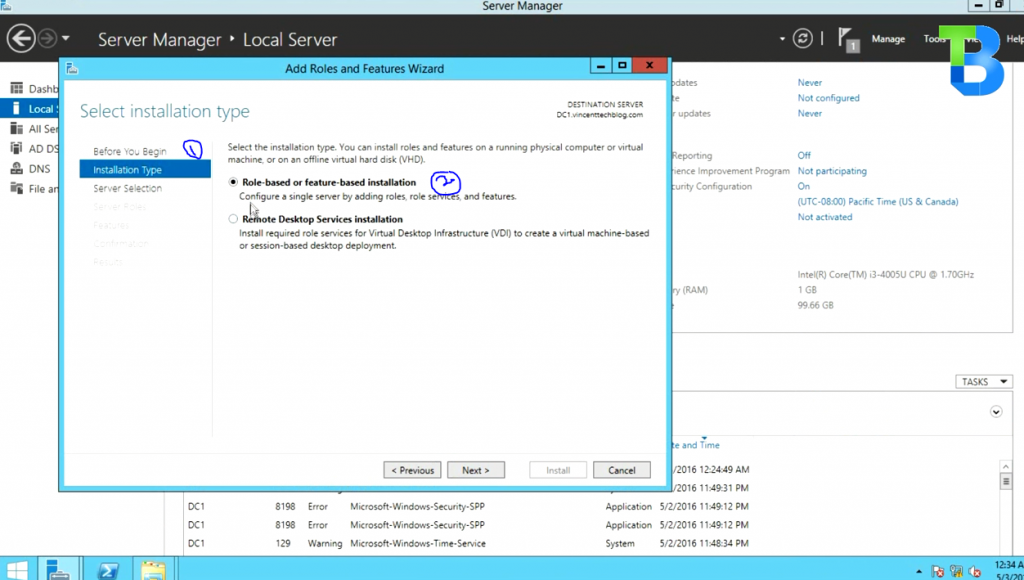
3. On the Before you begin page, click Next.
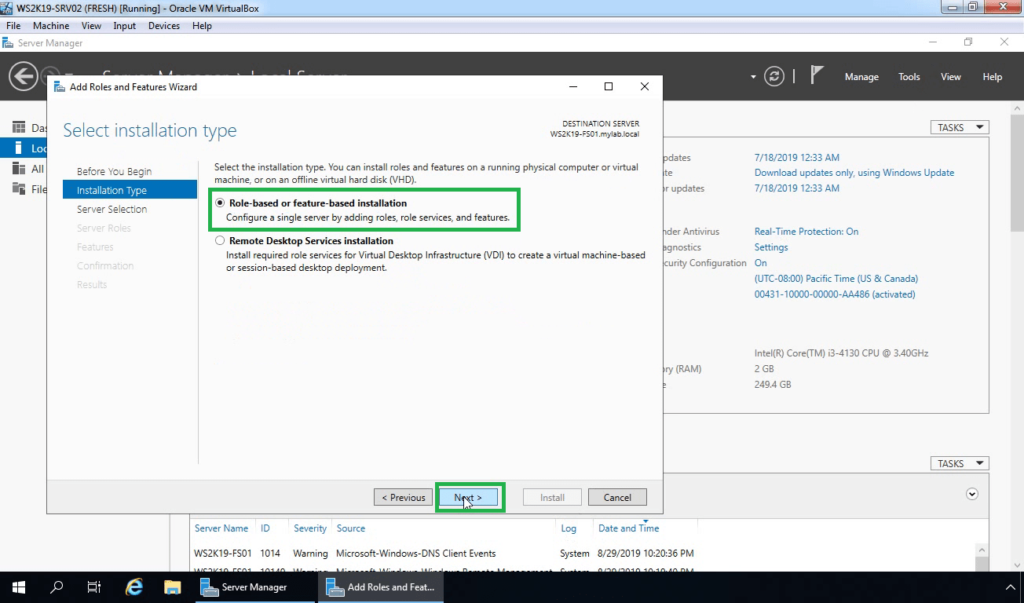
4. Select Role-based or feature-based installation and then click Next.
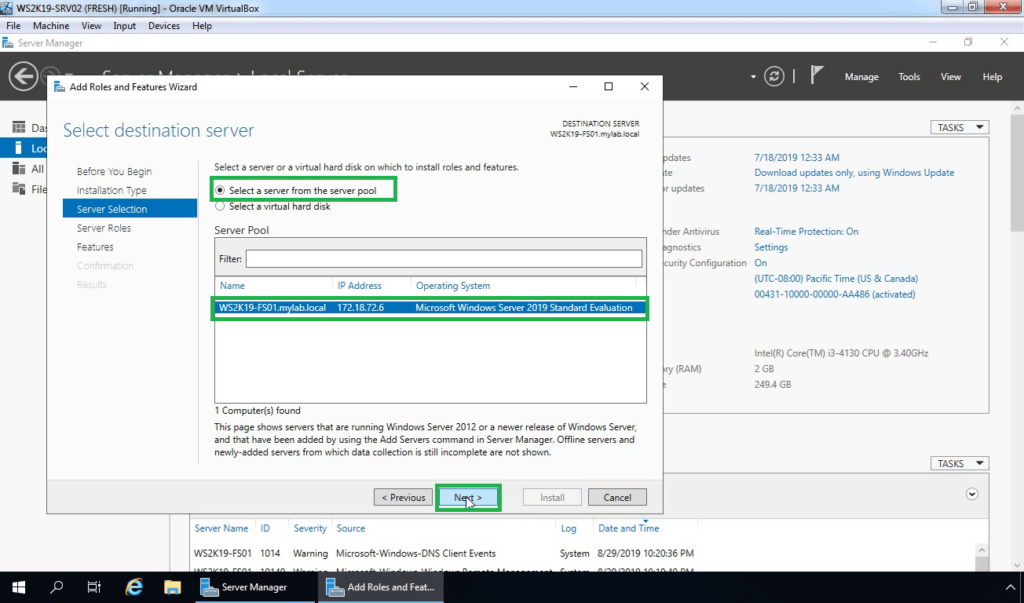
5. Select a server from the server pool to install FSRM to, and then click Next.
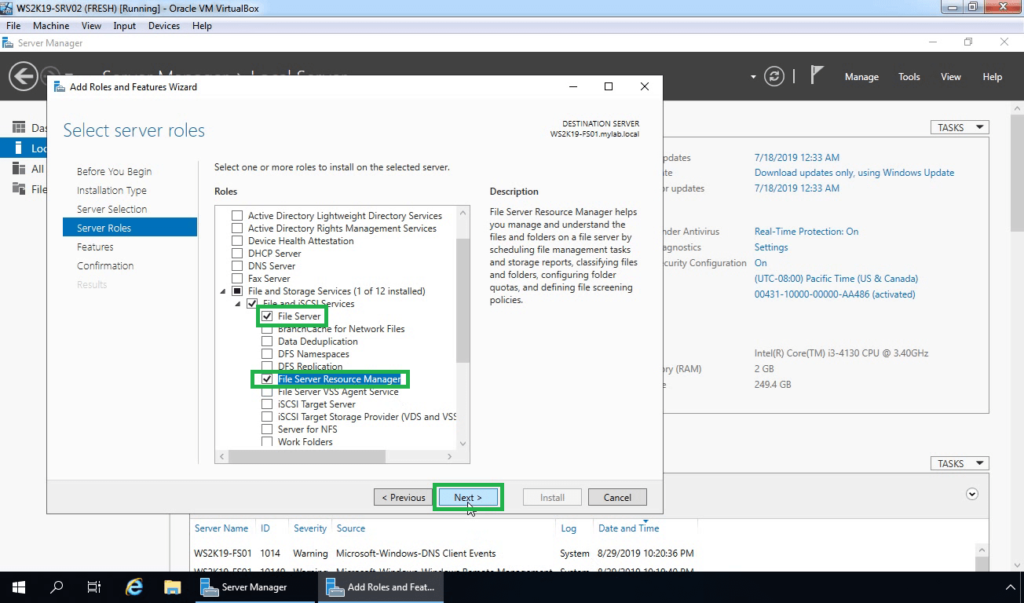
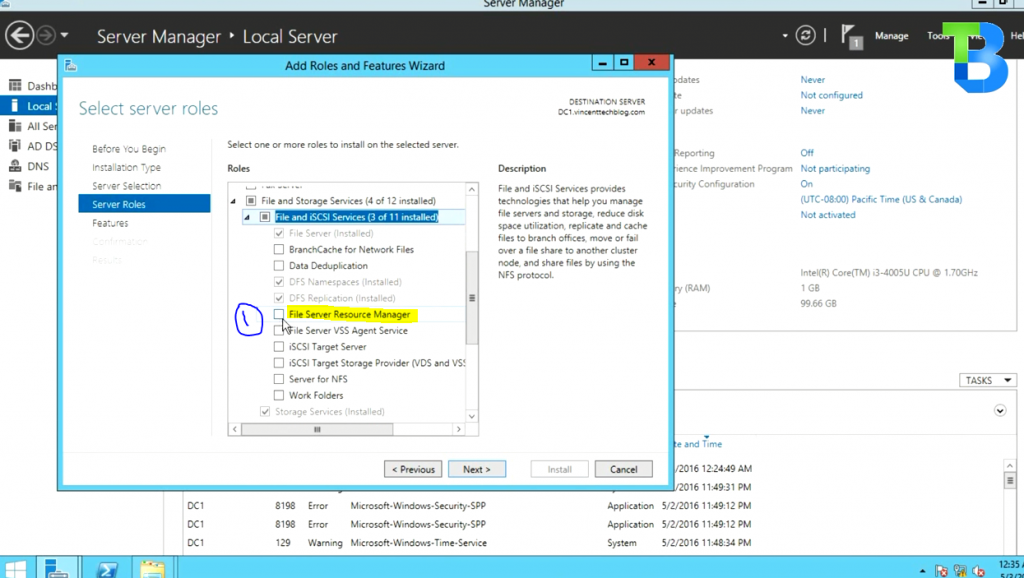
6. Expand File and Storage Services and expand the File and iSCSI Services. Select File Server Resource Manager.
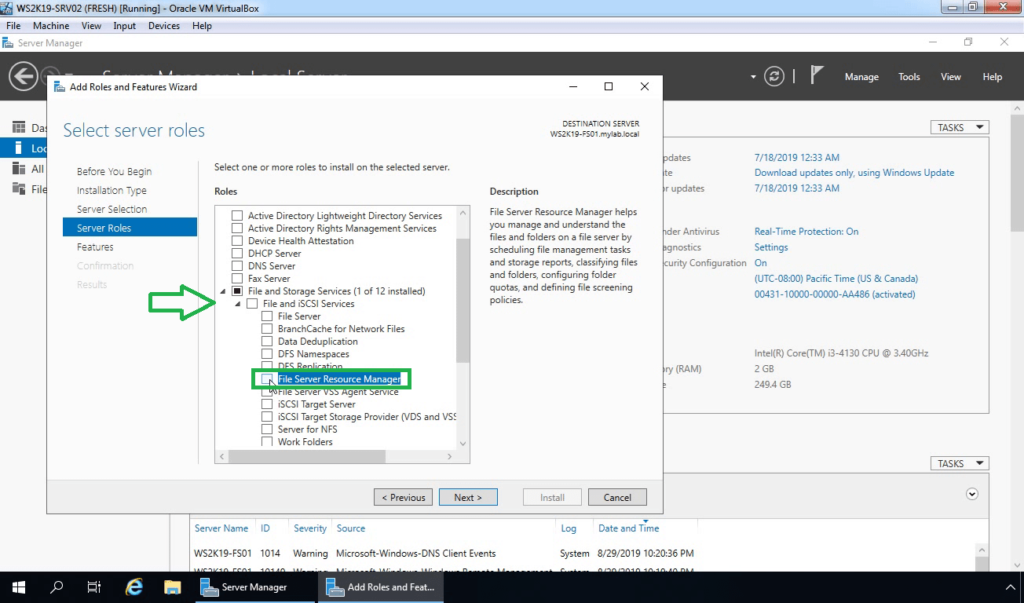
7. A new window will pop up, click on Add Features to include required features and management tools.
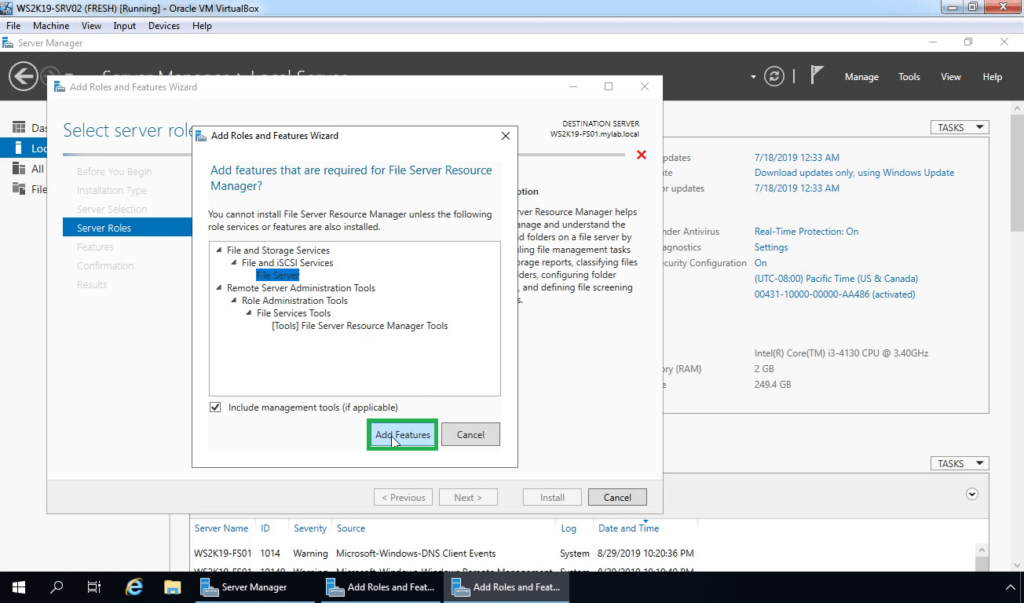
8. Make sure that File Server and File Server Resource Manager server role are selected. Click on Next.
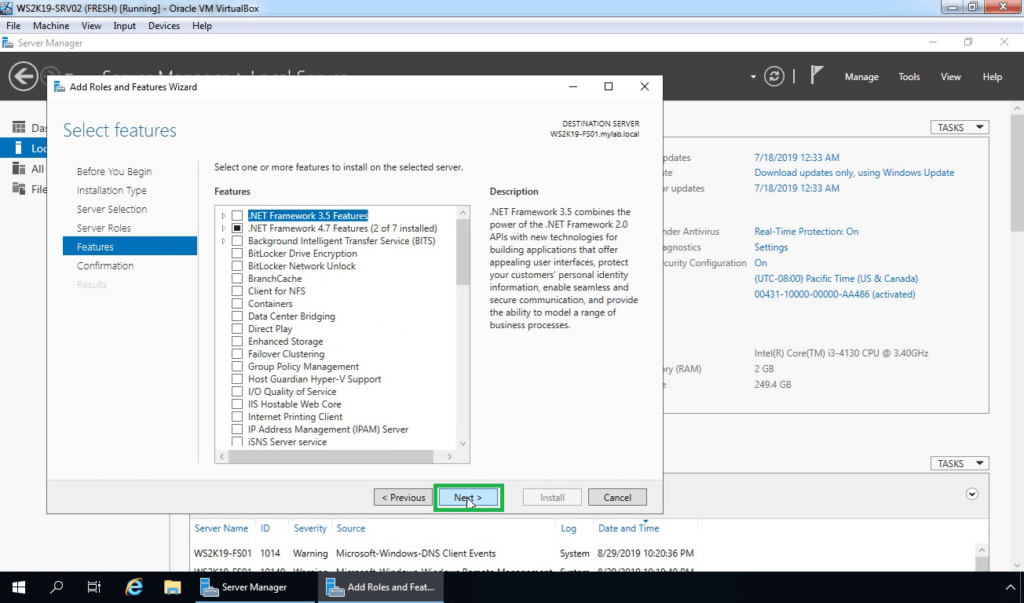
9. On select features page, click Next.
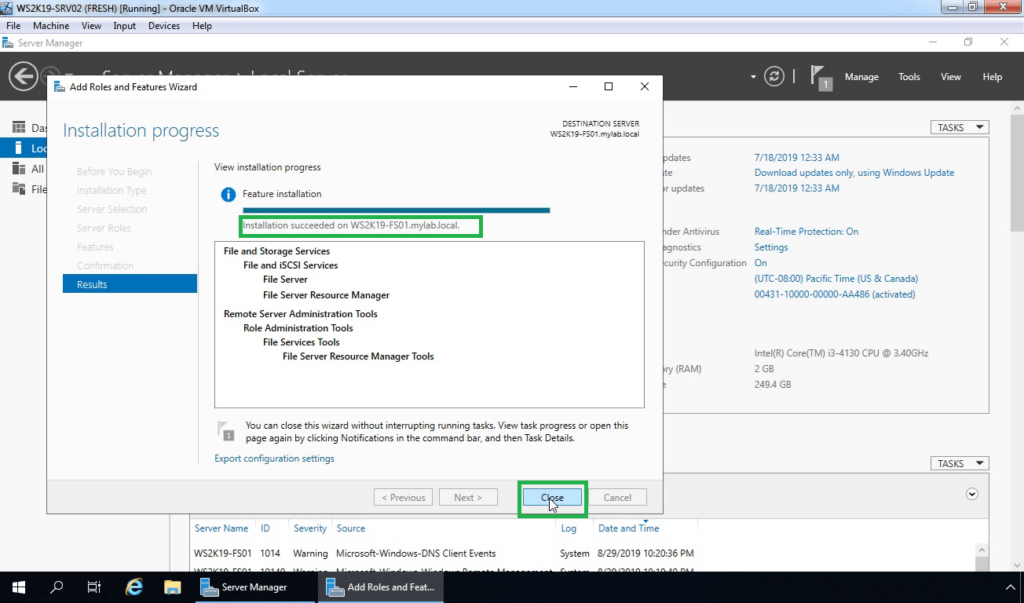
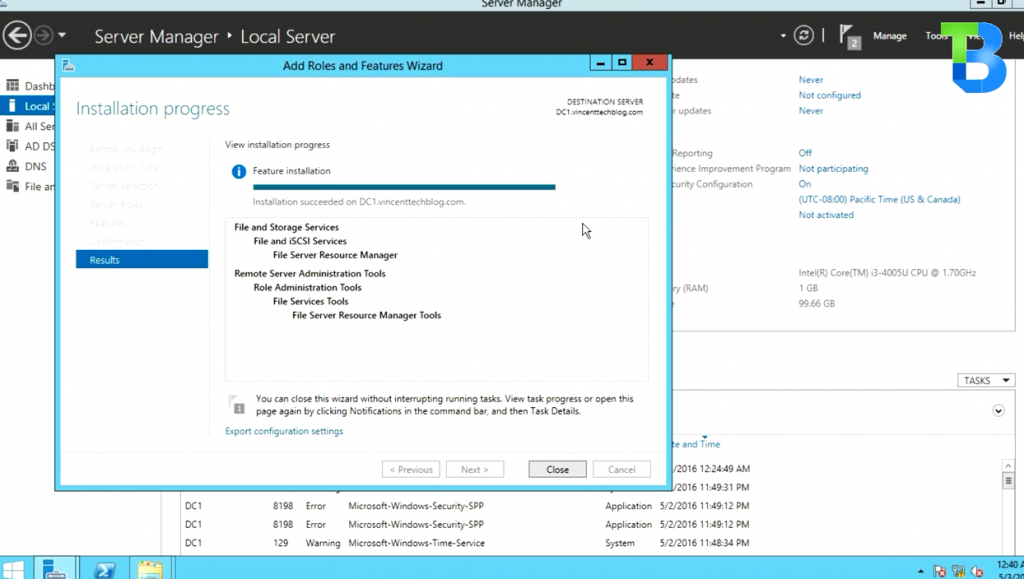
10. Click on Install to start the installation process.

11. When the installation is complete, click the Close button.
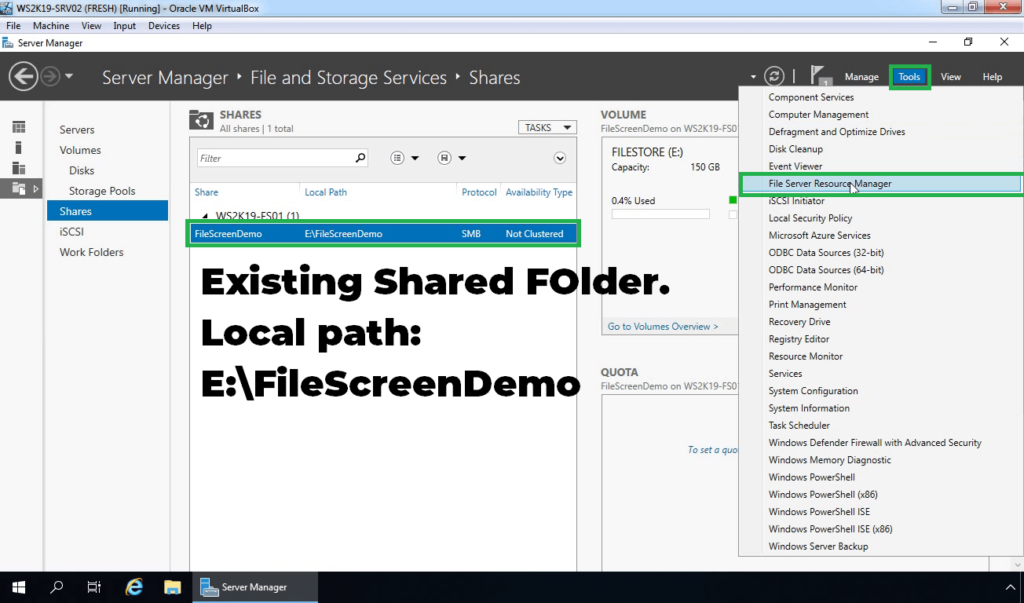
Note: Already I have created one shared folder on our file server for the testing purpose. We will apply File Screening on that shared folder.
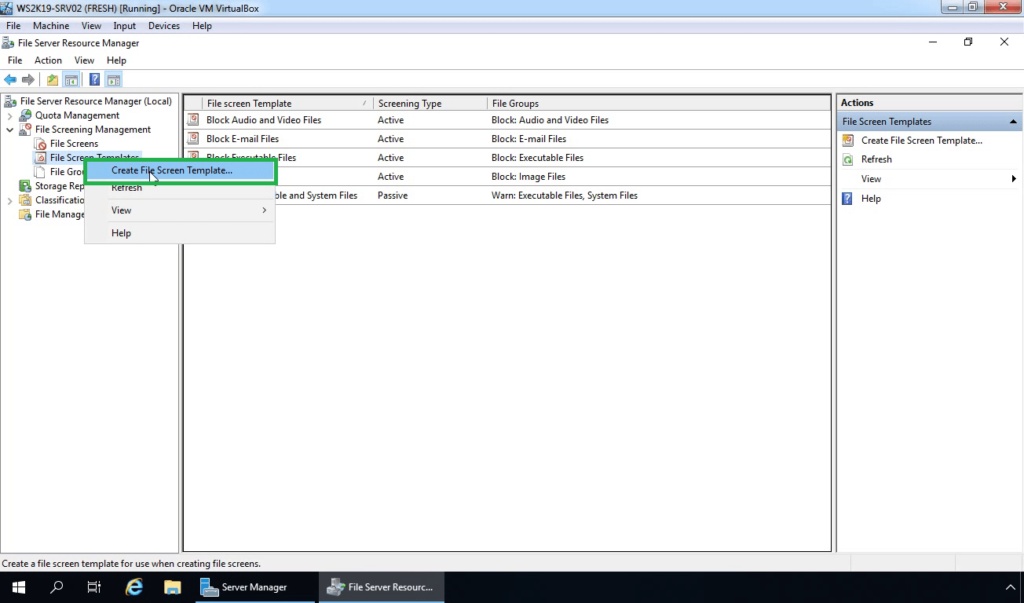
Create a File Screen Template:
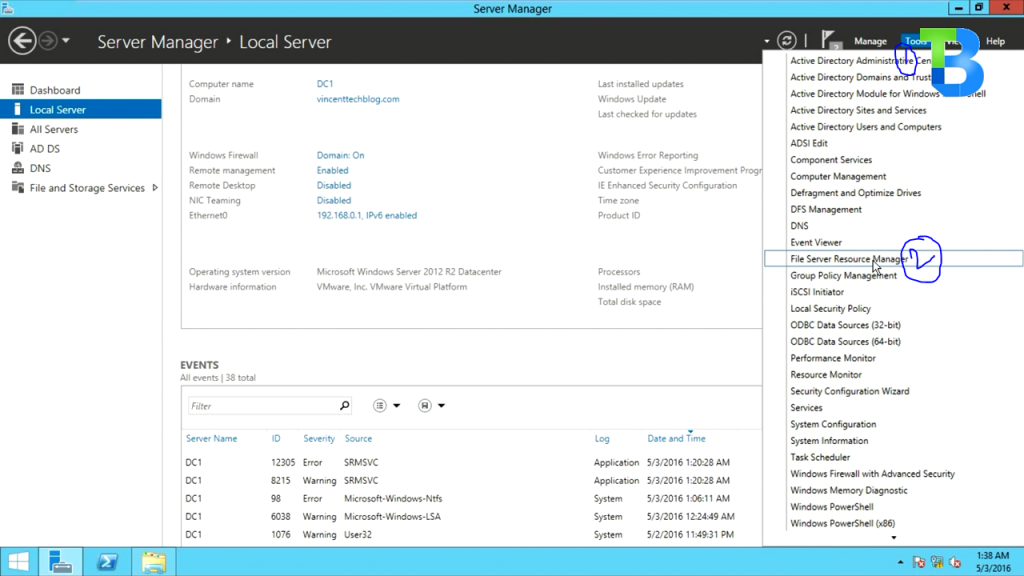
12. Click on Tools and select the File Server Resource Manager.
13. On File Server Resource Manager console, expand File Screen Management. Right-click File Screen Template and select Create File Screen Template.
14. In the Template name text box, type a name for a new file screen template.
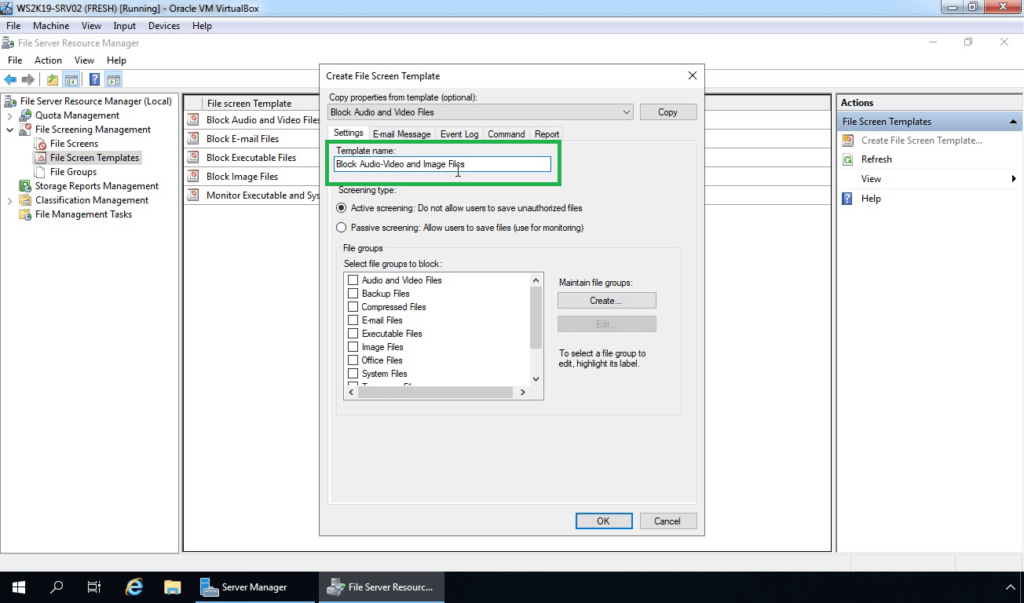
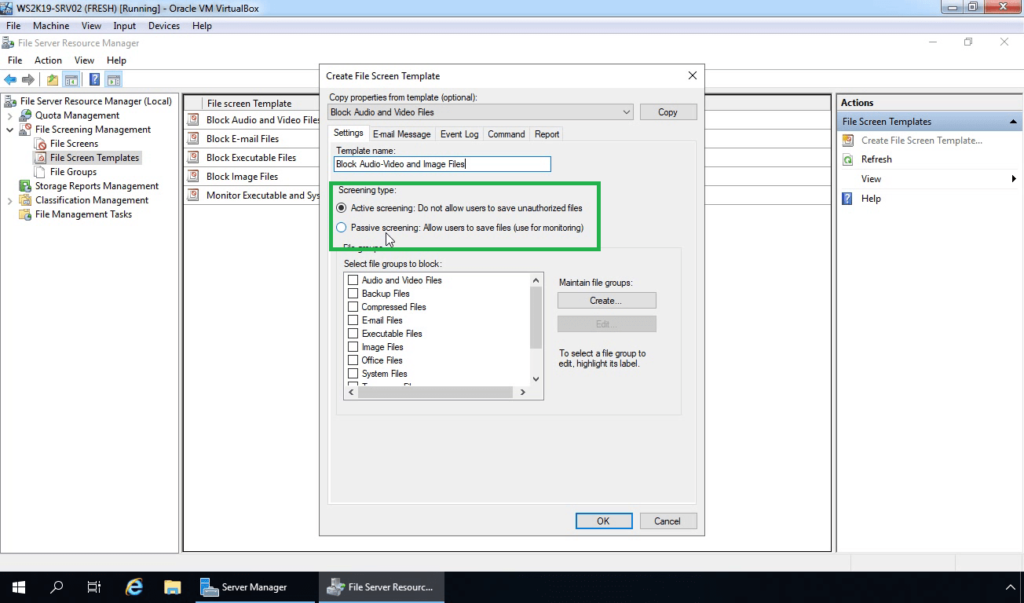
15. Under Screening type, click the Active screening or Passive screening option.
- Active screening prevents users from saving files that are members of blocked file groups and generates notifications when users try to save unauthorized files.
- Passive screening sends configured notifications, but it does not prevent users from saving files.
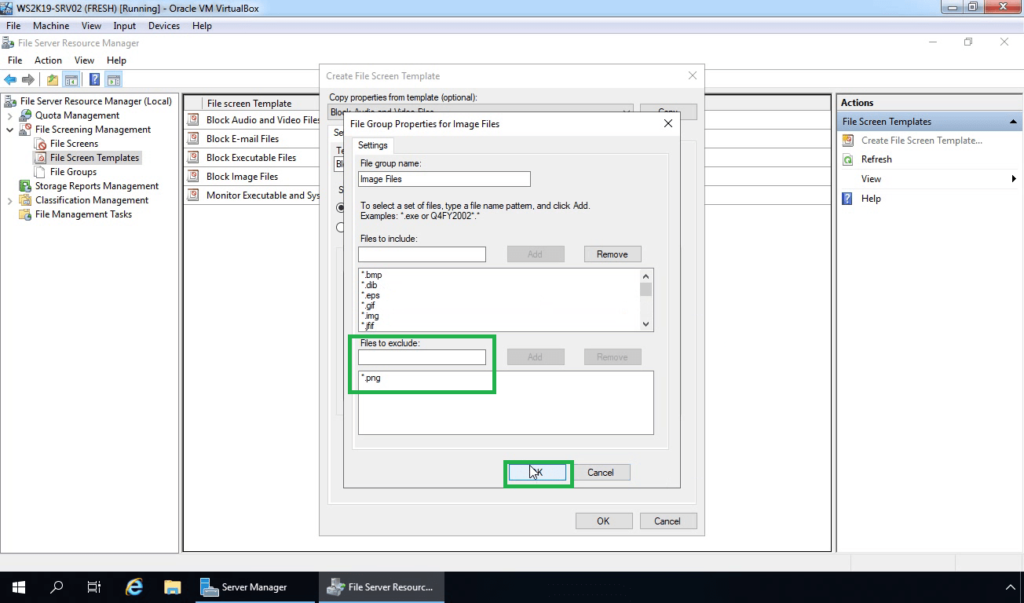
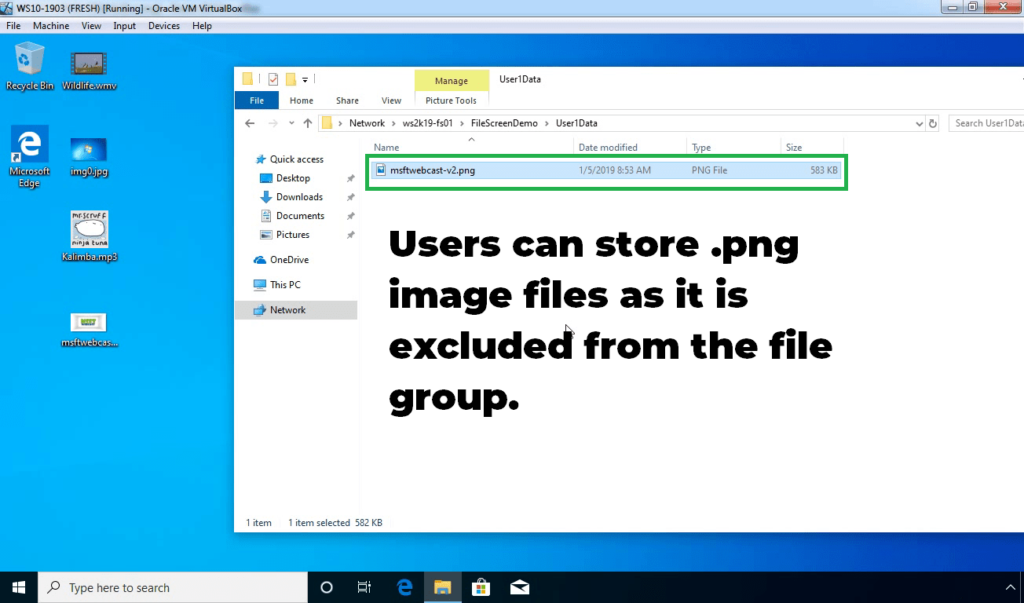
16. Select Audio and Video Files. Select Image Files and click on the edit button. We want to exclude .png file, so users can save only .png files.
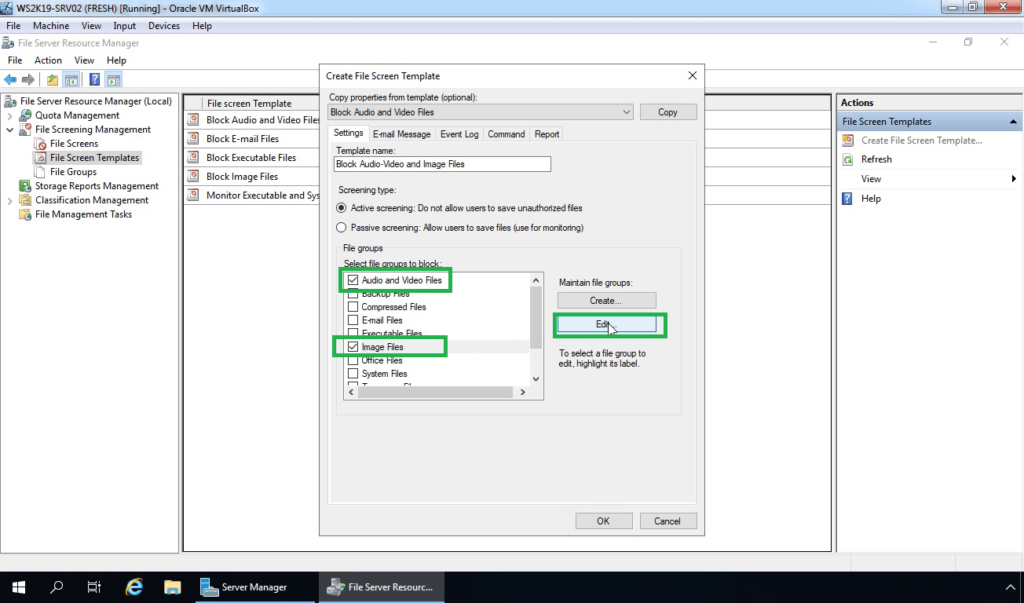
17. Under Files to exclude, type *.png and click on Add button. Once you are ready, Click OK.
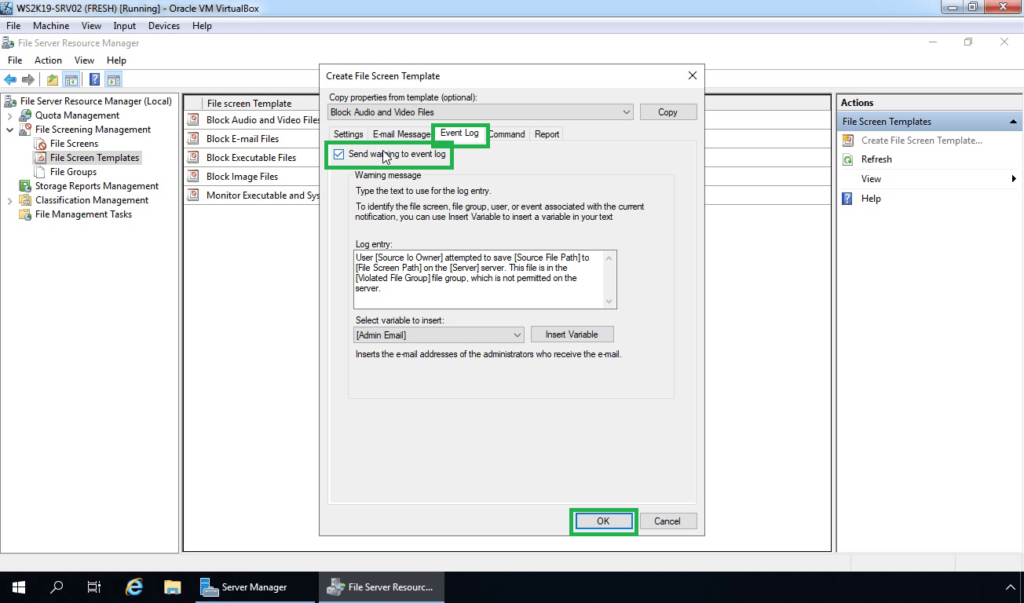
18. Click on Event Log tab, select the Send warning to event log checkbox. Click OK.
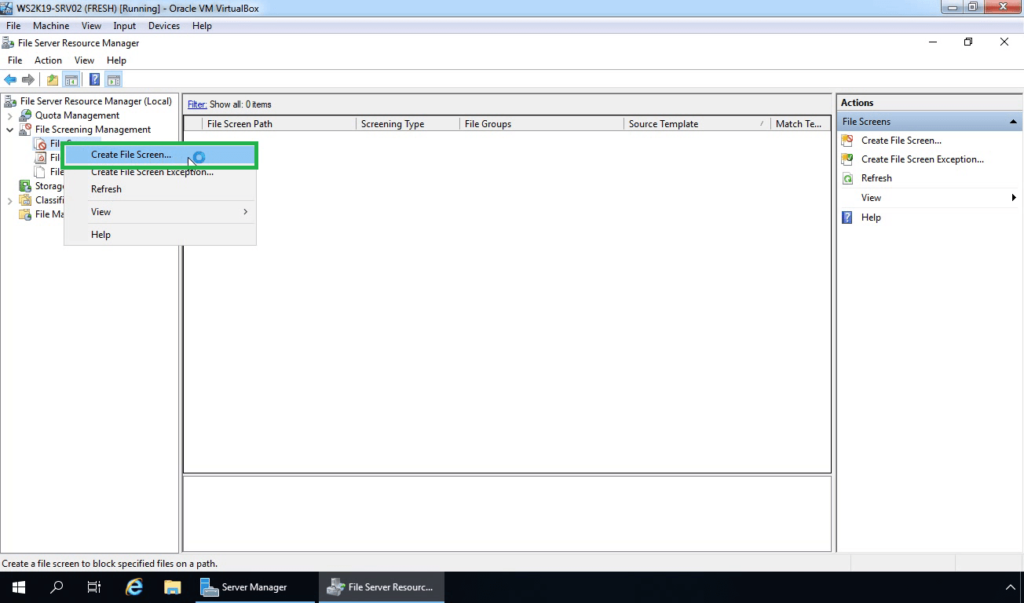
Creating File Screen in Windows Server 2019:
19. Right-click on File Screen and select Create File Screen.
20. Browse the path of the shared folder.
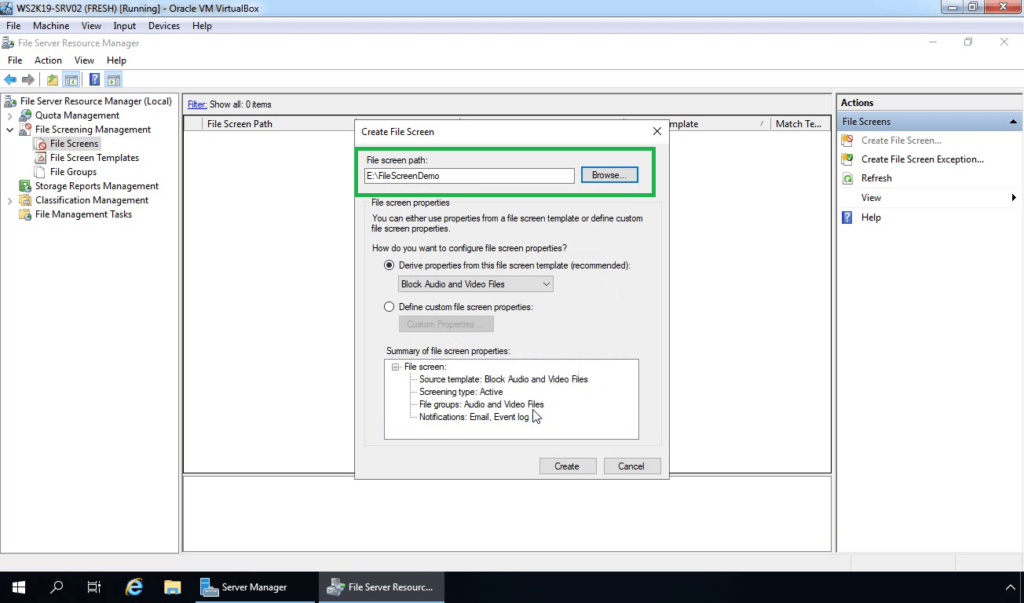
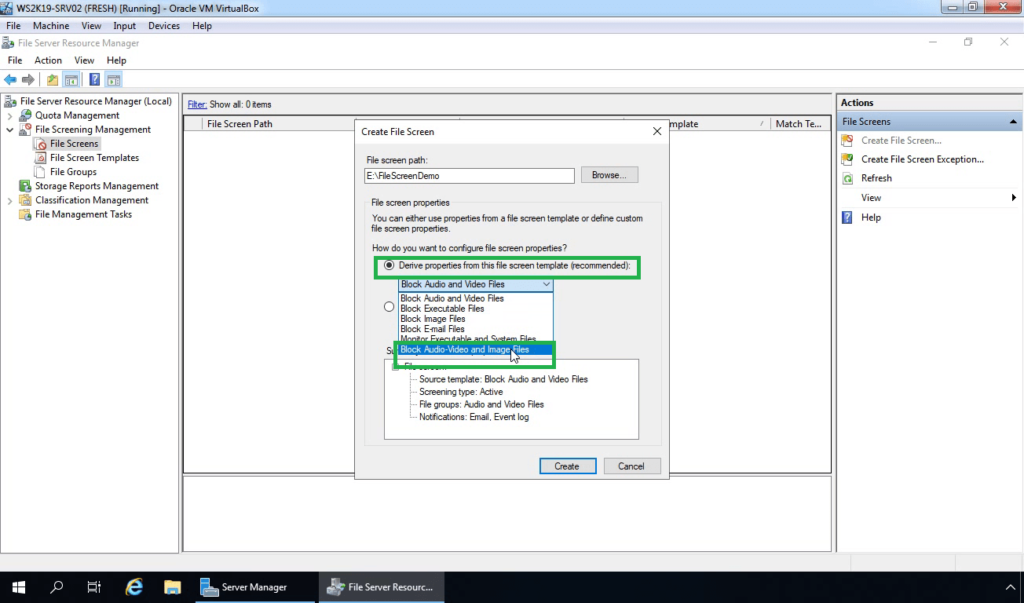
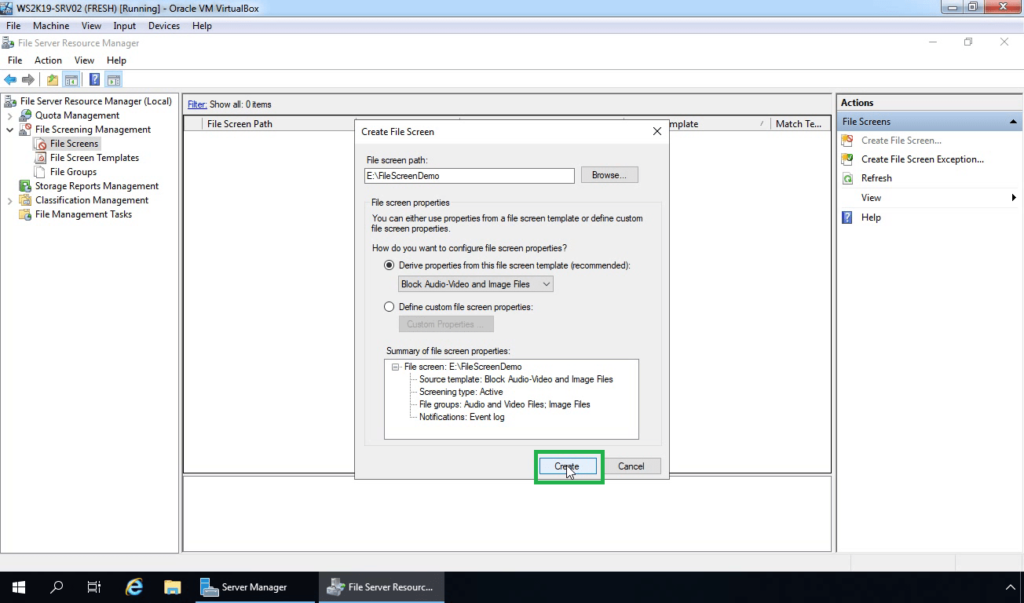
21. Choose the option, Derive properties from this file screen template (recommended). Select the File Screen Template which we have created earlier.
22. Click on Create.
How to test File Screening:
23. On Windows 10 client machine, access the shared folder. Try to copy any audio or video file to the folder for testing purposes.
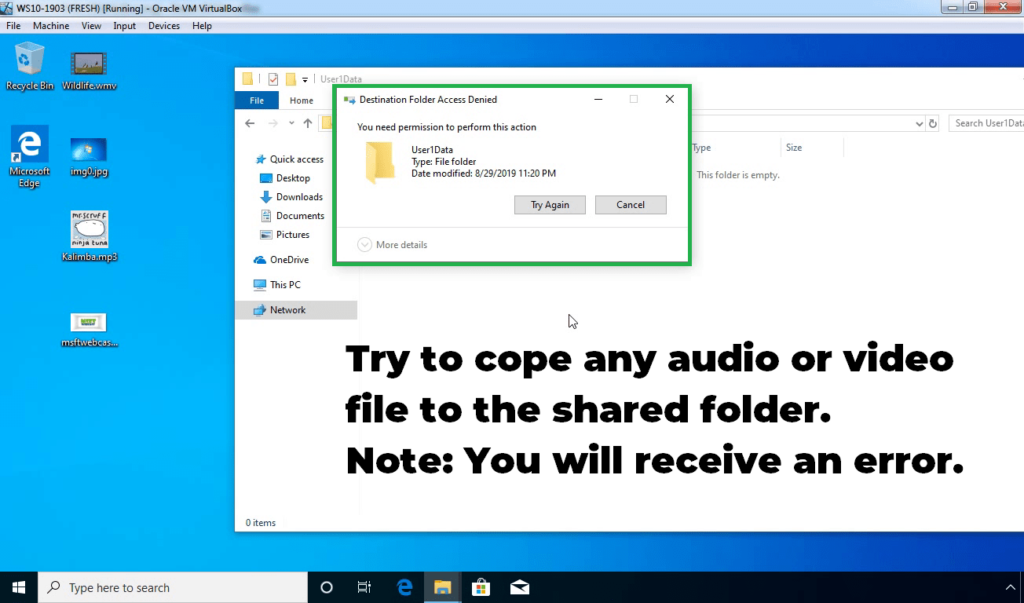
24. On a File server, open event viewer. Look for the event ID 8215.
25. If a user tries to save any .png image file then it is allowed as we have added the exclusion entry for .png file.
In this post, we have learned the steps to configure File Screening using file server resource manager in Windows Server 2019.
Hope this will be helpful. Thank you for reading.
Related Articles:
- Install and Configure DFS Namespace on Windows Server 2019
- How to configure DFS Replication in Windows Server 2019
- Configure Disk Quota with File Server Resource Manager (FSRM)
Post Views: 3,942
Welcome to this step by step tutorial, you will be learning about How to Install and Configure File Screening using File Server Resource Manager (FSRM) on Windows Server 2012 R2.
Installing FSRM.Installing FSRM on DC1Configuring File Screening Using FSRM on DC1Watch Video Tutorial
File Server Resource Manager is a pack of tools for Windows Server® 2008 or above that allows administrators to control and manage the quantity and type of data files that is stored on their network or servers.
Furthermore, File Screening is a tool part of the FSRM Pack of tools. It helps to Manage the type of data format stored on the server or network storage media.
The Step by step process below shows how to Install FSRM and Configure File Screening
Installing FSRM.
Prerequisite: Most of all, you should have a Domain Network configured and at least one client computer for testing after configuration. Also, Configure File Share or DFS for central file access to spice up our FSRM Configuration
Computers Used: DC1 (Domain Controller installed with Server 2012 R2) and a Client Computer (Installed with Windows 10)
Installing FSRM on DC1
Step 1
First of all, Go to Server Manager
Step 2
Select Manager – Add Roles and Features Wizard
Step 3
In addition, Select the “installation Type on the left panel” and choose “Role-Based or feature-based installation” and go for “Next”
Step 4
Also, expand “File and Storage Services” – Expand “File and iSCSI Services” and Select “File Server Resource Manager” Select Add Features from Pop up Dialog. And Select “Next”
Step 5
In addition, Select “Next” on the Select Features page
Step 6
As a result, Select “Install” on the confirm Installation Selections page
Configuring File Screening Using FSRM on DC1
When installation completes, Restart is not required
Step 1
On the Server Manager Console. Select “Tools” on the right top corner and choose “File Server Resource Manager”
Step 2
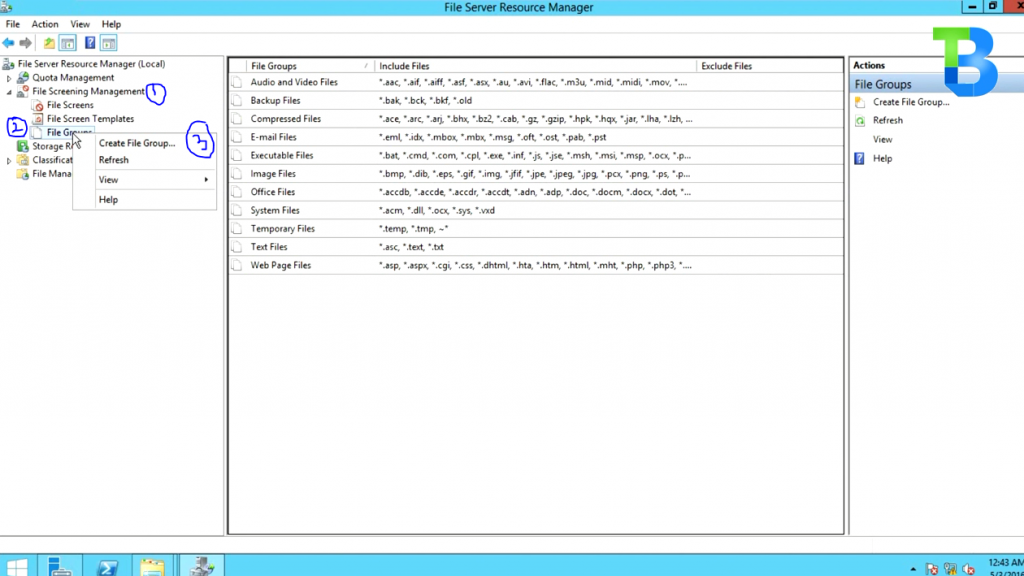
On the File Server Resource Manager console, Select “File Screening Management -> File Group”.
Right-Click on “File Groups”. Select “Create File Group
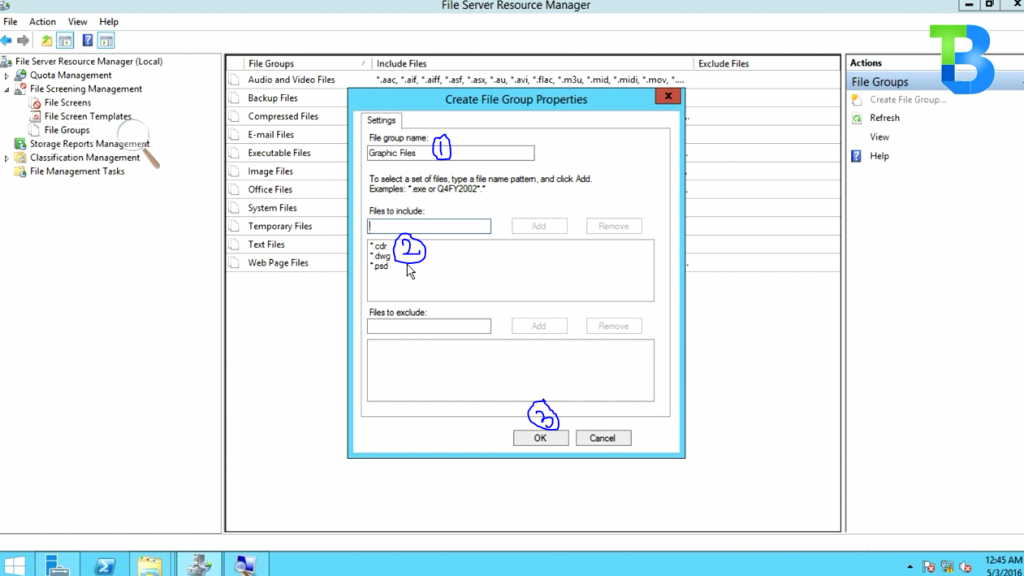
Step 3
Name your file group and add file extensions, then select “OK”
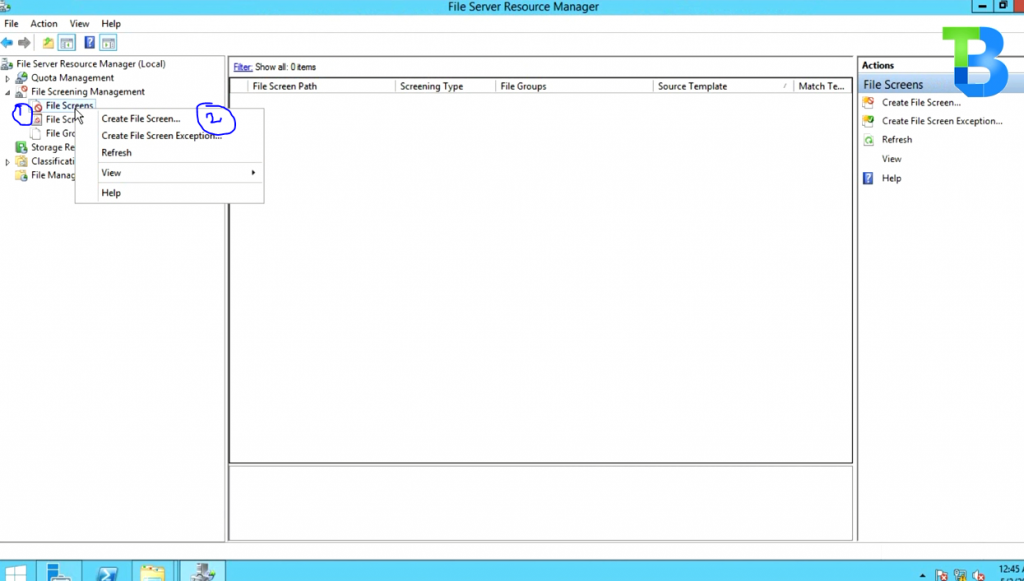
Step 4
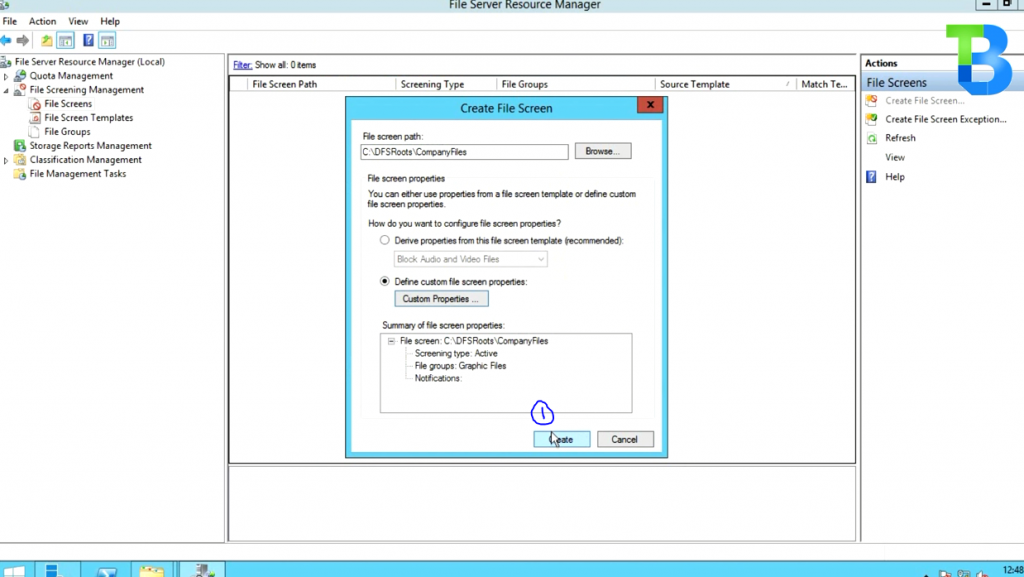
Thereafter, Switch to File Screen utility on the left pane. Right-Click and Select Create File Screen
Step 5
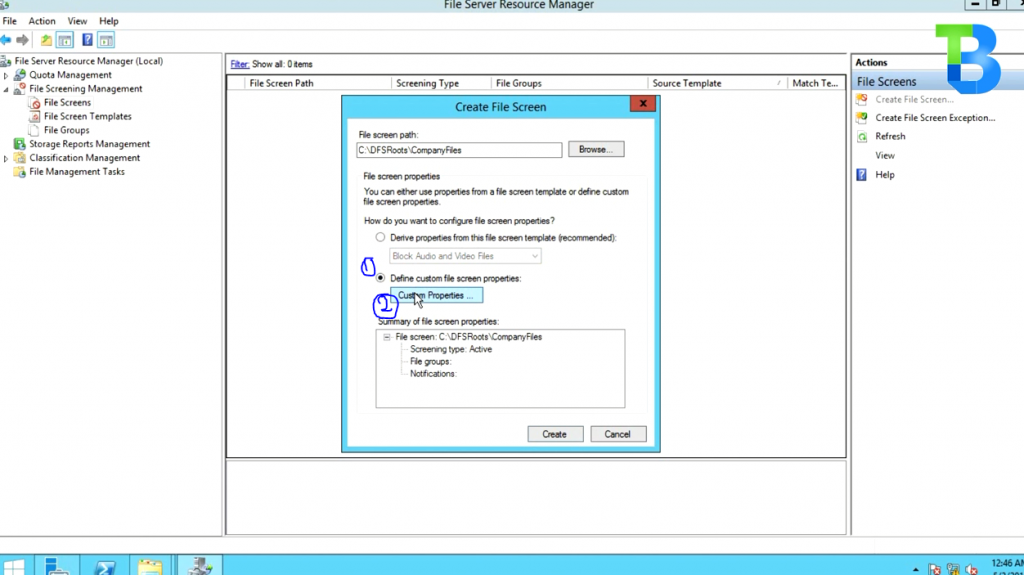
From here, Browser for File Screen Path

Step 6
Furthermore, Select “Define Custom File Screen Properties” and choose “custom Properties”
Step 7
Allso, under the “File Groups” Section, select “Your file group you created. Ours is “Graphic Files” and choose OK
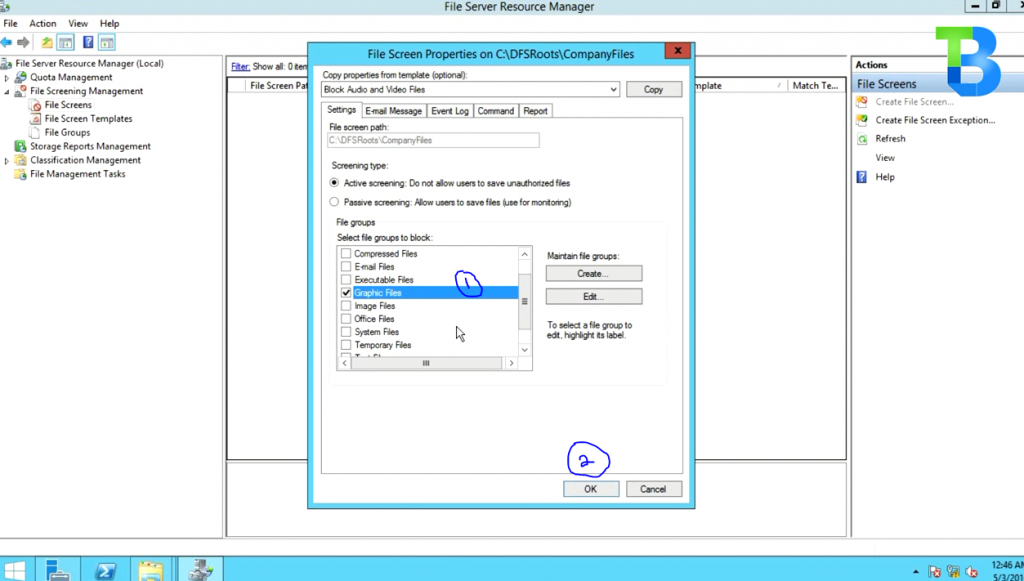
Step 8
In addition, Select “Create”
Step 9
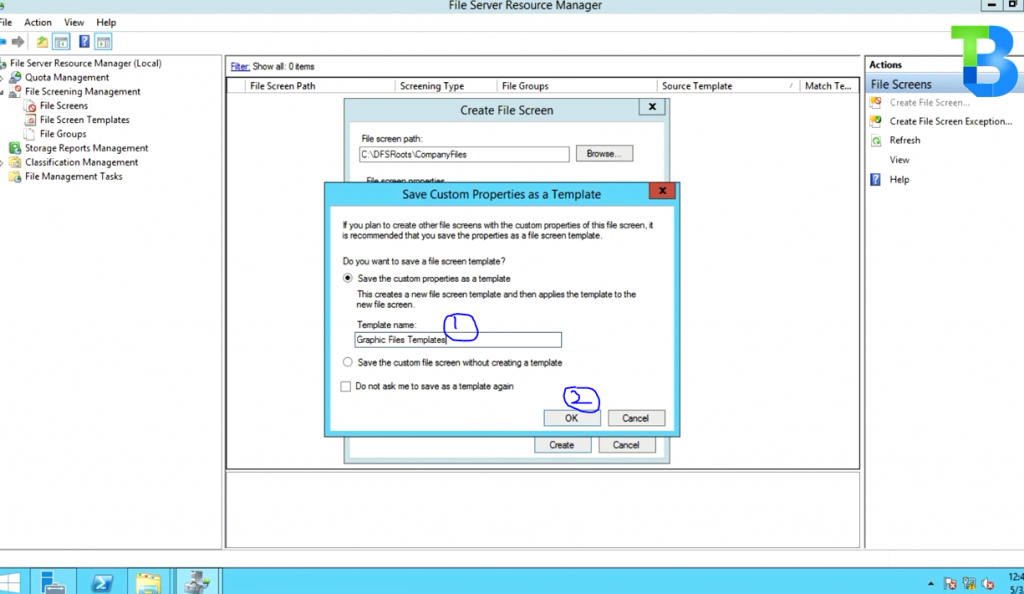
Finally, Save as a template with your preferred name. Our is “Graphic files template” and choose OK
We are done.
Therefore, next is to test the File path selected by Storing Graphic Files with the format we block and see our file screen in operation.
OR
Watch Video Tutorial
С помощью диспетчера ресурсов файлового сервера можно запретить пользователям сохранять файлы на сетевом диске с определенным разрешением или определенного размера, устанавливать квоты, настраивать мониторинг.
Первоначально для работы необходимо установить роли File Server, File Server Resource Manager и средства управления (Tools). Отмечаем эти компоненты в мастере установки в Server Manager и нажимаем Install.

Их можно установить гораздо быстрее, используя PowerShell. Запускаем PowerShell и вводим команду, которая установит сразу все необходимое:
Install-WindowsFeature -Name FS-FileServer, FS-Resource-Manager, RSAT-FSRM-Mgmt

Вначале нужно определиться с типами файлов, которые будут блокироваться. Минус в том, что правила используют расширения файлов, и если пользователь изменит расширение файла, то ограничение уже не отработает.
Нажимаем Win+R (Выполнить) вводим fsrm.msc и нажимаем Enter. Откроется оснастка File Server Resource Manager. Также ее можно запустить из Server Manager.

Преднастроенные (по-умолчанию) типы файлов находятся в группе File Screening Management — File Group.

В свойствах имеется возможность добавлять свои расширения файлов.
Знак * перед расширением — это знак, означающий, что любое имя файла с этими расширениями может быть заблокировано. Также могут быть разрешены или запрещены сами файлы, на основе содержимого самого имени, а не только расширения.
В группе File Screen Templates находятся готовые шаблоны, которые можно использовать или изменять.

В шаблоне Block Audio and Video Files включен (Active screening) активный мониторинг, т.е. он не позволит пользователю сохранить файлы, в то время как пассивный мониторинг (Passive screening) будет только мониторить и позволять сохранять файлы.
В Свойствах шаблонов имеются дополнительные вкладки для настройки уведомлений на электронную почту, которое получит пользователь, попытавшийся сохранить заблокированный файл. Это весьма полезная функция, если сотрудник не ознакомлен с правилами работы с сетевыми ресурсами. Сразу же можно отправить письмо в службу технической поддержки. При включении этой опции вы увидите предупреждение, т.к. у вас должен быть настроен SMTP-сервер.
В теме письма можно написать, почему нельзя сохранять тот или иной тип файлов.

На вкладке Event Log можно настроить регистрацию и запись события при попытке сохранить файл. Можно использовать переменные, которые будут автоматически подставляться в сообщение.

Вкладка Command позволяет указать программу или скрипт, который запустится при попытке сохранить неразрешенный файл. Можно указать уровень привилегий, с которыми будет запускаться программа или скрипт, т.к. у разных учетных данных могут быть различные права.

Последняя вкладка Reports. Отчет может быть автоматически сгенерирован и отправлен по электронной почте администраторам или пользователю, пытающемуся сохранить неавторизованный файл.

Создадим блокировку файлов мультимедиа. Шаблон по-умолчанию для этих файлов уже имеется.
Перейдем в File Screening Management — File Screens и выберем Create File Screen.

Сначала нужно указать каталог, к которому будет применяться блокировка. Выбрать шаблон (Block Audio and Video Files). Нажать Create.
Настройка будет применяться ко всему содержимому указанного каталога.
Так как в шаблоне блокировки установлено расширение *.mp3 создать или изменить файл в указанной директории не получится. Система покажет сообщение «File Access Denied«.

В группе Quotas Management Quota Templates существуют преднастроенные шаблоны квот. Эти шаблоны обладают такими же свойствами, как и шаблоны блокировки. Отправка предупреждения на почту, запись в лог, выполнение команды и отчет.
Создадим жесткую квоту в 100 MB, т.е. запись в папку будет ограничена при достижении объема в 100 MB.

При сохранении больше 100 MB получим сообщение, что нет свободного места.

Posted by
on March 17, 2017
We can configure file screens with File Server Resource Manager (FSRM) in Windows Server 2016 to restrict users from saving defined file types to the file share. For example, we can configure file screening to deny users from saving large video files on the file server.
In this example we’ll show you how to configure file screens in Windows Server 2016, however the steps are very similar to older versions of the Windows operating system.
To use this feature you must first install the FSRM role.
This post is part of our Microsoft 70-744 Securing Windows Server 2016 exam study guide series. For more related posts and information check out our full 70-744 study guide.
About File Screens
To configure a file screen we need to pick the types of files that we wish to screen and then choose how we want to deal with them. The limitation here is that if a user can edit the file extension or name to something else, the file may not correctly be screened as the content of the file itself is not checked.
A file screen is made up of a file screen template, which contains a file group.
Configure File Screens
Now that we understand what file screens can do, let’s take a look at configuring some examples. From Server Manager, select Tools > File Server Resource Manager.
File Groups
As file screens work based on file extensions, we must first define the file extensions that we want to block. If we look in the file groups section under File Screening Management we can see the default groups of file extensions that are ready to use.
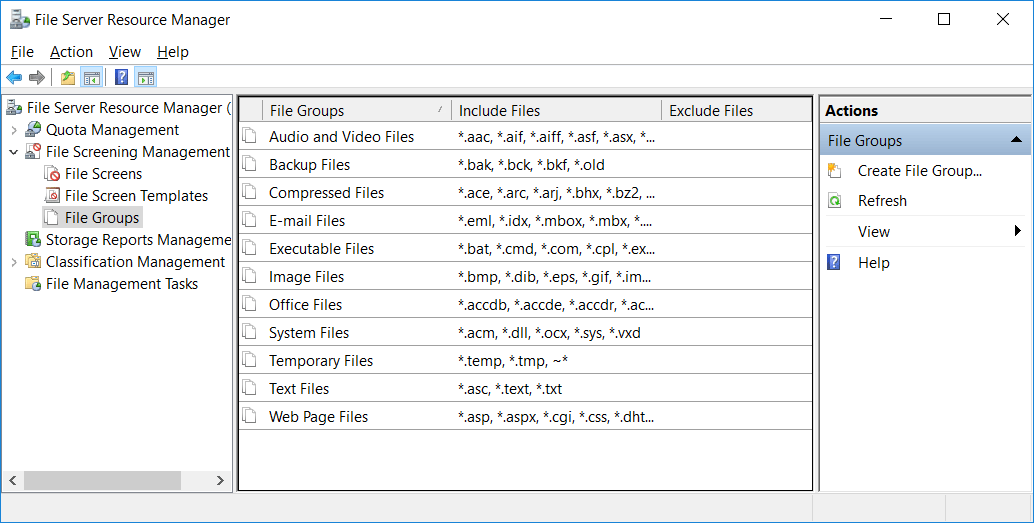
We can double click any of the existing file groups to see the file extensions that are included. In the below example we can see the text files group will screen out any files with the .asc, .text, or .txt extension.
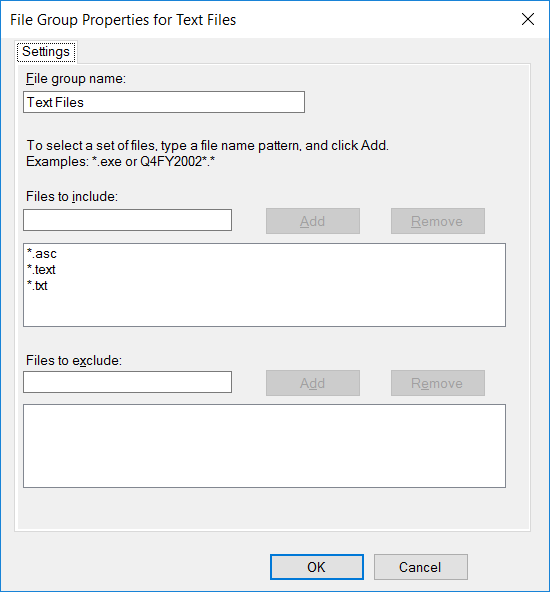
The * before the extension is a wildcard, meaning that any file name with these extensions can be screened. Files can also be allowed or denied based on the contents of the file name itself, not only the extension. We can also optionally add in file extensions or parts of the file name that we wish to exclude from the file screen. Exclusions are useful if a file screen has been applied at a higher level, this way the exclusions can remove file screens inherited from the higher level to the folder the exclusions are set on.
File Screen Templates
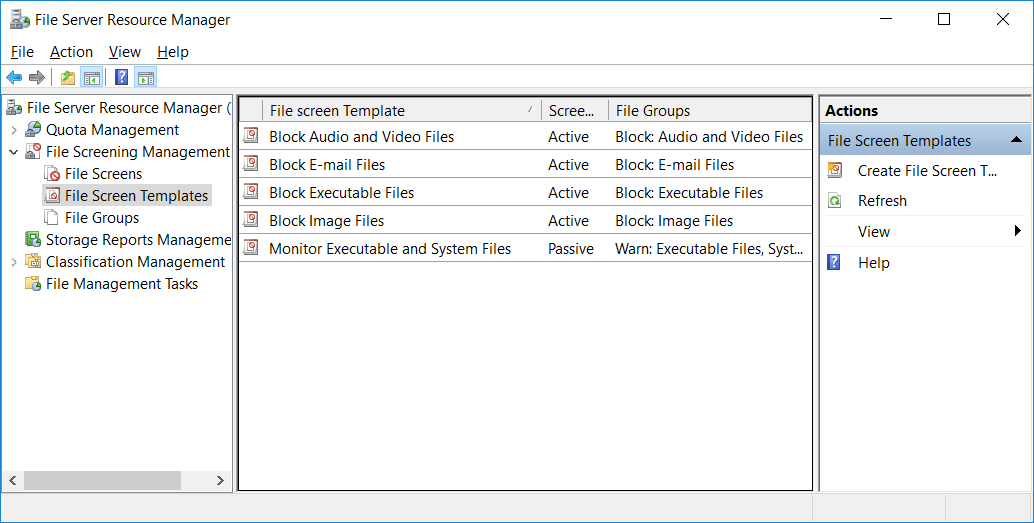
Before creating the file screen itself we must first create a file screen template. We can see that there are some existing default file screen templates that can be used or modified.
In this example we’ll create a new file screen template, as shown below.
Now let’s look at the settings available in the file screen template.
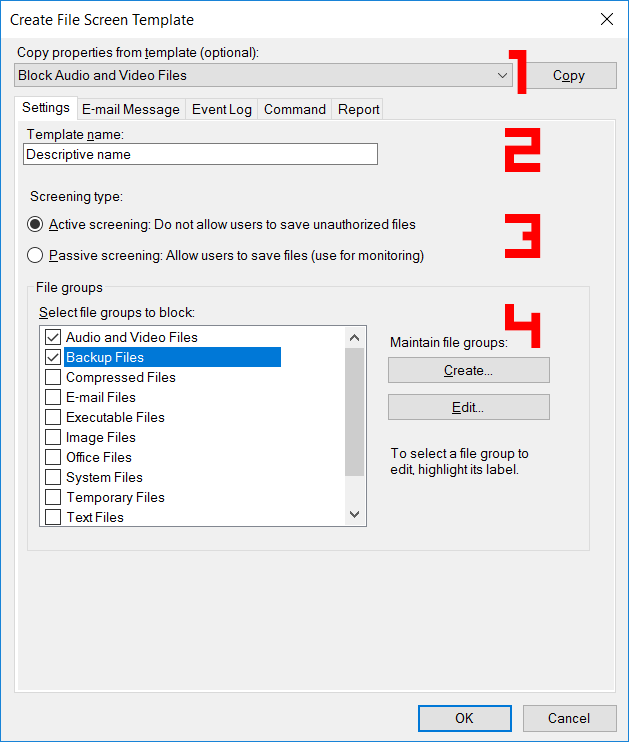
- At the top of the Create File Screen Template window we can optionally select an existing file screen template to use as a baseline. Simply select one from the drop down and click copy, the settings from that template will then be imported here and you will not have to create everything from scratch.
- Next we can set a name for the template.
- Following the name we can set the screening type as active or passive. Active screening does not allow users to save unauthorized files specified in the selected file group, while passive screening does allow this but the activity is logged.
- Finally we can select the file groups that this template should block, you can select as many as you want and if you click the create button you’ll be presented with the same window that we saw above when creating our file group, so you can instead create the file group completely through here.
Other than the settings, there are also tabs for configuring email, event logs, commands to run, and reports in the create file screen template.
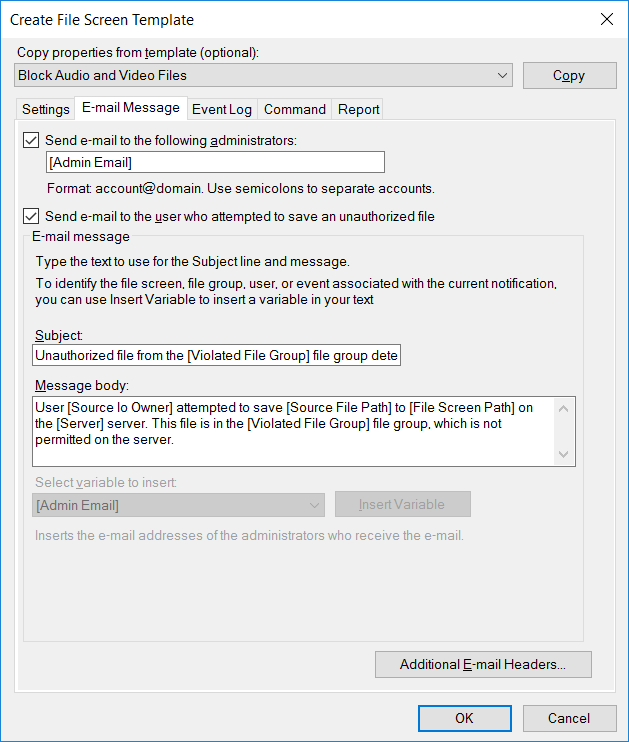
Under the E-mail Message tab we can configure an email notification to be sent to either administrators or the user who attempted to save an unauthorized file every time this happens. This could be useful to advise a user why they are not able to save a file, as the message body can be customized.
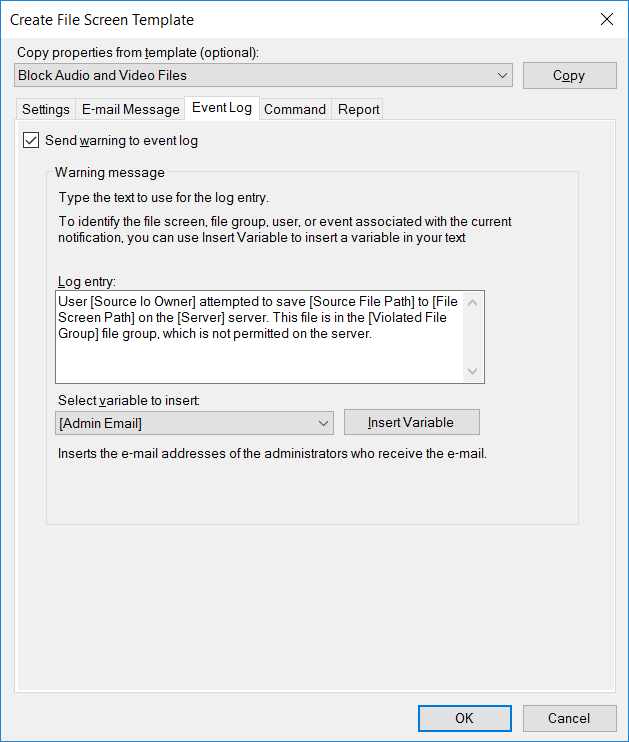
Under the Event Log tab we can configure an event to be logged when a user tries to save an unauthorized file. The log message can be customized with various useful variables available from the drop down menu which can be inserted into the message body. This option may be useful if you have monitoring on log files and want to create an alert when this sort of event happens.
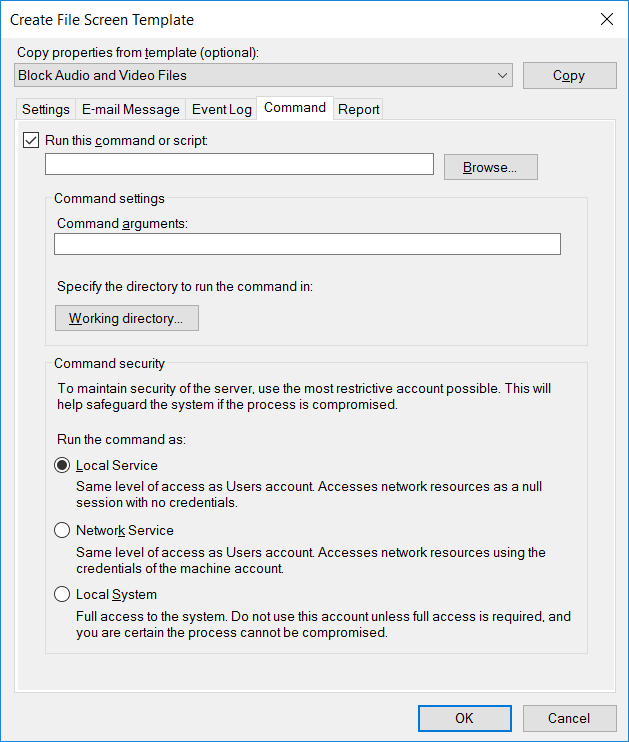
The command tab allows us to configure a command or script to execute along with specific arguments from a defined working directory. This may be useful if you want to automatically trigger some custom action to take place if a user attempts to save an unauthorized file. We can also specify the level of privileges that the script runs with, which can be useful as different accounts will have different access over various files.
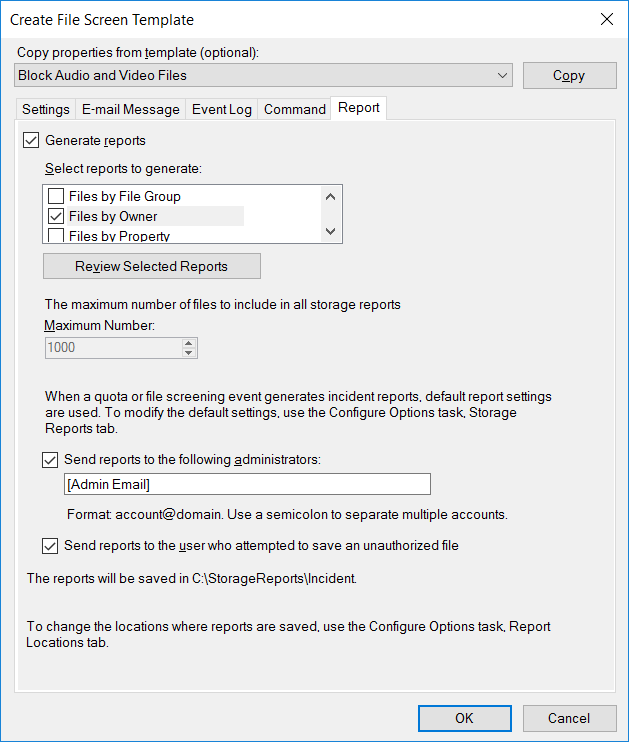
A report can be automatically generated and sent by email to administrators or the user that tries to save an unauthorized file. The types of reports available here don’t seem too useful with regards to having an unauthorized file blocked in my opinion, but it’s an option nevertheless.
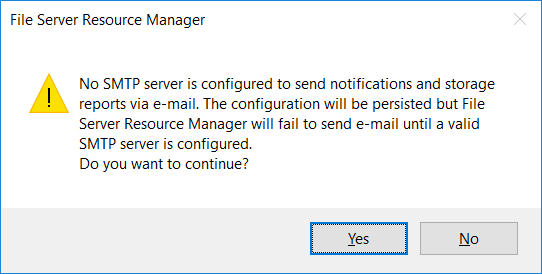
Note that to send mail through any of these options, you must install and configure an SMTP server. You’ll be warned about this if you enable any of the mail options.
File Screens
Now that we have our file screening template created with a file group specified, we are ready to create the file screen itself. This part is fairly straight forward as we’ve already done most of the configuration, we just need to apply it onto a specific folder.
A file screen is created under File Screening Management > File Screens and selecting Create File Screen.
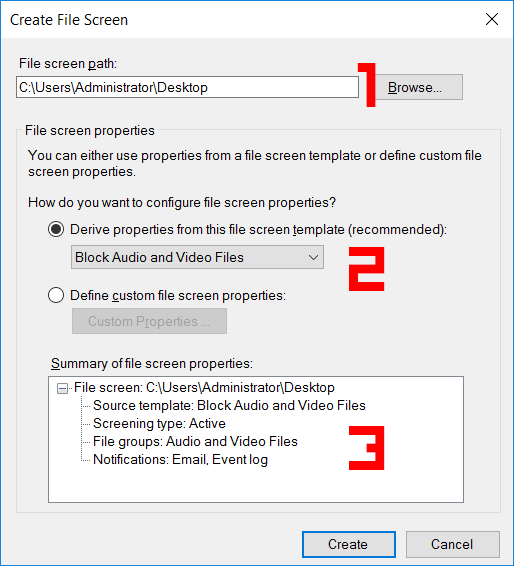
- First select the file screen path, this is the folder that we want to apply the file screen template to.
- We can now select the file screen template that we created previously or any other file screen template. We can instead define a custom file screen which will allow us to create a new template through this interface. As the new file screen template window also allows us to create a new file group, technically we could create all components just by creating a file screen.
- Finally we can view a summary of the file screens properties and get a brief overview of what it will actually be doing.
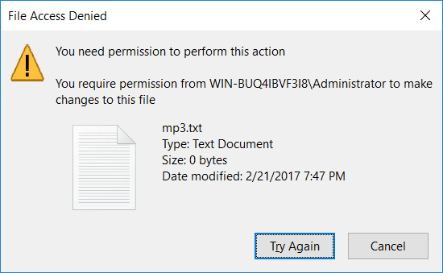
The file screen will apply to all contents within the directory recursively. In the below example I created the file mp3.txt, when I try to rename this to mp3.mp3 we get the below error message, as I have configured a file screen with the audio and video files default file group.
Summary
We can configure file screens with File Server Resource Manager (FSRM) in Windows Server 2016 to automatically deny users from saving files with a specific file extension or string in the file name. While this can be useful to a degree, a savvy user will be able to simply modify the file name or extension and save the file anyway, as the contents of the files themselves are not checked with this feature of FSRM.
This post is part of our Microsoft 70-744 Securing Windows Server 2016 exam study guide series. For more related posts and information check out our full 70-744 study guide.