
Provide feedback
Saved searches
Use saved searches to filter your results more quickly
Sign up
Appearance settings
Sign in to your MUO account

It can be very beneficial to re-create common apps when learning about Windows Forms. Doing so can also help reinforce your basic understanding of programming. One example of an app you can build is a basic file manager.
The file manager app should consist of quick links to common Windows folders (Desktop, My Documents, Pictures, Music, and Videos). It should also have the ability to navigate up and down directories.
How to Add UI Elements Onto the Canvas
First, create a new Windows Form application in Visual Studio. Once completed, you can start adding UI elements for the file manager onto the canvas.
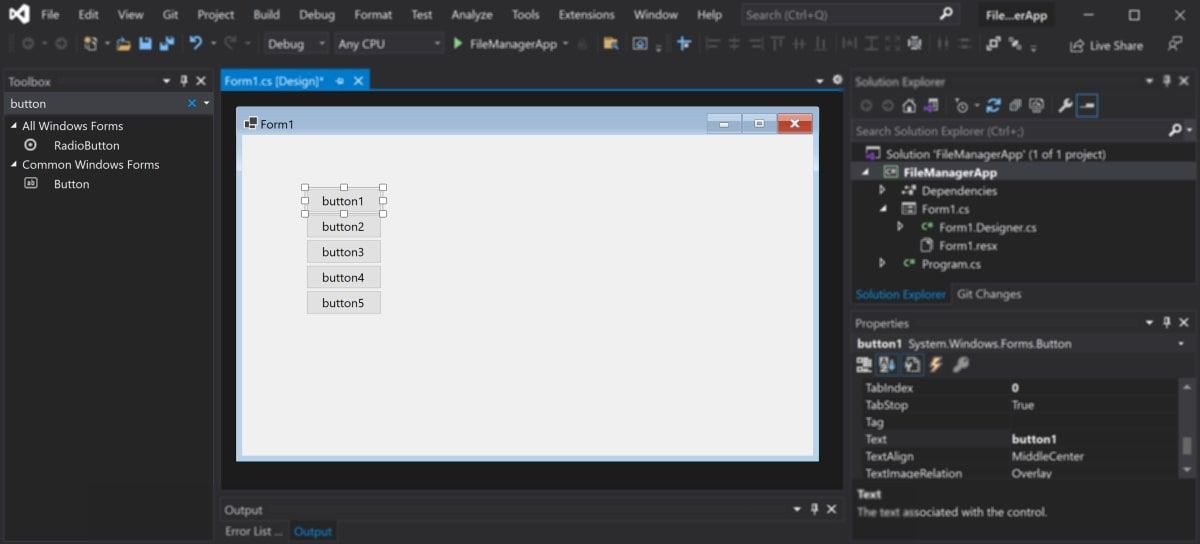
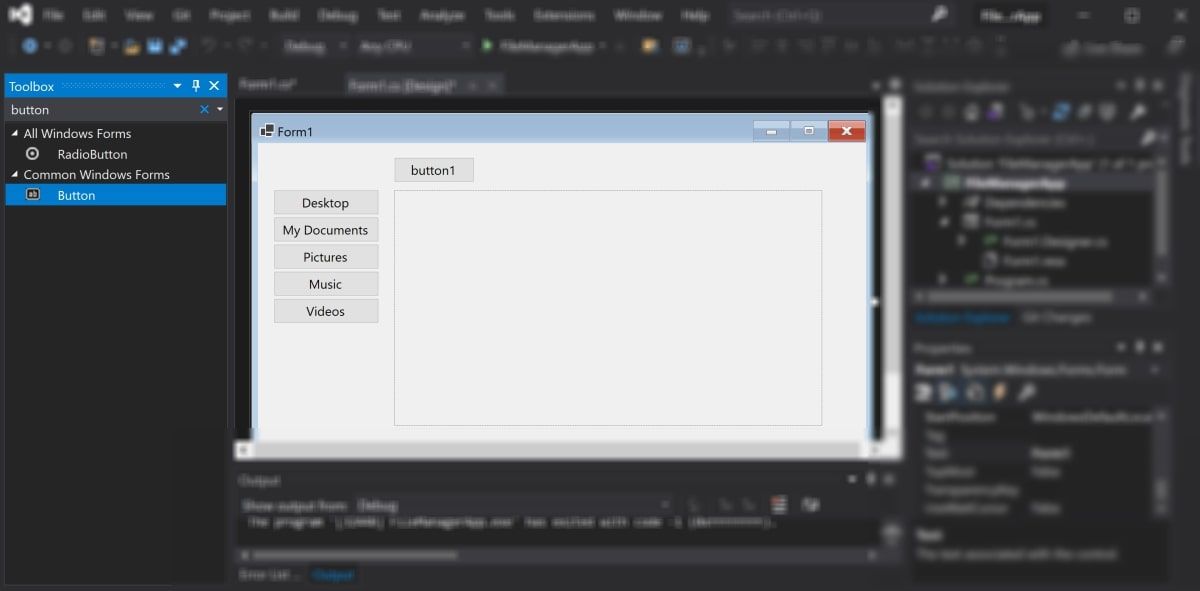
- With the canvas opened, search for a Button UI element using the Toolbox.
-
Drag and drop five buttons to represent the quick links that are available on a Windows computer. These will represent the Desktop, My Documents, Pictures, Music, and Videos folders.

-
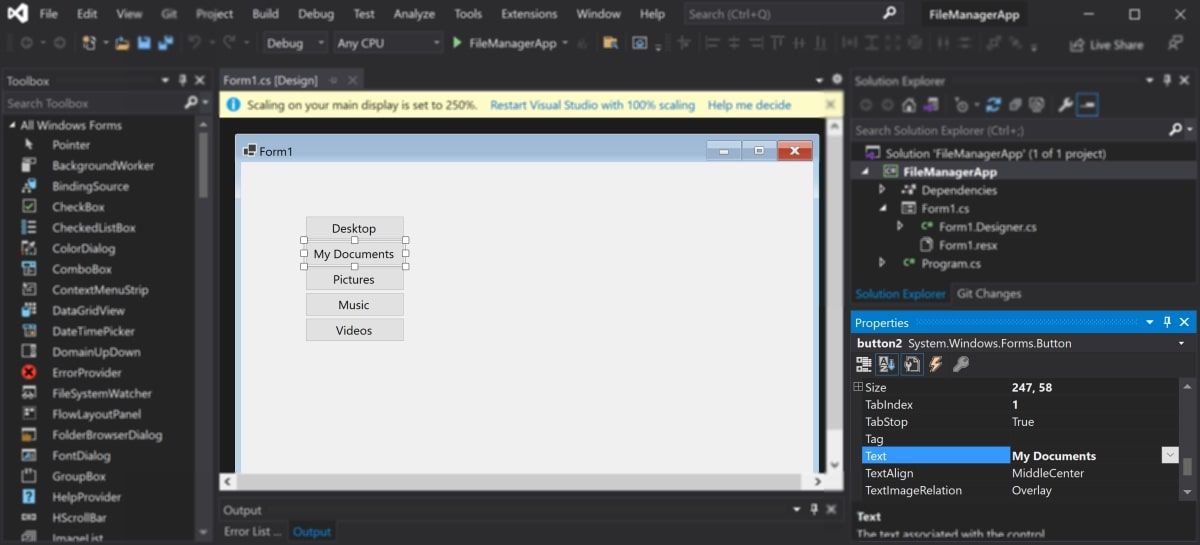
Highlight each button in turn and navigate to the Properties Window. Change each button’s Name Property and Text Property to the following values:
Button
Name Property
Text Property
1
button_Desktop
Desktop
2
button_Documents
My Documents
3
button_Pictures
Pictures
4
button_Music
Music
5
button_Videos
Videos
-

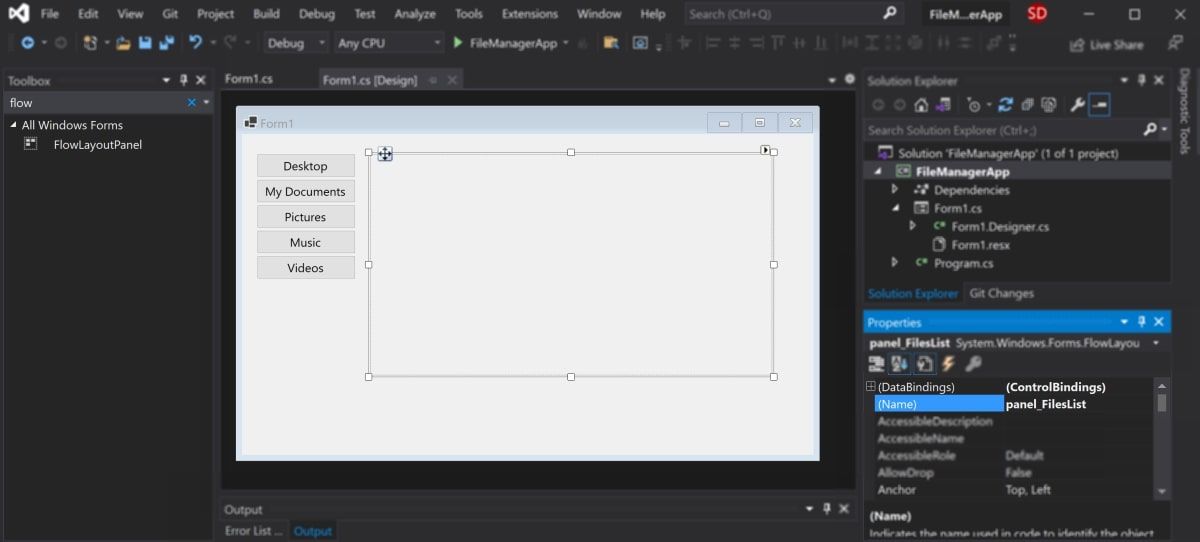
Search for a FlowLayoutPanel UI element using the Toolbox.
- Drag and drop it onto the canvas, and position it next to the quick links. This is where you will display your files and directories based on the directory you are currently viewing.
-
Highlight the panel and change the Name property to “panel_FilesList”.

How to Get the Current File Path
When you click on a button (for example, Desktop), the list of folders and files that are on the Desktop should display in the panel. To do this, you can get the file path of the folder you have clicked on, i.e., “C:\Users\User\Desktop”.
Write the logic for this in the code-behind C# file for the form. If you are unfamiliar with C# classes, you can learn more about classes in C#.
-
Double-click on each of the buttons on the UI. This will generate click event functions for each button inside the C# file for the form. These functions will run when you click the associated button.
private void button_Desktop_Click(object sender, EventArgs e)
{
}private void button_Documents_Click(object sender, EventArgs e)
{
}private void button_Pictures_Click(object sender, EventArgs e)
{
}private void button_Music_Click(object sender, EventArgs e)
{
}private void button_Videos_Click(object sender, EventArgs e)
{
} -
To get the file path of a special windows directory such as the Desktop, use the Environment.GetFolderPath() method. This will return a string of the filepath for the folder, for example, “C:\Users\User\Desktop”. Add this to each function, and pass the filepath value into another function called DisplayFiles(), which you will create later.
public Form1()
{
InitializeComponent();
DisplayFiles(Environment.GetFolderPath(Environment.SpecialFolder.Desktop));
}private void button_Desktop_Click(object sender, EventArgs e)
{
DisplayFiles(Environment.GetFolderPath(Environment.SpecialFolder.Desktop));
}private void button_Documents_Click(object sender, EventArgs e)
{
DisplayFiles(Environment.GetFolderPath(Environment.SpecialFolder.MyDocuments));
}private void button_Pictures_Click(object sender, EventArgs e)
{
DisplayFiles(Environment.GetFolderPath(Environment.SpecialFolder.MyPictures));
}private void button_Music_Click(object sender, EventArgs e)
{
DisplayFiles(Environment.GetFolderPath(Environment.SpecialFolder.MyMusic));
}private void button_Videos_Click(object sender, EventArgs e)
{
DisplayFiles(Environment.GetFolderPath(Environment.SpecialFolder.MyVideos));
}
How to Render the Files for the Selected Directory
Display a list of files depending on the Desktop, My Documents, Pictures, Music, or Videos button you click on.
-
Import the System.IO namespace at the top of the file.
using System.IO; -
Create a new function called DisplayFiles(), to display the files and folders of a selected directory.
        private void DisplayFiles(string filePath)
{
    // Code to display the files and folders inside the directory
} -
Inside the new DisplayFiles() function, compile a list of all the directories and files that are inside the selected folder.
string[] filesList = Directory.GetDirectories(filePath).Concat(Directory.GetFiles(filePath)).ToArray(); -
Make sure the panel that displays the list of files and directories is empty.
panel_FilesList.Controls.Clear(); -
Store the current directory in a global variable.
currentLocation = filePath; -
Declare the global variable at the top of the class.
stringcurrentLocation = ""; -
Back in the DisplayFiles() function, create a button for each directory and file. In a for-loop, isolate the name from the rest of the filepath. Programmatically create a new button, with the name of the file or directory as the button’s text.
for (int i = 0; i < filesList.Length-1; i++)
{
bool isHidden = ((File.GetAttributes(filesList[i]) & FileAttributes.Hidden) == FileAttributes.Hidden);if (!isHidden)
{
// Get the name of the file from the path
var startOfName = filesList[i].LastIndexOf("\\");
var fileName = filesList[i].Substring(startOfName + 1, filesList[i].Length - (startOfName + 1));// Display the file or folder as a button
Button newButton = new Button();
newButton.Text = fileName;
newButton.Name = filesList[i];
newButton.Location = new Point(70, 70);
newButton.Size = new Size(800, 100);
newButton.TextAlign = ContentAlignment.MiddleLeft;
newButton.Padding = new Padding(24, 0, 0, 0);
panel_FilesList.Controls.Add(newButton);
}
} -
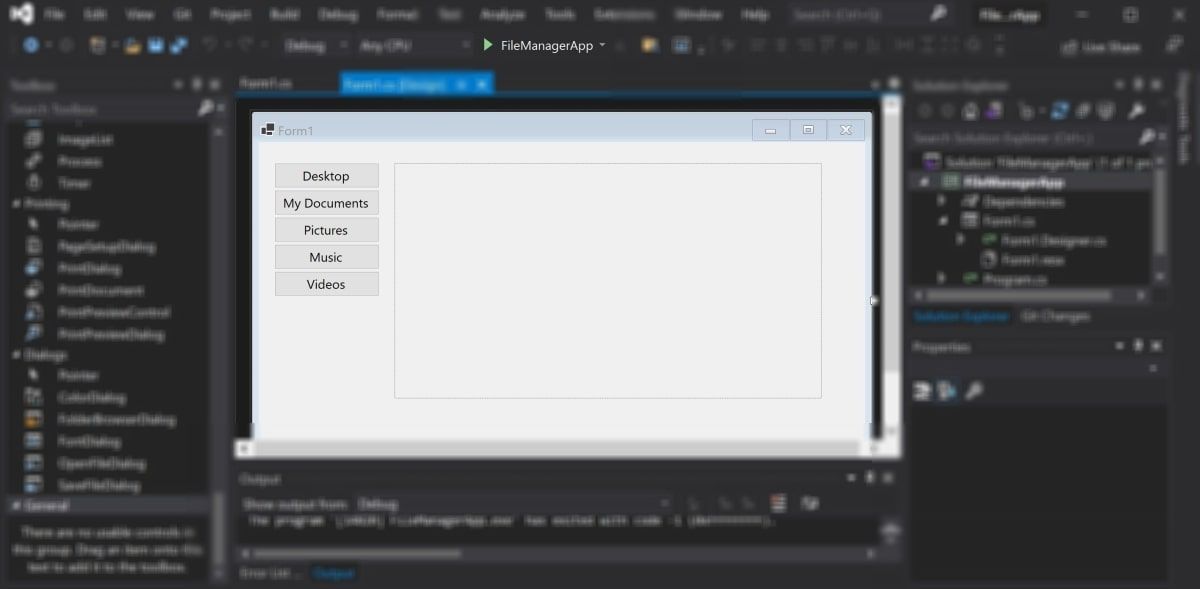
Press the play button at the top of Visual Studio to run the program.

-
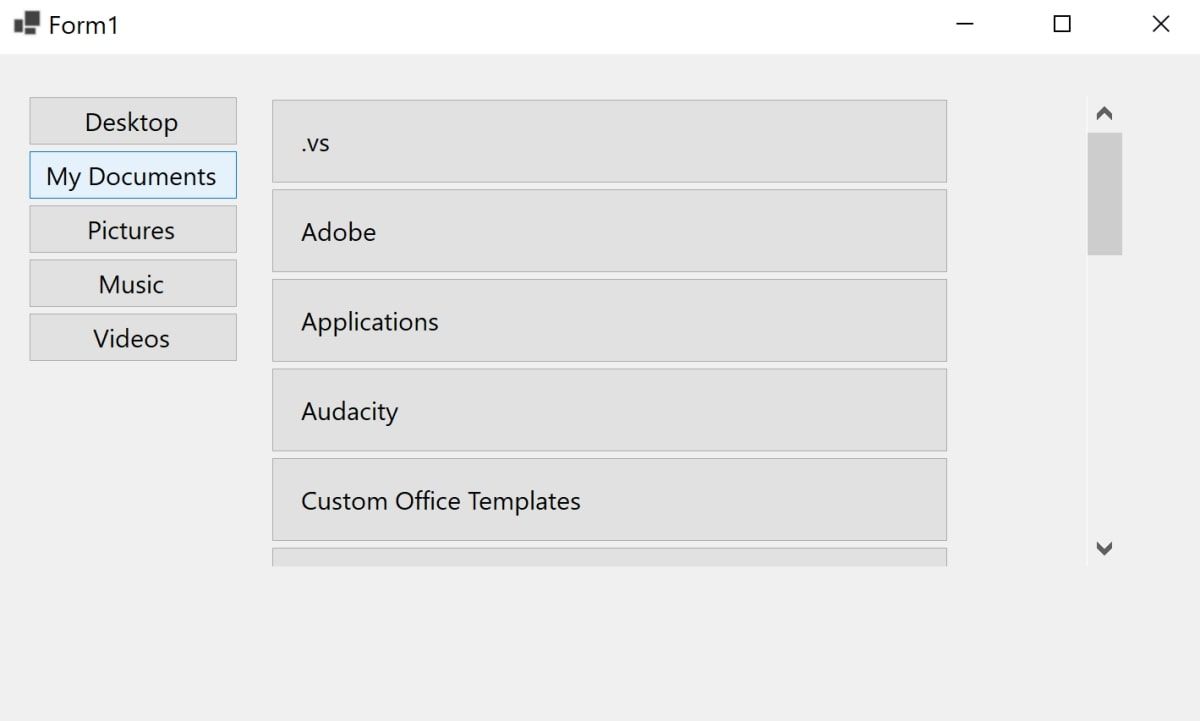
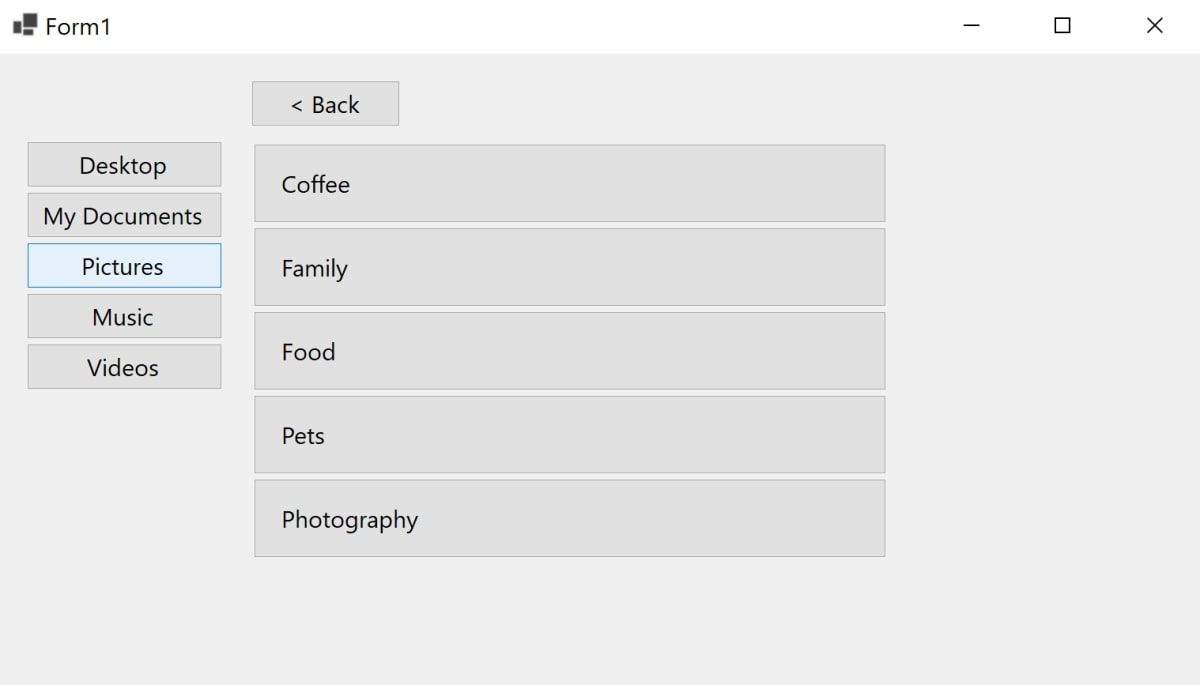
Click on any of the quick links. For example, if you click on My Documents, The panel on the right should populate with a list of files and folders in the My Documents folder.

-
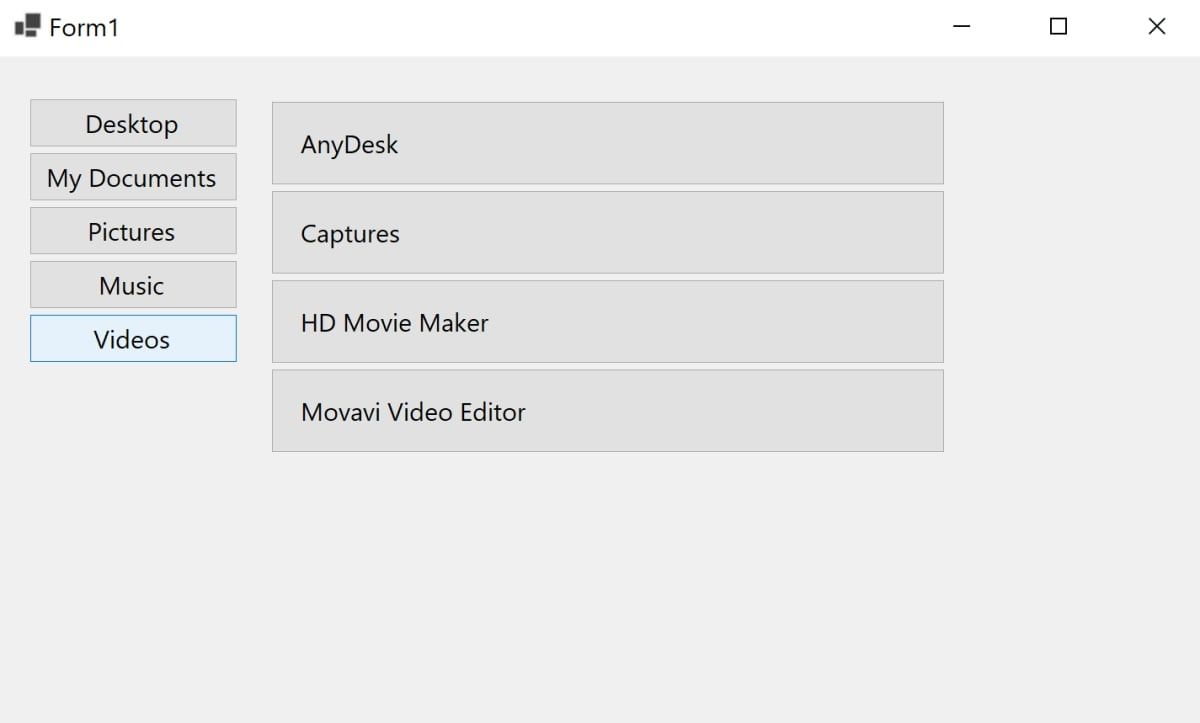
If you click on another quick link, for example, Videos, the panel should clear and change to display files and folders in the Videos folder.

How to Navigate Up and Down Directories
Modify the code so that when you click on a folder displayed in the list, you will move down a directory. You can also create a back button to move back up to the previous folder.
-
To move down a directory, create a new function called button_Click_Open(). If the user clicks on a directory in the list, the program will call the DisplayFiles() function to display the files inside that directory. If the user clicks on a file instead, the program will open the file.
private void button_Click_Open(object sender, EventArgs e)
{
Button button = (Button)sender;
string filePath = button.Name;try
{
// If a directory clicked, reload list of files in new directory
DisplayFiles(filePath);
}
catch (Exception ex)
{
// If file clicked, open the file
var process = new System.Diagnostics.Process();
process.StartInfo = new System.Diagnostics.ProcessStartInfo() { UseShellExecute = true, FileName = filePath };
process.Start();
}
} -
In the DisplayFiles() function, modify the part of the code that is creating a new button. Add a new line after creating the button to attach the new button_Click_Open() function to the Click event.
newButton.Click += button_Click_Open; -
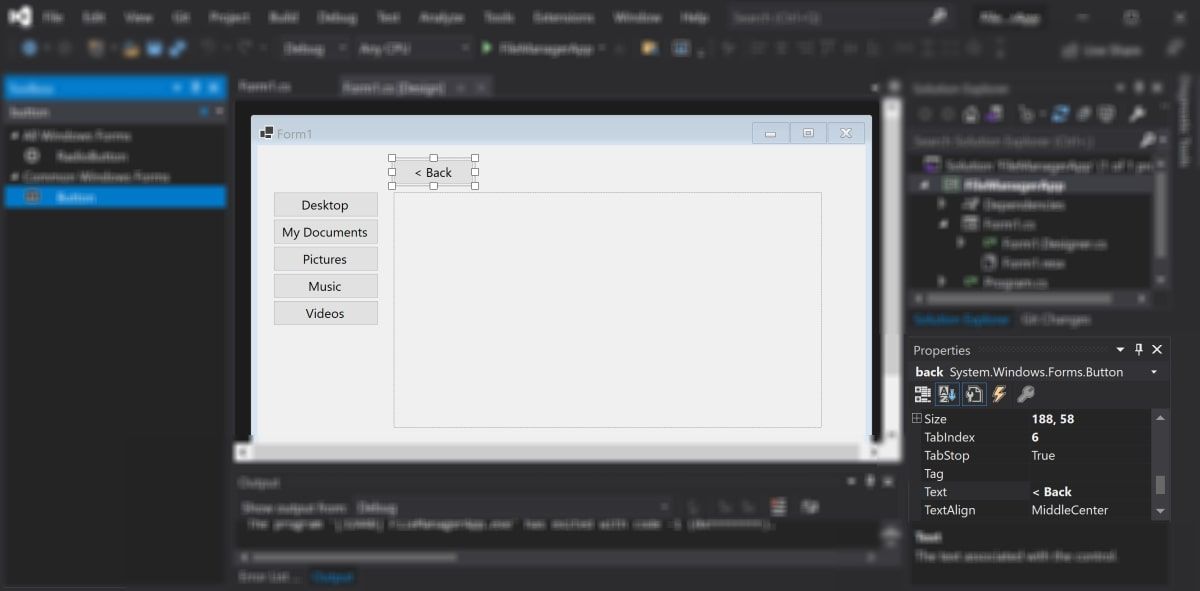
To navigate back up a directory, create a back button. On the canvas, click and drag a new button using the Toolbox.

-
Highlight the new Back button. In the properties window, change the Text property to “< Back”.
-
Double-click on the Back button to generate a click event function that will trigger when the user clicks the back button.
        private void back_Click(object sender, EventArgs e)
{
} -
Inside the function, find the filepath of the folder one level above, and display the files and directories for the folder above.
        var previousFolder = this.currentLocation.Substring(0, this.currentLocation.LastIndexOf("\\"));
DisplayFiles(previousFolder); -
Press the play button again at the top of Visual Studio to run the program. Click on any of the quick links again to display a list of folders or files.

-
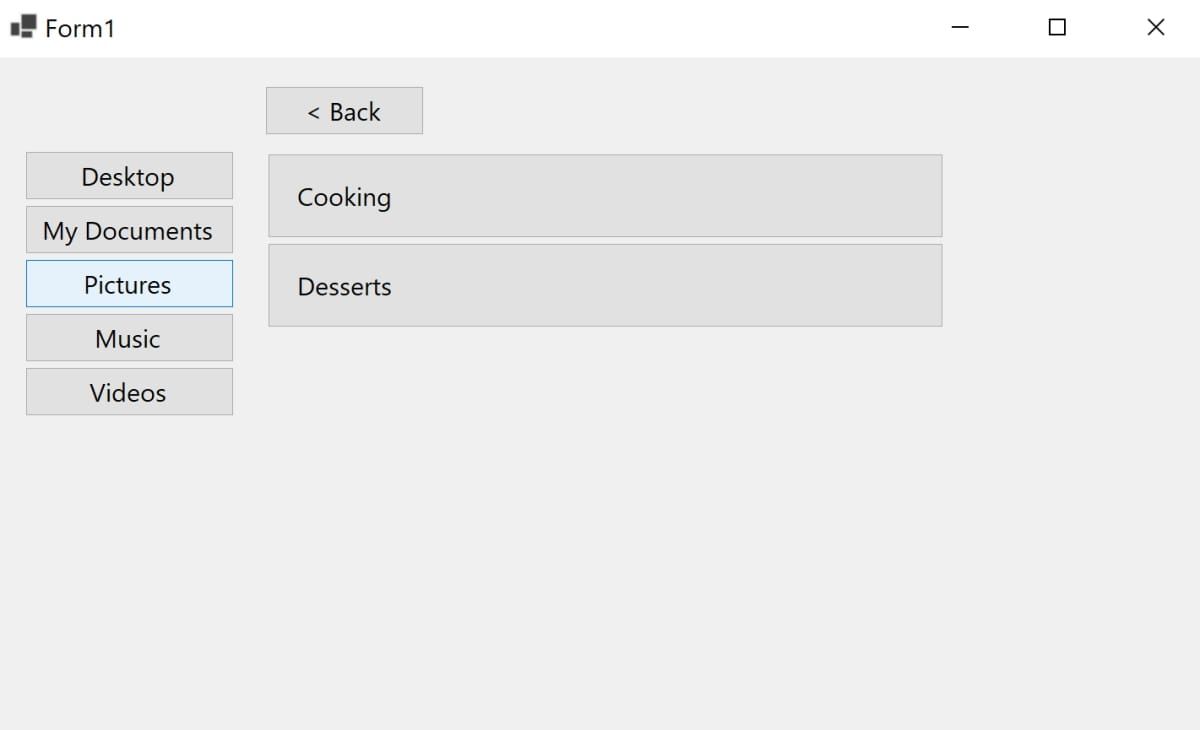
Inside the panel, click on a folder to move down a directory.

-
Click on the back button to move back up to the previous directory.
Creating Desktop Apps Using Windows Forms
A file manager is a simple app that you can build when learning how to create a Windows Form application. You can use the Toolbox to drag and drop a panel onto the canvas, along with various other buttons.
Now that your app has the main functionality, feel free to modify the button properties to improve the File Manager’s design.
Discover some of the other beginner apps that you can create when learning about Windows Forms applications.
In today’s digital age, file management is an essential aspect of computer usage. Whether it be organizing documents for work, photos from a vacation, or music files for entertainment, having a reliable and efficient file manager is crucial. In this article, we will explore how to build a simple file manager app using Windows Forms in C#.
Windows Forms is a graphical application programming interface (API) provided by Microsoft for developing Windows desktop applications. It allows developers to create rich user interfaces for their applications using a drag-and-drop interface design tool. By utilizing Windows Forms, we can create a user-friendly and intuitive file manager app that will help users easily manage their files and folders.
Before we dive into the development of the file manager app, let’s first understand the basic functionalities that we want to implement:
- Display a list of files and folders in a specified directory.
- Allow users to navigate through different directories.
- Enable users to create, delete, and rename files and folders.
- Provide options for copying, moving, and pasting files and folders.
- Implement file search functionality.
- Allow users to view file properties.
- Provide options for sorting files and folders.
Now that we have a clear understanding of the functionalities we want to implement, let’s begin building our file manager app using Windows Forms.
Step 1: Create a new Windows Forms project in Visual Studio
First, open Visual Studio and create a new Windows Forms App (.NET Framework) project. Name the project «File Manager App» and choose a location to save the project files. Once the project is created, you will see the default Form1 in the design view.
Step 2: Design the user interface
In the design view of Form1, add the following controls to create a basic user interface for the file manager app:
- A MenuStrip control at the top of the form with menu items for File, View, Edit, and Help.
- A TreeView control on the left side of the form to display the directory structure.
- A ListView control on the right side of the form to display the files and folders in the selected directory.
- Buttons for common file management operations such as Create, Delete, Rename, Copy, Move, and Search.
- Labels to display information about the selected file or folder.
Arrange the controls on the form to create a visually appealing and user-friendly interface. You can set properties such as Text, Font, ForeColor, BackColor, and Size to customize the appearance of the controls.
Step 3: Implement directory navigation
To populate the TreeView control with the directory structure, we need to write code to traverse the directories on the system. Add the following code to the Form1_Load event handler to display the root directories in the TreeView control:
private void Form1_Load(object sender, EventArgs e)
{
    PopulateTreeView();
}

private void PopulateTreeView()
{
    TreeNode rootNode = new TreeNode("Computer");
    rootNode.Tag = "Computer";

    foreach (DriveInfo drive in DriveInfo.GetDrives())
    {
        TreeNode driveNode = new TreeNode(drive.Name);
        driveNode.Tag = drive.Name;
        driveNode.Nodes.Add("");

        rootNode.Nodes.Add(driveNode);
    }

    treeView1.Nodes.Add(rootNode);
}
This code snippet retrieves the list of drives on the system using the DriveInfo class and populates the TreeView control with the root directories. When a drive node is expanded, the child directories and subdirectories will be displayed in the TreeView control.
Step 4: Display files and folders in the ListView control
To display the files and folders in the selected directory, we need to write code to populate the ListView control. Add the following code to the AfterSelect event handler of the TreeView control:
private void treeView1_AfterSelect(object sender, TreeViewEventArgs e)
{
    PopulateListView(e.Node.Tag.ToString());
}

private void PopulateListView(string path)
{
    listView1.Items.Clear();

    DirectoryInfo directory = new DirectoryInfo(path);

    foreach (DirectoryInfo dir in directory.GetDirectories())
    {
        listView1.Items.Add(new ListViewItem(new string[] { dir.Name, "Folder", dir.LastWriteTime.ToString() }));
    }

    foreach (FileInfo file in directory.GetFiles())
    {
        listView1.Items.Add(new ListViewItem(new string[] { file.Name, "File", file.LastWriteTime.ToString() }));
    }
}
This code snippet retrieves the list of files and folders in the selected directory using the DirectoryInfo class and populates the ListView control with the file name, type (Folder/File), and last modified timestamp. The ListView control will display a row for each file or folder in the selected directory.
Step 5: Implement file management operations
Now that we have populated the ListView control with the files and folders in the selected directory, we can implement file management operations such as Create, Delete, Rename, Copy, and Move. Add event handlers for the corresponding buttons and write the code to perform these operations:
private void createButton_Click(object sender, EventArgs e)
{
    string path = Path.Combine(treeView1.SelectedNode.Tag.ToString(), "NewFolder");

    if (!Directory.Exists(path))
    {
        Directory.CreateDirectory(path);
        PopulateListView(treeView1.SelectedNode.Tag.ToString());
    }
}

private void deleteButton_Click(object sender, EventArgs e)
{
    string path = Path.Combine(treeView1.SelectedNode.Tag.ToString(), listView1.SelectedItems[0].Text);

    if (listView1.SelectedItems[0].SubItems[1].Text == "Folder")
    {
        Directory.Delete(path, true);
    }
    else
    {
        File.Delete(path);
    }

    PopulateListView(treeView1.SelectedNode.Tag.ToString());
}

private void renameButton_Click(object sender, EventArgs e)
{
    string path = Path.Combine(treeView1.SelectedNode.Tag.ToString(), listView1.SelectedItems[0].Text);

    string newName = Microsoft.VisualBasic.Interaction.InputBox("Enter new name:", "Rename File/Folder", listView1.SelectedItems[0].Text);

    if (!string.IsNullOrEmpty(newName))
    {
        string newPath = Path.Combine(treeView1.SelectedNode.Tag.ToString(), newName);

        if (listView1.SelectedItems[0].SubItems[1].Text == "Folder")
        {
            Directory.Move(path, newPath);
        }
        else
        {
            File.Move(path, newPath);
        }

        PopulateListView(treeView1.SelectedNode.Tag.ToString());
    }
}
This code snippet demonstrates how to create a new folder, delete a file or folder, and rename a file or folder in the selected directory. The user can perform these file management operations by clicking the corresponding buttons on the form.
Step 6: Implement file search functionality
To enable users to search for files and folders in the selected directory, we can add a TextBox control and a Search button to the form. Add an event handler for the Search button and write the code to perform the search operation:
private void searchButton_Click(object sender, EventArgs e)
{
    string searchQuery = searchTextBox.Text.ToLower();

    foreach (ListViewItem item in listView1.Items)
    {
        if (item.Text.ToLower().Contains(searchQuery))
        {
            item.BackColor = Color.Yellow;
        }
        else
        {
            item.BackColor = Color.White;
        }
    }
}
This code snippet highlights the rows in the ListView control that match the search query entered by the user. By typing a keyword in the search TextBox and clicking the Search button, the user can quickly locate specific files or folders in the selected directory.
Step 7: Implement file properties view
To display detailed information about the selected file or folder, we can add a Label control to the form. Add an event handler for the ListView control’s ItemSelectionChanged event and write the code to display the file properties in the Label control:
private void listView1_ItemSelectionChanged(object sender, ListViewItemSelectionChangedEventArgs e)
{
    string path = Path.Combine(treeView1.SelectedNode.Tag.ToString(), e.Item.Text);

    if (e.Item.SubItems[1].Text == "Folder")
    {
        DirectoryInfo directory = new DirectoryInfo(path);
        label1.Text = string.Format("Directory Name: {0}nLast Modified: {1}nNumber of Files: {2}",
            directory.Name, directory.LastWriteTime.ToString(), directory.GetFiles().Length);
    }
    else
    {
        FileInfo file = new FileInfo(path);
        label1.Text = string.Format("File Name: {0}nLast Modified: {1}nFile Size: {2} bytes",
            file.Name, file.LastWriteTime.ToString(), file.Length);
    }
}
This code snippet retrieves and displays detailed information about the selected file or folder in the Label control. When the user clicks on a file or folder in the ListView control, the label will update with properties such as the file name, last modified timestamp, file size (for files), and number of files (for folders).
Step 8: Implement file sorting options
To allow users to sort the files and folders in the ListView control by name, type, or last modified timestamp, we can add a ComboBox control with sorting options. Add an event handler for the ComboBox control’s SelectedIndexChanged event and write the code to sort the items in the ListView control:
private void sortComboBox_SelectedIndexChanged(object sender, EventArgs e)
{
    switch (sortComboBox.SelectedIndex)
    {
        case 0: // Sort by name
            listView1.Sorting = SortOrder.Ascending;
            break;
        case 1: // Sort by type
            listView1.Sorting = SortOrder.Descending;
            break;
        case 2: // Sort by last modified
            listView1.Sorting = SortOrder.Ascending;
            break;
    }

    listView1.Sort();
}
This code snippet demonstrates how to sort the items in the ListView control based on the selected sorting option in the ComboBox control. The user can choose to sort the items by name in ascending order, type in descending order, or last modified timestamp in ascending order.
Conclusion
In this article, we have explored how to build a simple file manager app using Windows Forms in C#. By following the step-by-step guide and implementing the basic functionalities such as displaying files and folders, navigating directories, creating, deleting, renaming, copying, moving, searching, viewing properties, and sorting files and folders, you can create a functional and user-friendly file manager app for your desktop.
With Windows Forms, you can easily design and develop graphical user interfaces for your applications, making it easier for users to interact with and manage their files and folders. By leveraging the power of C# and the rich features of Windows Forms, you can create a robust and efficient file manager app that meets the needs of your users.
We hope this article has provided you with valuable insights and practical knowledge on how to build a simple file manager app in Windows Forms. Whether you are a beginner or an experienced developer, this project can serve as a great learning experience and help you enhance your skills in Windows desktop application development.
File management encompasses everything from generating and editing files to deleting them from a computer’s hard drive.
It is important to learn this functionality when it comes to data that needs to be handled with care and stored for security reasons.
In this tutorial, we will learn how to create files and folders, write them in different formats, read the memory data, delete the initially recorded files, and view all data using WinForms.
Table of contents
- Prerequisites
- Step 1 — Visual Studio setup
- Step 2 — Designing the WinForm
- Modifying the form name
- Using controls to construct the form
- Step 3 — Writing the C# code
- Including the necessary namespace
- Setting up the file path
- Coding the controls
- Step 4 — Debugging the application
- Conclusion
Prerequisites
To follow along, you need:
- A basic background knowledge in C# programming language and .NET framework.
- Visual Studio installed on your computer.
Let’s get started!
Step 1 — Visual Studio setup
Open Visual Studio and select create new project in the get started window.

Next, click on Visual C# and select Windows Desktop from its rows data.
On the right side of the window, select Windows Forms App (.Net Framework) as the default template for this project.
Navigate to the bottom of the window, and rename the project to File manager, you can also change the project location by clicking the browse button and choosing where the project will be saved.
Once you’re done, click OK to finish setting up the project

Step 2 — Designing the WinForm
Here we will modify the form by adding controls such as labels, buttons, e.t.c., which will help the user interact with the application.
Modifying the form name
First, we need to rename the form from Form 1 to File manager. We do this by changing its text property, as shown in the image below.
The start position property of the form is optional to modify since it just sets its position on the device during its run-time.

Using controls to construct the form
We will be using standard tabs in our project windows such as ToolBox and the Properties to modify the form structure.
To access the ToolBox, go to the upper row of the Visual Studio window, click View -> ToolBox, and a tab will pop up on the left side of the main window.
To access the properties window, click View -> Properties or right-click on the control you need to change its properties in the form; choose option property in the dialogue box that appears.
We will design the user interface into two parts to avoid complexity.
1. File browsing controls
First, we will design the UI to navigate and access the internal storage files.
To get started, follow the steps below:
From the Toolbox search for a PictureBox. Drag and drop it to the left upper side of the form.
Under its properties, set the name as pictureBox1 and change the size mode to stretch mode. This enables the picture you will load to fit the size of the pictureBox1.
To load a picture in the PictureBox, click the bold forward label in the picture box control, and a dialogue box will appear.
Under PictureBox Tasks, click on choose image -> local resources -> import -> choose image -> open -> OK. A picture will be loaded in control PictureBox.
The next step is to drag and drop two buttons and align them horizontally in the PictureBox. Name the first button as btnPrevious and change its text to <- in its properties.
For the second button, change its name to btnNext and its text to ->.
Drag and drop a label to the form and align it horizontally to the buttons added in the previous step, then change the labels’ text property to Path.
Drag and drop a text box into the form and align it horizontally to the label path. Under its properties, set the name to txtPath and leave the text as null(empty).
Drag and drop another button and align it horizontally with the text box. Change its name property to btnOpen and the text property to Open.
Finally, drag and drop a web browser just below the picture box. Under its properties, leave the default name as web browser and set the web browser size to (594,270), or input your preferred dimensions.
Your final design should look as shown below.

2. Create, write, read, and delete controls
Apart from the file browsing controls, we will design a UI that will help us create a new file, write files, read stored files, and delete generated files.
Follow the steps below to create the UI:
First, we need a menu strip to hold some file items that we will code later. Drag and drop a menu strip into the form from the toolbox. The menu strip is positioned outside and just below the form.
In the menu strip properties, set the name as menustrip1, back color as Active caption, Dock as Bottom, and Text direction as Horizontal.
To add menu items, click the menu control and edit the item’s row from left to right as File exploitation.
You can add the rest of the rows according to the file management functions. In our case, we will only work in the first row.
Add the following items in the file’s column exploitation row; create the file, read a file, and delete the file.
Next, drag and drop a panel just below the web browser. Change the back color to Active caption in the panel properties and set the size property to (300,130).
We will add the rest of the controls inside the panel, as discussed below:
First, drag and drop four labels in the panel and arrange them vertically to each other. Change their text property to; Name, Email, Gender, and Phone, respectively.
Next, drag and drop three text boxes and arrange them vertically and horizontally to the name, email, and phone labels. Name the text boxes as NameTb, EmailTb, PhoneTb respectively under their name properties.
Drag and drop a Combobox and align it horizontally to the gender label. In the items property of the Combobox, double-click to add collections of items that will be selected and populated as default values when recording student details.
Add the collection of items as Male and Female. Set the Dropdown style of the Combobox to Dropdown list.
Drag and drop two buttons on the panel and align them vertically and horizontally to the gender combo and phone text boxes.
Change the name property of the first button to AddStudentbtn and set its text property to Write/Add Student.
Also, change the second button’s name property to Clearbtn and set its text property to Clear.
Your design should appear as follows:

The final form design is shown below:

Step 3 — Writing the C# code
To write the C# code, double-click on the form design, and the file manager.cs will be loaded.
Including the necessary namespaces
using System;
using System.IO;//File and data stream types are included, as are those that facilitate basic file and directory operations.
using System.Windows.Forms;//Programs built using these classes can take advantage of the Version of Windows's rich UI.
Setting the file path
This is important because we will create a folder where the written data will reside in the memory.
We can also specify the format that it will be written in, for this project all our data will be stored in .txt files.
Add the following code:
string path = Environment.CurrentDirectory + "/" + "Students.txt";// The path where files will be written as a txt file.
Coding the controls
Note: To code within a method, we first need to double-click on the control for the file
manager.csto load.
In the <- (button previous) button, we add the following code to undo a file browsing in the web browser:
 private void btnPrevious_Click(object sender, EventArgs e)
        {
            if (webBrowser.CanGoBack)
                webBrowser.GoBack();
        }
In the -> (button next) button, we add the code below to enable file browsing:
   private void btnNext_Click(object sender, EventArgs e)
        {
            if (webBrowser.CanGoForward)
                webBrowser.GoForward();
        }
In the button Open, add the following code to navigate the files in the memory disk.
In the code below, the open file dialog box is displayed once the open button is clicked.
The description will give more information on what we are supposed to do, i.e., select the folder we want to see its content. The web browser displays the contents if the exact file path is selected.
  private void btnOpen_Click(object sender, EventArgs e)
        {
            using(FolderBrowserDialog fd = new FolderBrowserDialog() { Description = "Choose path here" })
            {
                if (fd.ShowDialog() == DialogResult.OK)
                {
                    webBrowser.Url = new Uri(fd.SelectedPath);
                    txtPath.Text = fd.SelectedPath;
                }
            }
        }
Add the code below in the createFile menu. This code will create a new file every time a user needs to create a new student record and the file doesn’t exist in the memory.
 private void createFileToolStripMenuItem_Click(object sender, EventArgs e)
        {
            if (File.Exists(path))
            {
                File.CreateText(path);
                MessageBox.Show("File Created Successfully");
            }
        }
In the Read file menu item, add the following code to help view the data record via the web browser.
The StreamReader reads a text file line-by-line from the start to the end.
  private void readFileToolStripMenuItem_Click(object sender, EventArgs e)
        {
            using (StreamReader sr = new StreamReader(Application.StartupPath + "\\Students\\"
                + NameTb.Text + "" + EmailTb.Text + "" + GenderCb.Text + "" + PhoneTb.Text + ".txt"))// To read a separate file for each student
            {
                webBrowser.DocumentText = sr.ReadToEnd();
                sr.Close();
            }
        }
In the Delete file menu item, add the code below to delete files that were initially created using the file path.
We will use the if statement to check if the text file exists in the memory. If it does, then it can be automatically deleted.
private void deleteFileToolStripMenuItem_Click(object sender, EventArgs e)
        {
            if (File.Exists(path))
            {
                File.Delete(Application.StartupPath + "\\Students\\"
                + NameTb.Text + "" + EmailTb.Text + "" + GenderCb.Text + "" + PhoneTb.Text + ".txt");// Will delete record initially written in the folder student
                MessageBox.Show(" Are You Sure to Delete file?");
            }
        }
In the Add student/Write button inside the panel, add the following code. It will record student data that was typed in the textboxes.
The StreamWriter class writes data to a stream.
  private void AddStudentbtn_Click(object sender, EventArgs e)
        {
            using (StreamWriter sw = new StreamWriter(Application.StartupPath +"\\Students\\"
                + NameTb.Text + "" + EmailTb.Text+"" +GenderCb.Text +"" + PhoneTb.Text + ".txt"))//Write on a separate file for each Student
            {
                sw.WriteLine(label2.Text + "" + NameTb.Text);
                sw.WriteLine(label3.Text + "" + EmailTb.Text);
                sw.WriteLine(label4.Text + "" + GenderCb.Text);
                sw.WriteLine(label5.Text + "" + PhoneTb.Text);
                sw.Close();
            }
        }
In the Clear button in the panel, add the following code. It will allow us to delete existing data in the text boxes, as well as edit new student data.
  private void Clearbtn_Click(object sender, EventArgs e)// To clear data initially in the textboxes
        {
            NameTb.Text = "";
            EmailTb.Text = "";
            GenderCb.Text = "";
            PhoneTb.Text = "";
        }
We will add the code below to ensure that the user doesn’t quit the application without knowing.
A dialogue box will pop up asking them to confirm whether or not they should exist the application.
The activity terminates when you choose No using the e.cancel = true; statements.
To access the form closing method, navigate to form properties, and under the Formclosing, double-click to load and write the following code:
 private void File_Mananger_FormClosing(object sender, FormClosingEventArgs e)
        {
            const string messages = "Please confirm closing the File Manager";
            const string caption = "Application Closing";
            var results = MessageBox.Show(messages, caption, MessageBoxButtons.YesNo, MessageBoxIcon.Question);
            //If the button was proposed
            if (results == DialogResult.No)
            {
                e.Cancel = true;// cancel the closure of the form
            }
        }
Step 4 — Debugging the application
Run the application and enter the information you need to record and access. You can start the app by simply clicking the Start button on the toolbar.

The image below shows how the application is managing files.

Conclusion
In this tutorial, we have created a file manager using WinForms. We also learned how to implement data files by creating, writing, reading, and deleting them.
You can now add more file management controls in other applications.
Happy coding!
Peer Review Contributions by: Jethro Magaji
It helps to maintains files in directories with dynamically generated names using company’s naming convention, versions and release
- Download source — 427.6 KB


Introduction
This is a tool to manage your files related to uploads on the server. When any one uploads updated files on server, generally he/she gets the backup of old files from server and and also creates a copy of new updated files in any directory. He/she gives the name to these directories according to company’s naming convention, corresponding version and release. This tool gives an easy way to automate this process. In this application; there is a settings section where user can set the naming convention, prefix for backup folders and prefix for folders which contains the copy of new uploaded files. After making these settings, the user can use these settings multiple times and the user can also change settings in the future. This application also allows user to drag and drop the files for fast working and all the saved directories are binded in a treeview using a separate thread, so it also supports multiprocessing upto some level. This application uses a Microsoft access file to maintain the track of version and release and uses quick sort to decide on the new version or release.
Using the Code
Just download and run the application. You can also make its setup. This application contains the following sections:
Form1(which is the default form)Settings(which is opened as a dialog box when user clicks on settings button onForm1)MyMessage(this form is used to display messages)
In this application, I have given a way to set company’s naming convention with few fields it can be added as per company’s requirement using some modification in source code.
The following function is called from a separate thread to start to bind treeview:
private void Get_nodes()
{
            string strPath = glbStrPath;
            strFiles = Directory.GetDirectories(strPath);
            Guid strguid;
            string strKey;
            string[] strName;
            char ch = Convert.ToChar("\\");
            //foreach (string strFile in strFiles)
            //{
            // int.TryParse(,intIndex);
            try
            {
                strName = strPath.Split(ch);
                strguid = System.Guid.NewGuid();
                strKey = strName[strName.GetUpperBound(0)] + Convert.ToString(strguid);
                if (InvokeRequired)
                {
                    BeginInvoke(new Onadd_Field(add_Field), new object[]
			{ strKey, strName[strName.GetUpperBound(0)] });
                }
                if (HasSubDirectory(strPath))
                {
                    Get_nodes(strPath, treeFileExplorer.Nodes[strKey]);
                }
                BeginInvoke(new ThreadFinishedEvent(ThreadFinished));
            }
            catch
            {
            }

            //}
       }
        delegate void ThreadFinishedEvent();
        void ThreadFinished()
        {
            t.Abort();
            progressBar1.Visible = false;
            lblSearch.Visible = false;
            pnlProcess.Visible = false;

            timer1.Stop();
            progressBar1.Value = progressBar1.Minimum;
        }
The following function is a recursive function which is initially called from called from Get_nodes() function:
private void Get_nodes(string strPath, System.Windows.Forms.TreeNode CurrentNode)
        {
            strFiles = Directory.GetDirectories(strPath);
            Guid strguid;
            string strNodeKey;
            string[] strName;
            string[] childs;
            char ch = Convert.ToChar("\\");
            foreach (string strFile in strFiles)
            {
                // int.TryParse(,intIndex);
                try
                {
                    childs = Directory.GetDirectories(strPath + "\\");
                    strName = strFile.Split(ch);
                    strguid = System.Guid.NewGuid();
                    strNodeKey = strName[strName.GetUpperBound(0)] +
			Convert.ToString(strguid);
                    if (InvokeRequired)
                    {
                        BeginInvoke(new Onadd_Node(add_Node), new object[]
		      { CurrentNode, strNodeKey, strName[strName.GetUpperBound(0)] });

                    }
                    //CurrentNode.Nodes.Add(strNodeKey,strName[strName.GetUpperBound(0)]);
                    if (HasSubDirectory(strFile))
                    {
                        Get_nodes(strFile, CurrentNode.Nodes[strNodeKey]);
                    }
                }
                catch
                {
                }
            }
        }
The following functions are called from the above functions to add nodes in treeview:
private delegate void Onadd_Field(string key, string item);

        private void add_Field(string key, string item)
        {
            treeFileExplorer.Nodes.Add(key, item);
        }

        private delegate void Onadd_Node(System.Windows.Forms.TreeNode CurrentNode,
		string key, string item);
        private void add_Node(System.Windows.Forms.TreeNode CurrentNode,
		string key, string item)
        {
            CurrentNode.Nodes.Add(key, item);
        }
Points of Interest
When I was developing this application, I experienced that if we wish to use any windows form control in a separate thread, we have to use «Invoke» or «BeginInvoke» function. To call functions within «Invoke» or «BeginInvoke«, we need to make delegate for the function which uses windows form control.
History
This is the first version of this application. Please give me feedback to make its next releases and versions. This is completely free and if any one goes through any other file manager of the same type, obviously those are paid.