

Windows 11 includes an updated version of File Explorer that retains the same classic look but with a new minimalistic menu that only shows basic commands. As a result, the commands have been reorganized, making it more difficult to find, including the Folder Options to customize File Explorer.
Since the “View” tab is no longer part of File Explorer, most of the commands and options have been relocated to three new menus, including “Sort and group options,” “Layout and view options,” and “See more.”
Although the ribbon is gone, you can still access the Folder Options within the File Explorer or Control Panel.
In this guide, you will learn two ways to open the Folders Options settings for File Explorer on Windows 11.
- Open Folder Options for File Explorer on Windows 11
- Open Folder Options for File Explorer via Control Panel
To find and open the Folder Options settings, use these steps:
-
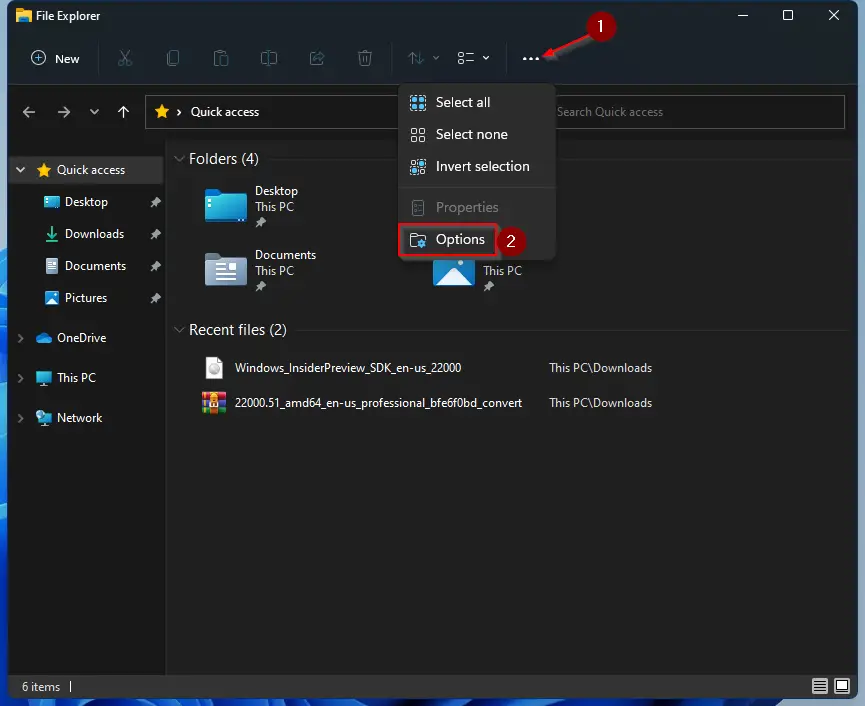
Open File Explorer on Windows 11.
-
Click the See more (three-dotted button) drop-down menu in the far right.

File Explorer Options -
Select the Options item.

Once you complete the steps, you will access the File Explorer settings to customize the experience.
Open Folder Options for File Explorer via Control Panel
To access the File Explorer settings through Control Panel, use these steps:
-
Open Control Panel.
-
Click on Appearance and Personalization.
-
Click the File Explorer Options.

Control Panel File Explorer Options

After you complete the steps, you will have access to the general, view, and search settings.
Mauro Huculak is a
Windows How-To Expert and founder of
Pureinfotech
(est. 2010). With over 21 years as a technology writer and IT Specialist,
Mauro specializes in Windows, software, and cross-platform systems such as Linux, Android, and macOS.
Certifications:
Microsoft Certified Solutions Associate (MCSA),
Cisco Certified Network Professional (CCNP),
VMware Certified Professional (VCP),
and
CompTIA A+ and Network+.
Mauro is a recognized Microsoft MVP and has also been a long-time contributor to Windows Central.
You can follow him on
YouTube,
Threads,
BlueSky,
X (Twitter),
LinkedIn and
About.me.
Email him at [email protected].
Finding options in Windows 11 File Explorer is an essential skill for users who want to navigate their files efficiently. The revamped interface of Windows 11 introduces various features and enhancements that make file management more intuitive yet sometimes can leave users puzzled about where certain options are located. In this article, we’ll explore the diverse options available in Windows 11 File Explorer, how to access them, and tips to optimize your file management experience.
Understanding Windows 11 File Explorer
Windows 11 File Explorer is the built-in file management tool that allows users to navigate their files and folders. Unlike its predecessors, Windows 11 comes with a more modern and streamlined interface. While the look and feel have changed, the fundamental purpose remains the same: making file organization easier for users.
The top navigation bar has been redesigned, offering options for quick access to various functions. Familiarizing yourself with the new layout is the first step to mastering file management in Windows 11.
Exploring the File Explorer Interface
When you launch File Explorer in Windows 11, you will notice several key components:
-
Navigation Pane: On the left side, you’ll find the Navigation Pane, which provides quick access to important folders like Quick Access, This PC, OneDrive, and network locations. You can easily navigate between different drives and folders using this pane.
-
Ribbon Interface: The Ribbon has been restructured in Windows 11, offering a condensed view that shows key commands like New, Copy, Paste, and Delete. It dynamically changes based on the context, ensuring that relevant options are presented without overwhelming the user.
-
Command Bar: Located at the top of the window, the Command Bar replaces traditional menus, offering a streamlined set of icons for common actions such as file management and view settings.
-
Content View: The central area displays the contents of the selected folder. You can choose between different view modes, such as List, Details, Tiles, and Large Icons, depending on how you prefer to visualize your files.
-
Status Bar: Located at the bottom of the window, the Status Bar provides information about the selected files, such as the number of items and available storage space.
Accessing Options in Windows 11 File Explorer
Let’s dive deeper into how you can find options, settings, and features within File Explorer:
1. Using the Command Bar
The Command Bar, located at the top of the File Explorer window, provides a quick way to access relevant file management options. You can perform actions like:
-
Creating New Folders: Click on the «New» button, usually represented by a plus sign (+), to create a new folder. Alternatively, right-click in the Content View area, select «New,» and choose «Folder.»
-
Copying and Moving Files: Select the files you want to copy or move, use the right-click context menu, or click on the respective icons in the Command Bar. You can also use keyboard shortcuts (Ctrl + C to copy, Ctrl + X to cut) and then paste (Ctrl + V) them in the desired location.
-
Deleting Files: To delete a file, select it and click the «Delete» icon in the Command Bar or press the
Deletekey on your keyboard. -
Renaming Files: Right-click on a file or folder, select «Rename,» and enter the new name.
2. Right-Click Context Menu
The right-click context menu offers additional options when you select a file or folder. Right-click on a file to reveal options like:
-
Open: To open the selected file with its associated application.
-
Share: To share the file with nearby devices and apps.
-
Send to: To quickly send the file to another location, such as an email or compressed folder.
-
Properties: To view or modify file properties, such as file size, type, and modification date.
Using the context menu is one of the most effective ways to access features quickly in Windows 11 File Explorer.
3. Quick Access Functionality
Quick Access is a prominent feature located in the Navigation Pane. It allows users to pin frequently accessed folders, making navigation faster. Here’s how to utilize Quick Access:
-
Pinning Folders: To pin a folder to Quick Access, right-click on the folder in the Navigation Pane, and select «Pin to Quick Access.» This makes it readily available for future navigation.
-
Removing Items: To unpin items from Quick Access, right-click on the pinned folder and select «Unpin from Quick Access.»
Quick Access also shows frequently used files and recently accessed items, enabling you to retrieve files without navigating through folders.
4. Different View Options
Windows 11 File Explorer provides various view options to help you visualize your files better. You can choose between the following:
-
List View: Displays files in a list format, showing minimal information.
-
Details View: Presents files in detail view, including size, date modified, and type.
-
Tiles View: Shows files with thumbnails, making it easier to identify images or documents.
-
Large Icons / Small Icons: These options allow you to view files in larger or smaller icon formats, depending on your preference.
To switch between views, click on the view icon in the Command Bar and select your desired format. Experimenting with different view styles can help you find the one that suits your workflow best.
5. Customizing the Interface
Windows 11 File Explorer allows for a degree of customization. You can adjust the layout and settings for a more personalized experience:
-
Changing Folder Options: Access additional folder options by clicking on the three-dots (more options) icon in the Command Bar. From here, you can access options like «Options,» where you can change view and search settings.
-
Changing File and Folder Sorting: In the Details View, you can click on column headers to sort files by name, size, type, or date modified. Right-clicking on the column headers also allows you to add or remove columns for a more customized view.
-
Customizing Quick Access: Rearranging items in Quick Access can help prioritize the folders most important to you. Simply drag and drop a folder up or down in the list to re-order it.
Advanced Features and Options
1. File Search
One of the most useful functionalities in File Explorer is the integrated search bar. Here’s how to use it effectively:
-
Basic Search: Simply type a file name or keyword into the search bar located on the top-right corner of the File Explorer window. Windows will dynamically filter results as you type, showing matching files and folders.
-
Advanced Search: For more specific searches, you can utilize search operators. For example, typing
*.jpgwill filter the results to show only image files, or usingdate:>01/01/2023will return files modified after January 1, 2023. This can help expedite the search process when dealing with extensive file libraries.
2. Using File Explorer Tabs
Windows 11 introduces tabbed browsing in File Explorer, allowing users to open multiple folders in a single window. You can create new tabs by clicking on the “+” icon beside existing tabs or using the keyboard shortcut Ctrl + T. This feature is particularly useful for users who need to transfer files between folders without cluttering their workspace with multiple windows.
3. Utilizing Cloud Services
With the integration of OneDrive and other cloud services, saving and managing files has become even simpler in Windows 11. Here’s how to use these features:
-
OneDrive Integration: Access your OneDrive directly through the Navigation Pane. You can easily drag and drop files to upload them to the cloud or download files back to your device.
-
Sync Settings: Within OneDrive, you can choose which folders to sync with your local Drive. This is useful for maintaining a balance between local storage and cloud accessibility.
Tips for Efficient File Management
1. Use Keyboard Shortcuts
Keyboard shortcuts can significantly streamline your workflow within File Explorer. Here are some essential shortcuts:
- Ctrl + N: Open a new File Explorer window.
- Ctrl + Shift + N: Create a new folder.
- Alt + Up Arrow: Navigate to the parent folder.
- Alt + Left Arrow / Right Arrow: Navigate backward or forward through the file history.
- F2: Rename a selected file.
Practicing these shortcuts can make your navigation through File Explorer much smoother and more efficient.
2. Explore File Properties
Every file in Windows has associated properties that can provide essential information. To access these:
- Right-click on a file and select «Properties.» Here, you’ll find information about the file’s size, date created, last modified, security permissions, and more.
Understanding file properties can help in organizing your files better and ensuring you have the relevant information at your fingertips.
3. Regularly Clean Up Your Files
A cluttered file system can lead to frustration and inefficiency. Set aside time to organize your files, delete unnecessary items, or move old files to external storage or cloud solutions. Creating a structured folder hierarchy can also make file retrieval easier in the future.
4. Back Up Your Files
Windows 11 integrates backup solutions allowing users to safeguard their files. Utilize OneDrive for automatic cloud backups or set up regular backups to an external hard drive. This proactive approach ensures that you don’t lose important files, especially in case of a system failure or accidental deletion.
Conclusion
Having a proficient understanding of how to find options in Windows 11 File Explorer greatly enhances your overall computing experience. The modernized interface, coupled with improved functionality, provides users with a powerful tool for managing their files. Familiarizing yourself with the Command Bar, right-click options, search functionality, and tabbed browsing will empower you to navigate and organize your files more efficiently.
As you practice using these features and tips, you’ll likely discover new methods to optimize your workflow, making file management a seamless part of your day-to-day computing activities. Embrace the changes brought on by Windows 11, and turn File Explorer into a well-oiled component of your productivity toolkit. Happy file management!
You are here:
Home » Windows 10 » 5 Ways To Open File Explorer Settings In Windows 10/11
Do you want to change the default settings and options of File Explorer in Windows 10/11? This guide will show you how to open File Explorer settings in Windows 10/11.
Following are the five easy ways to open the File Explorer settings in Windows 10 and 11.
Important: Some of the File Explorer options can be changed right from within File Explorer in Windows 10. For instance, you can click on the View tab and then select a view to change the default view settings. Likewise, you can show/hide the File Explorer navigation pane (left pane) by clicking on the Navigation pane option under the View tab and then selecting/deselecting the Navigation pane option.
Method 1 of 5
Step 1: Launch the File Explorer by clicking on its icon on the taskbar, search, or Windows + E keyboard shortcut.
Step 2: Once the File Explorer is launched, click on the File menu and then click Change folder and search options. This will open the Folder Options dialog, where you can change various File Explorer settings.


And if you are on Windows 11, in the File Explorer, click on the three dots (refer to the picture below) on the toolbar and then click Options to open Folder Options.

Method 2 of 5
Open File Explorer settings in Windows 10/11 using search
Step 1: In Windows 10/11’s search, type File Explorer options and then hit the Enter key to open the File Explorer Options, which is nothing but Folder Options.

Method 3 of 5
Open File Explorer settings via CMD in Windows 10/11
Step 1: Open the Command Prompt using search.
Step 2: At the Command Prompt window, type control.exe folders and press the Enter key to open the File Explorer Options dialog.

Method 4 of 5
Open File Explorer settings via Run in Windows 10/11
Step 1: Open the Run command dialog box using search or Windows + R hotkey.
Step 2: Type control folders in the Run command dialog and then hit the Enter key to open the Folder Options.

Method 5 of 5
Another way to open File Explorer settings from within File Explorer in Windows 10
Step 1: In the File Explorer, click on the View tab, click Options and then click Change folder and search options. That’s it!

Difference between File Explorer and Windows Explorer
Users who have been using Windows for over a decade know that both Windows Explorer and File Explorer are the same. With Windows 8, Microsoft renamed Windows Explorer to File Explorer.
Our File Explorer tips and tricks for Windows 10 guide might also interest you.
How do I open Folder Options in Windows 11? Windows 11 File Explorer look has been totally changed. Now, you will not find the ribbon menu. Also, many common menu items, such as “View Extensions,” are far away from normal users. In the place of Ribbon menus in File Explorer, you will find just icons.
Windows 11 comes with a new File Explorer that finally replaces the one Microsoft introduced back in 2012. It looks better and works fine than the previous version, although it requires learning new patterns and logic behind the new design. In this gearupwindows article, we will provide the easy steps to find the File Explorer settings in the latest OS.
There are at least three easy ways through which you can open the Folder Options (File Explorer Options) on Windows 11. These are the following:-
- Using File Explorer
- From the Run dialog box
- Through Control Panel
How to Open Folder Options in Windows 11 using File Explorer?
To launch Folder Options in Windows 11 using File Explorer, use these steps:-
Step 1. Simultaneously press Windows + E keys to open File Explorer. Alternatively, click on the Start button from the taskbar and search for File Explorer. In the available Search results, click on the File Explorer to open it.
Step 2. Click on the three dots menu (…) and then click on the Options item.
Once you complete the above steps, the Folder Options dialog will open.
How to Open Folder Options in Windows 11 from the Run box?
Follow these steps to open Folder Options in Windows 11 from the Run box:-
Step 1. Simultaneously press the Windows + R keys from the keyboard to open the Run dialog box.
Step 2. In the Run box, type the following and hit Enter from the keyboard to access Folder Options windows in Windows 11 OS:-
control.exe folders
How to Open Folder Options in Windows 11 through Control Panel?
Follow these steps to access Folder Options in Windows 11 through Control Panel:-
Step 1. Open the Run dialog box by pressing Windows + R keys from the keyboard.
Step 2. In the Run box, type Control Panel and press Enter from the keyboard.
Step 3. In the Control Panel that opens, set “View by” as “Large icons” and then click on the File Explorer Options.
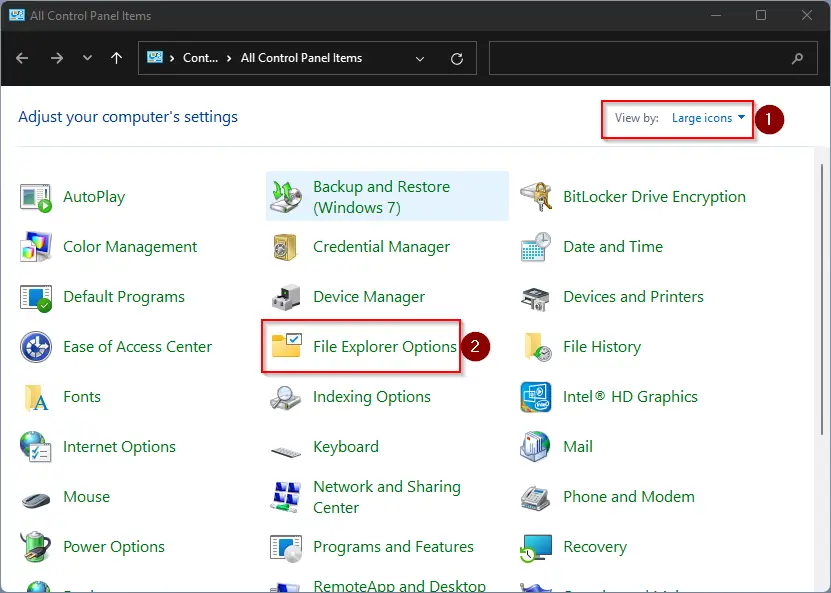
After completing the above steps, you should get access to Folder Options.
Conclusion
In conclusion, Windows 11 has introduced a new and updated File Explorer design that offers a better user experience. However, navigating through the new layout may be challenging for some users. Fortunately, there are three easy ways to access Folder Options in Windows 11, including using File Explorer, the Run dialog box, and Control Panel. By following the step-by-step instructions provided in this article, users can quickly and easily access Folder Options and customize their File Explorer settings according to their preferences.
How to «Show More Options» By Default in Windows 11 File Explorer
Windows 11 comes with a refreshed and streamlined File Explorer, integrating new design elements and features aimed at enhancing user experience. One of the notable changes introduced is the condensed «Show More Options» context menu, which replaces the traditional right-click menu for various tasks. While this modernized approach simplifies interactions and makes navigation easier, some users prefer the classic context menu style or wish to have additional options displayed by default. In this article, we will explore methods and settings that can help you adjust the File Explorer’s behavior to show more options by default, enhancing your productivity and user experience.
Understanding Windows 11’s File Explorer Context Menu
The revamped context menu in Windows 11 adopts a more minimalistic design with fewer options displayed immediately after a right-click. However, users can access the full set of options by selecting «Show more options» or pressing «Shift + F10». While this design is optimized for touch screens and cleaner aesthetics, it can sometimes feel limiting for power users who rely on various functions during their workflow.
Importance of Customizing File Explorer
Customizing the File Explorer to show more options by default can enhance your workflow in several ways, including:
-
Increased Efficiency: Having more options readily available minimizes the number of clicks required to perform common tasks, speeding up your workflow.
-
Familiarity: Users upgrading from previous versions of Windows may find the default context menu unfamiliar. Customizing it can restore a sense of familiarity.
-
Accessibility: Certain features may not be visible in the new context menu. Showing more options by default ensures you can quickly access any function without extra clicks.
Now that we understand the implications of this change, let’s dive into how to implement these customizations.
Method 1: Modifying the Registry to Show More Options
One of the most powerful ways to change Windows settings is through the Registry Editor. However, it’s important to approach this method with caution, as incorrect changes to the Registry can lead to system instability. Here’s how you can use the Registry to adjust the context menu behavior.
Steps to Modify the Registry
-
Open the Registry Editor:
- Press
Windows + Rto open the Run dialog. - Type
regeditand hit Enter. If prompted by User Account Control (UAC), click Yes.
- Press
-
Navigate to the Correct Path:
- In the Registry Editor, navigate to the following path:
HKEY_CURRENT_USERSoftwareClassesCLSID
- In the Registry Editor, navigate to the following path:
-
Create a New Key:
- Right-click on the
CLSIDfolder, selectNew, then clickKey. - Name the new key
{86C7BB60-6F13-11CE-9C57-00AA0067D642}.
- Right-click on the
-
Create a Subkey:
- Right-click on the key you just created, select
New, thenKey. - Name this new subkey
InprocServer32.
- Right-click on the key you just created, select
-
Edit Default Value:
- Select the
InprocServer32key. In the right pane, double-click on the(Default)value and ensure its data is set to an empty string.
- Select the
-
Close Registry Editor: After completing these steps, close the Registry Editor.
-
Restart Your Computer: For changes to take effect, restart your computer.
Note of Caution
If you ever want to revert these changes, you can delete the key you created, or you can back up your registry before making any modifications so you can restore it if something goes wrong.
Method 2: Using Third-Party Software
If you’re uncomfortable modifying the registry, there are third-party applications that can help customize context menus without delving into complex configurations. One popular application is «Ultimate Windows Tweaker.» Here’s how to utilize this software:
Steps to Use Ultimate Windows Tweaker
-
Download Ultimate Windows Tweaker:
- Visit the official website and download the application.
-
Run the Application:
- Launch the program. You don’t need to install it as it’s a portable application.
-
Navigate to Context Menu Settings:
- Once the application is opened, look for the “Explorer” section.
-
Customize Context Menu Options:
- Find any settings relating to the context menu. You may also find options to show more features or revert to the classic context menu style.
-
Apply the Changes: Once you have selected your preferences, apply the changes and close the application.
-
Restart Your Computer: Finally, restart your system to make sure all changes take effect.
Benefits of Using Third-Party Tweakers
Using third-party solutions typically offers a user-friendly interface and requires no technical knowledge. They can provide additional features, such as system optimization tools and backup utilities, which may further assist with productivity.
Method 3: Using Powershell
For users who prefer a command-line interface, modifying File Explorer settings through Powershell can also achieve similar results. Here’s how you can use Powershell for this purpose.
Steps to Use Powershell
-
Open Powershell:
- Press
Windows + Xand selectWindows Terminal (Admin)orWindows Powershell (Admin).
- Press
-
Execute the Command:
- You can use the following command to navigate and customize your context menu settings. Though the specific command may vary depending on desired context options, here’s a command that resets context menu settings:
Set-ItemProperty -Path 'HKCU:SoftwareMicrosoftWindowsCurrentVersionExplorerAdvanced' -Name 'ExtendedUI' -Value 1
- You can use the following command to navigate and customize your context menu settings. Though the specific command may vary depending on desired context options, here’s a command that resets context menu settings:
-
Close Powershell: After executing the command, simply close the terminal.
-
Restart Your Computer: Like with previous methods, restart your computer to see the changes.
Advantages of Using Powershell
Using Powershell provides a fast way to change advanced settings without extensive navigation through user interfaces. It’s ideal for users who are already comfortable with command-line tools.
Method 4: Personalizing the Context Menu with Batch Scripts
In some cases, you may prefer a context menu behavior that’s accessible and easy to execute. Batch scripts allow you to create streamlined commands that automate changing settings.
Creating a Batch Script
-
Open Notepad:
- Open a new Notepad document.
-
Enter Batch Commands:
- Insert a command similar to this into your Notepad:
@echo off
reg add "HKEY_CURRENT_USERSoftwareClassesCLSID{86C7BB60-6F13-11CE-9C57-00AA0067D642}InprocServer32" /ve /t REG_SZ /d "" /f
- Insert a command similar to this into your Notepad:
-
Save as .bat:
- Click File, then Save As. Set the file type to “All Files” and save it with a
.batextension.
- Click File, then Save As. Set the file type to “All Files” and save it with a
-
Run the Script:
- Right-click on the script you created and select
Run as administrator.
- Right-click on the script you created and select
-
Restart Your Computer: Restart after executing the script to see changes.
Benefits of Batch Scripting
Creating batch scripts offers the advantage of executing multiple commands in one go, simplifying repetitive tasks. It also gives you the ability to share scripts with others for a more uniform work environment.
Conclusion
Enhancing the context menu in Windows 11’s File Explorer to show more options by default greatly improves usability for many users. By utilizing the methods outlined in this article—modifying the registry, using third-party applications, leveraging Powershell, or creating batch scripts—you can customize your operating system to meet your workflow preferences.
Before making any changes, always remember to back up your registry or create a system restore point. By doing so, you can ensure that you have a fallback option in case any modifications do not yield the expected results.
Whether you are a basic user or a power user, these enhancements not only optimize your tasks but can also minimize frustration caused by the changes in context menus introduced with Windows 11. Enjoy the productivity benefits brought about by a more personalized File Explorer experience!