

Updated at 2020-9-24
The following changes and improvements have been made in FW2.0:
1.Added a new function of renaming the Bluetooth device. (FiiO Control App->Setting menu->Custom device name)
2.Added new options to the APP: Custom button function, Long press/Double tap the volume button to switch songs. (You would need to install FiiO Music APP V3.0 or FiiO Control APP latest version)
3.Fixed the issue where there was no prompt when turning the device off and when plugging in earphones after the device is turning on.
4.Fixed the issue where under Bluetooth multipoint pairing, if Device A is answering a phone call and Device B also had one later, after Device B hung up, the voice of Device A could not be heard.
5.Fixed the issue of text misses under USB in-vehicle mode.
6.Miscellaneous bug fixes.
BTR5 FW2.0: Click here
How to update the BTR5: Click here
USB DAC Driver(v4.47.0):
Click here
Updated at 2019-12-25
The following changes and improvements have been made in FW1.0.6:
1. Improved the battery indication in charging status: the battery scrolling is based on current battery
2. Improved the sampling rate recognition when connecting to mobile phone as USB DAC
3. Miscellaneous bug fixes.
BTR5 FW1.0.6: Click here
Last edited:
Same, no issues with update.
Hi
Can you explain the different «filter» options please? there is a list of it in the quick start manual with no explanation however there are more than in the manual and none of them make sense to me, there are:
— BRICK
— FAST
— SLOW
— MINI
— MINI S
— APOD 1
— APOD 2
— HYBR F
can’t seem to hear much difference of any at all.
thanks!
I have some issues when i connet to my pc USB port. DAC mode is ok. but it does not charge the unit in DAC mode. drain battery fast. i check in Fiio music setting and the charge mode is on. same status in the unit menu..
Hi
Can you explain the different «filter» options please? there is a list of it in the quick start manual with no explanation however there are more than in the manual and none of them make sense to me, there are:
— BRICK
— FAST
— SLOW
— MINI
— MINI S
— APOD 1
— APOD 2
— HYBR Fcan’t seem to hear much difference of any at all.
thanks!
Dear friend,
You may read this for reference. The effect is similar:


Best regards
I have some issues when i connet to my pc USB port. DAC mode is ok. but it does not charge the unit in DAC mode. drain battery fast. i check in Fiio music setting and the charge mode is on. same status in the unit menu..
Dear user,
Please try to clear the pairing record by holding the volume +&- for 5s and try again? And can you find the battery icon in the BTR5 moving when using as USB DAC?
Best regards
killaHz
Previously known as Matthew420
Is there any way to get the firmware updater to run on a Mac?
Is there any way to get the firmware updater to run on a Mac?
Dear user,
Sorry no. You may borrow a Windows computer for help?
Best regards
dfu-util can also be used to update firmware. I have only tested on linux. Should also work on OS X
Where can I get a DFU driver that works on Windows 10? I’m trying to be sure this thing is on the latest firmware release. When I put it in DFU mode it comes up needing a driver in Device Manager. The supplied drivers that come with the firmware download don’t work. I also tried manually pointing windows at the included driver folder and it says it could not find drivers.
-

DfuWizard_QWmJ40ybHq.png
18.4 KB
· Views: 0
-

mmc_pbYoqr4iJL.png
12.8 KB
· Views: 0


-
Main page -
Drivers
-
Sound cards
- Sound cards FiiO
-
FiiO BR13
-
FiiO BTA50
-
FiiO BTR15
-
FiiO BTR17
-
FiiO BTR25
-
FiiO K11
-
FiiO K11 R2R
-
FiiO K13
-
FiiO K15
-
FiiO K17
-
FiiO K19
-
FiiO K27
-
FiiO K9
-
FiiO KA11
-
FiiO KA13
-
FiiO KA15
-
FiiO KA17
-
FiiO KA19
-
FiiO KA7
-
FiiO KB3
-
FiiO M25
-
FiiO M27
-
FiiO M5
-
FiiO M9
-
FiiO Q1
-
FiiO Q11
-
FiiO Q15
-
FiiO Q17
-
FiiO Q25
-
FiiO Q27
-
FiiO Q3
-
FiiO Q5
-
FiiO R27
-
FiiO R29
-
FiiO R7 AKM
-
FiiO R9
-
FiiO S11
-
FiiO S13
-
FiiO S15
-
FiiO S17
-
FiiO S19
-
FiiO S9
-
FiiO SR11
-
FiiO USB Audio
-
FiiO USB DAC
-
FiiO USB DAC E07K
-
FiiO USB DAC-E10
-
FiiO USB DAC-E17
-
FiiO X1
-
FiiO X3
-
FiiO X3 2nd gen
-
FiiO X3II
-
FiiO X3K
-
FiiO X5
-
FiiO X5 2nd gen
-
FiiO X5II
-
FiiO X7
FiiO Sound cards Windows drivers were collected from official websites of manufacturers and other trusted sources.
Original software will help you to fix device errors with FiiO Sound cards.
Download latest drivers for FiiO Sound cards on Windows 11, 10, 8 (32-bit and 64-bit).
Download DriverHub
The web version of DriverHub may not contain all FiiO drivers. Install the DriverHub app to get access to the full database of drivers.
| Web version | DriverHub for Windows | |
|---|---|---|
| Full driver catalog | ||
| Automatic driver installation |
Download and update Windows drivers
Download DriverHub
Version: 1.3.15.3625 for Windows 8, 10 and 11
Free software
By downloading the program, you accept terms of the User Agreement and Privacy policy.
Optional software included
Optional software included
- Yandex Browser
- Opera Browser
- Avast Free Antivirus
- World of Tanks
- World of Warships
FiiO BTR5 driver is a windows driver .
Common questions for FiiO BTR5 driver
Q: Where can I download the FiiO BTR5 driver’s driver?
Please download it from your system manufacturer’s website. Or you download it from our website.
Q: Why my FiiO BTR5 driver doesn’t work after I install the new driver?
1. Please identify the driver version that you download is match to your OS platform.
2. You should uninstall original driver before install the downloaded one.
3. Try a driver checking tool such as DriverIdentifier Software .
As there are many drivers having the same name, we suggest you to try the Driver Tool, otherwise you can try one by on the list of available driver below.
Please scroll down to find a latest utilities and drivers for your FiiO BTR5 driver.
Be attentive to download software for your operating system.
If none of these helps, you can contact us for further assistance.
Как я Fiio BTR5 в Linux прошивал.
Было у меня устройство Fiio BTR5 — усилитель для наушников и по совместительству bluetooth-гарнитура и внешняя звуковая карта. Изначально устройство поставлялось с прошивкой версии 1.06. Её можно было обновить до версии 2.0 программой с сайта производителя. Совсем новые устройства поставляются с прошивкой версии 2.1. Вот последнее мне и не давало покоя.
На китайском сайте производителя можно найти установщик для версии 2.1. На той же странице написано, что версия 2.1 отличается от 2.0 только тем, что её прошивают на заводе. Никаких новых функций и исправлений она не несёт. Но хочется же самого свежего!
Сначала я попробовал обновить устройство утилитой производителя в Windows. Перевёл его в режим DFU следующим способом:
- Включить устройство самой маленькой кнопкой на корпусе;
- Перевести устройство в режим сопряжения удержанием средней кнопки до появления надписи «PAIRING«;
- Нажать и удерживать среднюю кнопку и кнопку увеличения громкости до короткого появления надписи «DFU» на экране.
После подключения к компьютеру устройство успешно определилось системой, но программа прошивать его отказывалась. Если не получается в Windows, то пойдём в Linux.
С форума 4PDA я узнал о существовании программы dfu-util, которая используется для загрузки прошивки по USB в различные устройства, которые поддерживают режим DFU. В репозитории Debian есть версия 0.9, с сайта программы можно скачать исходный код версии 0.10. Для сборки требуется библиотека libusb версии 1.0. Я использовал версию 0.10-dev из git-репозитория «git://git.code.sf.net/p/dfu-util/dfu-util».
Для обновления устройства нужно извлечь из архива образ прошивки и положить его по удобному пути. Файл называется «BTR5-FW2.1.C.dfu«. Само устройство надо перевести в режим DFU по алгоритму выше и подключить к компьютеру. Если всё сделано правильно, то в выводе «lsusb» должна появиться похожая строка:
Bus 001 Device 004: ID 0a12:ffff Cambridge Silicon Radio, Ltd USB Bluetooth Device in DFU State
Теперь устройство можно прошивать:
$ sudo dfu-util -d 0a12:ffff -D BTR5-FW2.1.C.dfu
dfu-util 0.10-dev

Copyright 2005-2009 Weston Schmidt, Harald Welte and OpenMoko Inc.
Copyright 2010-2021 Tormod Volden and Stefan Schmidt
This program is Free Software and has ABSOLUTELY NO WARRANTY
Please report bugs to http://sourceforge.net/p/dfu-util/tickets/

Opening DFU capable USB device...
Device ID 0a12:ffff
Run-Time device DFU version 0101
Claiming USB DFU (Run-Time) Interface...
Setting Alternate Interface zero...
Determining device status...
DFU state(0) = appIDLE, status(0) = No error condition is present
Device really in Run-Time Mode, send DFU detach request...
Resetting USB...
Opening DFU USB Device...
Claiming USB DFU Interface...
Setting Alternate Interface #0 ...
Determining device status...
DFU state(2) = dfuIDLE, status(0) = No error condition is present
DFU mode device DFU version 0101
Device returned transfer size 1023
Copying data from PC to DFU device
Download        [=========================] 100%      1090792 bytes
Download done.
dfu-util: unable to read DFU status after completion (LIBUSB_ERROR_TIMEOUT)
В самом конце может появиться сообщение с текстом «LIBUSB_ERROR_TIMEOUT«. Если я правильно понял, то после установки прошивки устройству должна отправляться команда на перезагрузку, но программа «dfu-util» этого не делает. Тем не менее прошивка успешно устанавливается.
Для перевода устройства в штатный режим работы его надо сбросить долгим удержанием кнопки включения. Держать надо не менее 10 секунд. После этого устройство включится, но все настройки будут сброшены до заводских.
—>
These are instructions on how to install FiiO USB Driver on Windows Computer (this method can be used on Windows XP, Windows 7, Windows 8, 8.1, and Windows 10).
Requirements: You need to have the Windows Computer and the FiiO Driver to follow the below guidelines.
Install FiiO USB Driver on Windows Computer
- Download and extract the driver package on the Computer. If in case, you have already downloaded and extracted the driver package, then SKIP this step.
- Once the driver package is extracted on the computer, you will be able to see the following files:
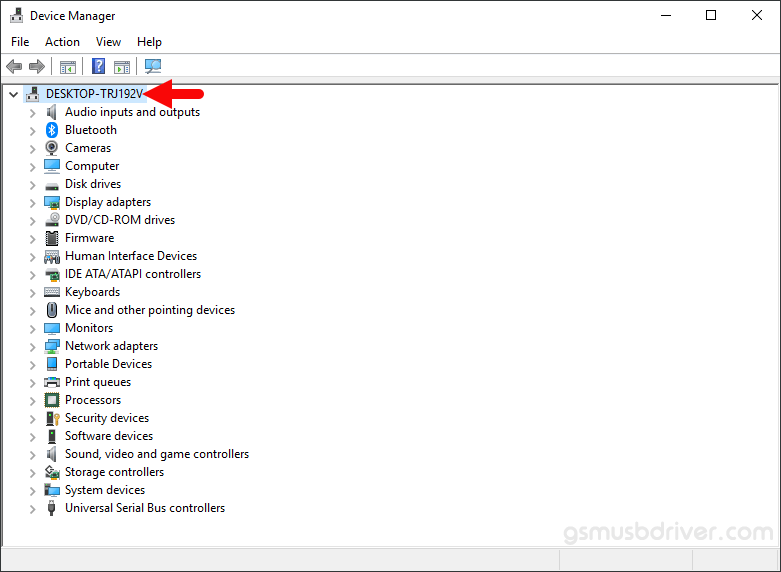
- Open Device Manager on the Computer. Press Win + R key from the keyboard and type devmgmt.msc and Click on OK Button:
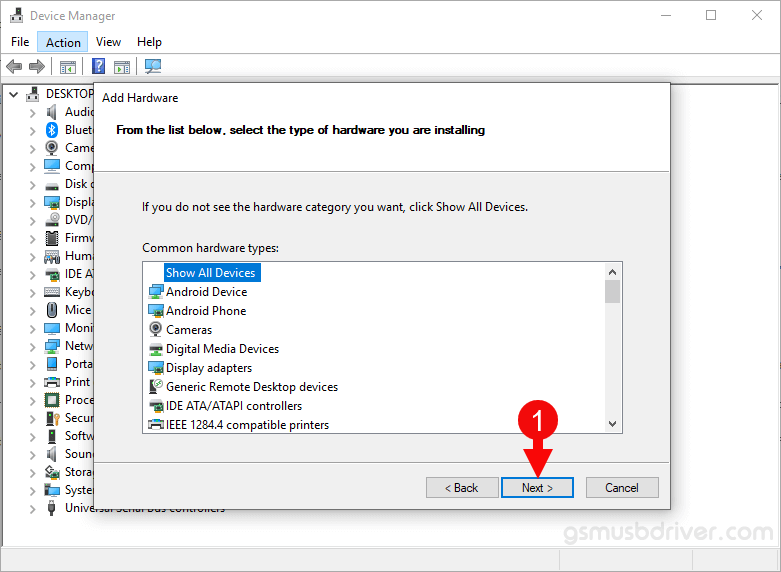
- Under Add hardware Dialog Box, Click on the Next Button:
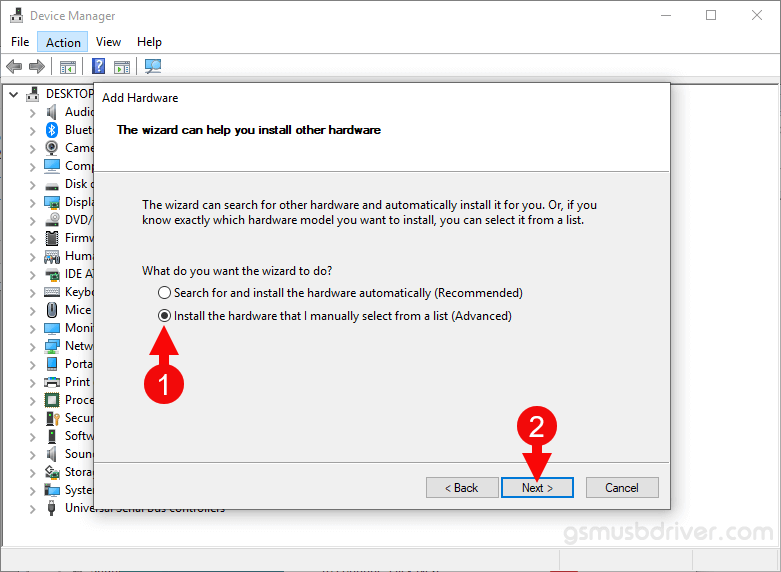
- Tick on the Install the hardware that I manually select from a list checkbox and Click on the Next Button:
- Click on the Browse Button:
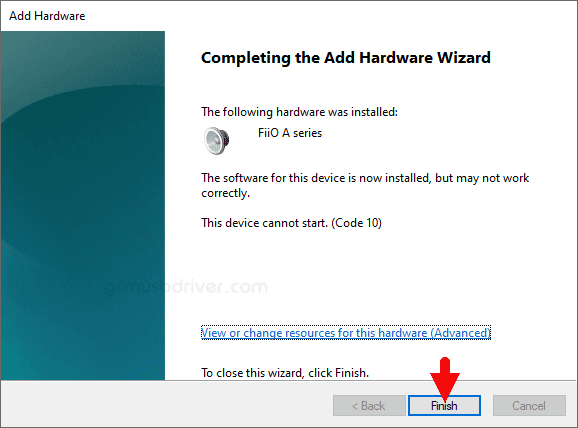
- Click on the Finish button to complete the installation process (ignore Code 10; it will be gone post restarting the computer).
- Restart the Computer.

a. Once the Device Manager is Launched, Click on the Computer Name (name can vary from the image below):
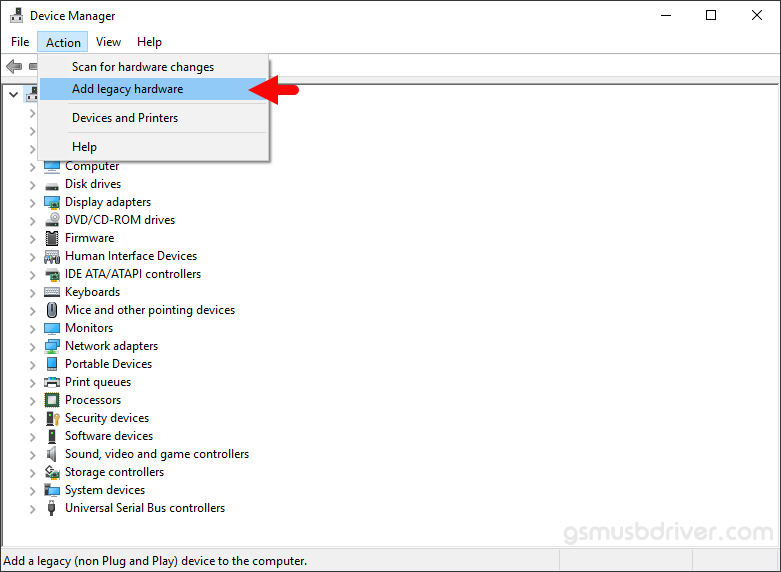
b. Click on the Action Menu and Select Add Legacy Hardware option:
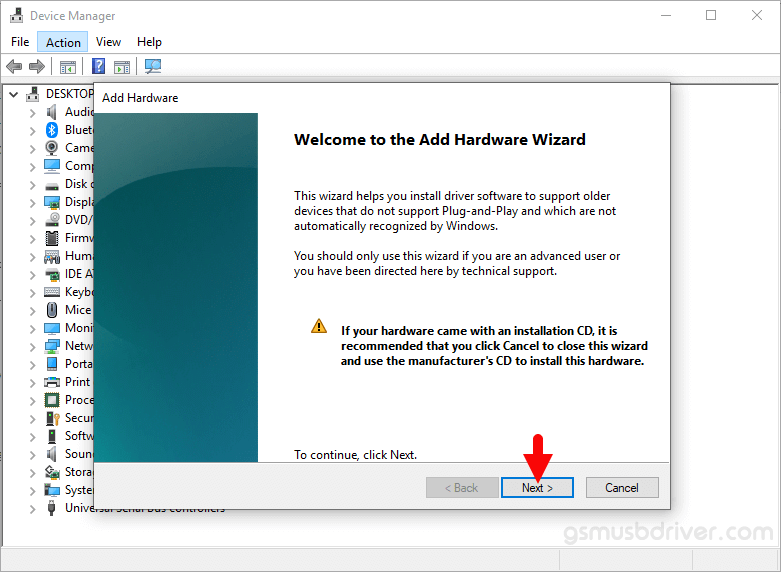
a. Click on the Next Button:
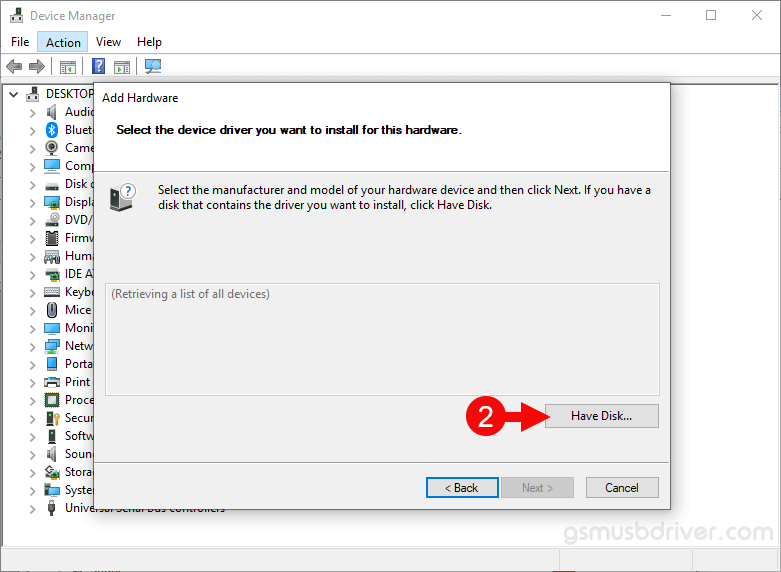
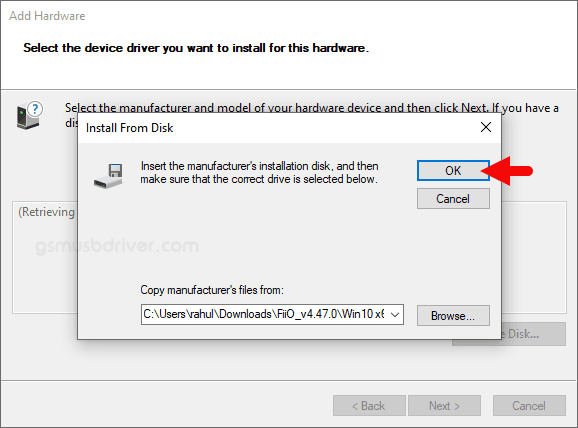
b. Then Click on the Have Disk Button:
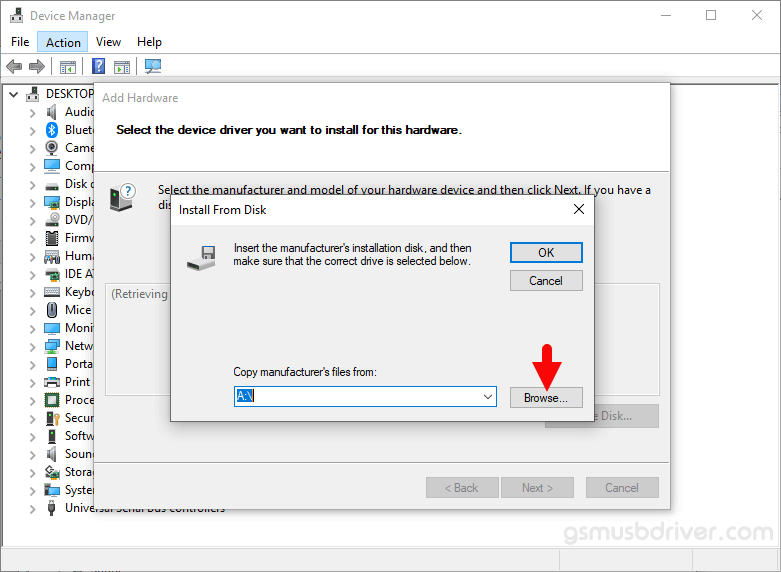
a. Locate the .inf file from the computer (this file can be found in the extracted driver folder).
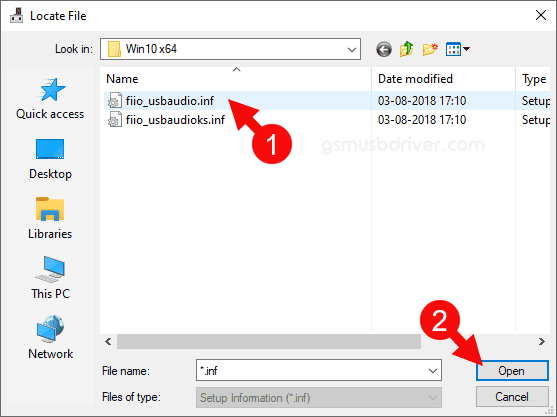
b. Click on the OK Button:
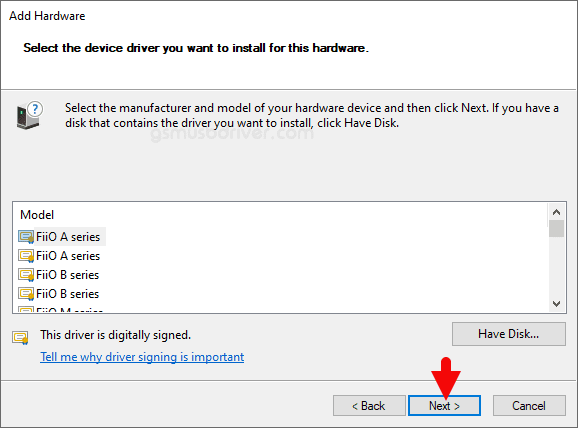
c. Click on the Next Button (you can manually select the model number of your FiiO device in this step):
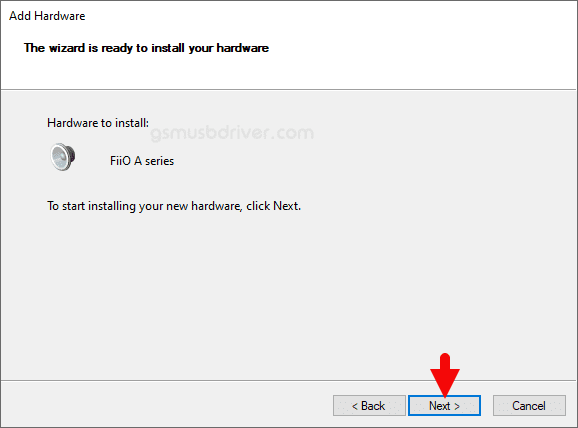
d. Again Click on the Next button:
Once the Computer is restarted, you can easily connect your FiiO devices to the computer without facing any issue.
Readme Once:
[*] We have used the FiiO Driver to create the above manual. If you wish, you can download the same driver from here.
[*] Driver Signature Error: If you are facing Driver Signature Error while installing the USB Driver, then head over to How to Fix Driver Signature Error page.
[*] Driver Easy: We recommend you to use Driver Easy application to update all the computer drivers in a Single Click.
[*] Credits: FiiO Driver is created and distributed by FiiO Electronics Technology Co. Ltd. So, full credit goes to them for sharing the driver for free.