
Due to patent restrictions, FFmpeg cannot be distributed with Audacity itself. However, FFmpeg is required to import and export a variety of audio formats, including M4A and WMA.
Note: In previous versions of Audacity, LAME was required to export MP3 files. It is now included with Audacity by default on Windows and macOS. Make sure you are using the latest version of Audacity if you’re getting any LAME errors.
You can download and install FFmpeg as follows:
-
Run the installer. You can ignore the «unknown publisher» warning.
-
Read and accept the license
-
Select the location to install FFmpeg. By default FFmpeg will be installed into C:\Program Files\FFmpeg for Audacity
Audacity should now automatically detect FFmpeg and allow you to use it.
If you prefer a manual installation of FFmpeg you can download a ZIP file from a different source:
Note:
-
Not all FFmpeg versions are supported on all releases.
-
Audacity prior 3.1 only supports avformat-55.dll.
-
Audacity 3.1 and later supports avformat-55.dll, avformat-57.dll and avformat-58.dll.
-
Audacity 3.2 and later also supports avformat-59.dll.
-
Audacity 3.3 and later also supports avformat-60.dll.
-
Audacity 3.5 and later also supports avformat-61.dll.
-
You can check which dll is in which FFmpeg release here.
-
-
Make sure you download full FFmpeg copies, not just the avformat-*.dll’s individually. Further, make sure to download or build the shared versions as only those contain .dll’s.
-
Different versions of FFmpeg may have different codecs enabled in them. In particular, AMR (narrowband) is not featured in the recommended installer.
If you have installed FFmpeg from a different source, or installed it in a different location, you’ll need to tell Audacity where to find it. To do this:
-
Go to Edit > Preferences > Libraries
-
Click on the Locate… button.
-
If the following message appears, Audacity has automatically identified FFmpeg:
You can click No as Audacity already knows where to find FFmpeg.
If this message does not appear, proceed with the next steps.
-
In this dialog window, click Browse… to locate the avformat-*.dll from the FFmpeg folder you downloaded/installed elsewhere
-
Once you’ve found it, click Open, then OK, then OK again to close the preferences.

Audacity is a powerful, open-source audio editing tool used by professionals and hobbyists alike. However, by default, it may not support all audio formats. FFmpeg is a versatile multimedia framework that expands Audacity‘s capabilities, allowing it to handle a wider variety of audio formats.
To work with a wider range of audio formats in Audacity, you need to install FFmpeg. Here’s a simple guide to help you set it up!
Step 1: Download FFmpeg
Download and run the installer.
For Windows:
Download FFmpeg 5.0.0 for Audacity for 32-bit Windows or Download FFmpeg 5.0.0 for Audacity for 64-bit Windows
Note: FFmpeg is compatible with Audacity versions 3.x.
Step 2: Link FFmpeg to Audacity
Open Audacity and go to Edit > Preferences (or Audacity > Preferences on macOS).

In the Libraries tab, click Locate next to FFmpeg.
If not automatically detected, browse to find the avformat-55.dll (Windows) or libavformat.dylib (macOS) file in the FFmpeg for Audacity directory.
With FFmpeg installed and linked, you can now handle more audio formats in Audacity!
Note: If you haven’t downloaded Audacity yet, get started by downloading it from Codecs.com: download Audacity. Enjoy editing your audio with expanded format support!
This is the FFmpeg for Audacity audio and you will need to download and install the FFmpeg library. This so that you can use Audacity audio. See below how to install the files for the audio editor as well as how this connects to the Audacity editor. Finally you can edit your audio files after this.
FFmpeg for Audacity Audio
First you will need to download the FFmpeg files below. Most installs are for the 64bit version if you are using the Windows operating system. Your Windows 10 and up are all 64bit systems. Likewise also see the article on Audacity audio problems as well as Audacity Recording Desktop Audio.
Setting up FFmpeg can be done easily by following these straightforward steps. Begin by downloading the 64-bit version of the FFmpeg installer. Once the download is complete, unzip the file to reveal its contents. Look for the EXE file within and click on it, even if a warning about an “unknown publisher” appears. Afterward, carefully read and accept the license agreement.
When prompted, choose the installation location; the default is C:\Program Files\FFmpeg for Audacity. Complete the process by clicking on “Finished.” To wrap it up, restart the Audacity Audio program. Alternatively, if you’re installing FFmpeg libraries from Audacity itself, the process is just as simple. Start by navigating to Edit > Preferences > Libraries.
Click on “Locate” and proceed to search for your file. Audacity will automatically identify FFmpeg, and you’ll receive a message confirming the successful installation. These steps ensure that FFmpeg is seamlessly integrated into your Audacity program, enhancing its functionality.
Installing FFmpeg
Follow the instructions below.
- Download the FFmpeg installer which is most the 64 bit version
- Next extract the file from the ZIP file
- Find the EXE file you extracted and then Click on the file (ignore the “unknown publisher” warning)
- Then read and accept the license
- Choose your location for the install (Default is C:\Program Files\FFmpeg for Audacity)
- Click on Finished
- Restart the Audacity Audio program.
Installing FFmpeg from Audacity
If you are going to install the FFmpeg libraries from inside Audacity then you will need to do the following:
- Click on the following sequence – Edit > Preferences > Libraries
- Click on Locate and browse for your file
- Finally the following message will appear, Audacity has automatically identified FFmpeg:
- Click No as Audacity already knows where to find FFmpeg;
- Browse the directories on your computer;
- Then Click Open, then OK, then OK again to close the preferences.
Download FFmpeg for Audacity Audio (32 bit)
Download FFmpeg for Audacity Audio (64 bit)
Finally, each file is inside a ZIP file. Extract the file inside once downloaded.
Download FFmpeg for Audacity (MacOS)
Likewise also see the Prosumer Video as well as the Audacity sound levels settings.
The optional FFmpeg library allows Audacity to import and export a much larger range of audio formats including M4A (AAC), AC3, AMR (narrow band) and WMA and also to import audio from most video files.
- Because of software patents, Audacity cannot include the FFmpeg software or distribute it from its own websites. Instead, use the following instructions to download and install the free and recommended FFmpeg third-party library.
- Advanced usage: If you already have Audacity-compatible FFmpeg 2.2.x or 2.3.x shared libraries in the system PATH, Audacity will use those as long as you do not install FFmpeg from the links below and as long as you do not specify the FFmpeg you want Audacity to use in Libraries Preferences.
Contents
- 1 Recommended Installer
- 1.1 Alternative zip download for FFmpeg 2.2.2
- 2 Locating the FFmpeg library manually
Recommended Installer
- Go to the external FFmpeg download page.
- Directly underneath «TO DOWNLOAD Lame and FFmpeg for Windows, click links BELOW:», left-click the link ffmpeg-win-2.2.2.exe and save the file anywhere on your computer.
- Double-click ffmpeg-win-2.2.2.exe to launch the installer (you can safely ignore any warnings that the «publisher could not be verified»).
- Read the License and click Next, Next and Install to install the required files to C:\\Program Files\\FFmpeg for Audacity (or C:\\Program Files (x86)\\FFmpeg for Audacity on a 64-bit version of Windows).
- If Audacity was running when you installed FFmpeg, either restart Audacity or follow the steps to manually locate FFmpeg.
If you have the previous FFmpeg 0.6.2 installed you should remove that before installing FFmpeg 2.2.2
Alternative zip download for FFmpeg 2.2.2
- Go to the external FFmpeg download page.
- Under «TO DOWNLOAD Lame and FFmpeg for Windows, click links BELOW:».
- Left click the link ffmpeg-win-2.2.2.zip
- Extract the entire contents of the downloaded ZIP file to a folder called «ffmpeg-win-2.2.2» anywhere on your computer, then follow the instructions below to locate the file «avformat-55.dll» using the Libraries Preferences.
Locating the FFmpeg library manually
If you installed FFmpeg while Audacity was running, or if you installed FFmpeg to a non-default location, Audacity will ask you to configure Preferences to locate the FFmpeg library. To do this, access Preferences then the «Libraries» tab on the left:
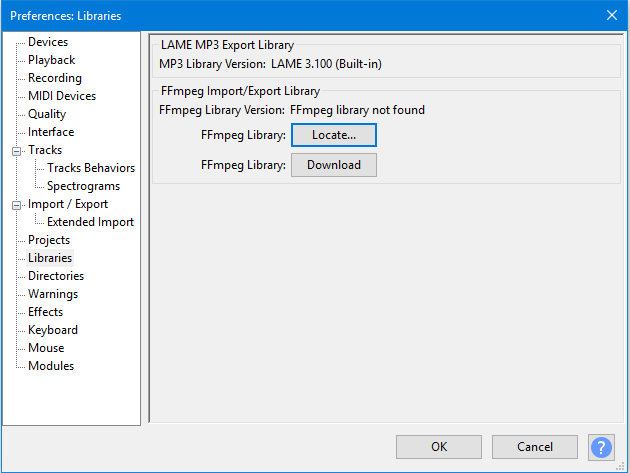
As seen in the image above, the «FFmpeg Library Version» will say «not found». To correct this:
- Click the Locate… button to right of «FFmpeg Library:«
- If a «Success» message indicates Audacity has now automatically detected valid FFmpeg libraries and asks if you want to detect them manually, click No, then OK to close Preferences
- If the «Locate FFmpeg» dialog appears, click Browse…
- Navigate to the folder that contains FFmpeg, and select the file avformat-55.dll
- Click Open then OK and OK again to close Preferences.
- FFmpeg Library Version should now show a set of three version numbers for the sub-libraries of FFmpeg («F» for libavformat version, «C» for libavcodec version and «U» for libavutil version).
If you still see «not found», you may have installed the wrong libraries. Click the Download… button to obtain the correct library for your operating system. You can also choose to see diagnostic information about FFmpeg detection.
|< Installing and updating Audacity on Windows
Из коробки Audacity не поддерживает многих функций. Это связано с тем, что разработчики проживают в США и они не могут нарушать их законодательство. Но к счастью можно скачать отдельные плагины бесплатно.
Lame encoder
При первом использовании Audacity когда вы захотите сохранить файл в mp3 формате у вас появится такое сообщение:
Данный плагин необходим для экспорта треков в mp3 формате. Вы можете скачать его по ссылке ниже:
lame_enc.dll для Windows
Lame для MacOS
После загрузки эту библиотеку нужно установить. Установка проходит как во всех программах.
Теперь вы можете перейти в Audacity закрыть окно требования lame библиотеки и заново нажать на экспорт. Теперь у вас на постоянной основе будет возможность сохранения файлов в mp3.
FFMpeg
С помощью этого плагина Audacity сможет читать такие форматы: AC3, AAC, WMA, AVI, MKV и другие (начиная с версии 1.3.6).
Ключевой особенностью библиотеки является импорт звука из видео файла.
Ниже вы можете скачать библиотеку FFMpeg для Audacity.
FFMpeg для Windows
Для установки необходимо открыть exe файл и следовать подсказкам. После перезагрузить Audacity и FFmpeg будет работать.
avformat-55.dll — поставляется внутри бибилиотеки FFMpeg.
Плагины VST
Плагины VST (Virtual Studio Technology) — это формат плагинов, который можно использовать вместе с любым совместимым хост-приложением. Подавляющее большинство плагинов VST — это эффекты, которые вы можете использовать для управления своим звуком в реальном времени.
Скачать VST плагины можно тут.
Izotope Ozone, Gsnap
Audacity позволяет работать со сторонними программами, данные плагины добавляют множество возможностей для работы со звуком.