
Last Updated :
06 Jan, 2025
FFmpeg is an open-source, versatile software that is widely used among Windows 10 and 11 users for creating and handling multimedia files right from editing to converting. So, it doesn’t matter whether you’re a beginner or a professional, if you’re looking for a reliable and lightweight tool, then FFmpeg is for you.
In this guide, we’re going to explain how you can download and install FFmpeg on Windows 10 and 11.
Prerequisites
- A working Internet connection
- Windows PC
- Administrative Rights
Steps to Download FFmpeg on Windows
You can download the FFmpeg for Windows by following these 2 simple steps. Let’s find out:
1. Visit the official Website and Select the Compatible OS
Open your web browser and visit the official website of FFmpeg for Windows.
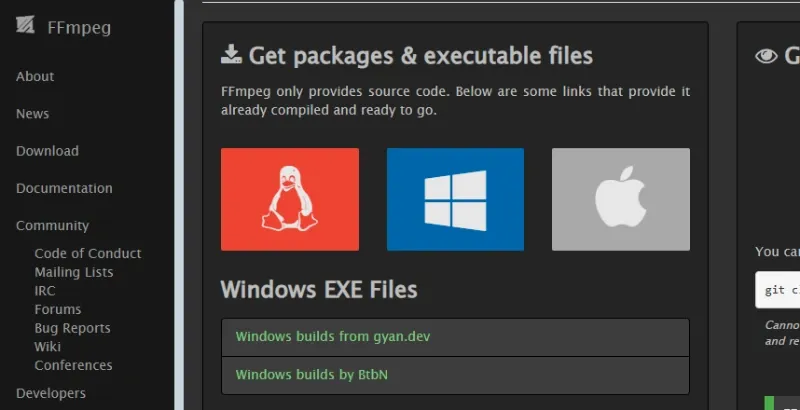
2. Choose your Compatible Version
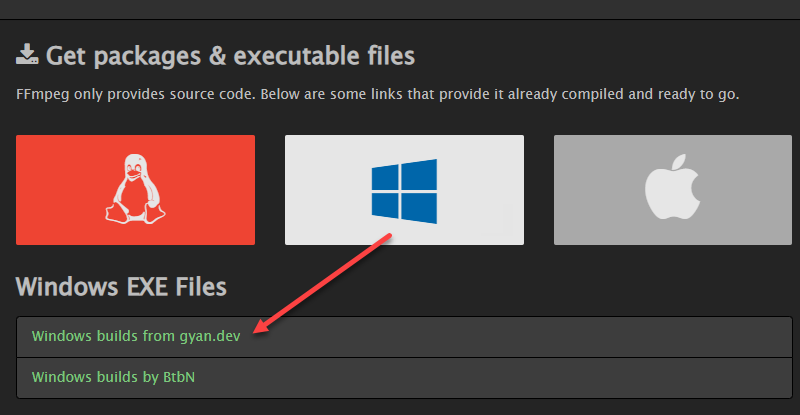
Scroll over the Windows Logo, you’ll see 2 options.
- Windows builds from gyan.dev
- Windows builds by BtbN
You can click on the second option, it will redirect you to its GitHub page. Navigate and download the ZIP file.
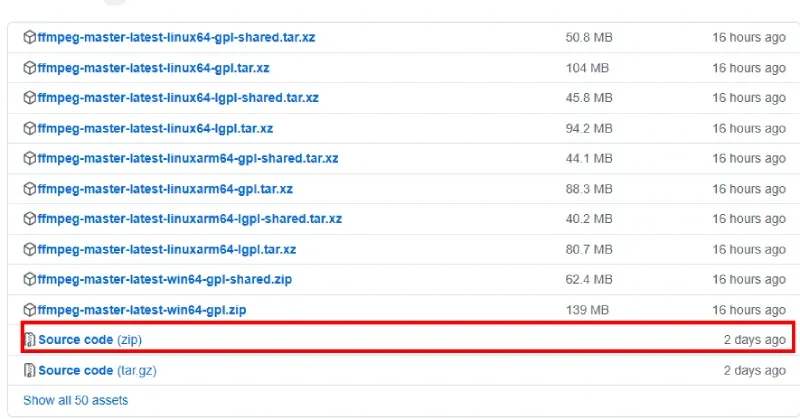
Release Builds
Steps to Install FFmpeg on Windows
Once you download the ZIP file, Now, it’s time to start extracting the file and Install it in your Windows computer. Let’s begin:
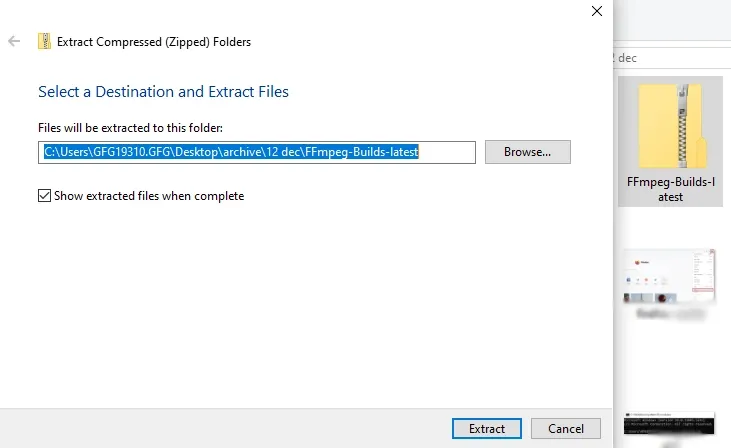
1. Navigate to the ZIP path
Locate the downloaded file so that you can unzip its folder.
ZIP folder
2. Unzip the Downloaded FFmpeg File
Right-click on the ZIP file and click on “Extract All” and choose a new path to unzip the extracted files.
Unzip the FFmpeg file
Configure FFmpeg Installer – 2 Steps
This is a crucial step to run this tool, once you allow FFmpeg to your system path, it can be easily used from the Command line. Let’s check out these two steps to configure the FFmpeg tool in your Windows 10 or 11.
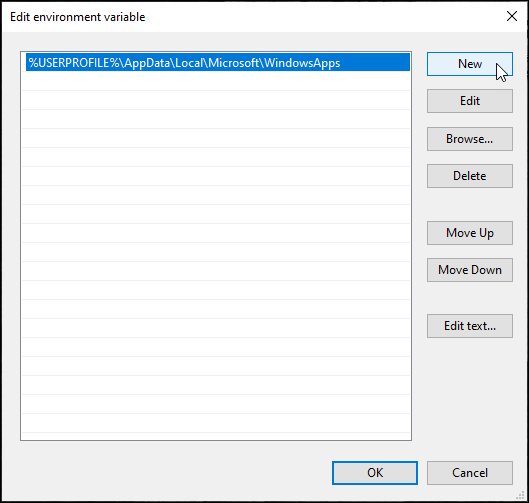
1. Press Win + S and type “Environment Variables”, you’ll see an option by this name “Edit the system environment variables” Hit the Enter button.
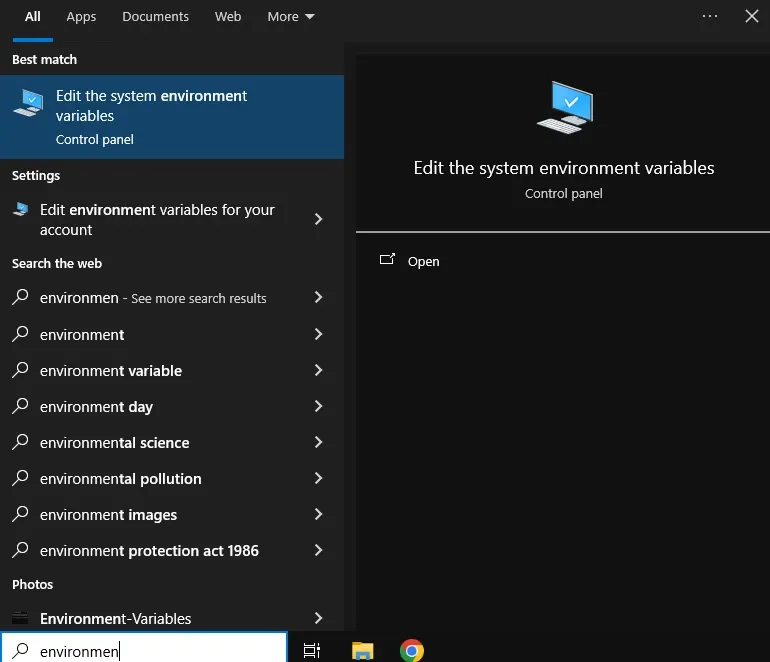
2. Click on path > edit and then click New and enter the path to the extracted folder of FFmpeg. Click on save and exit.
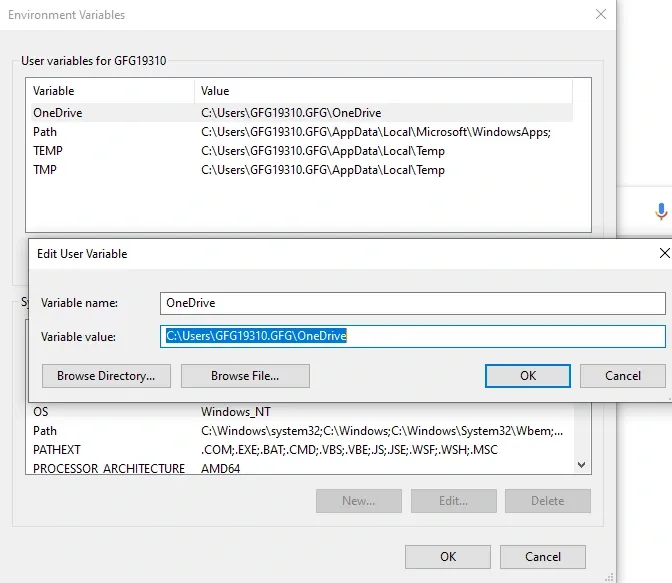
Edit Environment
Verify the FFmpeg Installation
Once you finish the installation, you can verify the same via the command prompt. Here’s how you can do it:
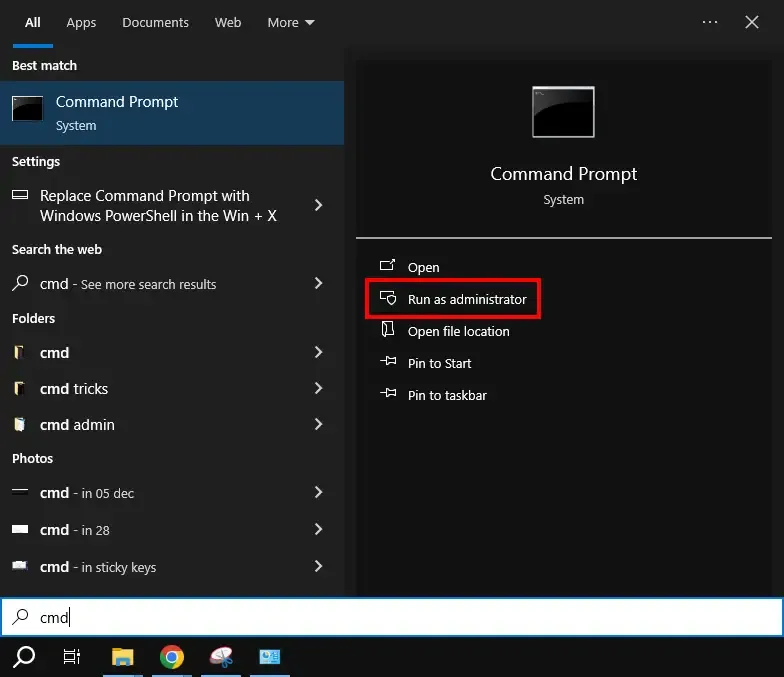
1. Open Command Prompt
Go to Start and type “Command Prompt” and select “Run as administrator”
Open command prompt as admin
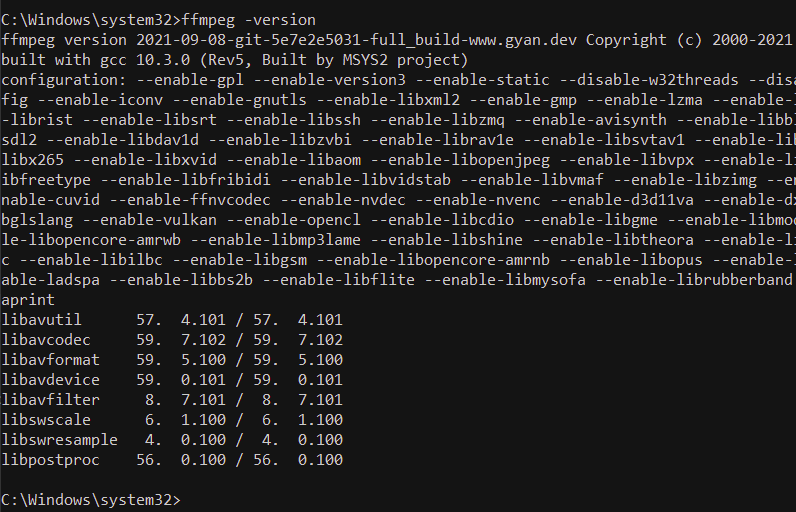
2. Run FFmpeg Installer Verification
Restart your computer and verify the installation by running:
ffmpeg -version
By following these methods, you can easily download, install, and verify the installer on your Windows computer. FFmpeg not only empowers you to handle media files (including video) but also provides solutions to perform audio editing and file compression. The above-mentioned steps have been segregated in such a way that if you’re a beginner or a professional, it should create any issue to get FFmpeg in your Windows 10 and 11.
FFmpeg is a command-line audio and video converter available for Linux, macOS, and Windows. This open-source tool helps users manipulate multimedia content and offers free access to several audio and video libraries.
Even though FFmpeg doesn’t have a clickable GUI, the installation process is straightforward.
In this guide, you will learn how to install FFmpeg on Windows in four simple steps.
Prerequisites
- A system running Windows (This tutorial uses Windows 10).
- A file archiver (This guide uses 7-Zip).
- Command Prompt or Windows PowerShell access.
- Administrator privileges.
How To Install FFmpeg on Windows
Installing FFmpeg on Windows requires adding the utility to the Windows PATH. Additionally, users can manually navigate to the folder containing the executable and run the program. However, the process is time-consuming and impractical.
A straightforward way to work with FFmpeg is to add it to PATH by editing Windows environment variables. Therefore, Windows knows where to look for the executable. Users can run FFmpeg directly from the command line without typing in the full path to the app’s folder.
Step 1: Download FFmpeg for Windows
Visit the FFmpeg download page. The More downloading options section has FFmpeg packages and executable files for Linux, Windows, and Mac. To get the Windows version:
1. Hover over the Windows logo and click the Windows builds from gyan.dev link. A new page opens.
2. In the git master builds section, look for the latest version of the FFmpeg build. Click the ffmpeg-git-full-7z link to download the full build since that version has the most up-to-date libraries.
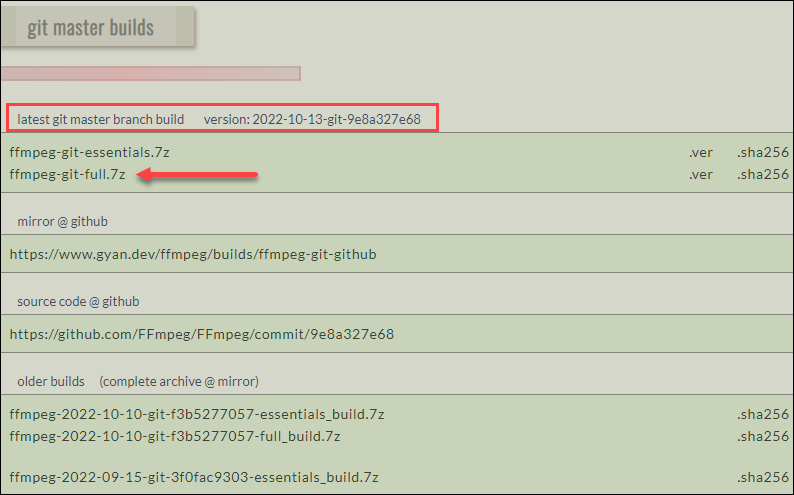
3. Choose the download location and save the file if the download does not start automatically.
Note: This guide uses the Windows build from gyan.dev. Other builds are available for download, like the one by BtbN. No official documentation confirms any significant differences between different builds.
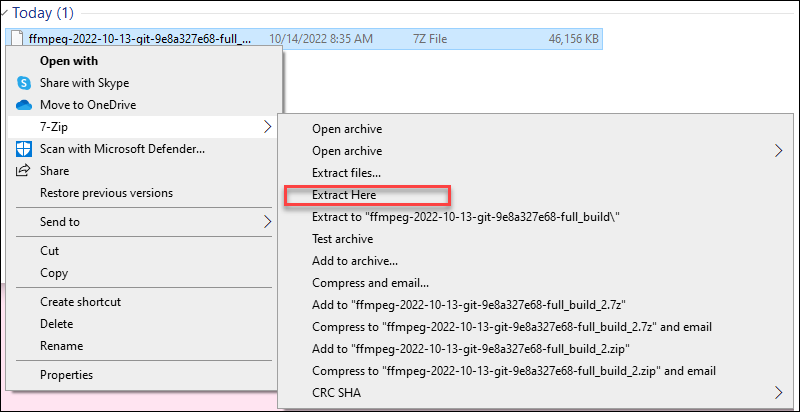
Step 2: Extract the Downloaded Files
Once downloaded, extract the contents:
1. Locate the downloaded file. The default location is the Downloads folder.
2. Right-click the file and hover over 7-Zip (or another file archiver of choice).
3. From the archiver submenu, choose Extract here. Wait for a few seconds for the extracting process to complete.
5. Rename the extracted folder to ffmpeg.

6. Move the folder to the root of the C drive or the folder of your choice.

Step 3: Add FFmpeg to PATH
Set Windows environment variables to add FFmpeg to the PATH. Follow these steps:
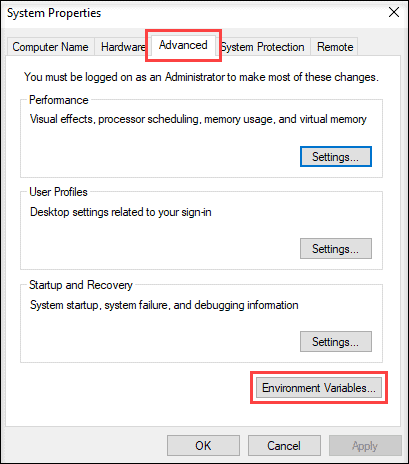
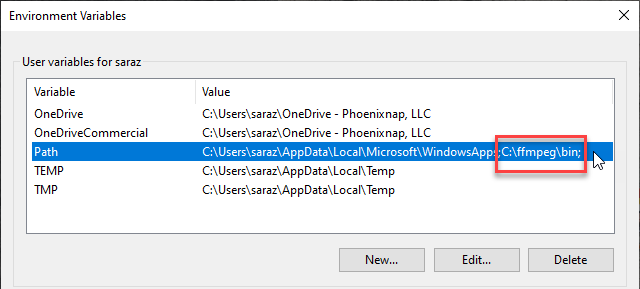
1. Type system variables into the search bar and click the Edit the system environment variables option.
2. Click the Environment Variables… button under the Advanced tab.
3. Under the User variables section, select Path and click the Edit button.

4. Choose New from the side menu.
5. Add C:\ffmpeg\bin to the empty field and confirm changes with OK.
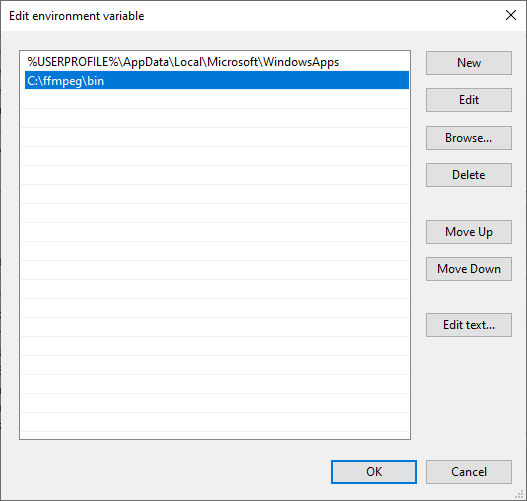
The change in the Path variable line confirms the FFmpeg is added to PATH.
Note: If you stored FFmpeg in a folder other than the C drive, use that path accordingly.
Step 4: Verify FFmpeg PATH
To verify the FFmpeg is correctly added to the Windows PATH, open the Command Prompt or PowerShell and run:
ffmpegThe output confirms the installation:

Conclusion
This article provided an easy step-by-step guide on installing FFmpeg on Windows.
For more tutorials refer to our article and learn how to install FFmpeg on MacOS.
Next, learn how to change or reset the administrator password on the Windows server.
Was this article helpful?
YesNo
Download Article
Get the FFmpeg audio and video conversion tool running on your PC
Download Article
FFmpeg is an open-source media tool you can use to convert any video format into the one you need. The tool is command-line only, so it doesn’t have a graphical, clickable interface. If you’re used to regular graphical Windows programs, installing FFmpeg may seem complicated at first—but don’t worry, it’s pretty easy! This wikiHow guide teaches you the simplest way to install FFmpeg on your Windows PC.
Things You Should Know
- Install 7-Zip first so you can extract the FFmpeg files.
- Download the latest full release build from https://www.gyan.dev/ffmpeg/builds.
- Extract the FFmpeg folder, move it to the root of your main drive, and add it to your system path.
-

If you don’t have 7-Zip already installed, you’ll need it to be able to extract the FFmpeg files. This tool is free, and you can download it from https://www.7-zip.org.
- Once you’ve downloaded the installer, double-click the downloaded file, then follow the on-screen instructions to install.
-
Advertisement
-
You’ll see this in the left panel.
-
-
Here’s how:
- Right-click the Windows/Start button and select File Explorer.
- Click the Downloads folder in the left panel (you may have to click This PC first to find it).
- Right-click the file that begins with «ffmpeg» and ends with «.7z.»
- (Windows 11 only) Click Show more options.
- Select the 7-Zip menu and click Extract Here. This creates a new folder with the same name as the .7z file.
-
To do this:
- Right-click the folder.
- If you’re using Windows 10, click Rename. If you have Windows 11, click the icon of an «A» followed by a cursor at the bottom of the menu.
- Type FFmpeg and press Enter.
-
This «cuts» the folder from the Downloads folder so you can paste it into the root of your hard drive.
-

It’s the computer icon in the left panel.
-
It’s usually called «Windows (C:)» or «OS (C:),» but the name and drive letter may vary.
-
This moves the folder to the root of your hard drive.
-
Open Command Prompt as an administrator. To do this, just type cmd into the Windows search bar, right-click Command Prompt, select Run as administrator, and then click Yes.
-
Add FFmpeg to your system path. To do this from the command line, type or paste setx /m PATH "C:\ffmpeg\bin;%PATH%" and press Enter.[2]
When you’re finished, close the Command Prompt window.- You’ve now installed FFmpeg and set the proper environment variables. To confirm that FFmpeg is working, open a new command prompt window, type ffmpeg -version, and then press Enter.


Advertisement
Add New Question
-
Question
Isn’t the folder path case-sensitive? If you rename it to «FFmpeg» but the path has «C:\…\ffmpeg\bin», won’t that cause an error?
Nicole Levine is a Technology Writer and Editor for wikiHow. She has more than 20 years of experience creating technical documentation and leading support teams at major web hosting and software companies. Nicole also holds an MFA in Creative Writing from Portland State University and teaches composition, fiction-writing, and zine-making at various institutions.
wikiHow Technology Writer
Expert Answer
Windows directory names are not case-sensitive. Don’t worry, it’ll definitely work!
-
Question
How can I get WSL (Ubuntu) to recognize this if I’ve installed it? Works with Powershell. (Using Windows Terminal)
Nicole Levine is a Technology Writer and Editor for wikiHow. She has more than 20 years of experience creating technical documentation and leading support teams at major web hosting and software companies. Nicole also holds an MFA in Creative Writing from Portland State University and teaches composition, fiction-writing, and zine-making at various institutions.
wikiHow Technology Writer
Expert Answer
If you’re using Ubuntu via WSL, you have a couple of options. If you want to run the FFmpeg binary, you can cd into /mnt/c/FFmpeg/bin (replace «c» if you put the FFmpeg folder on a different drive letter) and run the command ./ffmpeg.exe (add whichever flags you need), or skip the Windows stuff and just install the FFmpeg package in an Ubuntu terminal with «sudo apt install ffmpeg.»
-
Question
I clicked the following buttons, ffmpeg.exe, ffplay.exe and ffprobe.exe, they turned up for a glance then disappeared. What’s happened? Thank you.
Nicole Levine is a Technology Writer and Editor for wikiHow. She has more than 20 years of experience creating technical documentation and leading support teams at major web hosting and software companies. Nicole also holds an MFA in Creative Writing from Portland State University and teaches composition, fiction-writing, and zine-making at various institutions.
wikiHow Technology Writer
Expert Answer
These applications can only be run from the command line. If you try to double-click them in File Explorer, you’ll experience the behavior you’ve witnessed. Instead, open Command Prompt, then run the «ffmpeg» command to view all possible command line options.
See more answers
Ask a Question
200 characters left
Include your email address to get a message when this question is answered.
Submit
Advertisement
Video
-
FFmpeg is a command line-only program, meaning you can only use it in Command Prompt. This may prove difficult for users who aren’t familiar with Command Prompt.
-
You must have an administrator account to install FFmpeg.
Thanks for submitting a tip for review!
Advertisement
About This Article
Article SummaryX
1. Download FFmpeg from https://www.gyan.dev/ffmpeg/builds/ffmpeg-git-full.7z.
2. Extract the file.
3. Rename the extracted folder to «FFmpeg.»
4. Move the «FFmpeg» folder to the root of your hard drive.
5. Right-click the Start menu and select Command prompt (Admin).
6. Run this command: setx /m PATH «C:\FFmpeg\bin;%PATH%»
Did this summary help you?
Thanks to all authors for creating a page that has been read 2,014,927 times.
Is this article up to date?
Are you ready to unlock the powerful world of FFmpeg? Whether you’re a budding multimedia creator, a tech enthusiast, or simply looking to explore the magic of multimedia manipulation, FFmpeg is your go-to tool. In this blog, I’ll walk you through the step-by-step process of installing FFmpeg on both Windows and Mac, making sure you’re equipped to dive into audio and video wizardry!
Installing FFmpeg on Windows
Step 1: Downloading FFmpeg
-
Go to the official FFmpeg website at https://www.ffmpeg.org/download.html.
-
Scroll down to the “Windows” section and click on the link that says “Windows Builds by shiro” (or any other suitable option).
-
You’ll be redirected to a download page with several versions available. Choose the one that suits your needs. If you’re not sure, the “Latest Git” version is usually a safe bet.
-
Download the ZIP file corresponding to your system architecture (32-bit or 64-bit). If you’re unsure, go with the 64-bit version for better performance.
-
Once the download is complete, navigate to the location where you saved the ZIP file.
-
Right-click on the ZIP file and select “Extract All…” to unzip the contents.
-
Choose a destination folder for the extracted files and click “Extract.”
Step 3: Adding FFmpeg to PATH
-
Now that FFmpeg is extracted, you need to add it to your system’s PATH so that you can use it from the command line.
-
Search for “Environment Variables” in the Windows search bar and click “Edit the system environment variables.”
-
In the “System Properties” window, click the “Environment Variables…” button at the bottom.
-
In the “System Variables” section, find and select “Path,” then click “Edit.”
-
Click “New” and add the path to the “bin” folder of the extracted FFmpeg files (e.g.,
C:\path\to\ffmpeg\bin). Click “OK” to save the changes. -
Click “OK” to close all the windows.
Step 4: Verifying the Installation
-
Open the command prompt (you can search for “cmd” in the Windows search bar).
-
Type
ffmpeg -versionand press Enter. You should see information about your FFmpeg installation, confirming that it’s successfully installed.
Installing FFmpeg on Mac
Step 1: Using Homebrew (Recommended)
-
Open the Terminal app. You can find it in the “Utilities” folder within the “Applications” folder.
-
If you don’t have Homebrew installed, you can install it by running the following command:
1
/bin/bash -c "$(curl -fsSL https://raw.githubusercontent.com/Homebrew/install/HEAD/install.sh)"
-
Once Homebrew is installed, you can easily install FFmpeg by running the following command:
Step 2: Verifying the Installation
-
After the installation is complete, you can verify it by running:
You should see information about your FFmpeg installation, indicating that it’s ready to use.
Ready to explore!
Congratulations! You’ve successfully installed FFmpeg on both your Windows and Mac machines. Now you’re armed with a versatile multimedia tool that can handle a wide range of audio and video tasks. Whether you’re editing videos, converting audio formats, or exploring the world of multimedia, FFmpeg has got your back.
In the next blog post, we will start exploring the world of multimedia manipulation. But don’t only wait for me! Go ahead yourself, find other references, and start experimenting!
Note (or actually my wise advice): Make sure to respect copyright laws and terms of use when working with multimedia files.
FFmpeg Installation Guide
A comprehensive guide and automation scripts for installing FFmpeg across multiple operating systems. This repository provides easy-to-follow instructions and automated installation scripts to simplify the FFmpeg setup process.
Table of Contents
- Features
- Windows Installation
- Automated Installation
- Manual Installation
- macOS Installation
- Linux Installation
- Verification
- Troubleshooting
- Contributing
- License
Features
- Automated installation scripts for Windows
- Cross-platform installation guides
- Video tutorials for Windows and macOS
- Multiple installation methods for each operating system
- System path configuration included
Windows Installation
Automated Installation
Method 1: Using 7-Zip (Recommended)
Prerequisites:
- 7-Zip, WinRAR, or any 7-Zip fork installed
Steps:
- Download
install_ffmpeg_7z.bat - Run the script as administrator (UAC prompt will appear)
- Wait for the installation to complete
Method 2: Using ZIP (No Dependencies)
Prerequisites:
- None (uses built-in Windows tools)
Steps:
- Download
install_ffmpeg_zip.bat - Run the script as administrator (UAC prompt will appear)
- Wait for the installation to complete
Manual Installation
-
Download FFmpeg from one of these sources:
- FFmpeg Official Website
- Codex FFmpeg Releases
-
Choose the appropriate package:
ffmpeg-release-essentials.zipfor basic functionalityffmpeg-release-full.zipfor complete feature set
-
System Setup:
- Extract the ZIP file to a permanent location (e.g.,
C:\ffmpeg) - Add FFmpeg to System Path:
- Open System Properties (Right-click
This PC→ Properties) - Click
Advanced system settings - Click
Environment Variables - Under
System variables, selectPathand clickEdit - Add new entry:
C:\ffmpeg\bin(adjust path if needed) - Click
OKon all windows
- Open System Properties (Right-click
- Extract the ZIP file to a permanent location (e.g.,
📺 Video Tutorial: FFmpeg Windows Installation Guide
macOS Installation
Using Homebrew (Recommended)
# Install Homebrew (if not installed)
/bin/bash -c "$(curl -fsSL https://raw.githubusercontent.com/Homebrew/install/HEAD/install.sh)"

# Install FFmpeg
brew install ffmpeg
Using MacPorts
- Install MacPorts
- Run the installation command:
📺 Video Tutorial: FFmpeg macOS Installation Guide
Linux Installation
Package Managers
Ubuntu/Debian:
sudo apt update
sudo apt install ffmpeg
Fedora:
Arch Linux:
Universal Installation
Using Snap:
Verification
After installation, verify FFmpeg is correctly installed:
Troubleshooting
Common Issues
-
Windows Path Not Updated:
- Log out and log back in
- Or restart your computer
-
Permission Denied:
- Ensure you’re running scripts as administrator
- Check file permissions
-
Installation Failed:
- Try the alternative installation method
- Check your internet connection
- Verify system requirements
Contributing
Contributions are welcome! Please feel free to submit a Pull Request.
- Fork the repository
- Create your feature branch (
git checkout -b feature/AmazingFeature) - Commit your changes (
git commit -m 'Add some AmazingFeature') - Push to the branch (
git push origin feature/AmazingFeature) - Open a Pull Request
License
This project is licensed under the MIT License — see the LICENSE file for details.
Acknowledgments
- FFmpeg development team and community
- Contributors to this installation guide
- Package maintainers across different platforms