
[Dualboot] How to solve Fedora OS not showing grub bootloader and missing windows option
Troubleshooting Dual Boot: Windows and Fedora with GRUB
When setting up a dual-boot environment between Windows and Fedora, Fedora usually manages the installation of the GRUB bootloader. If you’re not seeing the GRUB bootloader at startup, follow these steps to resolve the issue.
- BIOS Boot Order
First, ensure that your machine is set to boot from Fedora. You can do this by going into your machine’s BIOS and adjusting the boot order:
Set Fedora as the first option to boot, or at least place it higher than Windows in the boot order.
This ensures the computer selects the GRUB bootloader instead of the Windows one.
- Check for Common Issues
If you still don’t see the GRUB loader at boot, it could be due to one of the following issues:
- Secure Boot is enabled.
- GRUB configuration hides the bootloader menu by default.
Secure Boot Issue
To disable Secure Boot:
- Reboot your machine and access the BIOS.
- Navigate to the Security panel (this location might vary depending on the machine).
- Disable Secure Boot.
GRUB Configuration Hiding the Menu
If the GRUB menu is hidden by default, follow these steps to unhide it:
Open a terminal in Fedora.
Run the following command to disable the menu_auto_hide option:
sudo grub2-editenv - unset menu_auto_hide
Reboot your machine. You should now see the GRUB bootloader.
- Adding Windows to the GRUB Boot Menu
If you only see Fedora options in GRUB, it means Windows hasn’t been added to the GRUB configuration. To add Windows:
Mount the Windows Partition, use the file explorer to manually mount the Windows partition.
Detect Windows, run the following command to detect the Windows boot option:
- Update GRUB Configuration:
Add the Windows boot option to GRUB by running:
sudo grub2-mkconfig -o /boot/grub2/grub.cfg
- Reboot your machine.
You should now see both Fedora and Windows in the GRUB boot options.
I installed Fedora 18 on laptop a couple of weeks back. I basically set up a dual boot system alongside with Windows 7 as I sometimes need Windows to play games and stuff. Despite the installer being pretty convoluted, I managed to install Fedora 18 successfully. After installation though I didn’t find any entry for Windows 7. My first reaction was that I might have corrupted the windows partition, but I checked and it was not the case. After searching for some time, I came across a pretty straightforward solution to this, which is as follows:
1. First we have check for the partition where our windows is installed. For that we need to fire up the terminal and use the following command:
sudo fdisk -l
There should be an output like this :
Disk /dev/sda: 320.1 GB, 320072933376 bytes, 625142448 sectors
Units = sectors of 1 * 512 = 512 bytes
Sector size (logical/physical): 512 bytes / 512 bytes
I/O size (minimum/optimal): 512 bytes / 512 bytes
Disk identifier: 0xe3d12c7cDevice Boot Start End Blocks Id System
/dev/sda1 * 2048 357074943 178536448 7 HPFS/NTFS/exFAT
/dev/sda2 357074944 519493904 81209480+ 7 HPFS/NTFS/exFAT
/dev/sda3 519495680 520536063 520192 83 Linux
/dev/sda4 520536064 625142447 52303192 5 Extended
/dev/sda5 520538112 625141759 52301824 8e Linux LVMDisk /dev/mapper/fedora-root: 12.6 GB, 12582912000 bytes, 24576000 sectors
Units = sectors of 1 * 512 = 512 bytes
Sector size (logical/physical): 512 bytes / 512 bytes
I/O size (minimum/optimal): 512 bytes …..
In my case I have my Windows 7 installed in /dev/sda1 partition, which might be different for other people so it’s better to check.
2. Now we need to create a custom grub script to add the Windows entry in the Grub menu. Create a file 15_Windows in the /etc/grub.d folder and add the following lines to it.
 #! /bin/sh -e
echo "Adding Windows" >&2
cat << EOF
menuentry "Windows" {
set root=(hd0,1)
chainloader +1
}
EOF
Note that we would need root permissions to create this file. Also on the line
“set root=(hd0,1)” , it depends on the partition where we have installed our windows on. My Windows was on my first hard disk ( the only one for that matter) and the first partition, hence hd0,1. hd0 refers to the first hard disk and 1 refers to the first partition. Edit this line to point it to the appropriate Windows partition.
3. Now we make this script executable by all users using the command:
chmod +x /etc/grub.d/15_Windows
4. After this we need to update the grub2 configuration file so that the script we created is always loaded at boot time. The following command accomplishes that
grub2-mkconfig -o /boot/grub2/grub2.cfg
And there all done. The next time you boot your computer, you should see the Windows option in the grub2 menu.
I found the guide originally here.
Содержание
- Fedora add windows grub
- Установка системы
- Как мне создать загрузочную флешку?
- Как загрузить Live образ целиком в память?
- Есть возможность самому выбрать пакеты для установки?
- Необходим ли доступ в Интернет при установке?
- Могу ли я автоматизировать установку?
- Могу ли я создать свой собственный ISO образ?
- Можно ли установить Fedora на устройство с ARM?
- Поддерживается ли технология Secure Boot?
- Могу я переместить Fedora на другой диск?
- У меня много оперативной памяти. Нужен ли мне раздел подкачки?
- Что будет если при отсутствующем разделе подкачки закончится память?
- Сколько нужно подкачки для работы гибернации?
- Что быстрее: раздел подкачки или файл подкачки?
- Можно ли сделать так, чтобы подкачка использовалась лишь при исчерпании ОП?
- Как ускорить запуск системы?
- Можно ли не переносить на SSD домашние каталоги пользователей?
- Нужно ли как-то настраивать Fedora для работы с SSD?
- Возможно ли в Fedora включить TRIM в реальном времени?
- Почему таймер TRIM отключён по умолчанию?
- Как улучшить отображение шрифтов в Fedora?
- В консолях фреймбуфера отображаются кракозябры. Как это починить?
- Какую файловую систему рекомендуется использовать на Fedora?
- Что вы скажете об установке системы на BTRFS?
- Можно ли без потерь данных преобразовать одну файловую систему в другую?
- Как установить Fedora в UEFI режиме?
- Какой способ разбиения диска лучше выбрать?
- Как лучше разбить диск самостоятельно?
Fedora add windows grub
Fedora, как и большинство современных linux-дистрибутивов, использует Grub как загрузчик для 32- и 64-битных x86 систем. Конфигурационный файл Grub лежит здесь: /boot/grub/grub.conf .
Выглядит он обычно так:
# grub.conf generated by anaconda
#
# Note that you do not have to rerun grub after making changes to this file
# NOTICE: You have a /boot partition. This means that
# all kernel and initrd paths are relative to /boot/, eg.
# root (hd0,1)
# kernel /vmlinuz-version ro root=/dev/main/root
# initrd /initrd-version.img
#boot=/dev/sda
default=0
timeout=5
splashimage=(hd0,1)/grub/splash.xpm.gz
hiddenmenu
title Fedora (2.6.23.1-49.fc8)
root (hd0,1)
kernel /vmlinuz-2.6.23.1-49.fc8 ro root=/dev/main/root rhgb quiet
initrd /initrd-2.6.23.1-49.fc8.img
root (hd0,1)
kernel /vmlinuz-2.6.23.1-42.fc8 ro root=/dev/main/root rhgb quiet
initrd /initrd-2.6.23.1-42.fc8.img
rootnoverify (hd0,0)
chainloader +1
Этот файл содержит глобальные опции (выделены зеленым), опции, относящиеся к Fedora (выделены синим), и опции, относящиеся к Windows (выделены красным).
- default — система, загружаемая по-умолчанию, без нажатия каких-либо клавиш. Значение — порядковый номер системы, начинается с 0;
- timeout — время в секундах, по прошествии которого загружается система по-умолчанию, если не было нажато никаких клавиш. Для того, чтобы загрузчик ждал бесконечно долго, удалите эту опцию. Чтобы загружать систему по-умолчанию буз задержек, установите опцию в 0;
- hiddenmenu — прятать меню выбора системы, пока пользователь не нажмет на кнопку. Чтобы меню отображалось всегда, удалите опцию;
- splashimage — выбрать картинку, которая будет показываться как фон в Grub.
Среди опций, относящихся к Fedora (как и к любому другому linux-дистрибутиву), есть title, содержащий имя системы, а также следующие опции:
- root — загрузочный раздел; внимание: тут указывается не root-раздел, а раздел, содержащий загрузочные файлы;
- kernel — ядро и опции ядра;
- initrd — файл, который содержит сжатый образ файловой системы, который загружается в память и используется в процессе всей загрузки.
Grub загрузит ядро и initrd с раздела, указанного в опции root, и выполнит ядро. Другая операционная система, такая, как Windows, загружается по-другому: Grub передает управление ее загрузчику, используя следующий опции:
- rootnoverify — как опция root для linux, эта опция указывает раздел, содержащий загрузчик;
- chainloader — указывает Grub-у выполнять код загрузчика, лежащего на втором (+1) секторе выбранного раздела.
На протяжении всего файла разделы описываются как (hdX,N), где X — порядковый номер диска, как он настроен в BIOS, нумерация с 0. N — номер раздела, также нумерация с 0. Если в системе всего один жесткий диск, раздел /dev/sda2 (/dev/hda2 для Fedora 6 и более ранних) будет правильно обозначаться в Grub как (hd0,1).
Если вы используете Xen, раздел Fedora может выглядеть так:
title Fedora (2.6.21-2950.fc8xen)
root (hd0,1)
kernel /xen.gz-2.6.21-2950.fc8
module /vmlinuz-2.6.21-2950.fc8xen ro root=/dev/main/root rhgb quiet
module /initrd-2.6.21-2950.fc8xen.img
Здесь kernel — это ядро в специальном виде для Xen,а initrd и vmlinuz загружаются как модули. Любые параметры ядра можно указывать после /vmlinux-* (как root=/dev/main/root).
Так как grub.conf — это обычный текстовый файл, его можно редактировать любым редактором текстовых файлов на Ваш выбор, например с помощью vi, gedit, или kate. Однако, если Вы допустите ошибку при редактировании, Вы уже не сможете загрузить систему из меню Grub. Чтобы снизить риск возникновения такого случая, можно скопировать раздел перед редактированием и назвать его по другому, например, Fedora-save. Тогда Вы всегда сможете загрузиться в систему, выбрав Fedora-save из меню Grub.
Материалы рубрики «Пакет дня» защищены лицензией Creative Commons Attribution-Share Alike 2.5 Canada License, оригинальные статьи: Fedora Daily Package
Установка системы
Как мне создать загрузочную флешку?
Как загрузить Live образ целиком в память?
Для загрузки Live образа целиком в память, необходимо стрелками выбрать пункт Start Fedora Live, нажать Tab, затем в строке редактирования параметров добавить rd.live.ram через пробел сразу после quiet и после этого нажать Enter.
Есть возможность самому выбрать пакеты для установки?
Да, при помощи netinstall образа, но лишь группами .
Необходим ли доступ в Интернет при установке?
Только для netinstall образа. Все остальные устанавливаются «как есть», т.е. со стандартным набором пакетов.
Могу ли я автоматизировать установку?
Могу ли я создать свой собственный ISO образ?
Да. Собственный образ можно создать на базе Kickstart файлов. Более подобную информацию можно найти здесь.
Готовые Kickstart проекты для изучения:
Можно ли установить Fedora на устройство с ARM?
Да. Загрузки доступны для armhfp, а также aarch64.
Поддерживается ли технология Secure Boot?
Да, полностью. В качестве предварительного загрузчика используется shim, подписанный цифровой подписью Microsoft.
Могу я переместить Fedora на другой диск?
Да. Алгоритм такой:
создание разделов для новой установки Fedora посредством GParted или любой другой утилиты разбиения дисков;
монтирование старых и новых разделов;
копирование всех файлов и каталогов со старого накопителя на новый с сохранением прав доступа;
редактирование файла /etc/fstab нового накопителя так, чтобы в нём были указаны UUID новых разделов;
создание в корневом каталоге нового накопителя файла /.autorelabel для автоматической установки контекста безопасности SELinux;
У меня много оперативной памяти. Нужен ли мне раздел подкачки?
За счёт использования сжатия памяти zram , в современных выпусках Fedora для большинства сценариев использования на рабочих станциях 10+ ГБ оперативной памяти будет вполне достаточно, поэтому раздел подкачки можно не создавать.
Внимание! При отсутствии раздела подкачки перестанет работать функция suspend to disk (гибернация).
Что будет если при отсутствующем разделе подкачки закончится память?
При критическом недостатке оперативной памяти (исчерпании доступных страниц) и при отсутствии подкачки существует риск зависания всей системы.
Таким образом, для данной конфигурации настоятельно рекомендуется использовать любой OOM killer пользовательского режима: earlyoom , systemd-oomd и т.п., чтобы не подвергать систему опасности и не доводить до использования механизма OOM Killer ядра Linux.
Сколько нужно подкачки для работы гибернации?
Для нормальной работы режима suspend to disk размер подкачки должен быть больше, либо равен объёму установленной в ПК или ноутбуке оперативной памяти.
Что быстрее: раздел подкачки или файл подкачки?
Раздел подкачки, т.к. отсутствуют ограничения, накладываемые используемой файловой системой.
Можно ли сделать так, чтобы подкачка использовалась лишь при исчерпании ОП?
Да, это возможно. Откроем терминал и выполним следующие команды:
Изменения вступят в силу немедленно и сохранятся до перезагрузки системы.
Для того, чтобы сделать эти изменения постоянными, создадим файл конфигурации sysctl .
Как ускорить запуск системы?
Приобрести в компьютер или ноутбук SSD накопитель и установить операционную систему на него. Это даст колоссальный прирост к скорости запуска.
Можно ли не переносить на SSD домашние каталоги пользователей?
Можно, но настоятельно не рекомендуется так делать ибо в таком случае прирост скорости работы системы будет далеко не таким большим, каким мог бы быть, т.к. колонна всегда двигается со скоростью самой медленной машины, а это всегда жёсткий диск.
Большая часть приложений хранят в домашних каталогах пользователей свои файлы конфигурации, а также различные кэши. В итоге, они загрузятся быстро, а затем перейдут в состояние iowait для ожидания этих данных с медленного накопителя.
Таким образом, на быстром SSD накопителе следует размещать как корневой, так и домашние каталоги пользователей.
Нужно ли как-то настраивать Fedora для работы с SSD?
Особой настройки не требуется. Необходимо лишь убедиться, что таймер процедуры TRIM активен:
Если это не так, активируем его:
Процедура TRIM для всех установленных твердотельных накопителей будет выполняться автоматически по расписанию один раз в неделю во время простоя системы.
Возможно ли в Fedora включить TRIM в реальном времени?
Да, это возможно. При использовании классической схемы с обычными разделами необходимо добавить опцию монтирования discard для каждого раздела на SSD в /etc/fstab .
При использовании LVM, следует открыть файл /etc/lvm/lvm.conf в текстовом редакторе и прописать:
При использовании зашифрованных LUKS томов следует в файле /etc/crypttab добавить опцию discard для каждого тома.
Однако следует помнить, что на некоторых накопителях реалтаймовый TRIM может вызвать сбой в работе контроллера и привести к потере всех данных. Именно поэтому он по умолчанию и не применяется.
Все изменения вступят в силу при следующей загрузке системы.
Почему таймер TRIM отключён по умолчанию?
Изначально таймер TRIM активировался автоматически, если установка Fedora производилась на SSD накопитель, но через некоторое время обнаружилась серьёзная проблема с noname-накопителями. Их контроллеры делегировали поддержку процедуры TRIM, однако при её выполнении теряли все данные на носителе.
Из-за достаточно большого количества жалоб на потерю данных с таких дешёвых контрафактных noname накопителей, созданных на базе простейших контроллеров от флешек и микросхем памяти из отбраковки, было решено таймер отключить.
Как улучшить отображение шрифтов в Fedora?
В актуальных релизах Fedora пакет freetype уже собран с поддержкой субпиксельного сглаживания, поэтому, чтобы получить качественный рендеринг шрифтов, необходимо лишь разрешить использование LCD фильтров, создав символическую ссылку на файл 11-lcdfilter-default.conf в каталоге /etc/fonts/conf.d :
Для вступления изменений в силу необходимо повторно войти в систему либо перезагрузить компьютер.
В консолях фреймбуфера отображаются кракозябры. Как это починить?
Способ 1:
Способ 2:
Установим пакет шрифтов Terminus:
Теперь откроем файл /etc/vconsole.conf в текстовом редакторе:
Укажем правильное имя шрифта внутри директивы FONT :
Сохраним изменения в файле и пересоберём initrd.
Какую файловую систему рекомендуется использовать на Fedora?
Начиная с Fedora 33, в редакции Workstation, для установки по умолчанию предлагается BTRFS .
Несмотря на это, мы рекомендуем применять ext4. На наш взгляд, это самая стабильная и популярная файловая система в настоящее время.
Для хранения больших объёмов данных можно использовать XFS. Это также стабильная и быстрая ФС, но следует помнить, что при сбоях электропитания вместо файлов, в которые в этот момент шла запись, могут оказаться нули. Таким образом, XFS лучше применять только если есть источник бесперебойного питания (UPS) либо на ноутбуках.
Что вы скажете об установке системы на BTRFS?
поддержка проверки целостности данных посредством контрольных сумм;
отсутствие ограничения на максимальное количество файлов;
поддержка прозрачного сжатия данных с использованием нескольких алгоритмов;
поддержка подтомов (subvolume);
встроенная поддержка клонирования, что полезно при создании резервных копий;
ранее была слишком нестабильной и при определённых условиях приводила к потере всех данных на накопителе;
не имеет встроенного полнодискового шифрования;
известны случаи несовместимости с системой внешнего полнодискового шифрования LUKS;
из-за COW очень сильно фрагментируется, поэтому не рекомендуется к использованию на жёстких магнитных дисках (HDD);
без использования флага nodatacow проседает производительность баз данных (СУБД), а также виртуальных машин.
Можно ли без потерь данных преобразовать одну файловую систему в другую?
Нет, конвертирование ФС без потери данных не представляется возможным, поэтому для выполнения данной процедуры необходим другой раздел диска подходящего размера с поддержкой прав доступа Unix. Алгоритм следующий:
копирование всех данных на другой раздел с сохранением прав доступа ;
форматирование старого раздела с необходимой файловой системой;
возвращение данных на прежнее место;
Как установить Fedora в UEFI режиме?
Загрузка Fedora LiveUSB образа должна производиться исключительно в UEFI режиме. На большинстве материнских плат в меню вариантов загрузки требуется выбрать режим UEFI External Drive или UEFI USB HDD.
Схемой разбиения диска, на который будет установлен дистрибутив, должна быть GPT. Проверить можно посредством выполнения fdisk:
Если используется классический MBR (msdos), необходимо запустить утилиту GParted, выбрать диск из списка, затем в меню Устройство пункт Создать таблицу разделов – GPT и запустить процесс кнопкой Применить изменения. Все данные на диске будут уничтожены.
Теперь можно приступать к установке. Автоматическое разбиение в Anaconda произведёт все действия самостоятельно.
Какой способ разбиения диска лучше выбрать?
Существует 2 способа:
LVM (используется по умолчанию) – динамические разделы, позволяющие изменять разделы на лету в любую сторону, а также поддерживающие функцию моментальных снимков (снапшотов);
классическая схема с физическими разделами.
Если возможности LVM использовать не планируется на ПК или ноутбуке, то рекомендуется применять классическое разбиение , т.к. такая схема работает быстрее и надёжнее.
Как лучше разбить диск самостоятельно?
Если по какой-то причине не хочется доверять автоматическому разбиению, мы рекомендуем следующую конфигурацию (порядок важен):
Introduction
Dual booting Fedora with Windows 10 can be a bit challenging, especially for those new to Linux. However, with the right steps and a bit of patience, you can successfully set up a dual boot system. In this article, we will guide you through the process of modifying GRUB to dual boot Fedora with Windows 10.
Prerequisites
Before we begin, make sure you have the following:
- A working installation of Windows 10
- A working installation of Fedora
- A basic understanding of Linux and GRUB
- The ability to access the GRUB menu during boot
Understanding the GRUB Configuration
GRUB (Grand Unified Bootloader) is a bootloader that allows you to choose which operating system to boot into. The GRUB configuration file is located at /etc/grub.d/40_custom on Fedora systems. This file contains the configuration for the GRUB menu.
Analyzing the Existing GRUB Configuration
You have found the following code in the /etc/grub.d/40_custom file:
menuentry "Windows 10" {
  set root='(hd0,1)'
  chainloader +1
}
This code is used to configure the GRUB menu to boot into Windows 10. Let’s break it down:
menuentry "Windows 10": This line defines a new entry in the GRUB menu with the label «Windows 10».set root='(hd0,1)': This line sets the root device to(hd0,1), which corresponds to the first partition on the first hard drive.chainloader +1: This line tells GRUB to chainload the Windows bootloader from the MBR (Master Boot Record) of the first hard drive.
Modifying the GRUB Configuration
To dual boot Fedora with Windows 10, we need to add a new entry to the GRUB menu for Fedora. We will also need to modify the existing Windows 10 entry to point to the correct partition.
Adding a New Entry for Fedora
Add the following code to the /etc/grub.d/40_custom file:
menuentry "Fedora" {
  set root='(hd0,2)'
  linuxefi /vmlinuz-<version> root=UUID=<uuid> ro
  initrdefi /initramfs-<version>.img
}
Replace <version> with the version of the Fedora kernel you are using, and <uuid> with the UUID of the Fedora partition. You can find the UUID of the partition by running the command blkid.
Modifying the Windows 10 Entry
Modify the existing Windows 10 entry to point to the correct partition:
menuentry "Windows 10" {
  set root='(hd0,1)'
  chainloader +1
  set gfxmode=auto
  set gfxpayload=keep
}
The set gfxmode=auto and set gfxpayload=keep lines are used to ensure that the graphics mode is set correctly and the graphics payload is kept.
Updating the GRUB Configuration
After modifying GRUB configuration, update the GRUB menu by running the following command:
sudo grub2-mkconfig -o /boot/efi/EFI/fedora/grub.cfg
This command will regenerate the GRUB configuration file and update the GRUB menu.
Rebooting and Testing
Reboot your system and enter the GRUB menu by pressing the Esc key. Select the Fedora entry and press Enter to boot into Fedora. Select the Windows 10 entry and press Enter to boot into Windows 10.
Troubleshooting
If you encounter any issues during the dual boot process, refer to the following troubleshooting tips:
- Make sure the GRUB configuration file is updated correctly by running the
grub2-mkconfigcommand. - Check the UUID of the Fedora partition to ensure it is correct.
- Verify that the Windows 10 entry is pointing to the correct partition.
- If you encounter any issues with the graphics mode, try setting the
gfxmodeto a specific value.
Conclusion
Introduction
Dual booting Fedora with Windows 10 can be a bit challenging, especially for those new to Linux. However, with the right steps and a bit of patience, you can successfully set up a dual boot system. In this article, we will answer some of the most frequently asked questions about modifying GRUB to dual boot Fedora with Windows 10.
Q: What is GRUB and why do I need to modify it?
A: GRUB (Grand Unified Bootloader) is a bootloader that allows you to choose which operating system to boot into. You need to modify GRUB to add a new entry for Fedora and to point to the correct partition for Windows 10.
Q: What is the difference between menuentry and linuxefi?
A: menuentry is used to define a new entry in the GRUB menu, while linuxefi is used to specify the kernel and initramfs files to boot.
Q: What is the set root command used for?
A: The set root command is used to set the root device to the correct partition. In the case of dual booting, you need to set the root device to the partition that contains the operating system you want to boot into.
Q: What is the chainloader command used for?
A: The chainloader command is used to chainload the bootloader of another operating system. In the case of dual booting, you need to chainload the Windows bootloader from the MBR (Master Boot Record) of the first hard drive.
Q: How do I find the UUID of my Fedora partition?
A: You can find the UUID of your Fedora partition by running the command blkid. This command will display the UUID of all partitions on your system.
Q: What is the gfxmode command used for?
A: The gfxmode command is used to set the graphics mode to a specific value. In the case of dual booting, you need to set the graphics mode to auto to ensure that the graphics mode is set correctly.
Q: How do I update the GRUB configuration?
A: You can update the GRUB configuration by running the command sudo grub2-mkconfig -o /boot/efi/EFI/fedora/grub.cfg. This command will regenerate the GRUB configuration file and update the GRUB menu.
Q: What if I encounter issues during the dual boot process?
A: If you encounter any issues during the dual boot process, refer to the troubleshooting tips below:
- Make sure the GRUB configuration file is updated correctly by running the
grub2-mkconfigcommand. - Check the UUID of the Fedora partition to ensure it is correct.
- Verify that the Windows 10 entry is pointing to the correct partition.
- If you encounter any issues with the graphics mode, try setting the
gfxmodeto a specific value.
Q: Can I dual boot multiple operating systems?
A: Yes, you can dual boot multiple operating systems However, you need to add a new entry for each operating system in the GRUB menu and update the GRUB configuration accordingly.
Conclusion
Dual booting Fedora with Windows 10 can be a bit challenging, but with the right steps and a bit of patience, you can successfully set up a dual boot system. By modifying the GRUB configuration and updating the GRUB menu, you can easily switch between Fedora and Windows 10. Remember to troubleshoot any issues that may arise during the dual boot process.

Dual booting Linux and Windows is one of the popular ways to enjoy the full potential of the two operating systems. You have both Linux and Windows installed on the same system and you can choose which one to use after starting your system.
If you have a system with Windows installed already, you’ll learn how to install Fedora alongside Windows in this tutorial.
Installing Fedora alongside Windows
The tutorial has been performed on a system with Windows already installed, GPT partitioning and UEFI boot. It should be applicable to other systems with MBR partitioning and legacy BIOS system as well, but I cannot confirm that.
Note: If your Windows system uses BitLocker encryption, it will be a good idea to disable it first before you go on installing Fedora.
Requirements
Here’s what you’ll need to follow this tutorial:
- A system preinstalled with Windows
- Good speed internet connection
- A USB key (pen drive) with at least 4 GB in size
- Optional: External USB disk for making back up of your existing data on Windows.
- Optional: Windows recovery or bootable disk (if you encounter any major boot issues, you can fix with it).
Let’s see the steps.
Step 1: Make a backup of data on your Windows system [optional]
Backup is always a good idea. You will be dealing with the disk partitions. In the rare unfortunate case, if you make a mistake and delete the wrong partition, you’ll lose your data.
The simplest way would to be to copy the data in Documents, Videos, Music, Pictures and other folders to an external USB disk. You can use an external HDD (slower but cheaper) or SSD (faster but expensive) and copy the important files and folders on it.
Step 2: Make some free space for Fedora installation
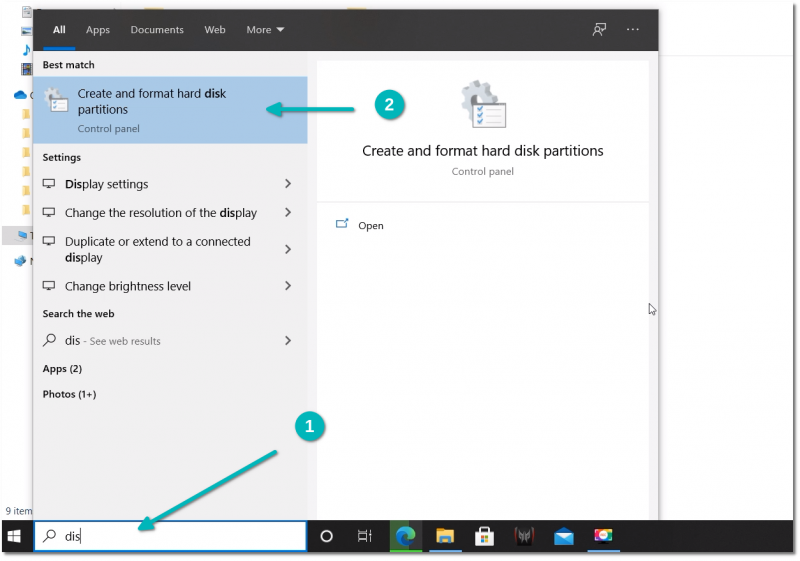
You need to create a partition where you’ll be installing Fedora. If you just have C drive, shrink it. If you have D, E or F drive, see if you can move their data to some other partition and delete or shrink one of them. Anything above 40 GB should be comfortable enough space for Fedora.
In the Windows menu, search for ‘disk partitions’ and go to ‘Create and format hard disk partitions’.
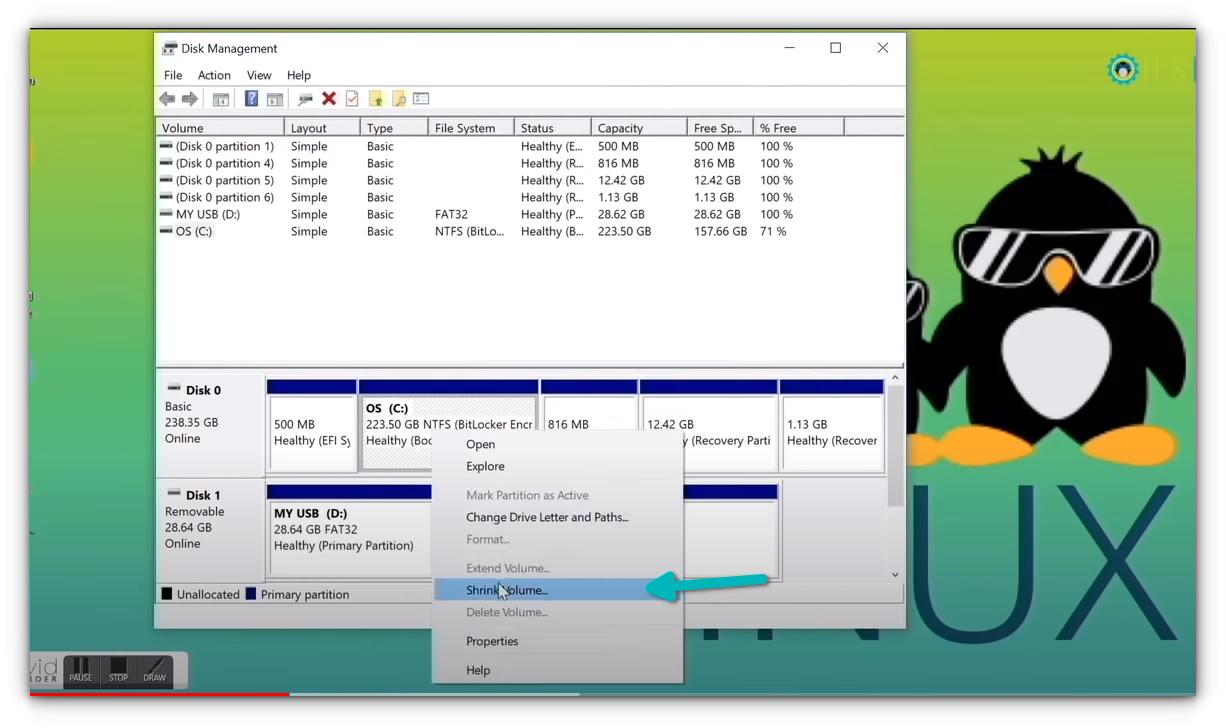
In the Disk Management tool, right-click on the drive which you want to partition and select shrink volume.
If you have just one partition like this, you need to make some free space out of it for Linux. If you have several partitions of considerable size, use any of them except C drive because it may erase the data.
Step 3: Making a live USB of Fedora in Windows
Now, this can be done in different ways. You can download the ISO and use Etcher or Rufus or some other tool to write the ISO image to the USB disk.
However, Fedora provides a dedicated tool for downloading and making live USB. I am going to use that in this tutorial. The Fedora team put some effort in creating this tool, so why not use it.
But first, plug in the USB key. Now, go to the download page of Fedora:
You’ll see the option to download the Fedora Media Writer tool for Windows.
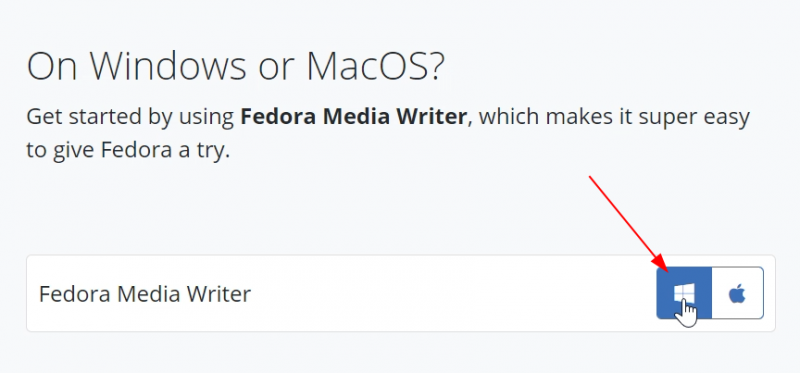
It will download an exe file. Once downloaded, go to your downloads folder and double-click the FedoraMediaWriter exe file to install the Fedora Media Writer tool. Just keep on hitting next.
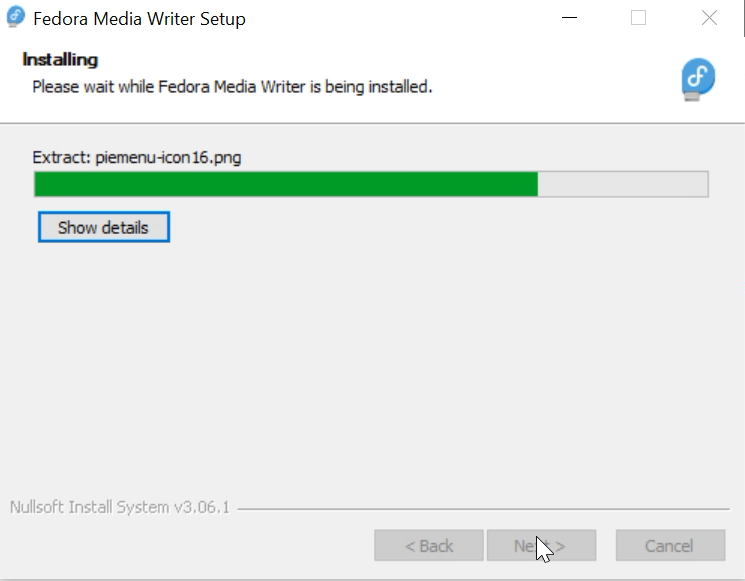
Once installed, run the Fedora Media Writer tool. But before that, make sure that you have plugged in the USB.
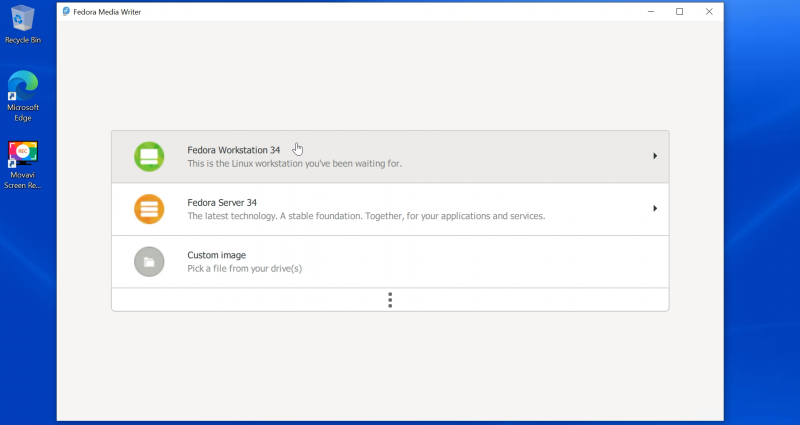
It will give you the option to install various editions of Fedora. For desktops, go with Workstation.
On the next screen, you’ll get the option to create live USB. When you hit that button, it starts downloading the ISO. It will also recognize your inserted USB key.
You need to have a good speed internet connection to download the 2 GB of ISO in a comfortable time span.
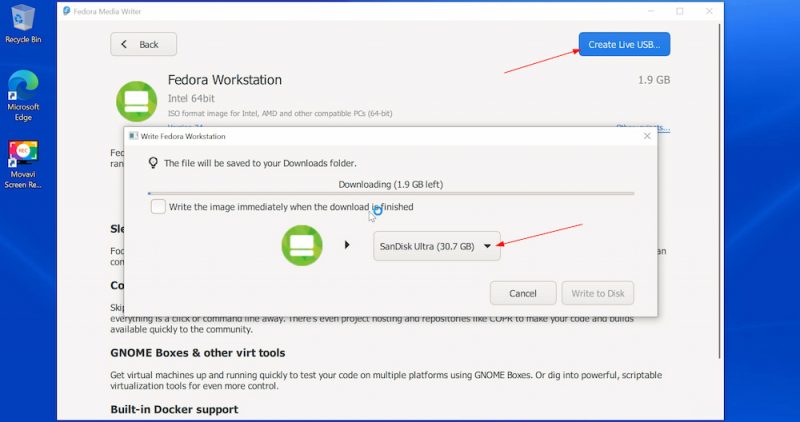
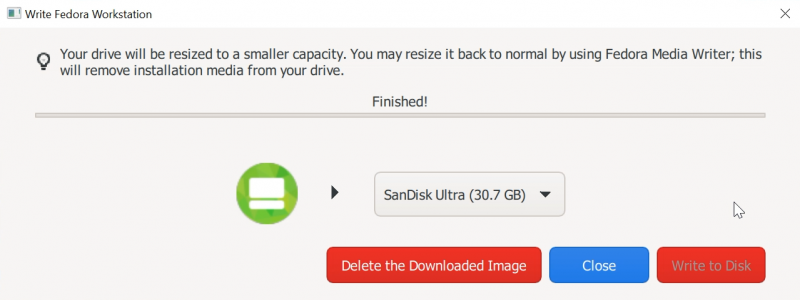
After downloading the ISO, it checks the download automatically and then gives you the option to write the ISO image to the USB disk, i.e. create the live USB. Hit the “Write to Disk” button.
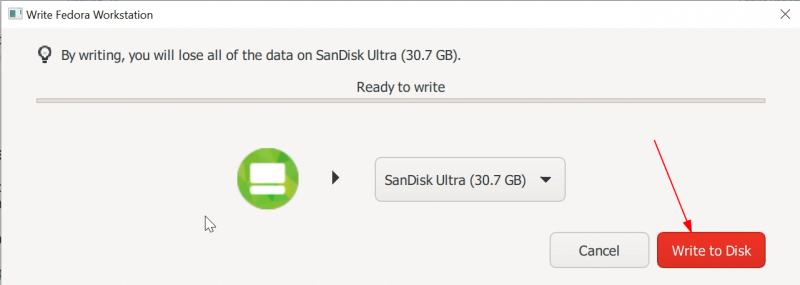
It will take a couple of minutes to complete the process. It displays “Finished” message and you can close the Fedora Media Writer tool now.
Good! So now you have the Fedora live USB ready with you. Time to use it for installing Fedora with Windows.
Step 4: Boot from live USB and install Fedora
Some systems do not allow you to boot from live USB with secure boot. If that’s the case with you, please disable secure boot.
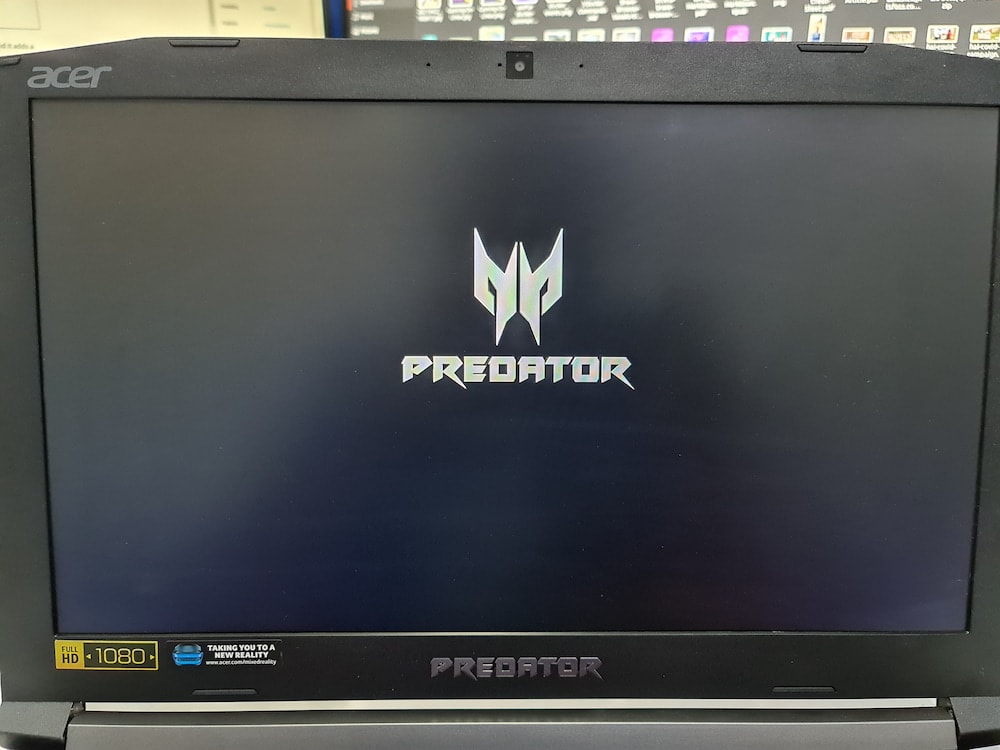
At the screen that shows the logo of your system manufacturer, press the F2 or F10 or F12 key. You may try pressing all of them one by one if you are not sure of the key. But be quick when you do that otherwise it will boot into the operating system.
This key is different for different brand of computers. Some may even use Esc or Del keys for this purpose.
In some rare cases, you may have to access the UEFI boot settings from within Windows.
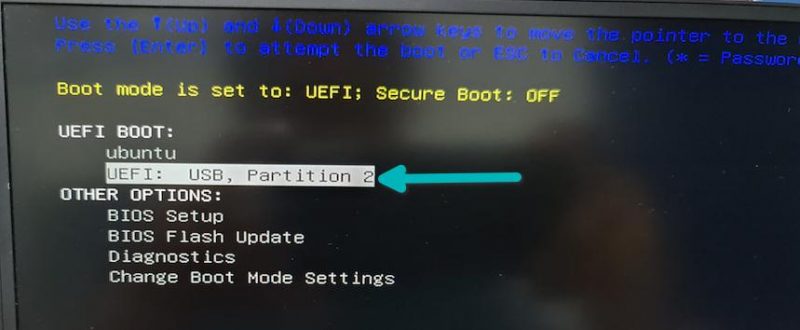
In the BIOS settings, normally, you should see a screen like this. Here, you use the arrow keys to move down to USB option and press enter to boot from the USB. Please note that the screen may look different in different systems.
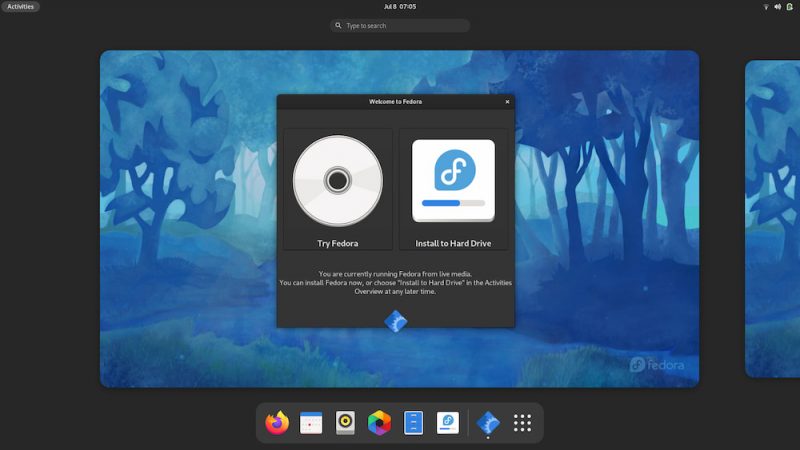
If things go right, you should see a screen like below. Go with the first option “Start Fedora Workstation”:

After some seconds, you should boot into the live Fedora session and see the option to try or install it. Go with “Install to Hard Drive”.
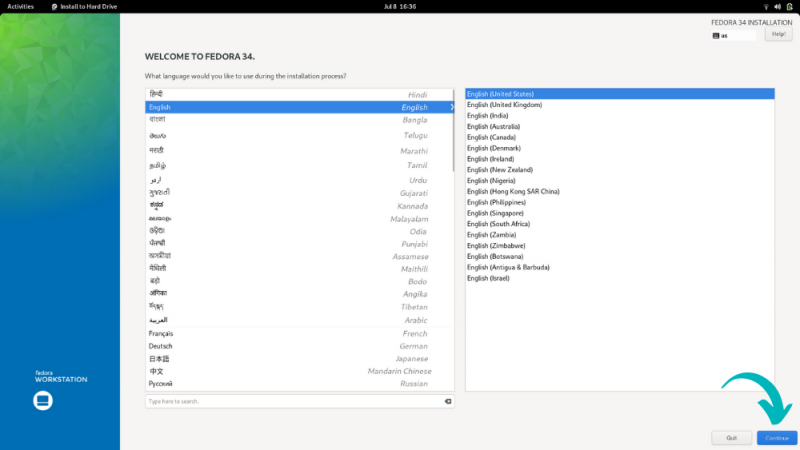
It will ask to choose the language of choice for the installation process.
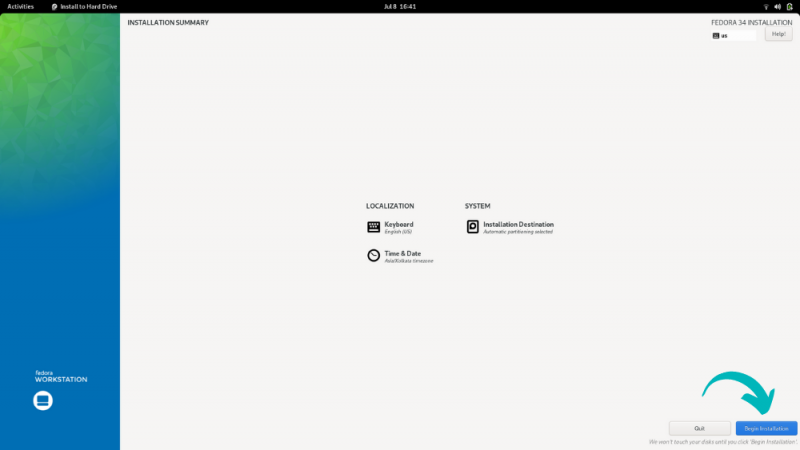
The next screen is important. If you had created the free space in the step 2, you should be able to hit on the “Begin Installation”. If you see an exclamation mark on the disk icon under System, click on it and see what kind of disk configuration you can use here.
If you have more than one disk, you can choose which disk to use for Fedora.
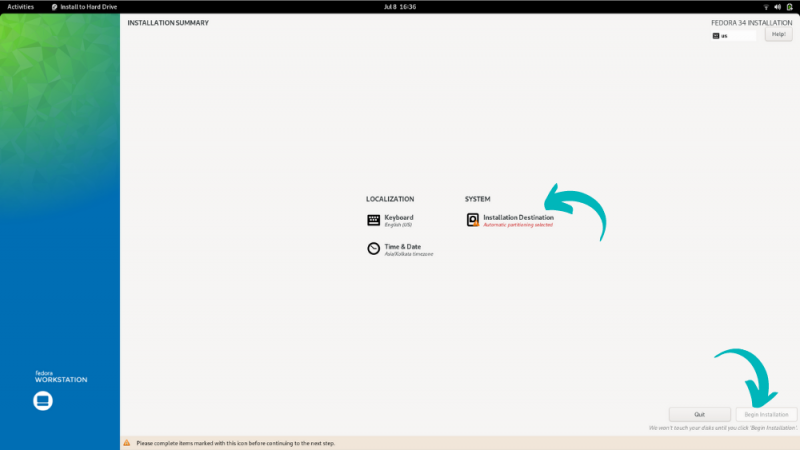
Select the disk and click on Done. You may see a warning message now. In my case, I did not create free space in the step 2 and hence it complained that there is not enough free space to install Fedora.
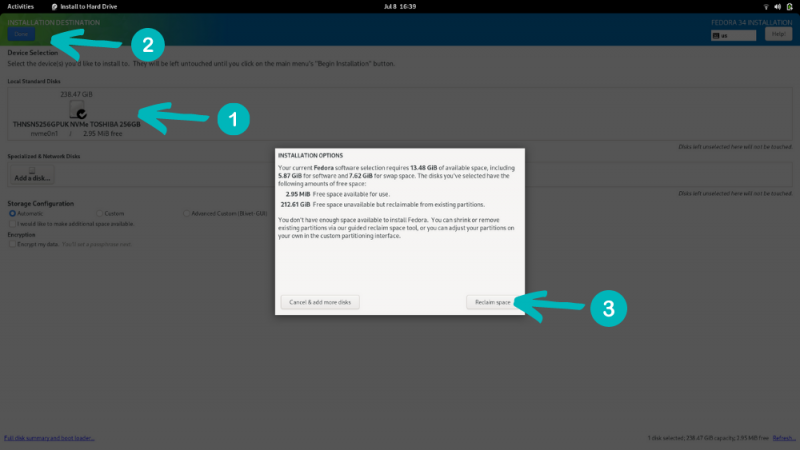
I clicked on reclaim space and shrank the Windows partition here.
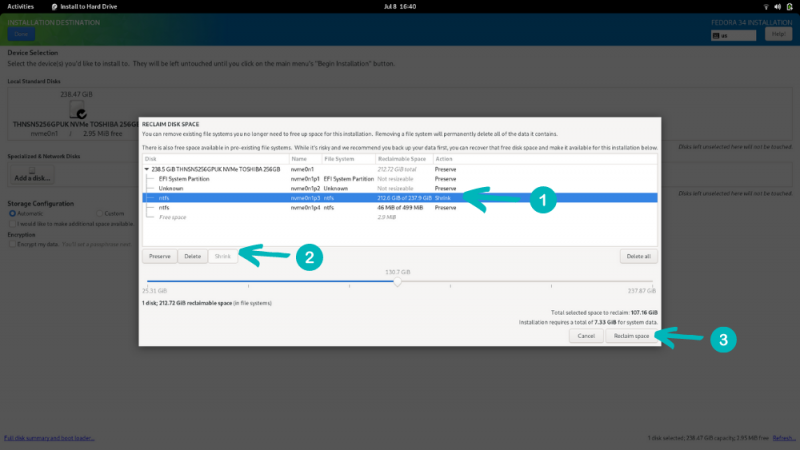
After this, the “Begin Installation” option appeared to start the installation.
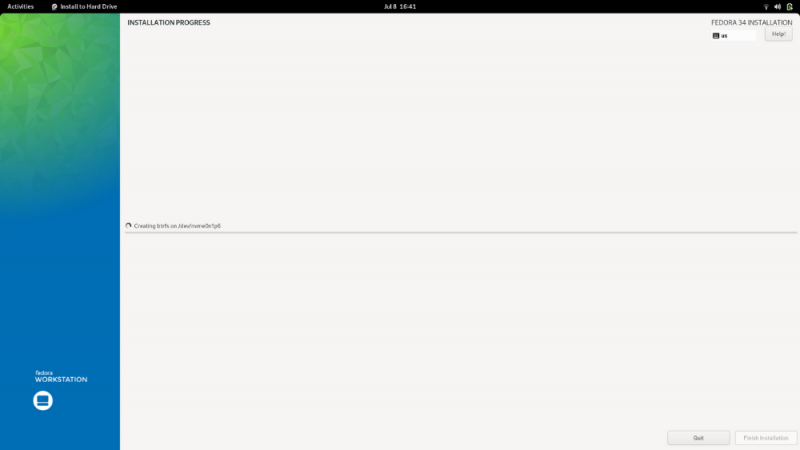
Now it’s just a waiting game. It will take a few minutes to extract files and install them.
When the process completes, you’ll see the “Finish Installation” button. Hit it.
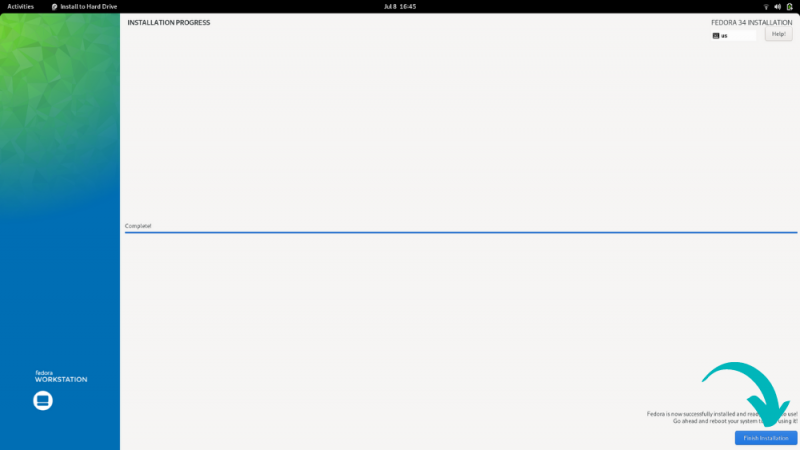
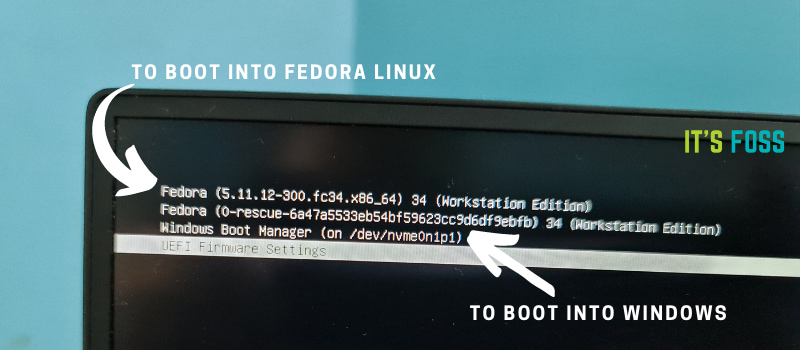
You’ll be back to Fedora live session. Click the top right corner to bring down the menu and select Restart.

When the system starts now, you should see the Grub bootloader screen with option to boot into Fedora and Windows.
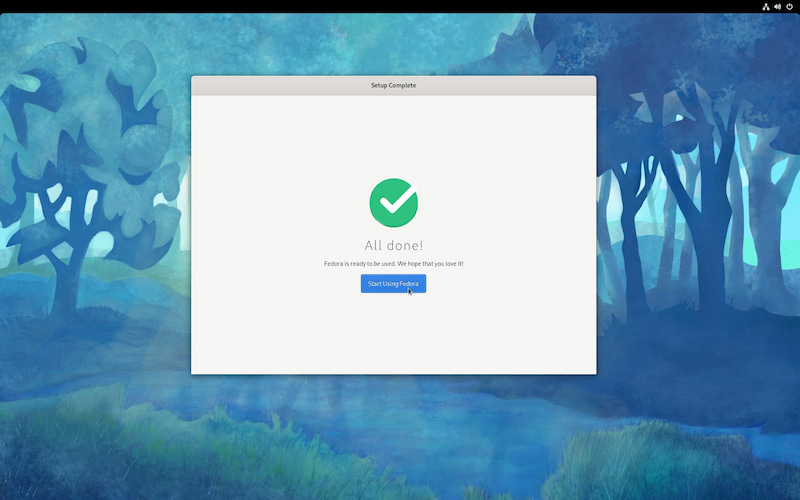
Step 5: Complete Fedora setup
You are almost there. Did you notice that Fedora didn’t ask you to enter username and password? Many distributions like Ubuntu ask you to create an admin user during the installation itself. On the other hand, Fedora gives you this option when you log in to the installed system for the first time.
When you first log in, it runs a setup and creation of user and password is part of this initial setup.
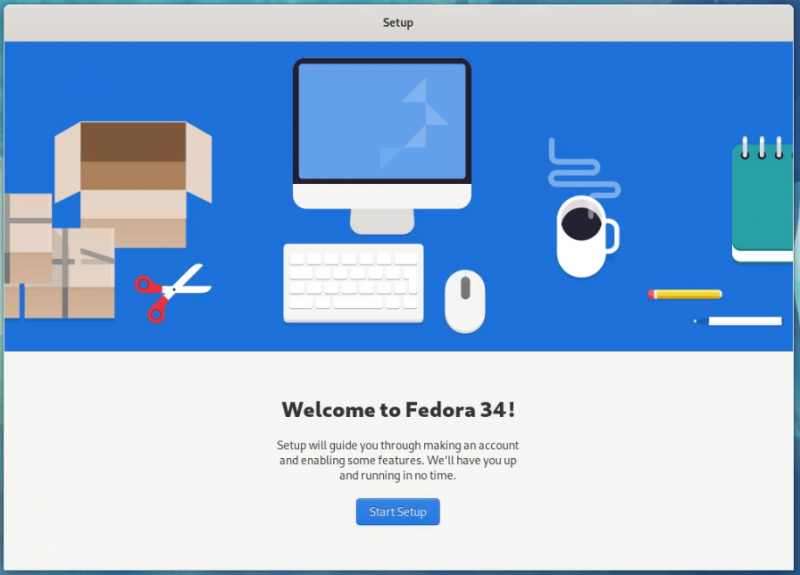
Once you do that, you are ready to enjoy Fedora Linux.
That’s it. You can enjoy Fedora Linux and Windows in dual boot mode on the same system.
If you have any questions or if you are facing any issues while following this tutorial, please let me know in the comment system.