
| Workable Solutions | Step-by-step Troubleshooting |
|---|---|
| Run Fdisk on Windows 10/11 | #1. Open Fdisk via Command Prompt…Full steps #2. Open Fdisk via Run Prompt…Full steps |
| Fdisk a Drive on Windows 10/11? | #1. Create a Primary Partition…Full steps #2. Format a Hard Drive Partition…Full steps #3. Extend a Partition…Full steps #4. Delete All Volumes…Full steps |
| Beginners’ Choice: Use EaseUS Partition Master for Disk Partitioning | Step 1. Check for free space. To divide a disk partition into multiple ones, you must ensure that there…Full steps |
Do you want to learn how to run fdisk on Windows 10/11? If yes, then you are landed on the right page. Today, we will give you detailed information regarding fdisk, its uses, and other relevant information. Before going to the in-depth guide, it’s necessary to know why fdisk is essential for Windows users? The answer is pretty simple! As fdisk is a utility, this is especially useful for formatting or preparing a hard disk drive to hold data. It helps partition the disk to separately install your OS on one drive and other necessary things on different drives.
What Is Fdisk?
When it comes to fdisk, it’s a simple command-line utility that offers a disk-partitioning feature on Windows. The tool was launched in the early days of Windows to manage partitions from the command line and was mainly aimed at IT admins. The tool allowed users to create partitions, add or remove spaces from it, organize storage space on new drives, format, re-organize old drives, etc.
However, one of the most significant drawbacks of the tool was it can’t manage storage sizes more than 64-GB storage. That was a huge problem, especially for server-side management and the backup servers. It forced users to split their backup files into smaller chunks or have a smaller partition size.
Most people now have a terabyte of storage space on their PC in modern times. That is where the DISKPART tool comes into the picture.
Diskpart is the perfect successor, which replaces the fdisk in serving Windows users to partition disks and creating use of disk space on Windows 10 and even the latest Windows 11. It can manage not only larger disk sizes but also offers more features and stability.
Fdisk is outdated and unavailable for modern platforms such as Windows 10 and Windows 11. Instead, you can use the diskpart tool to achieve the same and even more than fdisk.
Next we will share several ways to run Fdisk on Windows 10/11, if you think this passage is helpful, you can share it to other people in need.
Since fdisk has drawbacks and is not available for Windows 10/11, we will have to use the diskpart tool. Here is our step-by-step guide to help you o if you are new to this.
If you want to learn how to open fdisk on Windows 10/11, you can do it in two different ways, via Command Prompt and Run Prompt. Follow the steps below to open fdisk on Windows 10/11 in two other methods.
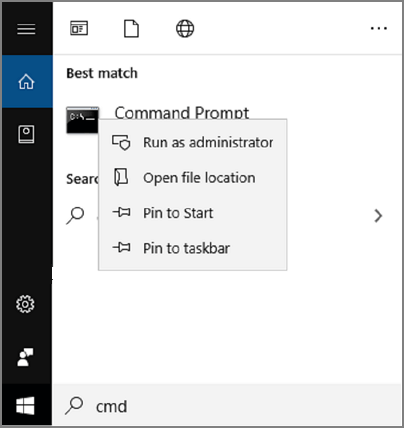
#1. Open Fdisk via Command Prompt
Step 1: Type Command Prompt near the Windows Start button search bar and run as administrator; this will open the Command prompt window.
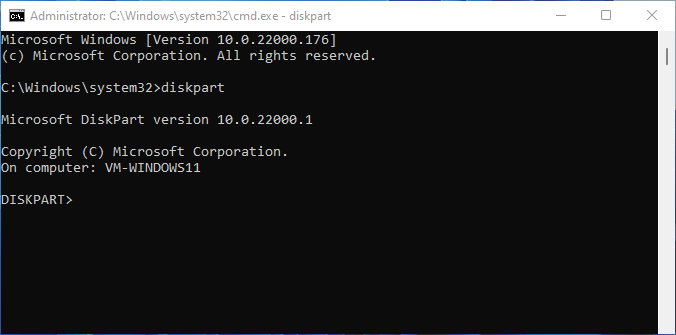
Step 2: Now type diskpart on the Command Prompt window and press Enter. It will open the diskpart window.
#2. Open Fdisk via Run Prompt
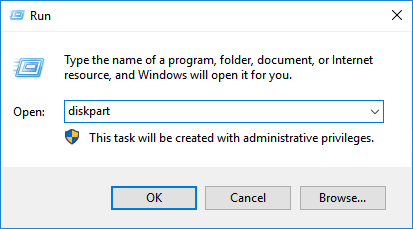
Step 1: Near the Windows Start button search bar, type Run and press the Enter button. You can also use Windows + R to open the Run prompt.
Step 2: Type diskpart and press Enter. You will be prompted by the UAC. Click on the Yes button to open Diskpart directly into the command prompt
How Do I Fdisk a Drive on Windows 10/11?
When managing a hard drive on Windows 10/11 using diskpart commands, we will provide the four best methods to guide you, so follow all the steps perfectly.
Let’s discuss more on those four methods
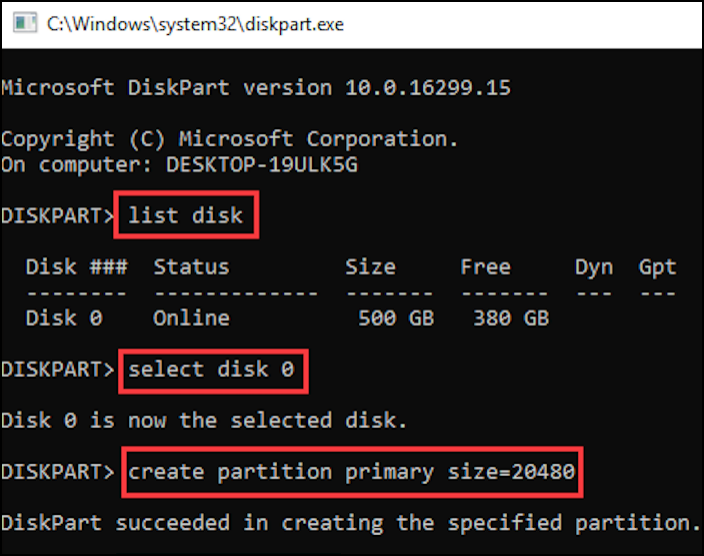
#1. Create a Primary Partition
To create a primary partition with the help of diskpart, follow the exact steps given below.
Step 1: Press Windows + R simultaneously, and type cmd. Then use Shift + Enter to launch with admin permission.
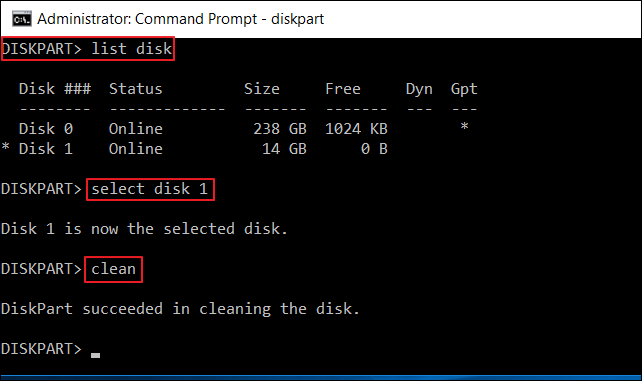
Step 2: On the Command Prompt window, type diskpart and pressEnter. It will open the diskpart window where you have to type list disk to see all the partitions of your system.
Step 3: Now type select disk (number) to select the desired drive. If you have any existing partitions, you can use the command clean to remove all the partitions and data from the drive. If it’s a fresh drive, then you can skip. It comes in handy if you need to re-setup an old drive.
Step 4: Now type create partition primary size=*and press Enter. Next type format override fs=NTFS and press enter key.
Note:
- Replace * with the size of the primary partition you have in mind.
- Format override helps to remove any permission error that might show up. You can also use format.
- The label option allows you to add the name of the primary partition. It’s optional.
Step 5: Now type list volume, which will show you all volumes available in the storage device. Now type select volume (number) to select the newly labeled volume.
Replace (number) with the digit shown in the list volume.
Step 6: Now type assign letter=X to assign the new letter to the volume. For example, assign letter=D, again type list volume, now you can see the new assigned or newly created partition.
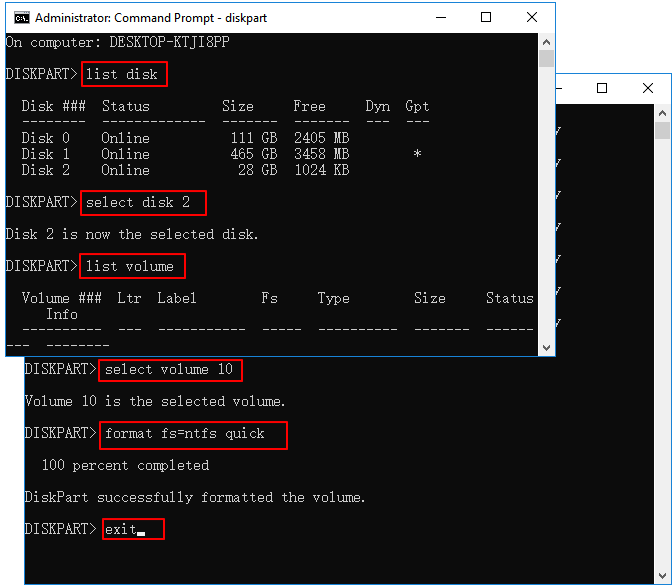
#2. Format a Hard Drive Partition to NTFS/FAT32
To format a hard drive partition to NTFS/FAT32 with the help of diskpart, follow the steps given below.
Step 1:Press Windows + R simultaneously and type cmd, right-click Command Prompt and click Run as Administrator; now type dispart and press the Enter button. Click yes to allow diskpart to run on Windows as Admin. Now it will open the diskpart window.
Step 2: Now type the following commands in sequence and press the Enter key after each.
- diskpart
- list disk
- select disk (number): the number represents the disk number
- list partition: to get how many partitions are on the chosen disk
- select partition (number): number represent the partition number
- format fs=ntfs quick
Step 3: After completing the process, type exit to close the diskpart window.
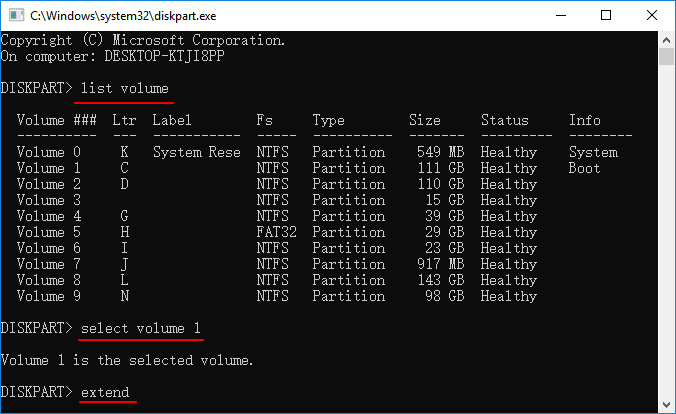
#3. Extend a Partition
To extend a partition with the help of diskpart, follow the exact steps given below.
Step 1: Right-click on the Windows icon and select Search; now type cmd and press the Enter key. Now type diskpart and press Enter. Click Yes to open diskpart.
Step 2: Now follow the given command below and press Enter each time.
- list volume
- select volume 1 (replace the disk number of your system accordingly)
- extend
#4. Run Windows 10/11 Fdisk to Delete All Volumes
You can use diskpart to delete all partitions from your system or reset the hard drive, follow the exact steps given below.
Step 1: Press Windows + R keys simultaneously and type cmd, right-click Command Prompt and click Run as Administrator; now type dispart and press the Enter button. Click yes to allow diskpart to run on Windows as Admin. Now it will open the diskpart window.
Step 2: On the diskpart window, now type list disk and press the Enter button. It will show all the disks number.
Step 3: Select disks one by one and hit the Enter button; it will show you the disk number is now the selected disk; then type clean all and press the Enter button.
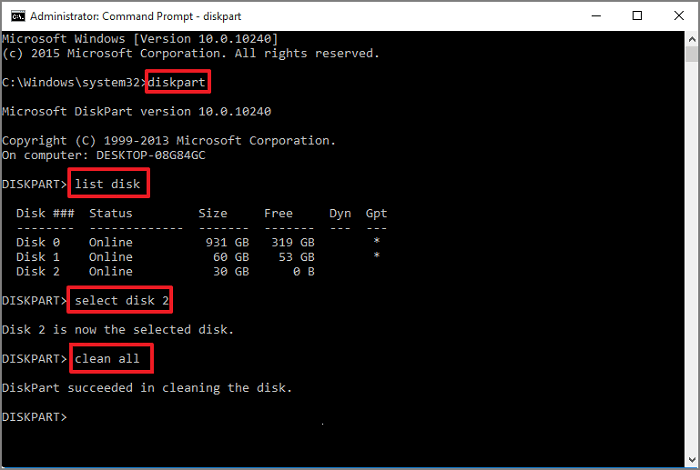
Step 4: When the process finishes, type exit to close the diskpart window.
Beginners’ Choice: Use Fdisk Alternative Tool for Disk Partitioning on Windows 11/10
Suppose you are a beginner and don’t have computer technical knowledge. In that case, we recommend that you use the EaseUS Partition Master as a perfect fdisk alternative software that can quickly and safely replace fdisk and diskpart in managing disk partitions. Let’s know more about the features and functions of this tool.
Step 1. Launch EaseUS Partition Master to check for free space at the Partition Manager section.
- If your hard drive has unallocated space, jump to Step 3 to create partition.
- If the hard drive has no unallocated space, continue with Step 2.
Step 2. Shrink a disk partition to create unallocated space.
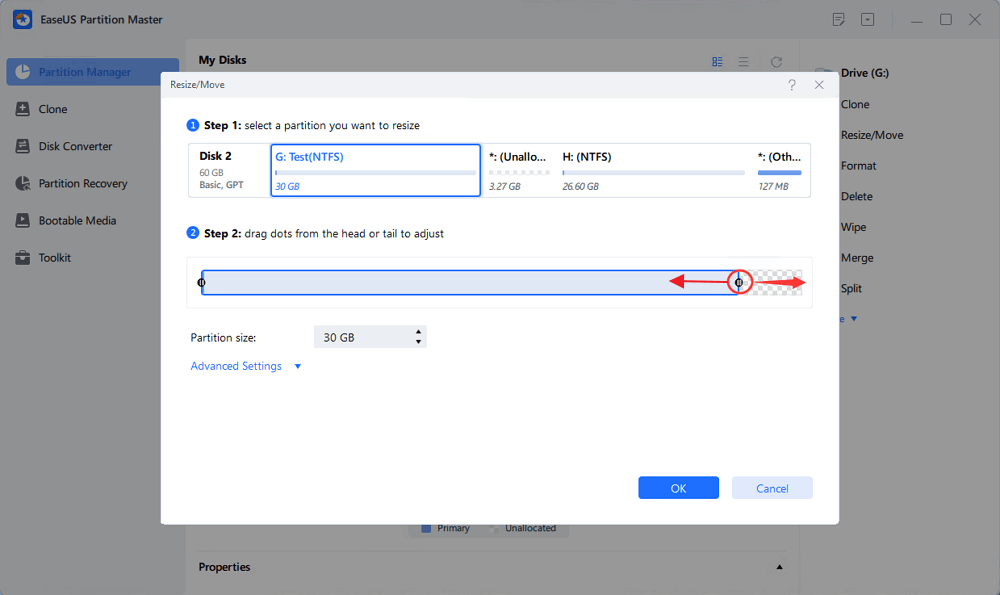
Right-click on the target drive partition with a lot free space and select «Resize/Move».
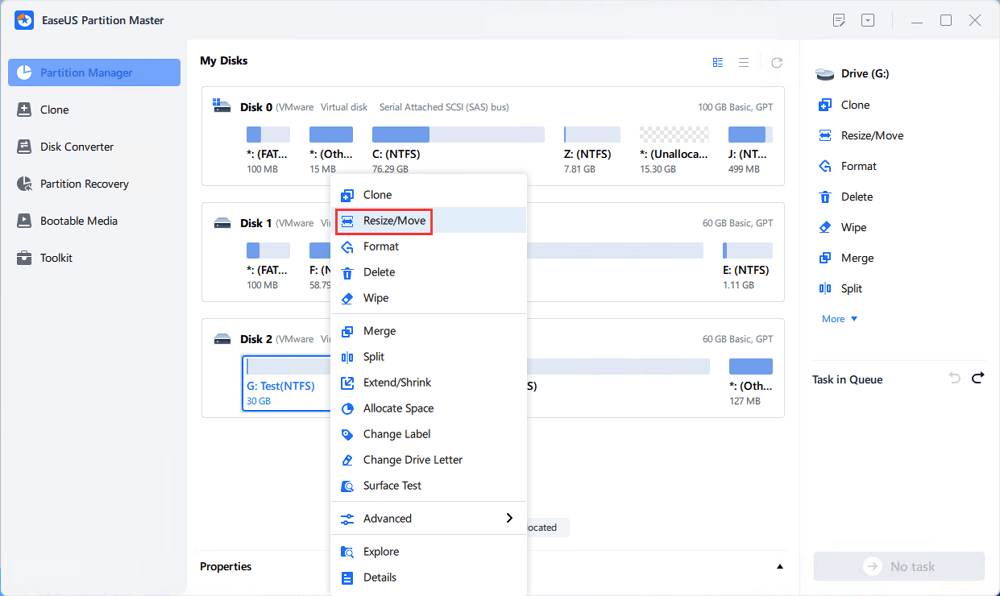
Drag either end of the partition rightwards or leftwards to shrink the partition size so as to get ample unallocated space. You can visually know how much space you’ve decreased in the «Size of partition» area. Click «OK».
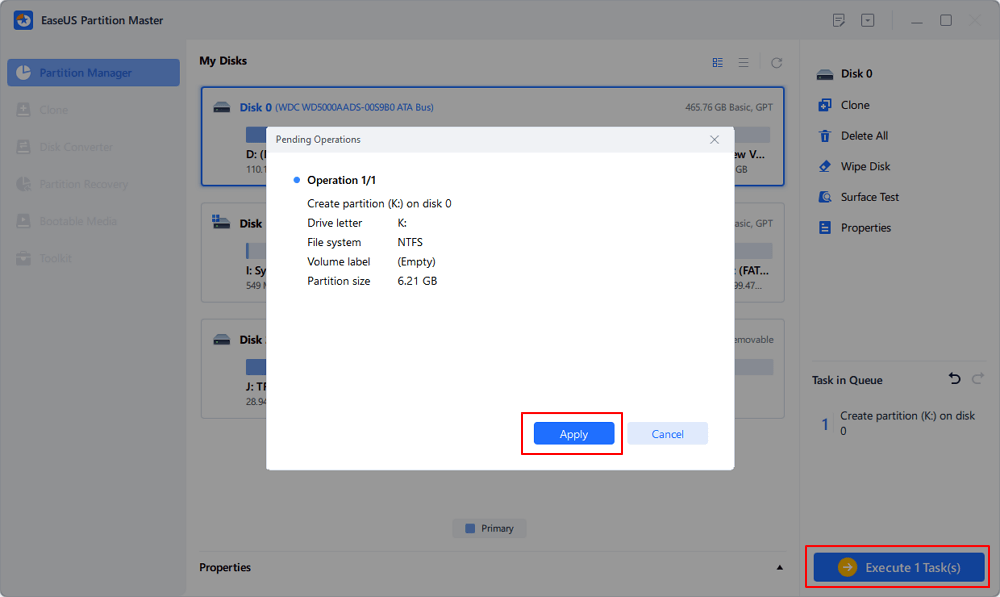
Click «Execute xx Task» and then «Apply» to save all the changes.

Go back to Partition Manager, there should be unallocated space appearing on the same disk and you can continue with the next step to create new partition on your hard drive.
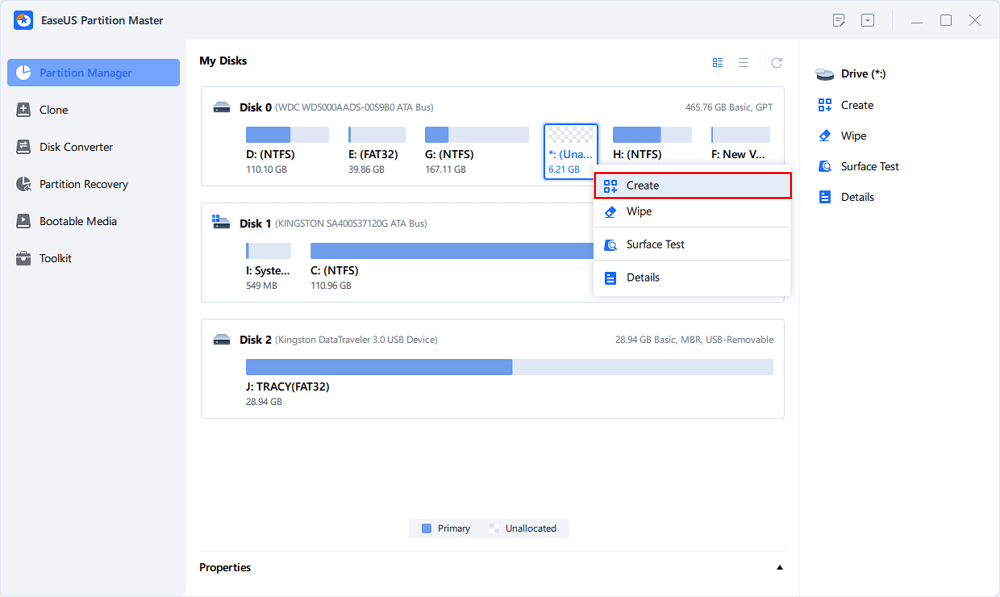
Step 3. Create a new partition with unallocated space on the target hard drive.
Right-click on the unallocated space and choose «Create».
Customize the partition size, partition drive letter, partition label, file system (NTFS, FAT32, EXT2/3/4, exFAT) and more in the Advanced Settings. Click «OK».
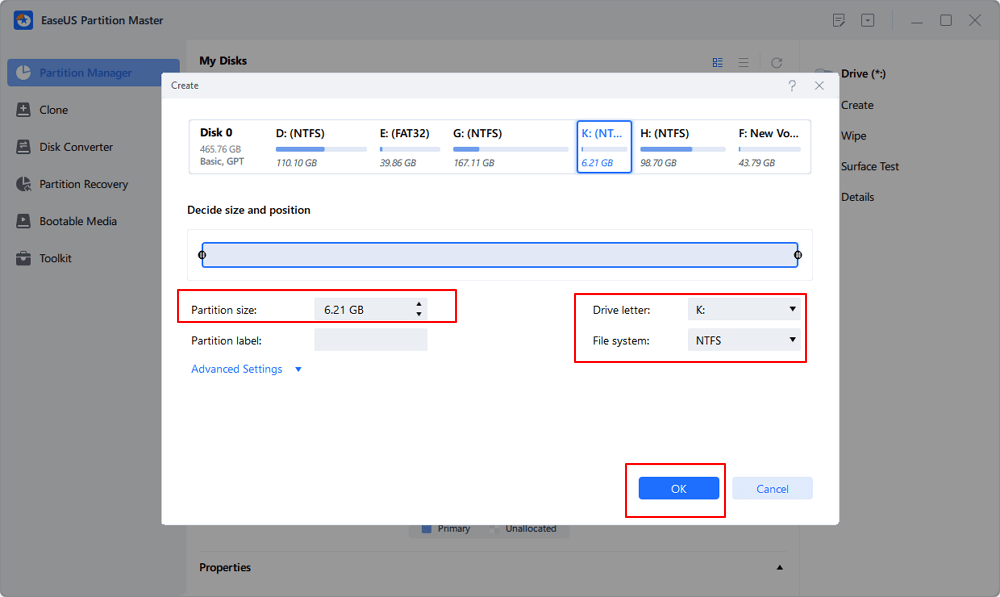
Finally, click «Execute * Task» and «Apply» to complete creating partition with the unallocated space on your disk. Repeat the steps to partition a hard drive and get many more partitions.
EaseUS Partition Master tool is one of the top-rated professional partitioning tools, which comes with several unique features like
- Migrate Windows 10/11 to a new SSD in just one click.
- Handy to extend or manage partitions in Windows 10/11.
- Combine two SSD into one without any data loss.
Some of the advanced features of EaseUS Partition Master
- Resize/Move Partitions
- Clone/Create/Format/Delete Partitions
- Copy Disk/Partition
- Migrate OS to SSD
- Dynamic Volume Management
- Partition Recovery
Fdisk Is No Longer An Efficient Way for Disk Partitioning | You Have a Better Choice
If you have been following the post till now, no doubt you have in-depth knowledge about the fdisk/diskpart and its uses. Diskpart is the ultimate alternative tool for every Windows user to replace fdisk on Windows 10/11. However, this is not the best and safest way of disk partitioning for beginners with no technical knowledge. We recommend you use the most reliable third-party tool, none other than EaseUS Partition Master, as it is safer and easier to manage with the slightest chance of any data loss.
Do you know how I can run fdisk in windows? If you’re looking to breathe new life into an old Windows computer or just starting and need help understanding how your computer works, fdisk can be a helpful tool. This disk utility is available in Windows 10, 8.1, 8, 7, Vista, and XP. Here’s how to run it:
You are using a Windows PC and need to run Fdisk, but you don’t know how.
Fdisk is a command line utility that is not available in Windows.
Check out the article How Can I Run fdisk in Windows? On our blog for instructions on how to install and use fdisk on your Windows PC.
What is fdisk Command in Windows?
The fdisk command is used to manage hard drive partitions in Windows. It can be used to create, delete, and resize partitions. The fdisk command can also be used to format partitions and to change the active cell.
- There are a few ways to run the FDISK program in Windows.
- One way is to open the command prompt and type “fdisk.”
- Another way is to open Windows Explorer and navigate to the folder where FDISK is located.
- However, the most common way to run FDISK is by using the Run window.
- To open the Run window, press the Windows key and R simultaneously. Then type “fdisk” into the text box and press Enter.
Why fdisk is not Running in Windows?
1. The Incompatibility of Fdisk with Newer Windows Versions
If you’re like me, you probably remember using fdisk to manage your computer’s hard drives back in the day. Fdisk is a command-line utility that has been around since the early days of MS-DOS. It allows you to create, delete, and manage partitions on your drive.
These days, though, if you try to run fdisk on a Windows PC, you’ll get an error message telling you that the program is incompatible with your version of Windows. That’s because Microsoft has been steadily phasing out fdisk in favor of newer tools like Disk Management and PowerShell.
So what are your options if you need to manage your partitions? For starters, you could try using a tool like MiniTool Partition Wizard.
2. The Disappearance of Fdisk from the Start Menu
When you open the Start menu in Windows 8 and 10, you won’t find fdisk. That’s because it’s no longer included in those versions of Windows. If you need to use fdisk to manage your hard disk partitions, you can do so by opening a Command Prompt window.
3. The Lack of Support for Fdisk in Windows
Windows do not include fdisk, a program that helps format and create partitions on hard disks. This can make it challenging to manage disk space on Windows computers, especially for users who are not familiar with the command line.
Alternatives to Fdisk include Disk Management in Control Panel and third-party programs such as Paragon Partition Manager.
4. The Ineffectiveness of Fdisk on Recent Versions of Windows
Since Microsoft released Windows 8, the Disk Management utility included with the operating system has caused problems for users trying to partition their drives using the standard fdisk tool.
In particular, attempting to create a new primary partition using fdisk on a Windows 8 or 10 machine will often result in an error message informing you that the selected disk is not valid for this operation.
While it is possible to work around this limitation by using third-party tools such as MiniTool Partition Wizard, it’s clear that Microsoft has designed Windows 8 and 10 to discourage users from manually partitioning their drives.
This is unfortunate, as fdisk is a powerful tool that can quickly and easily manage partitions on any disk, including SSDs.
Fortunately, there are still ways to use fdisk on recent versions of Windows.
5. The Obsolete Nature of Fdisk Compared to Modern Disk Management Tools
Fdisk is a command-line utility included in Microsoft Windows operating systems since MS-DOS 6.22. It is used to create and manage partitions on hard disks. However, fdisk is no longer the best tool for the job.
Modern disk management tools, such as Disk Management in Windows 10, are much more powerful and easier to use.
For example, Disk Management can resize partitions without losing data, create bootable USB drives, and much more. It also includes a graphical interface that makes it easy to understand what is going on. Fdisk does not have any of these features.
Another issue with fdisk is that it can be challenging to use if you are unfamiliar with the command line. Disk Management has a simple wizard-based interface that makes it easy for anyone to use.
6. The Declining Popularity of Fdisk Among
A recent study has shown that the use of fdisk is declining among computer users. Its use is now at an all-time low. There are several reasons for this decline, but the main one seems to be the increasing popularity of disk management utilities like GParted and GNOME Disks.
fdisk has been around since the early days of computing, and it was once the go-to tool for managing disks and partitions. However, its age is starting to show. It’s not as user-friendly as newer tools, and it doesn’t have some of the features that people want today, like support for encryption and LVM.
GParted and GNOME Disks are more modern alternatives that offer many features that fdisk doesn’t have.
FAQs:
Does Windows 10 have fdisk?
No, Windows 10 does not have fdisk. Fdisk is a command-line utility that creates and manages partitions on hard drives. Windows 10 has a built-in utility called Disk Management that can be used to create, delete, format, and resize partitions.
How do I fdisk my computer?
When your computer is having problems, and you can’t figure out why the first step you should take is to check the partitions. This can be done with the fdisk command. To use this command, you need to open up a terminal.
In Ubuntu, this can be done by pressing Ctrl+Alt+T. Once a terminal is open, type in sudo fdisk -l and enter.
This will list all of the partitions on your computer. If you want more information about a certain partition, such as its size or location, you can type in sudo fdisk -p <partition number> and hit enter.
For example, if I wanted more information about partition 5, I would type sudo fdisk -p 5 into the terminal and hit enter.
Does Windows 10 have DiskPart?
DiskPart is a command-line tool that you can use to manage disks, partitions, and volumes on your computer. DiskPart is included in Windows 10, and you can use it to perform the following tasks: Create and delete sections. Format partitions. Assign drive letters. Change volume labels. Hide a section from Windows Explorer.
- Archive an entire partition.
- Extract files from an archive.
How do I use Windows DiskPart?
DiskPart is a powerful command-line utility that comes with Windows 10. It enables you to manage your hard disk drives and partitions. This article will show you how to use DiskPart to create and format partitions, delete partitions, and more.
- To open DiskPart, press the Windows key + X keyboard shortcut and select Command Prompt (Admin).
- Type diskpart and press Enter.
- The DiskPart prompt will now be displayed. Here, you can type the commands that you want to run.
Final Words
In conclusion, there are a few ways to run Fdisk in Windows. You can open Command Prompt and type “fdisk” or you can open Disk Management and click on the “Disk Management” tab. Whichever way you choose, be sure to follow the on-screen instructions to complete the process.
Related Error Guides
- How To Fix Blue Screen Error In Windows 10? (10 Methods)
- How To Fix Ps4 Error CE-34878-0?
- How to Fix PS4 Error CE-32809-2?
This guide explains how to use the diskpart utility for the following Windows versions: Windows XP, Vista, 7, 8, 8.1 or 10.
What is diskpart
The diskpart utility (available in Windows 2000, XP, Vista, 7, 8, 8.1 and 10) can be used to create or delete partitions on your PC.

Command Prompt: list disk
The utility allows you to:
- Partion
- Remove partitions
- Remove formatting
- Assign and remove drive letters and mount points
- Convert disks from basic to dynamic
- Create and extend volumes
Most commands that you can perform in Disk Management (see Boot partitions) are available with diskpart. Because it’s a command line utility, you need to open Command Prompt and type diskpart.
On Windows Vista, 7, 8 and 10 systems, you can type diskpart at Run, click OK or press Enter and Command Prompt will automatically open with diskpart loaded.
When the utility is loaded, you will notice the version installed on your computer:
Microsoft DiskPart version 6.1.7600
Copyright  1999-2008 Microsoft Corporation.
On Computer: MY_COMPUTER
Commands and parameters
The diskpart tool has the following commands and parameters available:
selectcan set the focus on a specific targetselect disk– use this command to set the focus on a specific disk
Command Prompt: select disk
select partition– use the select partition command to set the focus on a specific partitionselect volume– use this command to set the focus on a specific volumedetail diskwill deliver information about the current diskdetail partitionwill deliver information about the current partitiondetail volumewill deliver information about the current volumelist disk– use list disk to get summary information about the available disks on your computerlist partition– use this command to get information about each partition available on a specific disklist volume– use list volume to get information about each volume available on the computeractive– use the active command to set the focus on the current partition to be activeassign– use assign to assign a letter or a mount point to the current active partitioncreate partition primary size=SIZE_IN_MB– use this command to create a new primary partition. TheSIZE_IN_MBis the size of the partition you want to create, in MB.create partition extended size=SIZE_IN_MB– use this command to create a new extended partition. TheSIZE_IN_MBis the size of the partition you want to create, in MB.create partition logical size=SIZE_IN_MB– use this command to create a new logical partition. TheSIZE_IN_MBis the size of the partition you want to create, in MB.delete partitionwill delete the current active partitionextendwill extend the current volumeremovewill remove a letter or a mount point from the current active partitionactive– use this to set the current volume as activeadd disk– use this command to add a mirror to the current active volumebreak disk– use this command to break the mirror addedcreate volume stripe– use this to create a stripe set volume on a specified diskcreate volume raid– use this command to create a Raid-5 volume on a specified diskdelete disk– use this command to delete a missing dynamic diskdelete partition– use this command to delete the current active partitionextend disk– use this command to extend the current volumeimportcan be used to import disks from a foreigh disk grouponlinecan be used to bring a disk or a volume online that was previously offlineremovecan be used to remove a letter or a mount point from the current active volumeretainis used to prepare a volume to be used as a boot or system volumeconvert mbrwill set the partition style of the current disk to MBRconvert gptwill set the partition style to GPTconvert dynamicwill change a basic disk into a dynamic oneconvert basicwill convert a dynamic disk (empty disk) into a basic diskexitwill exit the utilitycleanwill remove the partition or volume formatting from the current diskrescancan rescann the I/O buses and can discover new disks added to the computerhelpwill display the list of all available commands

Error Codes
You can find a list error codes to debug various errors:
- Code
0means that no errors occurred - Code
1means that a fatal exception occurred - Code
2means that the parameters you specified for a command are incorrect - Code
3means that diskpart is unable to open the specified file - Code
4means that diskpart (one of the services used by the utility) returned a failure - Code
5means a command syntax error
diskpart in Windows XP
Note that the fdisk utility found in pre-Windows XP systems is now known as diskpart on Windows XP systems.
If you can boot into Windows XP
If you can boot into your computer, you simply need to open Command Prompt to access diskpart:
- Boot into Windows XP
- Click Start
- Click Run
- Type
cmd - Press Enter or click OK
- At the Command Prompt window, type
diskpart - Press Enter
If you can’t boot into Windows XP
If you can’t boot into Windows XP to access diskpart, you have 2 options:
- Use the original CD to access Recovery Console
- Use Easy Recovery Essentials to launch Command Line
If you have the original CD:
If you can’t boot into Windows XP, but you have the original CD, you can access the Recovery Console:
- Insert the Windows XP CD
- Reboot the computer
- Press any key to boot from the CD
- At the Microsoft Setup menu, press R
- Select the operating system and enter the Administrator password, if requested
- When Command Line appears, type
diskpart - Press Enter
If you use Easy Recovery Essentials:
- Download Easy Recovery Essentials
- Burn the ISO Image. Follow our instructions on how to burn a bootable ISO image. If you’d like to have a recovery USB instead, follow our instructions on how to make a recovery USB.
- Boot Easy Recovery Essentials from the CD, DVD or USB
- Select Launch Command Line


diskpart in Windows Vista
You need to run these steps as an Administrator on Windows Vista systems.
If you can boot into Windows Vista with no errors, follow the If you can boot into Windows Vista set of instructions. Otherwise, follow If you can’t boot into Windows Vista.
If you can boot into Windows Vista
You simply need to open Command Prompt, if you can boot into Windows Vista:
- Boot into Windows Vista
- Click Start
- Type
cmd - Click Command Prompt from the search results list. You may need to right-click Command Prompt > Run as Administrator, if you are not logged in as Administrator already
- Type
diskpart - Press Enter
For the full list of diskpart commands and paremeters, go to Commands and Parameters.
If you can’t boot into Windows Vista
If you can’t boot into your system, you have the following options:
- Use the installation disc to access System Recovery Options
- Access System Recovery Options without the installation disc (if installed)
- Use Easy Recovery Essentials and access Command Line
If you have the installation disc:
If you can’t boot into Windows Vista, but you have the Windows Vista disc, follow these steps to open diskpart:
- Insert the original CD/DVD in the optical drive
- Boot your computer
- Press any key to boot from the CD/DVD
- Select your language, time and keyboard
- Click Next
- Click Repair your computer
- Select the operating system
- Click Next
- When the System Recovery Options screen appears, click Command Prompt
- Type
diskpart:diskpart
- Press Enter
For the full list of diskpart commands and paremeters, go to Commands and Parameters.
If you don’t have the installation disc:
If your Windows Vista has the System Recovery Options installed and is available at the Advanced Boot Options menu, you can run Command Prompt from there. Otherwise, see the “If you use Easy Recovery Essentials” set of instructions below.
Follow these steps below to access diskpart without the installation disc:
- Reboot the computer
- Press F8 as your computer starts to boot, but before the Windows Vista logo appears
- Select Repair Your Computer, at the Advanced Boot Options menu
If a “Repair Your Computer” option isn’t listed, System Recovery Options is not installed on your computer. Use the original installation disc or go to the “If you use Easy Recovery Essentials”set of instructions below .
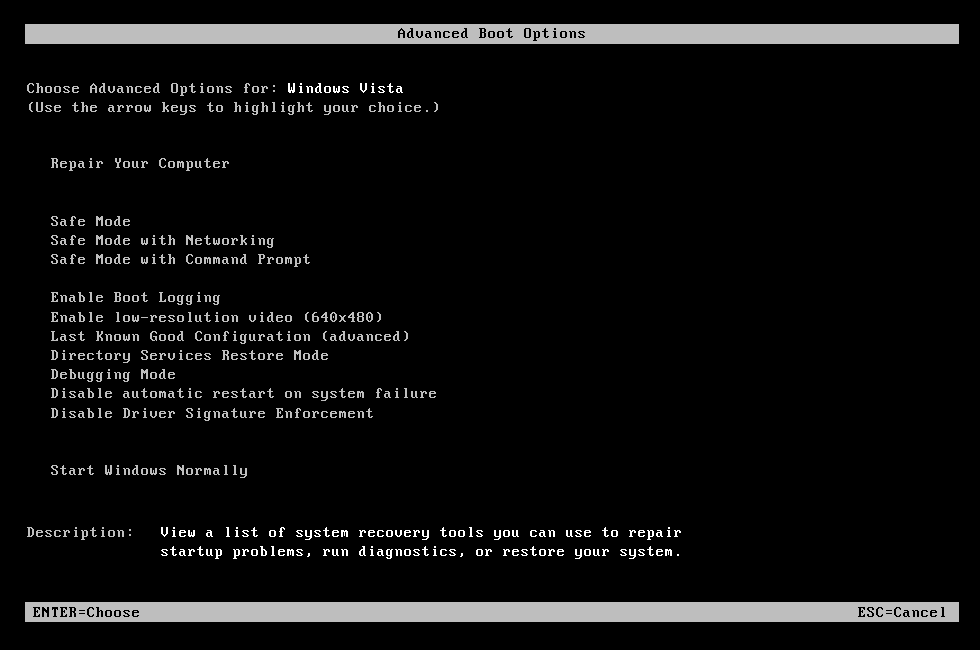
- Select Command Prompt at the System Recovery Options menu
- Type
diskpart - Press Enter
For the full list of diskpart commands and paremeters, go to Commands and Parameters.
If you use Easy Recovery Essentials:
If you don’t have the installation disc available, can’t boot into Windows Vista or you don’t have the “Repair Your Computer” option listed at the Advanced Boot Options menu, you can use Easy Recovery Essentials to access Command Prompt and load diskpart.
Follow these steps:
- Download Easy Recovery Essentials
- Burn the ISO Image. Follow our instructions on how to burn a bootable ISO image. If you’d like to have a recovery USB instead, follow our instructions on how to make a recovery USB.
- Boot Easy Recovery Essentials from the CD, DVD or USB
- Select Launch Command Line
diskpart in Windows 7
On Windows 7 systems, you can access diskpart just as you do Windows Vista systems.
Note that you need to run these steps as an Administrator on Windows 7 computers.
If you can boot into Windows 7
If you can boot into your Windows 7 system, simply open Command Prompt:
- Boot into Windows 7
- Click Start
- Type
cmd - Click Command Prompt from the search results list. Right-click on Command Prompt > Run as Administrator.
- When Command Prompt loads, type
diskpart - Press Enter
For the full list of diskpart commands and paremeters, go to Commands and Parameters.
If you can’t boot into Windows 7
Similar to Windows Vista, if you can’t boot into your system, you have the following options:
- Use the installation disc
- Boot into the Advanced Boot Options menu to access System Recovery Options
- Use Easy Recovery Essentials and access Command Line
If you have the installation disc:
If you can’t boot into Windows 7, but you have the installation disc, you can run diskpart using the disc. To do so, follow these steps:
- Insert the disc in the optical drive of your computer
- Restart the computer
- Press any key to boot from the disc
- Select your preferred language, time and keyboard
- Click Next
- Click Repair your computer at the Install Windows screen
- Select the operating system from the list
- Click Next
- Select Command Prompt
- Type diskpart


diskpart
- Press Enter
For the full list of diskpart commands and paremeters, go to Commands and Parameters.
If you don’t have the installation disc:
Usually, Windows 7 systems should have the System Recovery Options installed on the hard drive. If it’s not (follow steps below), go to the “If you use Easy Recovery Essentials” set of instructions below for an alternative to access diskpart.
Follow these steps to access diskpart without an installation disc on a Windows 7:
- Restart the computer
- Press F8 as the computer starts to boot. Press F8 before the Windows 7 logo appears.
- Select Repair Your Computer at the Advanced Boot Options screen
If Repair Your Computer is not listed, System Recovery Options is not installed on your PC. Go to If you use Easy Recovery Essentials for an alternative.
- Press Enter
- Select Command Prompt
- Type
diskpart - Press Enter

For the full list of diskpart commands and paremeters, go to Commands and Parameters.
If you use Easy Recovery Essentials:
Easy Recovery Essentials can run from any CD, DVD or USB flash drives.
To access diskpart using Easy Recovery Essentials, follow these steps:
- Download Easy Recovery Essentials
- Burn the ISO Image. Follow our instructions on how to burn a bootable ISO image. If you’d like to have a recovery USB instead, follow our instructions on how to make a recovery USB.
- Boot Easy Recovery Essentials from the CD, DVD or USB
- Select Launch Command Line
diskpart in Windows 8
If you can boot into Windows 8
If you can boot into your Windows 8 system, you simply need to open Command Prompt to access diskpart. To do so, follow these steps:
- Boot into Windows 8
- Press the key and C to open the charm bar
- Type
cmd - Click Command Prompt
- When Command Prompt opens, type
diskpart - Press Enter
For the full list of diskpart commands and paremeters, go to Commands and Parameters.
If you can’t boot into Windows 8
If you can’t boot into your Windows 8, you have these options available:
- Use the original DVD or USB with Windows 8 or Windows 8.1 to access the Repair your computer option
- Boot into the System Recovery Options with Shift and F8
- Use Easy Recovery Essentials to launch Command Line
If you have the installation disc:
If you can’t boot, but you have the installation disc, follow these steps:
- Insert the Windows 8 DVD or 8.1 USB
- Restart the computer
- Press any key to boot from the media
- Click Repair your computer or press R
- Select Troubleshoot
- Select Command Prompt
- Type
diskpart - Press Enter

For the full list of diskpart commands and paremeters, go to Commands and Parameters.
If you don’t have the installation disc:
If you don’t have the installation disc, you can boot into System Recovery Options or use Easy Recovery Essentials.
To access diskpart without an official Windows 8 or Windows 8.1 disc, follow these steps:
- Reboot the system
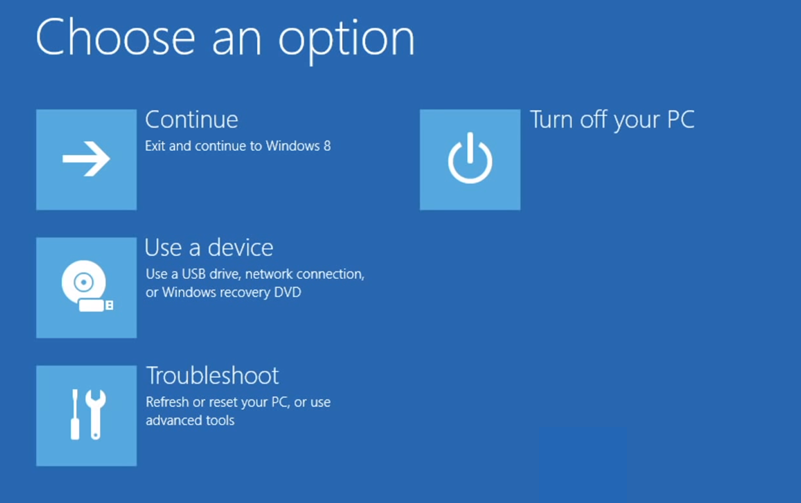
- Press Shift and F8 very quickly
- At Choose an option, select Troubleshoot
- Select Command Prompt
- Type
diskpart - Press Enter
For the full list of diskpart commands and paremeters, go to Commands and Parameters.
If you use Easy Recovery Essentials:
Easy Recovery Essentials can run from any CD, DVD or USB flash drives.
To access diskpart using Easy Recovery Essentials, follow these steps:
- Download Easy Recovery Essentials
- Burn the ISO Image. Follow our instructions on how to burn a bootable ISO image. If you’d like to have a recovery USB instead, follow our instructions on how to make a recovery USB.
- Boot Easy Recovery Essentials from the CD, DVD or USB
- Select Launch Command Line
diskpart in Windows 10
If you can boot into Windows 10
If you can boot into your Windows 10 system, you simply need to open Command Prompt to access diskpart. To do so, follow these steps:
- Boot into Windows 10
- Press the key and C to open the charm bar
- Type
cmd - Click Command Prompt
- When Command Prompt opens, type
diskpart - Press Enter
For the full list of diskpart commands and paremeters, go to Commands and Parameters.
If you can’t boot into Windows 10
If you can’t boot into your Windows 10, you have these options available:
- Use the original DVD or USB with Windows 10 to access the Repair your computer option
- Boot into the System Recovery Options with Shift and F8
- Use Easy Recovery Essentials to launch Command Line
If you have the installation disc:
If you can’t boot, but you have the installation disc, follow these steps:
- Insert the Windows 10 or USB
- Restart the computer
- Press any key to boot from the media
- Click Repair your computer or press R

- Select Troubleshoot
- Select Command Prompt
- Type
diskpart - Press Enter

For the full list of diskpart commands and paremeters, go to Commands and Parameters.
If you don’t have the installation disc:
If you don’t have the installation disc, you can boot into System Recovery Options or use Easy Recovery Essentials.
To access diskpart without an official Windows 10 media, follow these steps:
- Reboot the system
- Press Shift and F8 very quickly
- At Choose an option, select Troubleshoot

- Select Command Prompt
- Type
diskpart - Press Enter

For the full list of diskpart commands and paremeters, go to Commands and Parameters.
If you use Easy Recovery Essentials:
Easy Recovery Essentials can run from any CD, DVD or USB flash drives.
To access diskpart using Easy Recovery Essentials, follow these steps:
- Download Easy Recovery Essentials
- Burn the ISO Image. Follow our instructions on how to burn a bootable ISO image. If you’d like to have a recovery USB instead, follow our instructions on how to make a recovery USB.
- Boot Easy Recovery Essentials from the CD, DVD or USB
- Select Launch Command Line
Troubleshooting
Download diskpart
You can not download diskpart utility. This utility is a command line utility part of Windows.
To access diskpart, you have the following options:
- Use the original CD/DVD or USB of your Windows to access Recovery Console (for Windows XP) or System Recovery Options (for Windows Vista-8)
- Boot into the recovery mode of your Windows
- Use Easy Recovery Essentials, our recovery and repair disk, and open Command Line to access diskpart
Instructions on how to access diskpart if you use Easy Recovery Essentials:
- Download Easy Recovery Essentials
- Burn the ISO Image. Follow our instructions on how to burn a bootable ISO image. If you’d like to have a recovery USB instead, follow our instructions on how to make a recovery USB.
- Boot Easy Recovery Essentials from the CD, DVD or USB
- Select Launch Command Line
Instructions on how to access diskpart if you have the installation disc:
- For Windows XP
- For Windows Vista
- For Windows 7
- For Windows 8 or Windows 8.1
- For Windows 10
Instructions on how to access diskpart if you don’t have the installation disc:
- For Windows XP
- For Windows Vista
- For Windows 7
- For Windows 8 or Windows 8.1
- For Windows 10
Format USB with diskpart
To format a USB flash drive with diskpart, follow these steps:
- Open the utility by typing
diskpartin Command Prompt - Press Enter
- Once loaded, type
list disk:list disk
- Press Enter
- Determine which of the disks listed is your USB flash drive, e.g. Disk 2.
- Type
select disk 2, if #2 is the USB flash drive presented by the list disk command - Press Enter
- Type
cleanto clean the USB flash drive:clean
- Press Enter
- Type this command:
create partition primary
- Press Enter
- Type
active:active
- Press Enter
- You should now receive this confirmation message:
DiskPart marked the current partition as active.
- Type this command to format the USB flash drive:
format fs=ntfs label="MY USB DRIVE"
where
ntfsis the NTFS file system (you can also use fs=fat32) and “MY USB DRIVE” is the label given to the USB drive. - Type
assign:assign
- Press Enter
- Quit diskpart by typing
exit:exit
- Press Enter
Bootable USB with diskpart
To create a bootable USB using diskpart, follow the steps from Format USB with diskpart.
Once successfully formatted the drive, simply copy the files to the USB drive.
USB not showing in diskpart
diskpart will not list external media, e.g. USB flash drive, if you’re using Windows XP.
Windows Vista to Windows 8 systems will show the USB flash drives in diskpart.
More Information
Support Links
- Easy Recovery Essentials for Windows – our repair and recovery disk.
It’s an easy-to-use and automated diagnostics disk. It’s available for Windows 8, Windows 7 and Windows Vista. It’s also available for Windows XP and Windows Server.
Read more at Windows Recovery Disks.
- The NeoSmart Support Forums, member-to-member technical support and troubleshooting.
- Get a discounted price on replacement setup and installation discs: Windows XP, Windows Vista, Windows 7, Windows 8, Windows 10.
Applicable Systems
This Windows-related knowledgebase article applies to the following operating systems:
- Windows XP (all editions)
- Windows Vista (all editions)
- Windows 7 (all editions)
- Windows 8 (all editions)
- Windows 8.1 (all editions)
- Windows 10 (all editions)
- Windows Server 2003 (all editions)
- Windows Server 2008 (all editions)
- Windows Server 2012 (all editions)
Propose an edit
Fdisk is the oldest disk partition tool with DOS program. Since you have Fdisk in your Windows 10, you can use it to divide disk. However, the earlier Fdisk has no format functions to meet your requirements of formatting partitions and allocating file systems after dividing.
To do so, follow these steps: Boot into Windows 10. Press the Windows key and C to open the charm bar. Type cmd. Click Command Prompt. When Command Prompt opens, type diskpart. Press Enter.
How do I use fdisk on Windows?
Fdisk is an external command that is available for the following Microsoft operating systems. With MS-DOS 3.3x and below, fdisk.com was used as the external file. MS-DOS 4. x and later including versions of Windows that support the command, use fdisk.exe as the external file.
How do you use fdisk?
5.1. fdisk usage fdisk is started by typing (as root) fdisk device at the command prompt. device might be something like /dev/hda or /dev/sda (see Section 2.1.1). p print the partition table. n create a new partition. d delete a partition. q quit without saving changes. w write the new partition table and exit.
How do I use fdisk in command prompt?
FDISK Type: External (2.0 and later) Syntax: FDISK. FDISK [/status] Purpose: Prepares a fixed disk to accept DOS files for storage. Discussion. FDISK provides a set of options related to the preparation of a fixed disk. NOTE: This command is implemented in different ways by different manufacturers.
Does Windows 10 have fdisk?
Fdisk is the oldest disk partition tool with DOS program. Since you have Fdisk in your Windows 10, you can use it to divide disk. However, the earlier Fdisk has no format functions to meet your requirements of formatting partitions and allocating file systems after dividing.
How do I manage drives in Windows 10?
Way 1: The easiest way to open Disk Management in Windows 10 is from computer Desktop. Right click on Start Menu (or press Windows+X hotkey) and then select “Disk Management”.
What is the use of fdisk command?
fdisk command in Linux with examples. fdisk also known as format disk is a dialog-driven command in Linux used for creating and manipulating disk partition table. It is used for the view, create, delete, change, resize, copy and move partitions on a hard drive using the dialog-driven interface.
How do I fdisk C drive?
Format Hard Drive Type “c: /s” at the DOS prompt and press the Enter key. Press Y at the warning prompt, then press the Enter key to format your hard drive. Type a name for your hard drive or leave the name blank and press the Enter key.
What does fdisk MBR do?
The fdisk /mbr command is an undocumented switch used with the fdisk command (MS-DOS 5.0 and higher) that recreates the master boot record on a hard drive.
How do I start fdisk?
At the a: prompt type fdisk then hit enter. Click yes you want to use large disk support. To Delete the existing partition, Type 3 and press Enter. Select shown partition by typing the displayed number of partition and press Enter for confirmation for deleting partition.
What is the output of fdisk?
The first five lines of output from the fdisk –l /dev/sda command are summary information about the device itself, /dev/sda. The example output shows a 21.5 GB virtual disk (sda) with 41943040 sectors. The partition table is displayed after the summary information.
What fdisk command will allow you to change a partition type?
If you want to change the type, press l to get a list of partition types and then press t to change the type. Use the default values for the partition number, first and last sectors. This will create a partition that will use all available space on the disk. If you want to delete a partition, use the d command.
How do I format fdisk?
Linux Hard Disk Format Command Step #1 : Partition the new disk using fdisk command. Following command will list all detected hard disks: Step#2 : Format the new disk using mkfs.ext3 command. Step#3 : Mount the new disk using mount command. Step#4 : Update /etc/fstab file. Task: Label the partition.
How do I run Gdisk?
Under Windows, you can right-click the Command Prompt program and select the “Run as Administrator” option, then use the resulting window to run gdisk. You launch gdisk in much the same way as fdisk, although gdisk supports very few command-line arguments.
What is Lsblk command?
lsblk lists information about all available or the specified block devices. The lsblk command reads the sysfs filesystem and udev db to gather information. The command prints all block devices (except RAM disks) in a tree-like format by default. Use lsblk –help to get a list of all available columns.
How do I see all disks in Windows 10?
See drives in Windows 10 and Windows 8 If you’re running Windows 10 or Windows 8, you can view all mounted drives in File Explorer. You can open File Explorer by pressing Windows key + E . In the left pane, select This PC, and all drives are shown on the right.
How do I create a Windows 10 repair disk?
To create a recovery drive in Windows 10: In the search box next to the Start button, search for Create a recovery drive and then select it. When the tool opens, make sure Back up system files to the recovery drive is selected and then select Next. Connect a USB drive to your PC, select it, and then select Next.
How can I repair my Windows 10?
Here’s how: Navigate to the Windows 10 Advanced Startup Options menu. Once your computer has booted, select Troubleshoot. And then you’ll need to click Advanced options. Click Startup Repair. Complete step 1 from the previous method to get to Windows 10’s Advanced Startup Options menu. Click System Restore.