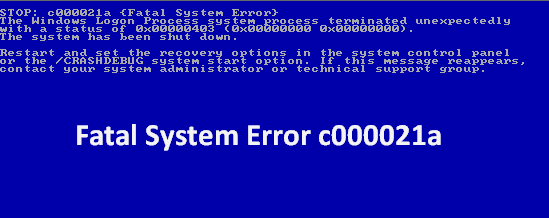
Computer errors can always be a problem, but the most problematic ones are usually Blue Screen of Death errors. The fatal error Windows 10 belongs to this category.
These errors can be quite a nuisance, so in today’s article, we’ll show you how to fix Fatal system errors on Windows 10.
Why does my computer say fatal error?
When your computer says “fatal error,” it means that an unexpected error has occurred, which is severe enough to cause the program or system to crash. The most common reasons your PC might display a fatal error include the following:
- Corrupted files – If one or more critical system files or application files are damaged, deleted, or modified, it can cause a fatal error.
- Software incompatibility – If you have installed software incompatible with your operating system or other software programs, it can cause conflicts, leading to a fatal error.
- Hardware failure – If there is a problem with any hardware component of your computer, such as the hard drive, RAM, CPU, or motherboard, it can cause a fatal error.
- Virus or malware infection – Malicious software programs can infect your computer, causing a fatal error.
- Insufficient system resources – If your computer does not have enough memory or processing power to run the program or task, it can cause a fatal error.
- Overheating – If your computer overheats due to inadequate cooling, it can cause a fatal error.
Now we know the causes, let us recommend the most valid solutions.
How do I fix the Fatal error on Windows 10?
1. Use the DISM command
- Restart your computer a few times during the boot phase to trigger the repair process.
- Choose Troubleshoot, then Advanced options.

- Select the Command Prompt option.

- When Command Prompt opens, enter the line below:
dism /image:c: /cleanup-image /revertpendingactions
- Press Enter to run it.
- Wait for the process to complete and check if the error is resolved.


Sometimes your Windows 10 installation can become corrupt due to a particular patch or for some other reason, and if that happens, you can fix it using the DISM command.
Users reported that they fixed the Fatal disk error on Windows 10 by running a system installation from bootable media using the DISM. To do that, follow the steps above.
2. Repair your PC with a great tool
One of the most recurrent causes for BSoD errors is a damaged system, particularly compromised files; we recommend you fix this issue with a professional repair tool.
These tools can repair the broken or corrupted files mainly responsible for the Blue Screen of Death issues and remove any secondary effects from previous virus infections.
3. Disable driver signature enforcement
- Restart your computer a few times during the boot phase to start the Automatic Repair process.
- Choose Troubleshoot, then Advanced options.
- Select Startup Settings.

- Press F7 to select Disable driver signature enforcement.

One potential solution to fix the BSoD problem is to disable driver signature enforcement. To do that, you need to follow the steps above.
After going through the troubleshooting process and you managed to disable the driver signature enforcement, you should check if the Blue Screen of Death issue is resolved.
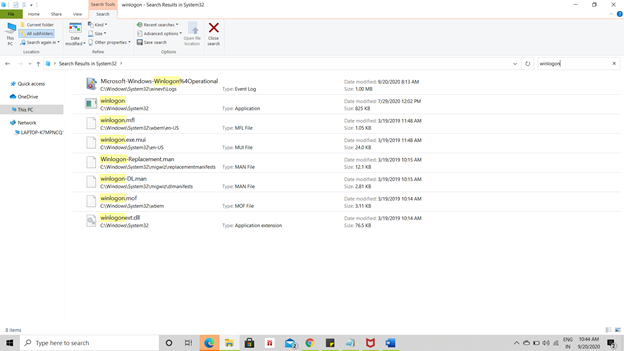
4. Replace the corrupted files
Corrupted system files can often cause a fatal system error, and users reported that Winlogon, Userinit.exe, and msgina.dll are the files you need to replace.
These files are usually located in the WindowsSystem32 directory, and you can replace them by copying the duplicate files from a different Windows 10 PC.
After copying these files from a different device, the system failure on Windows 10 should be resolved entirely.
Remember that you should copy these files from the same version of Windows 10. For example, if you use a 64-bit version of Windows 10, copy these files from another 64-bit Windows 10 PC.
5. Repair your registry
- Press Windows + E to open File Explorer.
- Go to the location below and copy the DEFAULT, SAM, SECURITY, SOFTWARE, and SYSTEM files to a different location.
C:\Windows\System32\config - Go to the folder below:
C:\Windows\System32\Config\Regback
- Paste the copied files.
- After doing that, check if the issue is resolved.

A few users reported fixing this issue simply by repairing their registry. Windows creates a backup of your registry, and you can replace it by following these steps:
6. Install the latest updates and drivers
- Press the Windows Key + I to open the Settings add and click on Update & Security.
- Then click Check for updates.

- Let Windows check and install any necessary updates.

You can fix many issues with Windows 10 simply by installing the latest updates. Those updates bring many fixes related to hardware and software, so be sure to use Windows Update to download the necessary updates.
Besides updates, it’s also essential that you install the latest drivers for your PC. To do that, visit your hardware manufacturer’s website and download the latest drivers for your device.
We recommend a third-party tool (100% safe and tested by us) to download all outdated drivers on your PC automatically.
When you use a driver updater, it not only downloads and installs drivers but also helps you manage them by detecting faulty drivers, backing up, and restoring them. As a result, it is worthwhile using one!
The specialized software can scan your PC for out-of-date drivers as soon as you install it and provides an accurate report of all the elements that need to be updated.
All you have to do is decide whether you want to update all of the drivers at once or one by one if you have reasons not to.
Many of these tools also allow you to schedule regular driver scans. This means you will get an automatic update whenever it is necessary. As a result, you won’t have to think about the issue again and avoid the BSoD bug.
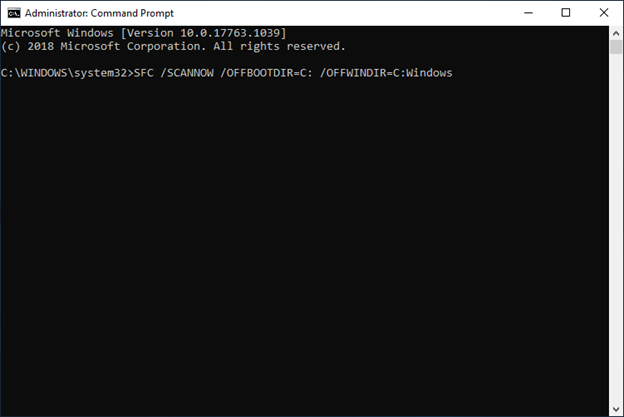
7. Run the SFC scan
- Restart your computer a few times during the boot phase to trigger the repair process.
- Choose Troubleshoot, then Advanced options.
- Finally, select the Command Prompt option.
- Type the command below and press Enter:
SFC /SCANNOW /OFFBOOTDIR=C: /OFFWINDIR=C:Windows
The SFC scan is designed to repair corrupted files, and if corrupted system files cause this error, you might be able to fix it by performing an SFC scan.
This scan has effectively solved numerous BSOD errors in Windows 10, including the dreaded System Service Exception stop code.
8. Run chkdsk
- Restart your computer a few times during the boot phase to trigger the repair process.
- Choose Troubleshoot, then Advanced options.
- Finally, select the Command Prompt option.
- Type in the following command then hit Enter:
chkdsk /r C:
- Replace the letter C with the letter of your partition.

Another potential solution is to use the chkdsk command. This command will scan your hard drive for any corrupted files and repair them.
To perform a detailed scan, scan all hard drive partitions by entering the same command and replacing C: with the letter that matches your hard drive partition.
- ERROR_OPLOCK_SWITCHED_TO_NEW_HANDLE [BSoD Fix]
- How to Fix the ERROR_OPLOCK_HANDLE_CLOSED?
- ERROR_CORRUPT_LOG_CORRUPTED: How to Fix BSoD Error
- 5 Ways to Fix ERROR_PWD_TOO_LONG
- ERROR_HIBERNATION_FAILURE: How to Fix This BSoD Error?
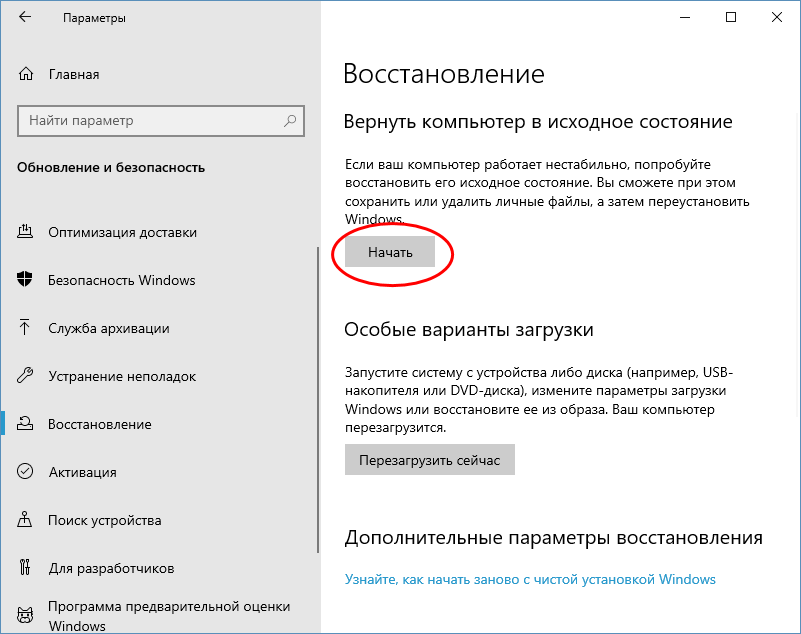
9. Reset Windows 10
- Restart your computer a few times during the boot phase to trigger the repair process.
- Choose Troubleshoot, then Reset this PC and Remove everything.

- Insert the installation media if you’re asked to.
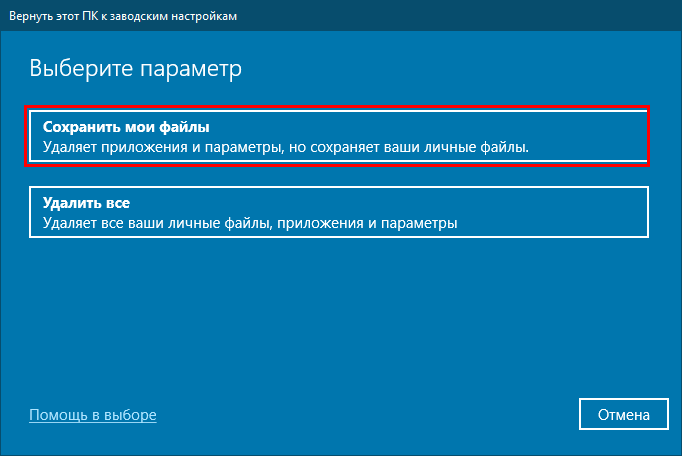
- Select Only the drive where Windows is installed, then Just remove my files.

- Click the Reset button to start the process.
- Follow the instructions to reset Windows 10.


If you can’t fix this error, you might want to reset Windows 10. To do that, restart your computer a few times during the boot process to enter Automatic Repair. After that, follow these steps:
If the reset process doesn’t help, perform a clean install of Windows 10. Remember that both these processes will delete all files from your C partition, so be sure to back up important files.
To better manage the Blue Screen of Death errors, we advise you to check out this comprehensive guide dedicated to the leading causes of the BSoD problem.
We also have a complete guide on how to fix the Fatal Error Coordinator Returned-1 error in Windows, and a guide on lowLevelFatalError, so don’t miss them.
We’d like to hear more on this subject, so don’t forget to comment in the dedicated section below.
Milan Stanojevic
Windows Toubleshooting Expert
Milan has been enthusiastic about technology ever since his childhood days, and this led him to take interest in all PC-related technologies. He’s a PC enthusiast and he spends most of his time learning about computers and technology.
Before joining WindowsReport, he worked as a front-end web developer. Now, he’s one of the Troubleshooting experts in our worldwide team, specializing in Windows errors & software issues.
While using a PC, you come across multiple types of errors. Some are easy to rectify and do not cause a lot of problems. However, some of them are too intense to handle, causing fatal errors or corrupting PC.
In this blog, we’ll look at some ways you can fix fatal system errors manually and with a dedicated tool. We will also try to understand exactly what is meant by fatal system errors and what might be the cause behind them.
Effective Ways to Fix Fatal System Errors on Windows 10
Fatal errors tend to shut down all the processes on a computer. If you often find blue screen errors on your PC or corrupt files that have affected your PC’s processing unit, you may look at a severe case of fatal system errors.
These errors are often caused due to bad sectors on your Windows drive, infected registry files, corrupt system files, fatal virus attacks, etc. All these errors seem common; however, their impact can leave your PC unusable.
When you face a fatal issue on your PC, it is due to an application shutting down for unknown reasons or a blue crash screen. Usually, these errors show you a code of the error. These are-
- FATAL ERROR: Unhandled xxxx exception at xxx
- “Your PC ran into a problem and needed to restart; just collect some information, and then we will restart for you.
The cause of the issue is simple. Whenever there’s an issue in running an application or completing a process, your computer passes an exception that helps handle the process’s smooth functioning, irrespective of missing components. When the root system knows the exception, the process runs smoothly. However, if the passed exception is unknown, it is a fatal error.
How to Deal with Fatal System Errors?
There are a few ways you can fix fatal system errors. Some of these require you to perform multiple steps manually, while some can be performed using a PC optimization tool. Let’s go through them one by one to find out more about them.
Method 1 – Use Advanced System Optimizer Tool
Let’s kick off the methods to handle fatal system errors with the only automated way you can use. Advanced System Optimizer, as the name suggests, is a system optimization application that can help you handle complex maintenance tasks easily with just a few clicks.
If we talk about fatal errors, they put your PC in size and cause multiple problems like –
- Unidentified bugs
- Outdated device drivers
- System crashes
- System files errors
- Kernel issues,
- Bad registry files.
You may overcome the fatal system error by manually handling the issue. However, it never means that these issues are fixed. To have a perfect PC, you need to fix all the errors from all the sectors of a PC, and Advanced System Optimizer does that for you.
You can download the Advanced System Optimizer by clicking here.
Once you run the application, you can find all the tools you can use to tune up your PC in a single place!

If you check the left panel of the tool, you have all the options you may require to handle a fatal error. Let’s quickly go through the crucial tools that can help you handle fatal errors one by one.
- The first is the Home Screen, where you can find 3 types of scans, Quick Scan, Deep Scan, and Custom Scan. Each of them has a dedicated functionality. To know more, read review of Advanced System Optimizer.
- The next thing that can be of help to you in handling the fatal issue is the registry optimizer. Click on the options and initiate a registry scan to find the issues. Here also have two options, one is a Registry Cleaner, and another is Registry Optimizer.

- After that comes the Windows Optimizers. You can use the Driver Updater option to find all the updates for outdated drivers. This way, you save time and get over the process quickly.

The tool offers some amazing operations that you can perform and optimize your PC without any hassle. Keep in mind that all the things that you might have to do manually to handle fatal errors can be done automatically using the tool.
Method 2 – Use the DISM command
The DISM command checks the functioning and health of. WIM files, full flash utility files, etc. Basically, it works with the Windows image that you have on your computer to find out the bad sectors.
To use the command, all you have to do is –
- Press Windows + R on the keyboard to bring up the Run box.
- In the Run search box, type cmd and hit enter.
- Once you have opened the command prompt, use the following command –
dism/image:c: /cleanup-image /revertpendingactions

- With the help of this command, you can initiate the deployment image servicing and management tool.
- Wait for it to finish processing. After that, check whether the fatal error still pops up.
Method 3 – Use SFC Scan on your PC
The SFC scan can helps in fixing corrupt system files. Implementing the command is quite easy. However, it takes a PC expert to know how to implement the command.
To run the SFC scan, follow these steps –
- Insert your Windows image file on your PC and restart the computer in Advanced options.
- When you restart the PC to fix the Windows setup files, you will find three options – Continue to Windows 10, Troubleshoot, and Turn off. Open the Troubleshoot window.

- In Troubleshoot options you will find two options; one is Reset PC and the other one is Advanced Options.

- Open Advanced Options. There you will find Command prompt. Open the Command Prompt Window.

- Once you have reached Command Prompt, use the following command
SFC /SCANNOW /OFFBOOTDIR=C: /OFFWINDIR=C: Windows

- This command will initiate an analysis of system files to find out corrupt files.
- Once the process is finished, it will automatically fix the errors that it can. In case some errors are still left, you might have to use another reproach.
Tip : Advanced System Optimizer has a dedicated module to deal with corrupt files so if this is too much work, use Disk Tools module.
Method 4 – Repair Registry Files
The registry files play a crucial role in the smooth functioning of any PC. To resolve fatal errors on a PC, you may be required to repair the registry files. But how?
Windows creates a backup of your registry files, just in case you face a fatal issue. You can simply remove the harmed files and repair them using the backup files for your good. Here’s how to do it –
- Open your Windows explorer and navigate to the following path –
C:\Windows\System32\config - From the given path, copy the files – DEFAULT, SAM, SECURITY, SOFTWARE, and SYSTEM.

- Keep them safe in some other folder.
- Now, in the next step, navigate to the following path and paste the copied files –C:\Windows\System32\Config\Regback

- Paste the files and refresh your system. Check again whether the fatal issue persists.
Method 5 – Keep Your Drivers Updated
The drivers play a crucial role in running so many processes on your system. No matter what you are trying to do on a system, if you have executed a file, there will be a driver engaged with the process. An outdated driver can surely cause the entire system to freeze and hence a fatal error can occur.
To avoid this from happening, make sure you keep all your drivers updated. You can use the tool mentioned above to automatically update the drivers or you can also do it manually by using the following steps –
- Press Windows + X to open the Quick access menu.
- From the menu, Open Device Manager.

- In the Device Manager, choose the component you want to update the driver for. Keep in mind that since it is a manual process, you will have to check for updates one by one. However, if you know what might have caused the error, select the component.
- Usually, it is the display adapter that causes your PC to face a blue screen crash. Click on the display adapters and check for updates.

- Click on update driver and select the first option.

- Windows will search for the driver automatically and ask you to install them.
Just repeat the process for all components to check and install available updates. It is indeed a time-consuming process. However, it can be shortened if you go for the automated process you can find in the tool.
Conclusion
Fatal system errors on Windows 10 are some of the most typical issues you can face. The best way to handle them is by following the appropriate step and diligently completing the troubleshooting process. Because a single mistake while performing the fix can brick your PC, you have both automated and manual procedures available to resolve the fatal issues. Now the choice is yours! Don’t forget to comment about which technique worked the best for you; good luck!
Recommended-
How to Fix Windows 11 High Disk Usage
Best Ways to Fix File Explorer is Slow in Windows 11
How To Fix – System Restore Not Working In Windows 10
How To Check Hard Drive Health on Your Windows PC
Summary: A fatal system error causes one or multiple programs on your PC to shut down suddenly. In this blog, you will learn about the fatal system error and the applicable fixes. To recover data loss due to this error, opt for a professional data recovery software like Stellar Data Recovery Professional for Windows. Download the software from the button below:
A fatal system error is a type of error that can cause a computer program to shutdown without any warning. The error is also known as system crash, a kernel error, or bug check.
A fatal system error can cause either a single program or multiple programs to close down abruptly.
How Fatal Errors Appear?
When a fatal system error occurs, you might encounter one of the following error messages:
· FATAL ERROR: Unhandled xxx Exception at xxx
· A fatal exception xx has occurred at xxxx:xxxxxxxx
· Fatal error detected, unable to continue
What Causes the Fatal System Error?
The main reasons for fatal errors are:
- Hardware failure
- Hardware drivers missing or corrupt
- Incomplete installation of Windows service pack
- Too many invalid or bad registry keys
- Power surges
- Kernel level of the operating system is disturbed by third-party applications
- Virus/malware attacks
A fatal system error can occur when your computer’s application attempts to access some invalid data or code. This causes the program to shut down and returns the user to the operating system.
The consequences of fatal system error can be:
– Loss of data due to sudden system shutdown
– Software failure
– Blue Screen of Death (BSOD): System error that signifies that the Windows OS cannot operate safely.
How to Fix Fatal System Error?
There are plenty of quick fixes that can resolve the Fatal system error. The key ones are:
- Update your Windows Operating system
- Uninstall any newly installed programs
- Free space on your computer’s hard drive
- From the Task Manager, disable unnecessary background programs
If the above quick fixes don’t work, you can try the complete solutions as described below:
1. Replace corrupted system files
Corrupted system files can cause a fatal system error. It would help if you replace them to fix the issue. The steps are listed below:
a) Find another PC running on the same version of Windows as yours.
b) Follow this path on the other computer: C:\Windows\System32.
c) Search for winlogon, dll, and Userinit.exe.
d) Copy these files and transfer them to your PC. Alternatively, you can save these files in your email, which you can retrieve in your PC afterward.
e) Now go to the same path: C:\Windows\System32 on your PC.
f) Replace the winlogon, dll, and Userinit.exe in your computer with the files you had saved from the other PC.
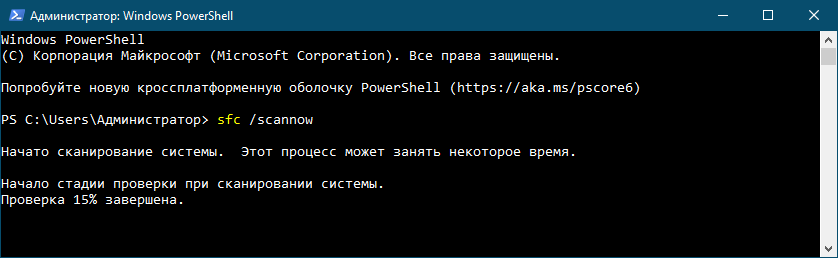
2. Run SFC scan
The SFC scan is designed to repair corrupted files that may cause fatal system error. Run the SFC scan program to locate the corrupted files with the steps below:
a) Type Command Prompt in the Windows search button.
b) Open the Command prompt and run it as an administrator.
c) Type SFC /SCANNOW /OFFBOOTDIR=C: /OFFWINDIR=C:Windows in the command prompt screen and press Enter. d) Wait till the scan is completed.
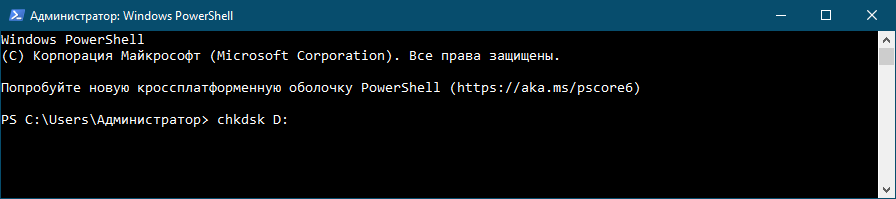
3. Run the CHKDSK command
CHKDSK (check disk) command can also fix the system error. Follow these steps to use the CHKDSK command:
a) Run the Command prompt as administrator.
b) Type chkdsk /r C: in the Command Prompt screen.
c) Wait till the process is completed.
4. Repair your PC’s registry
Repairing your PC’s registry can also fix the fatal system error. Below are the steps:
1. Go to this address on your PC: C:\Windows\System32\RegBack.
2. Select and copy all items.
3. Go to C:\Windows\System32\config and paste there.
Data Recovery as a result of Fatal System error
As described above, fatal system error can lead to loss of data. You might be working on something, and suddenly, the program shuts down. In more serious cases, the entire system might shut down due to the error. A data recovery tool can prevent permanent loss of your valuable data due to the error.
A data recovery software works by scanning through the device and looking for lost/deleted data. Once the lost files have been traced, the software restores them. One of the best data recovery software that can efficiently recover your data is the Stellar Windows Data Recovery Professional for Windows. It is a DIY tool with an easy-to-use interface. You can download the software from the button below and then follow the steps listed below to recover your data.
How to use Stellar Windows Data Recovery Professional for Windows
1. Download and install Stellar Data Recovery Professional for Windows.
2. Next, select the type of data you wish to recover.
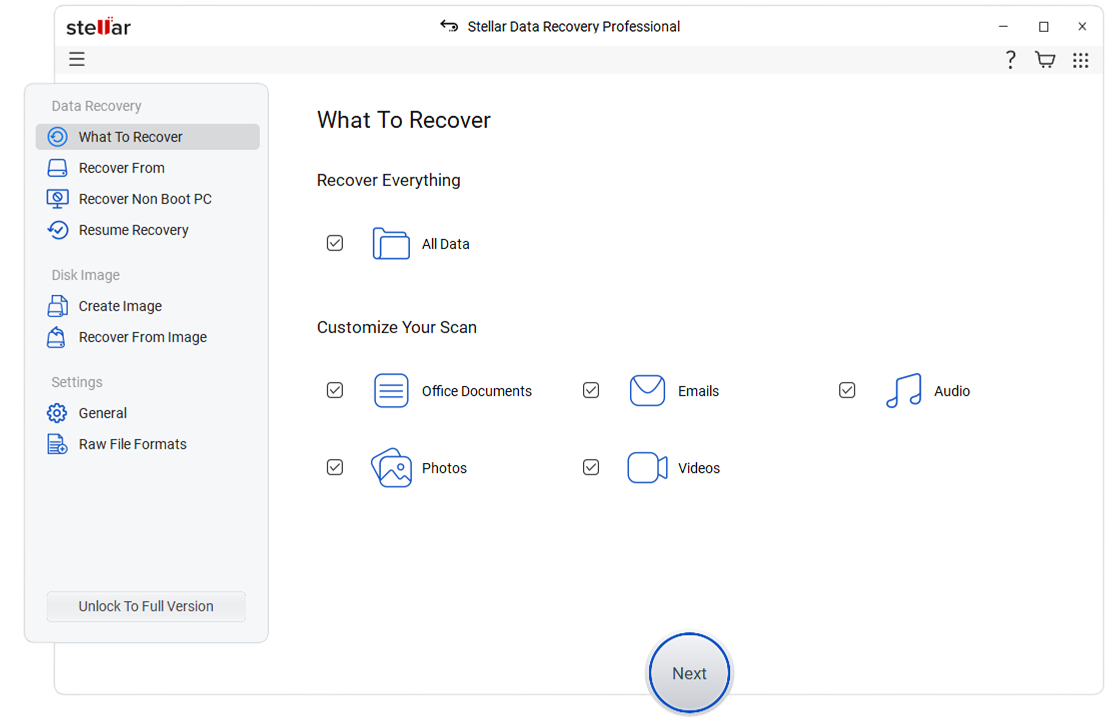
3. Choose the drive in your PC from where you want to recover the data.
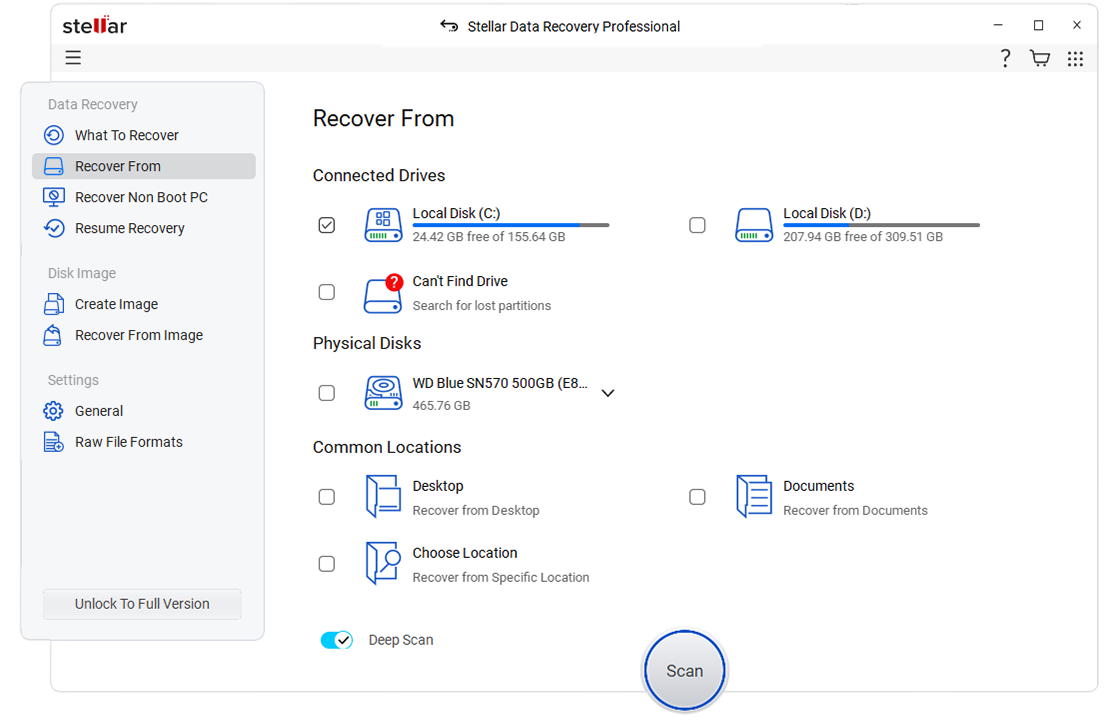
4. Once you have selected the drive, click Scan. You can also preview the files before recovering at the time of scanning.
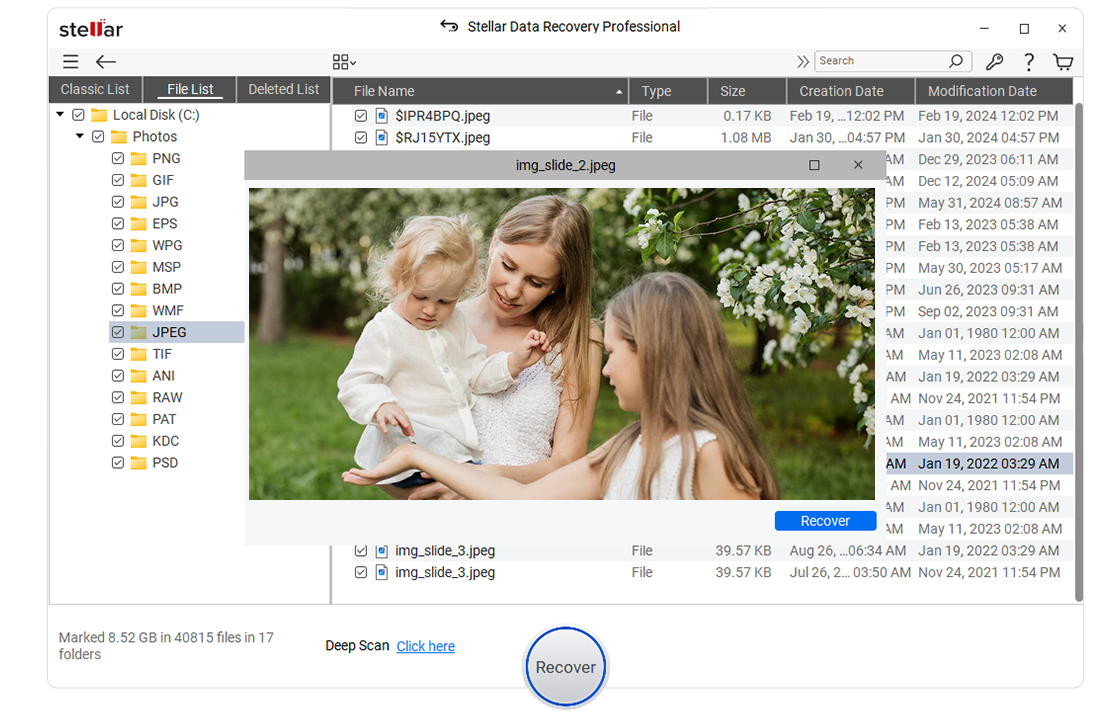
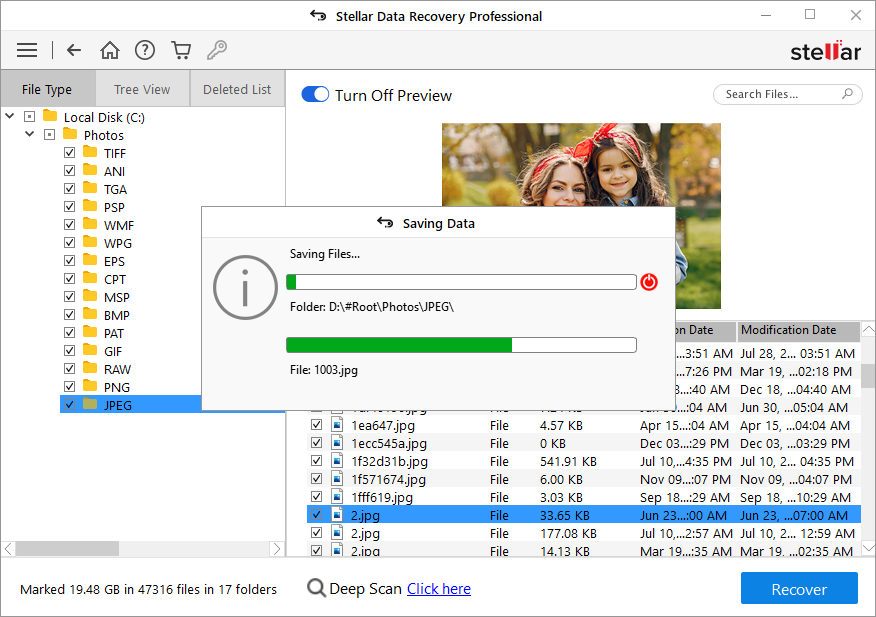
5. After scan completion, click Recover and choose a location to save the recovered files. (See Image 7)
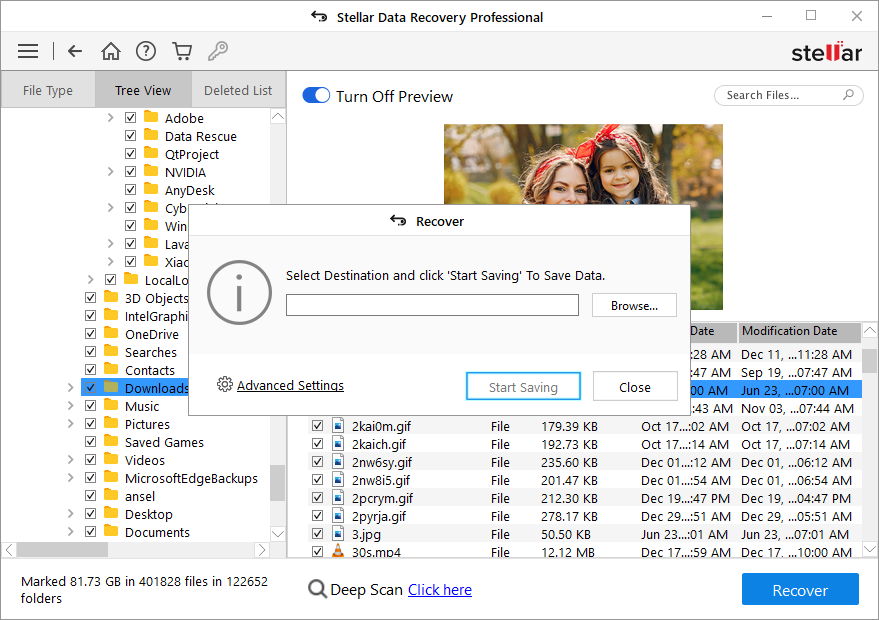
6. Finally, click ‘Start-Saving’ to save the data. (See Image 8)
Final Thoughts
The useful methods mentioned above can solve the fatal system error. This blog sheds light on both quick as well as detailed fixes of the error. Unfortunately, this error often leads to loss of data as the computer program shuts down suddenly. A data recovery software like Stellar Data Recovery Professional for Windows can help you recover any lost/deleted data arising due to the error.
Was this article helpful?
YES0
NO
Вопрос по поводу Video_dxgkrnl_fatal_error
“Я получаю сообщение BSOD из-за вышеуказанного на моем Dell XPS 15 9560.
Это модель с жестким диском емкостью 1 ТБ и i5. Теперь я не знаю что
делать. Были ли у кого-нибудь подобные проблемы, если да, то как вы их
решили? Я купил его отремонтированный в скупке, если я не смогу справится
с этой проблемой к пятнице, то я верну его обратно в скупку.”
Я думаю, что вы огорчены тем, что столкнулись с фатальной ошибкой video
dxgkrnl в вашей системе Windows 11 или 10? Вы к счастью не первый кто
столкнулся с этой проблемой. Многие пользователи сталкивались с этим. Эта
ошибка может серьезно повлиять на работу компьютера. Не паникуйте! В этом
подробном руководстве мы рассмотрим эту ошибку и предложим вам несколько
способов ее эффективного устранения. Мы рассмотрим различные методы, начиная
с самых простых и переходя к более продвинутым решениям. Независимо от того,
являетесь ли вы технически подкованным пользователем или новичком, это
руководство проведет вас по необходимым шагам, которые помогут вам
справиться с фатальной ошибкой Windows 11 или 10 в видео dxgkrnl.
Часть 1: Что такое фатальная ошибка видео Dxgkrnl?
Фатальная ошибка video dxgkrnl — это ошибка синего экрана в системах Windows
11 и 10. Обычно она связана с задачами, требующими большой работы с
графикой, такими как игры или мультимедийные приложения. Когда возникает эта
ошибка, она приводит к сбою в работе вашей системы и отображению синего
экрана управления памятью с сообщением об ошибке.
Причины:
Распространенными причинами фатальной ошибки video dxgkrnl являются
устаревшие или несовместимые графические драйверы, поврежденные системные
файлы, конфликты между аппаратными компонентами, неисправные видеокарты
или проблемы с DirectX, который представляет собой набор API-интерфейсов,
используемых для обработки мультимедийных задач в Windows.
Бонусный совет: Как восстановить потерянные данные после исправления
фатальной ошибки Video Dxgkrnl?
Важно отметить если вы исправите фатальную ошибку video dxgkrnl, внеся
изменения в свою систему, например, обновив или сбросив Windows, это может
привести к перезаписи или удалению некоторых ваших данных.
Чтобы восстановить все потерянные данные, вызванные исправлением фатальной
ошибки video dxgkrnl, мы рекомендуем использовать
4DDiG Windows Data Recovery
, надежный и удобный инструмент для восстановления данных, который
предназначен для восстановления различных типов потерянных данных, включая
документы, фотографии, видео и многое другое.
-
Восстановите данные, потерянные с жесткого диска, SSD-накопителя,
USB-накопителя или карты памяти. -
Оптимизирован для восстановления различных видеоформатов, таких как MP4,
MOV, AVI и т.д -
В 4DDiG используется режим восстановления только для чтения,
гарантирующий, что ваши исходные данные останутся нетронутыми в процессе
восстановления. - Позволяет пользователям выборочно восстанавливать файлы.
Вот пошаговое руководство о том, как использовать 4DDiG Windows Data
Recovery для восстановления потерянных данных:
-
Загрузите и установите на свой компьютер средство восстановления данных
Windows 4DDiG и запустите его. В главном интерфейсе перейдите на вкладку
«Восстановление данных», выберите диск, на котором вы потеряли файл, и
нажмите кнопку «Сканировать». -
Теперь система просканирует все файлы на выбранном локальном диске,
включая существующие и удаленные файлы. Вы можете просмотреть файлы в
виде дерева и на вкладке «Просмотр файлов» и как только вы найдете
нужный потерянный файл, вы можете остановить процесс сканирования. -
Как только вы найдете потерянный файл, остановите процесс, выберите
нужный вам файл и нажмите кнопку Восстановить в правом нижнем углу. И не
забудьте сохранить восстановленные данные в надежном для вас месте:
локальном или облачном.
Часть 3: Как исправить фатальную ошибку Video Dxgkrnl в Windows 11/10?
Итак, теперь вы поняли, что такое video_dxgkrnl_fatal_error, пришло время
обсудить, как самостоятельно устранить video_dxgkrnl_fatal_error. Итак, вот
6 различных способов как можно исправить фатальную ошибку stop code video
dxgkrnl в Windows 10 или 11.
Способ 1. Запустите средство устранения неполадок оборудования
Первый и самый простой способ устранения ошибки video_dxgkrnl_fatal_ror в
Windows 11 — это использовать средство устранения аппаратных неполадок
Windows. Средство устранения аппаратных неполадок — это встроенный в Windows
инструмент, который помогает выявлять и устранять проблемы, связанные с
оборудованием. Запустив это средство устранения неполадок, мы можем
проверить, не являются ли какие-либо аппаратные компоненты причиной
конфликтов, приводящих к фатальной ошибке video dxgkrnl.
Вот шаги, которые нужно выполнить:
-
Нажмите клавишу Windows + I, чтобы открыть меню настроек.
-
Нажмите на «Обновление и безопасность» и перейдите на вкладку
«Устранение неполадок». -
Выберите «Оборудование и устройства» и нажмите «Запустить средство
устранения неполадок». -
Следуйте инструкциям на экране и позвольте средству устранения неполадок
проверить наличие проблем с оборудованием. -
Если будут обнаружены проблемы, следуйте рекомендуемым инструкциям для
их устранения.
Способ 2. Обновите или переустановите графический драйвер
Устаревшие или несовместимые графические драйверы являются частой причиной
фатальной ошибки video dxgkrnl. Поэтому часто эту проблему можно устранить
путем обновления или переустановки графического драйвера.
Вот способ как вы можете обновить драйвер на своем компьютере.
-
Нажмите клавишу Windows + X и выберите «Диспетчер устройств».
-
Раскройте категорию «Видеоадаптеры».
-
Щелкните правой кнопкой мыши на вашей видеокарте и выберите «Обновить
драйвер». -
Выберите опцию автоматического поиска обновленного программного
обеспечения драйвера. -
Следуйте инструкциям на экране, чтобы установить последнюю версию
драйвера.
Если вам это не помогло, попробуйте переустановить драйвер, выполнив
следующие действия.
-
Нажмите клавишу Windows + X и выберите «Диспетчер устройств».
-
Раскройте категорию » Видеоадаптеры «.
-
Щелкните правой кнопкой мыши на вашей видеокарте и выберите «Удалить
устройство». -
Подтвердите удаление и перезагрузите компьютер.
-
После перезагрузки Windows автоматически переустановит драйвер.
Способ 3. Запустите проверку SFC
Поврежденные системные файлы также могут привести к фатальной ошибке video
dxgkrnl в Windows 11. Программа проверки системных файлов (SFC) проверяет и
восстанавливает поврежденные системные файлы, что может помочь и устранить
фатальную ошибку video dxgkrnl.
Давайте разберем как вы можете запустить проверку SFC в вашей системе.
-
Нажмите клавишу Windows + X и выберите «Выполнить».
-
Введите команду «sfc /scannow» и нажмите клавишу Enter.
-
Дождитесь завершения сканирования. Это процесс может занять некоторое
время. -
После завершения сканирования перезагрузите компьютер.
Способ 4. Запустите DISM
Иногда проверка SFC не устраняет проблему, вызванную повреждением системных
файлов. В этом случае средство обслуживания и управления образами
развертывания (DISM) используется для восстановления системных образов
Windows и устранения проблем, которые не могут быть устранены при проверке
SFC.
Чтобы устранить фатальную ошибку stop code video dxgkrnl, вы можете
запустить DISM, выполнив действия, приведенные ниже.
-
Нажмите клавишу Windows + X и выберите «Выполнить».
-
Введите команду «DISM /online /cleanup-image /restorehealth» и нажмите
Enter. -
Дайте процессу завершиться. На это может уйти какое-то время.
-
Как только процесс завершится, перезагрузите компьютер.
Способ 5. Обновите Windows
Как вы наверное знаете, поддержание вашей системы Windows в актуальном
состоянии имеет важное значение для устранения различных ошибок, включая
фатальную ошибку video dxgkrnl.
Поэтому, если вы часто сталкиваетесь с этой проблемой, попробуйте обновить
Windows, выполнив действия, приведенные ниже.
Для Windows 10:
-
Нажмите клавишу Windows + I, чтобы открыть меню настроек.
-
Нажмите на «Обновление и безопасность» и выберите «Центр обновления
Windows». -
Нажмите «Проверить наличие обновлений» и дайте Windows выполнить поиск
доступных обновлений. -
Если обновления найдены, нажмите на кнопку «Загрузить и установить».
Для Windows 11:
-
Нажмите клавишу Windows + I, чтобы открыть меню настроек.
-
Нажмите на «Центр обновления Windows» и выберите «Проверить наличие
обновлений». -
Если обновления доступны, нажмите на кнопку «Загрузить и установить».
Способ 6. Сброс настроек Windows
Если ничего не помогает, сброс настроек Windows может помочь устранить
постоянные проблемы, в том числе фатальную ошибку video dxgkrnl.
Обратите внимание, что на этом этапе будут удалены все установленные
приложения и настройки, поэтому важно заранее создать резервную копию
важных файлов.
Давайте разберем как вы можете сбросить настройки Windows 10 или 11.
Для Windows 10:
-
Нажмите клавишу Windows + I, чтобы открыть меню настроек.
-
Нажмите на «Обновление и безопасность» и выберите «Восстановление».
-
В разделе «Вернуть компьютер в исходное состояние» нажмите на кнопку
«Начать». -
Выберите, хотите ли вы сохранить свои файлы или удалить все, и следуйте
инструкциям на экране, для того чтобы завершить сброс настроек.
Для Windows 11:
-
Нажмите клавишу Windows + I, чтобы открыть меню настроек.
-
Нажмите на «Система» и выберите «Восстановление».
-
В разделе «Перезагрузка этого компьютера» нажмите «Подтвердить».
-
Выберите, хотите ли вы сохранить свои файлы или удалить все, и следуйте
инструкциям на экране, для того чтобы завершить сброс настроек.
Заключение
Итак, теперь вы знаете, как устранить ошибку video_dxgkrnl_fatal_error на
вашем компьютере с Windows 11 и 10. Помните, что обнаружение фатальной
ошибки video dxgkrnl может вызвать проблемы, но с помощью методов, описанных
в этом руководстве, вы сможете быстро устранить ее. Если при устранении этой
ошибки вы потеряли какой-либо важный файл, вы можете воспользоваться
средством восстановления данных Windows 4DDiG для его восстановления.
Александр Кокин (старший редактор)
Александр Кокин, главный редактор 4DDiG, занимается предоставлением наилучших решений для проблем, связанных с Windows и Mac, включая восстановление данных, ремонт, исправление ошибок.
Один и тот же BSOD может быть вызван разными причинами, поэтому более или менее корректно установить источник неполадки можно разве что проанализировав файл дампа. Правда, подсказка даётся уже в названии ошибки, что сразу позволяет сузить круг поиска. Ошибка, которую мы сегодня рассмотрим, имеет название PNP DETECTED FATAL ERROR, отсылающее нас к Диспетчеру PNP — компоненту операционной системы, обеспечивающему взаимодействие с системными модулями, драйверами и приложениями, необходимое для подключения и работы устройств. Сама PnP же — это технология, которая позволяет автоматизировать в системе идентификацию и конфигурирование разных устройств.
Простейшим примером работы PnP может послужить автоматическое монтирование в Проводнике подключаемых по USB накопителей, эта же технология используется для идентификации устройств периферии — USB-мышек, клавиатур и так далее. Вам не нужно отдельно устанавливать для этих устройств драйвера, так как Windows сама их определяет, сама ставит их драйвера, сама их настраивает. Если драйвер подключённого PNP-устройства по какой-то причине оказывается повреждённым, удалённым или просто несовместимым, происходит системный сбой, результатом которого становится синий экран смерти PNP DETECTED FATAL ERROR. Были, однако, отмечены случаи, когда ошибка возникала вследствие неполадок в работе жёсткого диска.
Если ошибка появилась вскоре после подключения к компьютеру любого нового устройства с поддержкой технологии PnP, отключите его. Если мера кажется вам слишком радикальной, можно попробовать удалить его из Диспетчера устройств, а затем перезагрузить компьютер, чтобы устройство смогло установиться повторно с драйверами по умолчанию.
Аналогичным образом поступаем, если ошибка стала появляться после установки какого-нибудь программного обеспечения, работающего в фоновом режиме. Поскольку чаще всего источником подобных проблем становятся антивирусы, попробуйте отключить используемый на компьютере антивирус и понаблюдайте за системой. Если BSOD с указанной ошибкой перестал появляться, значит всё дело в антивирусе. Замените его.
Поскольку ошибка PNP DETECTED FATAL ERROR может быть связана с неполадками в работе диска, проверьте последний встроенной утилитой chkdsk. Если есть такая возможность, снимите диск, подключите его к другому ПК, откройте на нём командную строку и выполните команду chkdsk X:, где X — буква диска. В случае обнаружения ошибок повторите команду с параметрами /f и /r. Если возможность подключения диска отсутствует, проверяем его «на месте» указывая буквы логических разделов. Заодно стоит проверить целостность системных файлов, для чего в той же командной строке необходимо выполнить команду sfc /scannow.
Мы не рекомендуем обновлять драйвера ради самого обновления, но это такой случай, когда обновиться всё же стоит. Ручное обновление драйверов — процесс долгий и утомительный, поэтому лучше всего воспользоваться какой-нибудь программой для обновления драйверов, например, Snappy Driver Installer. И наоборот, если ошибка стала появляться после установки новых версий драйверов, откатываемся к предыдущим версиям.
Некоторые пользователи сообщают, что им удалось устранить проблему отключением кэширования содержимого БИОС в кэш-память. Такое вполне возможно, если эта опция включена, чего по идее быть не должно, так как в современных версиях операционных систем она не используется. Зайдите в вашем BIOS в раздел дополнительных настроек (Advanced), найдите опцию System BIOS Cacheable (она может называться также System ROM Cacheable) и установите для неё значение Disabled.

Если на компьютере включена защита дисков и имеются точки восстановления, выполните откат к предыдущей точке (для вызова мастера выполняем команду rstrui в окошке Win + R). Наконец, вы можете пойти на радикальные меры и сбросить Windows к изначальному состоянию. Для этого переходим в приложении Параметры в раздел Обновление и безопасность → Восстановление, жмём «Начать» и следуем указаниям мастера. Сброс приведёт к обнулению системных настроек и удалению всех установленных на компьютере сторонних программ, зато с немалой долей вероятности положит конец появлению BSOD с ошибкой PNP Detected Fatal Error.