
You are here:
Home » Windows 10 » How To Install Windows Fax And Scan In Windows 10
Windows 10 ships with several apps. One of them is Scan. The Scan app was introduced to replace the classic Windows Fax and Scan program, as it has not seen updates for a long time. Additionally, the Fax function is no longer required.
The new inbox Scan app is pretty good. It offers all the features available in Windows Fax and Scan. However, the Scan app, at times, fails to detect the scanner or throws errors during a scan. Because of this, many users prefer using the old Windows Fax and Scan program.
While Windows Fax and Scan is very much part of Windows 10, many users have noticed that Windows Fax and Scan is missing from their Windows 10 installations. If the Windows Fax and Scan app is missing from your Windows 10 PC and you would like to use it instead of the Scan app, luckily, you can install it again with a few clicks.
Here is how to install Windows Fax and Scan in Windows 10.
Step 1: Launch the Windows 10 Settings app using search or Windows logo + I hotkey. On the Settings app home page, click System and then click Optional features located in the left pane.
Step 3: Next, click the Add a feature button.

Step 4: On the resulting dialog box, scroll down the list to see Windows Fax and Scan. Select the Windows Fax and Scan entry and then click the Install button to begin installing the Windows Fax and Scan program.

NOTE: If the Windows Fax and Scan is missing from the list, it’s likely because the program has already been installed on your Windows 10 computer. Please use the Start/taskbar search again to find the program.
The installation process might take a few minutes. The Settings app shows the installation progress. Once installed, if asked, please restart your Windows 10 PC once. That’s it!

If you are using Windows Fax and Scan, you might like to read our guide on how to save scanned documents in PDF.
Faxing technology has evolved so much that nowadays, even desktop computers and laptops can function as fax machines. You need only install an app or software on your device to send and receive faxes.
If you’re looking for the best fax software for Windows 10, you’re in luck. There are lots of free desktop apps or fax software that you can download online. Just sign up for an online fax service with multiplatform support.
Table of Contents
What Is the Best Windows 10 Fax Software?
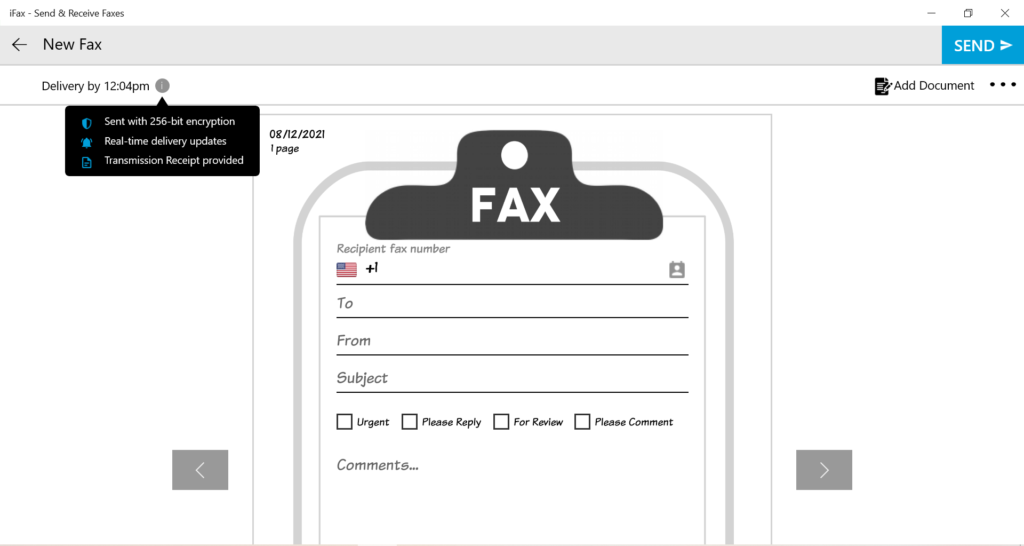
If you want the best Windows 10 faxing software, use iFax. This fax service is free to download and install from the Microsoft Store. To use it, you need to create an iFax account and sign up for a full plan or a free trial.
With the iFax software for Windows, you can turn your computer or laptop into a portable fax machine. There’s no need to connect with a phone line or modem. As long as you have a stable internet connection, you can send and receive faxes on your computer.
iFax uses enterprise-grade fax technology to provide a secure and unparalleled online faxing experience. It’s also one of the first HIPAA-compliant fax software on the market. It offers a user-friendly interface and seamless syncing across all supported platforms.
Why is iFax the best fax software for Windows 10 computers? Here are some of the reasons:
- Compatible with other platforms such as iOS, Android, and Mac OS
- Ideal for the medical industry due to HIPAA and GLBA compliance
- 256-bit end-to-end encryption for secure online fax transmissions
- Real-time updates via email for incoming faxes
Best of all, iFax is the perfect Windows 10 fax software because it offers a free 7-day trial. This allows you to test the different fax features without paying for a monthly subscription. It’s also compatible with all versions of Windows, from Vista to Windows 11.
Read Further: How to Fax from Windows 11
Does Windows Have a Fax Program?
Yes, the Windows operating system has built-in fax software. When you purchase a Windows PC, it comes with fax software called Fax and Scan. This app allows you to use computers to transmit and receive faxed documents without a fax machine.
This app is available on Windows versions. Just search “fax and scan” using Windows Search. Another way to access this app is by opening the Start menu. Scroll through the programs list and open the folder called Windows Accessories.
However, getting this app to work requires advanced Windows setup knowledge. It is also important to note that the Windows fax software requires an analog phone line. If you need an online fax solution, iFax is a better alternative.
Discover how Windows Fax and Scan works in this blog.
What Features Should You Look for in Windows 10 Fax Software?
When choosing fax software for Windows 10, it’s essential to look for features that ensure reliability, ease of use, and compliance with modern business needs. Here are some key features to consider:
- Compatible with Windows 10
- Support common document formats like PDF, DOCX, and TIFF
- Offers encryption and compliance with industry standards such as HIPAA and GDPR
- Offer cloud-based faxing, which allows sending and receiving faxes over the Internet without needing a physical fax machine or phone line.
- Has a mobile app or web-based access if you need to fax on the go
- Send and receive faxes via email for enhanced convenience
- Other business features like electronic signing, integration with business applications, and bulk faxing

How Do You Set Up Windows Fax Software
Setting up a Windows fax software using iFax doesn’t require advanced technical knowledge. If you follow the steps below, you’ll be able to do it in a matter of minutes.
- Download the app. The free fax app for Windows 10 can be downloaded from the Microsoft Store. You need to sign in to your Microsoft account to download and install the fax software.
- Launch the app. Once installed, launch iFax. Make sure to add it to your Windows Start menu for easy access.
- Create or sign in to your iFax account. Upon launch, iFax will ask you to sign in or register for an account. Go to iFax to create an account. For existing iFax users, go to Settings and select Login. When prompted, enter your email and password.
- Configure iFax for Windows. Once logged in, you can configure your iFax software for Windows using the options available in the left panel.
- Add a fax number. To receive faxed documents, you must create a fax number or port an existing one. A premium iFax plan, ideal for small business use, already has a fax number.
- Send faxes online. To send documents, click the New Fax button and compose your message.
That’s it. If you already use iFax online, it will automatically sync with your Windows PC. Just make sure that you have a stable internet connection while using it.
Why Is iFax the Best Fax Software for Windows 10
iFax is the ultimate fax solution for Windows 10, offering a seamless, secure, and hassle-free way to send and receive faxes online. Unlike traditional fax machines or built-in Windows fax software, iFax eliminates the need for a phone line, allowing you to fax from anywhere with just an internet connection.
With enterprise-grade security, including 256-bit encryption and HIPAA compliance, iFax ensures your documents remain private and protected. It’s also fully compatible with Windows 10 and syncs effortlessly across multiple devices, including smartphones and tablets.
Best of all, getting started is easy. Simply download iFax from the Microsoft Store and enjoy a free 7-day trial—no commitment required. Sign up for a trial and experience modern faxing with iFax today.
Cloud-Based Secure Faxing That Businesses Trust
Learn how iFax’s revolutionary faxing technology is helping businesses boost productivity by streamlining workflows.
Windows Fax and Scan is a useful built-in tool in Windows 10 that allows you to send and receive faxes, as well as scan documents and images directly from your computer. It eliminates the need for a separate fax machine and streamlines your document management process. In this tutorial, we will guide you through the step-by-step process of setting up Windows Fax and Scan in Windows 10.
Step 1: Open the Windows Fax and Scan application. You can do this by typing «Fax and Scan» in the Windows search bar and selecting the corresponding result.
Step 2: Click on the «Tools» menu at the top of the application window and select «Fax Accounts.«
Step 3: In the «Fax Accounts» window, click on the «Add» button.
Step 4: Follow the on-screen instructions to set up a new fax account. You will need to provide your fax number and configure the settings for receiving and sending faxes.
Step 5: Once your fax account is set up, click on the «New Fax» button in the application window to create a new fax.
Step 6: In the new fax window, enter the recipient’s fax number and add any attachments or cover pages as needed.
Step 7: Click on the «Send» button to send your fax. Windows Fax and Scan will handle the rest, including dialing the recipient’s fax number and transmitting the fax.
| Pros | Cons |
|---|---|
| 1. Eliminates the need for a physical fax machine. | 1. Requires a fax modem or an Internet faxing service. |
| 2. Allows easy management of received and sent faxes. | 2. May require additional configuration for proper operation. |
| 3. Integrates seamlessly with the Windows 10 operating system. | 3. Limited customization options compared to dedicated fax software. |
Setting up Windows Fax and Scan in Windows 10 can be a convenient and efficient way to manage your faxing needs directly from your computer. By following the steps outlined in this tutorial, you can easily configure Windows Fax and Scan and start sending and receiving faxes hassle-free.
Video Tutorial:Why won t Windows Fax and Scan work?
How do I enable Windows Fax and Scan in Windows 10?
To enable Windows Fax and Scan in Windows 10, you can follow these steps:
1. First, click on the Start Menu or press the Windows key on your keyboard to open the Start menu.
2. In the search bar, type «Windows Fax and Scan» and select the app from the search results.
3. If you don’t see the app in the search results, it may not be installed on your system. In that case, you can install it by following these steps:
a. Open the Control Panel by typing «Control Panel» in the search bar and selecting it from the results.
b. In the Control Panel, click on «Programs» and then select «Turn Windows features on or off» under the «Programs and Features» section.
c. In the Windows Features dialog box, scroll down and locate «Print and Document Services.» Expand the option by clicking on the «+» sign next to it.
d. Check the box next to «Windows Fax and Scan» and then click «OK.«
e. Windows will install the necessary components, and once the process is complete, you can access Windows Fax and Scan from the Start menu as mentioned in step 2.
4. After opening the Windows Fax and Scan app, you can set up your fax settings and configure a fax connection if necessary. The app provides options for receiving, sending, and managing faxes, as well as accessing scanned documents.
By following these steps, you will be able to enable and use the Windows Fax and Scan feature on your Windows 10 system.
How do I set up a Windows Fax and Scan printer?
Setting up a Windows Fax and Scan printer is a straightforward process. Here’s how you can do it:
1. Ensure you have a compatible fax modem or a multifunction printer with fax capabilities connected to your computer.
2. Go to the Start menu and search for «Windows Fax and Scan.» Click on the corresponding result to open the application.
3. In the Windows Fax and Scan window, click on «New Fax» in the toolbar. This will launch the Fax Setup wizard.
4. The wizard will guide you through the setup process. Firstly, you’ll need to choose whether to connect to a fax modem or a fax server over the network. Select the appropriate option and follow the on-screen instructions.
5. If you’ve chosen to connect to a fax modem, you’ll need to specify the fax device and configure the settings, such as the incoming/outgoing fax routes and telephone dialing rules. Again, carefully follow the prompts to complete this step.
6. Once the setup is complete, you can start using the Windows Fax and Scan printer. You can send faxes either by creating a new fax or by printing a document directly to the fax printer.
7. To send a new fax, click «New Fax» in the toolbar. Fill in the recipient’s fax number, attach any necessary documents, and compose your message. Then click on the Send button to transmit the fax.
8. Additionally, you can send a fax from other applications by selecting the Print option and then choosing the Windows Fax and Scan printer from the list of available printers.
9. To receive faxes, ensure your computer is turned on and connected to the fax modem or fax server. Incoming faxes will be routed to the Windows Fax and Scan application automatically, and you can view, save, or print them from there.
Setting up a Windows Fax and Scan printer allows you to send and receive faxes directly from your computer, providing a convenient and paperless solution for your faxing needs.
Is Windows 10 fax free?
Windows 10 does not include a built-in faxing feature. However, there are third-party software options available that allow users to send and receive faxes on a Windows 10 computer.
Here’s how you can send and receive faxes on Windows 10 using third-party software:
1. Research and choose a reliable third-party fax software: Look for reputable fax software providers that are compatible with Windows 10. Read reviews and compare features to find the one that best suits your needs.
2. Install the fax software: Download and install the chosen fax software on your Windows 10 computer. Follow the installation instructions provided by the software provider.
3. Set up your fax account: Launch the fax software and set up your fax account credentials. This typically involves providing your fax number and configuring the necessary settings.
4. Send a fax: To send a fax, open the fax software and create a new fax message. Enter the recipient’s fax number and attach any necessary documents. Follow the software’s instructions to send the fax.
5. Receive a fax: When a fax is sent to your fax number, the third-party software will receive it and store it on your computer. You can access the received faxes through the software’s interface.
Remember, using third-party software may incur costs associated with fax services. Be sure to review the pricing plans and any applicable fees before selecting a fax software provider.
Yes, Windows 10 does have the Windows Fax and Scan feature. This feature allows users to send and receive faxes using a fax modem or an installed fax device. Here are the steps to locate and use the Windows Fax and Scan feature on Windows 10:
1. Click on the Start menu and type «Windows Fax and Scan» in the search bar.
2. Click on the Windows Fax and Scan app that appears in the search results. The app will open.
3. To send a fax, click on the «New Fax» button in the toolbar. Follow the prompts to compose and send your fax.
4. To receive a fax, make sure your fax device or fax modem is properly connected to your computer. Incoming faxes will be automatically detected and displayed in the Windows Fax and Scan app.
It’s worth mentioning that the availability of the Windows Fax and Scan feature may depend on the edition of Windows 10 you are using. Some versions, such as Windows 10 Home, might not have this feature included by default. In such cases, you can explore the possibility of installing third-party fax software as an alternative.
Note: The information provided regarding Windows 10 and its features is based on the assumption that this is the information available up until 2023 and the features related to Windows Fax and Scan are accurate as of that time.
Why is Windows Fax and Scan not on my computer?
Windows Fax and Scan is a built-in feature in the Windows operating system that allows users to send and receive faxes directly from their computer. However, there could be several reasons why it is not available on your computer. Here are some possible explanations:
1. Windows Edition: The availability of Windows Fax and Scan can vary depending on the edition of Windows that you are using. This feature is typically included in the professional and enterprise editions of Windows but may not be available in the home or basic editions. Check your Windows edition to determine if it includes this feature.
2. Windows Components: It is possible that Windows Fax and Scan has not been installed or enabled on your computer. In some cases, certain Windows components or features are not automatically installed during the operating system installation process. You can manually check if Windows Fax and Scan is installed by following these steps:
– Go to the Control Panel.
– Select «Programs» or «Programs and Features.«
– Click on «Turn Windows features on or off» option.
– Look for «Windows Fax and Scan» in the list of features. If it is not checked, select it and click «OK» to install it.
3. Missing Driver or Hardware Support: Windows Fax and Scan requires a compatible fax modem or an all-in-one printer with fax capabilities to function properly. If your computer does not have the necessary hardware or if the drivers for the hardware are not installed correctly, Windows Fax and Scan may not appear. Ensure that you have the appropriate hardware and that the required drivers are installed.
4. Regional and Language Settings: The availability of Windows Fax and Scan can also vary depending on your region and language settings. It is possible that the feature is limited or not supported in your specific language or region. Check the regional and language settings in your computer’s control panel to verify if there are any limitations.
In conclusion, the absence of Windows Fax and Scan on your computer could be due to various reasons, including the Windows edition, installation status, missing drivers or hardware support, and regional and language settings. Checking these factors will help you determine why the feature is not present and take necessary steps to resolve the issue.
- Author
- Recent Posts
I started writing code around 20 years ago, and throughout the years, I have gained a lot of expertise from hands-on experience as well as learning from others. This website has also grown with me and is now something that I am proud of.
Gone are the days when fax machines were the size of microwaves, humming in the corner of the office. We’ve arrived in the digital age, and with Windows 10, faxing documents is like a walk in the park.
Who needs a bulky machine when you’ve got a sleek computer? With just a few clicks, we can send and receive faxes without breaking a sweat—provided, of course, we know the ropes.

Now, we’ve all faced the contradiction of a so-called “paperless world” that still asks us for faxes. But fear not! Our trusty Windows 10 comes equipped with its own Fax and Scan application.
It all boils down to setting things up, a task easier done than said. You can hook up a fax modem to your PC or even fax through the internet without additional hardware.
And let’s be honest, finding a fax machine nowadays feels like a scavenger hunt; we can definitely do without that wild goose chase.
Sure, you might think faxing is as outdated as floppy disks, but it remains steadfast in certain circles. The good news is, we’re here to guide you through the process so you can tick ‘faxing’ off your to-do list with aplomb.
The key is to have the right tools and a dash of patience – faxing from your Windows 10 machine can be your party trick at the next office gathering. Yes, it’s almost that easy to impress these days.
So, let’s roll up our sleeves and get to business; no paper jams included.
JUMP TO TOPIC
- Understanding Faxing from a Computer in Windows 10
- Setting Up Your Computer to Send and Receive Faxes
- Installing Fax Software or Applications
- Using Windows Fax and Scan
- Configuring Online Fax Services
- Sending a Fax from Windows 10
- Sending a Fax via Email
- Faxing through an Online Fax Service
- Using a Connected Fax Machine
- Advanced Fax Options and Troubleshooting
- Customizing Cover Pages
- Managing Large File Sharing and Cloud Storage
- FAQs and Common Issues
Understanding Faxing from a Computer in Windows 10
Faxing from Windows 10 may sound like a throwback to the golden days before email, but we’d be surprised how often it still comes in handy.
Within Windows 10, there’s a built-in Windows Fax and Scan utility that has kept the fax flame burning.
To send a fax from your computer using this handy tool, you’ll need a fax modem or a connection to an online fax service.
And remember, an internet connection is needed for online fax services but not necessarily for direct faxing through a phone line.
Here’s a quick rundown on both options:
| Using Windows Fax and Scan | Using Online Fax Services |
| – Set up through “Windows Fax and Scan”. – Requires a fax modem or an integrated fax server. |
– Choose a third-party fax service. – Requires internet connection. |
| – No need for internet once configured. | – Can send and receive faxes anywhere. |
When using Windows Fax and Scan, we start by setting up fax accounts.
The process is straightforward: click the “Start” button, type “Fax” in the search box, then select “Windows Fax and Scan”. From there we can configure our fax settings and get to sending.
Online fax services, on the other hand, give us mobility: fax from any internet connection, anywhere.
These services do require us to sign up for an account, and typically they aren’t free, but they bend over backwards to make faxing as convenient as email.
Sending a fax online is pretty much like drafting an email.
After creating an account with your chosen service, all it usually takes is entering the recipient’s fax number and attaching the documents we want to send off.
It’s a pretty sweet deal if we don’t have a landline or a fax machine.
Voilà! Whether we’re vintage enthusiasts rocking the modem or tech-savvy individuals cruising the internet highways, Windows 10 has kept the fax alive for us.
Who said old dogs can’t learn new tricks?
Setting Up Your Computer to Send and Receive Faxes

In the age of emails and instant messaging, some might say the fax machine seems like a relic. But don’t be fooled! Being able to send and receive faxes from your Windows 10 computer is still a superpower in the business world.
Installing Fax Software or Applications
First things first, if your PC doesn’t have an internal fax modem, and let’s face it, most don’t these days, you’ll need to either add one (calling all tech enthusiasts for a bit of hardware fun!) or opt for a software solution.
There are tons of applications out there ready to transform your computer into a fax-sending dynamo, no phone line needed!
Tip: When picking software, look for one that tickles your fancy in terms of ease of use and features like the ability to send unlimited efaxes!
Using Windows Fax and Scan
Good news for those who like built-in tools: Windows Fax and Scan is your go-to buddy for faxing.
Dive straight into the action by hitting the Start menu and searching for Windows Fax and Scan. Once opened, you can add your fax modem or configure your computer to send faxes using your connected multifunction printer.
Remember: To send a fax, just click ‘New Fax,’ pop in the recipient’s number, and hit Send. To receive faxes, make sure your computer is on and the software is running.
Configuring Online Fax Services
For those who prefer a modern twist, online fax services are like the cool kids in the faxing playground.
| Start | Configure | Fax Away! |
| Choose an online fax service. | Sign up and choose a fax number. | Send and receive faxes via email or app. |
Need to send a quick fax? No problem – just upload a document, enter the fax number, and click send.
Receiving faxes? They’ll waltz right into your inbox!
With these services, you can fax from your desktop, mobile, or tablet – talk about portable power!
In today’s digital age, it’s like a magic trick to send a document across the globe in minutes right from your Windows 10 computer. We’ve got several methods up our sleeve, from using email, online fax services, to the good old fax machine.
Sending a Fax via Email
Did you know you can fax with just a few clicks from your email? It’s a neat party trick.
First, you need an online fax account linked to your email address. Then, just compose an email, where the recipient’s fax number is entered followed by the fax service’s domain.
Hit the send button, and voila, your document is on its way faster than you can say “You’ve got mail!”
Faxing through an Online Fax Service
Faxing online is like sending an email but to a fax machine – a bridge between the old and the new.
We suggest you sign up for an online fax service. Here’s how it works:
- Log in to your fax account via a web browser.
- Create a new fax, inputting the recipient’s fax number.
- Attach documents you wish to fax.
- Add a cover page if needed – it’s like wrapping a gift.
- Finally, hit that Send button, and off it goes into the fax-ether!
Using a Connected Fax Machine
If you prefer a bit of nostalgia with today’s tech, here’s the scoop on using a physical fax machine connected to your Windows 10 PC:
- Ensure your PC has a fax modem.
- Connect the modem to a phone line – just like plugging in your favorite lamp.
- Open Windows Fax and Scan, select “New Fax”, and follow the wizard to send a fax.
Advanced Fax Options and Troubleshooting
Faxing from a computer using Windows 10 comes with a few tricks up its sleeve that can make the process as smooth as silk.
Whether you’re jazzing up your cover pages or wrestling with large files, we’ve got the deets that’ll save you time and keep your fax game strong.
Customizing Cover Pages
Ever wanted to make that cover sheet pop? Well, you’re in luck!
Look no further than Windows Fax and Scan where you can either use a pre-existing template or create a new cover page that fits your business needs. Here’s the scoop:
Step-by-Step Guide:
- Open Windows Fax and Scan and select New Fax.
- Right above the To line, click Add Cover Page.
- Select a template or create a custom one using text, images, and logos.
Managing Large File Sharing and Cloud Storage
When you’re dealing with hefty files that make your email frown, it’s time to bring in the big guns: large file sharing and cloud storage.
PDF files, especially those containing high-resolution images or extensive data, can be troublesome to share via traditional fax.
Cue cloud storage services like Google Drive or the faxing services, MyFax and eFax, which allow you to fax directly from the cloud.
Sending a fax from a computer with a side of cloud storage sure sounds like a recipe for success. Keep your documents at your fingertips, ready to be faxed in a jiffy.
FAQs and Common Issues
We’ve all been there — halfway through sending a fax from a computer, and bam! Something goes awry.
Never fear, the FAQ section is here!
Common issues with faxing from a computer can often include connection problems or software hiccups.
Here’s a quick cheat sheet:
| Problem | Potential Solution | Resources |
| Windows Fax and Scan not working | Check your connection or reset the feature in Windows Settings. | Windows Troubleshooting Guide |
| Sending large files fails | Compress the file or use a cloud service. | PDF Viewer or Google Drive |
| Cannot find cover page options | Ensure you’re using the latest version of Fax and Scan. | Check for Windows Updates |
Remember, folks, when the going gets tough, the tough get faxing!
Keep this table handy, and you’ll troubleshoot like a pro.
Выберите вариант загрузки:
- скачать с сервера SoftPortal (установочный exe-файл)
VentaFax — программа для приема и передачи голосовых и факс-сообщений. Позволяет осуществлять прием и передачу черно-белых и цветных факсов. Имеет функции автоответчика, АОНа и записи разговора. Очень удобная в работе (полное описание…)

Рекомендуем популярное
ZOOM 6.4.2.62735
Мощный сервис для проведения видеоконференций. Имеется интегрированное HD-видео и аудио…
Viber 24.3.0.0
Viber — настольная версия популярного мессенджера, который позволяет бесплатно отправлять…
MicroSIP 3.21.5
Приложение для интернет-звонков и обмена сообщениями. Программа поддерживает различные…