
Ventoy — бесплатная программа с поддержкой русского языка, быстро набирающая популярность у пользователей и позволяющая легко создать мультизагрузочную флешку или внешний USB диск для UEFI и Legacy, MBR и GPT систем путем простого копирования загрузочных файлов ISO на накопитель с широким набором доступных настроек.
В этой инструкции подробно о том, как пользоваться Ventoy и дополнительных возможностях программы. Утилита доступна как для Windows, так и для Linux, далее будет рассматриваться только Windows-вариант инструмента. Обратите внимание: можно использовать Ventoy для Android для создания загрузочной флешки на телефоне. Также может быть полезным: Лучшие программы для создания загрузочной флешки.
Быстрое создание мультизагрузочной флешки в Ventoy с параметрами по умолчанию
Сначала о базовом использовании программы, а именно о том, как максимально быстро сделать USB-накопитель в Ventoy. Шаги для создания мультизагрузочной флешки с параметрами по умолчанию, возможностью загрузки в UEFI и Legacy режимах.
Процесс быстрого создания загрузочного накопителя
Необходимые шаги будут следующими:
- Скачайте архив с Ventoy последней версии с официальной страницы разработчика https://github.com/ventoy/Ventoy/releases и распакуйте его в удобное расположение.
- Из папки запустите файл Ventoy2Disk.exe (в случае предупреждения от SmartScreen нажмите «Подробнее», а затем — «Выполнить в любом случае»).
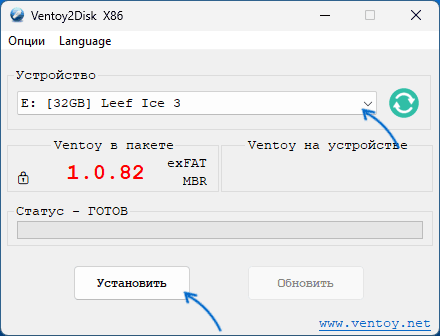
- При необходимости включите русский язык интерфейса в программе: выберите его в пункте Language главного меню.
- В окне программы выберите нужную флешку (внимание: по умолчанию все данные с неё будут удалены, но есть возможность работы и без удаления — об этом далее в статье) и нажмите кнопку «Установить» или «Install» для подготовки USB накопителя.

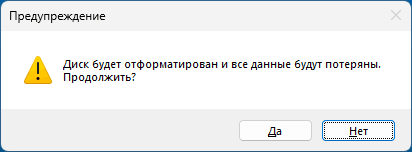
- Дважды подтвердите, что вы осознаете тот факт, что все данные с флешки будут удалены.

- После короткого промежутка времени вы получите сообщение о том, что Ventoy был успешно установлен на устройство. Нажмите Ок и закройте окно программы.
- В результате накопитель будет разделен на два раздела: один большой в файловой системе ExFAT и другой — FAT, с файлами для загрузки (в проводнике, возможно, будет отображаться только первый из них).
- Скопируйте любым способом необходимые загрузочные файлы ISO на первый раздел ExFAT (также поддерживаются WIM, VHD и IMG). При желании вы можете организовать их по папкам так, как это будет удобно вам, на работу загрузки это не повлияет (но не используйте пробелы и кириллицу в именах папок). Для переключения между видом по папкам (Tree View) и «все образы списком» (List View) можно использовать клавишу F3 в меню Ventoy.
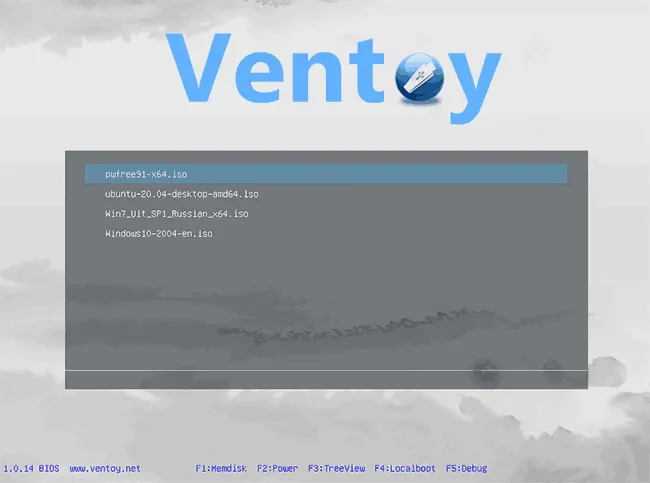
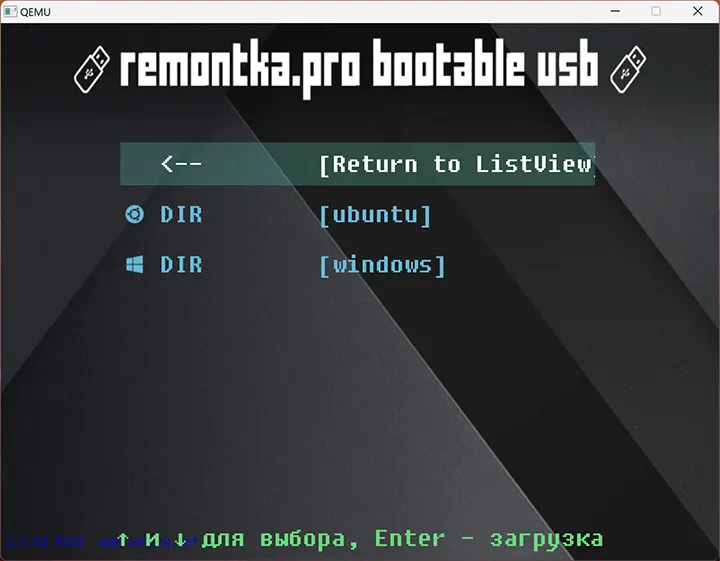
- Готово, вы можете поставить загрузку с флешки в БИОС или использовать Boot Menu для загрузки с нее как в Legacy, так и в UEFI режиме. Меню загрузки по умолчанию будет выглядеть примерно как на изображении ниже:

Для загрузки желательно отключить Secure Boot в UEFI (если опция включена). В программе есть возможность включить поддержку Secure Boot (в пункте «Опции» в главном меню, после чего нужно будет использовать кнопку «Обновить»), но использование функции потребует дополнительных действий, о которых в инструкции Secure Boot и загрузка с флешки Ventoy.
Базовые настройки перед записью Ventoy на флешку
Обычно базовые настройки, установленные в Ventoy по умолчанию, наилучшим образом подходят для большинства сценариев использования. Но вы можете изменить их, прежде чем нажимать кнопку «Установить», открыв меню «Опции».
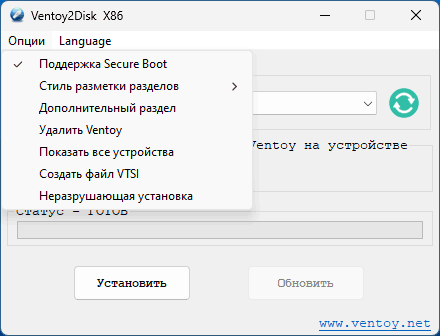
Здесь присутствуют следующие параметры:
- Поддержка Secure Boot — возможность загрузки без отключения Secure Boot, работает не для всех систем, включено по умолчанию.
- Стиль разметки разделов — можно выбрать GPT и MBR. Учитывайте: выбор MBR позволяет загружаться и в UEFI и в Legacy режиме. GPT — только в UEFI.
- Дополнительный раздел — выбор файловой системы дополнительного раздела: того раздела, на который вы копируете образы.
- Удалить Ventoy — удаляет Ventoy с выбранного накопителя.
- Показать все устройства — отображение не только съемных, но и локальных накопителей.
- Создать файл VTSi — создание файла VTSi с Ventoy для последующей записи на флешку с помощью Rufus в ситуации, когда средствами Ventoy2Disk это по какой-либо причине сделать не удалось.
- Неразрушающая установка — запись Ventoy на флешку без удаления уже имеющихся на ней файлов (раздел сжимается и записывается дополнительный раздел, необходимый для загрузки).
Конфигурация Ventoy: ventoy.json и VentoyPlugson
Ventoy поддерживает возможности гибкой настройки меню и некоторых других параметров с помощью файла конфигурации ventoy.json, который должен находиться в расположении
ventoy\ventoy.json
на разделе с загрузочными образами.
Этот файл можно создать и править вручную, но в последних версиях Ventoy появилась возможность установки параметров в графическом интерфейсе с помощью инструмента VentoyPlugson.exe, находящегося в архиве с программой, что куда удобнее:
- Запустите VentoyPlugson из папки с распакованным архивом Ventoy, укажите флешку, на которой уже установлен Ventoy и нажмите Start.
- Откроется веб-интерфейс конфигурации параметров — при изменениях, они автоматически будут записаны в файл конфигурации на накопителе.

Доступные параметры включают в себя:
- Настройки отображения меню (обычная или древовидная структура, разрешение, цвета и другое)
- Изменение отображаемого имени для ISO образов в меню (Menu Alias Plugin)
- Настройка темы оформления меню, поддерживаются темы GRUB (папку с темой размещаем в ventoy\themes). Указание тем выполняется в Theme plugin, а сами темы я рекомендую не создавать с нуля, а найти готовые для GRUB2 и отредактировать их.
- Добавление иконок к ISO файлам и папкам на флешке путем назначения классов для них. Иконки работают только при указании темы оформления в файле конфигурации и размещении иконок в ventoy\themes\имя_темы\icons (Menu Class Plugin).
- Настройка файлов автоматической установки unattended.xml
- Обход проверки системных требований при установке Windows 11 (пункт VTOY_WIN11_BYPASS_CHECK в Global Control Plugin).
- Настройка автоматической установки с помощью unattended.xml и других файлов конфигурации (Auto Install Plugin).
- Добавление собственных пунктов меню GRUB (Menu Extension Plugin), например, для запуска локальной ОС.
- Настройка постоянного хранилища для образов Linux, запускаемых в Live-режиме.
- Установка паролей для загрузки с флешки, использования образов (Password Plugin).
И многое другое. Доступные в файле конфигурации и в VentoyPlugson параметры описаны на официальном сайте https://www.ventoy.net/en/ в разделе «Ventoy Plugin»
Результат моих 10-минутных экспериментов с темой оформления в меню загрузочной флешки Ventoy:
Такие функции как обход требований Windows 11 при установке, настройку тем оформления и создание загрузочной флешки без удаления уже записанных на неё файлов я уже описал выше. Но Ventoy развивается и от версии к версии обрастает новыми функциями.
Загрузка локальных образов
Начиная с версии 1.0.66 появилась возможность загрузки образов, хранящихся на жестком диске или другом накопителе, а не на самой флешке Ventoy. Возможны два варианта использования:
- В меню Ventoy нажать клавишу F2 для выбора образа на любом из подключенных к компьютеру накопителей. Стало доступным с версии 1.0.67
- Использовать утилиту VentoyVlnk.exe из архива с Ventoy: запустите утилиту, нажмите кнопку «Create» и выберите образ на локальном диске. Утилита создаст файл имя_образа.vlnk.iso (или с другим расширением, зависит от выбранного образа) в том же расположении, откуда она была запущена. Уже этот файл располагаем на накопитель с Ventoy и он будет служить ссылкой для загрузки из нужного образа на локальном диске.
Ventoy LiveCD
На некоторых конфигурациях ПК с Windows Ventoy может не устанавливаться на накопитель. В этом случае можно использовать образ Ventoy LiveCD, доступный на той же официальной странице загрузки утилиты: достаточно записать его на флешку, например, с помощью Rufus, загрузиться с неё и использовать утилиту в среде Linux, запущенной в Live-режиме.
Подводя итог, Ventoy — очень достойное решение для создания мультизагрузочной флешки и не исключаю что для кого-то окажется наиболее подходящей программой для такого рода задач. Также рекомендую к ознакомлению другую похожую программу — AIO Boot.
Here’s the best format for a bootable USB drive:
NTFS usually transfers data faster and performs better with large volumes than FAT32 and exFAT for the most common operating systems such as Windows and Linux.
The FAT32 and exFAT file systems are the precursors of NTFS.
All three file systems, FAT32, exFAT, and NTFS were all created by Microsoft.
If you want to learn all about each format and which one is the best, the’re in the right place.
Let’s get started!
Which Format Is Better for a Bootable USB Drive: Fat32, NTFS, or ExFAT?
If you’re like most computer users, you probably take file systems for granted.
It’s common because the concept can be confusing and a little convoluted since you have so many options, and it’s challenging to keep track of them.
Of course, when you want to transfer files to a new device, knowing the basics can be a lifesaver.
If you want to keep your files readable, which format is better for a bootable USB drive:
- NTFS?
- Fat32?
- ExFAT?
Let’s jump right in:
What Is a Bootable USB Drive?
Bootable USB drives, also known as a live USB, is a flash drive or external hard disk drive that houses a complete operating system that you can boot up.
Technicians initially used live USBs to correct booting issues and some other malfunctions.
The live USBs served as an alternative to live CDs for repairs.
What Are the Benefits of Bootable USB Drives?
There are three primary reasons to use a bootable USB drive, including the lack of CD drives in many modern computers.
- You can change the data or add new information, so you can carry your operating system everywhere you go.
- Live USBs provide better security because you can keep it with you or store it safely to prevent others from accessing your information.
- You don’t need hard drives or optical media to use a bootable USB drive so that you can use it anywhere.
What Are the Bootable USB Drive Limitations?
Currently, there’s no perfect system, so bootable USB drives have some limitations to consider.
- Some systems become unusable once full.
- Unless a system originally had USB controller capability, it won’t work, even with an add-in card.
- Some systems have stringent settings that prevent or limit booting from USB devices.
- Using a flash drive in this capacity could reduce its life and render it unreadable earlier than expected.
Operating System vs. File System—What’s the Difference?
Your operating system is the software that manages your computer’s hardware, software resources, and computer programs. Essentially, it makes your computer run and do all the fun tasks you like to perform.
The file system is the method used to store and retrieve data. It’s basically an organizational system that helps your computer function.
File systems manage space and storage, store file names, include directories for organization, and maintain metadata.
The Most Common File Systems and How They Differ
Though you could find other file systems to use, your best bets are bootable USB NTFS, FAT32, or FATex.
FAT32
FAT32 emerged as an update from Microsoft in 1996 with the Windows 95 release.
The new file system included a larger memory footprint and used a 32-bit number system.
FAT stands for file allocation table.
Initially, the file system worked with floppy disks as an 8-Bit FAT, but the file system evolved to keep up with technological advancements.
Subsequent variations include FAT12 and FAT16, with the number representing the disk drive capacity.
Though FAT file systems began with Microsoft Windows computers, it’s no longer the default option.
FAT32 file systems have individual size limits of less than 4 GB and single volume limits of less than 8 TB, significantly smaller than most modern operating systems.
NTFS
New Technology File System, commonly referred to as NTFS, is another brainchild from Microsoft.
NTFS bootable USB drives support non-Windows systems, including Linux and macOS.
Of note, macOS can read but not write to NTFS formatted drives.
With NTFS bootable USB drives, you get metadata support and improved data structure.
Additional extensions enhanced security features and improved the overall system.
It’s also the standard file system for modern Windows operating systems.

NTFS file systems can handle individual files larger than you would find on current commercial drives.
The single-volume size limit is 16 EB (exabytes), so space isn’t an issue.
ExFAT
Extensible File Allocation Table, or exFat, also known as FATex, emerged as a file system with Windows in November 2006.
In 2019, exFAT technical specifications went public for use in other operating systems.
When NTFS isn’t an option and FAT32 doesn’t provide enough space, exFAT fills the gap.
Think of it as more powerful than the FAT32 but less muscle than the NTFS file system.
It’s also supported in multiple media devices, including TVs and portable devices.
ExFAT file systems compete with NTFS systems for individual file size but exceed their single-volume limitations.
You can manage up to 64 ZB (zettabytes) with an exFAT bootable USB, though they aren’t supported on as many devices as NTFS file systems.
Alternate File Systems
Though FAT32, NTFS, and FATex remain the most common file systems for bootable USB drives, they aren’t the only ones.
For anybody who works with alternate operating systems, like Linux and macOS, you will encounter alternatives.
What to Use with Your Operating System?
Now that you have the basics, you might be wondering which file system works best with your operating system.
So, here we go!
Windows Bootable USB: NTFS, FAT32, or FATex?
Choosing Windows bootable USB NTFS, FAT32, or FATex comes down to size and function.
Compare the file system capabilities against the size of your files and operating system.
You may also want to consider the default setting for your system.
Windows XP Bootable USB: NTFS, FAT32, or FATex?
Windows XP initially supported exFAT (FATex), but NTFS has more features.
You can use any of these Windows file systems, but expect NTFS to transfer faster and perform better with large volumes.
Windows 7 and Windows 10 Bootable USB: NTFS, FAT32, or FATex?
NTFS is Windows’ default file system, but that doesn’t mean you can’t use FAT32 or exFAT.
However, Microsoft optimized NTFS and established it as the default file system for every operating system after Windows XP.
Since NTFS is the default file system for bootable USB Windows 10, switching to FAT32 or FATex could be seen as a step back.
It also involves a lot of legwork on your part, so it may not be worthwhile.
Linux Bootable USB: NTFS or FAT32 or FATex?
You may not want to hear this, but Linux operating systems have unique file systems, so if you don’t need Windows compatibility, it may not be your best option to create a bootable USB with any of these options.
If you have to choose between a Linux bootable USB NTFS, FAT32, or FATex, it depends on how much space you need.
Since FAT32 has significant file size limitations, it may not be enough.
Ubuntu Bootable USB: FAT32, NTFS, or FATex?
You may run into some issues with some of the Ubuntu Linux partitions and abilities, but technically you can use any of these file systems.
Just make sure you check the capacity on the drive against your system first.
Kali Linux Bootable USB: FAT32, NTFS, or FATex?
Many users don’t recommend creating a bootable USB with Kali Linux systems because of the complexity.
Kali Linux partitions information making it too complicated for the current bootable USB technology.
Linux Mint Bootable USB: FAT32, NTFS, or FATex?
Most Linux Mint users suggest NTFS bootable USB if you insist on using a Windows-compatible file system.
However, like other Linux operating systems, Mint works best with Linux file systems.
How to Create a Bootable USB Drive?
Creating a bootable USB drive is simpler than you might think. There are two easy ways to prep a flash drive.
How to Format a Bootable USB Drive Using Your Computer?
For Windows, the bootable USB must be FAT32 or NTFS or FATex, though the default is usually NTFS.
With Linux systems, you would have alternate options, but if you want it to be Windows compatible, you need to choose one of the three Windows-based options:
- Start with a clean USB flash drive and install it in your computer’s USB port.
- Open your Device Manager.
- Find the USB device and double-click to open its properties.
- Select “Policies” and pick the option for best performance. Click “OK.”
- Open Computer and right-click on the flash drive. Select “Format.”
- Choose your file system type and select “Start.”
That’s all you have to do!
It may take a few minutes, but your computer will notify you when the drive is ready to use.
What Is Rufus, and How to Use It?
Rufus, the Reliable USB Formatting Utility with Source is another option for creating and formatting live USB drives.
It’s a free, open-source app for Windows but doesn’t work with OS operating systems.
First released in 2011, Rufus only worked with MS-DOS.
However, updates expanded capabilities to include FreeDOS and ISO image support.
You can use the software with Linux and Windows to create Rufus FAT32 or NTFS or FATex files systems.
Rufus provides a faster, easier way to create a bootable USB flash drive.
You just need to download the software, install the USB, and follow the prompts.
As a bonus, Rufus automatically detects your device.
In case you need it, Rufus offers extensive support and has a detailed FAQ page.
-
Tech entrepreneur and founder of Tech Medic, who has become a prominent advocate for the Right to Repair movement. She has testified before the US Federal Trade Commission and been featured on CBS Sunday Morning, helping influence change within the tech industry.
View all posts
|
|
Отправлено: 10-Апр-2021 17:41
(спустя 4 месяца 22 дня)
Отправлено: 10-Апр-2021 17:41
(спустя 4 месяца 22 дня)
ZhuMa |
|
Отправлено: 11-Апр-2021 11:12
(спустя 17 часов)
Отправлено: 11-Апр-2021 11:12
(спустя 17 часов)
Отправлено: 11-Апр-2021 12:07
(спустя 54 минуты)
Отправлено: 11-Апр-2021 12:07
(спустя 54 минуты)
Can you boot from an exFAT USB? Absolutely, but not by using one partition for USB booting. In order to make an exFAT bootable USB flash drive boot in UEFI mode, you will need to format the USB with multiple partitions. Then, install Grub2 on the boot partition. And finally, set your computer system BIOS or UEFI to boot from the flash drive to confirm that it boots.
How does exFAT USB booting Work?
This process covered here to exFAT USB boot works for both Legacy BIOS and EFI booting. To be able to USB UEFI boot requires the creation of a second Fat/Fat32 partition, which is also covered in this segment.
We will be creating an exFAT partition to be used for storing ISO files and for your traditional storage purposes. A second Fat32 BOOT partition will be created and used for Grub booting. Windows will only automatically assign a drive letter to the first partition. Which in turn, makes the fat32 boot partition natively hidden from Windows.
At this point, you might be wondering, how can I view the hidden partition? Well, you can use DiskMgmt within Windows to manually assign a drive letter to the hidden partition to make it accessible.
The advantage of using an exFAT partition over a fat32 filesystem for storing ISOs is that you can store bootable ISO files larger than 4GB, and still UEFI boot from them via the Fat32 boot partition. This is necessary because a Fat32 filesystem does not support storing file sizes beyond 4GB.
Caveats: Legacy BIOS booting does not work on a very small select few finicky CSM booted systems. Secure Boot is also not supported via this method.
The Diskpart version packaged with Microsoft Windows 7 and lower (Vista, XP, etc.) is not able to create multiple partitions on removable USB media. The process will fail to make the second partition. However Windows 11, 10, 8 should work fine.
On Linux systems, in order to exFAT format the first partition, the exFAT filesystem driver and utilities must be installed.
How to Create an exFAT Bootable USB Flash Drive
Covered below are both Windows and Linux methods to make a USB boot from exFAT. Simply toggle to switch to the exFAT Bootable USB method you prefer to use.
Make a Grub2 exFAT Bootable USB Drive from Windows
Note: I’ve put together a batch file that automates the steps below. Resulting in a flash drive that you can drag and drop ISO files onto and then USB boot from. Simply download and run exfat.bat from this make-exfat-bootable-usb.zip and follow the onscreen instructions.
The following covers performing these steps manually:
I. Creating exFAT and fat32 Partitions on the USB drive
1. To get started, Open a Command Prompt as admin.
1.) From the Windows ‘⌕ Type here to search’ box, type cmd.exe
2.) Then click Run as administrator.

2. Type the following and press enter to launch Disk Management Tool.
diskmgmt.mscNote which Disk and drive letter belong to your USB.
3. Back at the command prompt, type diskpart
diskpart4. To select the disk, type the following replacing # with your USB disk number.
sel disk #5. Then to wipe the disk, (WARNING: all existing content will be deleted) type the following one line at a time;
cleanconvert mbr6. Next to list the disk info so we can set size in the next step, type;
list diskAnd then note the size of your select * Disk in MB.
7. Now to prepare the first exFAT partition, type the following;
cre par prishrink minimum=50format fs=exfat label=USB quick8. Next to create and format the second partition as fat32, type;
cre par priformat fs=fat32 label=BOOT quickassign9. Then, to verify the created partitions and volumes, type;
list parlist volIMPORTANT: note which drive letter was assigned to your fat32 BOOT partition. You’ll need it when installing Grub2.
10. To leave diskpart, type;
exitII. Installing Grub2 for UEFI and BIOS on the USB drive
1. Download Grub2 from A1ive’s repository, and extract (using 7Zip) its contents to your Windows desktop.
Note: you’ll first need to extract the .tar file from the .gz, and then extract the contents of the .tar file. Once finished, you should have a grub folder containing the contents on your desktop.
2. Next to change to the grub directory, type or copy/paste the following;
cd %UserProfile%\Desktop\grub3. To install Grub2 for BIOS and UEFI type or copy/paste the following,
(replacing X with your BOOT drive letter and # your Disk number),
and then press Enter.
grub-install.exe --force --no-floppy --target=i386-pc --boot-directory=X:\boot //./PHYSICALDRIVE#grub-install.exe --force --removable --no-floppy --target=x86_64-efi --boot-directory=X:\boot --efi-directory=X:\grub-install.exe --force --removable --no-floppy --target=i386-efi --boot-directory=X:\boot --efi-directory=X:\Congratulations, you should have an exFAT bootable USB flash drive that is now able to Grub2 Boot from both Legacy BIOS and UEFI.
Make a Grub2 exFAT Bootable USB Drive from Linux
I. Partitioning the USB flash drive into two partitions
First, we need to partition the USB flash drive with an exFAT partition to use for ISOs and storage. Then we’ll create a secondary Fat32 BOOT partition to use for Grub booting. Here’s how:
1. Open a terminal Ctrl+Alt+T
2. To switch to super user (root), type
sudo su3. Type the following and then locate your USB
fdisk -l
4. Now to unmount and wipe partition info, (WARNING: erases all data) type the following (replacing X with the letter of your USB device);
umount /dev/sdX1Note: Repeat unmount /dev/sdX# for any additional mounted partitions.
dd if=/dev/zero of=/dev/sdX bs=512 count=15. Next to select your USB device, (replacing X) type the following;
fdisk /dev/sdX6. Then to create the first exFAT partition;
- type n and then press enter to create a new
- p to create a primary
- 1 to create the first primary partition
- just press enter to start at the default sector
- type —50M to set the size minus 50M (if prompted to remove signature, press Y)
- t for enabling type
- 7 to set the partition type to exFAT
7. Now to create the second fat32 partition;
- n to create a new
- p for primary
- 2 to create the second partition
- just press enter to start at the default sector
- then press enter once more to end at the default last sector
- t to enable type
- 2 to select the second partition
- 6 to set the type to fat
- a to make this partition active
- 2 again for the second partition
- w to write the information to disk and exit
8. Finally, to format the partitions, (replacing X) type;
mkfs.exfat -n USB /dev/sdX1mkfs.vfat -F 32 -n BOOT /dev/sdX2II. Installing Grub2 on the USB for UEFI and BIOS Boot
1. Type the following (replacing X with your actual USB letter)
mkdir /mnt/USBmount /dev/sdX2 /mnt/USB2. Grab the latest a1ive Grub2 release, copy/paste or type;
wget https://github.com/a1ive/grub/releases/download/latest/grub2-latest.tar.gz -O grub2-latest.tar.gz3. Next to extract the files;
tar -xf grub2-latest.tar.gz4. Then change to the grub i386-pc directory. And (replacing X), install Grub2 on the target USB.
cd grub/i386-pcgrub-install -d $PWD --force --no-floppy --target=i386-pc --boot-directory=/mnt/USB/boot /dev/sdX6. Change to the grub2 i386-efi directory, and install;
cd ../i386-efigrub-install -d $PWD --force --removable --no-floppy --target=i386-efi --boot-directory=/mnt/USB/boot --efi-directory=/mnt/USB7. Next change to the x86_64 directory and install;
cd ../x86_64-efigrub-install -d $PWD --force --removable --no-floppy --target=x86_64-efi --boot-directory=/mnt/USB/boot --efi-directory=/mnt/USB8. Finally, unmount and remove the created mountpoint;
umount /mnt/USBrmdir -rf /mnt/USBIf all went well, you should now have a Grub2 bootable USB Flash Drive. Utilizing exFAT for storage.
Upon completion, simply reboot your pc, select the USB drive from your BIOS or UEFI boot device menu, and then Boot. If all went well, you should be presented with Grub2!
Booting ISO files from an exFAT partition
Booting your select ISO files from a flash drive prepared as an exFAT bootable USB;
Grub can read from an exFAT filesystem using this method because it includes an exFAT driver module. However, to actually be able to boot from a Live ISO stored on the exFAT partition via loopback requires that the distribution also include a driver, and that the exFAT partition is automounted during boot. Otherwise, once the boot process has been handed over, the path to the ISO will no longer be found. When that happens, you’ll likely be dropped into a BusyBox shell.
Can I Boot ISO from USB without exFAT driver support?
Yes, there are a couple of ways to circumvent this requirement;
- Use PartNew to create and mount the ISO to a temporary partition.
- Or use map —mem to map the ISO to a memory address (if you have enough system memory).
- Then, set the proper linux and initrd paths or configfile path and proceed to boot the ISO
Here’s an example exFAT grub.cfg to use for booting Ubuntu from exFAT. Simply copy it to the boot/grub/ folder on your BOOT partition. Then copy your SLAX, Fedora, Ubuntu Live based ISO files to your USB partition, and reboot. If all went well, you should be presented with a menu option to boot them using Partnew.
This concludes the detailed manual procedure to create an exFAT bootable USB flash drive.
Software to automatically Make an exFAT Bootable Flash Drive
How can I automatically make an exFAT formatted USB flash drive bootable? You can use YUMI Multiboot USB Software instead of performing these steps manually. This tool will create a multiboot exFAT bootable USB flash drive for you.
Additionally, the YUMI App provides links to popular Linux distributions and tools and offers a folder structure for pre boot navigation. It also allows for copying ISO files to USB via drag and drop. A persistence feature is available where applicable, enabling you to save and restore changes on subsequent boots.
If you found this interesting, you might also want to check out how to make a Windows 10 bootable USB drive.
Как перейти от Waterfall к Agile
EggHead 06.05.2025
Каскадная модель разработки Waterfall — классический пример того, как благие намерения превращаются в организационный кошмар. Изначально созданная для упорядочивания хаоса и внесения предсказуемости. . .
Оптимизация SQL запросов — Продвинутые техники
Codd 06.05.2025
Интересно наблюдать эволюцию подходов к оптимизации. Двадцать лет назад всё сводилось к нескольким простым правилам: «Избегайте SELECT *», «Используйте индексы», «Не джойните слишком много таблиц». . . .
Создание микросервисов с gRPC и Protobuf в C++
bytestream 06.05.2025
Монолитные приложения, которые ещё недавно считались стандартом индустрии, уступают место микросервисной архитектуре — подходу, при котором система разбивается на небольшие автономные сервисы, каждый. . .
Многопоточность и параллелизм в Python: потоки, процессы и гринлеты
py-thonny 06.05.2025
Параллелизм и конкурентность — две стороны многопоточной медали, которые постоянно путают даже бывалые разработчики.
Конкурентность (concurrency) — это когда ваша программа умеет жонглировать. . .
Распределенное обучение с TensorFlow и Python
AI_Generated 05.05.2025
В машинном обучении размер имеет значение. С ростом сложности моделей и объема данных одиночный процессор или даже мощная видеокарта уже не справляются с задачей обучения за разумное время. Когда. . .
CRUD API на C# и GraphQL
stackOverflow 05.05.2025
В бэкенд-разработке постоянно возникают новые технологии, призванные решить актуальные проблемы и упростить жизнь программистам. Одной из таких технологий стал GraphQL — язык запросов для API,. . .
Распознавание голоса и речи на C#
UnmanagedCoder 05.05.2025
Интеграция голосового управления в приложения на C# стала намного доступнее благодаря развитию специализированных библиотек и API. При этом многие разработчики до сих пор считают голосовое управление. . .
Реализация своих итераторов в C++
NullReferenced 05.05.2025
Итераторы в C++ — это абстракция, которая связывает весь экосистему Стандартной Библиотеки Шаблонов (STL) в единое целое, позволяя алгоритмам работать с разнородными структурами данных без знания их. . .
Разработка собственного фреймворка для тестирования в C#
UnmanagedCoder 04.05.2025
C# довольно богат готовыми решениями – NUnit, xUnit, MSTest уже давно стали своеобразными динозаврами индустрии. Однако, как и любой динозавр, они не всегда могут протиснуться в узкие коридоры. . .
Распределенная трассировка в Java с помощью OpenTelemetry
Javaican 04.05.2025
Микросервисная архитектура стала краеугольным камнем современной разработки, но вместе с ней пришла и головная боль, знакомая многим — отслеживание прохождения запросов через лабиринт взаимосвязанных. . .