
Все способы:
- Способ 1: Сброс TCP/IP
- Способ 2: Решение проблем с драйвером сетевой карты
- Вариант 1: Обновление
- Вариант 2: Откат состояния
- Вариант 3: Переустановка
- Способ 3: Отключение стороннего антивируса
- Способ 4: Откат системы
- Вопросы и ответы: 0
Способ 1: Сброс TCP/IP
Сброс TCP/IP позволяет сбросить сетевые настройки, и эта процедура может помочь, поскольку ошибка с файлом Tcpip.sys, вызывающая BSOD, напрямую связана с этими протоколами. Сделать это несложно, достаточно знать несколько команд:
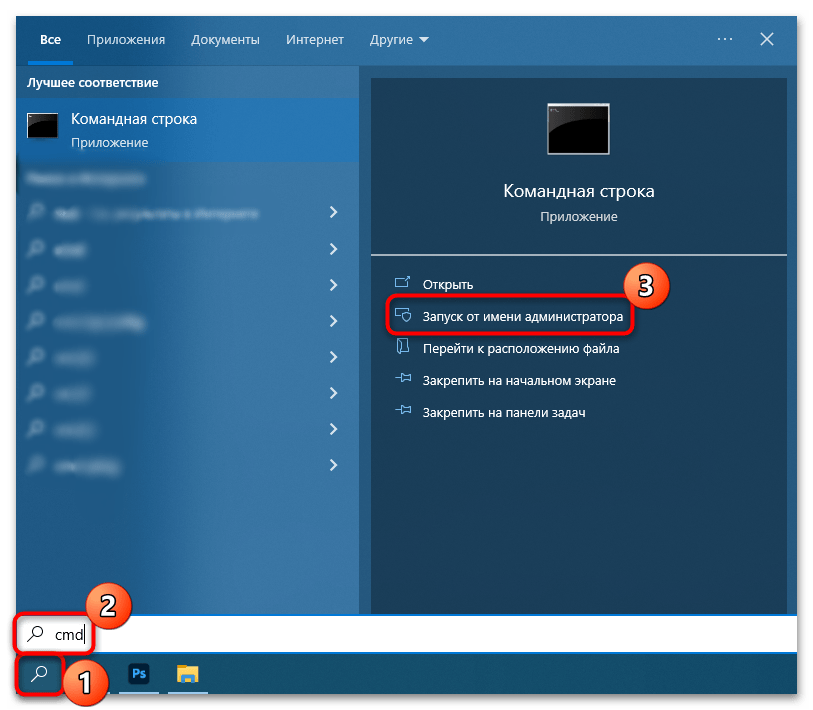
- Запустите «Командную строку» от имени администратора. Для этого введите в поиске по «Пуску» запрос
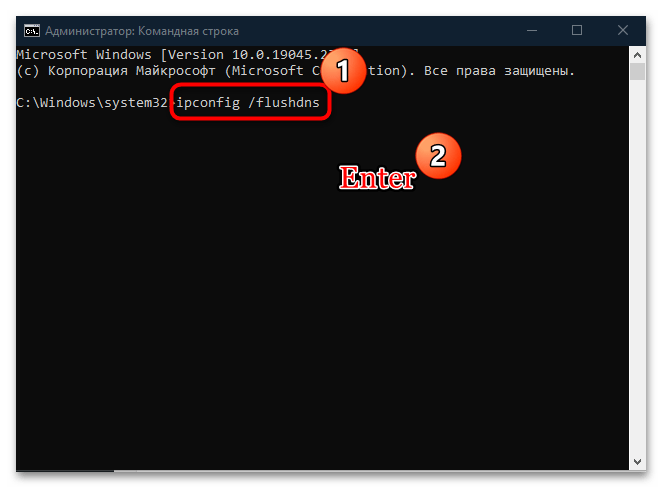
cmdи выберите соответствующий пункт из списка справа. - В окне консоли поочередно выполните команды, вводя их и нажимая после каждой клавишу «Enter»:
ipconfig /flushdns

ipconfig /registerdns

ipconfig /release

ipconfig /renew

netsh winsock reset catalog

netsh int ipv4 reset reset.log

netsh int ipv6 reset reset.log
После того как все команды окажутся выполнены, перезагрузите компьютер.
Еще один метод сбросить настройки протоколов подразумевает использование одной из функций системных «Параметров». В этом случае окажутся сброшены все настройки сетевых адаптеров, поэтому лучше выполнить его, если предыдущая инструкция не принесла эффекта:
- Нажмите на кнопку «Пуск» и выберите «Параметры».
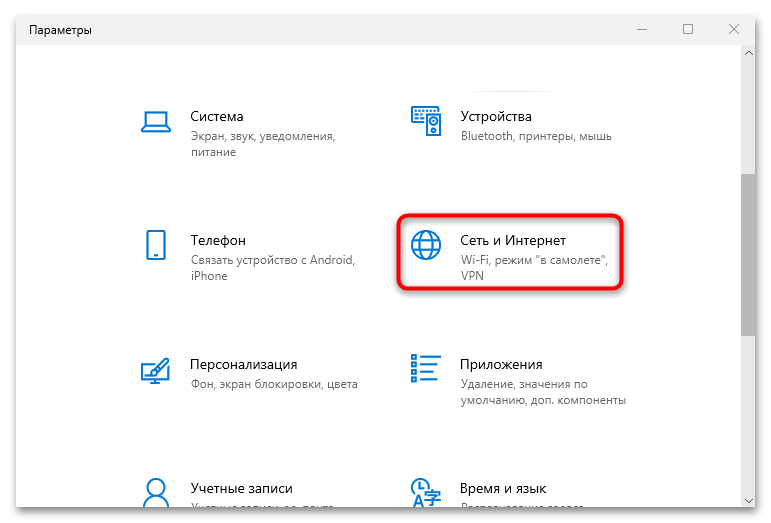
- Перейдите в раздел «Сеть и Интернет».
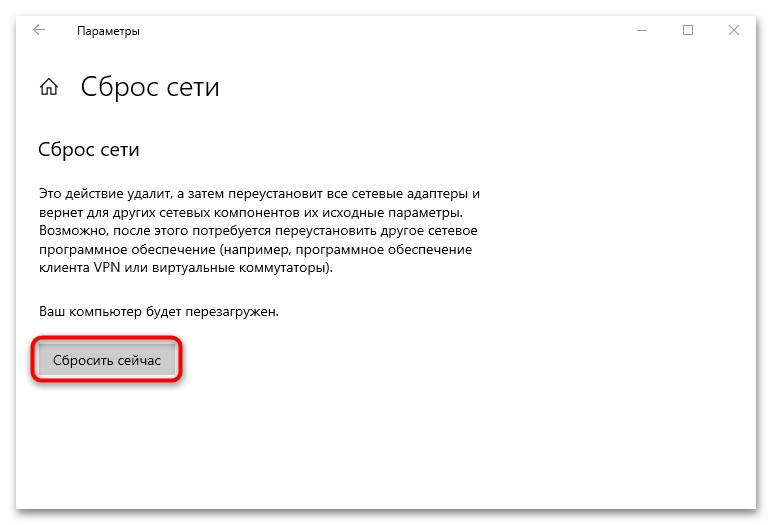
- На вкладке «Состояние» пролистайте основное окно вниз и кликните по ссылке «Сброс сети».
- В новом окне подтвердите действие, нажав на кнопку «Сбросить сейчас».

По окончании обязательно потребуется перезагрузка системы. Сделайте это и мониторьте работу ОС, чтобы проверить, ушла ли проблема.
Способ 2: Решение проблем с драйвером сетевой карты
Ошибка Tcpip.sys вызывает синий экран в Windows 10 из-за сбоя в работе программного обеспечения сетевого адаптера. Вероятно, драйверы устарели или произошла ошибка, влияющая на работу оборудования. Тогда может помочь обновление или переустановка драйверов.
Вариант 1: Обновление
В первом случае установить апдейты для оборудования можно с помощью штатных возможностей:
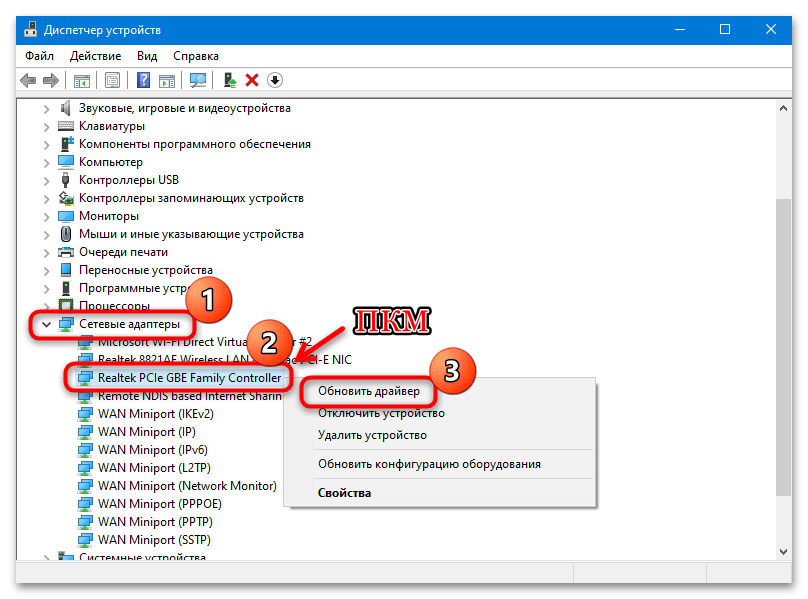
- Щелкните правой кнопкой мыши по кнопке «Пуск» и из меню выберите пункт «Диспетчер устройств».
- В новом окне разверните список «Сетевые адаптеры» и отыщите сетевую карту. Обычно в названии есть слово «Realtek», поскольку у большинства ПК и ноутбуков встраивается оборудование от этого производителя, а также слова LAN или PCIe. Если около устройства отображается значок в виде восклицательного знака, то это значит, что драйвер устарел. Чтобы обновить его, щелкните правой кнопкой мыши по названию и выберите «Обновить драйвер».
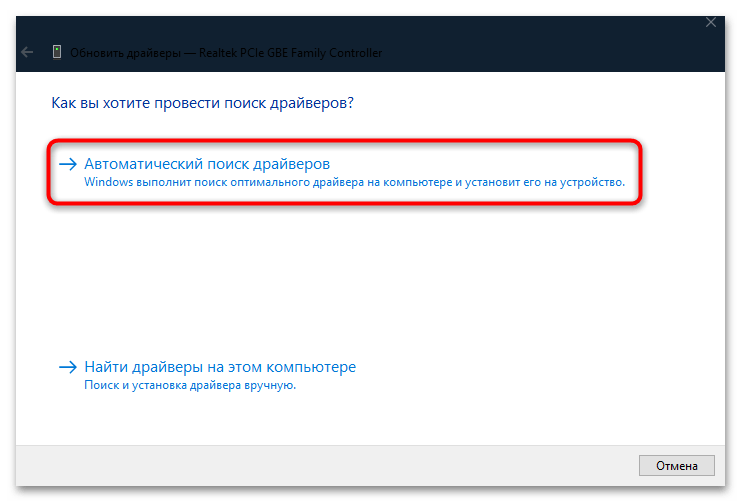
- В новом окне выберите автоматический поиск и дождитесь, пока необходимые компоненты будут установлены.
Следует отметить, что большинство необходимых для системы и оборудования драйверов обновляются вместе с апдейтами Windows 10.
Читайте также: Обновление Windows 10 до последней версии
Вариант 2: Откат состояния
Иногда срабатывает обратное — откат состояния программного обеспечения до предыдущего, особенно в случае ошибок, возникших, к примеру, при обновлении. Для этого через контекстное меню оборудования в «Диспетчере устройств» перейдите в «Свойства».
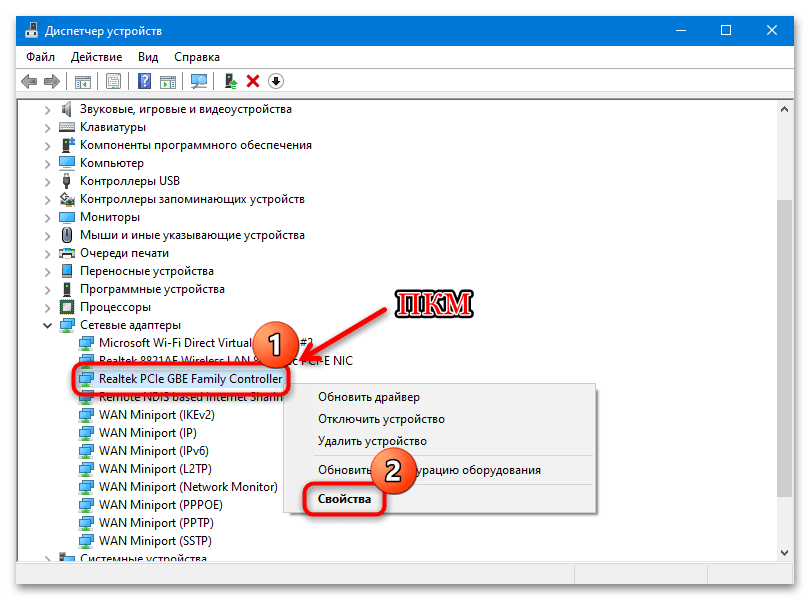
В окне выберите вкладку «Драйвер», затем нажмите на кнопку «Откатить», если она подсвечивается. Если она недоступна для нажатия, значит, предыдущее состояние система не сохранила.

Вариант 3: Переустановка
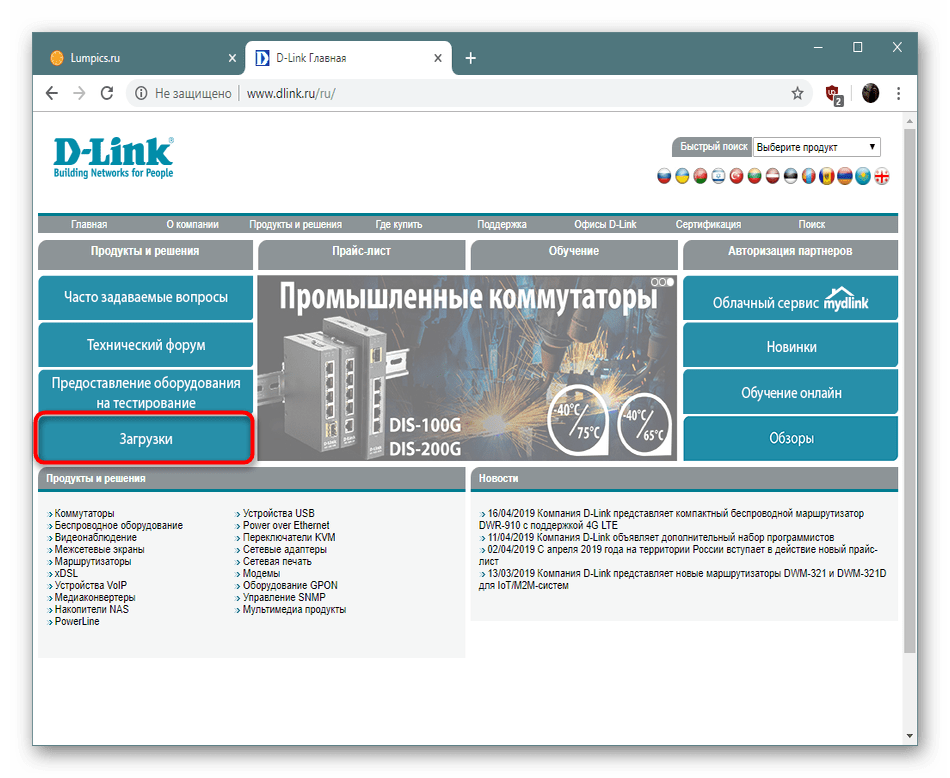
Последний вариант решения проблем с драйверами наиболее сложный, но может оказаться эффективным, если предыдущие рекомендации не помогли. В этом случае придется полностью удалить ПО для сетевого оборудования, затем снова установить его. Причем обычно система самостоятельно их инсталлирует после перезагрузки Windows, но настоятельно советуем на всякий случай заблаговременно ознакомиться с нашей статьей, где описаны методы поиска и скачивания необходимых компонентов, а также варианты их ручной установки. Это пригодится на случай, если автоматически драйвер установиться не сможет — у вас будет вручную скачанный экземпляр ПО, которым вы и воспользуетесь.
Подробнее: Инсталляция программного обеспечения для сетевого адаптера в Windows 10
Лучше для удаления и установки драйверов запускать систему в «Безопасном режиме». Это позволит предотвратить возможный конфликт ПО со сторонними службами и процессами. Как загрузить Windows 10 в этом режиме, мы писали ранее.
Подробнее: Безопасный режим в Windows 10

Когда зайдете в систему через «Безопасный режим», откройте «Диспетчер устройств» и в списке «Сетевые адаптеры» поочередно кликайте по каждому устройству правой кнопкой мыши и выбирайте функцию удаления.
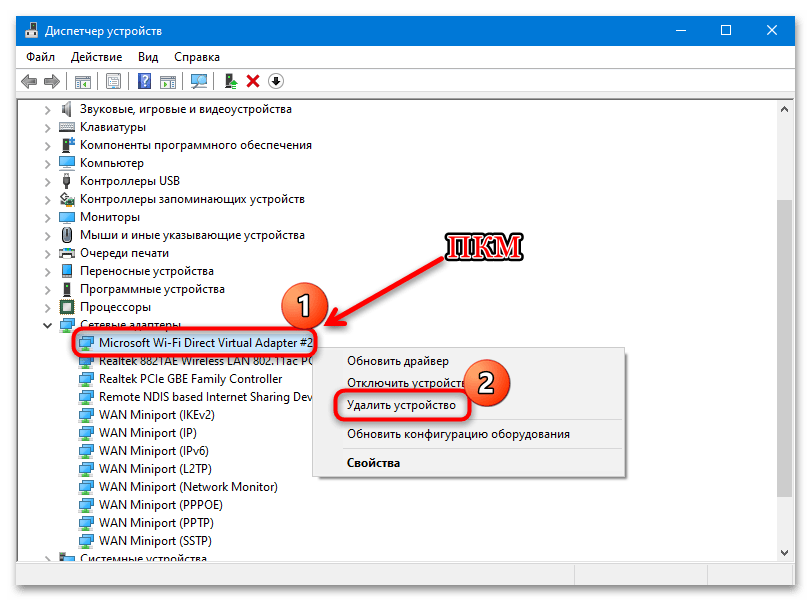
Как только все драйверы будут удалены, перезагрузите Windows 10. Если автоматической установки ПО не произошло, то возвращайтесь в инструкции выше, где описано, как это сделать вручную.
Способ 3: Отключение стороннего антивируса
Еще одна распространенная причина появления BSOD из-за Tcpip.sys – это сторонние антивирусы, которые вмешиваются в сетевые подключения. Чтобы проверить, так ли это, на время отключите работу такого софта. В большинстве случаев достаточно щелкнуть правой кнопкой мыши по значку программы в трее и выбрать пункт «Выйти» или «Закрыть», в зависимости от интерфейса. Также это сделать можно через настройки, но алгоритм действий отличается, поэтому универсальной инструкции нет. В нашем отдельном материале вы найдете инструкции для наиболее распространенных антивирусных решений.
Подробнее: Отключение антивируса
Если после отключения антивируса синий экран с Tcpip.sys перестал появляться, то, скорее всего, придется удалить программу и использовать другую в качестве альтернативы.
Способ 4: Откат системы
Если вы недавно устанавливали программы или вносили изменения в настройки системы, что особенно касается редактирования реестра, то некоторые такие действия могли привести к ошибке, поэтому есть смысл попробовать откатить ОС до контрольной точки восстановления. В этом случае все новые параметры будут сброшены, а установленный после контрольной точки софт — полностью удален.
Если на компьютере активна функция создания точек восстановления, откатить Windows 10 можно в несколько кликов, используя встроенные возможности. Наш автор подробным образом разбирал алгоритм действий.
Подробнее: Откат к точке восстановления в Windows 10

Наша группа в TelegramПолезные советы и помощь
| Информация о файле | Описание |
|---|---|
| Размер файла: | 2.6 MB |
| Дата и время изменения файла: | 2020:03:04 15:24:01+00:00 |
| Тип файла: | Win64 EXE |
| Тип MIME: | application/octet-stream |
| Тип компьютера: | AMD AMD64 |
| Метка времени: | 2003:12:07 09:54:51+00:00 |
| Тип PE: | PE32+ |
| Версия компоновщика: | 14.10 |
| Размер кода: | 1985536 |
| Размер инициализированных данных: | 815104 |
| Размер неинициализированных данных: | 0 |
| Точка входа: | 0x246010 |
| Версия ОС: | 10.0 |
| Версия образа: | 10.0 |
| Версия подсистемы: | 10.0 |
| Подсистема: | Native |
| Номер версии файла: | 10.0.16299.1087 |
| Номер версии продукта: | 10.0.16299.1087 |
| Маска флагов файлов: | 0x003f |
| Флаги файлов: | (none) |
| Файловая ОС: | Windows NT 32-bit |
| Тип объектного файла: | Driver |
| Подтип файла: | 6 |
| Код языка: | English (U.S.) |
| Набор символов: | Unicode |
| Наименование компании: | Microsoft Corporation |
| Описание файла: | TCP/IP Driver |
| Версия файла: | 10.0.16299.1087 (WinBuild.160101.0800) |
| Внутреннее имя: | tcpip.sys |
| Авторское право: | © Microsoft Corporation. All rights reserved. |
| Название продукта: | Microsoft® Windows® Operating System |
| Версия продукта: | 10.0.16299.1087 |
✻ Фрагменты данных файлов предоставлены участником Exiftool (Phil Harvey) и распространяются под лицензией Perl Artistic.
Tcpip.sys is one of the most basic Blue Screen issues that you can experience on your windows. It is a driver file associated with the Transmission Control Protocol over IP or Internet Protocol. The issue can appear if any file goes corrupted. Never panic if you face a problem on your Windows 10 or any other OS. Multiple people are there who have experienced the issue. However, we have given here a lot of solutions to help you. Go through our article correctly and follow the steps as shown.
Tcpip.sys is an SYS file available when downloading the Windows security updates. Microsoft released it in April 2011. While any SYS file is experiencing any problem, it is most likely corrupted drivers or faulty hardware due to which you are facing the issue. You should know one thing is that this file plays a major role in different Windows functions (like the April 2011 Security Release ISO Image). Therefore, if your SYS file is damaged, you can experience errors such as the blue screen of death (BSOD).
What are the Error Codes Related to the tcpip.sys BSoD?
If you face the error, you can find a few messages like:
- IRQL_NOT_LESS_EQUAL;
- KMODE_EXCEPTION_NOT_HANDLED.
- PAGE_FAULT_IN_NONPAGED_AREA.
You are advised to back up the data daily to keep your data secured and safe. These are the messages seen on display also.
- tcpip.sys could not be found.
- tcpip.sys failed to load.
- The file Tcpip.sys is missing or corrupt.
- Windows failed to start – tcpip.sys.
What Causes a TCPIP.SYS BSoD Error?
Generally, the TCPIP.SYS BSoD Error appears for the corrupted or failed Network drivers. However, a corrupted driver is not a single reason. It can be seen if your device comes with an antivirus system. The reason is that the system can interfere with your network, so that an error can happen. On the other hand, doing a new and wrong installation or configuration of hardware or software may be a reason for the problem.
We have given here noticeably three main reasons that are:
- Corrupted network drivers.
- Antivirus or Web protection.
- Improper installation or configuration of new software or hardware.
TCPIP.SYS BSoD Error Messages:
A problem has been detected, and Windows has been shut down to prevent damage to your computer. The problem seems to be caused by the following file: Tcpip.sys.
🙁 Your PC ran into a problem that it couldn’t handle and now needs to restart. You can search for the error online: [BSOD] (Tcpip.sys).
1. STOP 0x0000000A: IRQL NOT LESS EQUAL (tcpip.sys)
2. STOP 0x0000003B: SYSTEM SERVICE EXCEPTION (tcpip.sys)
3. STOP 0x00000050: PAGE FAULT IN A NONPAGED AREA (tcpip.sys)
4. STOP 0x0000001E: KMODE EXCEPTION NOT HANDLED (tcpip.sys)
5. STOP 0×0000007A: KERNEL DATA INPAGE (tcpip.sys)
6. STOP 0x0000007E: SYSTEM THREAD EXCEPTION NOT HANDLED (tcpip.sys)
Third-party drivers can be the reason for the issue. For instance, your computer may have Asus drivers like AsInsHelp64.sys, ASUSFILTER.sys, AsIO.sys. Quite often, etc. The extra features are not essential for the PC operation, which can conflict with such files. It is why we recommend uninstalling the additional components of this type. Ensure that you do not remove necessary programs that you can run on Windows.
Blue Screen of Death happens while any system file is malfunctioning. Windows turns off itself to prevent damage to the system. When the Restart completes, your PC is trying to gain regular operation.
How to Fix Tcpip.sys BSoD Error:
Fix 1) Reset TCP/IP:
The sys file is associated with TCP/IP. Therefore, you must try to reset the TCP/IP.
Step 1: You need to write Command Prompt first in the search bar of Cortona. After that, your job is to tap on the result that matches the best to choose Run as administrator.
Step 2: Then, you should hit the Yes option at the UAC prompt.
Step 3: When you are on the Command Prompt window, you have to write netsh int ip reset. After that, you should tap the Enter key to run it.
Step 4: As soon as the method is finished, you need to reboot the PC. Now, check if the error persists.
Fix 2) Update Network Card Drivers:
Corrupted drivers can cause the problem. Therefore, you need to try to update network card drivers to solve the issue.
Step 1) First, you need to open the Device Manager. In this case, your task is to tap the Windows + R button to call out the Run window. When the Run window appears, you need to write devmgmt.msc. After that, you are required to hit the OK button.
Step 2) When the Device Manager window is open, you need to expand the Network adapter. After that, you must tap the listed drive, and then you should choose the Update driver. You have to perform the operations again until updating all network card drivers is finished.
Step 3) After you complete updating all drivers, you need to restart the PC.
Whether you updated your driver before some days and then began to run into the issue, then try to roll back the driver.
If you are willing to roll back the driver, you have to go through the steps.
- You have to tap the driver again and then choose the Properties option by going to the right-click menu.
- When you open the Properties window, you must move to the Driver tab. After that, you need to tap the Roll Back Driver.
- Now, hit the OK for making the change. Thus, you can uninstall the updated driver and roll back the configuration to the previous version.
Fix 3) Disable Web Protection:
Try to disable web protection to check the issue. However, it may seem a little odd, but according to a few people, it helps to solve the issue.
If you are willing to turn off the web protection in your antivirus program, then it is better to get your antivirus manufacturers’ help.
If necessary, go to their sites and look for the steps accordingly.
Fix 4) Run the Blue Screen Troubleshooter:
- Run the blue screen troubleshooter if no method works. You can take the help of the feature for detecting and solving the issues.
- When you are going to run the troubleshooter, you need to move to the Start button. Then, head towards the Settings option.
- After that, your task is to tap on the update and security option. Next, you should go to these options— Troubleshoot, Blue Screen, and Run the troubleshooter, respectively.
- As soon as you finish the method, it would be best to restart the PC.
Fix 5) Disable Antivirus Program:
Antivirus is designed so that it can offer protection to your device. To do this, you have to monitor each action of your operating system. You can see multiple cases where the antivirus software has given a false positive and turned off a module, although there is no harm. Antivirus software developers fix the problems in an update. Malwarebytes, Symantec, etc., are examples of a few notable software that cause issues.
- Hit the Start button first, and then you are required to select the Run option from the menu.
- After that, the Run Command will open, where you should write cmd for opening the Command Prompt window.
- When you open the Command Prompt, you must type the wscui.CPL command. Next, hit the Enter key.
- While the Windows Security window is opened, you must select the Malware protection option. However, do this whether you use Windows Vista. If you have Windows XP, then you should choose the Virus Protection option.
- Now, you should tap the Start button and choose the All Programs option.
- After that, look for the antivirus program and then disable it temporarily.
- Next, you can access the Windows update on the computer or laptop.
- Ensure that you have turned on the antivirus program after completing the update process.
Fix 6) Perform Full System Scan:
- It would be nice if you tried to repair the damaged registries by performing a full system scan.
- Some online tools are helpful that you can use to repair these registries and enhance the system’s performance.
- If you are willing to perform a full scan with the help of the online tool, then follow the steps.
- First, download the software by navigating to the official site. Then, you need to install the software.
- When you have finished the installation process, your job is to run the Restoro for performing a full system scan.
- As soon as the system scan has been completed, tap on the Start Repair button.
Fix 7) Check for Incompatible Programs:
- To check the unsupported programs, you must restart the PC first.
- After that, ensure that you type the F8 button before displaying the Windows logo.
- Next, choose the Safe Mode option, and then you have to tap the Enter key.
- After that, you should move to the Start option and then type the “msconfig” message in the Search box. Now, you should tap on the Enter button.
- After tapping on the button, you can see the System Configuration window appearing. Here, you are required to select the Startup option that is available in the general tab. Next, you should hit the “Load Start Up item.”
- Then, tap on the “Services” tab and hit the “Hide all Microsoft Services” option. Next, you should select the “Disable All” option.
- Finally, you have to shut down the Window and then Restart the PC.
Fix  Clear & Repair the Registry:
 Clear & Repair the Registry:
In this case, your task is to download a registry cleaner first and then install it after that.
- When you complete downloading the registry cleaner tool, your job is to tap on the Scan for Issues button.
- After that, wait for a while until you cannot complete the scanning process.
- When it is completed, a list of corrupted registry entries appears.
- After that, your task is to hit the Fix Issue button to solve the problem.
- Next, you should Restart the system.
- Finally, when you complete performing the above steps, we hope that the issue is resolved.
Fix 9) Replace the SYS File:
If you are an expert or an advanced user, you also can try to download the file and replace it with the right version. The steps for downloading the replacing the files are as follows:
- First, your task is to find the Windows operating system that you can see available in the list of “Download tcpip.sys Files”.
- Tap on the right “Download Now” button, and after that, you should try to download the Windows file version.
- Now, you have to try to copy the file to the right Microsoft Office Access 2010 folder location.
1. Windows 10: C:\Windows\System32\drivers\
2. Windows 10: C:\Windows\Temp\527D94AF-D053-4381-B105-0D815D53791E\amd64_microsoft-windows-tcpip-driver_31bf3856ad364e35_10.0.16299.1087_none_df7524aee8d9d74f\
3. Windows 10: C:\Windows\WinSxS\amd64_microsoft-windows-tcpip-driver_31bf3856ad364e35_10.0.16299.1087_none_df7524aee8d9d74f\
4. Windows 10: C:\Windows\WinSxS\amd64_microsoft-windows-tcpip-driver_31bf3856ad364e35_10.0.16299.15_none_fae4b1a428530d41\
5.Windows 10: C:\Windows\System32\drivers\
6. Windows 8.1: C:\Windows\System32\drivers\
7. Windows 8: C:\Windows\System32\drivers\
8. Windows 7: C:\Windows\System32\drivers\
9. Windows Vista: C:\Windows\System32\drivers\
10. Windows XP: C:\WINDOWS\system32\dllcache\
11. Windows XP: C:\Windows\System32\drivers\
Now, try to reboot the PC.
Fix 10) Perform a Windows Update:
If you cannot solve the problem yet, update your windows. Multiple error messages are appearing due to an outdated Windows Operating System.
If you are willing to perform a Windows Update, you should do these steps.
- First, you should tap the Windows Start button.
- Then, navigate to the search box and write “Update” there. Next, you should tap on the “ENTER” option.
- Move to the Windows Update dialog box after the and then hit the “Check for Updates” option. You can find a similar button that relies on the type of windows version you use.
- If you find the updates, tap on the “Install Updates” option to download them.
- After completing the update, you should perform Restart to the computer or laptop.
- If you cannot fix the issue, you have to try another solution.
Fix 11) Perform System Restore:
Try this process in Windows XP, Vista, 7, 8, and 10.
- First, your task is to tap on the Windows Start button.
- As soon as you find the search box, you must write “System Restore” in the box. Then, you have to tap on the “ENTER” button.
- When you go to the search results, you have to look for the System Restore option and then tap on it after that.
- Then, you have to type the administrator password if you can apply.
- Now, your job is to follow the steps available in the System Restore Wizard to select a relevant restore point.
- Finally, you have to restore the PC.
Fix 12) Reinstall Microsoft Office Access 2010 software (Windows XP, Vista, 7, 8, and 10):
- First, your task is to tap on the Windows Start button.
- Then, move to the search box and write the “Uninstall” button. Now, you should tap the “ENTER” button.
- When you see the search results, you have to look for the “Add or Remove Programs” option. After finding the option, you should tap on it.
- Next, you have to look for the entry for the Microsoft Office Access 2010. Then, it would be best if you tapped on the “Uninstall” option.
- Now, you should look for the prompts for uninstallation.
- As soon as you uninstall the software completely, you have to restart the computer. Then, you have to install Microsoft Office Access 2010 software again.
Fix 13) Fix Corrupted Operating System Files:
In case you are unable to solve the problem, it may happen that your system files have become corrupted. Steps that you have to follow are as follows:
- First, your job is to head towards the start menu and tap on this. Then, you have to write the command prompt there. After that, you must tap on the app and then choose Run as administrator.
- Whether any user account control prompt appears on display, you must tap on the Yes option.
- After that, a black window appears where you need to write chkdsk C: /f /r and then tap the enter button.
- Now, you can see a message prompting, “Would you like to schedule this volume to be checked the next time the system restarts?”. In this case, you have to write Y and tap on the enter.
- Restart the system now. Using the scan, you can check your device for corrupted files. This scanning process can take 10 minutes to an hour.
- If you have faced the problem till now, then try another solution.
Fix 14) Run DISM Tool:
Defective Windows image files may be a reason for the problem in Windows 10. These are actually the snapshots of ISO files released before any major Windows Upgrade. A few malware infections or third-party programs are there, due to which the components can also be corrupted.
The tool is preloaded and used to repair these image files when you activate this in Elevated Command Prompt. If you are willing to scan the tool, you have to follow the steps:
- First, you need to take access to the elevated command prompt.
- After that, your job is to insert the command.
DISM /Online /Cleanup-Image /RestoreHealth
- Then, you have to tap the Enter button to allow the DISM tool.
- It can take some time, so it is better to schedule the task accordingly.
- After the completion, you have to restart your PC and check if the issue exists.
Fix 15) Check the Hardware Components and Fix Their Issues:
The problem can happen whether there is an issue on the hardware and software sides. Defective issues in hard disk, malfunctions on Power Supply Unit,
Problematic RAM sticks etc., can cause the issue. Besides, devices attached via USB ports such as a mouse, keyboard, speaker, or printer can also cause issues. Removing the devices can help you to fix the issue.
If the issue is not resolved, then you have to run the Windows Hardware Troubleshooter. Follow the steps if you are willing to run.
- First, tap on the Windows key to open the Start menu.
- Then, you have to tap the Power icon.
- Choose the Restart option, and then you should hold the Shift key at a time. In this case, Windows boots your system to Automatic Repair.
- When you open the blue screen, you should choose the Troubleshoot option.
- After that, you must select the Advanced options and then Command Prompt.
- As soon as the Elevated Command Prompt window appears, you should type the message.
msdt.exe -id DeviceDiagnostic - Hit the Enter button.
- Next, the Hardware and Devices Troubleshooter page is available on display immediately.
- Tap on the Next.
Fix 16) Replace Defective RAM:
We have repeatedly seen that a defective RAM unit is causing the issue.
Sometimes, your RAM can contain issues from manufacturing. On the flip side, it may have external damage that eventually affects this.
- If you are going to change the whole RAM, replace the entire unit that is costly. As a result, a confirmed diagnosis is essential before purchasing a new one. Windows Memory Diagnostic tool can be used in this case. When you complete checking your device with the help of the memory diagnostic tool, replace it if necessary.
- Now, you should tap on the taskbar search box Type memory, and after that, you should hit the Enter button.
- When using the Windows Memory Diagnostic Tool, you have to tap on the
- c, – “Restart now and check for problems (Recommended)” option.
- You will see a blue display. It helps to identify memory problems.
- As soon as the process finishes, your system will reboot again.
- In this case, an alert appears on the system tray from Windows Memory Diagnostic Tool.
- At last, chick if the error persists.
Conclusion:
In this article, we have given here a few solutions to solve the Tcpip.sys Blue Screen Error. I hope you find it helpful.
Table of contents
- Causes of the tcpip.sys Blue Screen Error
- Common tcpip.sys Error Description That Could Appear on Your Screen
- 1. “Windows unexpectedly shutdown due to a problem with tcpip.sys”
- 2. “0x050 – tcpip.sys: PAGE_FAULT_IN_NONPAGED_AREA – tcpip.sys”
- 3. “:-( An error from tcpip.sys has caused a problem, and your PC must restart.”
- 4. “0x0000001E STOP: KMODE_EXCEPTION_NOT_HANDLED – tcpip.sys”
- 5. “STOP 0x0000000A: IRQL_NOT_LESS_OR_EQUAL – tcpip.sys”
- How to Fix the tcpip.sys BSOD in Windows 10/7/8
- Fix 1: Reset the TCP/IP
- Fix 2: Update the network card drivers
- Fix 3: Use the blue screen troubleshooter
- Fix 4: Uninstall recent updates.
- Fix 5: Disable web protection.
- Conclusion
- FAQ
Thetcpip.sys is a necessary driver file associated with the Transmission Control Protocol over Internet Protocol (TCP/IP) in Windows operating systems in Windows functions. This file is crucial. So any damage or corruption to it can lead to serious system errors, such as the tcpip.sys Blue Screen of Death (BSOD) error.
That’s why backing up your data regularly is advisable to avoid this issue. That said, this guide will show you how to fix the tcpip.sys blue screen error.
Let’s begin.
Causes of the tcpip.sys Blue Screen Error
There are numerous reasons why the tcpip.sys BSOD error occurs. Some of the common reasons are:
1. Improper software installation. An incomplete or interrupted software installation can cause the tcpip.sys error. Reinstalling the application usually fixes this issue.
2. Corrupt or outdated network drivers. Network drivers that are corrupted or outdated can also cause a BSOD error. Updating your drivers can fix this issue.
3. Antivirus settings that conflict. The BSOD issue may occur if you have an installed third-party antivirus application and its incompatible settings. You can usually resolve this issue by disabling or adjusting the antivirus settings.
Related: How to Find Out the Causes of Your BSOD on Windows 10, 8, 8.1?
Common tcpip.sys Error Description That Could Appear on Your Screen
Several tcpip.sys BSOD errors can appear on your screen. Some of them are:
1. “Windows unexpectedly shutdown due to a problem with tcpip.sys”
This error message shows that Windows had an unexpected shutdown due to a problem with the tcpip.sys file. The main cause of the problem can vary. However, it usually comes from a conflict with or corruption in the tcpip.sys driver or related components.
Related: [FIXED] How to Fix “Windows 10 Won’t Boot” Problem Easily
2. “0x050 – tcpip.sys: PAGE_FAULT_IN_NONPAGED_AREA – tcpip.sys”
This error code directly relates to the tcpip.sys driver and shows a page fault in a non-paged area. It indicates that Windows tried to access an unavailable or invalid memory address. The possible causes could be hardware, driver compatibility, or memory corruption.
Also Read: Page Fault in Nonpaged Area: Expert Tips and Tricks for Windows Users
3. “:-( An error from tcpip.sys has caused a problem, and your PC must restart.”
This error message means that a tcpip.sys file error caused a critical system problem. In this case, you should restart your Windows to avoid further instability or potential data loss. The root cause may be software compatibility problems, other driver incompatibilities, or damaged system files.
4. “0x0000001E STOP: KMODE_EXCEPTION_NOT_HANDLED – tcpip.sys”
This error message shows a “kernel mode exception not handled” error related to the tcpip.sys driver. It means that a program running in kernel mode ran into an exception that it couldn’t manage. The cause could be hardware malfunctions, software problems, or outdated or incompatible drivers.
5. “STOP 0x0000000A: IRQL_NOT_LESS_OR_EQUAL – tcpip.sys”
This error shows an “IRQL not less or equal” error connected to the tcpip.sys file. It means that a process or driver attempts to access a memory address at an improper interrupt request level (IRQL). The error can occur because of incompatible hardware, bad drivers, or conflicts between various software components.
Related: BSOD Error FAT FILE SYSTEM on Windows 10
How to Fix the tcpip.sys BSOD in Windows 10/7/8
If your tcpip.sys file has failed, you’ll find several proven ways to fix the issue below:
Fix 1: Reset the TCP/IP
In some cases, the tcpip.sys error on Windows 10 happens when different processors receive the TCP segments. As such, the first thing you should try to do is to reset the TCP/IP driver. Simply follow the steps below:
- Press the
Windows Key + Son your keyboard. - Inside the search box, type
cmd. - In the results, right-click Command Prompt and select Run as Administrator.
- Inside the Command Prompt, paste the following command:
netsh int ip reset c:\resetlog.txt

Note
You can paste the command netsh int ip reset if you don’t prefer to assign a directory path for the log file.
- Once you’ve pasted your chosen command, press
Enter. - After making the change, restart your computer.
- Return to what you were doing and check if you’ve removed the tcpip.sys blue screen error.
Fix 2: Update the network card drivers

If you’ve tried the previous solution, and it still hasn’t fixed the error, you can try updating your network card drivers. You can manually do this or use a one-click solution like Auslogics Driver Updater.
To manually update your card drivers, go to Device Manager and search for Network Adapter. Then, right-click on each driver to update them. This can take a lot of your time.
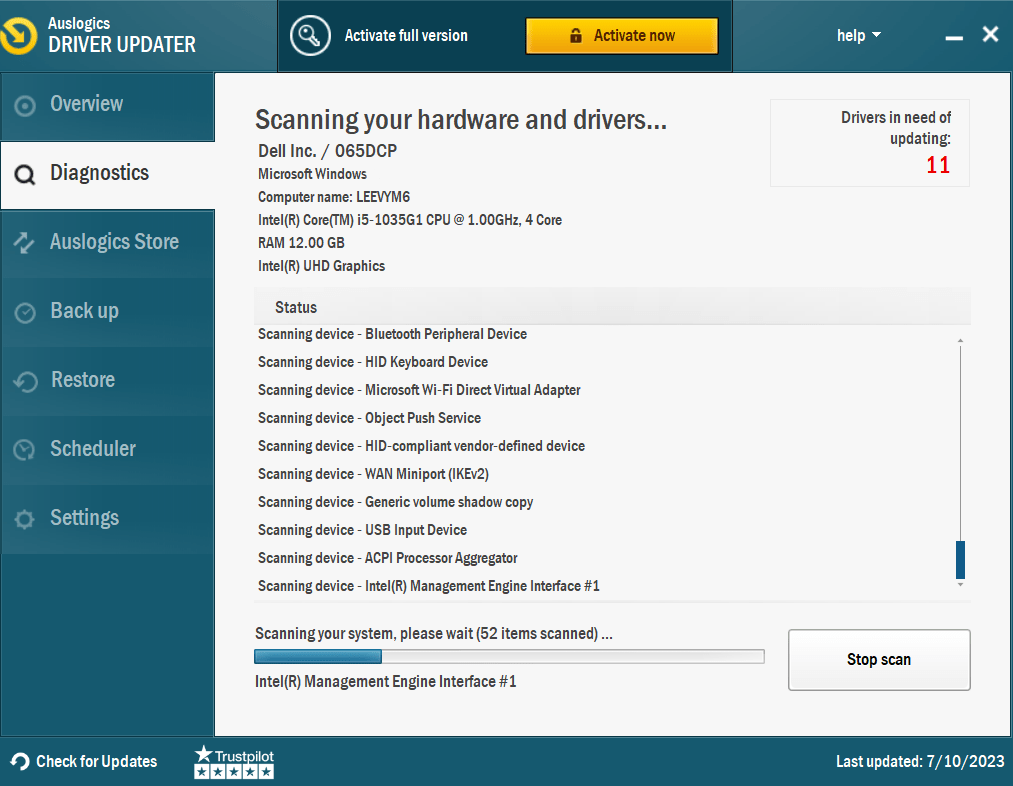
That’s why you should consider Auslogics Driver Updater. This software will automatically detect your operating system, search for the right driver, and automatically install them.
You can update your network card drivers to their latest manufacturer-recommended versions by clicking a button. This can help you fix the tcpip.sys error.
Related: Auslogics Driver Updater: New Drivers in One Click!
Fix 3: Use the blue screen troubleshooter
You can also use the blue screen troubleshooter to fix the tcpip.sys BSOD error. This tool aims to find and fix the root causes of blue screen issues. Follow these steps to use the blue screen troubleshooter:
- Click Start and choose Settings from the available options.
- Select Updates and Security and then click Troubleshoot.
- Click Blue Screen Troubleshooter from the available lists and run it.
- The troubleshooter will look for problems and immediately fix them if any are found. When the troubleshooter completes, restart your computer.
Fix this issue quickly
You can try using a safe and totally free tool developed by the Auslogics team of experts.
A few simple steps to troubleshoot the issue:
Download the tiny Auslogics TroubleShooter tool.
Run the application (no installation is needed).
The app will check for the issue mentioned in the article. When the scan is done, check that this is the issue you were looking to solve and click ‘Apply now’ to apply the recommended fix.
You can use the app to troubleshoot other malfunctions for free by simply typing in a brief description of the issue your PC is experiencing. Or you can scan your PC for performance issues using the My Scanner tab.
Related: How to Troubleshoot Blue Screen Error 0x00000109?
Fix 4: Uninstall recent updates.
- Click on
Windows + Rto start the Run. Then, typeappwiz.cpland click Enter. - Click on View installed updates in the Programs and Features window.
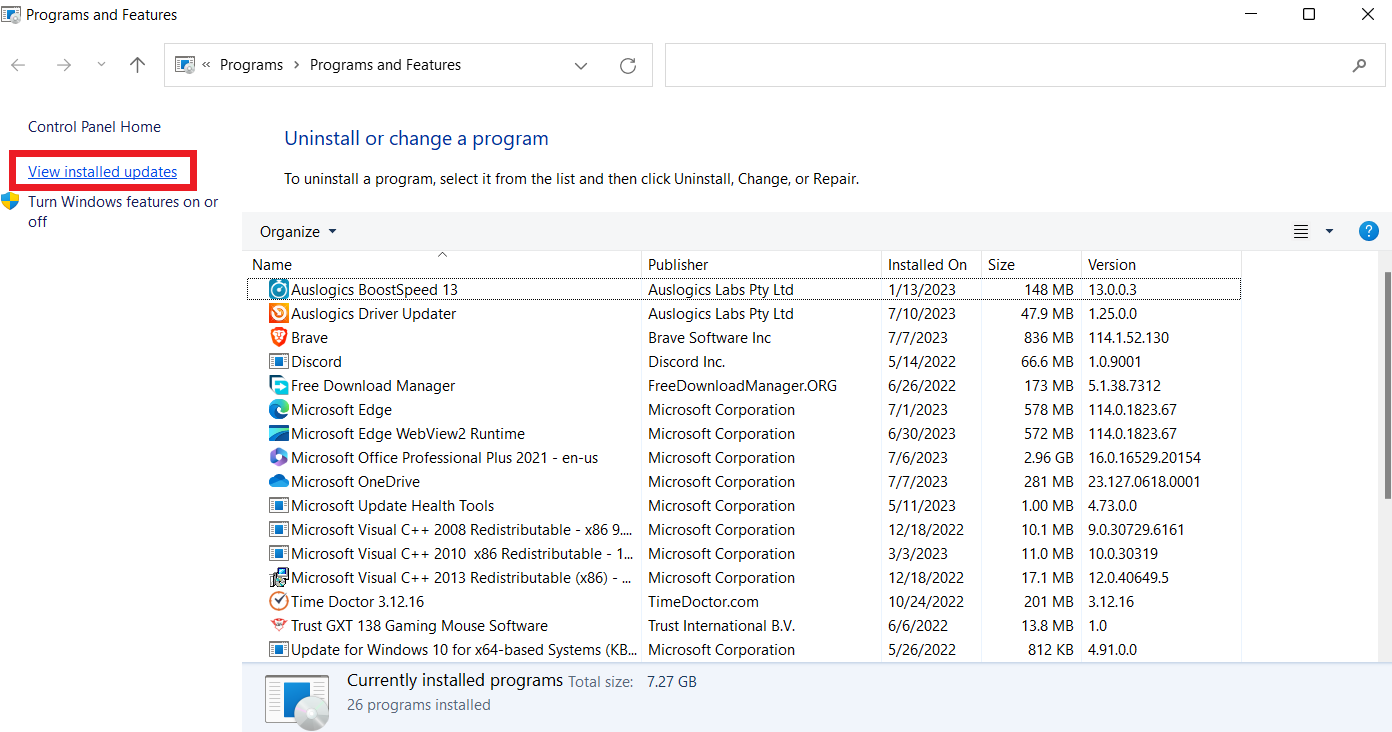
- Right-click on the update with an issue and click Uninstall under Uninstall an update.
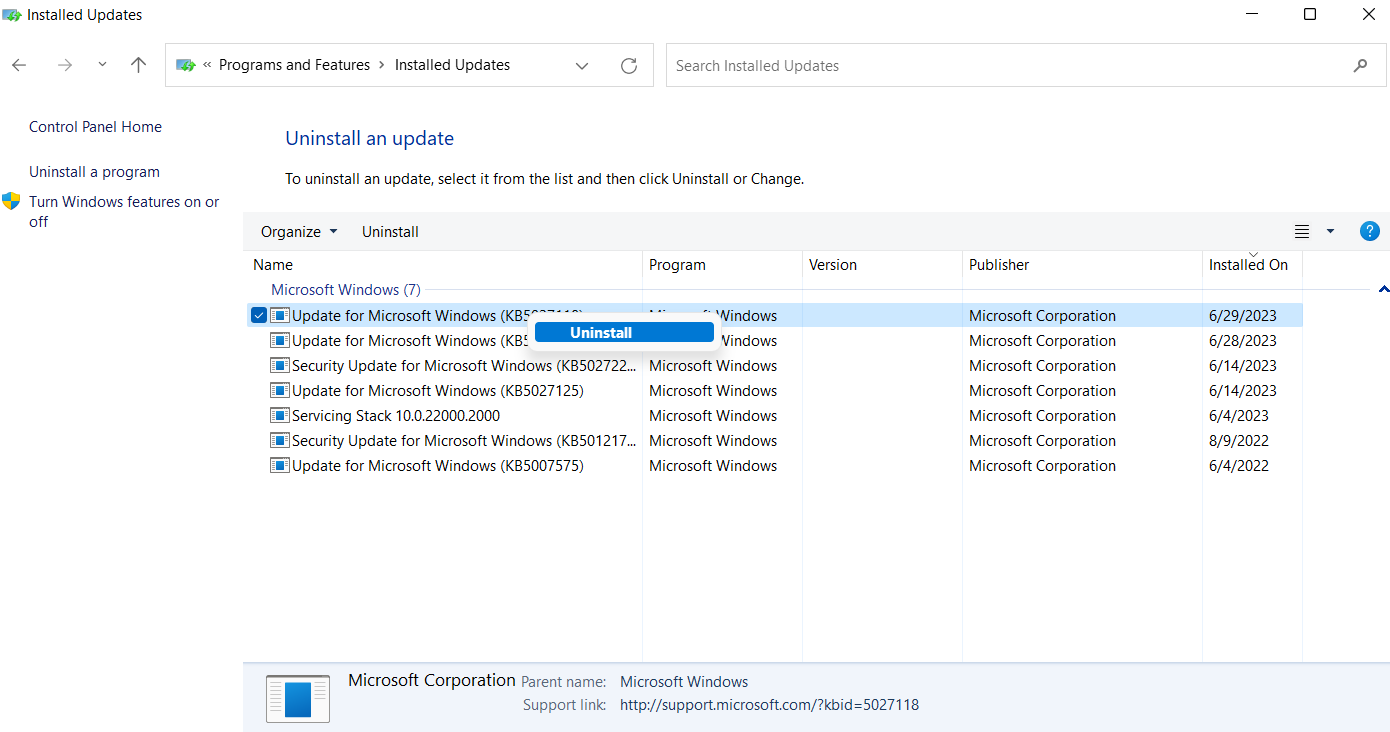
- After uninstalling, restart your computer and check if the problem is resolved.
Fix 5: Disable web protection.
Several user accounts say deactivating web protection has worked well to fix the tcpip.sys blue screen errors, even though it sounds counterintuitive. You can ask for help from the antivirus manufacturer.
Look for instructions specific to your software on the antivirus software’s official website. Follow the guidelines to disable site protection appropriately.
Conclusion
The tcpip.sys BSOD error on Windows 10/7/8 systems can be frustrating. It can happen for several reasons, including poor program installation, outdated or corrupt network drivers, clashing antivirus settings, etc.
You can resolve these issues by resetting the TCP/IP driver using Command Prompt. Another good alternative is manually updating network card drivers or using a trustworthy driver updater program like Auslogics Driver Updater.
You can fix the tcpip.sys BSOD error by implementing these solutions.
FAQ
What is TCP/IP?
TCP/IP stands for Transmission Control Protocol/Internet Protocol. It’s a collection of networking protocols that enables online communication and data exchange between devices.
Email, web browsing, file transfers, and other services are possible through TCP/IP, the backbone of modern Internet communication.
What can cause the Blue Screen of Death (BSOD)?
Windows will display the Blue Screen of Death (BSOD) when a system issue can’t be recovered. A BSOD may occur for several reasons, such as hardware issues, driver problems, software conflicts, etc.
TCP/IP Protocol Driver.
Default Settings
| Startup type: | Boot |
| Display name: | TCP/IP Protocol Driver |
| Service name: | Tcpip |
| Service type: | kernel |
| Error control: | normal |
| Group: | PNP_TDI |
| Path: | %SystemRoot%\System32\drivers\tcpip.sys |
| Registry key: | HKEY_LOCAL_MACHINE\SYSTEM\CurrentControlSet\Services\Tcpip |
Default Behavior
TCP/IP Protocol Driver is a kernel device driver. In Windows 10 it is starting by the operating system Boot Loader as a part of the driver stack for the boot volume. If TCP/IP Protocol Driver fails to start, the failure details are being recorded into Event Log. Then Windows 10 will start up and notify the user that the Tcpip service has failed to start due to the error.
Dependencies
While TCP/IP Protocol Driver is stopped, disabled or working incorrectly, the following services do not start:
- Connected Devices Platform Service
- IP Helper
- IP Network Address Translator
- IP Traffic Filter Driver
- IPsec Policy Agent
- Microsoft IPv6 Protocol Driver
- NetBT
- NetIO Legacy TDI Support Driver
- Network Connection Broker
- Network Location Awareness
- TCP/IP Registry Compatibility
- Windows NAT Driver
- Windows Network Data Usage Monitoring Driver
Restore Default Startup Configuration of TCP/IP Protocol Driver
1. Run the Command Prompt as an administrator.
2. Copy the commands below, paste them into the command window and press ENTER:
sc config Tcpip start= boot
sc start Tcpip
3. Close the command window and restart the computer.
The Tcpip service is using the tcpip.sys file that is located in the C:\Windows\System32\drivers directory. If the file is removed or corrupted, read this article to restore its original version from Windows 10 installation media.