
Примечание. Если компьютер входит в домен, политика домена может отменить внесенные в реестр изменения. Перед выполнением указанных ниже действий настоятельно рекомендуется отключить компьютер от домена.
- Выберите в меню Пуск пункт Выполнить, введите команду regedit и нажмите кнопку ОК.
- Найдите и выделите в редакторе реестра следующий раздел реестра:
HKEY_LOCAL_MACHINE\Software\Policies\Microsoft\Windows\Safer\CodeIdentifiers
Примечание. Перед изменением данного раздела реестра рекомендуется сделать его резервную копию. Для этого щелкните правой кнопкой мыши раздел CodeIdentifiers и выберите пункт Экспортировать. Сохраните файл там, где его впоследствии можно будет легко отыскать.
- Измените значение реестра PolicyScope. Для этого дважды щелкните пункт PolicyScope и измените значение с 0 на 1.
- Закройте редактор реестра.
- Нажмите кнопку Пуск, выберите пункт Выполнить, введите команду cmd и нажмите кнопку ОК, чтобы открыть окно командной строки.
- В командной строке введите следующую команду и нажмите клавишу ВВОД:
net stop msiserver
Эта команда останавливает службу установщика Windows, если служба в настоящий момент запущена в фоновом режиме. После остановки службы закройте окно командной строки и перейдите к действию 7.
Примечание. Если в командной строке появляется указанное ниже сообщение, закройте окно командной строки и перейдите к действию 7.
Служба установщика Windows не запущена.
- Установите пакет, при попытке установке которого появлялось сообщение об ошибке, описанное в разделе «Проблема».
- После установки пакета повторно выполните действия 1 и 2. Затем измените значение реестра PolicyScope обратно на 0.
- Если компьютер был отключен от домена, подключите его к домену и перезагрузите компьютер.
Примечание. Если компьютер не был отключен от домена, перезагрузка не требуется.
Если проблему не удалось устранить, выполните указанные ниже действия.
- Выберите в меню Пуск пункт Выполнить, введите команду control admintools и нажмите кнопку ОК.
- Дважды щелкните значок Локальная политика безопасности.
- Щелкните Политики ограниченного использования программ.
Примечание. Если ограничения использования программ отсутствуют, правой кнопкой мыши щелкните Политики ограниченного использования программ, затем выберите Создать новую политику.
- В разделе Тип объекта дважды щелкните Принудительный.
- Выберите вариант Для всех пользователей, кроме локальных администраторов и нажмите кнопку ОК.
- Перезагрузите компьютер.
Все способы:
- Видео инструкция
- Способы деактивации проверки
- Способ 1: Переход в режим загрузки с деактивацией обязательной верификации подписей
- Способ 2: «Командная строка»
- Способ 3: «Редактор групповой политики»
- Способ 4: «Редактор реестра»
- Вопросы и ответы: 52
Иногда операционная система блокирует инсталляцию драйверов, если у них отсутствует цифровая подпись. В Windows 7 эта ситуация особенно часто происходит на 64-разрядных ОС. Давайте разберемся, как в случае необходимости отключить проверку цифровой подписи.
Читайте также: Деактивация проверки подписи драйверов в Виндовс 10
Видео инструкция
Способы деактивации проверки
Сразу следует оговориться, что деактивируя проверку цифровой подписи, вы действуете на свой страх и риск. Дело в том, что неизвестные драйвера могут быть источником уязвимости или прямой опасности, если являются продуктом разработки злоумышленников. Поэтому не рекомендуем снимать защиту при установке объектов, скачанных из интернета, так как это очень рискованно.
В то же время бывают ситуации, когда вы уверены в подлинности драйверов (например, когда они поставляются в комплекте с оборудованием на дисковом носителе), но у них по какой-то причине отсутствует цифровая подпись. Вот для таких случаев и стоит применять описанные ниже способы.
Способ 1: Переход в режим загрузки с деактивацией обязательной верификации подписей
Чтобы деактивировать верификацию подписи драйверов при их инсталляции на Виндовс 7, можно произвести загрузку ОС в особом режиме.
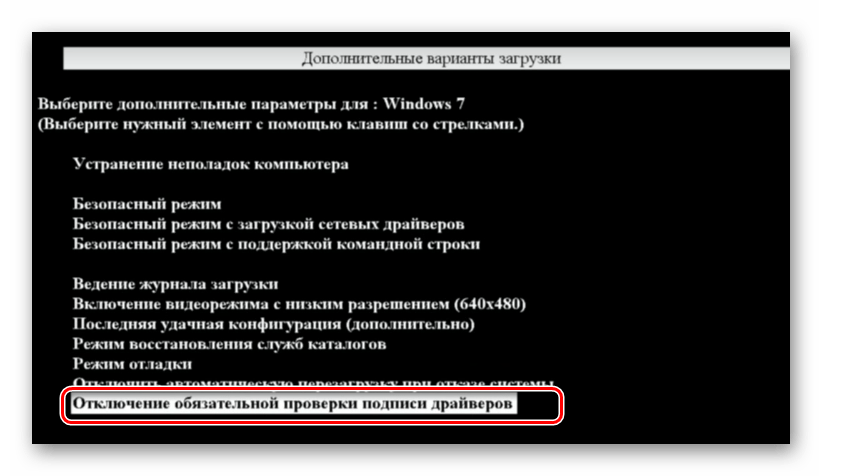
- Перезагрузите или включите компьютер в зависимости от того, в каком состоянии он в данный момент находится. Как только прозвучит звуковой сигнал при запуске, зажмите клавишу F8. В некоторых случаях это может быть иная кнопка или сочетание, в зависимости от версии BIOS, установленного на вашем ПК. Но в подавляющем большинстве случаев нужно применять именно вышеуказанный вариант.
- Откроется перечень вариантов запуска. При помощи стрелок навигации на клавиатуре выберите пункт «Отключение обязательной проверки…» и щелкните Enter.
- После этого ПК запустится в режиме деактивированной проверки подписи и вы сможете спокойно инсталлировать любые драйвера.

Недостаток данного метода заключается в том, что как только вы запустите в следующий раз компьютер в обычном режиме, все установленные драйвера без цифровых подписей тут же слетят. Этот вариант подходит лишь для одноразового подключения, ели вы не планируете использовать устройство регулярно.
Способ 2: «Командная строка»
Отключить верификацию цифровой подписи можно при помощи введения команд в «Командную строку» операционной системы.
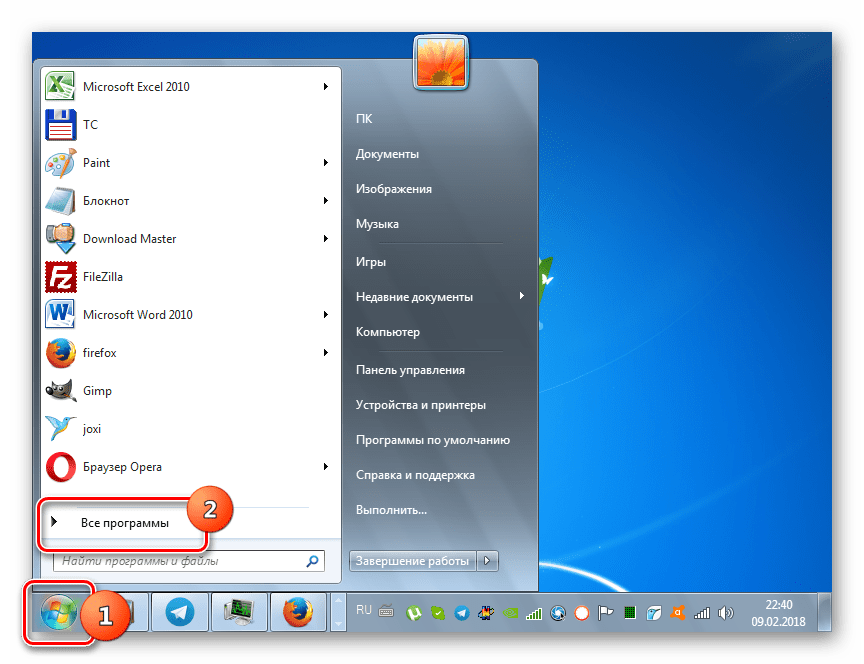
- Жмите «Пуск». Переходите во «Все программы».
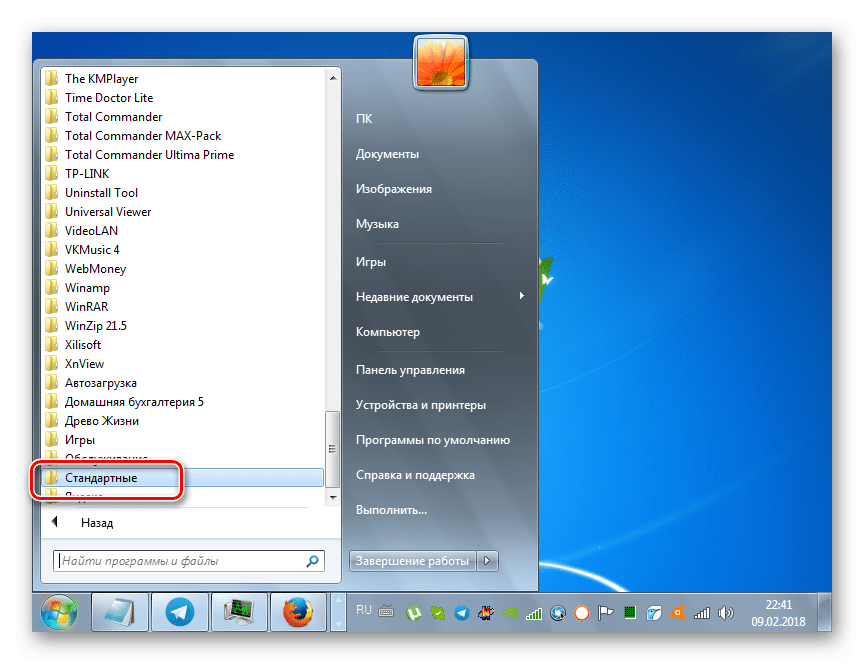
- Щелкайте «Стандартные».
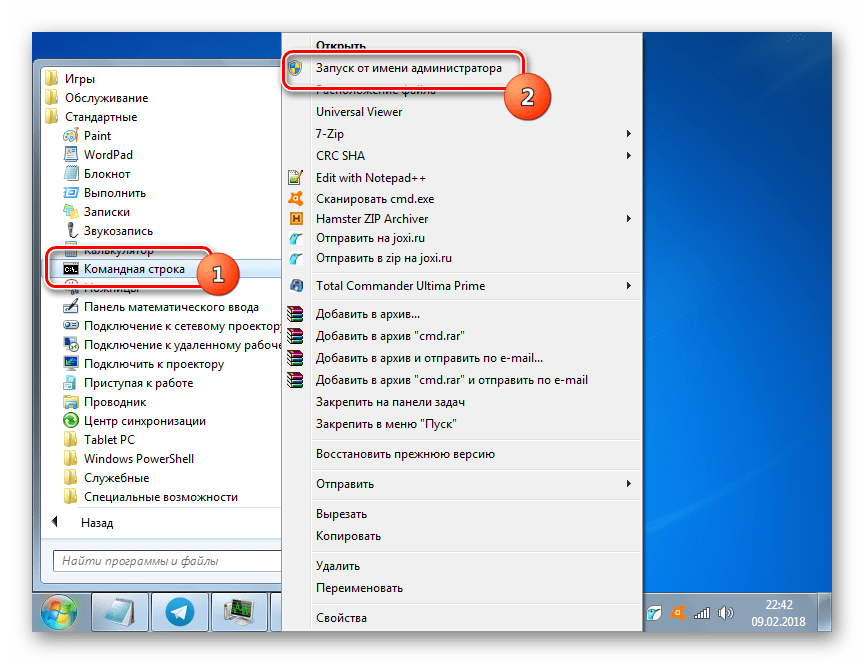
- В раскрывшейся директории ищите «Командная строка». Произведя нажатие по указанному элементу правой кнопкой мышки (ПКМ), выбирайте позицию «Запуск от имени администратора» в отобразившемся перечне.
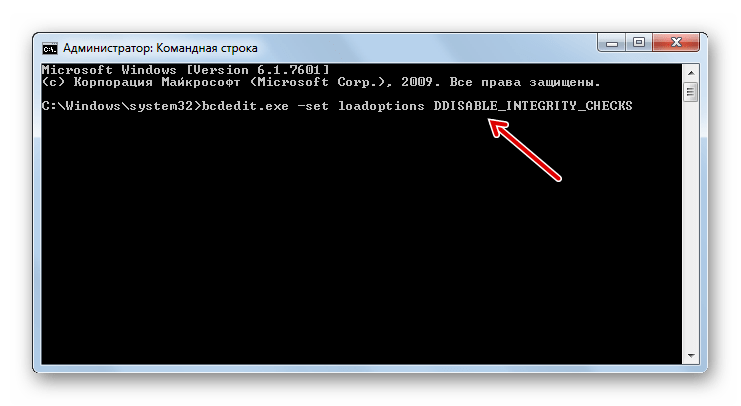
- Активируется «Командная строка», в которую нужно ввести следующее:
bcdedit.exe -set loadoptions DDISABLE_INTEGRITY_CHECKSЩелкайте Enter.
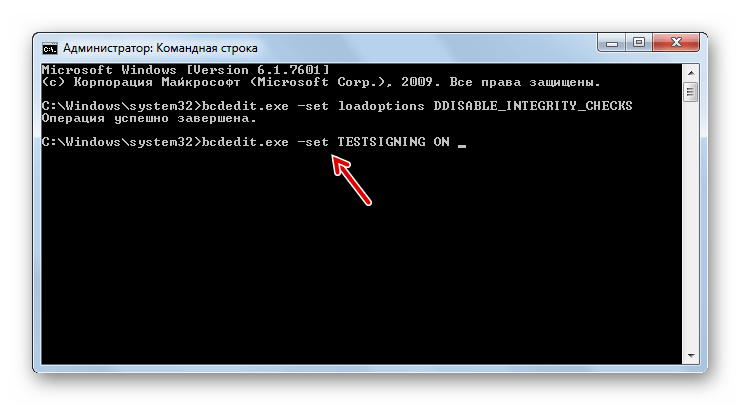
- После появления информации, говорящей об удачном завершении задачи, вбивайте такое выражение:
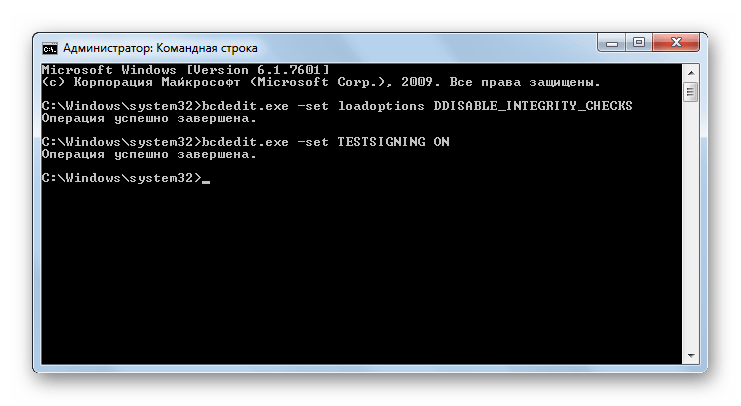
bcdedit.exe -set TESTSIGNING ONСнова применяйте Enter.
- Верификация подписи теперь деактивирована.
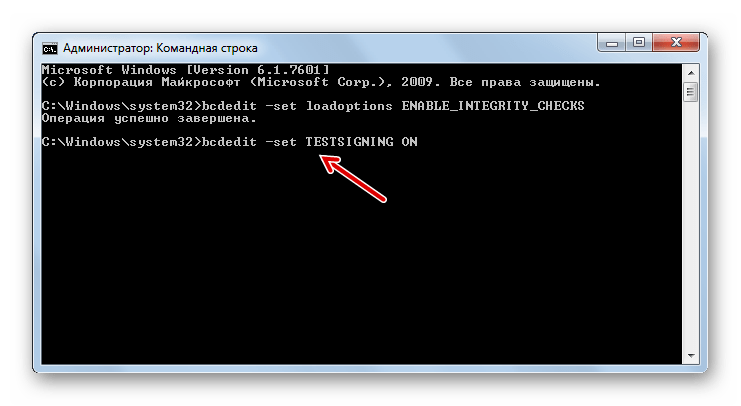
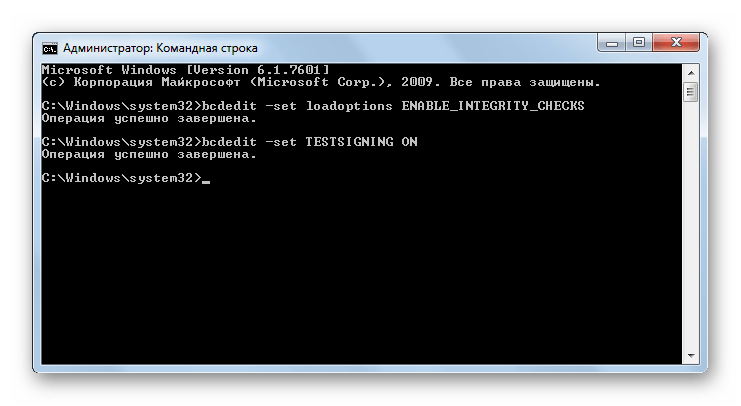
- Для её повторной активации вбейте:
bcdedit -set loadoptions ENABLE_INTEGRITY_CHECKSПрименяйте нажатием Enter.
- Затем вбейте:
bcdedit -set TESTSIGNING ONСнова нажимайте Enter.
- Верификация подписи снова активирована.

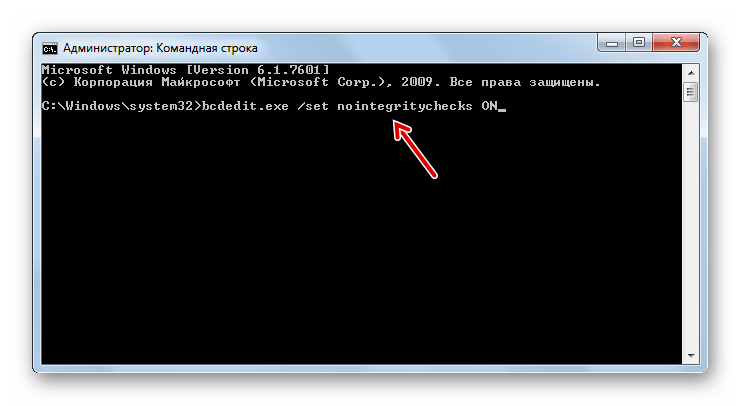
Существует ещё один вариант действий через «Командную строку». В отличие от предыдущего, он требует всего лишь введения одной команды.
- Вводите:
bcdedit.exe /set nointegritychecks ONЖмите Enter.
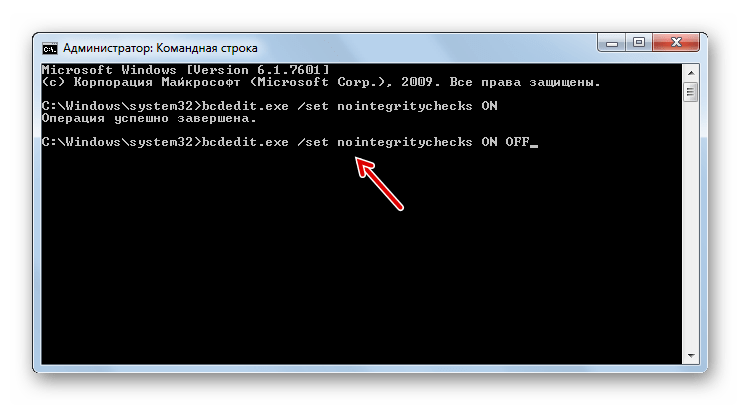
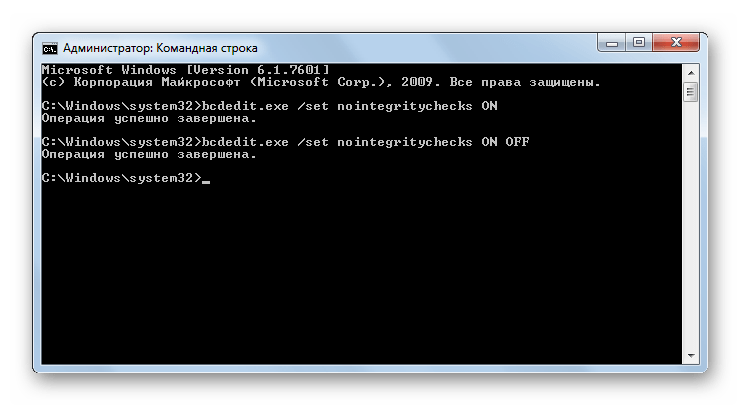
- Проверка деактивирована. Но после инсталляции необходимого драйвера все-таки рекомендуем снова активировать верификацию. В «Командной строке» вбейте:
bcdedit.exe /set nointegritychecks ON OFF - Верификация подписи опять активирована.
Урок: Активация «Командной строки» в Виндовс 7
Способ 3: «Редактор групповой политики»
Другой вариант деактивации верификации подписи осуществляется методом манипуляций в «Редакторе групповой политики». Правда, он доступен только в редакциях «Корпоративная», «Профессиональная» и «Максимальная», а вот для редакций «Домашняя базовая», «Начальная» и «Домашняя расширенная» этот алгоритм выполнения поставленной задачи не подойдет, так как в них отсутствует необходимая функциональность.
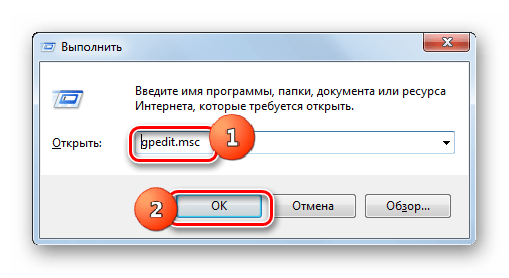
- Для активации нужного нам инструмента воспользуемся оболочкой «Выполнить». Нажмите Win+R. В поле отобразившейся формы введите:
gpedit.mscЖмите «OK».
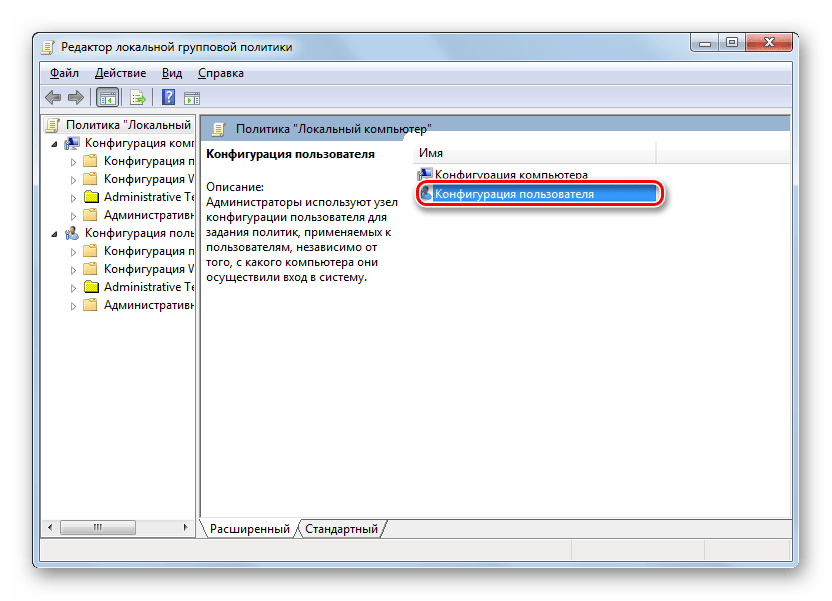
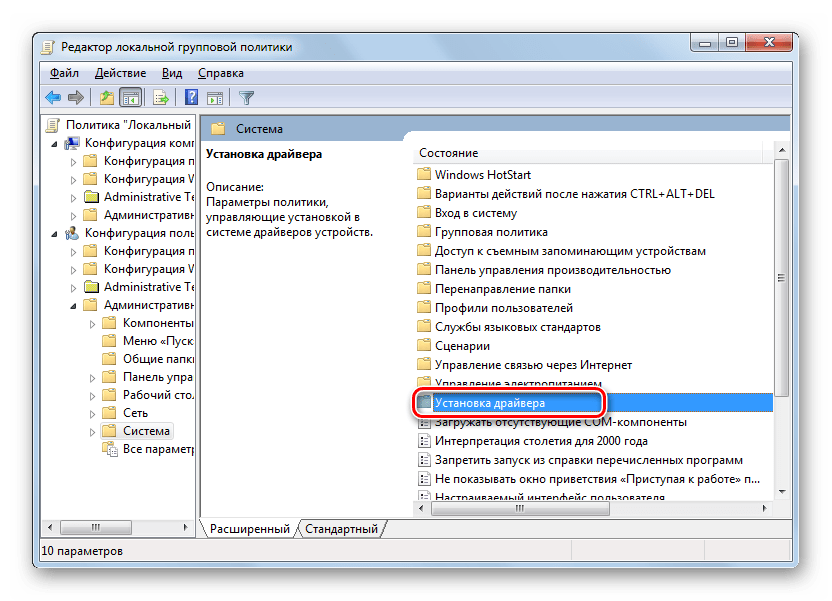
- Запускается необходимый для наших целей инструмент. В центральной части открывшегося окна щелкайте по позиции «Конфигурация пользователя».
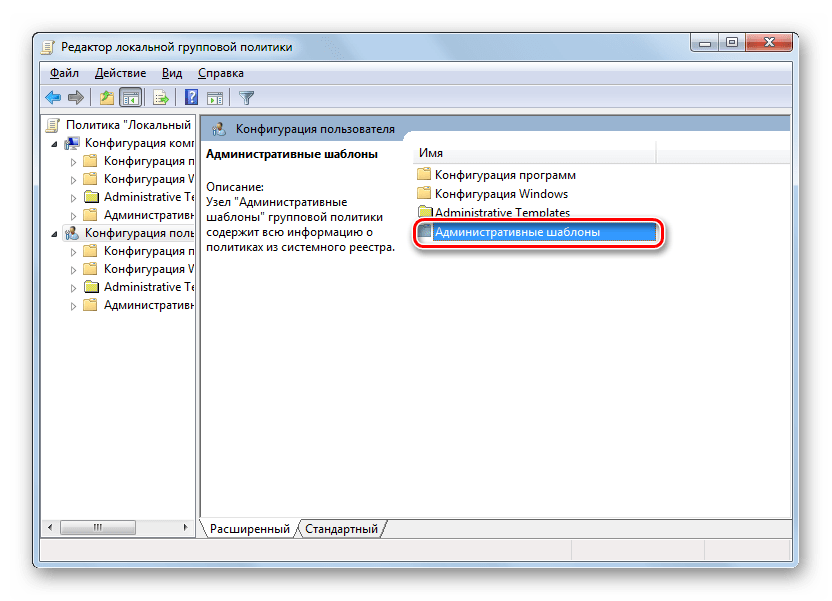
- Далее жмите «Административные шаблоны».
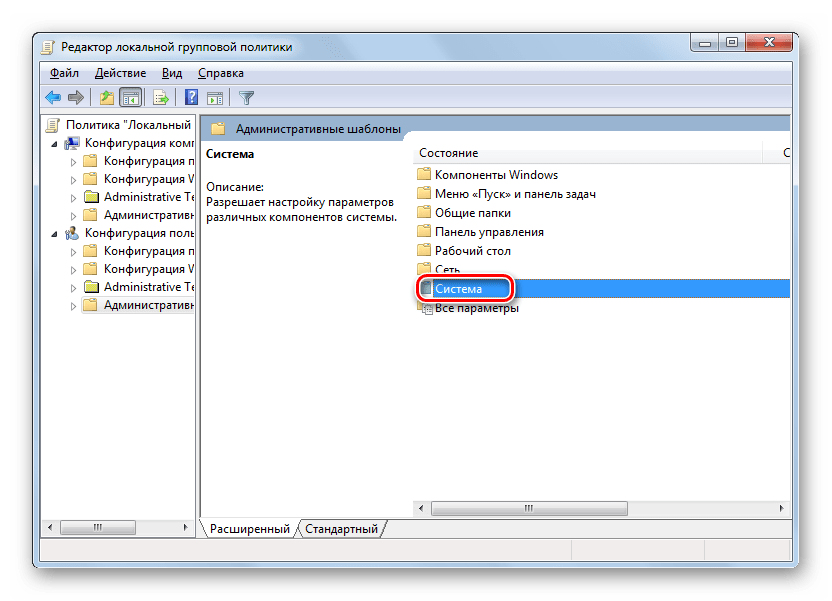
- Теперь войдите в директорию «Система».
- Затем откройте объект «Установка драйвера».
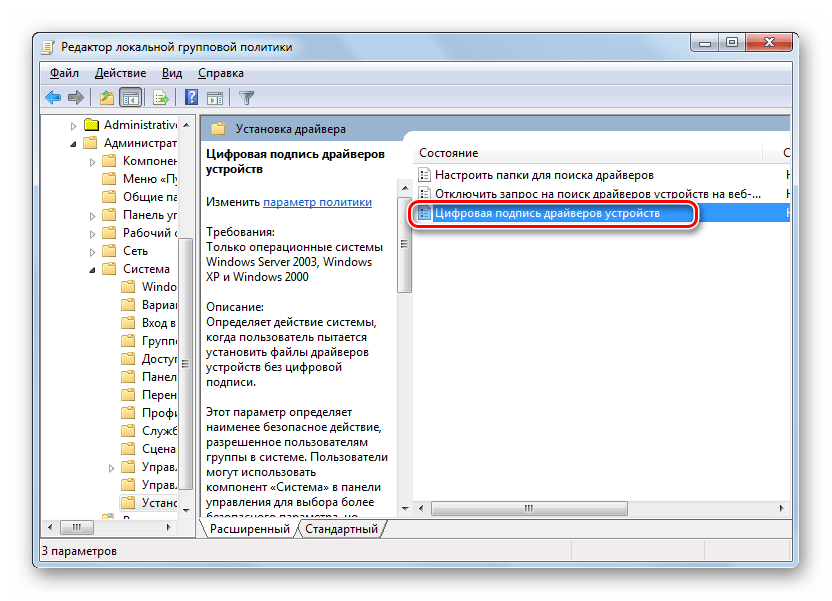
- Теперь щелкайте по названию «Цифровая подпись драйверов…».
- Открывается окно настройки вышеуказанного компонента. Выставьте радиокнопку в положение «Отключить», а затем жмите «Применить» и «OK».
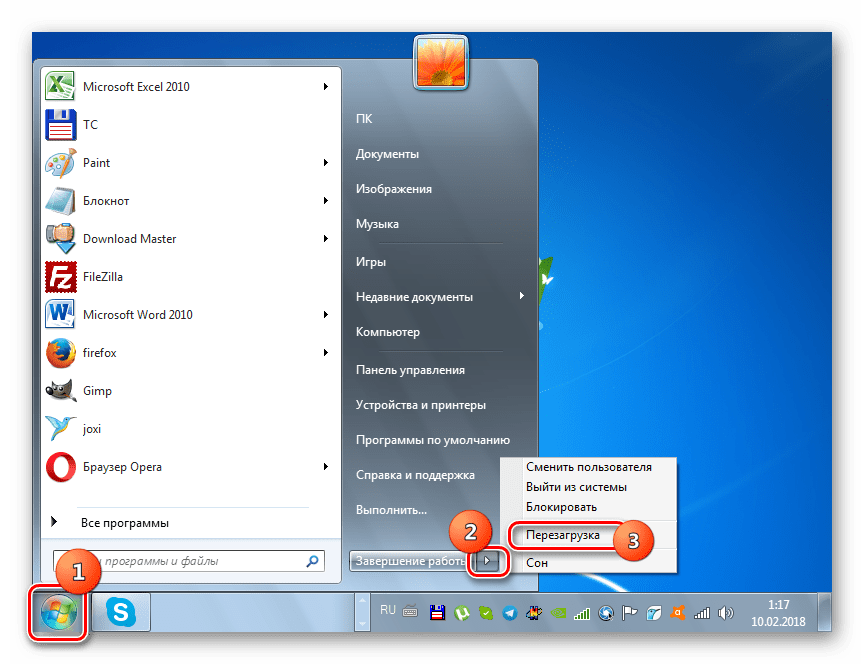
- Теперь закрывайте все открытые окна и программы, далее щелкайте «Пуск». Кликните по треугольной фигуре справа от кнопки «Завершение работы». Выбирайте «Перезагрузка».
- Компьютер будет перезапущен, после чего верификация подписи деактивируется.

Способ 4: «Редактор реестра»
Следующий способ решения поставленного задания выполняется через «Редактор реестра».
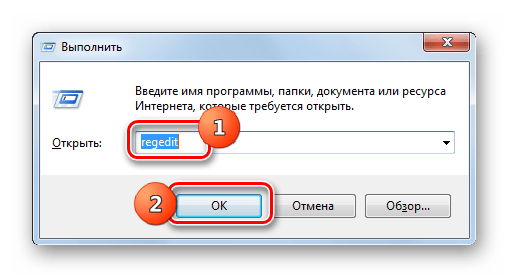
- Наберите Win+R. Введите:
regeditКликните «OK».
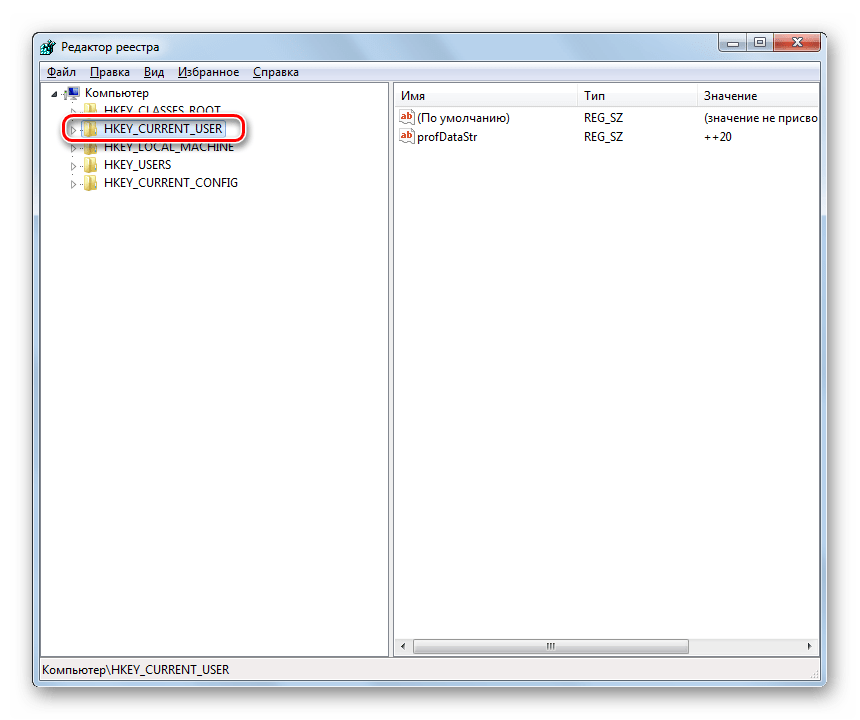
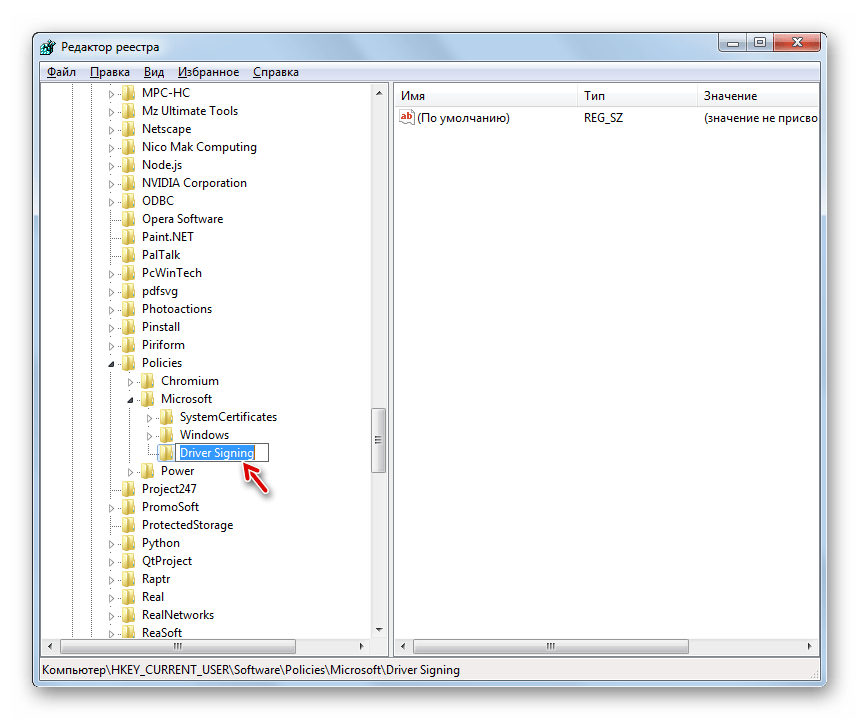
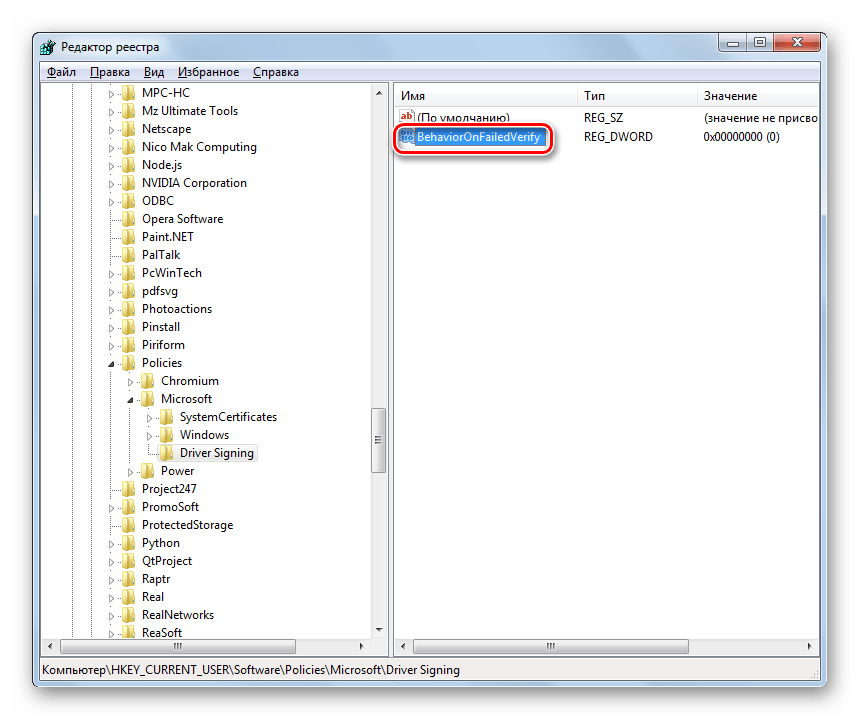
- Активируется оболочка «Редактора реестра». В левой области оболочки кликайте по объекту «HKEY_CURRENT_USER».
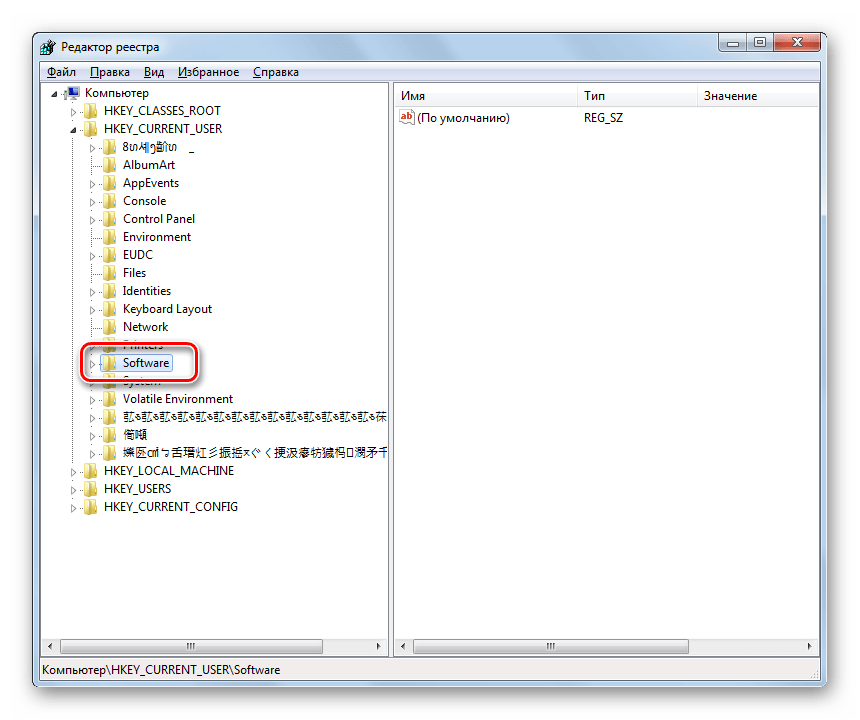
- Далее заходите в каталог «Software».
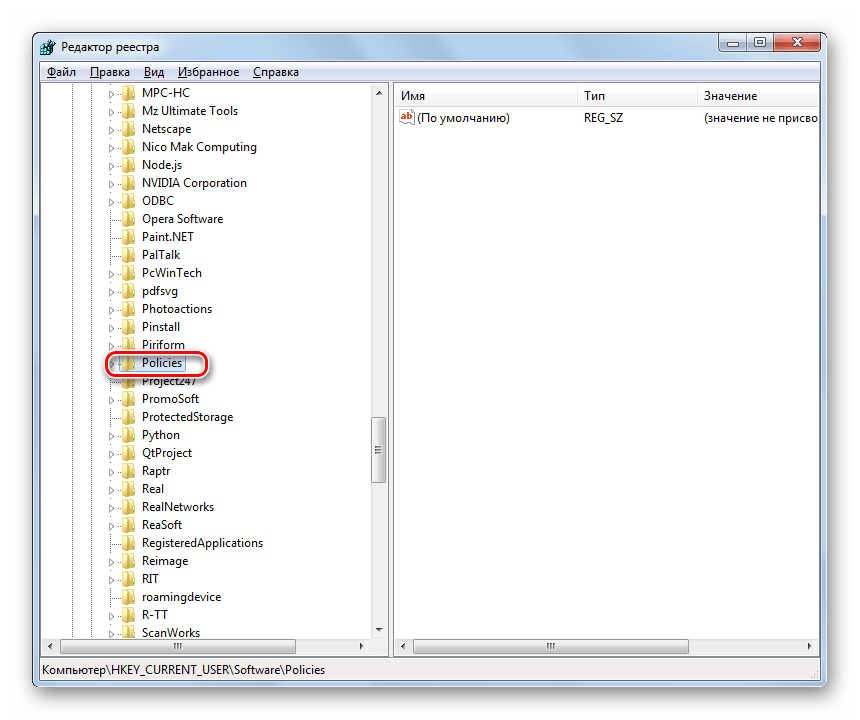
- Откроется очень длинный перечень разделов, расположенных по алфавиту. Отыщите среди элементов наименование «Policies» и кликните по нему.
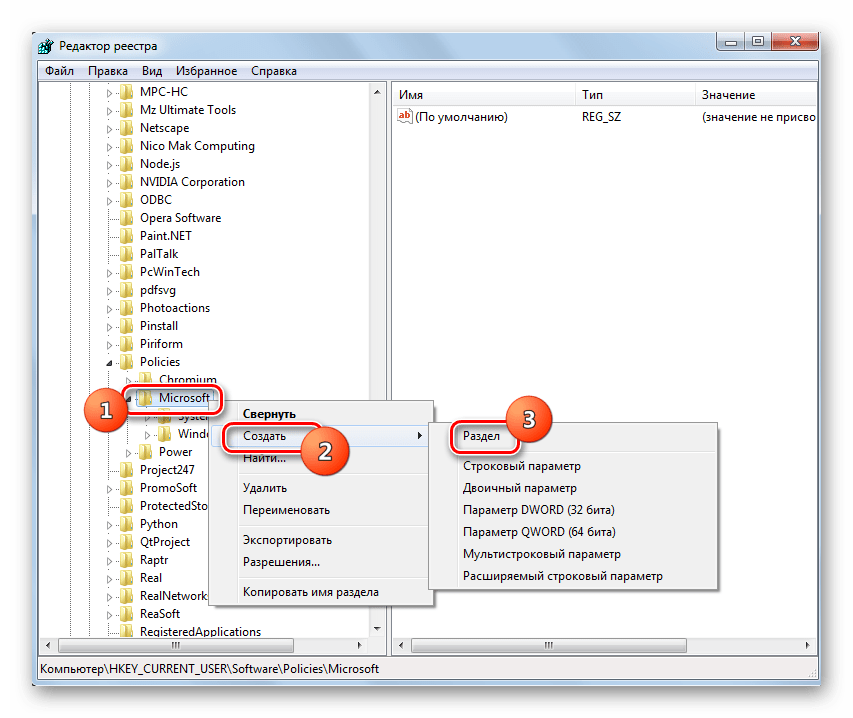
- Далее жмите по названию каталога «Microsoft» ПКМ. В контекстном меню выберите пункт «Создать» и в дополнительном перечне выбирайте вариант «Раздел».
- Отобразится новая папка с активным полем для наименования. Вбейте туда такое имя – «Driver Signing» (без кавычек). Щелкайте Enter.
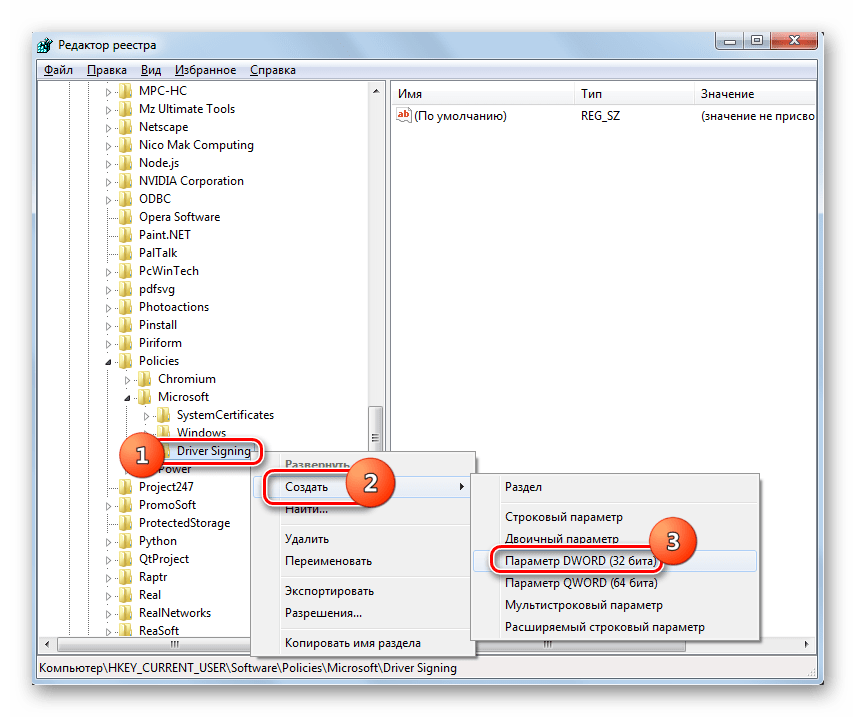
- После этого щелкайте ПКМ по наименованию только что созданного раздела. В списке щелкайте по пункту «Создать». В дополнительном перечне выбирайте вариант «Параметр DWORD 32 bit». Причем эту позицию следует выбрать независимо от того 32-битная у вас система или же 64-битная.
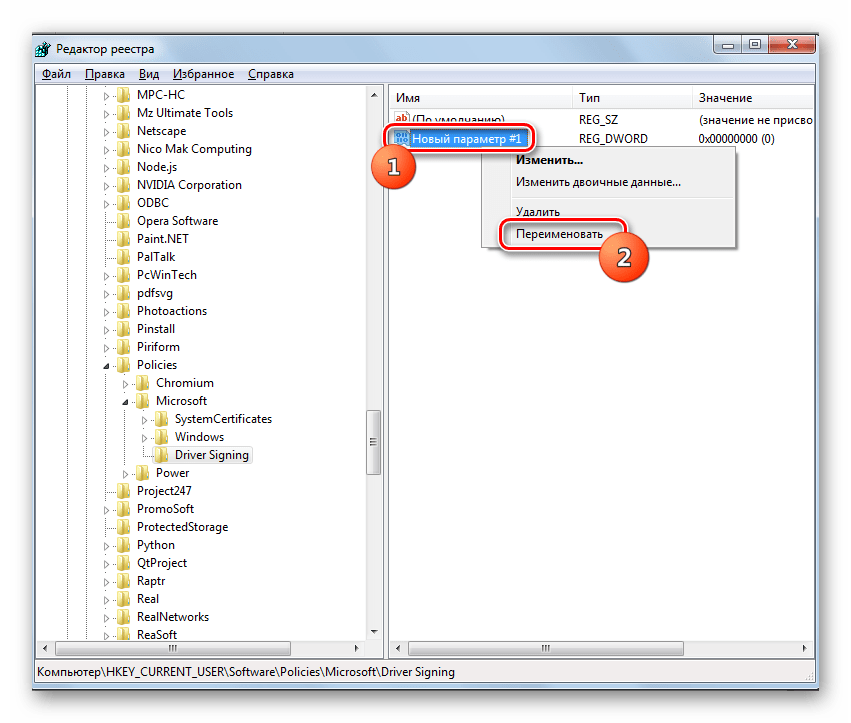
- Теперь в правой части окна отобразится новый параметр. Произведите по нему щелчок ПКМ. Выбирайте «Переименовать».
- После этого название параметра станет активным. Впишите вместо текущего наименования следующее:
BehaviorOnFailedVerifyЩелкните Enter.
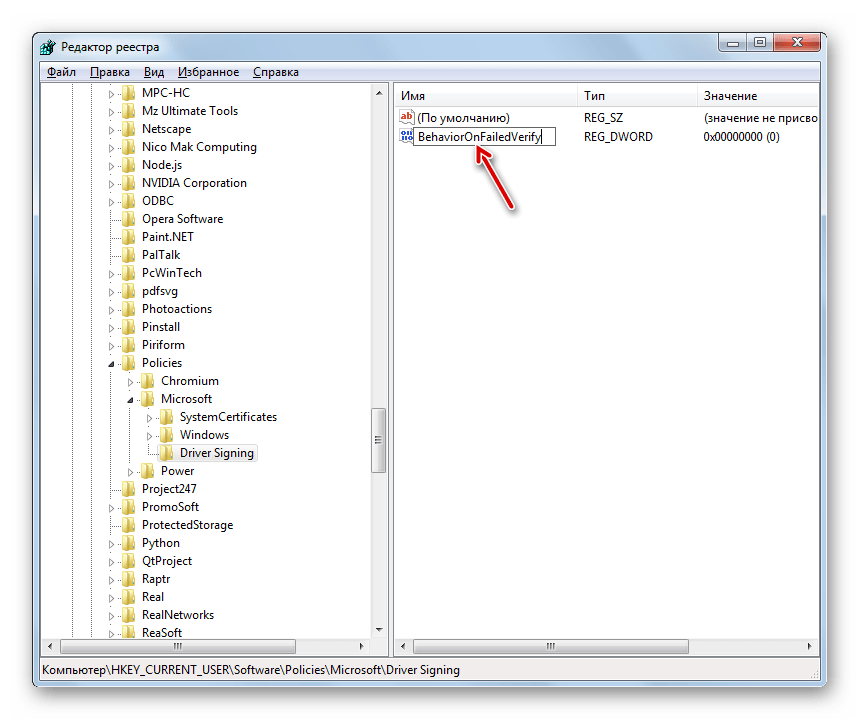
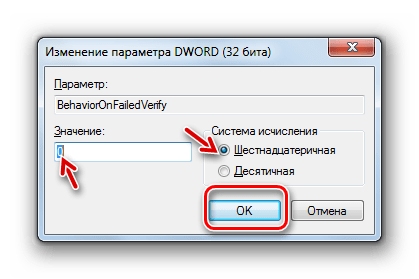
- После этого произведите двойной щелчок левой кнопкой мыши по этому элементу.
- Открывается окно свойств. Необходимо проверить, чтобы радиокнопка в блоке «Система исчисления» стояла в позиции «Шестнадцатеричная», а в поле «Значение» была установлена цифра «0». Если все это так, то просто щелкайте «OK». Если же в окне свойств любой из элементов не отвечает вышеприведенному описанию, то необходимо произвести те установки, о которых было сказано, и только после этого нажать «OK».
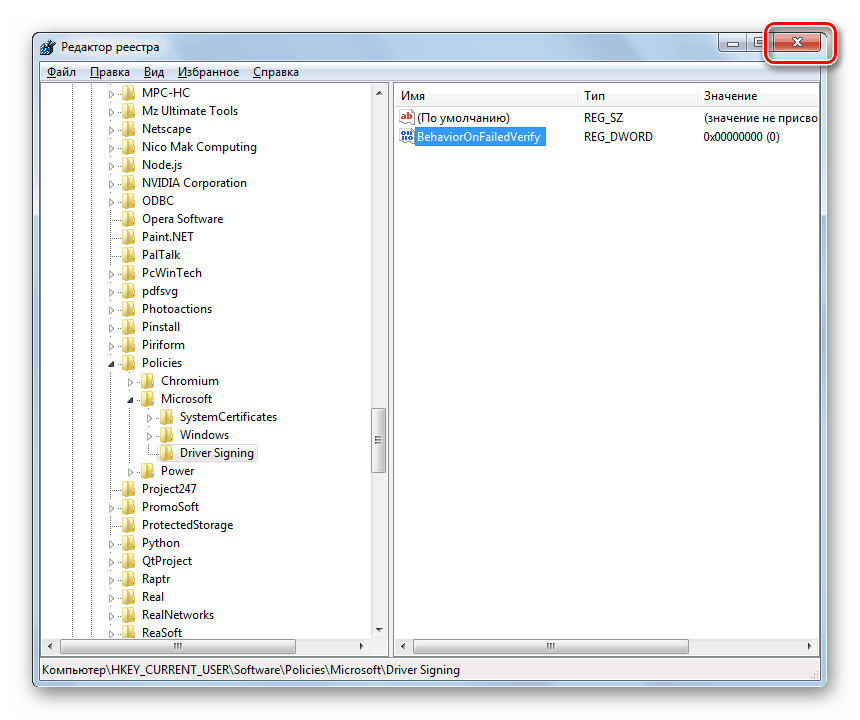
- Теперь закрывайте «Редактор реестра», нажав стандартный значок закрытия окна, и перезагружайте ПК. После процедуры перезапуска верификация подписи будет деактивирована.
В Виндовс 7 существует несколько методов деактивации проверки подписи драйверов. К сожалению, только вариант с включением компьютера в особом режиме запуска гарантировано обеспечит нужный результат. Хотя и он имеет некоторые ограничения, выражающиеся в том, что после запуска ПК в обычном режиме все инсталлированные драйвера без подписи слетят. Остальные методы могут работать не на всех компьютерах. Их работоспособность зависит от редакции ОС и установленных обновлений. Поэтому, возможно, придется перепробовать несколько вариантов, прежде чем вы получите ожидаемый результат.
Наша группа в TelegramПолезные советы и помощь
,
In Windows 8 (& 8.1), 7 & Vista Operating Systems, you cannot load a driver or execute a program that hasn’t a Driver Signature. Driver Signing is a method to verify the identity of the software publisher or the hardware (driver) vendor in order to protect your system from been infected with malware rootkits, that are able to run on the lowest level of Operating System. This means that all drivers and programs must be digitally signed (verified) in order to be installed and run on latest Windows Operating Systems.
Digital Signatures ensure that the software publisher or hardware vendor is trusted and verified by Microsoft. But in real life, publishers and vendors cannot always pay Microsoft to verify all their products or Microsoft cannot verify all the drivers or programs that are published every day. But this becomes a problem in the case that you own an old unsigned legitimate software or driver and you want to install or load it to your computer, because the OS doesn’t allow it to work or load.
Problems-Symptoms that are solved with this guide:
– Windows cannot verify the digital signature for this file. (0xc0000428)
– Windows requires digitally signed driver OR Digitally signed driver is required.
– Digital Signature Not Found.
– Cannot load or install an unsigned driver.
– Cannot run (execute) an unsigned software (program).
– Windows did not find a Microsoft signature associated with the software package you want to install.
In order to resolve digitally signed driver installation errors, follow the steps below:
How to Disable Driver Signature Enforcement in Windows 8.1, Windows 8, Windows 7, Windows Server 2008, or Windows Vista.
Attention: Keep in mind that disabling the Driver Signature Enforcement is a security risk, and you must disable it only if you are sure that the driver or program that you want to install and run is trusted and legitimate.
Solution 1: Disable Driver Signature once.
Solution 2: Disable Driver Signature completely.
Solution 1: Disable Driver Signature once.*
* Note: Use this solution to disable driver Signature Enforcement just once in order to install a unsigned driver (e.g. your old printer driver).
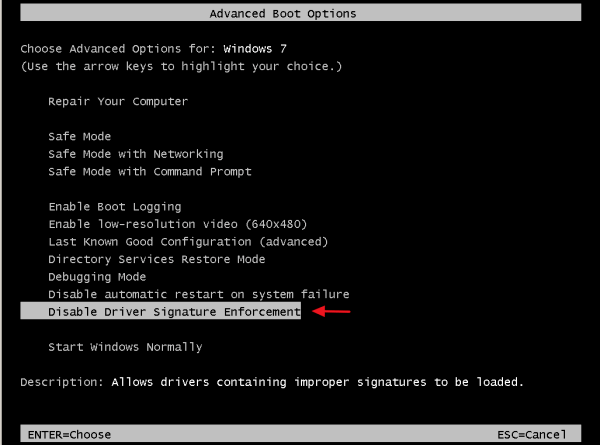
Step 1. Enter in Advanced Options menu.
Windows 7 & Vista
To enter in Advanced Options menu in Windows 7 and Vista OS:
- Close all programs and reboot your computer.
- Press the «F8» key as your computer is booting up, before the appearance of the Windows logo.
- When the «Windows Advanced Options Menu» appears on your screen, use your keyboard arrow keys to highlight the “Disable Driver Signature Enforcement” option and then press «ENTER«.
Windows 10, 8 & 8.1
To enter in Advanced Options menu in Windows 10, 8.1 & 8 OS:
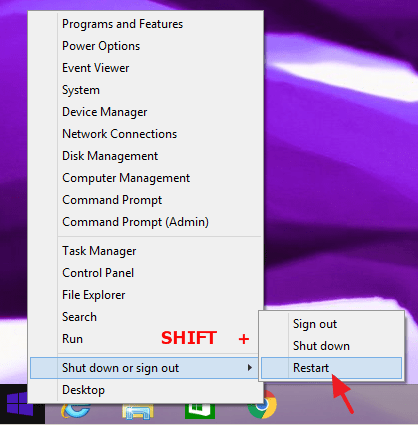
1. Right click at the Windows Start button and select Shut Down or sign out.
2. Press and HOLD down the SHIFT key and then click Restart.
3. When Windows restarts, press “Troubleshoot” .
4. In the “Troubleshoot options” screen, choose “Advanced options”.
5. In the “Advanced Options” window, choose “Startup Settings”.

6. In “Startup Settings” screen, click “Restart”.

7. After restart, select the «Disable driver signature enforcement» option and press Enter. *
* Note: If you see the below screen (Startup Settings), press the “F7” (or the “7”) key on your keyboard to select the“Disable driver signature enforcement” option.
8. Then, proceed to install your unsigned driver. During the installation procedure, Windows will inform you that can’t verify the publisher of this driver software. At this point, ignore the warning message and choose “Install this driver software anyway” to complete the installation.

Normally installation should be done without errors now. Keep in mind that after the restart, the driver signature enforcement will be enabled again to avoid security risks. If you want to keep driver signature enforcement always disabled, then you must apply solution 2.
Solution 2: Disable Driver Signature completely.*
*Note: Use this solution only if you want to keep driver signature enforcement always disabled. (e.g. if you always want to run an old legitimate software).
In this solution, we are going to modify Windows Boot loader options with the BCDEDIT tool.
Step 1. Disable Secure Boot in BIOS.
1. Power On your computer and launch BIOS SETUP settings.
2. In BIOS, disable the Secure Boot option. (the setting is commonly found at Security section or at Boot Options section)
Step 2. Modify Windows Boot Loader.
– In order to modify boot loader, open “Command Prompt” in administrative mode:
1. Right click at the Windows Start button and choose “Command Prompt (Admin)”.
2. Choose “Yes” at User Account Control” warning message:
3. Inside the command prompt window, type the following command and press “Enter”:
- bcdedit /set testsigning on

You should receive “The operation completed successfully” message.

4. Close command prompt window and restart your computer.
From now on, you will be able to install or run any unsigned driver or program without problems.
How to enable Driver Signature Enforcement.
1. In case that you want to enable driver signature enforcement in the future and avoid security risks, then open “Command Prompt” with elevate rights again.
2. Type type the following command and press “Enter”
- bcdedit /set testsigning off

You should receive “The operation completed successfully” message.

3. Close command prompt window and restart your computer.
4. Install the unsigned driver. *
* Note: If you still cannot install unsigned drivers then:
1. Open a command prompt with Administrative privileges and type this command:
- bcdedit /set nointegritychecks ON
2. Restart your computer
3. Install the unsigned driver.
To re-enable device driver signing, again type: bcdedit /set nointegritychecks OFF
That’s it!
If this article was useful for you, please consider supporting us by making a donation. Even $1 can a make a huge difference for us in our effort to continue to help others while keeping this site free:
- Author
- Recent Posts
Konstantinos is the founder and administrator of Wintips.org. Since 1995 he works and provides IT support as a computer and network expert to individuals and large companies. He is specialized in solving problems related to Windows or other Microsoft products (Windows Server, Office, Microsoft 365, etc.).
-
Simple07
- Posts: 169
- Joined: 5. Nov 2014, 16:05
VBox 7.0.12 GA cannot verify digital signature Windows 7
Installed VirtualBox 7.0.12 and when trying to update its Guest Additions on Windows 7 I get the following error message:
«Windows cannot verify the digital signature for this file. A recent hardware or software change might have installed a file that is signed incorrectly or damaged, or that might be malicious software form an unknown source. «
However, updating Guest Additions 7.0.12 on Windows XP and Windows 11 work fine.
I tried reinstalling Guest Additions 7.0.12 on Windows 7 few times, to no avail, but installing Guest Additions 7.0.10 on Windows 7 works fine!!
-
Simple07
- Posts: 169
- Joined: 5. Nov 2014, 16:05
Re: VBox 7.0.12 GA cannot verify digital signature Windows 7
Post
by Simple07 »
I tried a number of solutions, including registry editing, nothing worked.
But what worked for me is, start an Administrative CMD and run «bcdedit /set testsigning on»
Rebooted and successfully installed VirtualBox Guest Additions 7.0.12.
Last edited by klaus on 6. Nov 2023, 23:07, edited 1 time in total.
Reason: fix bcdedit command
-
tonny
- Posts: 22
- Joined: 7. Jan 2010, 23:54
- Primary OS: MS Windows 10
- VBox Version: VirtualBox+Oracle ExtPack
- Guest OSses: Windows 7
Re: VBox 7.0.12 GA cannot verify digital signature Windows 7
Post
by tonny »
In my case Guest additions installed without any error but after restart Windows 7 fails to boot and always loads startup repair.
I used F8 to select «Disable Driver Signature Enforcement» and after boot I used «bcdedit /set testsigning on» as suggested.
It now works ok with signature disabled.
-
FST
- Posts: 37
- Joined: 30. Jul 2014, 09:43
Re: Discuss the VirtualBox 7.0.12 release here
Post
by FST »
LOG found at C:\Windows\System32\LogFiles\SrtTrail.txt
Found cause of error:
———
The file «d:\windows\system32\drivers\vboxguest.sys» required for startup is corrupted.
-
ant
- Posts: 382
- Joined: 9. Jul 2007, 20:02
- Primary OS: MS Windows other
- VBox Version: OSE other
- Guest OSses: Windows and macOSes
- Location: An Ant Farm
- Contact:
Re: Discuss the VirtualBox 7.0.12 release here
Post
by ant »
galitsyn wrote: ↑17. Oct 2023, 16:14
You can download the release here.
VirtualBox 7.0.12 is a maintenance release.Changelog is here.
I hope we will get a new version with a fix soon. Is there a bug report of this?
-
fufu65
- Posts: 1
- Joined: 18. Oct 2023, 12:12
Re: Discuss the VirtualBox 7.0.12 release here
Post
by fufu65 »
Same problem with VB 6.1.48 released on the same date: guest with Windows Server 2008 R2 won’t boot.
Disabling driver signature only works on the first reboot.
Disabled driver signature, uninstalled Guest Additions 6.1.48 and reinstalled GA 6.1.46 (VB also on 6.1.48, so the problem is in the GA).
-
Simple07
- Posts: 169
- Joined: 5. Nov 2014, 16:05
Re: Discuss the VirtualBox 7.0.12 release here
Post
by Simple07 »
All the below testing was done on Windows 7 Virtual Machine.
I tried to install Guest Additions 7.0.11-159406 on VirtualBox 7.0.12, but it gave the same message.
— Uninstalled VirtualBox 7.0.12 completely and deleted the C:\Oracle folder, installed VirtualBox 7.0.11-159406 with its Extension Pack and tried to install GA 7.0.11 and GA 7.0.12 but both gave the same error.
— Uninstalled VirtualBox completely deleting C:\Oracle folder and installed VirtualBox 7.0.10. with its Extension Pack and tried to install GA 7.0.11 and GA 7.0.12 but both gave the same error.
It looks like the error was already in 7.0.11 but not enough testing was performed.
Last edited by Simple07 on 18. Oct 2023, 19:01, edited 1 time in total.
-
mpack
- Site Moderator
- Posts: 39134
- Joined: 4. Sep 2008, 17:09
- Primary OS: MS Windows 10
- VBox Version: VirtualBox+Oracle ExtPack
- Guest OSses: Mostly XP
Re: Discuss the VirtualBox 7.0.12 release here
Post
by mpack »
fufu65 wrote: ↑18. Oct 2023, 12:26
Same problem with VB 6.1.48 released on the same date: guest with Windows Server 2008 R2 won’t boot.
I installed 6.1.48, then the 6.1.48 GAs into a Win10 VM, and — no problem.
How far into a boot does yours get?
-
ant
- Posts: 382
- Joined: 9. Jul 2007, 20:02
- Primary OS: MS Windows other
- VBox Version: OSE other
- Guest OSses: Windows and macOSes
- Location: An Ant Farm
- Contact:
Re: Discuss the VirtualBox 7.0.12 release here
Post
by ant »
mpack wrote: ↑18. Oct 2023, 16:58
fufu65 wrote: ↑18. Oct 2023, 12:26
Same problem with VB 6.1.48 released on the same date: guest with Windows Server 2008 R2 won’t boot.I installed 6.1.48, then the 6.1.48 GAs into a Win10 VM, and — no problem.
How far into a boot does yours get?
Try installing GA in 64-bit W7 which others and I are having problems with. Mine always end up in Startup Repair screen after «Loading Files» screen. See my viewtopic.php?t=110349 thread.
-
mpack
- Site Moderator
- Posts: 39134
- Joined: 4. Sep 2008, 17:09
- Primary OS: MS Windows 10
- VBox Version: VirtualBox+Oracle ExtPack
- Guest OSses: Mostly XP
Re: Discuss the VirtualBox 7.0.12 release here
Post
by mpack »
Give me time! In fact I just tried it with a Win7-64bit guest, and now I see big problems. «Startup Repair» diagnostics says that «Boot critical file D:\Windows\system32\DRIVERS\VBoxGuest.sys is corrupt». Odd that it says D:, as the system drive is C:, D: is the CD I think (I can’t boot up to check!).
Ok, got to a terminal. Weird! Drive C seems to be a virtual folder containing one file «rescuepe.log». Perhaps this is something that the boot repair mode in Win7 does. I’m about to try deleting the «corrupt» file. {Edit}Yes, that gets me in. Now to reinstall the 6.1.46 GAs! {Edit2}That worked too.
Given that the file is probably not really corrupted, I’m going to guess that it’s missing a certificate that works in Win7. I don’t know why Win7 considers it «boot critical» tho.
-
ant
- Posts: 382
- Joined: 9. Jul 2007, 20:02
- Primary OS: MS Windows other
- VBox Version: OSE other
- Guest OSses: Windows and macOSes
- Location: An Ant Farm
- Contact:
Re: Discuss the VirtualBox 7.0.12 release here
Post
by ant »
mpack wrote: ↑18. Oct 2023, 17:07
Give me time! In fact I just tried it with a Win7-64bit guest, and now I see big problems…
OK. At least, you reproduced the issue.
-
mpack
- Site Moderator
- Posts: 39134
- Joined: 4. Sep 2008, 17:09
- Primary OS: MS Windows 10
- VBox Version: VirtualBox+Oracle ExtPack
- Guest OSses: Mostly XP
Re: Discuss the VirtualBox 7.0.12 release here
Post
by mpack »
I tried again and this time tried to pause it during the GAs install so I could read the messages. I get an error that it couldn’t replace «VBoxService.exe», and that after a bunch of errors concerning VBoxCertUtil.exe failures calling CertEnumSystemStore and CertOpenStore.
The final error message directs me to look at a file C:\Program Files\Oracle\VirtualBox\Windows Guest Additions\install_ui.log — which does not exist.
-
fth0
- Volunteer
- Posts: 5690
- Joined: 14. Feb 2019, 03:06
- Primary OS: Mac OS X other
- VBox Version: VirtualBox+Oracle ExtPack
- Guest OSses: Linux, Windows 10, …
- Location: Germany
Re: Discuss the VirtualBox 7.0.12 release here
Post
by fth0 »
mpack wrote: ↑18. Oct 2023, 17:49
The final error message directs me to look at a file C:\Program Files\Oracle\VirtualBox\Windows Guest Additions\install_ui.log — which does not exist.
Let’s have a look at «C:\Program Files\Oracle\VirtualBox Guest Additions\install_drivers.log» and «C:\Windows\INF\setupapi.dev.log» instead. And perhaps a screenshot of the messages during the installation process.
Edit:
Corrected the path and removed a superfluous space that crept in in front of the first file name. And added quotes.
Last edited by fth0 on 19. Oct 2023, 16:15, edited 1 time in total.
Applies ToWindows 7 Service Pack 1 Windows 7 Enterprise Windows 7 Home Premium Windows 7 Ultimate Windows 7 Starter Windows 7 Home Basic Windows 7 Professional Windows Server 2008 R2 Service Pack 1 Windows Server 2008 R2 Datacenter Windows Server 2008 R2 Enterprise Windows Server 2008 R2 for Itanium-Based Systems Windows Server 2008 R2 Foundation Windows Server 2008 R2 Standard Windows Server 2008 R2 Web Edition
Update information
The KB 3004394 update that was dated December 10, 2014 can cause additional problems on computers that are running Windows 7 Service Pack 1 (SP1) and Windows Server 2008 R2 SP1. This includes the inability to install future updates. This new update is available to remove KB 3004394 from your computer.
For more information about the KB 3004394 update, see the following Microsoft Knowledge Base article:
3004394 December 2014 update for Windows Root Certificate Program in Windows
How to obtain this update
Windows Update
Microsoft Download Center
The following files are available for download from the Microsoft Download Center.
|
Operating system |
Update |
|---|---|
|
All supported versions of Windows Server 2008 R2 for Itanium-based systems |
Download the package now. |
|
All supported x86-based versions of Windows 7 |
Download the package now. |
|
All supported x64-based versions of Windows 7 and Windows Server 2008 R2 |
Download the package now. |
For more information about how to download Microsoft support files, click the following article number to view the article in the Microsoft Knowledge Base:
119591 How to obtain Microsoft support files from online services Microsoft scanned this file for viruses. Microsoft used the most current virus-detection software that was available on the date that the file was posted. The file is stored on security-enhanced servers that help prevent any unauthorized changes to the file.
Prerequisites
There are no prerequisites for installing this update.
Registry information
To apply this update, you do not have to make any changes to the registry.
Restart requirement
You may have to restart the computer after you apply this update.
Update replacement information
This update does not replace a previously released update.
Need more help?
Want more options?
Explore subscription benefits, browse training courses, learn how to secure your device, and more.