
Attention Before you read this post, I highly recommend you check out my resources page for access to the tools and services I use to not only maintain my system but also fix all my computer errors, by clicking here!
Are you one of the many unfortunate souls that has encountered the failed to create D3D device error message while attempting to run a game using its executable file or within Steam’s game library? This is an error that occurs on virtually every iteration of Windows (7, 8 & 10). So, let’s talk about it.
If you’ve been playing games on your PC for any real length of time, then I’m certain you’ve come face to face with at least one launch error. Failed to create D3D Device is just one of many, though not as common, but just as irritating as any of its type.
In the vast majority of cases, this error is reported to occur while attempting to run games via Steam, with it almost being isolated to a couple of titles. Most notably:
- Borderlands 1 & 2
- Left 4 Dead 2
- CS: GO
- Portal
- Rocket League
Fortunately, there are verifiable ways you can fix this error. However, before we get to those solutions, let’s take a closer look at its common causes.
What Causes Failed to Create D3D Device errors?
Any error that has D3D included in it, is typically in reference to the DirectX API. DirectX errors are usually caused by the following:
- Outdated or Corrupted Drivers: It’s important you have the most up-to-date drivers for your graphics card.
- Insufficient Resources: Your system may lack the required specifications to run the game.
- Corrupted Game Data: Files belonging to the game (you’re attempting to run) may have been corrupted, possibly by a virus.
- Incorrect DirectX Version: The DirectX version on your system may be outdated or too up-to-date for your graphics card (depending on its age).
- Conflicting Apps: A program running in the background may be conflicting/interfering with the game you’re attempting to play.
With possible causes out of the way, let’s now explore the various ways you can fix this problem.
How to Fix It
Whenever you’re faced with any problem on your system, the first thing you’ll want to do is restart it. In many instances this may be enough to fix, whatever is causing the error.
But in instances where this isn’t enough, there are other things you will need to consider. Such as, a reinstallation of your DirectX runtime files.
It’s possible the files belonging to the DirectX API were damaged. In which case, you should try a reinstallation as a possible solution.
To do this, you will need to download DirectX from Microsoft. Which can be done, from the following link: https://www.microsoft.com/en-gb/download/details.aspx?id=35
Just choose the appropriate language and click on Download.

Once it has successfully downloaded to your system, double-click on it (to run it), then follow the onscreen instructions to complete the reinstallation.
If the reinstall fails to fix the failed to create D3D device error, then you may want to try these additional methods below.
Reinstall Drivers
One of the most common causes of a failed to create D3D device error is outdated or corrupted graphics drivers. The corruption could have been caused by a multitude of things, such as an abrupt shutdown, to a virus infection. Either way, you’ll want to ensure you have the most up-to-date drivers on your system.
Typically, when updating or reinstalling your drivers, you’ll first want to uninstall them. Once you’ve done that, you’ll need to visit the website of your device brand and download the latest iteration off there.
Alternatively, you could simply use DriverFinder, which is a driver automation tool. Just download, install and run it, and it’ll do the rest. It’s very simple to use.
Anyway, you can learn more about this useful tool, from the link below:
CLICK HERE TO CHECK OUT DRIVERFINDER
To ensure your systems healthy, running at optimal levels, it’s recommended that you routinely run a Windows repair tool. These tools are highly advanced, capable of detecting and fixing a plethora of issues on your system.
The tool I’m specifically talking about is called Advanced System Repair Pro, which is a tool, highly adept at fixing BSOD, DLL, App and Game related errors.
All you need to do is click on scan, and it will detect and fix where applicable.
You can learn more about this powerful tool from the link below:
CLICK HERE TO CHECK OUT ADVANCED SYSTEM REPAIR PRO
Verify Integrity of Game Files
Steam is a highly advanced digital distribution service that comes with a wide range of features and capabilities. One of these features is its ability to check and repair the integrity of a game install.
This can be especially helpful if a file belonging to an installed game was quarantined or blocked by your internet security tool.
If the failed to create D3D device error is the result of game data corruption, then this feature will root it out and fix it.
For step-by-step instructions on how to access and use this feature, check out my post on fixing steam_api64.dll errors.
Enable Graphics Service(s)
Another fairly common reason for failed to create D3D device errors is when services belonging to your graphics card are not running (or working). This could be due to corruption or a misconfiguration.
Either way, you may be able to fix the problem, by accessing System Configuration and enabling it.
To do that, follow the steps below:
1. Boot into your system as a full administrator.
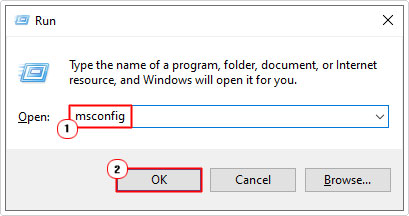
2. Then press + R, type msconfig and click on OK.
3. This will bring up System Configuration, from here, click on the Service Tab, next, tick the box next to any Graphics related Services and click on OK.

Note: Alternatively, you can simply click on Enable All, then click on OK.

4. Lastly, restart your system, then verify whether the error has been fixed.
Run in Windowed Mode
One method that has proven very effective at fixing failed to create D3D device errors involves forcing the game to start in Windowed mode. For those of you who don’t like Windowed mode, once the game has successfully loaded up, you can set it back to full screen – so you need not worry.
To run the game in Windowed mode, you have two main options. The first, is outlined below:
Windowed Mode via Steam
1. Boot into your system as a full administrator then load up Steam.
2. When Steam loads up, click on Library, then right-click on the Problematic Game and select Properties.

3. This will bring up the Game Properties, from here, type –windowed in the Launch Options box, then close Properties.

4. Now, run the game through Steam to check whether or not Windowed mode has fixed the Failed to create D3D Device error.
5. If the game runs successfully, then you should be able to set the game back to full-screen within Game settings.
Windowed Mode Using Shortcut
1. First, open up Steam again, then click on Library.
2. Next, right-click on the Problematic Game and select Manage -> Browse local files.

3. This will bring up the Game Folder, from here, right-click on the Game .exe file and select Create Shortcut.

4. Now right-click on the Game Shortcut and select Properties.

5. This will bring up the Game Shortcut Properties applet, from here, click on the Shortcut Tab (if it doesn’t automatically default to it), then go to the Target box, and type –windowed at the end of the text and click on OK.
6. Now, double-click on the Game Shortcut to run the game in Windowed mode.
Note: You can drag and drop the Game Shortcut to a location of your choosing. But you MUST use this shortcut to run the game.
7. If the game runs successfully, you can set the game back to full screen within the Game Settings menu.
Are you looking for a way to repair all the errors on your computer?
If the answer is Yes, then I highly recommend you check out Advanced System Repair Pro.
Which is the leading registry cleaner program online that is able to cure your system from a number of different ailments such as Windows Installer Errors, Runtime Errors, Malicious Software, Spyware, System Freezing, Active Malware, Blue Screen of Death Errors, Rundll Errors, Slow Erratic Computer Performance, ActiveX Errors and much more. Click here to check it out NOW!
Many Windows users are experiencing a frustrating issue: They get an error “Failed to create D3D device” when running their games (usually Counter-Strike: Global Offensive, Dota 2, Left 4 Dead 2, etc) or graphics programs.
This error can occur due to many reasons. As its message indicates, this is a Direct 3D and video card driver issue. But sometimes you can also fix this by changing the launch options of your game.
So if you get this issue, don’t worry. Try the following methods to fix your “Failed to create D3D device” error:
- Reinstall your graphics driver
- Set the launch options of your game
- Enable all your graphics services
- Undo the recent change
Method 1: Reinstall your graphics driver
D3D, short for Direct 3D, is a graphics application programming interface and is related to your graphics adapter and its driver. If something is going wrong with Direct 3D, it is likely that your graphics driver is broken. You can try reinstalling it and see if this resolves your problem.
You can uninstall your graphics driver on your own, and then download and install it from your device’s official site. But honestly, this will take much time and energy. If you want the process to be easier (and equally safe), it is recommended that you use Driver Easy.
Driver Easy will automatically recognize your system and find the correct drivers for it. You don’t need to know exactly what system your computer is running, you don’t need to be troubled by the wrong driver you would be downloading, and you don’t need to worry about making a mistake when installing.
You can download and install your drivers by using either the Free or Pro version of Driver Easy. But with the Pro version, it takes only 2 clicks (and you get full support and a 30-day money-back guarantee). Also, you can use the Pro version to reinstall your device drivers.
To reinstall your graphics driver with Driver Easy:
1) Download and install Driver Easy (and upgrade it to the Pro version).
2) Select Tools.
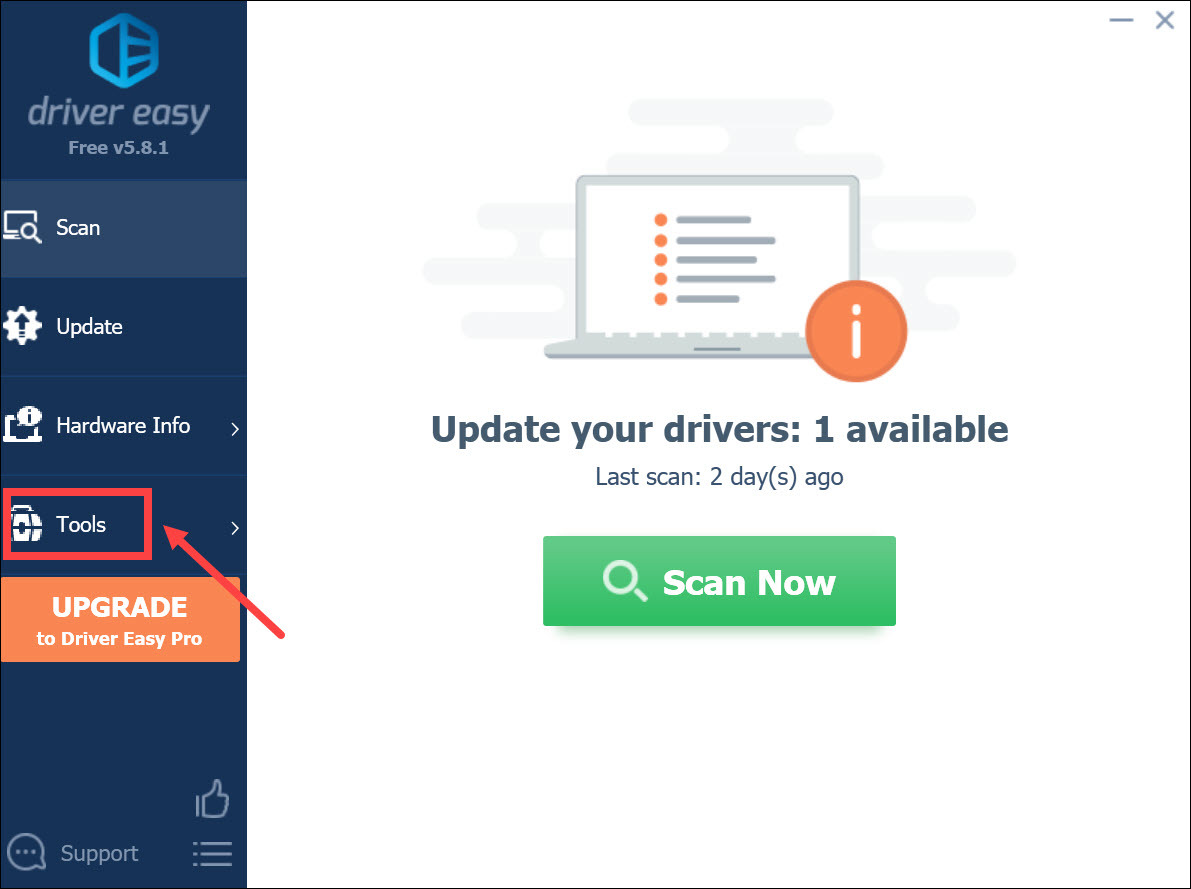
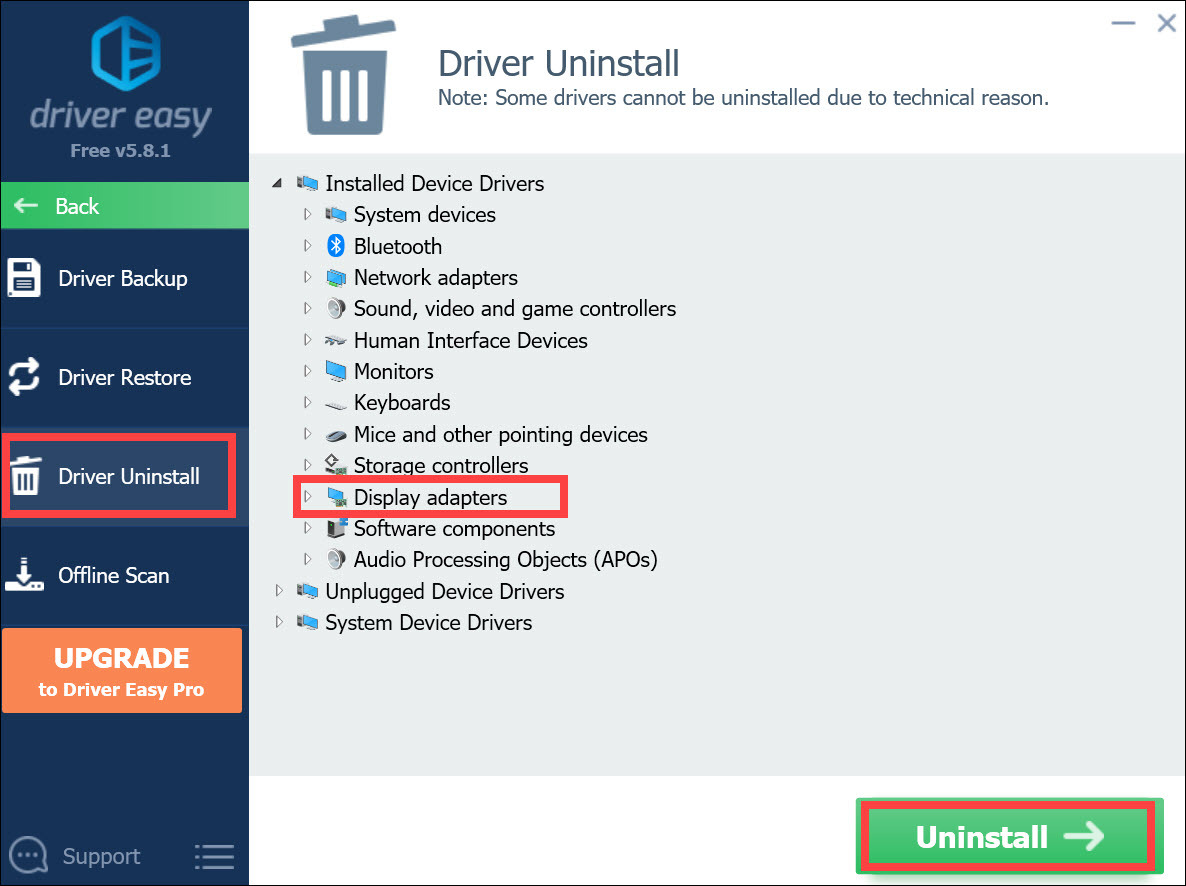
3) Select Driver Uninstall. Click your graphics driver in the Display adapters category and then click the Uninstall button. Your graphics driver will be removed soon.
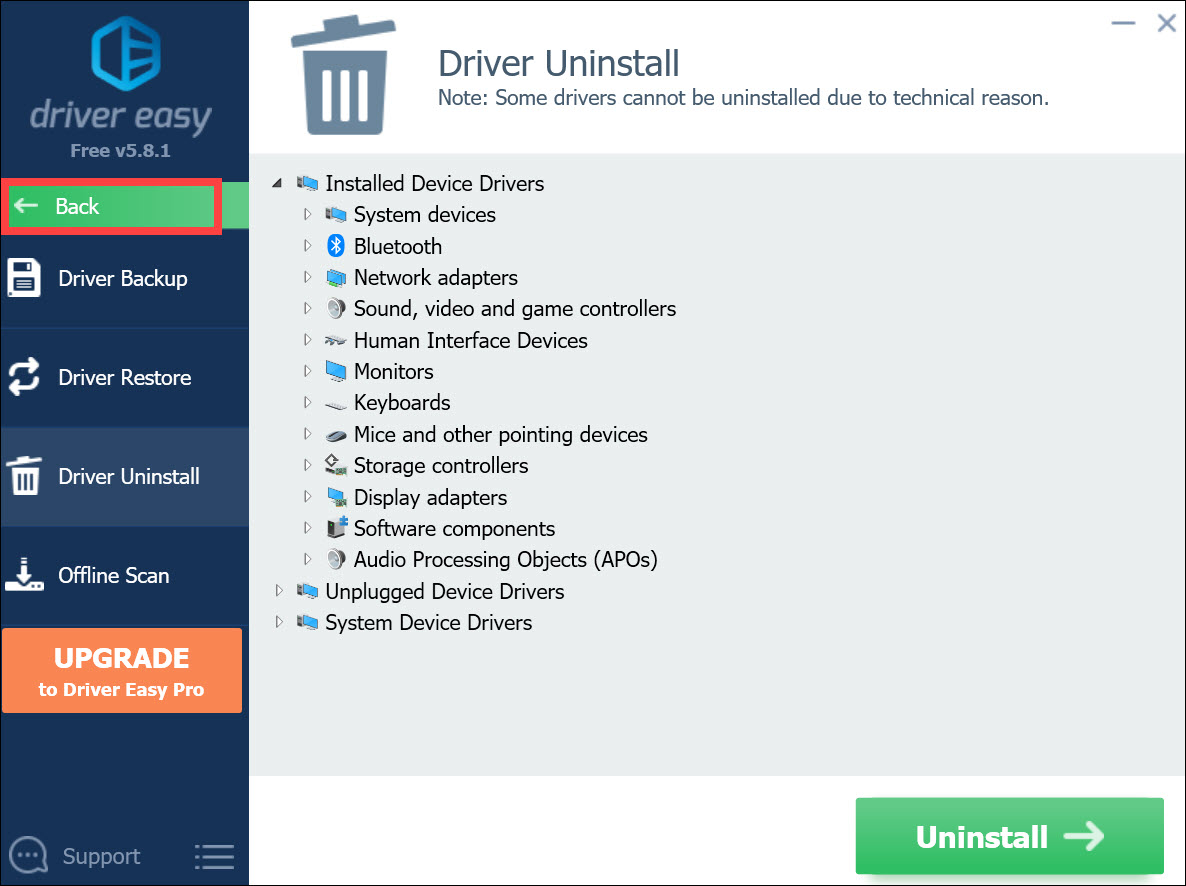
4) Click Back.
5) Click the Scan Now button. Driver Easy will then scan your computer and automatically detect that your graphics driver needs to be updated.
6) Click the Update button next to your graphics adapter to update its driver. Or you can click Update All to update all your device drivers at once.

7) Restart your computer and launch your game. Then check to see if the error disappears.
Method 2: Set the launch options of your game
By setting the launch options of your game on Steam, you change the internal game settings before its running. This is helpful for you to get around incompatible graphics issues, such as your D3D device failed error.
To set the launch options:
1) Launch your Steam client and go to your game library.
2) Right-click the game that is incurring the error and select Properties.
3) Under General, find LAUNCH OPTIONS.
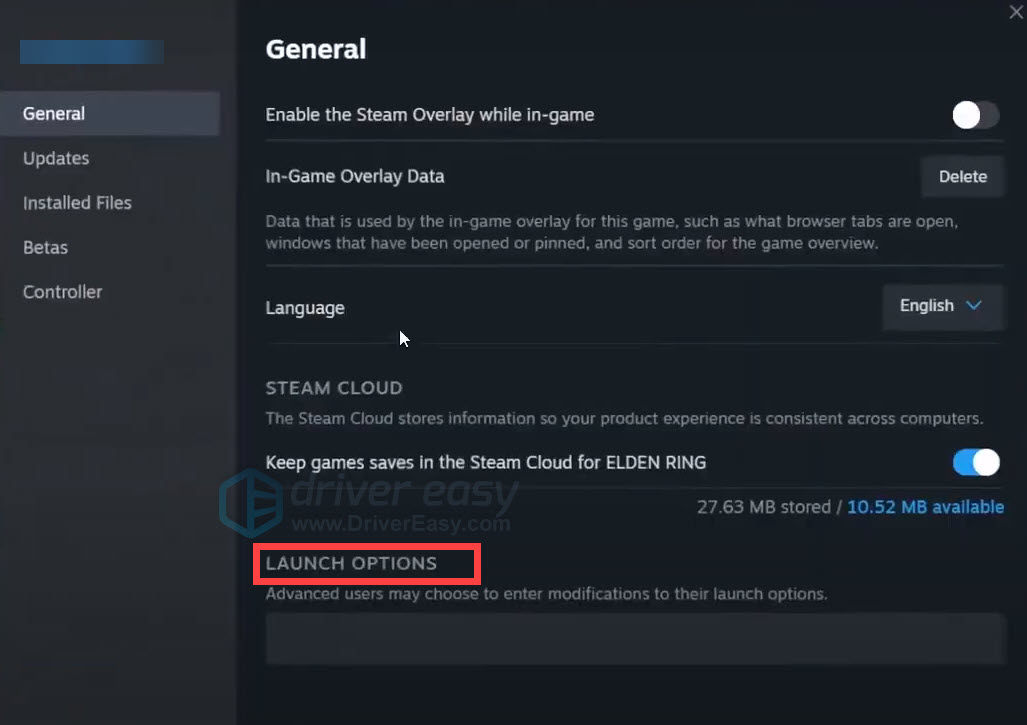
Type “-dxlevel 81“. (This forces your game to be launched using an earlier version of DirectX.)
*Note that if you are trying to play Counter-Strike: Global Offensive, Left 4 Dead 1 or 2, or Portal 2, you should type “-dxlevel 90“.
4) Close the Properties window and launch your game.
5) If the problem persists, open the Properties window of your game and click SET LAUNCH OPTIONS again.
6) Type the following line in the dialog and click OK (this forces the game to run with a set resolution):
-w 1280 -h 720
*Note that you should change the 1280 and 720 to the width and height of the recommended resolution on your computer respectively.
7) Close the Properties window and run your game. If this method works for you, you won’t see the error again.
Method 3: Enable all your graphics services
You may get the Failed to create D3D device error because your startup graphics services are disabled. You can check the status of these services and re-enable them when necessary. To do so:
1) Press the Windows logo key and R on your keyboard at the same time to invoke the Run box.
2) In the Run box, type “msconfig” and press Enter on your keyboard. This will open System Configuration.
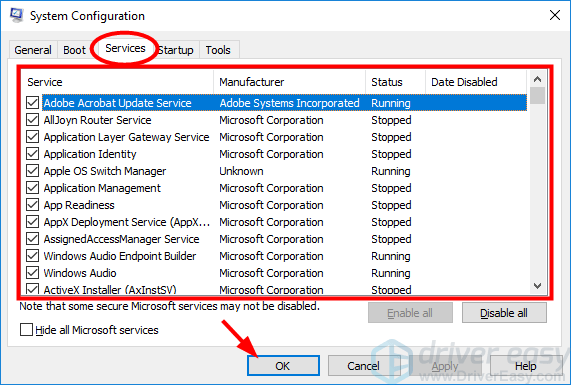
3) In the System Configuration window, click the Services tab. Then check if all the services related to your video card (usually their names including NVIDIA, AMD, Intel, etc) are checked. If not, select the check box next to each of these services. After that click OK.
4) Restart your computer. Then run your game and see if your problem is fixed.
Method 4: Undo the recent change
Sometimes a change of your computer settings or a newly installed application can lead to your D3D device failed to create error. Some settings or programs can be incompatible with your game. If you have recently made any change on your computer and you get the error, you can undo it and see if this resolves your problem.
74
74 people found this helpful
Available in other languages
Erhalten Sie eine Fehlermeldung „Failed to create D3D Device (D3D-Gerät konnte nicht erstellt werden)“? Hier sind 4 Fixe für Sie.
Readers help support Windows Report. We may get a commission if you buy through our links.
Read our disclosure page to find out how can you help Windows Report sustain the editorial team. Read more
Launch errors are too familiar for gamers as if the game senses our desire to play and refuses to give us what we seek. So is the case with the Failed to create D3D device or the less common but equally annoying Failed to create D3D9 device error.
Both of these errors are being reported by players launching games through Steam, and it seems to be isolated to only a few titles, including Left 4 Dead 2, CS: GO, Borderlands 1 & 2, Portal, and Rocket League.
Luckily, the route you’ll need to take is the same to fix both D3D and D3D9 errors, as they have a common cause. So, we will go through the usual troubleshooting steps when you see these errors.
What causes the D3D error?
The D3D Error is often a reference to a DirectX Error, precisely a Direct3D error. Several factors can cause a Direct3D error, including:
- Outdated or incorrect drivers – Ensure you have the most current drivers installed for your graphics card.
- Insufficient system resources – Your system might need more memory or processing power to run the game.
- Software conflicts – Other software running in the background can interfere with the game and cause a Direct3D error.
- DirectX version issues – The game may require a newer version of DirectX than what you have installed on your system.
- Corrupted or damaged game files – Sometimes, the files can become corrupt or damaged, causing the Direct3D error.
With the causes covered, let us explore some fixes you should apply.
How do I fix Failed to create D3D or D3D9 device error?
Before you even venture into our recommendations, you should restart the computer. A restart is a general fix but may be effective. It will force a few processes to stop and may help fix a failed to create d3d device error.
1. Verify the integrity of game files
- Launch Steam, right-click on the problematic game, and go to Properties.

- Click on the Local Files tab, then click on Verify Integrity of Game Files.


Valve has kindly baked into Steam the option to check if your game files have become corrupted or if something is missing from the game installation directory.
This can help if your antivirus or antimalware software has decided to block or quarantine a file.
If the Failed to create D3D device or D3D9 device errors have been caused by an error of the graphics driver, giving the system a fresh start might solve the issue.
2. Update Windows to the latest version
- Open Settings using the keyboard shortcut Win + i.
- Click on Update & Security.

- Click on Check for updates.


Keeping your Windows operating system up to date is essential because you benefit from the latest bug fixes and security updates.
Sometimes, these updates include compatibility patches which can fix mishaps like the Failed to create D3D device or failed to create D3D9 device errors.
3. Update your graphics drivers
3.1 Updating Nvidia graphics cards
- Right-click on your desktop and select Nvidia Control Panel.
- Take note of your driver indicated in the Control Panel.

- Now head over to the Nvidia website, and hit the Drivers tab.

- Fill up the form provided and hit Search to get your driver.

- Now hit download, double-click the downloaded file to launch the installer, and follow the prompts.
- Restart your computer.


3.2 Updating AMD graphics cards
- Right-click on your desktop and select AMD Radeon Software.
- Under Driver & Software, click on Check for Updates.

- Install the new driver and reboot.

One of the best ways to fix the failed to create D3D, or D3D9 device error is to update your graphics driver.
These errors are caused by a problem with the graphics card or its driver, so a driver update will usually be the solution.
To go one step beyond, we strongly recommend performing a clean install of the graphics driver or using a utility like DDU to remove the graphics driver altogether before installing the new one.
Note: If you use DDU to uninstall your graphics driver, you must go to the graphics card manufacturer’s website and manually download either the driver or the graphics software (GeForce Experience or AMD Adrenalin).
Besides the solutions presented above, you can also try specialized software like Outbyte Driver Updater to scan your device for outdated, damaged, or missing drivers and automatically update them with brand-new versions.
⇒ Get Outbyte Driver Updater
4. Set game launch options
- Open Steam, Right-click on the game, and select Properties.
- On the General Tab, select Set Launch Options and type -w 1920 -h 1080.

- Click OK.
- Finally, launch the game.

Note: instead of 1920 and 1080, use your monitor’s native resolution.
This will force the game to launch with the specified resolution. Unfortunately, some of these games are a bit older, so they don’t always cooperate with newer hardware and higher resolutions.
This can cause a problem when the game tries to launch with a low resolution, so you will need to force the desired resolution.
5. Run the game in compatibility mode
- Navigate to your game installation folder, right-click on the executable, and select Properties.
- Click on the Compatibility tab.
- Click Run this program in compatibility mode for and manually select an older version of Windows to run the game.
Once you have enabled compatibility mode, you can launch the game, which should clear the Failed to create D3D or D3D9 device error.
- Avowed Not Working or Launching: 4 Ways to Make it Work
- Fix: Failed to Connect to Steam Error Code 211
- How to Fix Escape from Tarkov Error 201
- Nvidia fixes the Valorant crashes with a new hotfix driver version for Windows 11
- How to Fix the Jagex Launcher Error 7,7 for Runescape
6. Enable services
- Press Windows + R, then type msconfig and hit Enter.
- Go to the Services tab.
- Make sure that all Nvidia or AMD services are enabled. (If you are unsure which services these are, click on Enable All).

- Reboot your PC

In pursuing more performance, some users disable certain services that they deem unimportant. Still, we cannot stress this enough: you should never disable these if you are not 100% sure of the changes you are making, as this could lead to game crashes or, even worse, system instability.
These fixes will help you fix both Failed to create D3D device and Failed to create D3D9 device errors when launching games on Steam.
If you encounter issues with Steam games, let us know in the comments section below.
John Nedelcu
Ever since I got my first computer, I wanted to know how it worked and how components were communicating between them to make such a marvellous machine work. Needless to say, I started taking it apart and inspecting the parts, although I didn’t understand what each of them was. That’s how I managed to destroy my first two computers, but by the time the second one had met its untimely demise, I was pretty confident that I knew how it worked.
By now, I have learned a few more things, but there’s still room for much more. For close to a decade, I’ve been covering technology news, reviews and trying to help others that have only now started on this journey.
You finally wind down for a weekend of gaming on your new computer, only to get the “failed to create D3D device error”. What is this error? Why is it occurring on your PC?
Generally speaking, this error represents a problem with your computer initializing the graphics capability of your computer’s video card. There are many possible causes for this problem, from missing drivers and bad launch settings to disabled graphics services. Here is how you deal with these issues and fix this error.

Enable Graphics Services
The most common reason for getting a failed to create D3D device error is if your graphics services are not working. This can be due to a faulty configuration or manual error.

- To fix this problem, enter System Configuration (earlier known as msconfig) in the search box of your Windows taskbar.

- The System Configuration app will open in a new window. By default, it will start at the General tab. Click on Services to switch to that tab.

- Here you can see the list of all startup services on your computer. What you are looking for are the services related to your GPU. Depending on the brand used in your PC, it can be NVIDIA, AMD, Intel, or something along those lines.

- Once you find the graphics services of your device, make sure that their checkbox is enabled. If you have trouble locating the right service, you can just Enable All to startup every service. Click on OK to save the changes.

- As the services are a part of your startup settings, you need to restart your computer to enable them.
Reinstall Your Graphics Drivers
Another common reason for the “failed to create D3D device” error is missing or outdated graphics drivers. Often we forget to re-install the graphics drivers after a factory reset or a fresh Windows installation. Or you have been using outdated drivers and need to update them.
Most guides will tell you to uninstall your device drivers and let Windows reinstall them for you. But we wouldn’t recommend that method as anything other than a temporary measure.
The better approach is to go to the manufacturer’s website and download the drivers specific to your model. These drivers are guaranteed to be optimized for your machine and will give you the best performance.
- First, head to the driver’s download page of your PC’s manufacturer. It can be Dell, HP, Lenovo, etc. We are going to demonstrate with an Acer laptop.

- You need to enter the model number of your machine or download a small application to detect it. This takes you to the download page for drivers tailored to your specific device.

- Scroll down the list of drivers to find VGA or GPU drivers. For machines with a discrete graphics card, there will be two sets of drivers. Download the drivers for your main GPU that you use for gaming.

- Once the download is complete, run the graphics driver setup application.

- The setup will install the drivers over the current drivers for you. The display might flash during the process.

- Once the installation is complete, all you need is to restart your computer to see the changes. Your game should run perfectly now if you were getting the “failed to create a d3d device” error because of missing drivers.

By Undoing Recent Changes
Sometimes you can get the “failed to create d3d device” error due to conflicts with a newly installed application. It can be because the app is running in the background or because it made changes to the graphics settings of your computer.
In these situations, a good thing to try is to undo these recent changes and try rerunning your game. If you don’t get an error, then that change was the problem.
- To remove recently installed applications on your PC, you can use the Add or remove programs utility. Just type it in the search box of the Windows taskbar to find it.

- A part of your system settings, Add or remove programs allows you to view all the installed applications on your computer in one place.

- By default, the apps are sorted by their names in alphabetical order. Change it to Install date to bring the recent additions to the top.

- Removing an app is simple: select it from the list and click on the Uninstall button.

If an application fails to uninstall through this method, you will need to try other ways to properly remove it.
Modify the Launch Options of Your Game
If everything on your computer is perfectly configured – your graphics services are enabled, your drivers are installed and up to date – then your game settings might be an issue.
The latest AAA games are often very demanding graphics, and your hardware might not be up to the task. However, you can try lowering the launch options of your game to be able to play it.
- To configure your game’s launch settings, run its launcher. Most games have their launchers, while Steam releases can be modified from the Steam launcher too.

- Click on the Configure option to open the launch settings. On Steam, you can right-click on the game in question and select Properties > SET LAUNCH OPTIONS.

- Usually, the application will scan your computer and automatically detect the best settings for your hardware.

- If that doesn’t work, you should modify your video settings and set most values to Low. This places the least strain on your video card and might help the game run on weaker hardware.
If your hardware can run the game at all, it should launch now. Note that Steam has many potential issues of its own that can prevent a game from launching.
The “Failed to create D3D device” error stems from the inability of the video card to interface with DirectX. The reasons are various. The lack of drivers, suspended graphics services, a conflicting application, or even extremely high graphical settings of a game.
All of these problems have straightforward solutions. Just follow the steps outlined above to fix the problem and get your game running smoothly in no time.
Related Posts
- How to Fix a “This file does not have an app associated with it” Error on Windows
- How to Fix an Update Error 0x800705b4 on Windows
- How to Resolve “A JavaScript error occured in the main process” Error on Windows
- How to Fix the Network Discovery Is Turned Off Error on Windows
- How to Change Folder Icons in Windows
Numerous Windows clients are encountering an irritating and annoying error notification saying ‘’failed to create d3d device’’. Ordinarily, they face this error during running computer games like Left 4 Dead 2, Counter-Strike: Global Offensive, Dota 2etc.
Well, this blunder can happen because of numerous reasons. However, this error message clearly indicates that there is an issue with the video card driver and Direct 3D.
How to Fix Failed to Create D3D Device?
I have mentioned some of the straightforward methods to solve this D3D device error. You can attempt them individually until your problem is tackled.
By enabling all the graphics services
In case the start-up graphics services are disabled in your system, then you may likewise get the ‘’failed to create d3d device’’ error. In such cases, you can check for the status of these graphics services and then re-enable it if in case it was disabled.
To apply this fix simply follow the steps mentioned underneath.
1. Press Windows + R key
2.Type msconfig and hit Enter to launch System configuration.

3. Now just switch to the Services tab and you need to ensure that all the graphics services (Intel, NVIDIA, AMD etc) associated with the video are checked.
4. Now in order to save all the changes, you made just click on the OK button and exit the System Configuration.
5. Now just Restart your computer.
That’s it now run your game and see if you still face the error or not.
By reinstalling the Graphics Driver
D3D or say Direct 3D is Microsoft Windows API (Application Programming Interface) and is somewhat associated with the graphics driver. In the event that something is turning out badly with Direct 3D, then there is a high possibility that the Graphics driver is broken.
In such cases, you can have a go at reinstalling it and check whether this purposes your concern. Here is the way to do it.
1. Press the Windows button and then type Device Manager and then click on the icon so as to open Device Manager.

2. Now to view list of adapters double click on the Display Adapters.
3. Now right click on the Graphics adapter ( in my case it is Intel(R) UHD Graphics 620) and choose the Uninstall device

4. Now a window will pop up on your screen you need to check to Delete the driver software for this device further click on
5. Restart your system.
Note: The Window will automatically install the driver software upon restarting so you will not have to install the driver software.
By undoing the recent changes you have made
A few software programs in your system might be contradictory to the game you’re playing hence it ultimately ends up with the ‘’failed to create d3d device’’ error.
If you experience this issue after you updated your Windows or after installing any particular application then you can try to uninstall it and see whether the issue persists or not.
To apply this fix successfully follow the steps beneath.
1. Open the Control Panel.
2. Next you will have to find Programs section and further left-click on Uninstall a Program.

Note: You will be seeing a list of all the software programs installed on your system.

3. Now among the find the application you recently installed.
4. Next right click on the program and select the option of Uninstall/Change.
Presently follow the prompts to uninstall the application effectively from your PC.
Note: To uninstall Windows updates you will have to click on the View installed updates under the Programs and Feature section.
By setting the launch options of your PC games
If you set the launch options of your PC games on Steam you are ultimately changing the settings of the game before the game actually starts running and hence it helps in the issue of ‘’failed to create d3d device’’. To do so follow the steps beneath.
1. At first launch the Steam application and then just navigate to your game library.
2. Right-click on the game that is causing the error and select the Properties
3. Next click on the ‘’SET LAUNCH OPTION…’’.

4. Now type ‘’-dxlevel 81’’ and then hit Enter.
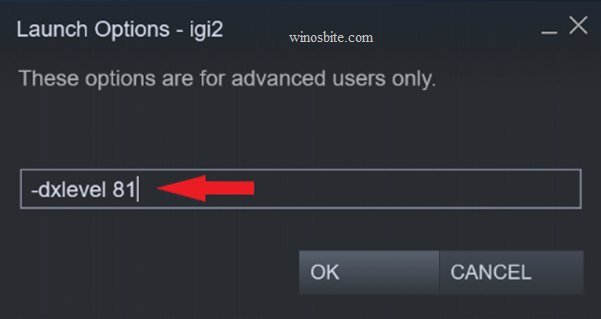
Note: In case you are playing Portal 2, Left 4 Dead 2, Dead Counter-Strike: Global Offensive or Left 4 then – dxlevel 90 should be set as your Launch Options.
5. Now close the properties windows and launch the game.
Note: If the problem is not resolved then open the Properties option and then click on the ‘’SET LAUNCH OPTION…’’again and type ‘’-w 1280 -h 720’’ (this powers the game to run with a specific width and height’’) and click on OK.
Update DirectX Driver
Sometimes, if the DirectX version is old then you might encounter ‘Failed to create D3D Device‘ whenever you will try to open CS:Go. Follow the below steps to update the DirectX version.
1) Open your favorite browser and click on this link.
2) Now click on the Download button

3) Let the download finish and then double click to install it.
4) It will show a pop-up option, choose “No thanks and continue with Direct X End-User Runtime Web installer” button.
5) Now, let the software to install on your Windows system.
6) Once done then restart your system.
Well, that’s it any of the above-mentioned methods will help you in getting rid of the ‘’failed to create d3d device’’ error. If you still have any doubts or questions, feel free to add your comment below.