
Fail2ban for Windows
This project is an implementation inspired by unix http://www.fail2ban.org.
F2B provides windows service that scans log data and detects attempts to guess
user password. Client IPv4/IPv6 address that causes significant login failures
can be automatically temporarily blocked using windows firewall configuration.
Requirements
- Windows Vista and newer
- .Net framework 4.5 (Windows Vista, 7, 2008 Server)
- Visual C++ Redistributable for Visual Studio 2015 («optional»)
- Microsoft Message Queue (optional, for distributed Fali2ban)
- Visual Studio Community 2015 / 2017 (optional, for building sources)
Quick Start
- checkout sources from git and go to the new F2B directory
git clone https://github.com/vokac/F2B.git
cd F2B
- build within MSBuild Command Prompt (some required VS2015 / VS2017 modules
are not installed during default installation and must be explicitely selected)
powershell -File build.ps1 -config Debug x86
- copy all files from build output directory
F2B.$(date).$(release).$(arch)toc:\F2B - update windows configuration to accept firewall rules from F2B
c:\F2B\F2BFwCmd.exe add-wfp
- register F2B as windows service
c:\F2B\F2BLogAnalyzer.nomsmq.exe install \
        -c c:\F2B\F2BLogAnalyzer.exe.config \
        -g c:\F2B\F2BLogAnalyzer.log -l ERROR
- modify configuration file
F2BLogAnalyzer.exe.configaccording your requirements - remove MSMQ from service dependencies (currently hardcoded in sources)
sc config F2BLA depend= eventlog/BFE
- start F2B service
Building from sources
- checkout sources from Git
git clone https://github.com/vokac/F2B.git
- install Visual Studio Community Edition version 2015 or 2017
- it is necessery to install components for C# and C++ development
- some modules must be explicitely selected
- Desktop development with C++ -> MFC and ATL support (x86 and x64)
- Desktop development with C++ -> Windows 8.1 SDK and UCRT SDK
- build with Visual Studio 2015 / 2017 GUI
- load F2B.sln project file with Visual Studio 2015 / 2017
- Build -> Batch Build… -> Build
- create «Release» build with F2BWFP compiled as 32bit dll
- for 64bit binaries disable «preferred 32bit» compilation
of the C# code and compile dll library as «Release|x64»
- build with Visual Studio 2015 / 2017 command line
- start MSBuild Command Prompt for VS2015 / Developer Command Prompt for VS 2017
- execute
powershell -File build.ps1 [-config Release|Debug] [-platform x86|x64]
Installation
Executables and libraries
No installation program exists and all binaries (F2BLogAnalyzer.all.exe,
F2BLogAnalyzer.nomsmq.exe, F2BLogAnalyzer.standalone.exe, F2BQueue.exe,
F2BFirewall.exe, F2BFwCmd.exe, F2BWFP.dll) must be placed in one directory
(e.g. c:\F2B). F2B service code was written in C# which requires at least
.Net framework version 4.5. This .Net version is not integral part of older
windows (Vista, 7, 2008 Server) and must be installed on these systems.
F2B use WFP API (Windows Filtering Platform) to access directly functions
that can modify windows firewall configuration. This functionality is
provided by native C++/CLI code compiled in F2BWFP.dll library and C++/CLI
requires redistributable Visual C++ package (x86/x64). You can download
and install redistributable package directly from Microsoft or you can
just copy all required libraries in the F2B directory (concrt140.dll,
mfc140.dll, mfcm140.dll, msvcp140.dll, ucrtbase.dll, vcamp140.dll,
vccorlib140.dll, vcomp140.dll, vcruntime140.dll). Be aware that debug
build of the F2B code needs debug version of C++ libraries and they come
only with full Visual Studio installation.
WFP modifications
Filtering rules in WFP must be associated with F2B application using
specific WFP provider and sublayer. It is necessary to create these
structures otherwise F2B will not be able to add new firewall filters.
All necessary changes in WFP can be done using
c:\F2B\F2BFwCmd.exe add-wfp
If you want to run F2B service using non-privileged user account (instead of
default LocalSystem), sufficient privileges to change firewall rules in WFP
must be assigned to such account using:
c:\F2B\F2BFwCmd.exe add-privileges -u username
To rollback changes in WFP (uninstall F2B) use
c:\F2B\F2BFwCmd.exe remove-privileges -u username
c:\F2B\F2BFwCmd.exe remove-wfp
Windows logging
Fail2ban can only work if log data produced by various services contains
all necessary information. This is not the case for most of default
windows installations (with exception of domain controllers), because
windows by default doesn’t log login failure events. Configuration can
be modified using gpedit.msc (GPO support was added in Windows 7
and Windows 2008 R2) or with auditpol.exe (secpol.msc) on older
Windows versions. Details about windows logging is summarized in
https://www.sans.org/reading-room/whitepapers/forensics/windows-logon-forensics-34132
-
gpedit.msc(preferred)- Computer Configuration\Windows Settings\Security Settings\Local Policies\Advanced Audit Policy Configuration\System Audit Policies — Local Group Policy Object
- Computer Configuration
- Windows Settings
- Security Settings
- Local Policies
- Advanced Audit Policy Configuration
- System Audit Policies — Local Group Policy Object
- Advanced Audit Policy Configuration
- Local Policies
- Security Settings
- Windows Settings
Logon/Logoff -> Audit Logon = Success and Failure Logon/Logoff -> Audit Logoff = Success and Failure Account Logon -> Audit Credential Validation -
auditpol.exeauditpol.exe /set /subcategory:"Logon" /success:enable /failure:enable auditpol.exe /get /subcategory:"Logon" auditpol.exe /set /subcategory:"Logoff" /success:enable /failure:disable auditpol.exe /get /subcategory:"Logoff" auditpol.exe /set /subcategory:"Credential Validation" /success:enable /failure:enable auditpol.exe /get /subcategory:"Credential Validation"
The second issue comes from different security mechanisms supported by
windows services. Unfortunately NTLM authentication doesn’t log client
IP address and that means fail2ban is not able to correctly process
these login failures. There is no elegant solution to work around this
problem, you can either completely disable NTLM (and possibly face some
issues with clients that support only NTLM) or it would be necessary
to implement service that could correlate incoming connections with NTLM
login failures. You can at least disable old and insecure NTLM methods:
gpedit.msc- Computer Configuration
- Windows Settings
- Security Settings
- Local Policies
- Security Options
- Local Policies
- Security Settings
- Windows Settings
Network security: LAN Manager authentication level -- Send NTLMv2 response only. Refuse LM & NTLMNetwork security: Restrict NTLM: Audit Incoming NTLM Traffic — Enable auditing for all accounts
Network security: Restrict NTLM: Incoming NTLM traffic — Deny all accounts- Computer Configuration
Windows event log data can be browsed with Eventvwr.msc GUI, wevtutil
or powershell eventlog API
wevtutil gp microsoft-windows-security-kerberos /ge /gm
wevtutil qe Security /q:"*[System[Provider[@Name='Microsoft-Windows-Security-Auditing'] and (EventID=4624)] and EventData[Data[@Name='LogonType']='2']]" /e:Events
Get-EventLog -LogName Security
        | Where-Object { $_.EventID -match "^(680|528|672|4768|4776)$" `
		      –AND $_.UserName -notmatch 'SYSTEM|NETWORK SERVICE|LOCAL SERVICE|ANONYMOUS LOGON' `
			  –AND $_.TimeGenerated -gt [datetime]::today } `
        | Sort-Object -Property TimeGenerated `
		| Select-Object -Last 100 `
		| Format-Table -AutoSize -Wrap
or
$query = @"
<QueryList>
  <Query Id="0" Path="Microsoft-Windows-Security-Auditing">
    <Select Path="Security">*[System[(band(Keywords,4503599627370496))]]</Select>
    <Suppress Path="Security">
      (*[System[(EventID='4768')]] or *[System[(EventID='4771')]])
      and
      (*[EventData[Data[@Name='Status']!='0x6']] and *[EventData[Data[@Name='Status']!='0x18']])
    </Suppress>
  </Qeury>
</QueryList>
"@

Get-WinEvent -LogName Security -FilterXPath $query -MaxEvents 10
F2B Configuration
Main F2B configuration is stored in F2BLogAnalyzer application XML file
App.config and source code contains example with all supported config
options. All remaining executables (F2BQueue.exe, F2BFirewall.exe)
use just command line options for their configuration.
Fail2ban log analyzer configuration
Almost all F2B configurations are enclosed in f2bconfig element.
Source code distribution includes three configuration examples
F2BLogAnalyzer\App.config— configuration with few useful features
enabled (this is good starting point to create customized production
config file)F2BLogAnalyzer\App.config.minimal— minimal fail2ban config fileF2BLogAnalyzer\App.config.full— examples of all available
configuration options which also include basic documentation
as XML comments
Input section
First F2B configuration must define at least one input that provides
log data for F2BLogAnalyzer.exe and currently two input data types
are supported:
EventLog— windows event log (local or remote)FileLog— application log files with all information on one line
parsed by regex
Most common fail2ban configuration can use just simple local windows
event log input and specify required name and type attributes.
The name attribute must contain unique input name that can be later
referenced in selector section. Input configuration type attribute
contains class name to be used.
<inputs>
  <!-- Subscribe to local windows event log -->
  <input name="local_eventlog" type="EventLog"/>
</inputs>
To subscribe windows event log (especially Security log) special privileges
are required. LocalSystem service account has by default sufficient rights
or F2BLA service can be executed under arbitrary user account that satisfy
one of following conditions:
-
service user is member of «Event Log Readers» group
-
special ACL was applied to event log
wevtutil gl "LOG_NAME"
wevtutil sl "LOG_NAME" /ca:"original SDDL"(A;;0x3;;;"user SID")
(LOG_NAME can be e.g. Security, Application, …)
Following log input configurations are currently supported:
-
subscribe to local event log
<input name="local_eventlog" type="EventLog"/>
-
subscribe to event log on given machine with service credentials
<input name="remote_eventlog" type="EventLog" server="win1.example.com"/>
-
subscribe to event log on given machine with custom credentials
<input name="remote_eventlog_auth" type="EventLog" server="win1.example.com"
       domain="EXAMPLE.COM" username="username" password="secret"/>
-
subscribe to changes in local log file
<input name="apache" type="FileLog" logpath="c:\apache\log\access_log"/>
Selector section
It is necessary to parse input events into F2B internal event structure.
Selector configuration provides flexible (although not always very simple)
way to access and assign all required (e.g. client address) and optional
(e.g. client port, login username, …) components.
Fail2ban is usually used to deal with login failure events produced
by windows services and stored in security EventLog. These kinds of events
can be selected by applying filter on «Security» event log with keyword
attribute set to audit failure value (0x10000000000000). These events
include e.g. Kerberos tgt requests, failed logins to Windows, … If we want
to ignore Kerberos failures except «bad password» it is possible to discard
messages using «Suppress» element.
<selectors>
  <!-- Audit failures (Keywords=0x10000000000000) -->
  <selector name="login" input_type="EventLog">
    <query>
      <![CDATA[
        <Select Path="Security">*[System[(band(Keywords,13510798882111488))]]</Select>
        <Suppress Path="Security">
          (*[System[(EventID='4768')]] or *[System[(EventID='4771')]])
          and
          *[EventData[Data[@Name='Status'] and (Data!='0x18')]]
        </Suppress>
      ]]>
    </query>
    <!-- Select event XML element with XPath and use its text content -->
    <regexes>
      <regex id="Address" type="data" xpath="Event/EventData/Data[@Name='IpAddress']"/>
      <regex id="Port" type="data" xpath="Event/EventData/Data[@Name='IpPort']"/>
      <regex id="Username" type="data" xpath="Event/EventData/Data[@Name='TargetUserName']"/>
      <regex id="Domain" type="data" xpath="Event/EventData/Data[@Name='TargetDomainName']"/>
    </regexes>
    <!-- User defined additional event properties for this input/selector -->
    <evtdts>
      <evtdata name="Event.Login" apply="before">failed</evtdata>
    </evtdts>
  </selector>
</selectors>
Every selector element can use these attributes
name— unique selector nameinput_name— event input name (input_name or input type must be defined)input_type— event input type (input_name or input type must be defined)processor— processor name used for selected events
(default: first processor defined in<processors>section)
Each selector can also contain user defined additional event properties
defined in evtdts subsection. These properties can be added unconditionally
«before» or «after» extracting event data using regexes or only in case
regex with given ID matches processed data (evtdata attribute apply must
be set to «match.ID» where ID corresponds to the regex ID attribute).
You can set overwrite attribute to force new value with same Event.»NAME»
to overwrite existing data that was set earlier.
Currently two input types (EventLog, FileLog) are supported by F2B selector
implementation:
-
EventLog selector configuration (
input_type="EventLog"):Selector query is required configuration option and it is used by log API
(see https://msdn.microsoft.com/en-us/library/bb399427%28v=VS.90%29.aspx).
You can use mmc Event Viewer snap-in to visually build required query with
help of «Create Custom View» -> «Define your filter» -> «XML».Client IP address, port, username, … can be extracted from eventlog
data using XPath + regex. It is necessary to extract valid IPv4/IPv6
address for several processors (includingRange,Fail2ban, …).regex attributes:
- id — regex identification (can be used to add evtdata for matched regexes)
- type — drives what to do in case regex match/fail to match event data
- data — parse data using regex
- match — use event if matches regex
- ignore — ignore event if matches regex (eventhough it matched some regex)
- xpath — used only by EventLog to apply regex just on selected data
- «value» — regex with named groups that provides Event.»GROUP_NAME»
data empty value means new Event.»ID» with full data from given xpath
-
Flat log file configuration (
input_type="FileLog"):List of regular expressions are used to match log lines and extract required
data (e.g. IP address). Selection is done by regex There are several types of regular expression- match …. matched line and its data preselected for further processing
- ignore … matched line is completely ignored (eventhough it was previously matched)
- data ….. just use matched named regex group as Event.group_name properties
  ...
  <!-- Selector for ssh log file -->
  <selector name="secure_log" input_name="ssh">
    <regexes>
      <regex id="failline" type="match"><![CDATA[^(?<time_b>...) (?<time_e>..) (?<time_H>..):(?<time_M>..):(?<time_S>..) (?<hostname>\S+) sshd\[\d+\]: Failed password for (?<user>.*) from (?<address>\S+) port (?<port>\d+) ssh2$]]></regex>
    </regexes>
    <evtdts>
      <evtdata name="Event.Login">failed</evtdata>
    </evtdts>
  </selector>
  ...
For debugging it is possible to log special event that trigers
dump of current internal state of all F2B processors into text
file. This event can be generated by LogEvents.exe dump and
config file of the F2BLogAnalyzer must contain following selector
to be able to capture these debug events.
  ...
  <!-- Test selector for eventlog data produced by LogEvents.exe -->
  <selector name="dump" input_type="EventLog" processor="last">
    <query>
	  <![CDATA[
	    <Select Path="Application">
		  *[System[(Provider/@Name='F2BDump') and (EventID=0) and (Level=2)]]
		</Select>
      ]]>
	</query>
  </selector>
  ...
Special selector defined below can be used for performance tests.
It catches events logged with LogEvents.exe repeat .... With
user defined option it is possible to inject arbitrary log data
that can be used to test full processor chain (see LogEvents.exe
command line options).
  ...
  <!-- Test selector for eventlog data produced by LogEvents.exe -->
  <selector name="test" input_type="EventLog" processor="first">
    <query>
	  <![CDATA[
	    <Select Path="Application">
		  *[System[(Provider/@Name='F2BBench') and (EventID=0) and (Level=2)]]
		</Select>
	  ]]>
	</query>
    <regexps>
      <regexp id="Benchmark" type="data" xpath="Event/EventData/Data">
	    <![CDATA[(?<Username>.+)@(?<Address>.+):(?<Port>.+)]]>
	  </regexp>
    </regexps>
    <evtdts>
      <evtdata name="Event.Login" apply="before">failed</evtdata>
    </evtdts>
  </selector>
  ...
Processors
Processors section is the most important part of the F2B configuration.
Each well defined log event structure created by F2B input modules and
filtered by one of the selectors can be passed to the chain of processor
instances with user defined configuration options. Different processing
path can be specified based on log event data.
Basic declaration of the processor is same and contains processor unique
name, type (processor class name), description and link to following
processor which is called in case execution of current processor did not
throw any (uncatched) exception. Next processor in configuration file
is used as a default value for successful processor execution and in
case of exception the default is empty processor which terminate event
log processing. Processing is also terminated in case unknown processor
name.
<processor name="unique processor name" type="ProcessorClassName">
  <description>User defined processor instance description</description>
  <options>
    <!-- processor configuration options -->
    <option key="key1" value="value1"/>
    <option key="key2" value="value2"/>
	<!-- ... -->
  </options>
  <!-- reference to the next processor (by default set to the
  processor name defined below this processor configuration)
  and to the processor called in case of execption (by default
  processor execution is terminated in case of exception) -->
  <goto next="label" error="last"/>
</processor>
Label
Simple label that can be used in attributes of the processor goto element.
<processor name="unique_label_name" type="Label"/>
Stop
This processor terminate processing chain.
<processor name="unique_stop_name" type="Stop"/>
Sleep
This processors just stops processing logged event for an interval defined
in processor options. Fixed interval can be specified by using «normal»
mode or time can be uniformaly distributed «random» number from defined
interval. Interval can be an expression that results in number of seconds.
<processor name="sleep" type="Sleep">
  <description>Processor for debuging / testing concurency</description>
  <options>
    <option key="mode" value="random"/>
    <option key="interval" value="10"/>
  </options>
</processor>
Parallel
Run specified processors in parallel using separate worker threads.
<processor name="parallel" type="Parallel">
  <description>Example configuration for Parallel processor</description>
  <options>
    <option key="processors" value="processor1,processor2,processor3,fail2ban"/>
  </options>
</processor>
Filters
These kind of processors can be used to branch processor chains based on log
event data. Their configuration can/should provide two additional goto
element attributes success and failure.
Login
Filter log events according login (audit) success/failure defined as selector
attribute. This processor also define procname.Success and procname.Failure
variable when at least one login succeed in given time period. This information
can be used to determine that at least one successful login ocured from given
address range.
<processor name="login" type="Login">
  <description>Skip events that correspond successfull login</description>
  <options>
    <option key="login" value="Event.Login"/>
    <option key="address" value="Event.Address"/>
    <option key="maxsize" value="100000"/>
    <option key="findtime" value="86400"/>
    <option key="count" value="24"/>
    <option key="ipv4_prefix" value="32"/>
    <option key="ipv6_prefix" value="64"/>
    <option key="state" value="c:\F2B\login.state"/>
  </options>
  <goto success="last"/>
</processor>
Range
Filter log events according client address specified directly in XML
configuration file. It can be used for static list of the IPv4/IPv6
addresses that requires some special treatment (e.g. not to apply fail2ban
for your own address range).
<processor name="whitelist" type="Range">
 <description>Whitelist IP addresses</description>
  <ranges>
    <range network="127.0.0.0/8"/>
    <range network="192.0.2.0/24"/>
    <range network="::1/128"/>
    <range network="2001:db8::/32"/>
  </ranges>
  <options>
    <!-- address comes usually directly from input parsers -->
    <option key="address" value="Event.Address"/>
    <!-- create ${whitelist.Mail} variable on successful search -->
    <option key="mail" value="whitelist-admin@example.com"/>
  </options>
  <goto success="last"/>
</processor>
RangeFile
Filter log events according client address read from config file.
The filename is monitored for changes and this module is automatically
reconfigured with updated data.
<processor name="important_clients" type="RangeFile">
  <description>Read address ranges from text file</description>
  <options>
    <option key="address" value="Event.Address"/>
    <option key="filename" value="c:\F2B\important_clients.ranges"/>
  </options>
  <goto success="last"/>
</processor>
File format is very simple, each line contains IPv4/IPv6 address or address
range. Optionally mail separated from IPv4/IPv6 address by tabulator can be
provided and it is used to create procname.Mail variable that can be later
used e.g. in Mail processor. Hash character «#» at the beginning of the
line means start of comment and these lines are skipped when parsing data
from this address ranges configuration file.
192.168.123.123
192.168.0.0/16	f2b-private-range-admin@example.com
192.168.1.0/24	f2b-private-subrange-admin@example.com
fc00::1234:1233
fc00::/7	f2b-private-range-admin@example.com
Input
Filter log events according list of input types, input names and selector
names. Regexp can be used to match each name. This processor can be used
to group similar events and apply to them same processor chain.
<processor name="login_input" type="Input">
  <description>Select just login events from all local and remote inputs</description>
  <options>
    <!-- <option key="type" value="(EventLog|FileLog)"/> -->
    <option key="input" value="(local.*|remote.*)"/>
    <option key="selector" value="(login|specific_login)"/>
  </options>
  <goto success="if_filter_login_succeeded" failure="if_filter_login_failed"/>
</processor>
Account
Filter log events according user account properties. This processor requires
existing <account> definition that provides user account data. Account
processor can be used to deal with non-existing, locked or disabled accounts
different with respect to normal failed login due to bad password.
<processor name="if_ad_account_exists" type="Account">
  <description>Filter log events for non-existing accounts</description>
  <options>
    <!-- username comes usually directly from input parsers -->
    <option key="username" value="Event.Username"/>
    <!-- data "source" is reference to existing "account" name -->
    <option key="account" value="ad_accounts"/>
    <option key="status" value="exists"/>
    <!--
    <option key="status" value="disabled"/>
    <option key="status" value="locked"/>
    <option key="status" value="disabled|locked"/>
    -->
  </options>
  <goto success="ad_account_exists" failure="not_ad_account_exists" error="ad_account_error"/>
</processor>
Case
Use template to create next processor name. If the label after template
variable expansion doesn’t correspond to any existing processor name than
standard failure processor will be called as next processor. If you leave
failure attribute empty than log event processing will follow standard
rules and no furter processor is called.
<processor name="case" type="Case">
  <description>Choose next processor according template</description>
  <options>
    <option key="template" value="label_for_${Event.Input}_${Event.Selector}"/>
  </options>
  <goto failure="last"/>
</processor>
Regex
For each event this processor expand expression specified in value
configuration option and evaluate regex on final data. In case of
match it calls success processor otherwise failure processor is
called. This can be used e.g. to deal differently with special user
accounts like machine accounts that ends with dolar sign (please note
that following example use ${EventData.*} event variable that become
available only after you already called EventData processor earlier
in processing chain).
<processor name="regex" type="Regex">
  <description>Use regex to choose next processor</description>
  <options>
    <option key="regex" value="(^svc-.+|.+\$)"/>
    <option key="value" value="${EventData.TargetUserName}"/>
  </options>
  <goto success="processor_for_matched_regex" failure="processor_for_no_match_with_regex"/>
</processor>
EventData
This processor just extract EventData attributes from windows log entry
and create ${EventData.*} variables that can be used in processors later
in processing chain.
<processor name="event_data" type="EventData">
  <description>Add all user data from windows event log record as ${EventData.*} variables</description>
</processor>
Logger
Log selected events in a file (timestamp, hostname, selector_name, IP address,
…). Output data format is treated as template where all variables are
expanded and than stored in predefined file. To prevent excessive disk space
usage this module can rotate its output files when their size reached given
treshold. It is also possible to keep history of several rotated log files.
<processor name="logger" type="Logger">
  <description>Log all selected events in log file</description>
  <options>
    <option key="file" value="c:\F2B\full.log"/>
    <option key="size" value="1073741824"/>
    <option key="rotate" value="4"/>
    <option key="template" value="${Event.TimeCreated}\t${Event.EventId}\t${Event.RecordId}\t${Event.Address}\r\n"/>
    <option key="synchronized" value="true"/>
  </options>
</processor>
LoggerSQL
Log important data from selected events in a SQL database using ODBC (MySQL,
PostgreSQL and MSSQL database was tested with this module). Before you can
start to use LoggerSQL module first you have to create database table that
will keep all required data. In F2B configuration file it is necessary
to specify ODBC connection string, database table name or you own customized
«insert» command and mapping between F2BLogAnalyzer event parameters
and database table columns.
It is useful to call EventData processor before logger module, because
this module populate event parmeters with all data from logged event
(${EventData.*} variables). Databases handle incorrect input data types
differently (e.g. MySQL is very «clever» when it comes to conversion from
input string to various data types) and most of them can’t automatically
deal with complex data conversion. Databases are usually able to convert
string representation of number, but final value should not exceed range
for column numeric data type. Also be avare that string data should not
exceed lenght of CHAR or VARCHAR — it is possible to truncate string
directly using F2B expression syntax ${variable:start_pos:length}.
You can customize how to store data in database using insert configuration
option. This example also shows in a comment user defined «INSERT» command
that is ekvivalent to the behavior when you just specify simple table
configuration option. Customized insert SQL command provides maximum
flexibility, because it can be used e.g. to call stored procedure to save
data. Parameters are defined as column.name expressions and they are passed
to the SQL engine ordered by columns configuration option.
Executing LoggerSQL processor by default waits till database server
accepts new data. This is not optimal in case database is down, because
log event processing can hang till timeout. It is more robust to save
data asynchronously with async configuration option set to true.
With async enabled LoggerSQL first put data in a queue and separate
thread (re)tries to store these data in database. There is an upper limit
async_max_queued for unsaved data in the queue to prevent excessive
memory usage in case there is long-lasting issue with database.
CREATE TABLE f2b (
    inserted TIMESTAMP DEFAULT CURRENT_TIMESTAMP,
    timestamp BIGINT DEFAULT NULL,
    hostname VARCHAR(50) DEFAULT NULL,
    id INTEGER DEFAULT NULL,
    input VARCHAR(50) DEFAULT NULL,
    selector VARCHAR(50) DEFAULT NULL,
    login VARCHAR(10) DEFAULT NULL,
    --status INTEGER UNSIGNED DEFAULT NULL,
    status BIGINT DEFAULT NULL,
    --substatus INTEGER UNSIGNED DEFAULT NULL,
    substatus BIGINT DEFAULT NULL,
    event INTEGER DEFAULT NULL,
    record INTEGER DEFAULT NULL,
    --keywords INTEGER DEFAULT NULL,
    keywords BIGINT DEFAULT NULL,
    machine VARCHAR(50) DEFAULT NULL,
    created VARCHAR(22) DEFAULT NULL,
    provider VARCHAR(40) DEFAULT NULL,
    address VARCHAR(40) DEFAULT NULL,
    port VARCHAR(5) DEFAULT NULL,
    username VARCHAR(25) DEFAULT NULL,
    domain VARCHAR(20) DEFAULT NULL
);
<processor name="logger_sql" type="LoggerSQL">
  <description>Log all selected events in database using ODBC</description>
  <options>
    <!--
    # MySQL ODBC OPTION AUTO_RECONNECT(4194304)
    # https://dev.mysql.com/doc/connector-odbc/en/connector-odbc-configuration-connection-parameters.html#codbc-dsn-option-flags
    <option key="odbc" value="DRIVER={MySQL ODBC 3.51 Driver};SERVER=mysql.example.com;PORT=3306;DATABASE=f2b;USER=username;PASSWORD=secret;OPTION=4194304"/>
    <option key="odbc" value="DRIVER={MySQL ODBC 5.1 Driver};SERVER=mysql.example.com;PORT=3306;DATABASE=f2b;USER=username;PASSWORD=secret;OPTION=4194304"/>
    <option key="odbc" value="DRIVER={MySQL ODBC 5.3 Unicode Driver};SERVER=mysql.example.com;PORT=3306;DATABASE=f2b;USER=username;PASSWORD=secret;OPTION=4194304"/>
    # PostgreSQL ODBC connection
    <option key="odbc" value="DRIVER={PostgreSQL ANSI};SERVER=postgresql.example.com;PORT=5432;DATABASE=f2b;USERNAME=username;PASSWORD=secret"/>
    # MSSQL ODBC connection with autoreconnect enabled
    <option key="odbc" value="DRIVER={ODBC Driver 11 for SQL Server};SERVER=server_that_supports_connection_resiliency;UID=username;PWD=secret;ConnectRetryCount=2;ConnectRetryInterval=1"/>
    -->
    <option key="odbc" value="DRIVER={MySQL ODBC 3.51 Driver};SERVER=mysql.example.com;PORT=3306;DATABASE=f2b;USER=username;PASSWORD=secret;OPTION=4194304"/>
    <option key="table" value="f2b"/>
    <!--
    <option key="insert" value="INSERT INTO f2b (timestamp,hostname,id,input,selector,login,status,substatus,event,record,keywords,machine,created,provider,address,port,username,domain) VALUES (?,?,?,?,?,?,?,?,?,?,?,?,?,?,?,?,?,?)"/>
    -->
    <option key="columns" value="timestamp,hostname,id,input,selector,login,status,substatus,event,record,keywords,machine,created,provider,address,port,username,domain"/>
    <option key="column.timestamp" value="${Event.Timestamp}"/>
    <option key="column.hostname" value="${EventSystem.Computer:0:50}"/>
    <option key="column.id" value="${Event.Id}"/>
    <option key="column.input" value="${Event.Input:0:50}"/>
    <option key="column.selector" value="${Event.Selector:0:50}"/>
    <option key="column.login" value="${Event.Login:0:10:=}"/>
    <option key="column.status" value="$(${EventData.Status:=-1})"/>
    <option key="column.substatus" value="$(${EventData.SubStatus:=-1})"/>
    <option key="column.event" value="${Event.EventId}"/>
    <option key="column.record" value="${Event.RecordId}"/>
    <option key="column.keywords" value="${Event.Keywords}"/>
    <option key="column.machine" value="${Event.MachineName:0:50}"/>
    <option key="column.created" value="${Event.TimeCreated:0:22}"/>
    <option key="column.provider" value="${Event.ProviderName:0:40}"/>
    <option key="column.address" value="${Event.Address:=}"/>
    <option key="column.port" value="${Event.Port:=0}"/>
    <option key="column.username" value="${Event.Username:0:25}"/>
    <option key="column.domain" value="${Event.Domain:0:20}"/>
    <option key="timeout" value="15"/>
    <option key="async" value="true"/>
    <option key="async_max_queued" value="1000"/>
  </options>
</processor>
Fail2ban
Provides fail to ban functionality by counting login failure events
from client IP address (range) that reach this processor within given
time period findtime and calls another chain of action processors
when number of events reaches maxretry treshold. You must specify
variable address which is evaluated to the user IPv4/IPv6 address
and its prefix length that is used for grouping address ranges
(e.g. IPv6 client device can easily use 2^64 different addresses
and fail2ban module should specify a limit to prevent F2BLogAnalysis
resource exhaution).
You can specify more tresholds within one fail2ban processor instance.
This can be used to specify smaler soft limit where you just log info in
text file or send mail notification (using logger or mail processor)
and hard limit that can be used to add firewall rules to block offending
address range (e.g. fail2banWFP). For each treshold it is possible
to specify bantime that is not really used by this processor except
it is added to the event variable list. This variable can be later used
by processors that really set firewall rules to set their expiration
time.
Fail2ban has to keep track of recent events and it is possible to choose
best way how to store these data using history configuration options:
all— store all timestamps forfindtimeinterval (can use a lot of memory
in case of highmaxretrytreshold)one— just one number to store history of failed logins, but it is less
precise in tracing / removing exipred failed loginsfixed— fixedcountof history entries that represents number of failed
logins in the same size history intervals; you can specify smaller weight
for older failed logins bydecayparameter lower than 1.0rrd— history entries with variable intervals (not yet implemented)
<processor name="fail2ban" type="Fail2ban">
  <description>Fail to ban processor</description>
  <options>
    <!-- address comes usually directly from input parsers -->
    <option key="address" value="Event.Address"/>
    <option key="state" value="c:\F2B\fail2ban.state"/>
    <option key="findtime" value="600"/>
    <option key="ipv4_prefix" value="32"/>
    <option key="ipv6_prefix" value="64"/>
    <option key="history" value="all"/>
    <!--
    <option key="history" value="all"/>
    <option key="history" value="one"/>
    <option key="history" value="fixed"/>
    <option key="history.fixed.count" value="10"/>
    <option key="history.fixed.decay" value="1.0"/>
    <option key="history" value="rrd"/>
    <option key="history.rrd.count" value="5"/>
    <option key="history.rrd.repeat" value="2"/>
    -->
    <option key="tresholds" value="test,soft,hard"/>
    <option key="treshold.test.function" value="simple"/>
    <option key="treshold.test.maxretry" value="0"/>
    <option key="treshold.test.repeat" value="0"/>
    <option key="treshold.test.bantime" value="300"/>
    <option key="treshold.test.action" value="action_test"/>
    <option key="treshold.soft.function" value="simple"/>
    <option key="treshold.soft.maxretry" value="7"/>
    <option key="treshold.soft.repeat" value="0"/>
    <option key="treshold.soft.bantime" value="-1"/>
    <option key="treshold.soft.action" value="action_soft"/>
    <option key="treshold.hard.function" value="simple"/>
    <option key="treshold.hard.maxretry" value="10"/>
    <option key="treshold.hard.repeat" value="0"/>
    <option key="treshold.hard.bantime" value="600"/>
    <option key="treshold.hard.action" value="action_hard"/>
    <!-- this should go to default filewall configuration options
    <option key="maxentries" value="100000"/>
    -->
  </options>
</processor>
Send email created from predefined template
<processor name="action_mail" type="Mail">
  <description>Test email sender processor</description>
  <options>
    <option key="sender" value="helpdesk@example.com"/>
    <option key="recipient" value="f2b-admin@example.com,${address_group.Mail}"/>
    <option key="subject" value="[F2B] Fail2Ban[${Fail2ban.Last}] reached ${${Fail2ban.Last}.Treshold} treshold for ${${Fail2ban.Last}.Address}/${${Fail2ban.Last}.Prefix}"/>
    <option key="body" value="Mail body text."/>
  </options>
  <goto on_error_next="true"/>
</processor>
Cmd
Execute command with arguments expanded from user defined string. It is quite
tricky to do argument escaping correctly (e.g. arguments starting with «-«)
and probably even impossible when you use event variables in the argument
string. Be avare that in worst case scenario this can lead to security
vulnerability. In our example ${Event.Username}) is controlled by user
(advarsary) who can easily specify ‘» something’ as his username and our
code gets incomplete information for param3.
You should avoid to use this processor for any other reason than for debugging.
It is much better and more efficient to implement required functionality
in powershell and use it together with PSFunct or PSProc processors.
Our Cmd processor configuration example just shows how to use this processor,
but calling powershell code this way is at least order of magnitude slower
than our dedicated PSFunct and PSProc processors.
By default this processor wait for executable to finish (wait_for_exit)
and store exit code in procname.ExitCode event log dictionary.
<processor name="action_cmd" type="Cmd"> <description>Execute user defined command with arguments</description> <options> <option key="path" value="c:\\Windows\\System32\\WindowsPowerShell\\v1.0\\powershell.exe"/> <option key="args" value="-File c:\\F2B\\PSCmd.ps1 "-param1:${Event.Address}" "-param2:${Event.Username}""/> <option key="wait_for_exit" value="true"/> </options> <goto on_error_next="true"/> </processor>
Example of simple c:\F2B\PSCmd.ps1 powershell script that deals with arguments
passed by the Cmd processor to powershell executable that defined in the
sample configuration described above.
param (
   [string]$param1 = "empty",
   [string]$param2 = "empty",
)

$ret = $param1 + ';' + $param2
Add-Content C:\F2B\PSCmd.out "$ret"
#$ret
PSFunct
Call powershell function implemented directly in configuration or from external file.
Function accepts arguments that can be specified using «params» configuration option
and list of named parameters. Last value returned by powershell function call is
stored in procname.Result event log dictionary.
<processor name="psfunct" type="PSFunct"> <description>Call powershell function implemented directly here or in external file and store result in procname.Result</description> <options> <option key="code" value="function Test-Me($param1, $param2) { $ret = $param1 + ';' + $param2;Add-Content c:\F2B\PSFunct.out "$ret";$ret }"/> <!-- <option key="script" value="c:\F2B\PSFunct.ps1"/> --> <option key="function" value="Test-Me"/> <option key="params" value="param1,param2"/> <option key="param.param1" value="${Event.Id}"/> <option key="param.param2" value="${Event.Address}"/> </options> <!-- <goto on_error_next="true"/> --> </processor>
Example of simple c:\F2B\PSFunct.ps1 powershell script used in PSFunct
processor configuration sample.
function Test-Me($param1, $param2)
{
	$ret = $param1 + ';' + $param2
	Add-Content C:\F2B\PSFunct.out "PSProcStart" $ret
	$ret
}
PSProc
Allow user to implement F2B processors in powershell scripting language.
In each processor livecycle stage corresponding function (start/execute/stop)
is called. If you don’t want to call start/execute/stop function use empty
string as a value for corresponding function name.
Function funct_execute is called for each captured event and it must have
one argument. This argument is used to pass EventEntry data structure
representing event log object and providing powershell code access to the
same data as in C# processor (it is also possible to modify event variable
dictionary using SetProcData method). Execute powershell function can also
return result(s) and the last one can be used to choose next processor name.
There are three supported return values:
- NEXT — use default
goto_nextprocessor from currentPSProcconfiguration - ERROR — use error
goto_errorprocessor from currentPSProcconfiguration - GOTO proc_name — continue with processor named
proc_name
<processor name="psproc" type="PSProc">
  <description>Call processor implemented in powershell</description>
  <options>
    <option key="script" value="c:\F2B\PSProc.ps1"/>
    <option key="funct_start" value="PSProcStart"/>
    <option key="funct_stop" value="PSProcStop"/>
    <option key="funct_execute" value="PSProcExecute"/>
    <!-- <option key="threadsafe" value="true"/> not implemented -->
  </options>
  <!-- <goto on_error_next="true"/> -->
</processor>
Example of simple PSProc.ps1 powershell script that can be called
by PSProc module.
param($proc)

function PSProcStart()
{
   Add-Content $outputFile "PSProcStart $($proc.Name) - $(Get-Date)"
}

function PSProcStop()
{
   Add-Content $outputFile "PSProcStop $($proc.Name) - $(Get-Date)"
}

function PSProcExecute($evtlog)
{
   Add-Content $outputFile "PSProcExecute $($proc.Name) - $(Get-Date)"
   Add-Content $outputFile "  Processor instance details:"
   Add-Content $outputFile "    Proc.Id: $($proc.Name)"
   Add-Content $outputFile "    Proc.Next: $($proc.goto_next)"
   Add-Content $outputFile "    Proc.Error: $($proc.goto_error)"
   Add-Content $outputFile "  Event log instance details:"
   Add-Content $outputFile "    Evtlog.Id: $($evtlog.Id)"
   Add-Content $outputFile "    Evtlog.Input.Name: $($($evtlog.Input).Name)"
   Add-Content $outputFile "    Evtlog.Input.InputName: $($($evtlog.Input).InputName)"
   Add-Content $outputFile "    Evtlog.Input.InputType: $($($evtlog.Input).InputType)"
   Add-Content $outputFile "    Evtlog.Input.SelectorName: $($($evtlog.Input).SelectorName)"
   Add-Content $outputFile "    Evtlog.Input.Processor: $($($evtlog.Input).Processor)"
   Add-Content $outputFile "    Evtlog.Created: $($evtlog.Created)"
   Add-Content $outputFile "    Evtlog.Hostname: $($evtlog.Hostname)"
   Add-Content $outputFile "    Evtlog.LogData: $($evtlog.LogData)"
   $procNames = $evtlog.ProcNames -join ','
   Add-Content $outputFile "    Evtlog.ProcNames: $procNames"
   Add-Content $outputFile "  Available variables:"
   foreach ($data in $evtlog.ProcData.GetEnumerator()) {
      Add-Content $outputFile "  $($data.Key): $($data.Value)"
   }

   # add / modify event data
   $evtlog.SetProcData("$($proc.Name).data1", "value1");
   $evtlog.SetProcData("$($proc.Name).data2", "value2");
   $evtlog.SetProcData("$($proc.Name).data3", "value3");

   # call error processor
   #"ERROR"
   # call named processor
   #"GOTO proc_name"
   # call next processor (default behavior)
   "NEXT"
}

$outputFile = "C:\F2B\PSProc.$($proc.Name).out"
Add-Content $outputFile "PSProcInit $($proc.Name) - $(Get-Date)"
Fail2banAction
Base class for Fail2ban* action processors that provides general
configuration option:
bantime— default expiration time for F2B firewall rule that is
used only ifFail2banmodule doesn’t provide its recommended valuemax_ignore— maximum time we ignore events with request to block
same address
Fail2banMSMQ
Send information about banned IP address into F2BQueue that use MSMQ
to implement producer-subscriber queue. This can be used to implement
distributed F2B with many sources (F2BLogAnalyzers) and protected machines
that receives information about addresses that would be added in firewall
(F2BFirewall). Configuration options (queue_name) must correspond command
line arguments used to start F2BQueue.
<processor name="action_hard_msmq" type="Fail2banMSMQ">
  <description>Send message to F2BPS service using MSMQ</description>
  <options>
    <option key="queue_name" value=".\private$\F2BProductionQueue"/>
    <option key="max_ignore" value="60"/> <!-- maximum time in seconds we ignore message with same parameters (minimum is real bantime/100) -->
    <option key="bantime" value="600"/> <!-- used only if Fail2ban module doesn't provide specific value -->
    <option key="time_to_be_received" value="300"/> <!-- how long should message wait to be processed in MSMQ before we discard it -->
  </options>
  <goto on_error_next="true"/>
</processor>
Fail2banWFP
Module that can be used to add new rules into local firewall using directly WFP
API (F2BWFP.dll). This module also automatically cleanup expired F2B firewall
rules. This is recommended module in case you don’t want to build distributed
F2B infrastructure (using F2BQueue + F2BFirewall) and it provides excelent
performance for milions firewall rules.
<processor name="action_hard_wfp" type="Fail2banWFP">
  <description>Ban IP address reaching fail2ban treshold with local firewall using WFP API (F2BWFP.dll)</description>
  <options>
  <option key="max_ignore" value="60"/> <!-- maximum time in seconds we ignore message with same parameters (minimum is real bantime/100) -->
    <option key="bantime" value="600"/> <!-- used only if Fail2ban module doesn't provide specific value -->
    <option key="cleanup" value="60"/> <!-- clean list of expired rules every cleanup seconds -->
    <option key="max_filter_rules" value="0"/> <!-- maximum number of active F2B filter rules (0 .. no limit) -->
    <option key="permit" value="false"/> <!-- add F2B permit filter rule (instead of blocking rule) -->
    <option key="persistent" value="false"/> <!-- F2B persistent filter rule (survive restart) -->
  </options>
  <goto on_error_next="true"/>
</processor>
Fail2banFw
Module that can be used to add new rules into local firewall using standard
COM Firewall API (FirewallAPI.dll). This module also automatically cleanup
expired F2B firewall rules. Use this module with caution because its perfromance
gets unusable with few tousands active firewall rule (packet processing is fine
but add/remove firewall rule can take excessive time).
<processor name="action_hard_fw" type="Fail2banFw">
  <description>Ban IP address reaching fail2ban treshold with local firewall using COM Firewall API (FirewallAPI.dll) ... much slower than WFP</description>
  <options>
    <option key="max_ignore" value="60"/> <!-- maximum time in seconds we ignore message with same parameters (minimum is real bantime/100) -->
    <option key="bantime" value="600"/> <!-- used only if Fail2ban module doesn't provide specific value -->
    <option key="cleanup" value="60"/> <!-- clean list of expired rules every cleanup seconds -->
    <option key="max_filter_rules" value="0"/> <!-- maximum number of active F2B filter rules (0 .. no limit) -->
    <option key="permit" value="false"/> <!-- add F2B permit filter rule (instead of blocking rule) -->
  </options>
  <goto on_error_next="true"/>
</processor>
Fail2banCmd
This module execute external application and can pass argumens that comes
from evaluated string expression
<processor name="action_test_cmd" type="Fail2banCmd">
  <description>Execute F2BFwCmd.exe to add local WFP filter (this module can be used to run arbitrary executable / script)</description>
  <options>
    <option key="path" value="c:\F2B\F2BFwCmd.exe"/> <!-- path to F2BFwCmd.exe executable -->
    <option key="args" value="add-filter /address ${${Fail2ban.Last}.Address}/${${Fail2ban.Last}.Prefix} /expiration ${${Fail2ban.Last}.Expiration}"/> <!-- executable arguments -->
    <option key="max_ignore" value="60"/> <!-- maximum time in seconds we ignore message with same parameters (minimum is real bantime/100) -->
    <option key="bantime" value="600"/> <!-- used only if Fail2ban module doesn't provide specific value -->
  </options>
  <goto on_error_next="true"/>
</processor>
Other configurations
Queue
Internal event queue options that allows to limit number of unprocessed log
events to prevent memory exhaustion. In case this limit is reached, further
events will be immediately dropped. Also maximum time for whole processor
chain can be specified to protect execution from processor that hangs. This
is just another safety mechanism in case F2B implementation misbehaves.
Event processors can be implemented thread safe or thread safety can be
guaranteed by global lock. This means that log events can be processed
in parallel, but most of currently implemented processors are so simple
that there is basically no gain in performance when we allow more
consumers (initial tests shows in average 1M increase in memory usage
per each consumer thread).
<!-- Parameters for log event producer/consumer queue -->
<queue>
  <!-- maximum lenght of event queue (0 ... no limit) -->
  <maxsize>100000</maxsize>
  <!-- maximum run time for full chain of processors -->
  <maxtime>10</maxtime>
  <!-- number of event consumer threads -->
  <consumers>10</consumers>
</queue>
SMTP
Global configuration for sending mail from F2B. This configuration
is used by Mail processor.
<smtp>
  <host>smtp.example.com</host>
  <port>25</port>
  <ssl>false</ssl>
  <!-- SMTP AUTH with username/password requires SSL
  <ssl>true</ssl>
  <username>username</username>
  <password>secret</password>
  -->
</smtp>
Account
This configuration is used by Account processor.
<!-- User account configurations (used e.g. by AccountProcessor) -->
<accounts>
  <account name="file_accounts" type="File">
    <description>Use user names (+ account status) from CSV text file</description>
    <options>
      <option key="casesensitive" value="false"/>
      <option key="filename" value="c:\F2B\accounts.txt"/>
      <option key="separator" value="	"/>
    </options>
  </account>
  <account name="ad_accounts" type="Cached+AD">
    <description>Cached AD accounts</description>
    <options>
      <option key="casesensitive" value="false"/>
      <option key="hosts" value="ldap1.example.com,ldap2.example.com,ldap3.example.com"/>
      <option key="port" value="389"/>
      <option key="ssl" value="false"/>
      <option key="starttls" value="false"/>
      <option key="auth" value="basic"/>
      <option key="username" value="EXAMPLE\username"/>
      <option key="password" value="secret"/>
      <option key="base" value="DC=example,DC=com"/>
      <option key="filter" value="(objectClass=user)"/>
      <option key="cache_positive_time" value="600"/>
      <option key="cache_negative_time" value="60"/>
      <option key="cache_positive_max_size" value="10000"/>
      <option key="cache_negative_max_size" value="1000"/>
      <option key="refresh_inc" value="300"/>
      <option key="refresh_full" value="3600"/>
    </options>
  </account>
</accounts>
Command line options
There are couple of options common to every F2B executable. To see all
available command line options with their description use -h option.
Useful informations are showed aslo once you call executable with examples
option (e.g. F2BFwCmd.exe examples). This shows most common patterns
how to use command line interface including short description.
Every executable also supports options related to logging. If you run
F2B executable interactively it sends by default log data to standard
output and in service mode to the windows event log. You can save F2B
logging in a flat file by specifying -g filename command line option.
To change log level use -l command line option with INFO, WARN
or ERROR parameter.
Command line interface can be also used to manage F2B services that
corresponds to F2BLogAnalyzer.exe, F2BQeueu.exe and F2BFirewall.exe.
This applications support install (uninstall) option that is used
to install (uninstall) particular windows service. It is also possible
to start/stop corresponding windows service with start and stop
commandline option. It is possible to manage services with standard
windows tools like sc.exe, but especialy installing and uninstalling
F2B services should be done with their own command line interface,
because that ensures correct service options and also all necessery
modifications (e.g. F2BFirewall configures also WFP during service
installation).
Before installing / starting F2B services it is useful to start executables
interactively, because it is much faster to trace configuration issues
this way. Interactive mode is initiated with run command line option.
Be aware that F2B binaries may need special privileges (access to windows
event log, access to WFP, …) and by default they’ll work only when
executed with local administrator privileges. It is possible to run each
F2B executable with normal user account, but in that case you must first
add access rights to required user to windows event log and windows
filtering platform.
F2B binaries also support configuration of the memory limits enforced
by windows. With -x size option you can control windows Job Object
memory configuration. This can prevent memory exhaution in case of
non-optimal configuration (e.g. IPv6 Fail2ban configuration can cause
issues in case you use /128 prefix and attacker controls all 2^64
addresses on one subnet).
F2BLogAnalyzer (F2BLA service)
Main configuration is stored in XML file that was already described
in prior sections. Use -c filename command line option to select
required configuration.
Debug build of the F2BLogAnalyzer provides simple interface that can
be used to dump internal state of this application includig current
state of each configured processor. This is useful espetially for
new module development but it can also help troubleshooting issues
with configuration. When you run F2BLogAnalyzer interactively you can press
«d» key to dump program state in c:\F2B\dump.txt (different file can be
passed with --dump-file filename command line option). Special log event
that can be created with LogEvents.exe dump filename also dumps internal
F2BLogAnalyzer state in required filename.
In addition to config file F2BLogAnalyzer.exe supports also command
line actions that can be used to manage F2BLA service and even run this
service interactively to be able to easily trace problems with modifications
in configuration XML file. Supported actions:
- help — show this help
- examples — show command line examples
- run — execute service interactively
- install — install as windows service
- uninstall — uninstall windows service
- start — start installed service
- stop — stop installed service
Some actions use (optional/required) parameters:
-h, --help— show this help-l, --log-level— log severity level (INFO, WARN, ERROR)-g, --log-file file— log filename (disables event log or console logging)--log-size size— maximum log file size--log-history cnt— number of rotated log files-c, --config file— use this configuration (default: F2BLogAnalyzer.exe.config)-u, --user user— use given user to run this service-x, --max-mem size— configure hard limit for memory in MB (Job Object)--dump-file file— file used to store service internal state (default: c:\F2B\dump.txt)
Examples how to use F2BLogAnalyzer.exe:
- interactive run for debuging
F2BLogAnalyzer.exe run -c F2BLogAnalyzer.config
- manage F2BLogAnalyzer service using builtin funtionality
F2BLogAnalyzer.exe install -c c:\F2B\F2BLogAnalyzer.config [-u DOMAIN\username] [-l INFO] [-g c:\F2B\F2BLogAnalyzer.log]
F2BLogAnalyzer.exe start
F2BLogAnalyzer.exe stop
F2BLogAnalyzer.exe uninstall
- manual F2BLogAnalyzer service management
sc create F2BLA binPath= "C:\F2B\F2BLogAnalyzer.exe" DisplayName= "Fail2ban Log Analyzer for Windows" type= own start= auto depend= eventlog/MSMQ
sc description F2BLA "Provides one component of fail2ban services for Windows that can reconfigure firewall to reject clients that exceed failed login threshold."
sc queryex F2BLA
sc qc F2BLA
sc start F2BLA
sc stop F2BLA
sc delete F2BLA
- user access to windows event log
# Add user to "Event Log Readers" group or change directly log SDDL, e.g.
wevtutil gl Application
wevtutil sl Application /ca:...(A;;0x3;;;"SID")
F2BQueue (F2BQ service)
This executable doesn’t use configuration file and its behavior is driven
only by command line arguments. Supported F2BQueue.exe actions:
- help — show this help
- examples — show command line examples
- run — execute service interactively
- install — install as windows service
- uninstall — uninstall windows service
- start — start installed service
- stop — stop installed service
Some actions use (optional/required) parameters:
-h, --help— show this help-l, --log-level— log severity level (INFO, WARN, ERROR)-g, --log-file file— log filename (disables event log or console logging)--log-size size— maximum log file size--log-history cnt— number of rotated log files-c, --config file— use this configuration (default: F2BQueue.exe.config)-s, --state file— read/write queue state to file-u, --user user— use given user to run this service-x, --mex-mem size— configure hard limit for memory in MB (Job Object)-H, --host host— hostname with running F2BQueue (or F2BLogAnalyzer) service-p queue— producer queue provided by F2BQueue (or F2BLogAnalyzer) service-r queue— subscription queue for F2BQueue service-i interv— unsubscribe interval in seconds (default 150, disable 0)-n interv— cleanup interval for expired filter rules in seconds (default 300, disable 0)-m, --max-size size— maximum size of non-expired records in queue (default 0 — no limit)
Examples how to use F2BQueue.exe:
- interactive run for debuging
F2BQueue.exe run -H . -p F2BProducer -r F2BSubscription -s c:\F2B\queue.dat -i 300 -n 150
- manage F2BLogAnalyzer service using builtin funtionality
F2BQueue.exe install [-u DOMAIN\username] [-h HOST] [-p F2BFWProduction] [-r F2BFWRegistration] [-i 150] [-n 300] [-s c:\F2B\queue.dat] [-l INFO] [-g c:\F2B\F2BQueue.log]
F2BQueue.exe start
F2BQueue.exe stop
F2BQueue.exe uninstall
- manual F2BQueue service management
sc create F2BQ binPath = "C:\F2B\F2BQueue.exe" DisplayName= "Fail2ban Queue for Windows" type= own start= auto depend= eventlog/MSMQ
sc description F2BQ "Provides message queue component of fail2ban services for Windows that can reconfigure firewall to reject clients that exceed failed login threshold."
sc queryex F2BQ
sc qc F2BQ
sc start F2BQ
sc stop F2BQ
sc delete F2BQ
F2BFirewall (F2BFW service)
This executable doesn’t use configuration file and its behavior is driven
only by command line arguments. Supported F2BFirewall.exe actions:
- help — show this help
- examples — show command line examples
- run — execute service interactively
- install — apply required WPF modifications and register F2BFW service
(use «user» to specify unprivileged account for F2BFW service) - uninstall — remove WPF modifications and unregister F2BFW service
- start — start installed service
- stop — stop installed service
Some actions use (optional/required) parameters:
-h— show this help-l— log severity level (INFO, WARN, ERROR)-g, --log-file filelog filename (disables event log or console logging)--log-size size— maximum log file size--log-history cnt— number of rotated log files-u user— use given user to run this service-x size— configure hard limit for memory in MB (Job Object)-H host— hostname with running F2BQueue (or F2BLogAnalyzer) service-p queue— producer queue provided by F2BQueue (or F2BLogAnalyzer) service-r queue— subscription queue for F2BQueue service-i interv— subscribe interval in seconds (default 60, disable 0)-n interv— cleanup interval for expired filter rules in seconds (default 30, disable 0)-m size— maximum number of filter rules in WFP (default 0 — no limit)
Examples how to use F2BFirewall.exe:
- interactive run for debuging
# service startup command for F2BQueue running on HOST
F2BFirewall.exe run -H HOST -r F2BSubscription -i 240 -n 150
# service startup command for direct communication with F2BLogAnalyzer
F2BFirewall.exe run -H . -p F2BProducer
- manage F2BFirewall service using builtin funtionality
# register F2BFirewall service and allow "DOMAIN\username" to modify firewall filters
F2BFirewall.exe install [-u DOMAIN\username] [-h HOST] [-p F2BProvider] [-r F2BFWRegistration] [-i 60] [-n 30] [-l INFO] [-g c:\F2B\F2BFirewall.log]
# unregister F2BFirewall service and remove "DOMAIN\username" privileges for firewall filters
F2BFirewall.exe uninstall [-u DOMAIN\username]
- manual F2BFirewall service management
# register WPF provider with GUID aebba4b7-7d2f-436f-b0ed-40069fb63cbc
# register WPF subLayer with GUID 82ff6293-af12-4ef8-97dd-fd5477303838
# add user ACL to WPF provider, subLayer and filter if you want run this service with unprivileged account
# create F2BFW service
sc create F2BFW binPath= "C:\F2B\F2BFirewall.exe" DisplayName= "Fail2ban Firewall Service" type= own start= auto depend= eventlog/BFE/MSMQ
sc description F2BFW "Fail2ban firewall service reads message queue filled by Fail2ban and adds ban rules in Windows firewall."
sc queryex F2BFW
sc qc F2BFW
sc start F2BFW
sc stop F2BFW
sc delete F2BFW
F2BFwCmd (F2B windows firewall interface)
Commandline interface to manage windows firewall configuration related to
the F2B application. It must be used to initialize WFP stuctures for F2B
and provide functions to manage firewall rules created by F2B. Supported
F2BFwCmd.exe actions:
- help — show this help
- examples — show command line examples
- list-filters — list all F2BFW filters
- add-filter — add F2BFW filte rule
- remove-filter — remove F2BFW filter rule with filterId
- remove-filters — remove all F2BFW filters
- remove-expired-filters — remove expired F2BFW filters
- remove-unknown-filters — remove F2BFW filters with invalid name
- list-wfp — show F2B WFP structures
- add-wfp — add F2B WFP structures
- remove-wfp — remove F2B WFP structures
- list-privileges — show WFP security descriptors
- add-privileges — add user to WFP security descriptors
- remove-privileges — remove user from WFP security descriptors
Examples how to use F2BFwCmd.exe:
- add privileges F2B firewall rules to «DOMAIN\username»
F2BFwCmd add-privileges [-u DOMAIN\username]
- remove privileges F2B firewall rules from «DOMAIN\username»
F2BFwCmd remove-privileges [-u DOMAIN\username]
- list all F2B filter rules (to get full firewall configuration use
netsh wfp show state wfpstate.xml)
- add F2B firewall filter for 192.0.2.123/24 with 5 minute expiration
powershell -command "[System.DateTime]::UtcNow.Ticks + [System.TimeSpan]::FromMinutes(10).Ticks"
F2BFwCmd add-filter --address 192.0.2.123/24 --expiration 636403126277103869
- add pernament F2B firewall filter with hight priority which permits access from 192.0.2.234
F2BFwCmd add-filter --address 192.0.2.234 --weight 18446744073709551615 --permit --persistent
- remove filter with ID 12345678 (only F2B rules can be removed)
F2BFwCmd remove-filter --filter-id 12345678
- manage service manually:
- register WPF provider with GUID
aebba4b7-7d2f-436f-b0ed-40069fb63cbc - register WPF subLayer with GUID
82ff6293-af12-4ef8-97dd-fd5477303838 - add user ACL to WPF provider, subLayer and filter if you want run this service with unprivileged account
- register WPF provider with GUID
Simple examples how to use F2B executables
- Standalone I (F2B for one machine)
c:\F2B\F2BFwCmd.exe add-wfp
c:\F2B\F2BLogAnalyzer.all.exe install \
        -c c:\F2B\F2BLogAnalyzer.exe.config \
        -g c:\F2B\F2BLogAnalyzer.log -l ERROR
sc start F2BLA
- Standalone II (F2B for one machine, no dependency on Microsoft Message
Queue installation)
c:\F2B\F2BFwCmd.exe add-wfp
c:\F2B\F2BLogAnalyzer.nomsmq.exe install \
        -c c:\F2B\F2BLogAnalyzer.exe.config \
        -g c:\F2B\F2BLogAnalyzer.log -l ERROR
sc config F2BLA depend= eventlog/BFE
sc start F2BLA
- Standalone III (F2B for one machine, use slow COM FirewallAPI that can’t
handle more than few tousands F2B filter rules, but this binary has no
external dependency on Visual C++ Redistributable package or Microsoft
Message Queue installation)
c:\F2B\F2BLogAnalyzer.standalone.exe install \
        -c c:\F2B\F2BLogAnalyzer.exe.config \
        -g c:\F2B\F2BLogAnalyzer.log -l ERROR
sc config F2BLA depend= eventlog/BFE
sc start F2BLA
-
Distributed (analyze logs and configure firewall on groups of machines)
-
log analyzer machine
c:\F2B\F2BLogAnalyzer.all.exe install \
       -g c:\F2B\F2BLogAnalyzer.log -l ERROR \
       -c c:\F2B\F2BLogAnalyzer.exe.config
sc start F2BLA
- message queue machine (queuehost)
c:\F2B\F2BQueue.exe install \
       -g c:\F2B\F2BLogAnalyzer.log -l ERROR \
       -H . -p F2BProducer -r F2BSubscription \
       -s c:\F2B\queue.dat -i 300 -n 150
sc start F2BQ
- machine protected by Fail2ban firewall
c:\F2B\F2BFwCmd.exe add-wfp
c:\F2B\F2BFirewall.exe install \
       -g c:\F2B\F2BLogAnalyzer.log -l ERROR \
       -H queuehost -r F2BSubscription -i 240 -n 150
sc start F2BFW
Performance
F2BLogAnalyzer in standalone configuration with Logger+Range+Fail2ban
and Fail2banWFP modules can process more than 1k selected events per
second on Intel Q9550 @ 2.83GHz (2009 desktop). The bottleneck is not
F2B, but windows logging which took more than 2/3 of CPU time during
performance tests. Next expensive operation are changes in WFP (in a
test environment this processor was called for each selected event),
but such operation should not happen very often and almost 10k filter
rules can be added/deleted within a second.
Reasonable performance was also behind decision to use WFP API,
because common interfaces like netsh use FirewallAPI.dll and filter
rules are inserted in application firewall layer. This library has
sufficient performance for manipulation with few thousands filter rules,
but it can cause issues once you reach 10k rules. WFP provides different
firewall layers and FirewallAPI.dll use complex application layer.
It is more efficient to use just IPv4/IPv6 packet layer to block remote
addresses, because add/remove operations are much faster. It is possible
to change 100k fail2ban rules within 15 seconds where FirewallAPI.dll
needs more than 40 minutes to do same changes.

Тема безопасности сервера Windows не раз поднималась, в том числе и в этом блоге. Тем не менее мне хотелось бы еще раз освежить в памяти старые методы защиты и рассказать о малоизвестных новых. Разумеется, будем использовать по максимуму встроенные средства.
Итак, предположим, что у нас есть небольшая компания, которая арендует терминальный сервер в удаленном дата-центре.
При проектировании любой защиты следует начинать с модели угроз — от кого или чего, собственно, будем защищаться. В нашей типовой конфигурации я буду строить оборону от внешних злобных хакеров, от некомпетентных (а может, и немного злонамеренных) пользователей. Начнем с внешнего периметра обороны — фаервола.
За тобой как за огненной стеной
Во времена Windows 2003 встроенный фаервол представлял собой жалкое зрелище, и в случае невозможности применения сторонних средств приходилось использовать IPSec. Пример такой настройки разобран, например, в материале Secure Windows Servers using IPSec Firewall.
Сейчас, с появлением WFP (Windows Filtering Platform) дела стали получше. В принципе, с этим фаерволом так или иначе сталкивался, наверное, каждый системный администратор Windows, поэтому настройка удаленного доступа к серверу только с определенных IP не должна вызывать затруднений. Я обращу внимание на некоторые «фишки», которые используются редко.
По умолчанию фаервол блокирует все входящие соединения, кроме явно разрешенных, но исходящие разрешает все, кроме явно запрещенных. Политику эту можно изменить, открыв управление фаерволом через wf.msc и выбрав «Свойства».

Настройка фаервола.
Теперь, если мы захотим запретить пользователям терминального сервера выходить с этого сервера в интернет — у нас это получится.
Стоит отметить, что при настройке правил доступа к серверу (входящие подключения) явно создавать правила для исходящего трафика не нужно. В терминах iptables — established и related всегда разрешены.
Для ценителей командной строки настройку фаервола можно производить в контексте netsh advfirewall. Почитать про команды можно в материале «Брандмауэр Windows 7 в режиме повышенной безопасности», я же добавлю, что блокировка входящих и исходящих подключений включается командой:
netsh advfirewall set currentprofile firewallpolicy blockinbound,blockoutbound
Еще одной особенностью фаервола windows является то, что любая программа или настройка меняет его правила без уведомлений. Например, отключили вы все правила на нашем дедике, рядом появился второй, вы сделали между ними локальную сеть, настроили общий доступ и… внезапно у вас включается smb для всех и вся со всеми вытекающими последствиями.
Выхода, по сути, два с половиной (напомню, мы пока говорим только про встроенные средства): регулярно проверять, не изменились ли правила, и использовать старый добрый IPSec или — как по мне, самый разумный вариант — настраивать фаервол групповой политикой. Настройка производится в Конфигурация компьютера — Конфигурация Windows — Параметры Безопасности — Монитор брандмауэра Защитника Windows в режиме повышенной безопасности.

Настройка фаервола групповой политикой.
Также при помощи фаервола windows можно реализовать простой fail2ban. Достаточно включить аудит неудачных попыток входа и при нескольких неудачах подряд блокировать IP источника. Можно использовать самописные скрипты, а можно уже готовые средства, о которых я писал в статье «Как дать шифровальщикам потопить компанию».
Если же встроенного фаервола не хватает и хочется использовать что-то более серьезное, то можно установить стороннее ПО. Жаль, что большинство известных решений для Windows Server — платные. Другим вариантом будет поставить перед сервером роутер. Понятно, что такая установка подойдет, если мы используем colocation, а не аренду сервера где-то далеко-далеко за рубежом. Если же зарубежный дата-центр — это наш выбор, то можно использовать виртуализацию — например, встроенный Hyper-V — и установить в виртуалку привычный GNU\Linux или FreeBSD.
Возникает вопрос: как сделать так, чтоб виртуалка имела прямой выход в интернет, а сервер — нет? Да еще чтобы MAC-адрес сервера не светился хостеру и не требовал тем самым покупки еще одного IP-адреса.
Осторожно! Дальнейшие действия лучше проводить через IP-KVM!
Для этого виртуальную машину нужно снабдить двумя сетевыми адаптерами. Один — для непосредственного подключения к интернету, для него мы сделаем виртуальный коммутатор типа «внешний» и снимем галочку, разрешающую операционной системе взаимодействие с этим коммутатором. Этой самой галочкой мы лишим сервер прямого доступа в интернет (настройку виртуальной машины-фаервола лучше произвести заранее), и его MAC не будет светиться хостеру.

Настройка внешнего виртуального коммутатора.
Другой виртуальный коммутатор следует сделать типа «внутренний» для взаимодействия виртуальной машины и сервера. На нем уже нужно настроить локальную адресацию. Так получится создать виртуальный роутер, стоящий перед сервером и защищающий его.
Заодно на этой виртуальной машине можно настроить любимый VPN до офиса или удаленных сотрудников, не заморачиваясь с ролью «Маршрутизация и удаленный доступ» или со встроенным IPSec, как я рассказывал в статье «Как я базы 1С в Германии прятал». Главное, не забыть проверить автозапуск этой виртуальной машины при старте системы.
Подключаться к такому серверу можно при помощи обычного RDP или использовать HTML5 клиенты с двухфакторной аутентификацией. Стоит на случай брутфорса озаботиться и решениями fail2ban, и блокировкой учетной записи на некоторое время при нескольких неудачных попытках авторизации подряд.
Снаружи сервер мы более-менее защитили, перейдем к защите внутренней.
Защита внутренняя: остановить и не пущать
Конечно, для защиты сервера изнутри очень хочется поставить какой-нибудь антивирус — мало ли что пользователи сервера накопируют или накачают из интернета. Но на практике антивирус на сервере может принести больше вреда, чем пользы. Поэтому я обычно использую механизмы блокировки запуска ПО не из белого списка — в частности, механизм SRP (software restriction policies), о котором я тоже упоминал в статье «Как дать шифровальщикам потопить компанию».
Остановлюсь чуть подробнее на одном подводном камне, о котором часто забываем при включении SRP со стандартными настройками, когда блокируется все, кроме папок Windows и Program Files. Действительно, это отфильтровывает почти всех зловредов. Но не очень работает со злонамеренностью сотрудников, ведь в системных папках есть подпапки с правом на создание объектов пользователями. Например, можно посмотреть на папку C:\Windows\Temp.

Разрешения на папку, которая попадет в белый список.
И такая папка не одна. Можно, конечно, проводить аудит системных папок самостоятельно, а можно довериться людям, которые это уже сделали. Например, специалист Stefan Kanthak в своем блоге (по ссылке есть тестовый вирус EICAR, антивирус может сработать) в довольно агрессивной манере проходится по антивирусам и методам защиты Windows и заодно предлагает уже собранный пакет настроек SRP, который будет блокировать и такие подозрительные папки. По запросу автор предоставляет и программу для конвертирования этих настроек реестра в файлы локальных политик.
Если вы предпочитаете использовать механизм AppLocker c более гибкими настройками, то вам может помочь решение AaronLocker.
Редакция не рекомендует использовать и устанавливать скрипты и прочие программы из интернета без предварительного их изучения.
Если AppLocker появился уже довольно давно, а возраст SRP перевалил за 15 лет, то относительно свежей альтернативой является WDAC (Windows Defender Application Control). Действительно, со времен Security Essentials встроенный «антивирус» обзавелся многими интересными возможностями. Например, WDAC — модуль, который отвечает за политики доступа к приложениям и библиотекам. Ранее он являлся частью Device Guard (защита компьютера, в том числе с применением технологий виртуализации), и немного про его настройку рассказывалось в материале «Принцип работы S Mode в Windows 10 и настройка Device Guard своими руками». Подробнее со всеми тонкостями можно ознакомиться в официальной документации, мне же остается добавить несколько минусов, отличающих его от классических решений вроде SRP и AppLocker:
- Графической настройки нет, все через командлеты PowerShell.
- Нет настроек в срезе пользователя, только для компьютера.
- Настройка делается довольно непривычно — подготавливается файл в формате xml, который затем приводится к бинарному, и распространяется по компьютерам.
Зато возможна настройка в срезе приложения: например, если вы хотите дать доступ к cmd.exe вашему скрипту, а не стороннему вирусу — это можно реализовать. Да еще и политику можно применить до загрузки системы, при помощи UEFI.

Блокировка хрома через WDAC.
В целом из-за тягостной настройки сложилось впечатление, что WDAC больше позиционируется не сам по себе для управления компьютерами, а как средство, позволяющее интегрироваться с централизованными MDM-системами вроде Microsoft Intune. Но при этом разработка старых добрых SRP прекращена в Windows 10 1803.
Если говорить про Защитник Windows, нельзя не упомянуть про Credential Guard и Remote Credential Guard.
Первое средство использует опять же виртуализацию, запуская компонент LSA (Local Security Authority) в изолированном от операционной системы процессе, что сильно усложняет процесс кражи хешей паролей и билетов Kerberos. Подробнее про технологию можно почитать в официальной документации. Для работы процессор должен поддерживать виртуализацию, а также в системе должна быть включена безопасная загрузка (Secure Boot) и модуль TPM для привязки учетных данных к оборудованию. Включить Credential Guard можно через групповую политику Конфигурация компьютера — Административные шаблоны — Система — Device Guard — Включить средство обеспечения безопасности на основе виртуализации.

Включение Credential Guard.
Второе средство служит для защиты передаваемых учетных данных (особенно админских!) для удаленного подключения, например, по тому же RDP. Ранее для этих целей предлагался механизм Restricted Admin Mode, но он ограничивал подключение только одним сервером. Подключившись к серверу, нельзя было просто так использовать ресурсы сети, права администратора применялись только к одному серверу а-ля системный аккаунт Local System.
Remote Credential Guard позволяет передавать учетные данные с локальной машины удаленному серверу без явного ввода пароля, что, помимо расширенной безопасности, даст и удобство подключения к серверам (SSO). Почитать подробнее можно в документации, ну а я добавлю, что для работы механизма достаточно включить его поддержку на сервере — например, через реестр командой:
reg add HKLM\SYSTEM\CurrentControlSet\Control\Lsa /v DisableRestrictedAdmin /d 0
А потом подключаться к серверу командой:
mstsc.exe /remoteGuard
Теперь учетные данные в безопасности, а сервер достаточно защищен. Правда, в материале я осознанно не касался вопросов защиты от злонамеренного хостера, но тут все сводится в общем-то к одному — к шифрованию дисков.
Только зарегистрированные пользователи могут участвовать в опросе. Войдите, пожалуйста.
Расскажите, а как вы защищаете свои удаленные серверы?
45.56% Использую VPN и сплю спокойно.41
27.78% RDP на нестандартном порту, сложные пароли и блокировка учеток при брутфорсе25
2.22% Все перечисленное в статье мне знакомо и используется.2
12.22% Нет у меня никаких удаленных серверов: сбои интернета — помеха работе!11
7.78% Работаем на сбрученном дедике, зачем защита?7
4.44% Другое (расскажу в комментариях).4
Проголосовали 90 пользователей. Воздержались 22 пользователя.
Если сервер «светит» на весь мир, то мы попадаем под риски активной брутфорс атаки.
Очень сильно поможет решение весом 802 KB. Надёжное, как автомат Калашникова. Речь про программу RDP Defender.
Программа имеет интуитивно понятный интерфейс
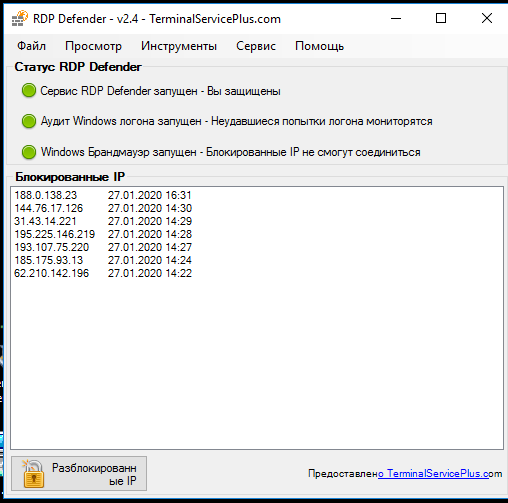
Настройки имеют всего несколько пунктов: разрешенные IP (можно задать пул), количество попыток и ограничение по времени.
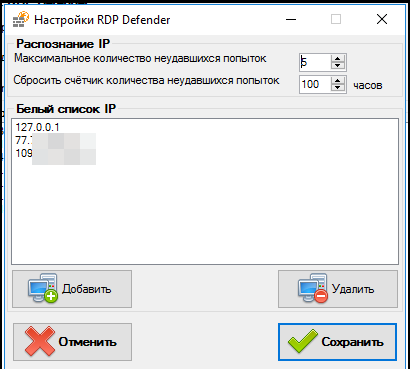
Программа отрабатывает на ура! Ложных блокировок нет. Просто так не пропускает.
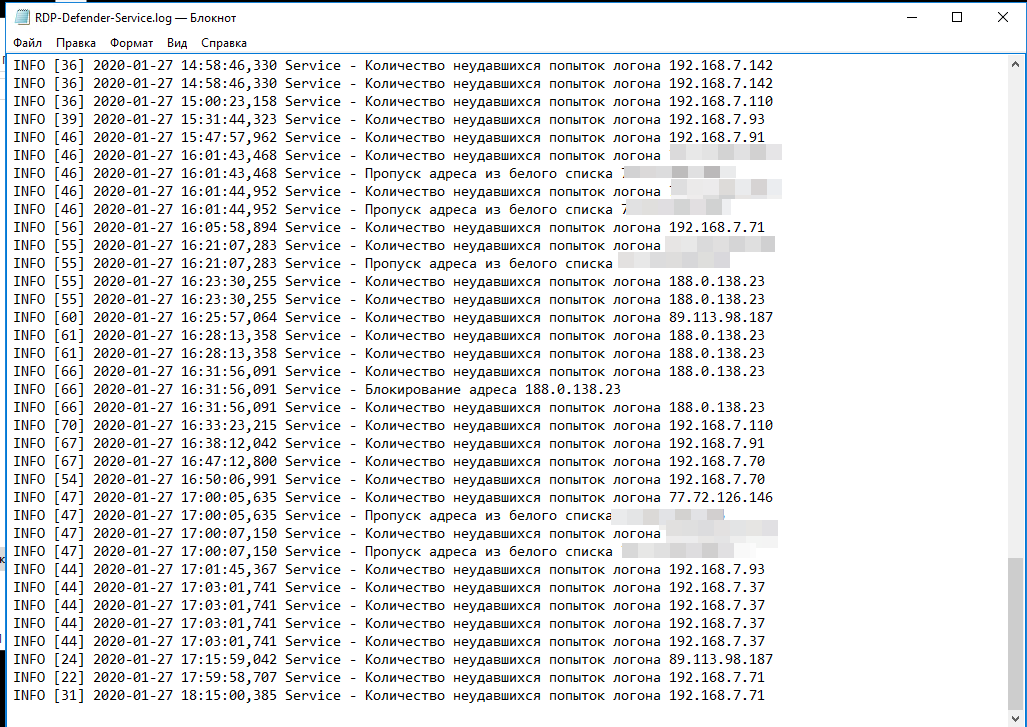
Все блокировки можно увидеть в штатном брандмауэре.
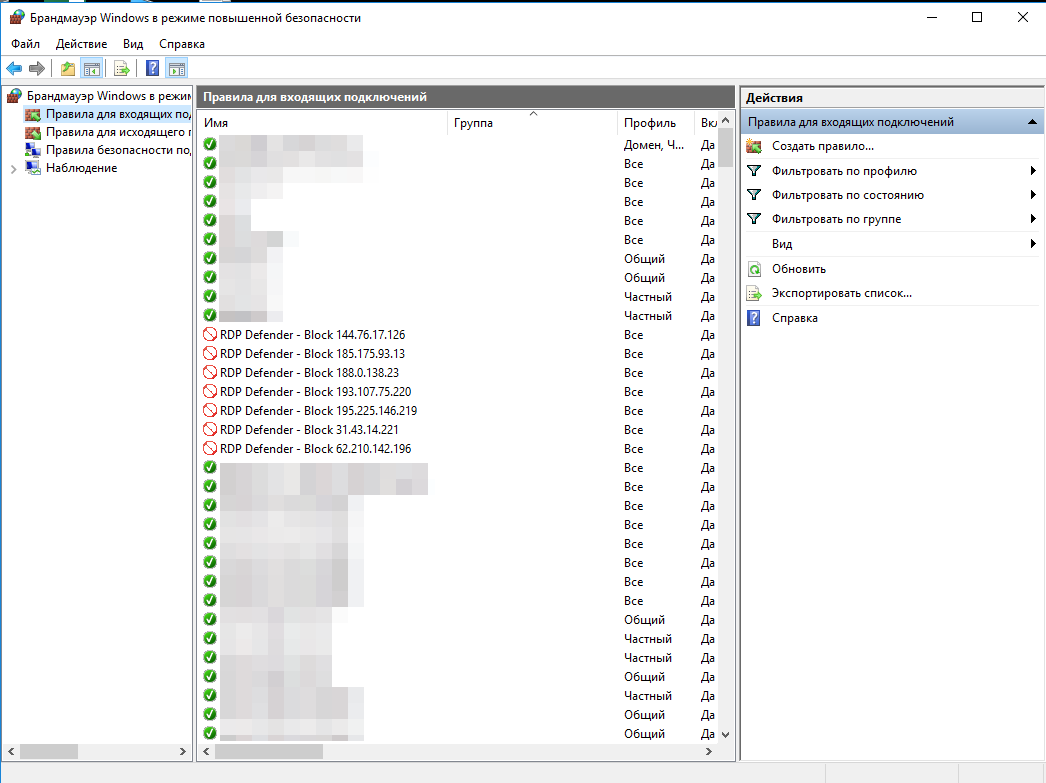
Если интересно — я собираю свой арсенал утилит и софта такие же полезные, как в этой записи.
Считаю, что это просто must have.
Просмотры: 16 762
Если мой материал был полезен, то можете угостить меня кофе ☕️
Fail2ban для Windows Server

Fail2ban — это система безопасности, которая работает на основе фильтров и запрещает доступ в защищенную систему после нескольких неудачных попыток входа. Это очень полезно для защиты серверов, особенно в случае использования Windows Server. Fail2ban доступен для Linux, но многие не знают, что он также может быть установлен на Windows Server. В этой статье мы рассмотрим, как установить Fail2ban на Windows Server и использовать его для обеспечения безопасности.
Установка Fail2ban
- Сначала необходимо установить Python на ваш сервер Windows, если он еще не установлен.
- После установки Python, скачайте последнюю версию Fail2ban с официального сайта https://www.fail2ban.org/wiki/index.php/Downloads. Распакуйте загруженный архив в любое удобное место на диске.
- Откройте командную строку и перейдите в папку, в которой находится файл fail2ban-client.exe. Этот файл находится в папке \bin.
- Запустите команду «python fail2ban-client.exe» в командной строке, чтобы убедиться, что Fail2ban правильно установлен.
Конфигурация Fail2ban
После установки вы можете настроить Fail2ban под свои нужды.
- Перейдите в папку \etc\fail2ban на диске, на котором установлен Fail2ban.
- Откройте файл fail2ban.conf в любом текстовом редакторе.
- Настройте параметры в файле fail2ban.conf для соответствующей защиты вашего сервера. В этом файле можно настроить время блокировки, количество попыток входа, перед блокировкой и другие параметры.
Настройка фильтров

Фильтры — это конфигурационные файлы, которые определяют, какие действия Fail2ban должен выполнить при нахождении определенного события. Fail2ban поставляется с несколькими встроенными фильтрами, но вы можете легко создавать свои собственные.
- Перейдите в папку \etc\fail2ban\filter.d на диске, на котором установлен Fail2ban.
- Создайте свой собственный файл фильтрации в этой папке с расширением .conf.
- Откройте созданный файл фильтрации в любом текстовом редакторе и настройте фильтр под свои нужды. Вот пример фильтра для блокировки IP-адресов после нескольких неудачных попыток входа на сервер:
[Definition]failregex = ^ .*(Invalid password)|(authentication failure).*$ignoreregex =
Запуск Fail2ban
После установки и настройки Fail2ban можно запустить его для защиты вашего Windows Server.
- Откройте командную строку и перейдите в папку, в которой находится файл fail2ban-client.exe.
- Запустите команду «fail2ban-client start» в командной строке, чтобы запустить Fail2ban.
- Fail2ban начнет мониторить журналы событий на вашем сервере и будет блокировать IP-адреса, когда они попытаются войти слишком много раз с неверными учетными данными.
Итог
Fail2ban — это отличная система безопасности, которая может быть установлена и использована на Windows Server. Она может значительно улучшить безопасность вашего сервера и предотвратить несанкционированный доступ. Установка и настройка Fail2ban на Windows Server не очень сложна, и соответствующая защита может быть настроена в течение нескольких минут. Надеемся, что эта статья поможет вам обеспечить безопасность вашего сервера.
Fail2ban для windows server
Системы безопасности являются неотъемлемой частью всех серверов. Однако, наличие обычных систем безопасности не гарантирует полной защиты. Вот почему в последние годы все больше владельцев серверов используют дополнительные инструменты безопасности, такие как fail2ban.
Что такое fail2ban?
Fail2ban — это фреймворк безопасности, который использует различные средства защиты и предотвращения любых атак на сервер. Он отслеживает журналы стандартных служб и блокирует доступ к любым IP-адресам, которые попытались получить доступ к несуществующим или недоступным ресурсам. Fail2ban обеспечивает блокировку импульсных атак (DoS), атак с использованием скриптов, флуд-атак, атак на пароли и множество других.
Использование fail2ban для windows server
В настоящее время fail2ban является стандартом безопасности в Linux и Unix-системах. Тем не менее, владельцы серверов на Windows также могут использовать это программное обеспечение.
Однако, для того чтобы использовать fail2ban в Windows средах, необходимо сначала установить его на сервер. Процесс установки на Windows довольно простой:
- Скачайте и установите Python. Fail2ban написан на питоне и требует этот язык программирования для его запуска.
- Скачайте архив самого fail2ban с официального сайта проекта.
- Распакуйте архив в любое удобное для вас место и перейдите в каталог fail2ban-/bin.
- Запустите fail2ban, прописав команду `fail2ban-client.bat`.
Конфигурация fail2ban
После установки fail2ban на сервер необходимо настроить его, чтобы он работал так, как нужно вам.
Сначала необходимо изменить файл конфигурации, расположенный в каталоге fail2ban-/config.
В файле config меняем значения настройки следующим образом:
[DEFAULT]
- ignoreip = 127.0.0.1/8
- bantime = 600
- maxretry = 3
Пояснение этих параметров:
- ignoreip — список IP-адресов (разделенных запятой), которые будут проигнорированы при проверке журналов.
- bantime — время, на которое будет заблокирован IP-адрес после того, как он был обнаружен fail2ban.
- maxretry — количество попыток входа, после которых IP-адрес будет заблокирован.

После того, как мы отредактировали файл config, необходимо создать файлы фильтра. Эти файлы определяют, какие записи должны быть обработаны fail2ban.
Например, в качестве примера мы можем создать файл под названием «ssh.conf», который будет относиться к фильтрованию журналов для SSH:

[Definition]
- failregex = ^%(__prefix_line)s(?:error: PAM: )?Authentication failure for .* from $
- ignoreregex =

В этом файле используется регулярное выражение (regex) для определения записей журнала, которые fail2ban будет обрабатывать.
Общий итог
Fail2ban — это отличный инструмент, который позволяет обеспечить дополнительную безопасность на вашем сервере. Даже если вы используете обычные системы защиты, fail2ban может защитить вас от любых атак, которые могут поступить на ваш сервер.
Fail2Ban для Windows Server: защита от атак

В сегодняшнее время компьютеры и сервера стали незаменимыми инструментами в бизнесе и даже в повседневной жизни. Они хранят и обрабатывают большое количество информации, включая конфиденциальные данные, финансовую информацию и данные о клиентах. Из-за этого серверы становятся объектами атак хакеров, которые пытаются получить доступ к информации и использовать ее в личных целях. В связи с этим Fail2Ban для Windows Server становится необходимым инструментом для защиты сервера от атак.
Что такое Fail2Ban для Windows Server?
Fail2Ban для Windows Server — это программа для автоматического обнаружения и блокировки неудачных попыток входа в систему. Это решение помогает защищать серверы, используя метод защиты от перебора паролей и других атак. Fail2Ban для Windows Server поддерживает множество протоколов, включая SSH, FTP, SMTP, POP3 и многие другие.
Как работает Fail2Ban для Windows Server?
Fail2Ban для Windows Server отслеживает неудачные попытки входа в систему и блокирует IP-адреса хакеров, которые пытаются получить доступ несколько раз за короткий промежуток времени. Эта защита от перебора паролей известна как метод блокировки временем (time-based blocking).
Программа Fail2Ban для Windows Server работает следующим образом:
- Отслеживает журналы системы для обнаружения неудачных попыток входа в систему.
- Анализирует данные в журналах, чтобы определить, какие IP-адреса пытались получить доступ к системе.
- Блокирует IP-адреса, которые слишком часто пытались получить доступ к системе.
- Снимает блокировку через определенное время, обычно через несколько минут или часов.
Преимущества Fail2Ban для Windows Server

Fail2Ban для Windows Server имеет множество преимуществ, включая:
- Автоматическое обнаружение и блокировка неудачных попыток входа в систему
- Защита от перебора паролей
- Поддержка множества протоколов
- Настраиваемые правила блокировки
- Возможность отслеживать журналы истории системы
- Простой и понятный интерфейс для управления программой
Установка и настройка Fail2Ban для Windows Server
Установка и настройка Fail2Ban для Windows Server может быть немного сложной процедурой, однако следуя определенным шагам и инструкциям, мы можем легко использовать программу для защиты нашего сервера. Ниже приведены шаги для установки и настройки Fail2Ban для Windows Server:
- Убедитесь, что ваш сервер работает на Windows Server.
- Установите Python и pip на сервер.
- Загрузите и установите Fail2Ban для Windows Server.
- Создайте файл конфигурации Fail2Ban и настройте его согласно своим требованиям.
- Добавьте правила для защиты конкретных протоколов, таких как SSH или FTP.
- Запустите Fail2Ban, чтобы начать применять блокировки.
- Отслеживайте журналы, чтобы убедиться, что программа работает правильно и блокировки применяются при неудачных попытках входа в систему.
Итог
Fail2Ban для Windows Server — это мощный инструмент для защиты серверов от атак. Он автоматически обнаруживает неудачные попытки входа в систему и блокирует IP-адреса хакеров, чтобы защитить информацию, хранящуюся на сервере. Установка и настройка Fail2Ban для Windows Server может быть сложной процедурой, но следуя инструкциям, мы можем легко установить и настроить программу для защиты своего сервера.
I was looking for a tool to block IP addresses after a certain number of failed RDP login attempts, something like fail2ban but for Windows. I came across IPBan. Calling IPBan a “fail2ban for Windows” unfairly minimizes what it can do, but it can handle that task quite nicely.
As a test I installed it on a Windows 2019 Server running in Azure using the provided install instructions from the README:
[Net.ServicePointManager]::SecurityProtocol = [Net.SecurityProtocolType]::Tls12; iex ((New-Object System.Net.WebClient).DownloadString('https://raw.githubusercontent.com/DigitalRuby/IPBan/master/IPBanCore/Windows/Scripts/install_latest.ps1'))You don’t want to blindly run a script that downloads and installs something on your machine without looking at it first, do you? Of course not. You take a look at the code first:
https://github.com/DigitalRuby/IPBan/blob/master/IPBanCore/Windows/Scripts/install_latest.ps1
Essentially, the script does the following:
- Downloads a zip file
- Extracts the files
- Sets up a Windows service
- Suggests that you might want to edit the config by opening the config file in Notepad
I took a look at the config file and made only one change to get started: I added a CenturyLink subnet to the allow list. CenturyLink is my ISP, and I didn’t want to accidentally lock myself out. Normally you wouldn’t want to add an entire /12 of your residential ISP, but this was just a test on a temporary and disposable server:
<add key="Whitelist" value="75.160.0.0/12"/>I noted a few other interesting things in the config file:
- It can also examine Linux logs (IPBan can run on Windows or Linux)
- It blocks failed RDP logins, but also blocks failed logins for other Windows services, such as MSSQL and Exchange
- It defaults to banning an IP address after 5 failed attempts, but the number of failed attempts can be configured
- The default ban duration is 1 day, but this can be configured
- The default ban duration can take into account recidivism, so that the second or third time an address is banned it can use a longer duration
- It can also use a username-based allow list (whitelist), so that attempted logins from usernames not on the list will ban the IP address immediately
- It can add blocks based on external threat intelligence feeds, and uses the Emerging Threats blocklist by default
- It can pull the config file from a URL, allowing you to manage the configuration of many servers from one location.
After I reviewed the config file (C:\Program Files\IPBan\ipban.config) I restarted the IPBAN service via Services GUI. You could also restart it via Powershell:
sc.exe stop IPBAN
sc.exe start IPBAN
Now that it was up-and-running, what changes did it make? I opened up Windows Defender Firewall and opened the Advanced Settings. Looking though the Inbound rules I found 4 rules prefixed with IPBAN_, three Deny rules and one Allow rule:
- [Deny]
IPBan_Block_0 - [Deny]
IPBan_EmergingThreats_0 - [Deny]
IPBan_EmergingThreats_1000 - [Allow]
IPBan_GlobalWhitelist_0
I looked at the properties for IPBan_Block_0. Already, one IP address had been banned! (I checked several hours later and only 2 additional IP addresses had been banned, so I may have gotten lucky to see one within minutes.)
It took me a while to figure out what the difference between IPBan_EmergingThreats_0 and IPBan_EmergingThreats_1000. IPBan is creating a new firewall rule after 999 entries, so the 1000th IP address or subnet from the Emerging Threats feed was added to IPBan_EmergingThreats_1000. I’ve seen some arguments online about whether or not there is a limit to the number of addresses or subnets that can be included in the scope for a Windows Defender Firewall rule, and some sources indicate there is a limit of 1000 (and I’m fairly certain the author of IPBan is one of the people arguing there is a limit).
The IPBan_GlobalWhitelist_0 contained the CenturyLink subnet that I explicitly allowed.
I was excited about pulling the configuration from a URL, so I added my configuration to https://osric.com/chris/ipban/ipban.example.config, initially with just one tweak:
<add key="UserNameWhitelist" value="chris"/>This would, in theory, ban any IP address immediately if they used an address like admin or guest. It uses a configurable Levenshtein distance to try to avoid banning an IP address based on a typo (for example, chros instead of chris), which is a clever approach.
I then added the URL to the config file on the server itself:
<add key="GetUrlConfig" value="https://osric.com/chris/ipban/ipban.example.config"/>After another service restart, I wanted to test to see if a login attempt with a bad username would cause an immediate block. I opened an RDP connection using the credentials admin:admin and from a VPN IP address that would be outside of the allowed CenturyLink subnet.
I did not immediately see the VPN IP address in the IPBAN_Block_0 deny rule. I checked the logs (C:\Program Files\IPBan\logfile.txt):
2021-12-31 04:35:45.3336|INFO|DigitalRuby.IPBanCore.Logger|Firewall entries updated:
2021-12-31 04:37:45.5791|WARN|DigitalRuby.IPBanCore.Logger|Login failure: 198.51.100.101, admin, RDP, 1
2021-12-31 04:37:45.5791|INFO|DigitalRuby.IPBanCore.Logger|IP blacklisted: False, user name blacklisted: False, fails user name white list regex: False, user name edit distance blacklisted: True
2021-12-31 04:37:45.5791|WARN|DigitalRuby.IPBanCore.Logger|Banning ip address: 198.51.100.101, user name: admin, config black listed: True, count: 1, extra info: , duration: 1.00:00:00
2021-12-31 04:37:45.6024|WARN|DigitalRuby.IPBanCore.Logger|Updating firewall with 1 entries...
2021-12-31 04:37:45.6024|INFO|DigitalRuby.IPBanCore.Logger|Firewall entries updated: 198.51.100.101
There was just a delay in adding it. I checked the IPBan_Block_0 deny rule again in Windows Defender Firewall and the IP address was there. I must have been exceedingly quick, as the cycle time defaults to 15 seconds:
<add key="CycleTime" value="00:00:00:15"/>One other change I made to my config: I set this option to false so that any future tests would not send my VPN IP to the “global ipban database”:
<add key="UseDefaultBannedIPAddressHandler" value="true" />Normally leaving that set to true should be fine, but during testing it would be good to avoid adding your own IP address to a block list. I have not yet discovered if the global IPBan database is publicly available.
A couple other things I noted:
The ipban.config file was completely overwritten by the version at the GetUrlConfig, including the GetUrlConfig value! The next time I restarted the IPBAN service, it did not pick up the config from that URL, as the GetUrlConfig option was now blank. I updated the GetUrlConfig value on ipban.config locally and on the remotely hosted ipban.example.config to include the URL to itself, so that it would persist after a restart.
The FirewallRules config option has a somewhat confusing syntax, at least for Deny rules. I added the following rule, which then appeared in my Windows Defender Firewalls block rules as IPBan_EXTRA_GoogleDNS_0:
<add key="FirewallRules" value="
    GoogleDNS;block;8.8.4.4;53;.
"/>
This rule allows inbound port 53/tcp traffic from 8.8.4.4 and blocks it from all other ports (0-52/tcp and 54-65535/tcp). I’m still not sure how to specify that I want to block all ports, or block both TCP and UDP traffic using this config option.
IPBan has a lot of other configuration options that I’m excited to test. For me, this tool fills a major gap for Windows servers!