
Updated on Apr 28, 2025
External SSDs have better performance than HDDs, and the average boot time for SSDs is 10-13 seconds, compared to 30-40 seconds for HDDs. In addition to booting Windows from a USB or SD card, many users wonder if they can boot their computers from an external SSD. The following is a typical case study:
Is it possible to boot Win10 or 11 from an external SSD? I read that SD cards are possible with Windows to go but unreliable enough. (SD card corruption) And I think this might be the least intrusive solution if you are not into dual booting and need Windows for a special use case. — from Reddit
Don’t worry. EaseUS will walk you through the feasibility of booting Windows from an external SSD and provide a detailed solution.
View the Necessary Information to Boot from External SSD
| ⚙️Complex Level | Low, Beginners |
| ⏱️Duration | 4-8 minutes |
| 💻Applies to | Set External SSD as a boot drive |
| ✏️Stages |
1️⃣Stage 1. Prepare the External SSD and Put It Into Your PC 2️⃣Stage 2. Install OS on External SSD 3️⃣Stage 3. Set External SSD As Boot Drive in BIOS |
Is It Possible to Boot from External SSD?
Yes, you can boot from external SSD; it helps to have a bootable external drive if the OS on the internal drive is corrupted. There are more benefits to booting Windows from an external SSD. Here are some of the main reasons why:
- External SSD is more durable: it has no moving parts and can take more of a beating. And the SSD generates less heat and noise, which means it’s more energy efficient, which can lead to longer battery life for the laptop.
- External SSDs offer faster speeds: SSDs can load and transfer files and applications faster. And it can reduce the time it takes to boot up your computer.
Whatever your reason for wanting to boot from an external SSD, this article has a detailed solution. Next, we will discuss how to boot Windows from external SSD.
You May Also Interested In:
There are three stages to booting an SSD from an external drive. I will provide detailed steps for each stage. Please adhere to the instructions in this article to properly navigate and efficiently use an external SSD as a bootable drive.
Stage 1: Prepare the External SSD and Put It Into Your PC
1. Connect the external SSD to your computer using a compatible interface (USB or Thunderbolt).
2. If it is a new SSD, please initialize it. And format the SSD to the NTFS file system
- Press and hold the Windows icon, and select and open Disk Management.
- Right-click on the external SSD to be formatted and select «Format.»
- Choose the file system, then adjust the cluster size to your liking.
3. Make sure the SSD has enough space for partitioning
You need to ensure enough space on the external SS to accommodate your Windows 11/10 operating system. The capacity of the external SSD needs to be greater than or equal to the capacity used by the system partition.
Note: If there is insufficient space on the SSD, you can delete some hidden files or extend the partition. Read more: SSD Reports Wrong Size.
Stage 2: Install OS on External SSD
There are several ways to install an operating system on an SSD: you can do it via a Windows ISO file or by cloning the Windows operating system. Whichever way you choose, the best tool to use is the EaseUS Partition Master.
This tool provides powerful features to help you install an operating system. You can migrate your Windows OS to a new external SSD easily and quickly. And it simplifies installing an operating system, providing a safe and fast solution. Read on to see the detailed step-by-step guide.
Step 1. Select the source disk.
- Click the «Clone» from the left menu. Select the «Clone OS Disk» or «Clone Data Disk» and click «Next».
- Choose the source disk and click «Next».
Step 2. Select the target disk.
- Choose the wanted HDD/SSD as your destination and click «Next» to continue.
- Read Warning message and confirm «Yes» button.
Step 3. View the disk layout and edit the target disk partition size.
Then click «Continue» when the program warns it will wipe out all data on the target disk. (If you have valuable data on the target disk, back up it in advance.)
You can select «Autofit the disk», «Clone as the source» or «Edit disk layout» to customize your disk layout. (Select the last one if you want to leave more space for C drive.)
Step 4. Click «Start» to start the disk cloning process.
EaseUS Partition Master is a powerful tool. It supports all external and internal devices. With this way, you can also install Windows 10 from USB. Besides, if you want to know how to boot Windows from SD Card, click the following link to get more information.
After installing the operating system on the external SSD, uninstall the SSD from the computer. Then, follow the steps below to set up the external SSD.
Stage 3: Set up the external SSD as a boot drive in BIOS
When you make the external SSD bootable, you will also need to change the boot order of the external SSD in the BIOS. Whenever you start your computer, it will automatically check if the external SSD is available. If the external SSD is available, you can successfully boot Windows from the external SSD.
Here are the steps to set up an external SSD as a bootable drive on Windows:
Step 1. Reboot your computer and enter BIOS setup: Use F2/F12/Del to enter BIOS.
Step 2. Change the boot order in the boot options: Find the target external SSD under the Boot Priority tab and move it to the top.
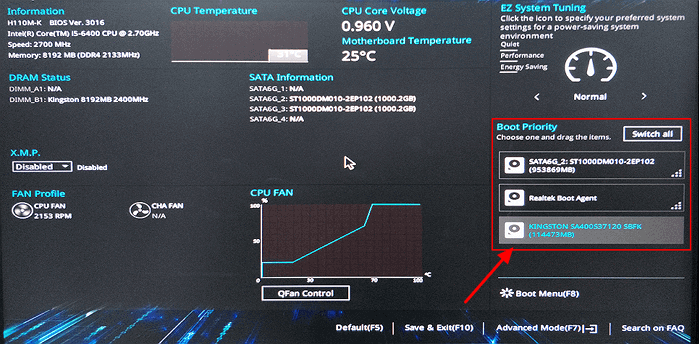
Step 3. Save the changes and exit.
After setting the external SSD as a bootable drive, you can use the new SSD as your system operating disk. Below is a full guide video for booting from the external SSD:
Conclusion
Is it possible to boot from an external SSD? This article provides an easy-to-follow method. In three stages, you can set up an external SSD as the primary boot drive. With EaseUS Partition Master, you can clone your Windows system to an external SSD.
If you enjoyed this article about how to boot Windows from an external SSD, don’t forget to share it to help more people in need!
FAQs About Booting from External SSD
If you have further questions about booting from an external SSD or setting it as the primary drive, our FAQ section may provide your answers.
1. How can I boot from SSD instead of HDD in BIOS?
Once you have the required operating system on the external SSD, you can set the drive as the boot drive by following these steps:
Step 1. Press and hold F2/F12/Del to enter the BIOS.
Step 2. Change the boot order to set the operating system to boot from the new SSD.
Step 3. Save the changes and reboot the PC.
2. Why can’t I set an external SSD as a boot drive?
A boot mode error may cause setting external SSD as boot drive: If the SSD is a GPT disk, you need to enable EFI/UEFI boot mode. And enter BIOS setting to change boot mode. Or convert SSD to MBR disk. Otherwise, it can’t boot from SSD.
3. Why does BIOS not recognize SSD boot?
The cable may be damaged or incorrectly connected if the BIOS does not detect or recognize the SSD. The Serial ATA cable may sometimes be disconnected. Please check if the SATA cable is firmly connected.
4. How to boot Mac from an external SSD?
An external SSD as a boot disk can provide better performance for your Mac regarding system response, applications, startup, and more. Here are the steps to boot from an external SSD on Mac:
Step 1. Connect the external SSD to your Mac and erase the external SSD: Reformat the external SSD using Disk Utilities.
Step 2. Install macOS to the external SSD.
Step 3. Reboot the Mac and hold down the Option key until Boot Options appears.
Step 4. Set «Allow booting from external media or removable media» under Utilities.
To boot Windows 10 from an external SSD, you will first need to create a bootable Windows 10 installer on the SSD.
Next, you will have to modify your computer’s BIOS settings to allow it to boot from the SSD. Finally, you will need to install Windows 10 on the SSD.
Creating a bootable Windows 10 installer requires a valid copy of the Windows 10 ISO file, which can be downloaded from the official Microsoft website.
Once you have the ISO file, you can use a program like Rufus to create the bootable installer on the SSD.
Modifying your computer’s BIOS settings involves restarting your computer, pressing the designated key to enter the BIOS (usually Del, F2, or F12), and changing the boot order to prioritize the USB port that the SSD is connected to.
Installing Windows 10 onto the SSD is as simple as following the on-screen prompts once your computer has booted from the SSD.
Download the Windows 10 ISO file from the official Microsoft website.
Use a program like Rufus to create a bootable Windows 10 installer on the SSD.
Restart your computer and enter the BIOS settings.
Change the boot order to prioritize the USB port that the SSD is connected to.
Install Windows 10 on the SSD by following the on-screen prompts.
Booting Windows 10 from an external SSD can provide several benefits, including faster boot times, increased portability, and the ability to easily switch between different operating systems.
It also allows you to free up space on your computer’s internal drive, which can improve overall system performance.
| Steps | Instructions |
|---|---|
| 1 | Connect the external SSD to the computer. |
| 2 | Open computer’s BIOS Setup Utility. |
| 3 | Enter the Boot menu. |
| 4 | Change the boot order to set the external SSD as the first boot device. |
| 5 | Save changes and exit the BIOS Setup Utility. |
| 6 | Restart the computer. |
| 7 | The computer should now boot from the external SSD. |
| 8 | Install or run Windows 10 from the external SSD if it doesn’t load automatically. |
Key Takeaway
Booting Windows 10 from an external SSD can be significantly faster than booting from a standard hard drive.
An external SSD is a practical solution for those needing additional storage capacity, speed, or a method to back up their operating system.
To boot Windows 10 from an external SSD, it needs to be properly partitioned and formatted.
The process also requires setting the SSD as the primary boot device in your computer’s BIOS settings.
Five Facts About: Booting Windows 10 from an External SSD
Solid-state drives (SSDs) are much faster than regular hard drives. This means faster boot times, faster file transfers, and overall snappier performance for your PC.
The process of booting from an external SSD includes connecting the drive, partitioning and formatting it, installing the Windows operating system, and setting up the BIOS to boot from the SSD (source: lifewire.com).
Booting Windows 10 from an external SSD could allow you to carry your OS in your pocket, plug it into any computer, and work with your own setup anywhere.
Since SSDs lack moving parts, they are also more durable, which makes them a preferable choice for mobile computing.
However, SSDs have a limited lifespan, meaning they can only write a certain amount of data before they start failing. But, with proper management and monitoring, an SSD can last years without any issues (source: pcmag.com).
Why Booting Windows 10 From An External Ssd Is Beneficial
Booting Windows 10 from an external SSD offers numerous benefits such as faster performance, improved system responsiveness, and enhanced portability.
Experience seamless computing with Windows 10 installed on an external SSD for increased efficiency and productivity.
Faster Boot Times And Improved Performance
- An external SSD (Solid State Drive) allows for faster boot times compared to traditional internal hard drives. This means that when you start up your computer, Windows 10 will load much quicker, getting you up and running in no time.
- The improved performance is a result of the high-speed data transfer capabilities of an external SSD. With faster read and write speeds, accessing and running programs on your computer becomes more seamless and efficient.
- By booting Windows 10 from an external SSD, you can experience smoother multitasking, quicker response times, and reduced lag when working with resource-intensive applications.
- Overall, the use of an external SSD for booting Windows 10 can significantly enhance the performance of your system, making your computing experience faster and more efficient.
Portability And Convenience
- One of the significant advantages of booting Windows 10 from an external SSD is the portability it offers. This means that you can carry your operating system and files with you wherever you go, without the need to take your entire computer.
- External SSDs are lightweight and compact, making them easy to transport in your backpack or pocket. This portability allows you to work seamlessly across multiple devices or share your operating system with colleagues or friends.
- Booting from an external SSD also offers convenience when it comes to system maintenance and troubleshooting. If you encounter any issues with your Windows 10 installation, you can simply plug the external SSD into another computer and access your operating system, files, and settings quickly and easily.
- Additionally, by using an external SSD, you can save precious internal storage space on your computer. This is particularly beneficial for devices with limited storage capacity, such as ultrabooks or tablets.
Booting Windows 10 from an external SSD provides faster boot times, improved performance, portability, and convenience.
By harnessing the power of an external SSD, you can optimize your computing experience and enjoy the benefits of a faster, more efficient system.
Things You Will Need
To boot Windows 10 from an external SSD, you will need a Windows 10 installation USB, a functioning PC, and a compatible external SSD with enough storage capacity.
Additionally, make sure to back up important data as the process may involve formatting the SSD.
External Ssd:
An external SSD, or Solid State Drive, is a portable storage device that offers faster data transfer speeds and enhanced reliability compared to traditional hard drives. It is an essential component when it comes to booting Windows 10 from an external source.
Here are a few key points to consider:
Convenient and portable:
An external SSD is smaller in size compared to regular hard drives, making it easy to carry around and use on different computers. Its compact design also makes it ideal for travel or on-the-go usage.
Faster data transfer:
Thanks to the flash memory technology used in SSDs, data can be accessed and transferred much faster compared to traditional hard drives. This is advantageous when booting an operating system like Windows 10.
Reliability and durability:
Since SSDs do not have moving parts like traditional hard drives, they are less prone to mechanical failures. Moreover, they can withstand shocks and vibrations better, which adds to their overall durability.
Increased performance:
By using an external SSD for booting purposes, you can experience improved system performance.
Windows 10 can load faster, applications can launch quicker, and overall responsiveness can be enhanced.
Windows 10 Installation Media:
To boot Windows 10 from an external SSD, you will need the Windows 10 installation media, which serves as a source to install or repair the operating system. Here is some key information to keep in mind:
Create a bootable USB:
Start by creating a bootable USB drive that contains the Windows 10 installation files. This can be done using the Windows Media Creation Tool, which is available for free from Microsoft’s official website.
Obtain a genuine copy:
Ensure that you have a valid and genuine copy of Windows 10 before creating the installation media.
This will provide you with the necessary license to activate and use the operating system on your external SSD.
Backup important data:
Before proceeding with the installation, it is crucial to back up any important data from your computer’s internal hard drive. This will prevent any potential loss of data during the installation process.
Format the SSD:
Once you have the installation media ready, connect the external SSD to your computer and format it. This will erase any existing data and prepare the SSD for the Windows 10 installation.
Computer With Usb Ports:
For the successful booting of Windows 10 from an external SSD, you will require a computer with USB ports.
Here are some key points to consider:
- Check USB compatibility: Ensure that the USB ports on your computer are compatible with the external SSD. USB 3.0 ports are recommended for faster data transfer speeds, but USB 2.0 ports will work as well.
- Sufficient number of USB ports: Make sure that your computer has enough USB ports to connect both the external SSD and the installation media simultaneously. This will allow for an easy and hassle-free installation process.
- Check USB connectivity: Before starting the installation process, ensure that the USB ports on your computer are in working condition. Any issues with the USB connectivity may hinder the booting of Windows 10 from the external SSD.
By following these steps and ensuring that you have an external SSD, Windows 10 installation media, and a computer with USB ports, you will be well-equipped to boot Windows 10 from your external SSD.
Preparing The External Ssd For Windows 10 Installation
Learn how to easily prepare your external SSD for Windows 10 installation and boot your system from it. Step-by-step instructions to optimize your SSD for seamless performance.
Before you begin the process of booting Windows 10 from an external SSD, there are two important steps you need to follow.
Firstly, you need to format the SSD to ensure it is ready for the installation process. Secondly, you will need to create a bootable USB with the Windows 10 installation media.
Let’s walk through each step in detail.
Formatting The Ssd:
To make the external SSD compatible with Windows 10 and ensure a smooth installation process, you need to format it correctly.
Here’s how you can do it:
- Connect the external SSD to your computer using the appropriate cable.
- Open Disk Management on your Windows computer by pressing Windows Key + X and selecting “Disk Management” from the menu.
- Locate the external SSD in the list of available drives. Ensure you choose the correct drive to avoid formatting any other drive accidentally.
- Right-click on the SSD and select “Format” from the context menu.
- In the Format window, choose the desired file system for the SSD. NTFS is the recommended file system for Windows 10.
- Give the SSD a suitable name in the Volume Label field.
- Check the “Perform a quick format” option to expedite the process.
- Click on “OK” to begin formatting the SSD.
Creating A Bootable Usb With Windows 10 Installation Media:
Once you have formatted the SSD, the next step is to create a bootable USB with the Windows 10 installation media.
This will allow you to install Windows 10 on your external SSD. Follow these steps to create the bootable USB:
- Download the Windows 10 Media Creation Tool from the official Microsoft website.
- Run the Media Creation Tool and accept the license terms.
- Choose the “Create installation media (USB flash drive, DVD, or ISO file)” option.
- Select the preferred language, edition, and architecture (32-bit or 64-bit) for your Windows 10 installation.
- Choose the “USB flash drive” option and click on “Next.”
- Connect a USB flash drive with sufficient storage space to your computer.
- Select the USB flash drive from the list and click on “Next.”
- The Media Creation Tool will now download the necessary files and create the bootable USB with the Windows 10 installation media.
- Once the process is complete, safely eject the USB flash drive.
By following these steps, you have prepared your external SSD for Windows 10 installation. Now, you can proceed to boot Windows 10 from the external SSD using the bootable USB.
Configuring Bios Settings For External Ssd Boot
To boot Windows 10 from an external SSD, you need to configure the BIOS settings. This involves adjusting the boot priority order and enabling UEFI boot mode. By following these steps, you can efficiently boot your operating system from the external SSD.
When it comes to booting Windows 10 from an external SSD, configuring the BIOS settings correctly is essential.
By changing the boot order to prioritize the external SSD, you can ensure that your computer starts up from the external drive rather than the internal hard drive.
Here’s how you can access the BIOS on your computer and make the necessary changes to enable booting from an external SSD:
Accessing Bios On Your Computer:
To access the BIOS on your computer, follow these steps:
Restart your computer and wait for it to boot up.
As soon as you see the manufacturer’s logo on the screen, press the designated key to enter the BIOS setup.
This key may vary depending on your computer’s manufacturer, but it is typically one of the following:
F2, F10, Esc, or Del. Refer to your computer’s manual or the manufacturer’s website for the exact key.
- Once you enter the BIOS setup, navigate to the “Boot” or “Boot Options” tab using the arrow keys on your keyboard.
Changing Boot Order To Prioritize External Ssd:
To change the boot order and prioritize the external SSD, follow these steps:
- Locate the “Boot Order” or “Boot Priority” option in the BIOS menu.
- Use the arrow keys to select the option and press Enter.
- In the boot order list, use the arrow keys to move the external SSD to the top of the list. This ensures that the computer boots from the external drive before any other devices.
- Save the changes and exit the BIOS setup by pressing the designated key (typically F10) or following the prompts on the screen.
That’s it! You have successfully configured the BIOS settings to boot Windows 10 from an external SSD.
Now, when you restart your computer with the external SSD connected, it should start up from the external drive instead of the internal hard drive.
By prioritizing the external SSD, you can enjoy the benefits of faster boot times and improved performance.
Installing Windows 10 On The External Ssd
Learn how to easily boot Windows 10 from an external SSD for improved speed and performance.
This step-by-step guide will help you install Windows 10 on your external SSD, ensuring a smooth and efficient experience.
Connecting the external SSD to your computer:
- The first step to installing Windows 10 on an external SSD is to connect the SSD to your computer. This can be done by using a USB cable to connect the SSD to an available USB port on your computer.
Booting from the USB drive:
Once the external SSD is connected to your computer, you will need to boot from the USB drive. To do this, you will need to access the boot menu of your computer.
The specific method for accessing the boot menu may vary depending on your computer’s manufacturer, but it is typically done by pressing a specific key, such as F12 or Esc, during the computer’s startup process.
After accessing the boot menu, you will need to select the external SSD as the boot device. Use the arrow keys on your keyboard to navigate to the external SSD in the boot menu and press Enter to select it.
This will ensure that your computer boots from the USB drive rather than its internal storage.
Following the Windows 10 installation process:
Once your computer boots from the external SSD, the Windows 10 installation process will begin. Follow the on-screen instructions to proceed with the installation.
You will be prompted to choose your language, region, and other preferences. Select the options that are appropriate for your needs.
Next, you will need to enter the product key for your Windows 10 installation. If you don’t have a product key, you can choose to skip this step and activate Windows later.The installation process will then prompt you to choose the installation type.
Select the “Custom:
Install Windows only (advanced)” option.
- In the next step, you will need to select the external SSD as the destination for the Windows 10 installation. Click on the SSD’s partition or drive to select it and then click on the “Next” button to proceed.
- Windows 10 will now be installed on the external SSD. The installation process may take some time, so be patient and avoid interrupting it.
- Once the installation is complete, your computer will restart. Make sure to remove any installation media, such as the USB drive, from your computer before it restarts.
Congratulations! You have successfully installed Windows 10 on your external SSD. You can now enjoy the benefits of running Windows from a fast and portable storage solution.
Troubleshooting Common Issues
Learn how to troubleshoot common issues when trying to boot Windows 10 from an external SSD. Discover effective solutions to ensure a smooth and seamless startup process on your computer.
In order to successfully boot Windows 10 from an external SSD, you may encounter a few common issues that could hinder the process. This section will guide you through three possible obstacles and how to resolve them.
Incompatible Hardware Or Drivers:
- USB connection: If your computer’s USB port is not compatible with the external SSD, it might not be recognized by the system. Ensure that you are using a USB 3.0 or newer port for optimal compatibility with high-speed data transfer.
- Outdated drivers: If your computer’s drivers are not up to date, it might not be able to recognize the external SSD. Check for any available driver updates for your computer’s motherboard and USB drivers. Updating these drivers can help establish a successful connection.
- Insufficient power supply: Some external SSDs require extra power, especially if they come with additional features like encryption. Make sure your external SSD is properly powered or consider using an external power source if necessary.
Bios Settings Conflicts:
- Boot order: Check your computer’s BIOS settings to ensure that the external SSD is set as the primary boot device. Adjusting the boot order can help prioritize the external SSD and allow your computer to boot from it successfully.
- Secure Boot: If your computer has Secure Boot enabled, it may prevent booting from external devices. Disable Secure Boot in the BIOS settings to allow booting from the external SSD.
- Legacy boot mode: If you are using an older computer with UEFI firmware, try switching to legacy boot mode in the BIOS settings. This can increase compatibility with external devices and enable booting from the SSD.
Windows 10 Activation Issues:
- Product key: If you have recently migrated your Windows 10 installation to an external SSD, you might encounter activation issues. Make sure you have a valid product key and use it to reactivate your Windows 10 installation.
- Hardware changes: Moving your Windows 10 installation to an external SSD might trigger activation issues if your computer’s hardware has changed significantly. In such cases, you may need to contact Microsoft support for assistance in reactivating your Windows 10 license.
- Digital license: If your Windows 10 license is tied to a Microsoft account, make sure you sign in with the correct account when booting from the external SSD. This will help Windows recognize your digital license and activate it accordingly.
By troubleshooting these common issues, you can overcome any obstacles that may arise when attempting to boot Windows 10 from an external SSD. Experiment with the suggested solutions to ensure a smooth and successful experience.
Transferring Files And Settings To The External Ssd
Learn how to easily transfer your files and settings to an external SSD, allowing you to boot Windows 10 from the SSD for a faster and more efficient experience.
If you’re looking to boot Windows 10 from an external SSD, transferring your files and settings is an important step to ensure a seamless transition.
Whether it’s your personal files, installed programs, or personalized settings, moving them to the external SSD will make sure that everything you need is readily available.
Here’s how you can do it:
Migrating User Files And Folders:
- Copy and paste: Simply select the files and folders you want to transfer and copy them to the external SSD. It’s as easy as dragging and dropping.
- Backup and restore: Use Windows Backup and Restore feature to create a backup of your files and then restore them onto the external SSD.
- Sync with cloud storage: If you have cloud storage services like OneDrive or Google Drive, you can sync your files and folders to the external SSD. This way, you’ll have access to your files from anywhere.
Transferring Installed Programs:
- Reinstallation: Some programs may require a fresh installation on the external SSD. Make sure you have the installation files or setup packages ready to reinstall them.
- Migration software: Certain migration software tools can help you transfer installed programs to the external SSD without the need for reinstalling. These tools ensure that your programs are copied over with all the necessary files and settings intact.
Setting Up Personalized Settings:
- Export and import settings: Many applications allow you to export your settings as a file, which you can then import onto the external SSD. This way, you can maintain your customized configurations.
- Sync with online accounts: Applications like web browsers often have the option to sync your settings when you log in with your account. By syncing your settings, you can carry them over to the external SSD effortlessly.
- Windows settings transfer: Use the Windows Easy Transfer feature to transfer your personalized settings to the external SSD. This includes desktop backgrounds, theme settings, and more.
Remember, transferring your files and settings to the external SSD is crucial to ensure a smooth Windows 10 boot.
By following these steps, you can seamlessly migrate your user files, transfer installed programs, and set up personalized settings on the external SSD.
Enjoy a faster and more convenient computing experience with Windows 10 on your external SSD.
Tips For Optimizing Windows 10 Performance On External Ssd
Boost the performance of your Windows 10 by optimizing it on an external SSD. Learn how to efficiently boot Windows 10 from an external SSD for faster and smoother operations.
Windows 10 is a powerful operating system that can be further enhanced when booted from an external SSD. To ensure optimal performance, there are a few tips and tricks you can follow.
Here’s how to optimize Windows 10 on your external SSD:
Enabling Trim Support:
Enabling TRIM support is crucial for maintaining the longevity and performance of your external SSD. TRIM allows the operating system to inform the SSD which blocks of data are no longer in use, facilitating faster write performance and prolonging the SSD’s lifespan.
To enable TRIM support on Windows 10, follow these steps:
Open an elevated Command Prompt by right-clicking the Start button and selecting “Command Prompt (Admin)”.
Type the following command and press Enter: `fsutil behavior set DisableDeleteNotify 0`
- Restart your computer for the changes to take effect.
Disabling Unnecessary Startup Programs:
Having too many programs starting up with Windows can significantly slow down boot time and overall system performance.
To improve the performance of Windows 10 on your external SSD, consider disabling unnecessary startup programs.
Follow these steps to disable startup programs:
- Press Ctrl + Shift + Esc to open the Task Manager.
- Go to the “Startup” tab.
- Right-click on any programs you don’t use frequently and select “Disable”.
Keeping The External Ssd Updated:
- Regularly updating your external SSD’s firmware and drivers is essential for maintaining peak performance and compatibility with Windows 10. Firmware updates often include bug fixes and performance improvements, ensuring that your SSD runs smoothly.
- Check the manufacturer’s website for firmware and driver updates specifically designed for your external SSD model. Follow their instructions to update the SSD’s firmware and drivers.
By following these tips and optimizing your Windows 10 settings on the external SSD, you can experience improved performance and enjoy the benefits of faster boot times and smoother overall operation.
Final Thoughts
Looking to boot Windows 10 from an external SSD? Follow these steps for a seamless process. Get the most out of your operating system by optimizing your storage options.
Enjoy The Benefits Of Booting Windows 10 From An External Ssd
Windows 10 is a powerful operating system that offers a range of features and functionalities. If you’re someone who uses Windows 10 regularly, you might have experienced the frustration of slow boot times and sluggish performance.
But fear not, as there is a solution that can dramatically improve your Windows 10 experience – booting it from an external SSD.
By utilizing an external SSD as your boot drive, you can enjoy numerous benefits, including increased speed, enhanced performance, and improved reliability.
Let’s delve into the details and discover why booting Windows 10 from an external SSD is a game-changer.
Speed Up Your Boot Time
One of the most significant advantages of booting Windows 10 from an external SSD is the unparalleled speed it provides.
Traditional internal hard drives can be slow when it comes to running your operating system, resulting in long boot times that can be frustrating.
However, by using an external SSD for your boot drive, you can experience lightning-fast boot times.
The SSD’s flash memory technology allows it to access data significantly faster than a conventional hard drive, resulting in a seamless and speedy boot experience.
Improve Overall System Performance
In addition to speeding up boot times, an external SSD can also significantly enhance the overall performance of your Windows 10 system.
With its faster data transfer rates and quicker access times, the SSD ensures applications load swiftly and operate smoothly.
Whether you’re launching resource-intensive software, multitasking between various applications, or simply browsing the web, you’ll notice a notable improvement in responsiveness and system efficiency.
Say goodbye to lags, freezes, and frustrating delays – an external SSD can revolutionize your Windows 10 experience.
Enhance System Reliability
Reliability is another key benefit of booting Windows 10 from an external SSD. Traditional hard drives consist of spinning magnetic disks, which are susceptible to mechanical failures and data loss.
On the other hand, SSDs have no moving parts, making them more durable and less prone to physical damage.
This means your important files and data are better protected, reducing the risk of unexpected system crashes or losing valuable information.
By making the switch to an external SSD as your boot drive, you can enjoy peace of mind knowing that your system is more reliable and your data is safer.
Portability And Convenience
Another advantage of using an external SSD to boot Windows 10 is the portability and convenience it offers.
With an external SSD, you have the freedom to take your operating system with you wherever you go.
Whether you’re traveling for work or leisure, you can easily connect your external SSD to any compatible device and continue working seamlessly.
This portability allows for a convenient and efficient computing experience, without the hassle of transferring files or dealing with multiple operating systems on different devices. With an external SSD, your Windows 10 system is always within reach.
Booting Windows 10 from an external SSD is a game-changer for anyone looking to enhance their Windows 10 experience.
With its exceptional speed, improved performance, enhanced reliability, and portability, an external SSD offers a range of benefits that can transform the way you use your operating system.
Say goodbye to slow boot times, frustrating lags, and unreliable systems. Upgrade to an external SSD as your boot drive and enjoy the seamless, efficient, and powerful performance that Windows 10 was meant to deliver.
FAQ About How to Boot Windows 10 from External Ssd
How do I boot Windows 10 from an external SSD?
To boot Windows 10 from an external SSD, you need to use a USB adapter to physically connect the SSD to your system. Once the SSD is connected, you can enter the BIOS/UEFI settings to select the USB drive as the primary boot device. Finally, you can save and restart the system for the changes to take effect.
Does an external SSD require additional drivers to boot Windows 10?
Generally, no additional drivers are required for booting Windows 10 from an external SSD, as long as it uses a USB adapter that is compatible with your system. This is because basic USB functionality is typically supported in the BIOS/UEFI firmware.
How do I troubleshoot boot issues when using an external SSD?
When troubleshooting boot issues with an external SSD, the first step is to ensure that it is properly connected to the system (i.e. no loose cables or bad connections). Additionally, you should also double-check that the drive is selected as the primary boot device in the BIOS/UEFI settings.
Can I use an external SSD to install Windows 10?
Yes, you can use an external SSD to install Windows 10. All you need to do is connect the SSD to the system using a compatible USB adapter and then restart the system to launch the installation process.
Conclusion
Booting Windows 10 from an external SSD is a great option for improving system performance and increasing storage capacity.
By following the step-by-step guide provided in this blog post, you can easily set up your external SSD as a bootable device and enjoy the benefits it offers.
By using an external SSD, you can significantly reduce boot-up time and experience faster overall system performance.
This is especially advantageous for individuals who work with large files or run resource-intensive applications.
Furthermore, the flexibility and portability of an external SSD make it an excellent choice for those who frequently switch between multiple devices or need to take their work on the go.
Remember to select a high-quality SSD and ensure compatibility with your Windows 10 system before proceeding with the installation process.
Overall, booting Windows 10 from an external SSD can be a game-changer in terms of speed, performance, and storage capacity.
Give it a try and experience the difference it can make for yourself.
Содержание статьи:
- Создание загрузочного внешнего диска
- ШАГ 1: подключение
- ШАГ 2: создание нового раздела под Windows
- ШАГ 3: делаем этот раздел активным
- ШАГ 4: записываем на раздел ОС Windows 10/11
- ШАГ 5: проверка работы
- Вопросы и ответы: 42
Вопрос от пользователя
Здравствуйте.
У меня есть внешний жесткий диск USB на 1500 ГБ, заполнен где-то наполовину. Можно ли его сделать загрузочным под установку Windows 10, не форматируя и не удаляя данные с него?
Здравствуйте.
Если все аккуратно выполнить — то да, данные на нем не пропадут и вы сможете устанавливать с него ОС.
Ниже в статье покажу как это можно сделать на примере одного своего диска (используемого для хранения различного софта). Обращаю внимание, что если вы некоторые действия сделаете иначе, чем показано в моем примере — можете лишиться данных на диске… 📌
*
Создание загрузочного внешнего диска
ШАГ 1: подключение
Итак, включите ноутбук (ПК) и подключите свой внешний HDD/SSD к USB-порту (желательно к USB 3.0 — тогда все операции пройдут значительно быстрее).
Также не могу не порекомендовать отключить все остальные диски и флешки от USB-портов компьютера (это поможет избежать различных ошибок при записи…).
Внешний HDD подключен к USB
*
ШАГ 2: создание нового раздела под Windows
Далее нам нужно запустить управление дисками (нажмите Win+R, и введите команду diskmgmt.msc в строку открыть, см. скрин ниже). Это ПО встроено во все последние ОС Windows XP, 7, 8, 10, 11.
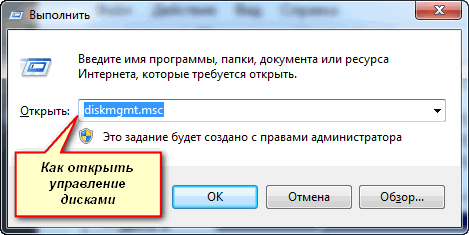
Как открыть управление дисками — diskmgmt.msc
В управлении дисками вы должны увидеть все подключенные накопители к компьютеру. Нам нужно найти внешний диск, который мы подсоединили к USB-порту.
Далее выберите один из разделов на этом внешнем HDD (прим.: в большинстве случаев на внешнем диске один раздел — и выбирать не из чего…), нажмите на нем правой кнопкой мышки и выберите функцию сжать том.
(суть операции: мы от этого раздела «заберем» немного свободного места и создадим из него новый раздел под Windows, куда и запишем загрузочные данные. Операция эта должна проходить без потери информации: по крайней мере, на моем опыте всегда так и было…). 👇
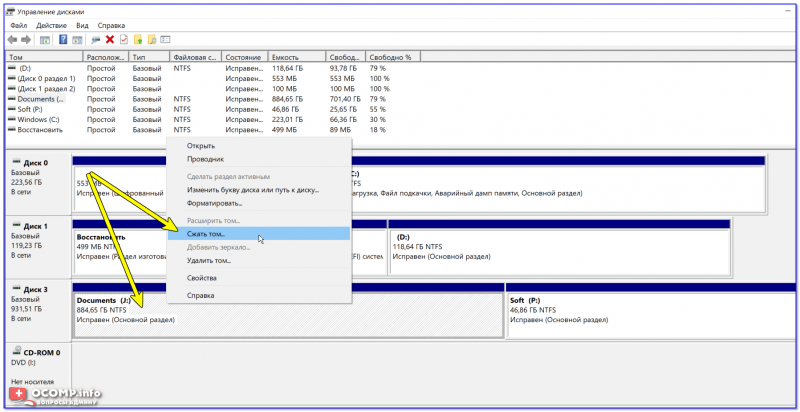
Сжать том (на внешнем диске)
После, в настройках укажите размер нового раздела (рекомендую выбрать цифру в 20-30 ГБ — этого вполне хватит на несколько загрузочных ISO-образов).
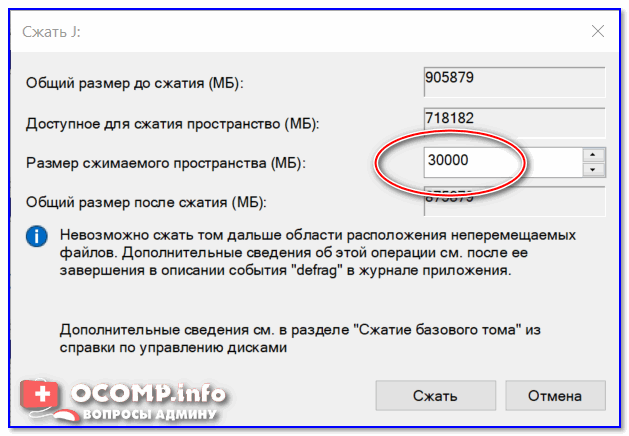
30 000 МБ для нового диска
Затем вы увидите, что на диске появилась новая не размеченная область черного цвета (на которой пока что ничего нет). Щелкните по ней правой кнопкой мышки и создайте простой том.
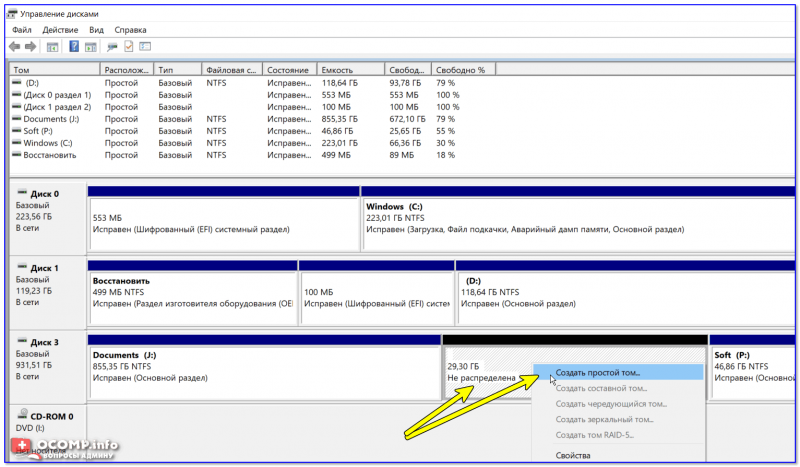
создать простой том
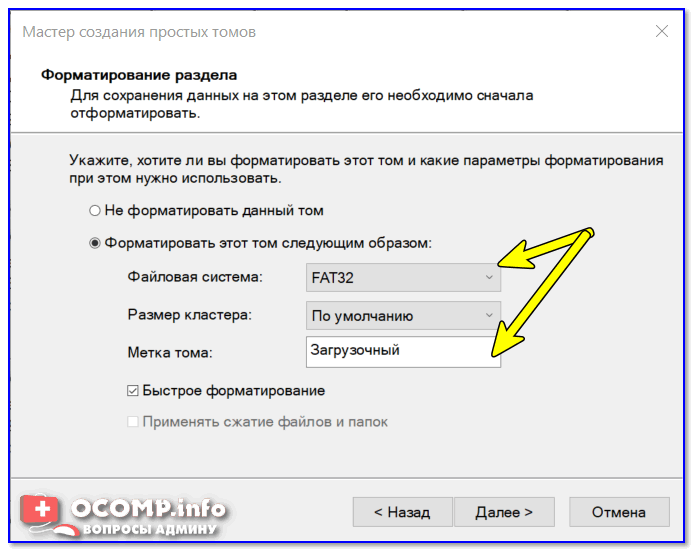
Далее укажите файловую систему FAT 32, задайте метку тома (может быть любой) и отформатируйте раздел (📌 Важно! Форматируется только этот новый созданный раздел, а не целый диск! Поэтому все данные на других разделах этого диска будут целыми).
FAT 32
*
ШАГ 3: делаем этот раздел активным
Теперь нам нужно не забыть об одной очень важной вещице — сделать наш новый раздел активным. Активные разделы служат для размещения загрузчика ОС (если этого не сделать — то почти наверняка вы не сможете с него загрузиться).
Кстати, активным может быть только один раздел на одном физическом жестком диске. Если у вас несколько жестких дисков — то каждый из них может содержать только один активный раздел.
*
👉 Итак, самый простой вариант сделать это — в управлении дисками просто кликнуть правой кнопкой мышки по нужному разделу и выбрать функцию «Сделать раздел активным». Но, к сожалению, часто эта функция светится серым и не доступна…
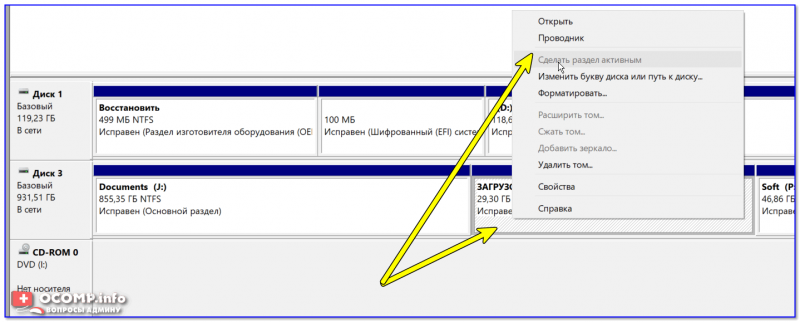
Сделать раздел активным
Альтернативный вариант
Сначала необходимо запустить командную строку от имени администратора. Чтобы это сделать — просто откройте диспетчер задач (Ctrl+Shift+Esc), создайте новую задачу через меню файл, и используйте команду CMD (пример ниже). 👇
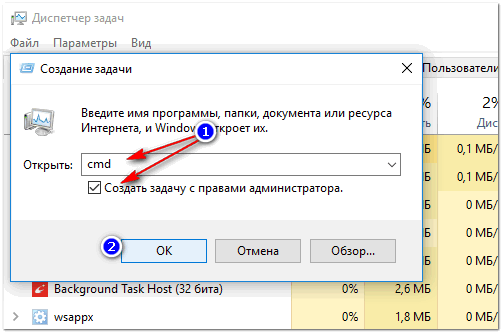
Командная строка с правами администратора
Далее нужно последовательно ввести следующие команды (после каждой нажимайте Enter):
- diskpart (запуск утилиты для работы с дисками);
- list disk (увидите список подключенных физических дисков);
- select disk 3 (вместо 3 укажите свой номер диска, на котором создали новый раздел);
- list partition (просмотр всех разделов на выбранном диске);
- select partition 3 (вместо 3 укажите свой номер раздела (тот, который создали шагом ранее)).
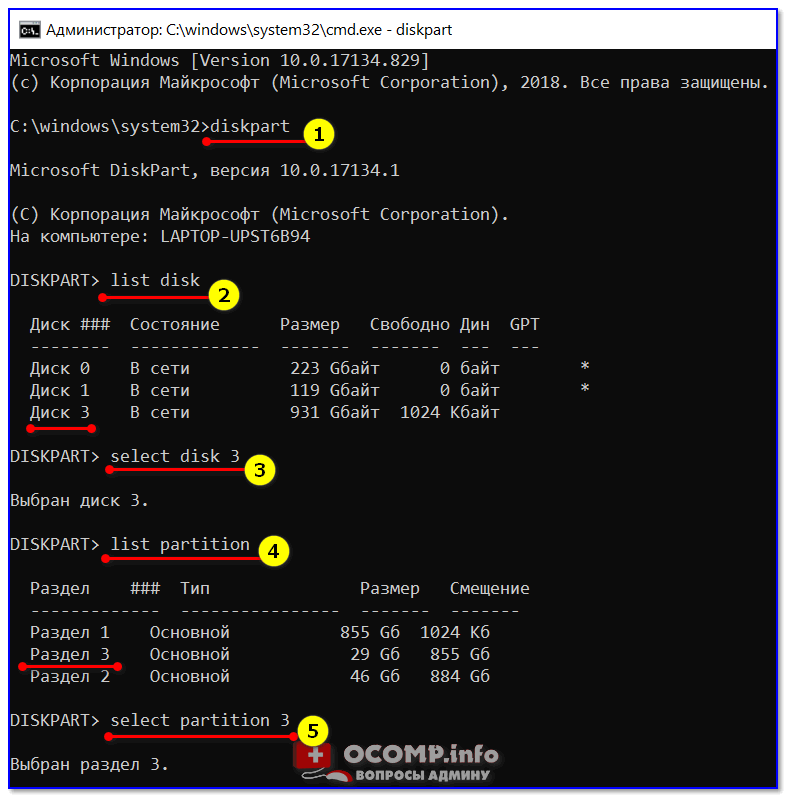
Выбор раздела
Теперь, когда мы выбрали диск и раздел — просто используйте команду active (если все прошло удачно — появится сообщение, что этот раздел был помечен как активный).
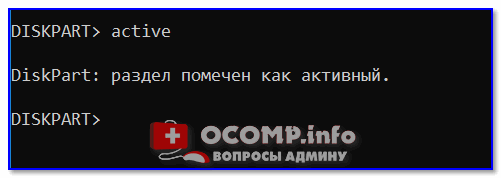
Активен
Кстати, если теперь зайдете в «Мой компьютер» — увидите чистый новый диск (пример ниже). Так и должно быть. 👌👇

Новый раздел диска
*
ШАГ 4: записываем на раздел ОС Windows 10/11
Для начала работ нам нужен образ ISO с ОС Windows 10/11. Если у вас его нет — можете создать по следующей инструкции: 📌 https://ocomp.info/kak-skachat-win10-legalno.html
Теперь о том, как правильно записать загрузочный носитель.
*
📌 Вариант 1 (рекомендую использовать сначала вариант 2!!!)
Просто скопировать все файлы из ISO-образа на наш новый раздел. Сделать это можно при помощи обычного архиватора, того же 7Z (лучшие архиваторы: https://ocomp.info/arhivatoryi-analog-winrar.html).
Способ хоть и удобен, но лично я все же прибегаю к спец. утилитам (об этом в варианте 2).
*
📌 Вариант 2
Использовать программу 👉 WinSetupFromUSB. Обратите внимание, что нужна версия не ниже 1.9 (свой пример я покажу как раз в ней).
Запустить эту утилиту нужно от имени администратора (для этого просто кликните на исполняемом файле правой кнопкой мышки и выберите оное, см. пример ниже).
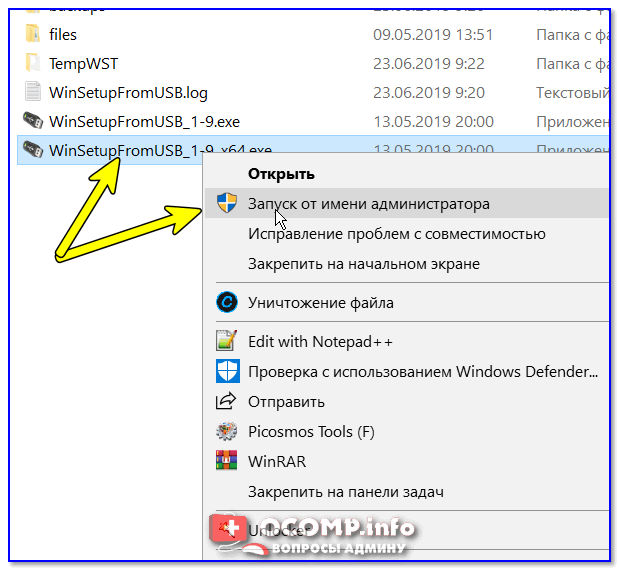
WinSetupFromUSB — запуск от имени администратора
Далее приведу действия по порядку:
- сначала нужно кликнуть на открытие окна расширенных опций (см. стрелка-1, Advanced options); 👇
- включить отображение дисков, подключенных к USB (см. стрелка-2); 👇
- выбрать тот раздел, который мы спец. подготовили в предыдущих шагах (ориентируйтесь по размеру);
- указать образ ISO файла с ОС Windows 10/11;
- приступить к выполнению записи.
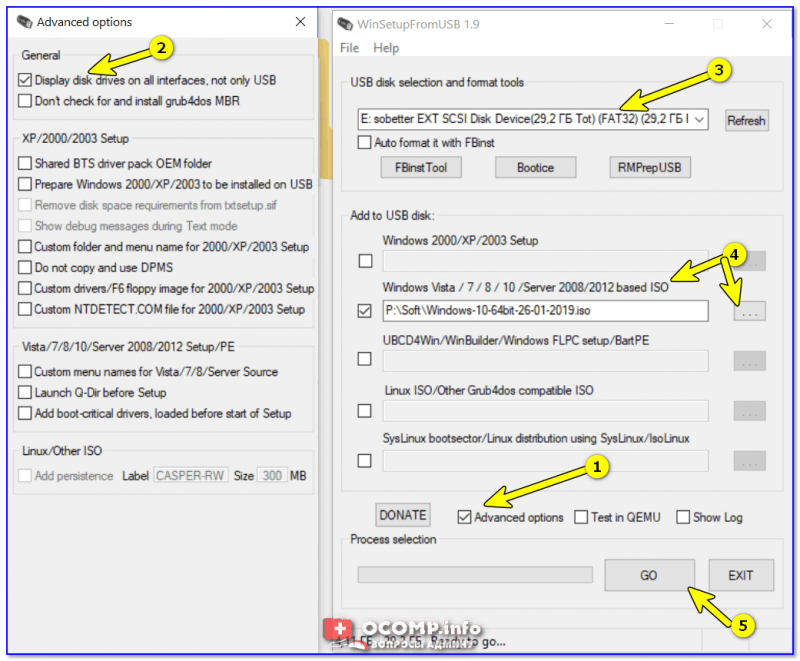
Настройка утилиты
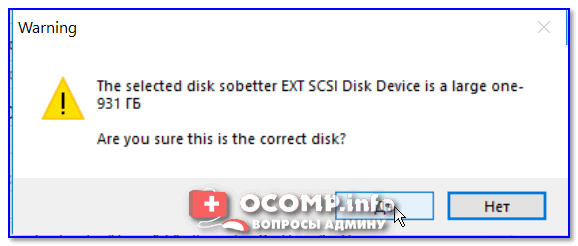
Обратите внимание, что программа должна предупредить вас о том, что вы выбрали внешний диск и он слишком большой. Просто согласитесь.
(📌 Важно! Никаких предупреждений о форматировании диска быть не должно! Просто проглядите сообщение, что в нем нет слов formate или erase, delete…).
Подтверждение
После ~10 мин., если все прошло удачно, вы увидите сообщение, что работа выполнена (Job done). Значит диск готов!
Готово!
*
ШАГ 5: проверка работы
В общем-то, если вы все сделали в точности шаг за шагом, как показано выше, то при загрузке ноутбука (ПК) вам нужно только войти в Boot Menu (загрузочное меню), выбрать внешний диск HDD и приступить к установке ОС Windows 10/11 (см. пример ниже).
👉 В помощь!
О том, как войти в BIOS и загрузочное меню — можете узнать здесь: https://ocomp.info/bios
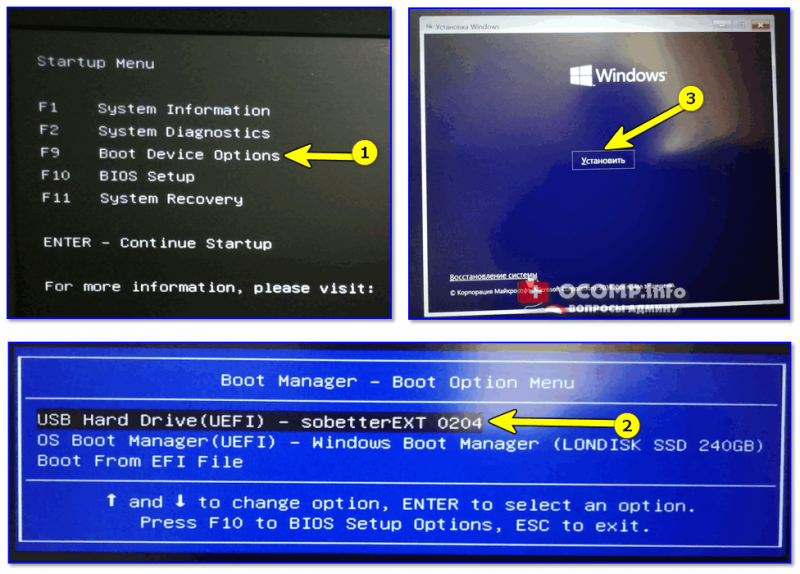
Проверка и загрузка с внешнего HDD
Если в загрузочном меню ваш диск не отображается — в первую очередь необходимо зайти в настройки BIOS и проверить, включена ли возможность загрузки с USB-устройств (параметр USB Boot должен находится в значении Enabled, см. пример ниже). 👇
Как правило, данную настройку можно найти в разделах BOOT или System Configuration.
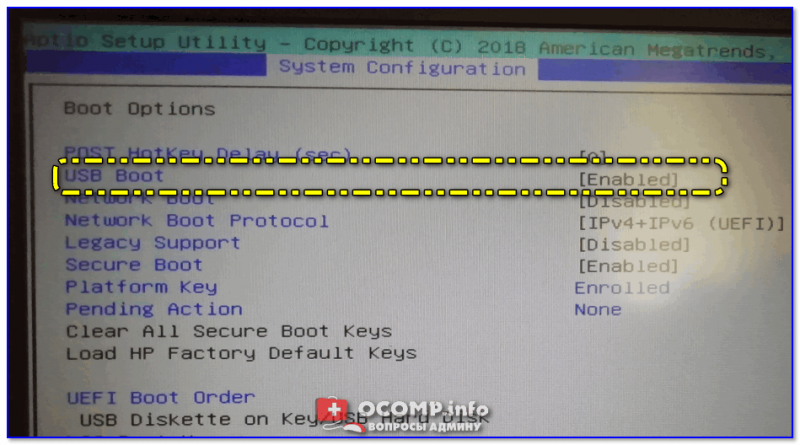
Если диск не виден — проверьте включена ли загрузку с USB в BIOS
*
Примечание: инструкция актуальна для относительно новых компьютеров (ноутбуков) поддерживающих UEFI.
*
На этом пока все, дополнения по теме были бы кстати…
Ни пуха ни пера!
✌
Первая публикация: 23.06.2019
Корректировка: 17.09.2022
SSDs are the best upgrades a PC can get. Without spending a fortune, you can inject snappiness into your computer.
But this does not mean you need to open up your computer to install the SSD. You can install any operating system on an external drive too.
This guide states how to set up and install Windows or mac to your USB SSD. So, tag along, and let’s get started.
Things that you need:
An External SSD, A Type-C to Type-A adapter (if your computer does not have USB C), a Windows ISO file and a will to dabble with the command prompt.
Microsoft used to provide a dedicated tool to install its OS on external drives. This is known as Windows to Go. But it stopped supporting it starting from Version 2004, which was released in mid-2020.
But we can configure the SSD as a boot drive using the command prompt. So let’s look at how you can do it.
Follow the steps to boot Windows into external SSD using the command prompt:
1. Format the External SSD
First, insert the SSD into the USB port. Use a Type C port if it is available. For most computers, choose the fastest port that is available. USB 3.0 ports are marked blue for locating easily.
Now, format the SSD from the Files Explorer. We will choose NTFS as the file format.
Here are the steps to format your USB SSD:
When the format is successful, move on to the next step. Note the drive letter of the SSD, which we will need later on.
Check our exclusive tutorial on how to use an internal SSD for external storage.
2. Copy the Windows ISO into the SSD
Now we need to copy the files from the windows installation into the SSD. First mount the ISO to access the file as a drive. Then copy the Windows setup file by using CMD. Just replace your ISO and USB SSD location in the command prompt command.
Follow the steps to mount ISO on your computer:
Next, open CMD and copy the files into the USB SSD.
These are the steps to copy the Windows ISO to a USB SSD:
- Press the Windows key + R.
- Write cmd and press OK.
- Type cd .. and press enter.
- Next, type xcopy e:\*.* d: /e/h/f replacing e with the ISO drive letter and d with the SSD drive letter.
- Press enter and wait till the process completes.


When the files are copied, it’s time to make the SSD bootable.
Follow the steps to make the SSD bootable:
- Open CMD from the Start Menu.
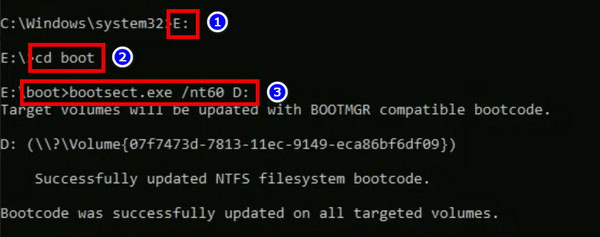
- Enter the iso file location, E: and press the enter key.
- Type cd boot and press the enter key.
- Next, type bootbootsect /nt60 d: where e contains the Windows ISO and d is the USB SSD drive.

Now the SSD is configured with the Windows installation files.
Also, check out our expert’s recommended fastest PCIE 4.0 SSDs.
3. Set the SSD to boot from the BIOS and install Windows
Your BIOS is set to load the boot drive, which contains Windows. Now that we intend to use the SSD as the primary drive, you need to point this to the BIOS.
To do that, you must connect the SSD using a USB port. Then enter the BIOS by pressing the key set by the manufacturer. This is usually the DEL key.
Inside the BIOS, navigate to Boot Priority and set the USB SSD to the top of the list. Save the changes by pressing the F10 key, and the computer will restart.
Next, follow the on-screen instructions and complete the Windows installation. During this time, the computer will restart many times. When the process completes, you will land right on the desktop.
You have successfully made a portable Windows setup on the external disk drive. Now you can plug it into any computer, and upon booting, all your files and apps will be present. In short, your work will travel with you.
Did you know you can also use the external drive for backup? Read our excellent piece on how to backup and restore your files in Windows 11.
How to Boot macOS From an External SSD
You can also boot a macOS installation from an external SSD. This is particularly useful for older macs which are harder to upgrade. Just make sure you are using a USB 3.0 port to connect the SSD to enjoy its faster speeds.
Here are the steps to boot macOS from an external SSD:
1. Erase and Format the SSD
First, remove any existing files and erase the SSD. Use Disk Utility from Settings to do this.
These are the steps to erase a drive using Disk Utility:
Now all the files are erased from the USB drive.
Read more on how to use old SSD on a new computer.
2. Install the Latest macOS from the App Store
The app store provides the latest OS for your mac. Just search using the name of the latest software, which will open a new window that will guide you through this process.
Remember to select the USB SSD as the disk drive, or everything in your primary drive will be permanently erased.
Follow the steps to install macOS on an external SSD:
Your mac will reboot and start installing its software. A progress bar will show you how long it takes until the process completes.
3. Set the SSD as the Startup Disk
Now make sure the mac boots up from the SSD instead of the internal disk. Change this from the Startup Disk settings inside System Preference.
These are the steps to set the SSD as the start-up disk on macOS:
Now the mac will load from the external drive every time you power it on.
On older macs, you will definitely appreciate the overall speed boost. Doing any tasks will feel smoother the next time you use your computer.
Final Words
If opening up your mac or Windows computer gives you anxiety, setting up the OS on an external drive is the perfect solution for you. You get the benefits of both worlds ‒ speed and convenience as well.
So, how well did this project go? Do not forget to let us know in the comments.
Goodbyes for now.
If you’re considering upgrading to a Crucial X9 Pro or Crucial X10 Pro
Portable SSD, you may wonder, “Can I use an external SSD as a boot drive?” We have good news. Yes, you can boot from an external SSD on a PC or Mac.
While there may be a list of reasons one might want to use an SSD as a boot drive, the speed that an external SSD offers is usually at the top. Many find that their systems boot faster when they switch from a traditional hard drive (HDD) to an SSD. With an external SSD, you can add in the ease of operation — no need to get out a screwdriver or open your PC case! Instead, with easy plug-and-play USB connections, external SSDs are a cinch to work with.
Here are some common questions we get about booting from an external SSD:
What is an external SSD boot drive?
A boot drive is a storage medium with all the crucial files to start and run your computer device. This means that if you want to set up your external SSD as a boot drive, you must load it with your computer’s operating system (for example, macOS or Windows). If you choose an external SSD as a boot drive, keep in mind that your PC or Mac will not turn on (specifically, boot up) without the external SSD plugged in.
Is it better to boot from an SSD or HDD?
A hard disk drive (HDD) uses spinning disk technology to store data, while an SSD uses flash technology that’s faster, quieter, and lighter. While both can be used as a boot drive, a durable SSD is a more reliable, high-performing storage solution. With an SSD, your system will boot faster.
How much storage do I need for a boot drive?
It’s recommended that you have at least 32GB available for your boot drive. However, 64GB could be more optimal for some of the newer operating systems available.
Can I boot my Mac from an external SSD?
Depending on the model, Macs can be difficult to upgrade. Older iMacs or Mac Mini systems likely came with a hard disk drive — which are much slower than SSDs — or a low-capacity SSD. External SSDs like those in the Crucial portfolio, offer an easy way to increase speed and capacity without replacing internal parts since they connect to your Mac with a plug-and-play USB interface.
After learning how to install your Crucial external SSD, you’ll find that setting it up as a boot drive is a simple and reliable way to upgrade your system without using a screwdriver.
Note: Just in case you accidentally delete some files or select the wrong drive, Crucial recommends backing up your files in a secondary location before setting up your external SSD boot drive.
How to boot your Mac from an external SSD via the BIOS
Step 1: Erase your internal drive
Warning! Before you erase your internal drive, make sure you’ve backed up any files you want to save onto another drive. Erasing your drive will permanently delete all files you’ve saved on it.
To wipe your internal drive and begin the process of saving MacOS to your Crucial portable SSD, go to this Apple.com article, How to reinstall MacOS from MacOS Recovery.
Step 2: Open Disk Utility
After following Apple’s instructions for opening MacOS Recovery, open Disk Utility.
Step 3: Select your Crucial external SSD
Select your Crucial portable SSD (for example, “Crucial X9” or “Crucial X10 Pro”) from the list of storage disks on the left-hand column.
Step 4: Erase existing data
Select Erase to remove all existing data from the drive.
Step 5: Name the SSD
When prompted for the new volume name, call it by the operating system and Crucial SSD (for example, “macOS X9” or “macOS X10”). Select the filing system that corresponds to your disk format, either APFS or X Extended (Journaled). Leave the scheme set as GUID partition map.
Step 6: Close Disk Utility
Close Disk Utility, then select Reinstall macOS.
Step 7: Reinstall macOS
Follow the macOS installer prompts, selecting the “macOS X9” or “macOS X10” volume as the destination for where to install the new operating system.
Crucial SSD resources
If you still have questions about using your Crucial external SSD as a boot drive, consider exploring the resources on our website. Whether you’re installing or optimizing your SSD, Crucial offers clear guidance on how to get the most out of your SSD. Here are a few popular resources to check out:
- SSD FAQ
- SSD firmware and support
- SSD form factors explained
- The business case for SSDs
©2019-2024 Micron Technology, Inc. All rights reserved. Information, products, and/or specifications are subject to change without notice. Neither Crucial nor Micron Technology, Inc. is responsible for omissions or errors in typography or photography. Micron, the Micron logo, Crucial, and the Crucial logo are trademarks or registered trademarks of Micron Technology, Inc. Mac, OS X, and Apple are trademarks of Apple, Inc., registered in the United States and/or other countries. All other trademarks and service marks are the property of their respective owners.