
Среда восстановления Windows Recovery Environment (WinRE) это минимальная ОС на базе образа Windows Preinstallation Environment (WinPE), в которую включен ряд инструментов для диагностики и восстановления Windows. Если Windows не загружается, загрузчик BCD попытается запустить среду восстановления WinRE, которая может исправить проблемы в автоматическом режиме или предоставить доступ к средствам восстановления. Из WinRE можно исправить конфигурацию загрузчика, восстановить ОС из резервной копии образа, откатиться к точке восстановления, запустить командную строку и т.д.
Среда Windows RE состоит из 3 трех файлов, которые находятся на отдельном скрытом разделе Recovery Partition (в старых версиях Windows раздел назывался System Reserved):
- winre.wim – WIM образ со средой WinPE, в которую интегрированы дополнительные утилиты для восстановления Windows;
- boot.sdi – файл SDI (System Deployment Image), который используется для создания RAM диска WinRE в памяти;
- ReAgent.xml — конфигурационный файл WindowsRE.
В этой статье мы покажем, как загрузить Windows в среде восстановления и как пересоздать среду WinRE, если она на работает.
Содержание:
- Как войти в среду восстановления Windows?
- Средства восстановления Windows в среде WinRE
- Не удалось найти среду восстановления
- Включить (отключить) среду восстановления в Windows
- Восстановление среды Windows Recovery Environment
- Пересоздать среду восстановления Windows
Как войти в среду восстановления Windows?
Чтобы запустить среду восстановления Windows, зажмите клавишу Shift и щелкните по кнопке перезагрузки в меню Пуск.
Можно перезагрузить компьютер в режиме WinRE из командной строки с помощью параметра /o в команде shutdown:
shutdown /f /r /o /t 0
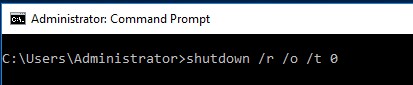
Есть еще одна команда для принудительного входа в среду восстановления при следующей загрузке:
reagentc /boottore
Среда восстановления должна запустится автоматически, если возникают проблемы с нормальной загрузкой Windows. Так, например, если три предыдущие попытки нормальной загрузки Windows были неудачными — компьютер автоматически загружается в среде Windows Recovery Environment. Т.е. чтобы загрузить ваш компьютер в WinRE достаточно 3 раза подряд прервать загрузку Windows кнопкой питания.
Средства восстановления Windows в среде WinRE
В среде восстановления WinRE доступно несколько инструментов, которые позволят вам исправить различные проблемы с Windows:
- Reset this PC – позволяет сбросить вашу Windows к заводским настройкам (личные данные и файлы будут удалены);
- System Restore – позволяет восстановить состояние Windows с помощью созданной ранее точки восстановления;
- System Image Recovery – полное восстановление Windows из резервной копии образа (на внешнем носителе);
- Startup Repair– Windows пытается автоматически найти и исправить возможные проблемы (мастер может самостоятельно восстановить загрузчик, конфигурацию BCD и запись MBR(Master Boot Record);
Рекомендуется использовать этот способ исправления проблем в первую очередь.

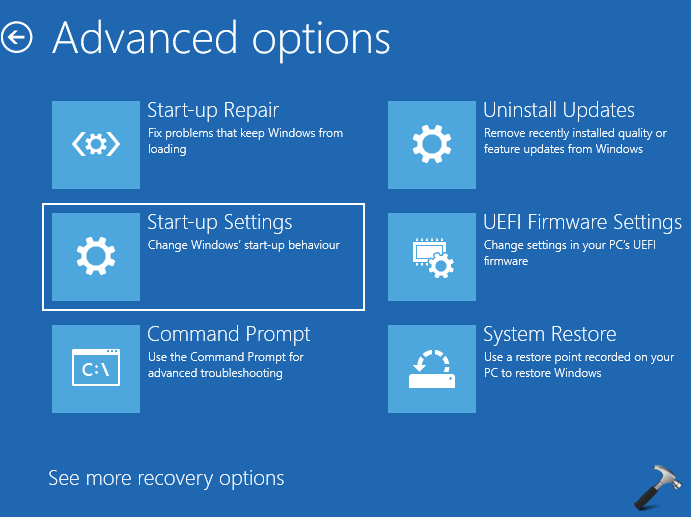
- Startup Settings – позволяет выбрать различные сценарии загрузки Windows: загрузить компьютер в безопасном режиме, отключить проверку цифровой подписи драйверов, отключить автоматическую перезагрузку при появлении ошибок (только так можно увидеть код ошибки BSOD на экране загрузки Windows);
- Uninstall Updates – удаление установленных обновлений (обычно используется, если Windows не загружается после установки обновлений);
- • Go back to the previous version – позволяет откатиться к предудущему билду Windows (после выполнения апгрейда билда Windows);
- Command Prompt – запустить командную строку для ручного запуска команд диагностики и исправления;
- UEFI Firmware Settings – при следующей загрузки автоматически войти в настройки UEFI компьютера.


Если вы хотите запустить командную строку или другое средство исправления ошибок, WinRE запросит от вас пароль учетной записи с правами локального администратора (используются учетные данные из локальной базы SAM). Впрочем, пароль администратора Windows можно сбросить.

В Windows 11 большинство инструментов в среде восстановления доступны без ввода пароля администратора.
Перед вами должно открыться окно командной строки X:\Windows\System32>.
Из командной строки можно выполнить проверку диска утилитой chkdsk, выполнить проверку образа Windows с помощью DISM и sfc.exe, запустить
regedit
,
bootrec
,
startrep
(эта утилита позволяет найти и исправить проблемы с реестром, драйверами, разделами и т.д.), выполнить диагностику памяти командой
mdsched
, и выполнить другие команды (на сайте довольно много статей, где мы показываем как исправить различные проблемы Windows в среде восстановления или WinPE).
Чтобы закрыть командную строку WinRE и вернутся к выбору режима загрузки, выполните команду:
exit
Не удалось найти среду восстановления
В некоторых случаях Если раздел с WinRE или WIM файл среды восстановления были удалены/повреждены, или некорректно настроена конфигурации ReAgent или BCD, то при попытке загрузить компьютере в среде Windows Recovery Environment появится ошибка:
Невозможно найти среду восстановления.
Could not find the recovery environment.
Insert your Windows installation or recovery media, and restart your PC with the media.
Причины, по которым на компьютере не загружается среда WinRE могут быть разными:
- Среда WinRE отключена в Windows;
- В хранилище конфигурации загрузки (BCD) отсутствуют записи для загрузки в режиме восстановления;
- Файл с образом среды winre.wim отсутствует или перемещен;
- Отсутствует или содержит некорректные данные файл конфигурации WinRE (ReAgent.xml).
Далее мы рассмотрим основные способы восстановления среды WinRE на примере Windows 10 и 11

Включить (отключить) среду восстановления в Windows
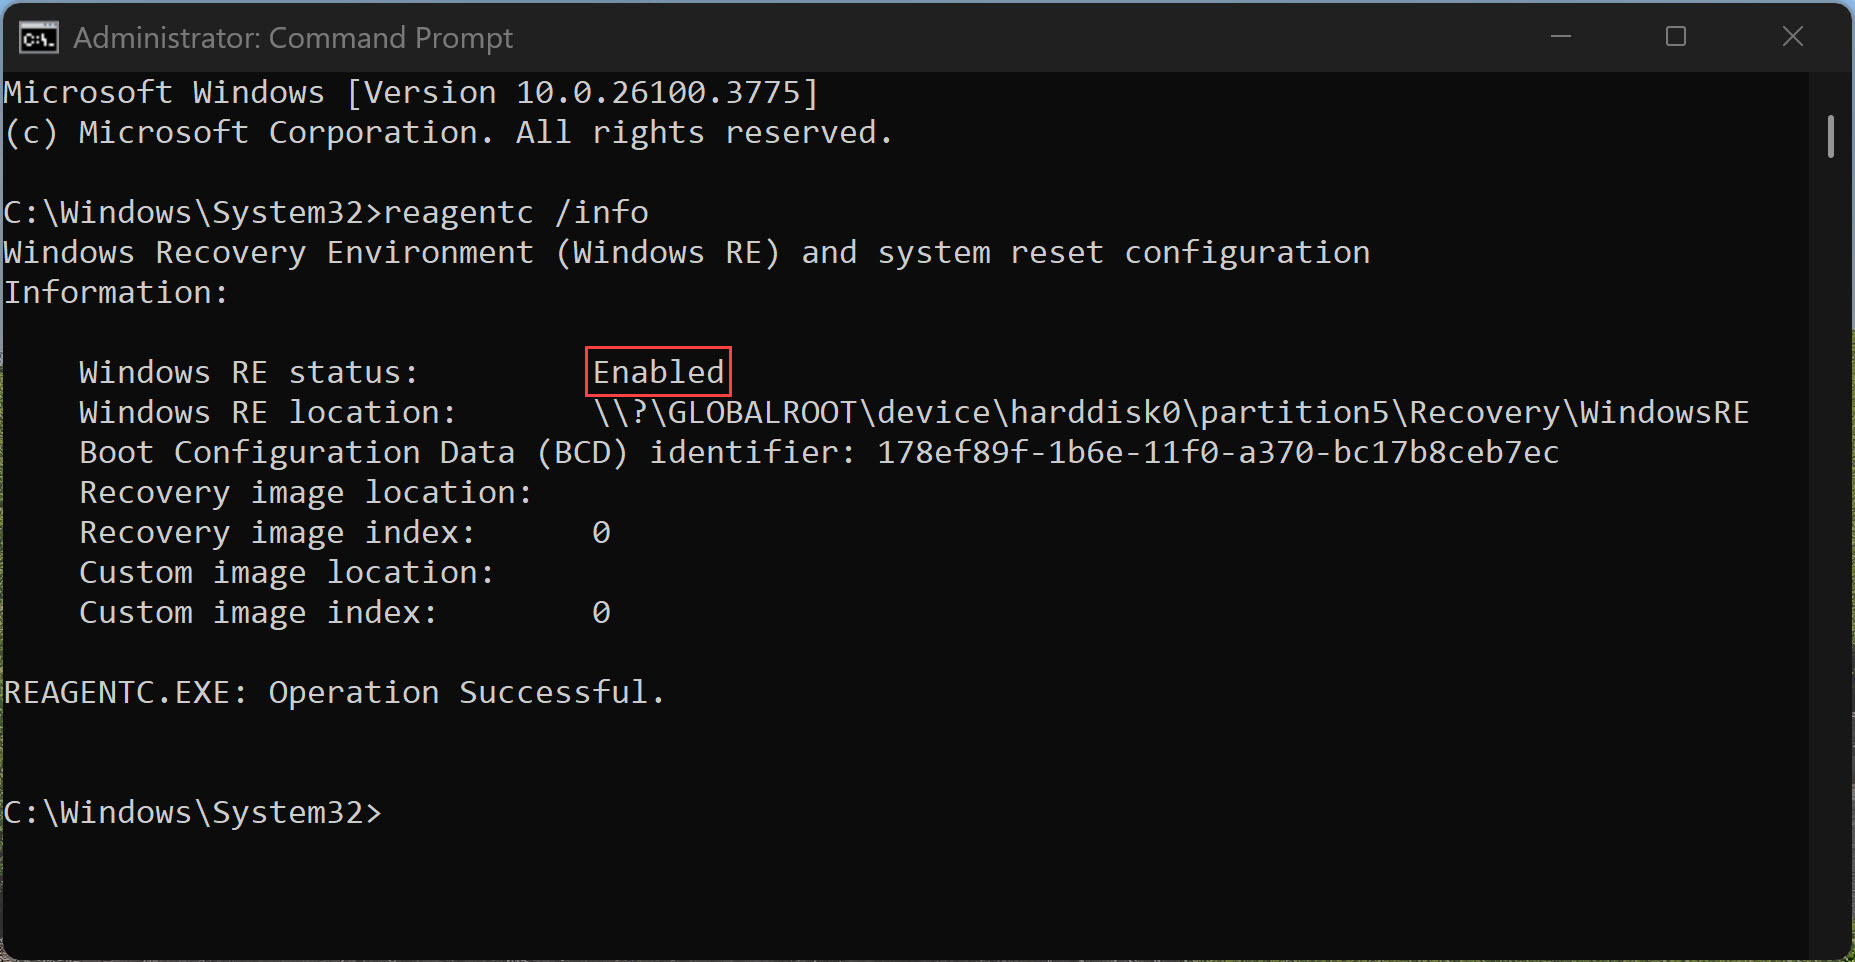
Вы можете проверить, включена ли среда восстановления на вашем компьютере с помощью команды:
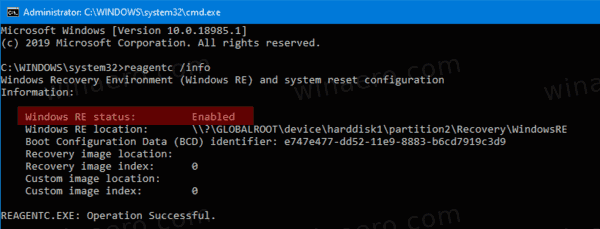
reagentc /info
Команда покажет текущую конфигурацию среды восстановления Windows. В этом примере WinRE активна:
Windows RE status: Enabled

Этак команда также вывела идентификатор записи WinRE в BCD (Boot Configuration Data (BCD) identifier) и путь к образу Windows RE (location: \\?\GLOBALROOT\device\harddisk0\partition4\Recovery\WindowsRE)
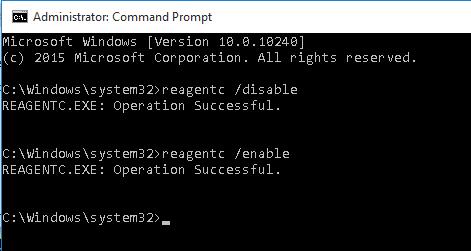
Чтобы включить (отключить) среду восстановления в Windows, используются команды:
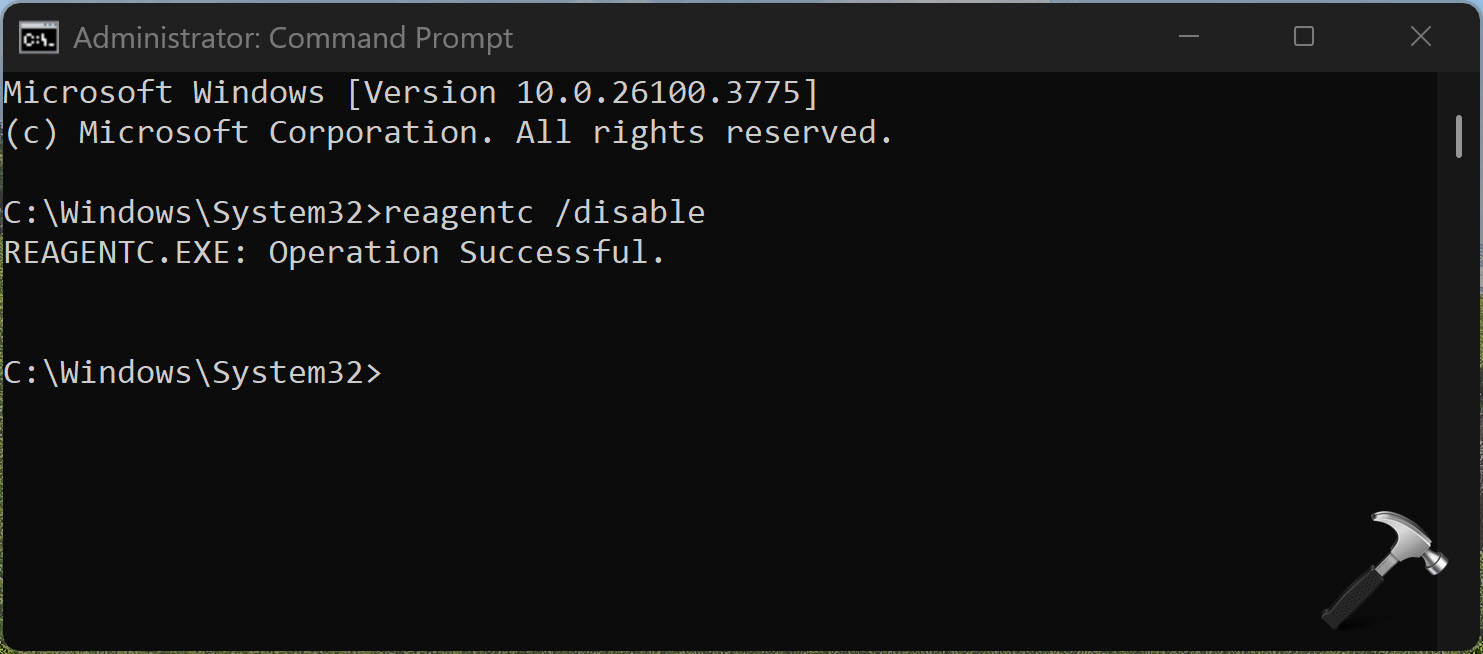
reagentc /disable
reagentc /enable
Логи среды восстановления Windows хранятся в файле %WINDIR%\System32\LogFiles\Srt\SrtTrail.txt.
Восстановление среды Windows Recovery Environment
Самый простой способ восстановить среду восстановления в Windows – просто отключить и включить WinRE с помощью команд:
reagentc /disable
reagentc /enable
Утилита должна обновить конфигурацию загрузчика BCD и добавить записи для среды WinRE.
При появлении ошибки “
REAGENTC.EXE: Unable to update Boot Configuration Data
”, исправьте сначала проблему с загрузчиком Windows (инструкция для UEFI и BIOS компьютеров).
Команда reagent может вернуть ошибку:
REAGENTC.EXE: The Windows RE image was not found.
REAGENT.EXE: образ среды восстановления Windows не найден.
Это обычно означает, что удален файл winre.wim или раздел System Restore. В этом случае вам нужно попробовать восстановить среду WinRE.

Проверьте, что в конфигурации загрузки BCD (Boot Configuratin Data) имеются корректные записи для загрузки среды WinRE.
bcdedit /enum all
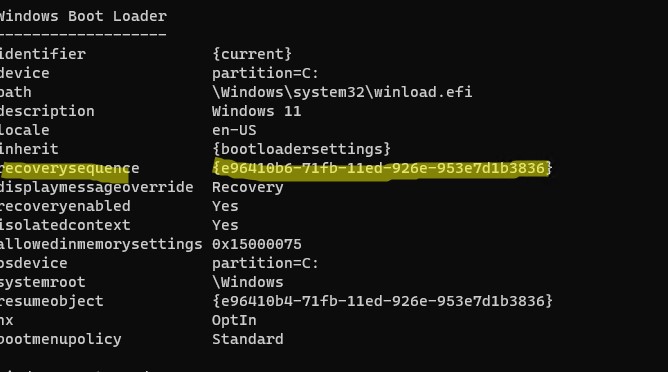
В списке вариантов загрузки найдите секцию Windows Boot Loader, с идентификатором identifier={current}. В нашем примере эта запись выглядит таким образом:
Windows Boot Loader
-------------------
identifier              {current}
device                  partition=C:
path                    \Windows\system32\winload.efi
description             Windows 11
locale                  en-US
inherit                 {bootloadersettings}
recoverysequence        {e96410b6-71fb-11ed-926e-953e7d1b3836}
displaymessageoverride  Recovery
recoveryenabled         Yes
isolatedcontext         Yes
allowedinmemorysettings 0x15000075
osdevice                partition=C:
systemroot              \Windows
resumeobject            {e96410b4-71fb-11ed-926e-953e7d1b3836}
nx                      OptIn
bootmenupolicy          Standard
Найдите и запомните значение GUID в атрибуте recoverysequence (в нашем примере это {7c817935-e52f-11e6-9c2c-0050569efccb} ).
Далее нужно найти секцию конфигурации загрузки, у которой значение идентификатора (identifier) равно полученному выше GUID, а в описании поля (description) указано Windows Recovery Environment. Эта запись может выглядеть так:
Windows Boot Loader
-------------------
identifier              {e96410b6-71fb-11ed-926e-953e7d1b3836}
device                  ramdisk=[\Device\HarddiskVolume4]\Recovery\WindowsRE\Winre.wim,{e96410b7-71fb-11ed-926e-953e7d1b3836}
path                    \windows\system32\winload.efi
description             Windows Recovery Environment
locale                  en-us
inherit                 {bootloadersettings}
displaymessage          Recovery
osdevice                ramdisk=[\Device\HarddiskVolume4]\Recovery\WindowsRE\Winre.wim,{e96410b7-71fb-11ed-926e-953e7d1b3836}
systemroot              \windows
nx                      OptIn
bootmenupolicy          Standard
winpe                   Yes
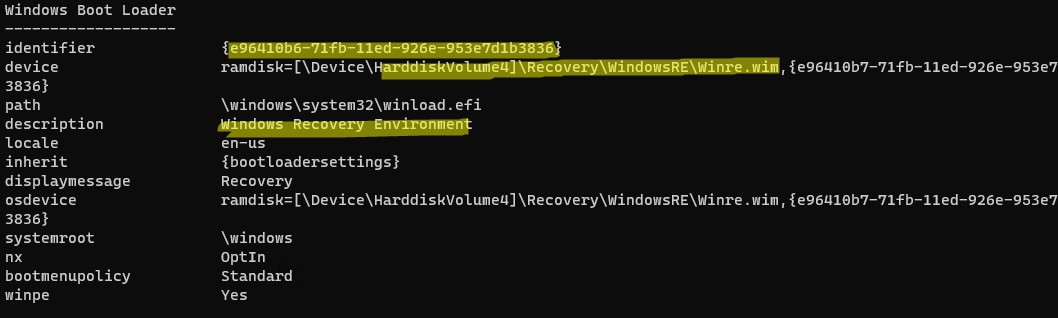
В строке Device указан полный путь к WIM образу среды восстановления. В нашем примере он находится на разделе 4 диска (HarddiskVolume4) по пути \Recovery\WindowsRE\Winre.wim.
Чтобы принудительно указать путь к WIM образу на этом разделе в конфигурации WinRE, выполните команду:
REAGENTC.EXE /setreimage /path \\?\GLOBALROOT\device\harddisk\partition4\Recovery\WindowsRE
Если этот раздел существует, можно привязать эту запись загрузчика для загрузки WinRe в качестве среды восстановления для текущей системы. Скопируйте GUID найденной записи и замените его в следующей команде:
bcdedit /set {current} recoverysequence {НайденныйGUID}
Примечание. Если вы используете мультизагрузку, имейте в виду, что каждая ОС будет добавлять в Microsoft Boot Manager собственную запись для среды Windows Recovery Environment. Здесь важно не запутаться в них.
Убедитесь, что файл Winre.wim находится по указанному пути. Как правило, он хранится в одном из следующих местоположений (папки скрытые): каталоге C:\Windows\System32\Recovery, на отдельном скрытом разделе Recovery Partition (или System Reserved), либо на OEM разделе восстановления от производителя (убедитесь, что вы не удаляли OEM раздел восстановления). В нашем примере путь к файлу Recovery Partition.
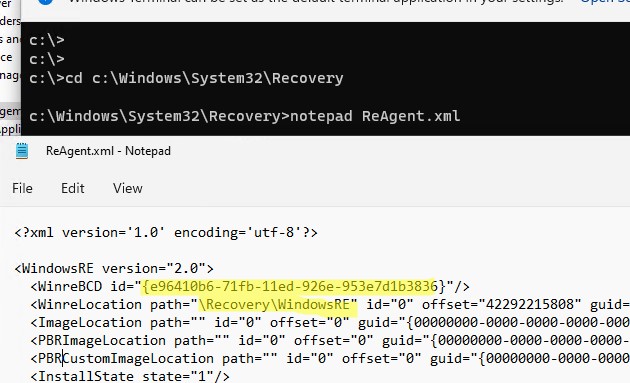
Затем проверьте путь к wim файлу, который указан в файле ReAgent.xml (находится в каталоге C:\Windows\System32\Recovery либо в каталоге Recovery на разделе восстановления).
notepad c:\Windows\System32\Recovery\ReAgent.xml
Откройте файл конфигурации с помощью любого редактора и проверьте значение атрибута <WinreLocation path =. Если указанный в файле путь не существует (оригинальный раздел был удален), можно изменить путь на <ImageLocation path= «\Recovery\WindowsRE»), создать каталог C:\Recovery\WindowsRE и скопировать в него файл Winre.wim.
Отключите и включите WinRE еще раз:
reagentc /disable
reagentc /enable
Пересоздать среду восстановления Windows
Если вы не нашли файла Winre.wim ни в одном из стандартных каталогов, попробуйте найти его поиском с помощью файлового менеджера или такой командой:
dir /a /s c:\winre.wim

Совет. Не забудьте поискать данный файл и на скрытых разделах, которым нужно предварительно назначить букву диска.
Если вы нашли файл, скопируйте в стандартное местоположение его следующими командами:
attrib -h -s c:\Recovery\xxxx\winre.wim
xcopy /h c:\Recovery\xxxx\winre.wim c:\Windows\System32\Recovery
Если на диске отсутствует WIM образ WinPE, вы можете скопировать его с компьютера с аналогичной версией Windows (версия и битность ОС должна совпадать), или с установочного диска / загрузочной USB флешки с Windows.
В нашем примере у нас есть установочный ISO образ с Windows.
Откройте ISO образ помощью 7-Zip, выберите файл \sources\install.wim (или install.esd) и извлеките файлы \Windows\System32\Recovery\Winre.wim и ReAgent.xml в каталог c:\Windows\System32\Recovery. Оригинальный файл boot.sdi можно скопировать из папки \Windows\Boot\DVD.
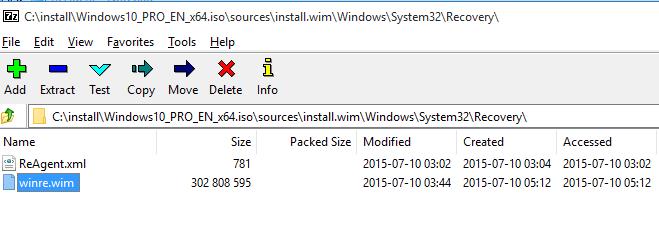
Можно заменить стандартный образ winre.wim на более продвинутый образ восстановления DART, в котором есть дополнительные утилиты, полезные для диагностирования и исправления проблем с Windows.
Удалите файл ReAgent.xml со старой конфигураций WinRE:
ren C:\Windows\System32\Recovery\ReAgent.xml ReAgent_backup.xml
Замените путь к файлу winre.wim в конфигурации Recovery Agent:
reagentc /setreimage /path C:\windows\system32\recovery
REAGENTC.EXE: Operation Successful.
Если файл winre.wim отсуствует в целевом каталоге, команда вернет ошибку:
REAGENTC.EXE: No valid image found in the specified path.
Осталось включить Windows Recovery Agent командой:
reagentc /enable
В данном случае файлы среды восстановления будут хранится на системном диске C:.
The Windows Recovery Environment (WinRE) is a companion operating system installed alongside Windows 10, typically in a separate partition, that can help with troubleshooting, recovery, or booting from external media, such as a USB stick. WinRE is also used during the Windows update process to apply updates in specific paths or phases. (This process is sometimes referred to as SafeOS.)
In this post, we’re going to walk you through the tools in WinRE, offer tips and tricks for using it effectively, and, while we’re at it, clear up common misconceptions around WinRE. We’ll also show how WinRE can enable a Windows 10 device that might have issues starting or applying the latest updates, get back to a good state.
When talking to IT pros, enthusiasts, and other Microsoft employees, I like to refer to WinRE as the “blue screen of life.” Some agree with me out of politeness, but I believe the phrase resonates with many people because, at the end of the day, WinRE is typically used to fix something.
WinRE is almost always located in a separate partition that immediately follows the main Windows partition. (For more details on the default partition layout for UEFI-based PCs, see our partition layout documentation.)
If you are familiar with Windows PE (WinPE), this may sound similar. Think of WinPE as the base OS and WinRE as the user interface with some recovery tools added.
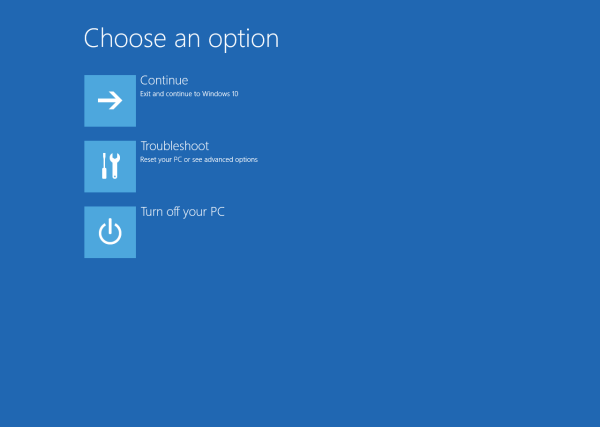
When you launch WinRE, you may see these options: Continue (exit WinRE and continue to Windows 10), Use a device (use a USB drive, network connection, or Windows recovery DVD), Troubleshoot (reset your PC or use advanced options), and Turn off your PC.
Figure 1. Initial WinRE menu options
You can access WinRE via multiple entry points:
- From the Start menu, select Power then select and hold down the Shift key while selecting Restart.
- In Windows 10, select Start > Settings > Update & Security > Recovery. Under Advanced startup, select Restart now.
- By booting to recovery media.
- Note: an easy way to create recovery media is to use the Media Creation Tool or to create a recovery drive and uncheck the Back up system files to the recovery drive option.
- A hardware recovery button (or button combination) configured by the OEM.
Here are two lesser-known ways to access WinRE:
- Use REAgentC. From Windows 10, run a command prompt as an administrator, then type reagentc /boottore. Restart the device and it will load WinRE instead of Windows 10.
- The shutdown command also has an entry point for WinRE. Run command prompt as an administrator and type shutdown /r /o.
Okay, so now that you’re in WinRE, what can you do?
Depending on how you started WinRE, the options may differ. For example, if you boot from a USB stick, the Reset this PC option does not appear. You can continue to Windows 10 or turn off your PC.
If the options presented are not desired, select Continue to start Windows 10. Likewise, the Turn off your PC option will shut down the device. If you have multiple operating systems installed, this would also be where you could select which OS to boot.
This option helps you boot from another source such as USB, DVD, or even a network connection. This can be helpful as it is simpler than some BIOS/Unified Extensible Firmware Interface (UEFI) menus and provides a consistent experience.
WinRE has many troubleshooting tools to help you get devices back to a good state quickly and easily. For more information, see Use WinRE to troubleshoot common startup issues.
Now, let’s explore the options available in the Troubleshoot category.
Resetting a PC reinstalls Windows 10, but lets you choose whether to keep your files or remove them before reinstalling Windows. Reset this PC is the most popular option and offers a few options. (You can also access Reset this PC from the Settings menu if you can successfully start Windows 10.) For more information on Reset this PC, see Recovery options in Windows 10. I’ll also dive deeper into Reset this PC in future posts, so stay tuned!
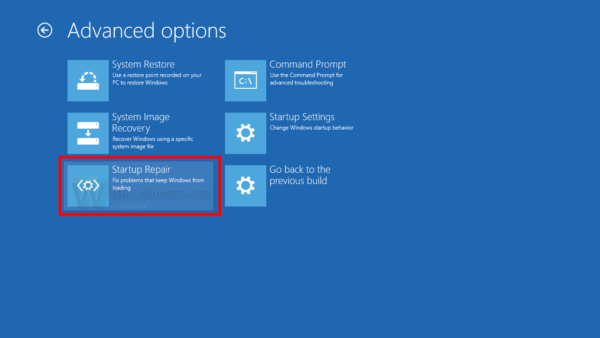
Figure 2. The Advanced options menu
If Windows fails to start twice, the third attempt will run Startup Repair automatically. This is also available as an option on the advanced options page of troubleshooting. Startup Repair can help fix a corrupt master boot record (MBR), partition table, or boot sector. Beginning with Windows 10, version 1809, automatic Startup Repair also removes the most recently installed update if that installation immediately preceded the startup failure.
Another troubleshooting step is to change how Windows starts up. Enabling debugging or boot logging can help identify a specific issue. This is also where you can enable Safe Mode. Check out the support page on Startup Settings for more information.
While not the most approachable tool for unfamiliar users, the command prompt is the most powerful and dynamic tool in WinRE. It can do everything from registry edits to copying files to running Deployment Image Servicing and Management (DISM) commands. Next, we’ll cover a few notable examples. (Note that while using Command Prompt in WinRE, it automatically runs with elevated administrator permissions.)
Copying files
If you need to copy a few files from your device before reinstalling Windows, using a USB drive or network share can be a quick way to do this using the command prompt within WinRE.
There is also a popular Notepad trick that makes it easier to copy files. I love it and wish I could take credit as it a big timesaver for visual people like me. !
Chkdsk
Running chkdsk is a common first step to help resolve issues. This process checks the file system and file system metadata of a volume for logical and physical errors. (While in WinRE, drive letters may be assigned differently than in Windows 10. You can run BCDEdit to get the correct drive letters.)
SFC
SFC scans and verifies the integrity of all protected system files and replaces incorrect versions with correct versions. If this command discovers that a protected file has been overwritten, it retrieves the correct version of the file, and then replaces the incorrect file.
Repair corrupt components using DISM
Windows system components may become corrupt from hard drive malfunctions or update issues. If you have a wired ethernet connection, you can turn on networking to then scan and repair corrupted content using Windows Update and the /Cleanup-Image switch in DISM.
From the command prompt, type wpeinit and Enter to turn on the networking stack then type the following command:
dism /image:c:\ /cleanup-image /restorehealthFigure 3. Using DISM within the command prompt in WinRE
Registry Editor
Yes, you can use regedit within Windows RE, but warning: this is a powerful tool that can really mess things up if not used correctly! Keep in mind the X:\ drive is the WinRE OS and has its own registry. C:\ is likely where the Windows 10 registry is.
Figure 4. Launching the Registry Editor from the command prompt in WinRE
Removing the latest updates recently installed to Windows 10 can be a good troubleshooting step if you are having trouble starting your PC or if you are having trouble uninstalling something within Windows 10. Simply select Uninstall latest quality update or Uninstall latest feature update to uninstall the desired update from WinRE with just a couple of steps. Please note; however, that you should reapply the latest updates as soon as possible to help keep your devices protected and productive.
Figure 5. The Uninstall Updates menu
This option makes it easy to boot into the UEFI menu to change firmware settings, especially as the many different devices offered by OEMs use different keyboard or button combinations to access UEFI. For example, some use volume buttons, function keys, the delete key, or a combination therein. WinRE provides a consistent method for accessing UEFI firmware settings across all devices.
These two options can be useful if you are using legacy system restore features or image-based recovery. The System Restore option can restore your PC to a previous restore point which, for example, could undo the latest win32 application installation if you captured a restore point prior to the installation.
Creating a recovery drive is a built-in Windows ability that can easily create a USB drive with WinRE. Optionally, it can also “back up system files to the recovery drive,” a process that takes a while but will fully reinstall Windows onto that same system even if the hard drive is blank. This is often referred to as Bare Metal Recovery (BMR). When starting your system from a Recovery Drive, you will notice that is uses WinRE to perform the recovery. You will need to pick your language first and there will then be an option on the first screen to “Recover from a drive.”
WinRE can help devices recover back to Windows, but, if needed, it can be disabled by opening an elevated command prompt and using the reagentc /disable command. By disabling WinRE, however, some Windows 10 features may not work, including many outlined in this blog post. Additionally, WinRE will be re-enabled after a feature update is installed as it is a critical part of the update process.
If you are a Windows Insider taking flights, you may have seen a behavior change on Windows 10 Insider Preview Build 19536 and later, where the default authentication requirements for WinRE are different. Previously, most tools and actions required local admin credentials but were not able to use modern credentials like Windows Hello (face, PIN, fingerprint). This became a big problem with passwordless accounts and Azure Active Directory accounts that weren’t backed up with a local admin account. To address this, we changed the default behavior to no longer require local administrator authentication to access WinRE tools.
If you manage devices using mobile device management (MDM) solutions such as Microsoft Endpoint Manager, you can configure the Security/RecoveryEnvironmentAuthentication policy if you would like to require local administrator authentication to use WinRE components.
WinRE can be installed in the same partition as Windows, but it is usually installed in the Recovery or WinRE tools partition. Regardless of where it is installed, it always runs in the RAM (or RAM disk boot) and is assigned the X:\ drive. This is important to note because any changes you make to X:\ will not be saved after a reboot.
Depending on the combination of your entry points to WinRE, how BitLocker is configured (auto-unlock), and what WinRE option you select, you may be prompted for the BitLocker recovery key to unlock your Windows partition. As an example, when launching a command prompt, you will be prompted to unlock BitLocker. If you skip the unlock process, the Windows installation drive will remain locked, but you will have access to the X:\ drive, where WinRE runs in RAM.
One potentially confusing thing about WinRE is the implementation of BootIM.exe. Most won’t see a difference, but I want to explain how this works. When using the entry point from the lock/login screen and holding the Shift key or Settings > Advanced Startup, Windows 10 is not rebooting into WinRE. Instead, it is entering pre-shutdown and showing the BootIM screen which looks exactly like WinRE. If you select an option that needs to change the boot flag like Use a device, it saves you one restart because you don’t have to start WinRE to then restart the system again using a device.
You can see this functionality by running BootIM.exe from an elevated command prompt, but a quick tip is to open Task Manager beforehand so you can easily use the Alt + Tab combination and end the task when you are done. If you are a Windows Insider taking flights, you will see a behavior change beginning with Windows 10 Insider Preview Build 19577 to enable greater accessibility within this experience. As the pre-shutdown behavior doesn’t support Narrator or other accessibility features, BootIM will only be used if WinRE isn’t available. Otherwise, the system will restart directly to WinRE and skip BootIM.
Prior to Windows 10, the recommended partition layout was to place the recovery partition before the OS partition. Unfortunately, this made it difficult to update WinRE. For Windows 10, we updated the recommendation to always list WinRE immediately after the OS partition. Depending on how Windows was originally installed, your partitions may not have this layout.
Even with the updated recommendation, OEMs have the flexibility to choose a different partition layout for specific solutions. When installing from USB, the legacy layout was still being used by some partners until it was formally updated in Windows 10, version 20H1. For example, in this screenshot from a newer laptop, the OEM put an Recovery Partition where it needs to go, last in line.
Figure 6. A Disk Management partition layout example
The WinRE partition can have any volume label or no label, but the most common labels are WinRE tools, WinRE, or Recovery. The label is subject to change upon update. The status could also say OEM Partition or Recovery Partition.
The WinRE partition shouldn’t have a drive letter assigned and any folders or files should not be available for editing. A common misunderstanding is that the recovery partition contains a compressed copy of Windows and that this copy is what is restored during the reset process. This is not the case. This partition only contains WinRE and drivers. The size can vary depending on how it was configured by the OEM (e.g., what languages and drivers were included).
Figure 7. An example of labels within the Disk Management partition
In closing, I hope this information has been helpful and helps provide greater understanding about WinRE. As we continue to improve, we are always interested in your ideas and feedback, and ask that you please share them in Feedback Hub (<— this is direct link to the Advanced startup category that includes WinRE).
If you have ideas or requests on other aspects of recovery you’d like us to share, please let us know in the comments section below.
Реализация DI в PHP
Jason-Webb 13.05.2025
Когда я начинал писать свой первый крупный PHP-проект, моя архитектура напоминала запутаный клубок спагетти. Классы создавали другие классы внутри себя, зависимости жостко прописывались в коде, а о. . .
Обработка изображений в реальном времени на C# с OpenCV
stackOverflow 13.05.2025
Объединение библиотеки компьютерного зрения OpenCV с современным языком программирования C# создаёт симбиоз, который открывает доступ к впечатляющему набору возможностей. Ключевое преимущество этого. . .
POCO, ACE, Loki и другие продвинутые C++ библиотеки
NullReferenced 13.05.2025
В C++ разработки существует такое обилие библиотек, что порой кажется, будто ты заблудился в дремучем лесу. И среди этого многообразия POCO (Portable Components) – как маяк для тех, кто ищет. . .
Паттерны проектирования GoF на C#
UnmanagedCoder 13.05.2025
Вы наверняка сталкивались с ситуациями, когда код разрастается до неприличных размеров, а его поддержка становится настоящим испытанием. Именно в такие моменты на помощь приходят паттерны Gang of. . .
Создаем CLI приложение на Python с Prompt Toolkit
py-thonny 13.05.2025
Современные командные интерфейсы давно перестали быть черно-белыми текстовыми программами, которые многие помнят по старым операционным системам. CLI сегодня – это мощные, интуитивные и даже. . .
Конвейеры ETL с Apache Airflow и Python
AI_Generated 13.05.2025
ETL-конвейеры – это набор процессов, отвечающих за извлечение данных из различных источников (Extract), их преобразование в нужный формат (Transform) и загрузку в целевое хранилище (Load). . . .
Выполнение асинхронных задач в Python с asyncio
py-thonny 12.05.2025
Современный мир программирования похож на оживлённый мегаполис – тысячи процессов одновременно требуют внимания, ресурсов и времени. В этих джунглях операций возникают ситуации, когда программа. . .
Работа с gRPC сервисами на C#
UnmanagedCoder 12.05.2025
gRPC (Google Remote Procedure Call) — открытый высокопроизводительный RPC-фреймворк, изначально разработанный компанией Google. Он отличается от традиционых REST-сервисов как минимум тем, что. . .
CQRS (Command Query Responsibility Segregation) на Java
Javaican 12.05.2025
CQRS — Command Query Responsibility Segregation, или разделение ответственности команд и запросов. Суть этого архитектурного паттерна проста: операции чтения данных (запросы) отделяются от операций. . .
Шаблоны и приёмы реализации DDD на C#
stackOverflow 12.05.2025
Когда я впервые погрузился в мир Domain-Driven Design, мне показалось, что это очередная модная методология, которая скоро канет в лету. Однако годы практики убедили меня в обратном. DDD — не просто. . .
Windows Recovery Environment is something you’ll need when you can’t start your system normally. Usually you turn on the system, it will boot, and then you’ll login. But there are many cases when this process doesn’t occurs. In such cases, either Windows is not able to boot due to any specific reason or you can’t login after Windows boots. Using Windows Recovery Environment, you can use advanced features to get back your working Windows system. Here’s how you can activate or deactivate Windows Recovery Environment (WinRE) on Windows 11.
The typical Windows Recovery Environment screen is shown below. It has a solid blue background.
Page Contents
Enable Windows Recovery Environment (WinRE) on Windows 11
By default, Windows Recovery Environment (WinRE) on Windows 11 is enabled. Additionally, it is recommended to have it enabled for recovery purpose. If your system won’t be able to boot usually for an unknown reason, you can troubleshoot only using Windows Recovery Environment.
To check, you can try these steps:
1. Search for Command Prompt and open Command Prompt as administrator.
2. In the Command Prompt window, run reagentc /info command.
3. If you see Windows RE status as Enabled, this confirms Windows Recovery Environment is activated, or turn on for your system.
4. If Windows RE status is Disabled, then next you can run reagentc /enable command.
Disable Windows Recovery Environment (WinRE) on Windows 11
To disable Windows Recovery Environment (WinRE) on Windows 11, these steps can be performed:
1. Search for Command Prompt and open Command Prompt as administrator.
2. In the Command Prompt window, first check Windows RE status.
3. If Windows RE status is Enabled, you can next run reagentc /disable command to disable Windows Recovery Environment.
Conclusion
When you disable Windows Recovery Environment, Windows will usually copy recovery image file named winre.wim from Recovery Partition to the Recovery folder inside System32 folder of root drive installation. The operation is reversed when you enable Windows Recovery Environment.
That’s it!
RELATED ARTICLES
How to Enable or Disable Windows Recovery Environment (WinRE) in Windows 10
Windows Recovery Environment (WinRE) is a set of troubleshooting tools available under advanced startup options in Windows 10. These tools are useful if you have some issue that you cannot fix in the regular Windows 10 environment, for example, you may need to overwrite or delete some in-use files. It is really a good alternative to a bootable DVD or USB stick.
By default, Windows Recovery Environment comes available out of the box in Home, Pro, Enterprise, and Education editions of Windows 10.
Here is how the Advanced Startup Options screen looks in Windows 10.
The continue item allows you to exit the screen and start the OS normally.
The «Troubleshoot» item includes a number of useful tool, e.g. command prompt, system recovery and reset, startup repair, and more.

Windows Recovery Environment includes the following tools:
- Automatic Startup Recovery. If the system detects a boot failure on a computer running Windows, the system automatically fails over into the on-disk Windows RE tool.
- Automatic Repair. The Automatic Repair tool automates common diagnostic and repair tasks for non-bootable operating system installations.
- System Image Recovery.
- System Restore.
- Command Prompt.
- The ability to customize startup settings.
- It may also include custom Support and Recovery Tools from OEM.
If you have a reason to disable WinRE, e.g. you want to prevent your family members from accidental use of this tools, here’s how it can be done.
To Check Windows Recovery Environment Status in Windows 10,
- Open a new command prompt as Administrator.
- Type or copy-paste the following command:
reagentc /infoand hit the Enter key to execute it. - See the value next to the Windows RE Status line. It should say either Enabled or Disabled.

- Open a new command prompt as Administrator.
- Type or copy-paste the following command:
reagentc /disableand hit the Enter key to execute it. - This will disable WinRE.
Here’s how to re-enable it.
To Enable Windows Recovery Environment in Windows 10,
- Open a new command prompt as Administrator.
- Type or copy-paste the following command:
reagentc /enableand hit the Enter key to execute it. - This will enable WinRE in Windows 10.
You are done!
Articles of interest:
- Add Advanced Startup Options Context Menu in Windows 10
- Make shortcut to Advanced Startup options in Windows 10
- Tip: Boot Windows 10 into Advanced Startup Options quickly
- How to run Startup Repair manually in Windows 10
- Open Advanced Startup Options Automatically in Windows 10
Support us
Winaero greatly relies on your support. You can help the site keep bringing you interesting and useful content and software by using these options:
If you like this article, please share it using the buttons below. It won’t take a lot from you, but it will help us grow. Thanks for your support!