
При съёмке фото на смартфон или фотоаппарат, создаваемый файл содержит не только изображение, но и дополнительные метаданные EXIF (Exchangeable Image File Format), содержащие различную информацию о времени и условиях съёмки, включая данные, предоставление доступа к которым посторонним может быть нежелательным: например, о точном местоположении.
Данные EXIF могут быть полезными для работы с фото в собственной коллекции, но при передаче файлов фотографий третьим лицам эту информацию может иметь смысл очистить. О том, как это сделать — далее в инструкции.
Просмотр и очистка данных о местоположении и другой личной информации из фото
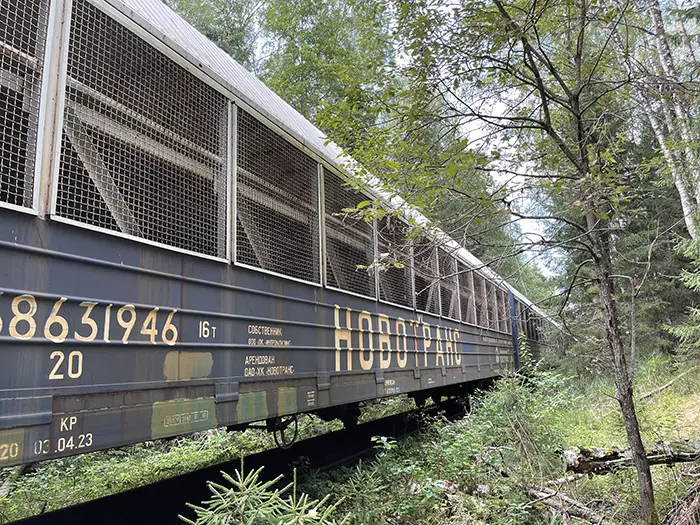
Сначала кратко о том, где вы можете увидеть данные EXIF, о которых идёт речь. Сделать это можно средствами Windows, для примера возьмём фото выше (метаданные из него специально не были удалены). Чтобы узнать, где, когда и как это было снято:
- Нажмите по файлу фотографии правой кнопкой мыши, выберите пункт «Свойства».
- Перейдите на вкладку «Подробно».
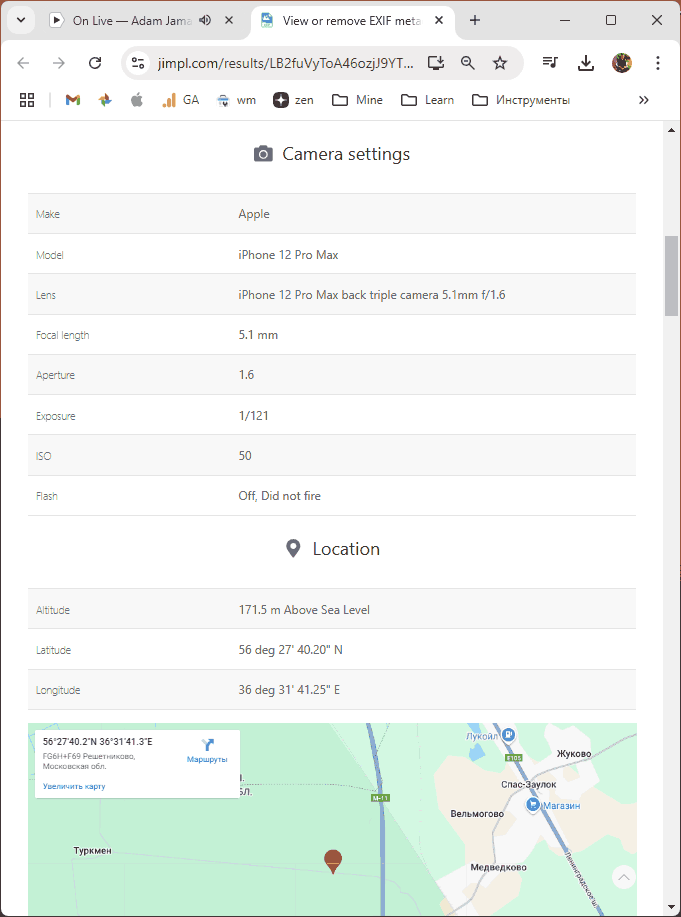
- Здесь вы можете увидеть, с помощью какой камеры был сделан снимок, данные GPS, позволяющие определить точное местоположение, информацию о параметрах съёмки и программе, с помощью которой производилась обработка фотографии.


Те же сведения можно получить с помощью сторонних программ для анализа метаданных фотографий.
Есть и онлайн-сервисы для тех же целей, которые, например, могут показать место съёмки на карте:
Удаление указанных метаданных возможно также средствами Windows:
- Откройте свойства файла фотографии и перейдите на вкладку «Подробно».
- Нажмите по ссылке «Удаление свойств и личной информации» внизу окна.
- Выберите один из вариантов: создать копию файла, но без личной информации, либо удалить выбранные свойства из имеющегося файла. Во втором случае вы сможете установить отметки для удаления конкретных свойств, например, только данных GPS:
- Нажмите «Ок» для подтверждения.

Готово, теперь фото можно смело пересылать куда угодно, не боясь скомпрометировать конфиденциальные данные.
Удаление данных EXIF в программах
Свойства файла фотографии — не единственный метод очистки данных EXIF в Windows 11/10 или с помощью сторонних средств. Некоторые из других доступных вариантов:
- Открыть файл изображения во встроенном приложении «Фотографии», нажать кнопку «Изменить», после чего в окне редактирования — «Сохранить копию», копия будет сохранена без данных EXIF.

- Скачать инструмент командной строки ExifTool с официального сайта, распаковать архив, после чего использовать командную строку или PowerShell для удаления информации. Например, если нам требуется удалить метаданные для всех фотографий JPG в папке, потребуется переименовать загруженный файл из «exiftool(-k).exe» в «exiftool.exe», после чего использовать следующую команду PowerShell:
Get-ChildItem "путь_к_папке_с_фото" -Filter *.jpg | ForEach-Object {Start-Process -NoNewWindow -FilePath "путь_к_exiftool.exe" -ArgumentList "-all=", "-overwrite_original", $_.FullName}Если же запустить исполняемый файл ExifTool как обычную программу, это позволит ознакомиться с инструкциями по использованию инструмента:


Многие сторонние программы для просмотра и управления фото также позволяют очистить метаданные из файлов изображения.
Дополнительные сведения в контексте рассмотренной темы, которые могут быть полезными:
- Большинство приложений камеры на Android смартфонах позволяют отключить сохранение данных о местоположении в снимках, соответствующую опцию обычно можно найти в настройках приложения камеры. В случае iPhone для отключения потребуется перейти в Настройки — Конфиденциальность и безопасность — Службы геолокации — Камера и выбрать вариант «Никогда».
- Многие мессенджеры удаляют личные данные из фото при отправке их в сжатом виде (при отправке в виде файла данные сохраняются). Однако не факт, что сведения не собираются на серверах мессенджера.
Если у вас остаются вопросы на тему конфиденциальных сведений в фотографиях, вы можете задать их в комментариях ниже.
ExifTool is a powerful tool for reading, writing, and editing metadata in various file formats, enhancing digital workflows
Introduction
In the world of digital forensics, photography, cybersecurity, and digital content management, metadata plays a critical role. Metadata provides information about a file, such as who created it, when it was created, with what device, and even where it was created. Extracting and manipulating this metadata can reveal important details that aren’t visible from the file content alone.
One of the most powerful tools for handling metadata is ExifTool. Developed by Phil Harvey, ExifTool is a free, open-source, cross-platform command-line application for reading, writing, and editing meta information in a wide variety of file types.
This in-depth guide explores every feature of ExifTool, complete with explanations, use cases, commands, options, and sample outputs. Whether you’re a digital forensics analyst, photographer, journalist, penetration tester, or archivist, this guide will help you harness the full potential of ExifTool.
- Getting Started with ExifTool
1.1 Installation
On Linux:
To install ExifTool on Linux-based systems:
sudo apt update
sudo apt install libimage-exiftool-perl
Explanation:
sudo apt updateupdates the local package list.sudo apt install libimage-exiftool-perlinstalls the ExifTool package.
On macOS (with Homebrew):
For macOS users, you can install ExifTool using Homebrew:
brew install exiftool
Explanation:
brew install exiftoolinstalls ExifTool using Homebrew, a package manager for macOS.
On Windows:
- Download the Windows executable from ExifTool’s website.
- Extract and rename
exiftool(-k).exetoexiftool.exe. - Add it to your system’s path or run it directly from the extracted location.
- Reading Metadata
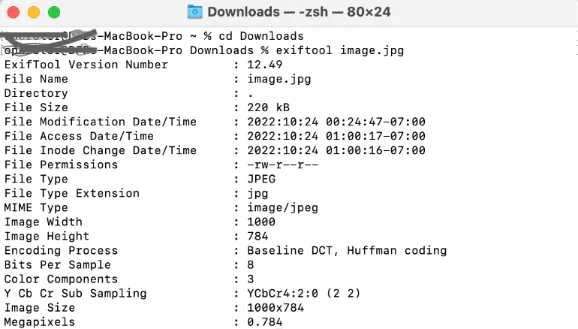
exiftool image.jpg
Explanation:
exiftool image.jpg: This is the basic command to extract metadata from an image (or any supported file type). ExifTool reads and displays metadata for the specified file.
Output Example:
ExifTool Version Number         : 12.50
File Name                       : image.jpg
File Size                       : 3.2 MB
File Modification Date/Time     : 2023:10:10 14:22:30
Camera Model Name               : Canon EOS 80D
Date/Time Original              : 2023:10:10 14:20:00
GPS Latitude                    : 37.7749 N
GPS Longitude                   : 122.4194 W
exiftool -Model -DateTimeOriginal -GPSLatitude -GPSLongitude image.jpg
Explanation:
-Model: Extracts the camera model used to capture the image.-DateTimeOriginal: Extracts the original date and time when the image was captured.-GPSLatitude: Extracts the latitude of the image’s GPS location.-GPSLongitude: Extracts the longitude of the image’s GPS location.
This command allows you to extract specific metadata tags by naming them explicitly.
2.3 Reading Metadata from All Files in a Directory
exiftool *.jpg
Explanation:
*.jpg: This wildcard tells ExifTool to process all.jpgfiles in the current directory and display their metadata.
exiftool -r /path/to/folder
Explanation:
-r: The-roption tells ExifTool to recursively process files in the specified folder, extracting metadata from all files and subdirectories within that path.
- Writing Metadata
exiftool -Artist="John Doe" image.jpg
Explanation:
-Artist="John Doe": This sets theArtisttag to «John Doe,» effectively changing the creator’s name in the metadata of the image file.
3.2 Modify Date/Time
exiftool -DateTimeOriginal="2023:10:10 12:00:00" image.jpg
Explanation:
-DateTimeOriginal="2023:10:10 12:00:00": This modifies theDateTimeOriginaltag to set the date and time when the photo was taken.
3.3 Add Copyright Information
exiftool -Copyright="(c) 2025 John Doe" image.jpg
Explanation:
-Copyright="(c) 2025 John Doe": Adds or modifies the copyright information in the metadata of the image.
3.4 Remove Metadata
exiftool -all= image.jpg
Explanation:
-all=: This option removes all metadata tags from the specified file. The file will remain the same but without any metadata.
3.5 Remove All Metadata Except EXIF
exiftool -all= -tagsFromFile @ -exif:all image.jpg
Explanation:
-all=: Removes all metadata.-tagsFromFile @: Copies metadata tags from the current file (@refers to the current file).-exif:all: Keeps the EXIF data intact while removing other tags.
3.6 Rename Files Using Metadata
exiftool '-FileName<${DateTimeOriginal}_${Model}.jpg' image.jpg
Explanation:
'-FileName<${DateTimeOriginal}_${Model}.jpg': This command renames the file based on the EXIF metadata.${DateTimeOriginal}and${Model}are placeholders that are replaced with the image’s date and time of capture and the camera model.
- Working with GPS Data
exiftool -gps:all image.jpg
Explanation:
-gps:all: This option extracts all GPS-related metadata tags from the file, such as latitude, longitude, altitude, and more.
4.2 Add GPS Coordinates
exiftool -GPSLatitude=37.7749 -GPSLatitudeRef=N -GPSLongitude=122.4194 -GPSLongitudeRef=W image.jpg
Explanation:
-GPSLatitude=37.7749: Sets the latitude of the image to37.7749.-GPSLatitudeRef=N: Indicates that the latitude is North.-GPSLongitude=122.4194: Sets the longitude of the image to122.4194.-GPSLongitudeRef=W: Indicates that the longitude is West.
4.3 Remove GPS Tags Only
exiftool -gps:all= image.jpg
Explanation:
-gps:all=: This option removes all GPS-related metadata from the image.
- File Type Support
ExifTool supports metadata editing for a variety of file types. Here’s an example of how to check the file type:
exiftool -filetype image.png
Explanation:
-filetype: This option shows the file type of the specified image.
- Comparing Metadata
6.1 Compare Two Files
exiftool -a -G1 -s file1.jpg > metadata1.txt
exiftool -a -G1 -s file2.jpg > metadata2.txt
diff metadata1.txt metadata2.txt
Explanation:
-a: Allows duplicate tags to be displayed.-G1: Groups the metadata by tag category.-s: Short output format.diff metadata1.txt metadata2.txt: Compares the metadata of two files.
- Advanced Usage
7.1 Copy Metadata from One File to Another
exiftool -TagsFromFile source.jpg target.jpg
Explanation:
-TagsFromFile source.jpg: Copies metadata fromsource.jpg.target.jpg: The destination file to which metadata will be copied.
7.2 Batch Processing
exiftool -r -ext jpg -overwrite_original -Artist="John Doe" /path/to/images
Explanation:
-r: Recursively processes files in subdirectories.-ext jpg: Restricts the operation to.jpgfiles.-overwrite_original: Overwrites the original files with the modified metadata.-Artist="John Doe": Adds or modifies theArtisttag for all files.
7.3 Use Wildcards
exiftool -Model -DateTimeOriginal *.jpg
Explanation:
*.jpg: The wildcard specifies that the command will apply to all.jpgfiles in the current directory.-Model: Extracts the camera model used to take the photos.-DateTimeOriginal: Extracts the original date and time of capture.
7.4 Export to CSV
exiftool -csv *.jpg > metadata.csv
Explanation:
-csv: Exports metadata in CSV format.*.jpg: Applies the operation to all.jpgfiles in the current directory.
7.5 Import from CSV
exiftool -csv=metadata.csv
Explanation:
-csv=metadata.csv: Imports metadata from themetadata.csvfile.
- Scripting with ExifTool
8.1 Shell Script Example (Linux/macOS)
#!/bin/bash
for file in *.jpg; do
    exiftool -Artist="John Doe" "$file"
done
Explanation:
- This shell script loops through all
.jpgfiles in the current directory and sets theArtisttag to «John Doe».
8.2 PowerShell Example (Windows)
Get-ChildItem *.jpg | ForEach-Object {
    & exiftool.exe -Artist="John Doe" $_.FullName
}
Explanation:
- This PowerShell script loops through all
.jpgfiles and modifies theArtisttag to «John Doe».
-
Integration and Use Cases
-
Digital Forensics: Extract EXIF metadata to verify the origin, modification date, and camera information of digital images.
- Cybersecurity: Analyze metadata to uncover sensitive information or leakage from documents.
- Photography: Organize and modify metadata, like adding keywords and descriptions.
- Journalism: Verify the authenticity of photos by checking the metadata for creation date and camera information.
- Web Development: Remove metadata before publishing photos online to protect privacy.
- Tips and Tricks
10.1 See All Available Tags
exiftool -s -G1 -e image.jpg
Explanation:
-s: Shows short output, displaying only the tag names.-G1: Groups tags by their category.-e: Lists all possible tags available in the image file.
10.2 List Supported File Formats
exiftool -listf
Explanation:
-listf: Lists all file formats that ExifTool supports.
10.3 List All Writable Tags
exiftool -listw
Explanation:
-listw: Lists all writable metadata tags for the specified file type.
10.4 List All Tag Names
exiftool -list
Explanation:
-list: Displays all available tag names in the file.
10.5 Conditional
Writing
exiftool -if '$Model eq "Canon EOS 80D"' -Artist="John Doe" *.jpg
Explanation:
-if '$Model eq "Canon EOS 80D"': This condition applies the changes only to files where the model is «Canon EOS 80D».-Artist="John Doe": Sets theArtisttag to «John Doe» for those files.
Conclusion
ExifTool is a versatile and powerful tool that offers complete control over file metadata. From extracting location data to cleaning personal information, ExifTool is an essential utility for anyone working with digital files.
In this guide, you’ve explored every feature, from basic metadata extraction to advanced scripting and automation. By mastering ExifTool, you gain the ability to inspect, modify, and secure metadata across a wide range of formats and applications.
Назваться любителем командной строки будет для меня как-то чересчур, скорее, я стал им добровольно-принудительно, т.к. после обновления OS X 10.7 на 10.8 перестала работать программа, которая до того вполне неплохо проставляла геотеги на отснятые фотографии. Здесь надо сделать отступление: на написание этой заметки меня сподвиг более или менее «соседний» материал под названием «Как сэкономить на фотоаппарате с GPS». В моём случае имеет место несколько менее извращённый подход к получению координат посещённых мест, а именно — запись трека GPS-навигатором, остальное же выполняется с помощью ExifTool.
Пожалуй, можно опустить получение удобоваримого формата трека, т.к. это вряд ли сопоставимо с темой заметки, а вот проставление геотегов — одна из задач, которую ExifTool чудесно выполняет.
Итак, предположим, что у Вас есть набор снимков, GPS-трек, ExifTool и часы камеры и GPS-устройства были синхронизированы (или Вы знаете разницу во времени). В таком случае следующая команда удобно совершит все действия над файлами *.tif в текущем каталоге (папке):
exiftool -geotag ~/Documents/Travel/.../some_track.gpx *.tifN.B.: я использую запись «exiftool», т.к. в моём случае (OS X) так оно вызовется относительно правильно, для Windows желательно будет добавить расширение (с уважением, К.О.).
И, к слову, создаст вдвое больше файлов, оставив рядом с каждым файл-оригинал *.tif_original. Это вполне удобно, пока Вы лишь экспериментируете, дабы не затереть существующий материал и не обременять себя дополнительным резервным копированием. Если же Вы хотите избежать такого действия — достаточно воспользоваться опцией -overwrite_original.
А если часы камеры и gps-приёмника рассинхронизированы? К примеру, в прошлом году я успешно забыл сменить летнее время на зимнее и пол-года у меня что-то было чуть-чуть не так… Опция -geosync позволяет задать эту разницу во времени.
exiftool -geosync=+1:00:00 -geotag ~/Documents/Travel/.../some_track.gpx *.tifУдобно? По-моему, относительно удобно. Лично мне тыкать мышью в поисках трек-файла часто отнимало больше времени, чем сразу прописать путь к нему.
Бывает потребность в обратном: удалении геотегов. Это тоже элементарно:
exiftool -xmp:geotag= *.tiffНо давайте рассмотрим и другие аспекты применения ExifTool.
Копирование EXIF-тегов
Я использую RAW-конвертор RPP, у которого есть опция, позволяющая включить или выключить копирование EXIF-тегов. Иногда это действительно удобно, но иногда — очень даже лишнее. Зазевавшись однажды, я заметил недостающую информацию уже после того, как были сгенерированы и обработаны все *.tiff. Но оказалось, что этот вариант — не проблема. Решение элементарно как для одиночного файла:
exiftool -TagsFromFile a.cr2 a.jpgТак и для нескольких файлов в папке (предполагается, что оригиналы и производные лежат «рядом»):
exiftool -tagsfromfile %d%f.CRW -r -ext JPG dirСвалить в более или менее хронологическую кучу фотографии с разных камер
Переименование осуществляется только на основе даты из EXIF, имя файла-оригинала удаляется:
exiftool -d %Y%m%d-%H%M%S.%%e "-filename<CreateDate" *.cr2И без удаления имени оригинала:
exiftool -d %Y%m%d-%H%M%S%%-c-%%f.%%e "-filename<CreateDate" *.cr2N.B.: желательно, чтобы часы камер были предварительно синхронизированы (с уважением, К.О.).
В метаданные можно вписать Ваши титулы и email-ы
Вы же хотите, чтобы Вас потом можно было найти?
exiftool -Artist='Ivan Petrov' -Copyright='© Ivan Petrov, all rights reserved' -By-line='Ivan Petrov' -Credit='Petrov Studio' -Contact='ivan@petrov.com' '-xmp-xmprights:marked=1' -overwrite_original *.cr2Извлечь определённые данные (на примере фокусного расстояния)
В ходе одной дискуссии у меня возникла необходимость ответить на вопрос о том, каковы наиболее популярные (у меня) фокусные расстояния. Но надо откуда-то взять исходные данные. Что ж, можно выгрузить информацию в текстовый файл, например, в формате :
exiftool -r -T -filename -focallength -ext CR2 FOLDER_NAME > FILE_NAME.txtДальнейший анализ легко выполняется в любимом табличном процессоре (хотя мой друг, поленившись, втянул всё это в SQL-базу, для него так было быстрее).
Восстановить дату создания файла
В ходе манипуляций ExifTool поменяет дату создания файла (что, в принципе, логично, т.к. файлы переписываются). Восстановить дату создания оригинала легко:
exiftool "-filemodifydate<datetimeoriginal" DIRИзвлечение встроенных в RAW JPEG-ов
Иногда бывает полезно. Впрочем, это элементарно:
exiftool -b -PreviewImage -w _preview.jpg -ext RAW_EXTENSION -r FOLDERДобавить в EXIF данные о старой оптике
Имея в наличии арсенал старой оптики и всевозможные переходники для Sony Nex, у меня также есть желание знать, каким объективом я снимал. Это тоже вполне возможно:
exiftool -LensModel="Meyer Optik Görlitz Oreston 50mm F1.8" ‑"MaxApertureValue"=1.8 ‑FocalLengthIn35mmFormat="75" ‑FocalLength="50" ‑LensType="M42 via adapter" FILENAME/MASKНа известном форуме любителей MF-оптики предлагается более изящный вариант, который требует создания файла-описания для каждой линзы, по виду:
-n
-XMP:Lens=Carl Zeiss Jena Tessar 50mm f/3.5 (EXA)
-XMP:SerialNumber=3692001
-EXIF:MaxApertureValue=3.5
-EXIF:FocalLength=50
-EXIF:FocalLengthIn35mmFormat=50
-EXIF:FNumber=5.6
После чего его применение будет несколько более тривиальным:
exiftool -@ czjtessar50exa.txt H:\RAW\2012\20120218.Family.NEX\N.B.: последняя строка в файле-описании необязательна, т.к. она определяет запись «рабочего значения» диафрагмы, а оно, во-первых, может быть разным, а во-вторых, не всех действительно интересует. Ведь тогда надо его не только запомнить, но и проставить отдельно для всех фотографий…
Надеюсь, кому-то эта информация покажется интересной и/или пригодится, хотя она является, по большому счёту, выдержками из документации ExifTool. Однако, не всегда есть возможность читать всю документацию, потому «готовый рецепт» может пригодится. По крайней мере, я так полагаю. Удачи!
UPD1. В комментариях (здесь) советуют альтернативу для некоторых операций — я пока что не смотрел, но вдруг.
UPD2. А ещё — дельное напоминание о существовании Windows-GUI для ExifTool.
ExifTool by Phil Harvey is probably the BEST EXIF metadata viewer for many file types, such as image files, document types and multimedia files. This article will show you how to install and use ExifTool on Windows, macOS and Ubuntu operating systems, through both simple drag & drog and easy command line instructions.
The easiest way is to use a drag-and-drop approach for Windows and a simple terminal command for Mac and Linux systems.
Table Of Contents
- How to Install and Use ExifTool on Windows, Mac and Linux?
- Install and Use ExifTool on Windows
- Install and Use ExifTool on Mac
- Install and Use ExifTool on Linux (Ubuntu)
How to Install and Use ExifTool on Windows, Mac and Linux?
Here are the steps below for the three (3) different operating systems.
Install and Use ExifTool on Windows
Go to the official homepage of ExifTool and download the stand-alone Windows executable version.
It is usually a zip file.
Install on Windows
Unzip and you will see the ExifTool file named as “exiftool(-k).exe”.
There is no installation required here, as you are using the standalone lightweight ExifTool executable. You can move the “exiftool(-k).exe” to any directory folder you want.
How to Use ExifTool on Windows
Now, drag and drop your image or multimedia file to the ExifTool executable file.
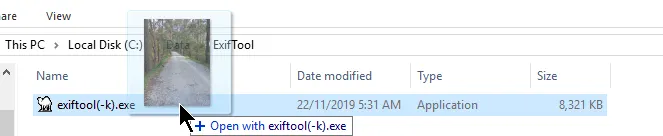
Your Windows command prompt will automatically open now to display the Exif metadata output.

Install and Use ExifTool on Mac
Go to the official ExifTool homepage and find the latest macOS version. It is a macOS package and in a .dmg format.
Download it onto your Mac.
Install on Mac
Double-click to install the dmg package and follow the instructions.
If you are stopped with an “unidentified developer” message and unable to proceed with the installation, make sure you go to <System Preferences>, <Security & Privacy>, unlock the padlock with your Mac password and allow the app to pass through.
How to Use ExifTool on Mac
Open the Terminal app by clicking on the magnifying glass and type in “Terminal”
Navigate the Terminal into the exact folder where the image file resides. In this example, my image file is in the Downloads folder. I will run the following command.
cd ~/Downloads/Now, run the exiftool application against the image file (shown below)
exiftool photo.jpgYour Terminal will now display the EXIf metadata of the file.
To uninstall ExifTool from your Mac, type “open /usr/local/bin” (without the quotes) into Terminal. You will now see two files namely “exiftool” and “lib”. Delete these two files to uninstall ExifTool.
Install and Use ExifTool on Linux (Ubuntu)
In this example, I will be installing and using it on Ubuntu distribution.
Go to the official ExifTool homepage and find the latest Linux version. It is a zipped package and in a .tar.gz format.
Install on Ubuntu
Unzip the package and navigate into the extracted folder using the following commands;
    cd <your download directory>
    gzip -dc <ExifTool version>.tar.gz | tar -xf -
    cd <ExifTool version>
Install ExifTool in Ubuntu by;
    perl Makefile.PL
    make test
    sudo make install
How to Use ExifTool on Ubuntu
To use ExifTool on a image file, this works similar to macOS method. Just navigate to the image file directory and type the following command.
exiftool image.jpgTo uninstall ExifTool from Linux, type the command below;
sudo apt-get remove exiftool