
«How do I open my workbooks in separate windows?» This has been a common inquiry from many of our customers who want to look at their workbooks side by side, or spread them across more than one monitor. Good news: starting with Excel 2013, each of your workbooks opens in its own window, similar to Word and PowerPoint today. That means that each workbook has its own ribbon and top-level window frame that you can move and resize independent from your other open workbooks. This functionality can improve multitasking, visibility, and analysis across workbooks. Read on to find out how to put this functionality to work for you.
This week we continue exploring new features in Excel 2013. This post is brought to you by Chad Rothschiller, a Program Manager in the Excel Team.
“How do I open my workbooks in separate windows?” This has been a common inquiry from many of our customers who want to look at their workbooks side by side, or spread them across more than one monitor.
Good news: starting with Excel 2013, each of your workbooks opens in its own window, similar to Word and PowerPoint today. That means that each workbook has its own ribbon and top-level window frame that you can move and resize independent from your other open workbooks. This functionality can improve multitasking, visibility, and analysis across workbooks.
In computing terminology, this is called Single Document Interface (SDI). Versions of Excel before the 2013 release used Multiple Document Interface (MDI), where all workbook windows were contained within a top-level “master” container window.
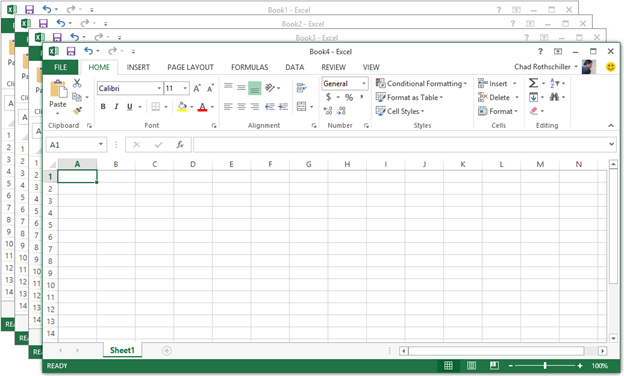
Here’s an example of four new workbooks. Note that each one has its own window and ribbon:
Microsoft Excel
Turn data into insights.
How to arrange your windows
Now that you have multiple windows, how should you arrange them? Well, there are plenty of options and below are some favorites:
Smart Snapping: Grab the top of the window, and drag it to the top, left, or right edge of your screen, then let go. The window automatically resize:
- Drag Left: Position on the left half of the screen
- Drag Right: Position on the right half of the screen
- Drag Top: Fills the entire screen
Windows Taskbar: If you hold down the Shift Key and then right click the Excel icon on the Windows Task Bar you will see options for arranging your open windows. The cool thing about these options is that if you have multiple monitors, Windows remembers each workbook’s monitor and arranges workbooks displayed within the same monitor.
Excel Ribbon: Click on View the Arrange All to see more options for arranging your workbooks:
Note that you can still create new windows (or multiple windows) showing the same workbook. Similarly, the “View Side by Side” and “Synchronous Scrolling” features work just like they used to.
Tell us what you think
Thanks for learning more about this new feature in Excel 2013. I hope you all get wonderful benefits from being able to arrange workbooks on your screens! In a future post, we’ll go into a couple more advanced topics such as “Merging Instances and Long Running Operations” and how they work with pre-existing add-ins. In the meantime, let us know in the comments how you’re planning to use this new feature or anything else you’d like to see in future versions.
—Chad Rothschiller, Excel Program Manager

This post describes how to open Excel files in separate instances. Have you ever experienced the frustration of having your Excel application freeze or slow down when working on a complex spreadsheet? Or have you ever needed to use Power Query in Excel but couldn’t switch to another workbook in the same instance? If so, you’re not alone.
The good news is that there’s a solution – opening multiple instances of Excel. In this article, we’ll explore 7 different methods to do just that so you can work more efficiently and tackle even the most complex tasks in Excel.
Table of contents
- Why Open Multiple Instances of Excel
- How to Open a New Instance of Excel
- Alt + Open Excel
- Alt + Scroll Wheel
- Double Click on a File then hold Alt
- Create a Custom Shortcut
- Use the Run Window
- Use VBA Macro
- Edit the Registry: Force Excel to Open New Instance by Default
- Conclusion
Why Open Multiple Instances of Excel
When working with Excel, there are many scenarios where you might want to open multiple instances. One of the main reasons is to boost your productivity. If you have a large and complex spreadsheet, it can take time to process, and your Excel application might slow down. Opening multiple instances will let you work in one instance, while the other one is performing the calculations in the background.
Another reason is when you’re working with Power Query. When you open Power Query in Excel, you won’t be able to switch to another workbook that’s open in the same instance. Having a separate instance lets you use Power Query and continue working in another Excel file at the same time.
In short, opening multiple instances of Excel can save you time, boost productivity, and make it easier to work with complex spreadsheets and Power Query. It’s like having two independent applications open. In the next sections, we’ll explore seven different ways to open multiple instances of Excel.
How to Open a New Instance of Excel
Now that we know why it’s helpful to open multiple instances of Excel, let’s dive into the different methods you can use to do so. In this chapter, we’ll explore 7 different ways you can open a new instance of Excel, from using the taskbar to modifying your Excel shortcut properties. By the end of this chapter, you’ll have a range of options to choose from depending on your preference and workflow.
Alt + Open Excel
The easiest method to open a new Excel instance is:
- Right-click the Excel icon in the taskbar.
- Hold down the Alt – key and left-click the Excel icon in the menu.
- Keep holding the Alt-key until the window appears.
- Click Yes to open a new instance of Excel.
Alt + Scroll Wheel
Easily open a new instance of Excel with this method:
- Press and hold the Alt-Key
- Hover your mouse over Excel’s Taskbar Icon and click the scroll wheel
- Keep holding the Alt–key until a window appears.
- Click Yes to open a new instance of Excel.
This directly opens a new Excel instance with just a click of the scroll wheel.
Double Click on a File, then hold Alt
When you prefer to open a file directly in the file explorer, you can use the third method. The fastest way to open a specific file in a new instance of Excel is by:
- Find your file in the file explorer.
- Double-click the file to trigger an opening event.
- After clicking, directly press and hold your Alt – key
- When the pop-up appears, select Yes to open a new Excel instance
After confirming, you have now opened your Excel file in another instance. For this method, make sure that in step 3, you hold your Alt – key directly after you double-click the file. Doing this during the clicking won’t work.
Create a Custom Shortcut
If you plan to open excel in a new instance more often, you can also create a custom shortcut to open excel in the right way. The easiest way to do that is to:
- First, we need the target of our shortcut. To get it, right-click on your Excel icon in the taskbar -> right-click again on ‘Excel’ -> click properties. This opens the Excel Properties window.
- Copy the address that’s displayed in the Target field of the Shortcut tab. For me, this is: “C:\Program Files\Microsoft Office\root\Office16\EXCEL.EXE”. This includes the quotes!
- On your desktop, right-click -> New -> Shortcut. This opens the screen to create a shortcut. You first need to add the location of the item we make a shortcut for.
- For the location, paste the target we just copied. Then, right after this code, write the following: ” /x”. This time without the quotes! So for me, the adjusted target is:
“C:\Program Files\Microsoft Office\root\Office16\EXCEL.EXE” /x - Press next and give your shortcut a name.
- Now click finish
You have now created a new shortcut. When you click this shortcut, Excel will open a separate instance. You can also add this shortcut to your taskbar if you like. In that way, you can simply click that shortcut. Thanks go to Mike Barrett, who mentioned this in the comments.
Use the Run Window
One of the quickest ways is using the Run window. It uses a similar method as the previous example. To do this:
- Click Start -> enter ‘Run’ -> fill in “Excel.exe /x” and press Enter.
- Or on Windows 10: enter “Excel.exe /x” in the start menu and press Enter.
A new Excel instance will open.
Use VBA Macro
For those who prefer a more customized approach, VBA (Visual Basic for Applications) can be a valuable tool. To create a VBA script that opens multiple workbooks in separate windows, follow these steps:
- Press ALT + F11 to open the VBA editor.
- Click on Insert and select Module.
- Enter the following code into the module:
Sub OpenNewExcelInstance()

Dim xlApp As Excel.Application
Set xlApp = New Excel.Application
xlApp.Workbooks.Add
xlApp.Visible = True
Set xlApp = Nothing

End Sub
Run the above VBA script to open a second Excel instance.
Edit the Registry: Force Excel to Open New Instance by Default
This section explains how to open each Excel spreadsheet in a new instance by configuring a registry key. Of all methods, this one involves the most steps to configure. However, if you need Excel to open a new instance by default, this method may be worth your while.
Note: this method only works when you use the Excel icon to open a new spreadsheet. When opening a new spreadsheet from within a file by using File -> Open, the file still opens in the current Excel instance. The same happens when you open a file from within the file explorer.
Backup
Please be careful when adjusting the registry. Adjusting the wrong entries may cause serious problems. If you’re new to this, it could be good to make a backup of the registry before making any changes. In that way, you can always restore it. To do this:
- Click Start -> type ‘Regedit’ -> click on Regedit in the search results
- Press File -> Export -> Select Export Range ‘All’ -> Save the backup in a safe location.
Edit the Registry
Now we’re set to go. To edit the registry:
- First, close all instances of Excel.
- Open the Registry Editor (as explained in the backup step).
- Go to HKEY_CURRENT_USER\Software\Microsoft\Office\16.0\Excel\Options.
- Click Edit in the menu, press New, and select DWORD value.

- Name the entry ‘DisableMergeInstance’, and press enter.
- Right-click the entry DisableMergeInstance, and select Modify.
- In the Value data box, fill in 1, and click OK.
Next time you open a new Excel window using the taskbar icon, it will open in a new instance.
Conclusion
By combining these techniques and tips, you’ll be well-equipped to manage multiple Excel workbooks in separate windows and maximize your efficiency. So go ahead, give it a try, and see the difference it makes in your workflow.
These were my favourite methods to open a new Excel instance. Which one is your favourite?
For continued learning, make sure to check out Grouping or Summarizing your Data in Power Query and learn How to Use the Data Model in Excel. Until next time!

I was asked how set up Excel so that opening individual Excel files would open in separate Excel Windows. By default, it seems Excel 2007 and 2010 open separate files in the same instance of Excel. In technical terms, Excel uses MDI instead of SDI. I searched and found several posts that basically said “can’t be done” or “not supported”. I found some others that outlined some Registry tweaks. They were slightly different in their instructions and a little hard to follow. I tried some of the changes and have documented what has worked for me on multiple systems with different versions of Windows as well as Excel.
Setting up your system to open Excel files in separate windows
If you have Excel 2007 or Excel 2010, you can make a change on your system so that when you open an Excel file it will always open in a new Excel window. This is handy for working with multiple worksheets – especially if you have more than one monitor. The changes needed will require making some changes in the Windows Registry.
Changes to make in the Registry
Warning: The steps below outline manual changes to be done on your Windows registry. If you don’t know what the Windows registry is, consider getting some help with this. Goofing up changes in your Windows registry can cause serious problems – so proceed at your own risk.If you’re not familiar with or comfortable with making changes to the Windows Registry, read the Warning note above again.
The changes below have worked on Windows 7 and Windows 8. I’m also running both Excel 2007 and Excel 2010.
Step 1 – Add a parameter
Change the Default key data value of the following
HKCR\Excel.Sheet.8\shell\Open\command
by appending the following characters (including the quotes)
"%1"
When done, you should have something similar to the following:
Step 2 – Rename the command key
Rename the following key
HKCR\Excel.Sheet.8\shell\Open\command\command
to the following
HKCR\Excel.Sheet.8\shell\Open\command\command-original
Step 3 – Rename the ddeexec key
Rename the following key
HKCR\Excel.Sheet.8\shell\Open\ddeexec
to the following
HKCR\Excel.Sheet.8\shell\Open\ddeexec-original
Step 4 – Add a parameter
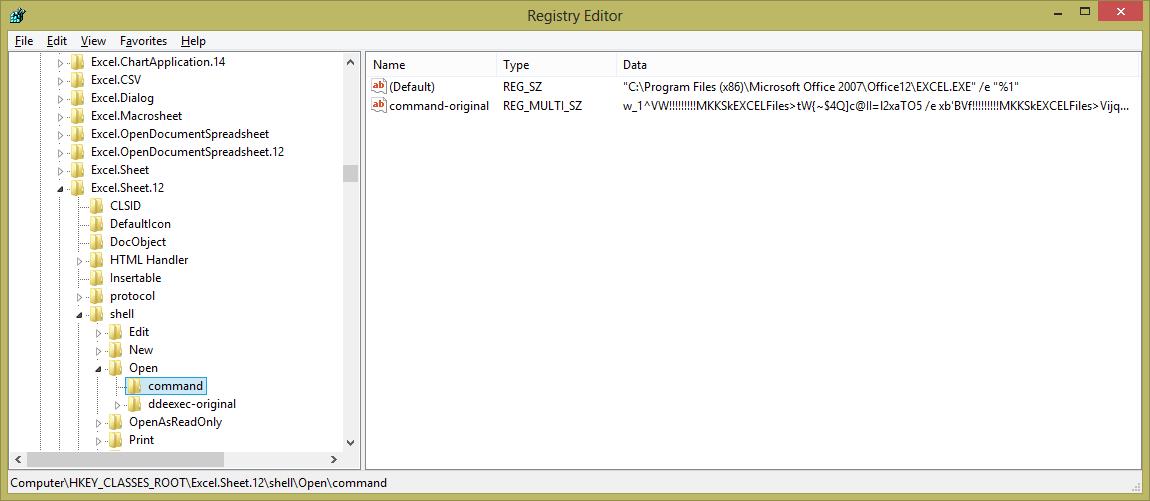
Change the Default key data value of the following
HKCR\Excel.Sheet.12\shell\Open\command
by appending the following characters (including the quotes)
"%1"
When done, you should have something similar to the following:
Step 5 – Rename the command key
Rename the following key
HKCR\Excel.Sheet.12\shell\Open\command\command
to the following
HKCR\Excel.Sheet.12\shell\Open\command\command-original
Step 6 – Rename the ddeexec key
Rename the following key
HKCR\Excel.Sheet.12\shell\Open\ddeexec
to the following
HKCR\Excel.Sheet.12\shell\Open\ddeexec-original
When you’re done with the changes your registry should look like the following image.
I’m finding it’s way less frustrating working with multiple files in Excel now.
There you go.
Readers help support Windows Report. We may get a commission if you buy through our links.
Read our disclosure page to find out how can you help Windows Report sustain the editorial team. Read more
When you open multiple files in Excel, those files do not open in separate windows. Instead, users can switch between them by clicking their thumbnail previews on Windows 10‘s taskbar.
However, some users might need to open two MS Excel files in separate windows so they can view their contents side by side.
In the guides below you will find out how users can open two or more Excel files in multiple windows.
How can I have two Excel windows open side by side?
1. Open two Excel windows and place them side by side
- You can open the Excel application multiple times to have a couple of Excel windows on the desktop. To do that, click the Excel icon to open the software.
- Then click Excel’s icon again to open the software for a second time. Thereafter, you’ll have two Excel windows on the desktop.
- Click the Restore Down buttons on the windows.
- Then you can drag one window to the left of the desktop to fill the left side.
- Drag the other window to the right of the desktop to fill the right side of the desktop as shown directly below.

- Then click File > Open in both windows to open spreadsheets in them.

2. Press the Shift Key to open multiple Excel files side by side
Alternatively, you can open multiple Excel windows by pressing and holding the Shift key. First, open the Excel software. Then hold the Shift key, and click Excel’s taskbar icon. That will open another window for the application that users can drag to both desktop sides as outlined above.
3. Add the Office Tab to Excel
Users can also open spreadsheets in separate windows with the Office Tab extension for Excel. That’s a $29 add-on for Excel that adds spreadsheet tabs to Excel, and users can try out a one-month free trial for Office Tab.
After installing that add-on, Excel will include alternative tabs for separate spreadsheets. Then users can right-click a spreadsheet tab and select its Open in New Window context menu option.

- Microsoft finally addresses a long-standing issue in Excel with Value Tokens
- Copilot in Excel is apparently extremely popular amongst users
4. Use the View Side by Side option
-
1. Launch Excel.
-
2. Click File > Open to open a couple of spreadsheets.
-
3. Choose the View tab.
-
4. Select the View Side by Side option in the Window group.
-
5. Alternatively, users can select the New Window option to open another spreadsheet in separate window.
Users utilizing full versions of Excel 2019-2007 can select a View Side by Side option to compare two spreadsheets. The option is built-in on the app, and is very easy to toggle on.
So, there are a few ways users can open Excel spreadsheets in separate windows. Then users can drag windows to the left and right sides of the Windows desktop to view both the spreadsheets’ contents.
However, note that Windows XP and Vista don’t include the Windows Snap feature for arranging windows on the left and right sides of the desktop.
For any more questions or suggestions, don’t hesitate to reach for the comments section below.
Matthew Adams
Windows Hardware Expert
Matthew is a freelancer who has produced a variety of articles on various topics related to technology. His main focus is the Windows OS and all the things surrounding it.
He is passionate about the tech world, always staying up-to-date with the latest and greatest. With an analytical view, he likes problem-solving, focusing on errors and their causes.
In his free time, he likes to read and write about history and tries to always develop new skills.
Opening Excel sheets in separate windows allows for easier comparison and multitasking. To do this, first, open Excel and then open the first workbook you wish to view. For the second workbook, instead of opening it within the same instance of Excel, launch a new instance of Excel, then open the workbook there. This way, both workbooks will be in separate windows, enabling you to view them side by side or on different monitors.
After completing this action, you will have two or more Excel windows opened, each containing a different workbook. This allows you to work on multiple sheets simultaneously without switching back and forth between tabs within the same window.
Introduction
When it comes to productivity, it’s often the little things that make the biggest difference. One such thing is the ability to open Excel sheets in separate windows. This feature is a game-changer for anyone who works with large datasets or needs to compare information across multiple spreadsheets. It’s particularly relevant to accountants, data analysts, and anyone who relies heavily on Excel for their daily tasks.
But why is it so crucial? Well, imagine trying to compare two sets of data that are in different workbooks. If you have both sets open in the same window, you’re constantly flipping back and forth between tabs, trying to remember figures, and often losing your train of thought in the process. It’s inefficient and frustrating. Opening Excel sheets in separate windows eliminates this hassle and can greatly enhance your workflow. Plus, it’s not as complicated as you might think to set up. Whether you’re a seasoned Excel user or just getting started, this article will guide you through the process step by step. Let’s dive in!
Step by Step Tutorial: Opening Excel Sheets in Separate Windows
Before we begin, ensure you have the latest version of Excel installed on your computer. This will help you avoid any compatibility issues.
Step 1: Open the first Excel workbook
Open Excel and then open the first workbook you want to work with. This is your starting point.
Opening the first Excel workbook is straightforward. Simply click on the Excel icon, and once it’s open, find your document and open it as you usually would. If it’s a recent document, it might appear in the ‘Recent’ list, making it even quicker to access.
Step 2: Launch a new instance of Excel
For the second workbook, you want to open in a separate window, you’ll need to open a new instance of Excel.
To launch a new instance, go to the Start Menu or taskbar, find Excel, and click on it to open a new window completely separate from the first one. If you’re using Windows, you can also hold the ‘Shift’ key and click on the Excel icon to open a new instance.
Step 3: Open the second workbook in the new instance
In the new instance of Excel that you just opened, go to ‘File’ and then ‘Open’ to select the second workbook you want to view.
When you open the second workbook in the new instance of Excel, it’ll appear in its own separate window. You can now position the windows side by side, or if you have multiple monitors, drag one to the other screen for even more space to work.
Pros
| Benefit | Explanation |
|---|---|
| Multitasking | Opening Excel sheets in separate windows allows for more efficient multitasking and data comparison. |
| Increased productivity | It reduces the time spent switching between tabs, thereby increasing productivity. |
| Better organization | Having separate windows can lead to better organization of work, especially when dealing with multiple datasets. |
Multitasking becomes a breeze when you can view multiple Excel sheets simultaneously. Instead of flipping between tabs, you can have all the information you need visible at once, making cross-referencing data or working on parallel tasks much easier.
Increased productivity is a natural outcome of better multitasking capabilities. When you’re not constantly switching between tabs, you save time and maintain your focus better. This streamlined workflow can significantly boost your efficiency.
Better organization is another advantage. When each project or dataset has its own window, it’s easier to keep track of your work. This can be particularly helpful when you’re juggling multiple tasks and need to ensure that no detail is overlooked.
Cons
| Drawback | Explanation |
|---|---|
| More resources used | Opening multiple instances of Excel can use more of your computer’s resources, potentially slowing it down. |
| Potential for confusion | Having multiple windows open might be confusing for some users, leading to lost data or errors. |
| Screen real estate | If you have a single monitor or limited screen space, managing multiple windows can be challenging. |
More resources used is a consideration, as each open instance of Excel will consume a portion of your computer’s processing power and memory. If your machine is older or has limited resources, this could lead to performance issues.
Potential for confusion can occur, especially if you’re not used to working with multiple windows. There’s a risk of closing the wrong window or losing track of where specific data is located.
Screen real estate can be a limitation for some users. If you don’t have multiple monitors or your screen size is small, it can be difficult to arrange the windows in a way that is helpful rather than hindering.
Additional Information
Mastering the art of opening Excel sheets in separate windows can significantly enhance your data management skills. However, there are some additional tips that can make this process even smoother. For example, you can use keyboard shortcuts to quickly switch between open Excel windows. Alt + Tab (on Windows) or Command + Tab (on macOS) will allow you to cycle through all open applications, including different instances of Excel.
Additionally, if you’re using Excel on Windows 10, you can take advantage of the ‘Snap’ feature to easily organize your open windows. Just drag a window to the side of your screen, and it will automatically resize to fill half the screen, making it simple to work with two sheets side by side.
Remember that if you’re working with very large datasets, opening them in separate windows might slow down your computer. In this scenario, consider whether the benefit of viewing the sheets simultaneously outweighs the potential performance hit.
Summary
- Open the first Excel workbook normally.
- Launch a new instance of Excel for the second workbook.
- Open the second workbook in the new instance.
Frequently Asked Questions
Can I open more than two Excel sheets in separate windows?
Yes, you can open as many instances of Excel as you need, as long as your computer’s resources allow.
Will this work with Excel on a Mac?
The process is similar on a Mac, but the way you open a new instance of Excel may differ slightly. You can use the ‘Open’ command while holding the Option key to open a new instance.
What if I accidentally close the wrong Excel window?
Excel’s ‘AutoRecover’ feature should save your work periodically. However, it’s always a good idea to save frequently to avoid losing data.
Can I use this method to compare more than two workbooks?
Absolutely! As long as you have the screen space and computing power, you can open multiple workbooks in separate windows for comparison.
Is there a limit to the number of separate Excel windows I can open?
No hard limit, but your computer’s performance may start to decline if you open too many.
Conclusion
Learning how to open Excel sheets in separate windows is a simple yet effective way to boost your productivity and streamline your workflow. Whether you’re analyzing financial data, comparing sales reports, or managing inventory, this skill allows you to multitask and organize your work more efficiently.
By following the steps outlined in this article, you’ll be able to take full advantage of Excel’s capabilities and tackle your tasks with greater ease and confidence. Keep practicing, and soon opening Excel sheets in separate windows will become second nature.
Matthew Burleigh has been writing tech tutorials since 2008. His writing has appeared on dozens of different websites and been read over 50 million times.
After receiving his Bachelor’s and Master’s degrees in Computer Science he spent several years working in IT management for small businesses. However, he now works full time writing content online and creating websites.
His main writing topics include iPhones, Microsoft Office, Google Apps, Android, and Photoshop, but he has also written about many other tech topics as well.
Read his full bio here.