
In today’s interconnected world, security is paramount, and managing secure connections efficiently is a key aspect of this endeavor. Whether you’re a system administrator or a developer, using SSH (Secure Shell) is ubiquitous in your work. This article delves into how to utilize the eval command to manage the SSH agent on Windows effectively, ensuring you streamline your workflows without compromising security. Let’s get right into it.
Understanding SSH and Its Importance
SSH, or Secure Shell, is a cryptographic network protocol used for operating network services securely over an unsecured network. Its most notable applications are remote login and command execution. The ability to encrypt the connection ensures that sensitive data, such as passwords and commands, are transmitted securely across potentially vulnerable networks. In essence, SSH creates a secure channel between a local and a remote computer.
SSH Agent: The Key Management Utility
The SSH agent is a helpful utility that simplifies authentication by managing your SSH keys. When you unlock an SSH key, the agent retains unlocked keys in memory, making subsequent authentications seamless and secure without repeatedly entering your passphrase. This approach significantly enhances user experience and efficiency.
The Role of Eval in SSH
The eval command is a builtin shell command used to execute arguments as a shell command. Integrating eval with SSH agent commands can instantly enhance your efficiency by initializing your SSH-agent session properly, thus maintaining a secured and authenticated connection effortlessly.
Setting Up SSH on Windows
Before diving into how eval can assist in managing your SSH agents, let’s first discuss setting up SSH on Windows. Windows now comes with an optional OpenSSH feature, which simplifies the process significantly. Here’s a step-by-step guide:
- Enable OpenSSH Client and Server
Go to Settings > Apps > Optional Features > Add a feature and install both the OpenSSH Client and Server.
- Generate SSH Key Pair
Open PowerShell and run:
ssh-keygen -t rsa -b 4096 -C "[email protected]"
This command generates a new SSH key pair. Follow the prompts to save your keys in the default directory.
- Start the SSH Agent
Run the following commands to start the SSH agent:
Start-Service ssh-agent
- Add Your SSH Key to the Agent
Use this command to add your SSH key to the SSH agent:
ssh-add ~/.ssh/id_rsa
Integrating Eval with SSH-Agent on Windows
Leveraging eval in combination with the SSH agent can greatly enhance your workflow. Understanding how to properly utilize these commands significantly enhances your secure connection management. Here’s how you can effectively integrate eval with the SSH agent on Windows:
Why Use Eval with SSH-Agent?
The eval command essentially executes the command within the current shell, providing a seamless initialization of your SSH-agent session. It effectively allows the SSH agent to run in the background and retain your authentication credentials for subsequent access without hassle.
Step-by-Step Guide to Using Eval with SSH-Agent
Step 1: Start SSH-Agent
First, start the SSH agent by running:
eval $(ssh-agent)
Step 2: Adding Your SSH Key
Next, add your SSH key to the agent:
eval $(ssh-add ~/.ssh/id_rsa)
Benefits of Using Eval with SSH-Agent
- Efficiency: Significantly reduces the need to manually enter your passphrase each time you connect to a remote server.
- Security: The agent holds your keys securely in memory, reducing the risk of key exposure.
- Convenience: Streamlines your workflow by maintaining active sessions without frequent reauthentication.
Advanced Configuration of SSH-Agent on Windows
For users who wish to delve deeper into SSH-agent settings, customization and advanced configurations can significantly enhance functionality. Below we explore some advanced SSH-agent configurations:
Persistent SSH-Agent Sessions
To maintain the SSH-agent session across different terminal windows or periods of inactivity, you can configure your environment to automatically initialize and connect to the SSH agent when a new session is started. Here’s how:
- Create or Edit the Initialization Script
Open PowerShell and create or edit the profile script:
notepad $PROFILE
- Add SSH-Agent Initialization Commands
Append the following lines to your profile script:
if ($env:SSH_AGENT_PID) {
    ssh-add ~/.ssh/id_rsa
} else {
    eval $(ssh-agent -s)
    ssh-add ~/.ssh/id_rsa
}
Automating the SSH-Agent for Persistency
- Automate SSH-Agent Execution
To ensure the SSH agent starts every time you log in to your Windows session, you can create a scheduled task:
- Open Task Scheduler: Search for ‘Task Scheduler’ in the Windows start menu.
- Create a New Task: Select «Create Task» from the ‘Actions’ pane.
- Configure the Task: Set a name, specify a trigger for «At log on» and set an action with the program/script as:
powershell.exe -File C:\path\to\script.ps1
Note: Ensure the script at C:\path\to\script.ps1 includes your SSH-agent initialization commands.
Common Troubleshooting Tips for SSH-Agent on Windows
Encountering issues while using SSH-agent with eval? Here are some common troubleshooting tips:
SSH-Agent Not Running
- Verify Status: Check if the SSH-agent service is running:
Get-Service ssh-agent
- Start Agent: If not running, start the agent:
Start-Service ssh-agent
Keys Not Added Automatically
- Check Key Paths: Ensure the path to your SSH key in the ssh-add command is correct.
- Permissions: Ensure your SSH key files have the proper permissions set.
Use:
icacls ~/.ssh/id_rsa
Environment Variables Not Set
- Verify Variables: Ensure your environment variables are properly set during the eval execution.
- Profile Configuration: Double-check your PowerShell profile script for correct syntax.
Conclusion
Mastering the integration of eval with SSH-agent on Windows offers a seamless approach to secure and efficient remote connections. By streamlining the initialization and management of your SSH keys, you not only enhance your security posture but also simplify repetitive tasks, boosting your overall productivity. Dive into configuring your Windows environment today and witness a smoother, more secure workflow!
Don’t forget to share your experience and tips using the hashtags below:
#SSHAgent#WindowsSSH#Security#SysAdmin#DevOps
Инструменты
Git SSH Windows — пошаговое руководство
Дата размещения статьи 08/12/2019 👁31067
Git SSH Windows — пошаговое руководство
Настроим пошагово Git SSH для Windows 10. Это позволит вам выполнять команды git без ввода пароля от своей учетной записи GitHub.
Порядок действий:
- Генерация ключа SSH.
- Добавление SSH-ключа в ssh-agent.
- Добавление ключа SSH в учетную запись GitHub.
Генерация ключа SSH
Откройте bash/терминал. Добавьте следующий текст, подставив свой адрес электронной почты GitHub.
ssh-keygen -t rsa -b 4096 -C "ваша@почта.com"Будет создан ключ ssh, используя e-mail в качестве метки.
Когда вам будет предложено «Введите файл, в котором вы хотите сохранить ключ», нажмите Enter. Это установит в местоположение по умолчанию.
Enter a file in which to save the key (/c/Users/you/.ssh/id_rsa):[Press enter]
Далее введите безопасную фразу-пароль дважды или просто нажмите Enter.
Enter passphrase (empty for no passphrase): [Type a passphrase]
Enter same passphrase again: [Type passphrase again]
Добавление SSH-ключа в ssh-agent
Чтобы запустить ssh-агент введите следующую команду.
На экране отобразится похожая строка.
Agent pid 31724
Добавим свой закрытый ключ SSH в ssh-agent. Если вы создали свой ключ с другим именем (или добавляете существующий ключ с другим именем), замените в команде id_rsa на имя вашего файла закрытого (приватного) ключа.
Ключ будет успешно добавлен в ssh-агент.
Добавление ключа SSH в учетную запись GitHub
Мы сгенерировали у себя на компьютере закрытый ключ SSH и добавили его в ssh-агент. Теперь нам необходимо добавить SSH ключ в учетную запись GitHub.
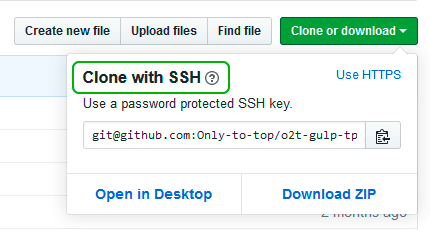
Сейчас нам необходимо скопировать SSH ключ в буфер обмена.
Способов есть несколько, но я же вам предлагаю следующее решения для Windows 10: введите команду ниже.
Прямо в терминале вы увидите содержимое необходимого файла с ключем. Скопируйте его в буфер.
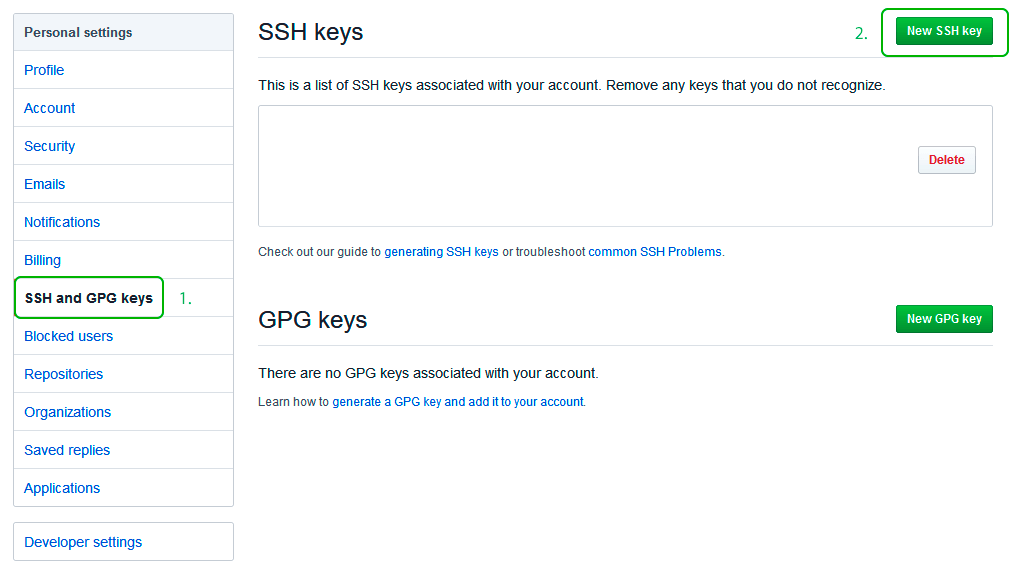
Теперь зайдите на вашу страницу GitHub » Settings.
Перейдите во вкладку SSH and GPG keys и нажмите на кнопку New SSH key для добавления SSH ключа в вашу учетную запись GitHub.
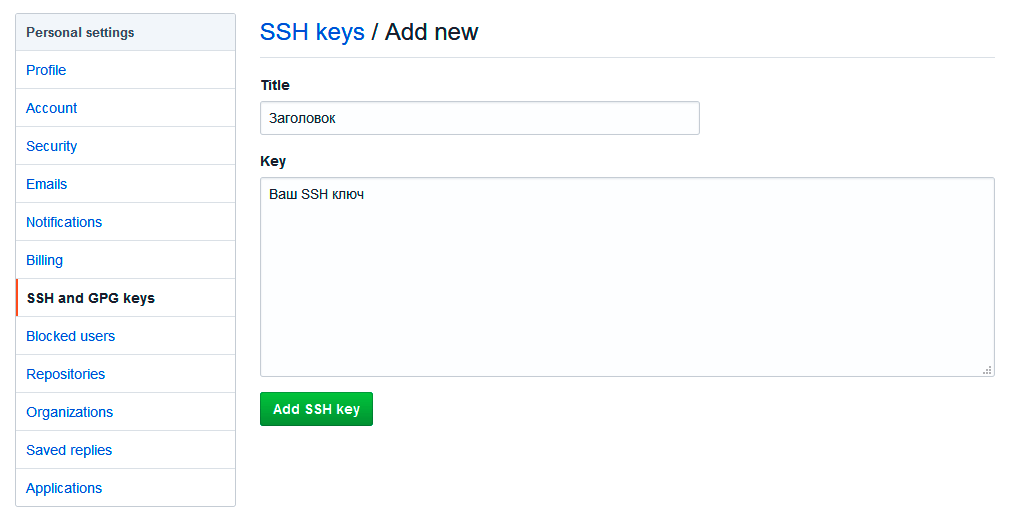
В поле Title добавьте заголовок для данного ключа. Например, если вы захотите настроить SSH доступ на нескольких устройствах, то вы будите понимать какой ключ принадлежит какому устройству.
В поле Key добавьте свой ssh-ключ, который вы скопировали в буфер обмена на предыдущем шаге.
Нажмите Add SSH key.
Для подтверждения вам потребуется ввести свой пароль от учетной записи GitHub.
На этом настройка SSH для вашего устройства завершена, теперь вы можете работать с git без ввода пароля от своей учетной записи.
Если вам понравилась данная статья, можете прочитать как настроить моментальную загрузку сайта на хостинг и синхронизацию файлов.
JavaScript: Window Location Checkbox Checked — Проверка Состояния Чекбокса ✔️
Надеюсь, вам понравилась данная информация. Если вам интересна тема web-разработки,
то можете следить за выходом новых статей в Telegram.
- Настройка Gulp Babel
- Микроразметка сайта
- Как перенести сайт WordPress на хостинг
- Настройте показ всего текста во время загрузки веб-шрифтов
- Сниппеты в VS Code
- Не удается проверить так как не задан исполняемый PHP-файл
При первой загрузке/выгрузке изменений в/из Github часто возникает ошибка git@github.com: Permission denied (publickey). fatal: Could not read from remote repository. Данная статья раз и навсегда положит этим ошибкам конец!
")
Всё то, о чём пойдет речь ниже, можно посмотреть в этом видео
Открываем терминал в том месте где у вас лежит код, который вы хотите интегрировать в Github или Gitlab. Проверяем есть ли уже существующий SSH ключ, для этого вводим команду ниже:
ls -al ~/.ssh
Пример НЕсуществующего ключа SSH:

Пример существующего ключа SSH:

Если ключ существует переходите сразу к шагу 4 или создайте отдельный новый ключ специально для Github.
ШАГ 2. Генерация нового SSH ключа
- Введите в терминале команду ниже:
ssh-keygen -t ed25519 -C «your_email@example.com»
Пояснения команды:ssh-keygen команда для генерации SSH ключа -t ed25519 алгоритм шифрования, по умолчанию алгоритм rsa, Github рекомендует использовать алгоритм ed25519 -C значит «комментарий», все что после этой команды в кавычках будет комментарием «your_email@example.com» комментарий, замените на свой email в Github — это нужно чтобы различать SSH ключи между собой, их может быть несколько - Теперь нужно указать путь и название файла, можно оставить по умолчанию и нажать Enter, но давайте поменяем имя файла, чтобы понимать что он сгенерирован именно для Github!
Скопируйте и вставьте путь по умолчанию, поменяйте имя файла и нажмите Enter.
- Далее нужно будет задать пароль (кодовую фразу) для нашего ключа, пропускаем этот шаг, просто два раза нажимаем Enter, иначе придется постоянно вводить этот пароль.
- Если вы все сделали правильно будет примерно также, как на скриншоте ниже:


ШАГ 3. Добавление SSH ключа в SSH-agent
Не пропускайте этот шаг! Без него ничего работать не будет.
Что же такое SSH-agent на сайте habr.com вот такое описание: «ssh-agent — это менеджер ключей для SSH. Он хранит ваши ключи и сертификаты в памяти, незашифрованные и готовые к использованию ssh . Это избавляет вас от необходимости вводить пароль каждый раз, когда вы подключаетесь к серверу.»
- Сначала запустим SSH-agent командой ниже:
eval «$(ssh-agent -s)»
надпись Agent pid 61 (у вас будет любое другое число) говорит о том, что агент успешно запущен!
- Добавьте SSH ключ в SSH агент командой ниже, предварительно поменяв название SSH ключа на ваше:
ssh-add ~/.ssh/id_ed25519_github
надпись примерная как на скрине ниже, говорит о том, что ключ успешно добавлен
- Добавим конфигурационный файл, чтобы SSH ключ автоматически добавлялся в SSH-agent, введите команду ниже, она создаст файл config, если он отсутствует:
touch ~/.ssh/config - Теперь в созданный файл config добавим следующий текст, заменив id_ed25519_github на название своего ключа, если нужно:
Host *
  AddKeysToAgent yes
  IdentityFile ~/.ssh/id_ed25519_github
- Для пользователей MacOS вводим команду ниже, откроется обычный редактор текста, вставляем в него текст и сохраняем изменения
open ~/.ssh/config - Для пользователей Windows вводим команду ниже и нажимаем Enter
cat > ~/.ssh/config <<EOF
далее вставить текст, нажать Enter, ввести команду ниже и нажать Enter
EOF
- Для пользователей MacOS вводим команду ниже, откроется обычный редактор текста, вставляем в него текст и сохраняем изменения
- Проверьте что текст был добавлен в файл config командой
cat ~/.ssh/config
должно быть как на скриншоте:


ШАГ 4. Добавление SSH в Github
Готово! Проверьте что ключ работает
Возвращаемся в наш терминал и вводим команду git pull, файлы должны загрузиться или как в моем случае должна появиться надпись, что все уже обновлено.

Спасибо за внимание!
WINDOWS
Introduction
With the advent of OpenSSH being natively integrated into Windows 10 and beyond, managing SSH keys has become more streamlined and efficient for Windows users. Coupled with Windows Subsystem for Linux (WSL), users can enjoy a seamless experience when working with SSH in a cross-platform environment. In this article, we will cover everything you need to know about setting up ssh-agent on both Windows and WSL, ensuring your SSH environment is consistent, predictable, safe, and easy to use.
What is ssh-agent?
ssh-agent is a key management program that holds your private keys used for SSH authentication. When you add your keys to ssh-agent, it will handle authentication requests for you, so you won’t need to enter your passphrase every time you connect to a remote server. This is particularly useful in a development environment where multiple SSH connections are often required.
Benefits of Using ssh-agent
-
Convenience: Avoids the need to manually enter passphrases.
-
Security: Keeps your private keys secure while allowing easy access for authentication.
-
Integration: Works smoothly across various systems, including Windows and WSL.
Setting Up ssh-agent on Windows
Step 1: Install OpenSSH
-
Check for OpenSSH Installation:
Open PowerShell or Command Prompt and run:
If OpenSSH is already installed, you will see the version number. If not, continue with the steps below.
-
Install OpenSSH via Settings:
-
Go to Settings > Apps > Optional Features.
-
Scroll down and click on Add a feature.
-
Search for OpenSSH Client and click Install.
-
Step 2: Initialize ssh-agent
-
Start the ssh-agent service:
Open PowerShell and run the following command to start the ssh-agent service:
-
Configure ssh-agent to start automatically (optional):
Get-Service ssh-agent | Set-Service -StartupType Automatic
Step 3: Load Your SSH Keys
-
Generate SSH Keys (if you don’t have them):
ssh-keygen -t rsa -b 4096 -C "your_email@example.com"By default, the keys will be saved in
C:\Users\<YourUserName>\.ssh\. -
Add your SSH private key to the ssh-agent:
Once those steps are complete, your SSH keys are ready to be used with minimal passphrase interruption.
Setting Up ssh-agent on WSL
Step 1: Install OpenSSH
Unlike Windows, most recent distributions of WSL come with OpenSSH pre-installed. You can check by running:
If it’s not installed, you can install it using your package manager. For Ubuntu, run:
sudo apt update
sudo apt install openssh-client
Step 2: Start ssh-agent
-
Start the ssh-agent:
In your WSL terminal, run the following command: -
Add Your SSH Key:
If you have already generated an SSH key, use:
Step 3: Configure Your SSH Environment
To ensure that ssh-agent starts automatically with your WSL sessions, add the following lines to your .bashrc or .zshrc file:
# Start ssh-agent
eval "$(ssh-agent -s)"
ssh-add ~/.ssh/id_rsa
Synchronizing SSH Keys Between Windows and WSL
Using SSH keys seamlessly between your native Windows environment and WSL requires setup for consistent key access:
-
Use a Shared .ssh Directory:
Point both environments to the same SSH key directory. You can either copy your keys over to WSL or create a symbolic link.
For instance, to create a symbolic link:
ln -s /mnt/c/Users/<YourUserName>/.ssh ~/.ssh
-
Accessing SSH Keys in Windows with WSL: Ensure your Windows
.sshkey permissions are correctly set. You can do this via:chmod 600 /mnt/c/Users/<YourUserName>/.ssh/id_rsa
Troubleshooting Common Issues
Issue 1: Permission Denied Errors
This could arise from incorrect permissions on your key files. Ensure your private key has the correct permissions:
Issue 2: ssh-agent Not Starting
Ensure that your ssh-agent service is running. You can check on Windows by running:
If it’s not running, start the service as described above.
Issue 3: Key Does Not Appear to Be Added
Verify that your key is loaded by running:
If it isn’t, ensure that you are using the correct path when adding your key.
Conclusion
Setting up ssh-agent on Windows and WSL enhances your development workflow by simplifying and securing SSH key management. With the comprehensive guide provided in this article, you can ensure a consistent and safe SSH environment across your systems. Don’t forget to maintain best practices in key management to safeguard your credentials. Whether you are a developer, system administrator, or a hobbyist, harnessing the power of ssh-agent will undoubtedly enrich your experience in cross-platform development.
Further Reading
-
OpenSSH Official Documentation
-
Windows OpenSSH Features
Keywords: ssh-agent, Windows, WSL, OpenSSH, SSH keys, key management, Windows Subsystem for Linux, secure SSH authentication.
Suggested Articles
WINDOWS
WINDOWS
WINDOWS
WINDOWS
WINDOWS
WINDOWS
Introduction
Greetings, esteemed readers! Today, we delve into the fascinating realm of eval ssh agent. 🚀 This powerful tool has gained immense popularity among developers and system administrators for its ability to streamline the authentication process and enhance security in SSH connections. In this article, we will explore the ins and outs of eval ssh agent, providing you with a comprehensive understanding of its functionality, advantages, disadvantages, and more. So, fasten your seat belts and get ready for an exhilarating journey into the world of eval ssh agent!
What is eval ssh agent?
Eval ssh agent, or “eval $(ssh-agent)”, is a command commonly used in the world of SSH (Secure Shell) connections. It launches an SSH agent, a program that stores private keys and handles the authentication process when connecting to remote servers via SSH. The eval command dynamically sets environment variables, allowing the user’s shell to interact with the SSH agent and utilize its capabilities securely.
How does eval ssh agent work?
To understand how eval ssh agent functions, let’s break it down into a step-by-step process:
- When the command “eval $(ssh-agent)” is executed, a new SSH agent process is spawned.
- The SSH agent generates a unique identification number (SSH_AUTH_SOCK) for the socket used for communication.
- The environment variable SSH_AUTH_SOCK is set to the socket path, allowing the user’s shell to locate and communicate with the SSH agent.
- The SSH agent prompts the user for their passphrase to unlock their private key (if applicable) and securely stores it in memory.
- Upon successful authentication, the SSH agent associates the private key with the user’s session, eliminating the need to re-enter the passphrase for subsequent SSH connections.
The Advantages of eval ssh agent
Now, let’s explore the numerous benefits that eval ssh agent brings to the table:
1. Enhanced Convenience and Efficiency 😃
By utilizing eval ssh agent, users can avoid the hassle of repeatedly entering their passphrase for each SSH connection. Once the private key is loaded into the agent, authentication is streamlined, significantly improving productivity and saving valuable time.
2. Simplified Key Management 🗝️
With eval ssh agent, managing multiple SSH keys becomes a breeze. The agent securely stores all the private keys in memory, eliminating the need to remember and manually type in passphrases each time a connection is established.
3. Improved Security 🔒
One might wonder if having the SSH agent store private keys poses a security risk. However, when properly implemented, eval ssh agent enhances security by preventing the keys from being exposed to potentially malicious remote servers. The agent acts as a secure intermediary, protecting the private keys and securely handling the authentication process.
4. Easy Integration with Automation Tools 🤖
For those engaged in automated tasks or scripting, eval ssh agent proves to be a valuable ally. It enables seamless integration with various automation tools and frameworks, allowing SSH connections to be established without human intervention while maintaining security.
5. Wide Platform Support 🌍
Whether you are utilizing macOS, Linux, or Windows, eval ssh agent is readily available across different platforms. This cross-platform compatibility ensures that users can leverage its benefits regardless of their operating system.
6. Versatility in SSH Connection Types ⛓️
Eval ssh agent is not limited to specific SSH connection types. It supports various connection mechanisms, including password-based authentication, key-based authentication, and more. This versatility empowers users to adapt eval ssh agent to their specific authentication requirements.
Eval ssh agent is backed by a vibrant open-source community, continuously working on enhancing its features, addressing bugs, and ensuring compatibility with evolving technologies. This active community support makes it a reliable and future-proof solution for SSH connections.
The Drawbacks of eval ssh agent
While eval ssh agent offers a plethora of advantages, it is crucial to be aware of its limitations:
1. Dependency on Shell Compatibility 🐚
Eval ssh agent relies on the shell environment and its compatibility with the eval command. In rare cases, certain shells might not fully support eval ssh agent, limiting its usage. However, this issue is generally mitigated by the broad support across popular shells.
2. Security Considerations 🛡️
Although eval ssh agent enhances security in SSH connections, the private keys stored in memory can be susceptible to attacks if the local machine is compromised. It is essential to follow best practices when managing private keys and ensure the host system’s overall security.
3. Limited Scope of Key Sharing 🌐
Eval ssh agent is primarily designed for a single user environment. Sharing SSH agent sockets or private keys among multiple users on the same host can lead to security risks. For multi-user scenarios, alternative approaches like agent forwarding should be considered.
4. Potential for Agent Forwarding Misuse 🚫
Agent forwarding, a feature often used in conjunction with eval ssh agent, can expose the SSH agent and keys to remote servers. If the remote server is compromised or untrusted, it could potentially misuse the agent forwarding feature to gain unauthorized access. Care should be taken when utilizing agent forwarding, and it is recommended to limit its use to trusted environments.
5. Compatibility with Non-SSH Protocols 🚧
As the name suggests, eval ssh agent is primarily designed for SSH connections. It is not directly compatible with other protocols that may require authentication, such as SFTP or Git. Additional measures or tools may be necessary to integrate eval ssh agent-like functionalities into non-SSH scenarios.
6. Learning Curve and User Familiarity ⚠️
For users new to eval ssh agent or unfamiliar with SSH agent concepts, there may be a learning curve involved in initial setup and usage. However, once the core concepts are understood, the benefits outweigh the initial effort.
7. Potential for Expired Keys and Passphrases 🔑
When using eval ssh agent, it is important to regularly review and update SSH keys and passphrases to ensure maximum security. If keys or passphrases expire or are compromised, they should be promptly replaced to maintain a robust security posture.
Complete Information about eval ssh agent
| Parameter | Description | Value |
|---|---|---|
| Command | eval ssh agent | eval $(ssh-agent) |
| Functionality | Launches SSH agent and sets up environment variables | Dynamically sets SSH_AUTH_SOCK and SSH_AGENT_PID |
Frequently Asked Questions (FAQs)
1. Can eval ssh agent be used with different shells?
Yes, eval ssh agent can generally be used with various shells, including Bash, Zsh, and Fish. However, it is essential to ensure compatibility and verify the specific syntax requirements of each shell.
2. Does eval ssh agent work with password-based authentication?
Absolutely! Eval ssh agent is not limited to key-based authentication and seamlessly integrates with password-based authentication as well.
3. Is eval ssh agent suitable for managing multiple SSH keys?
Indeed, one of the strengths of eval ssh agent is its ability to simplify the management of multiple SSH keys. It securely stores all the keys in memory, eliminating the hassle of entering passphrases repeatedly.
13. Is eval ssh agent compatible with Windows?
Yes, eval ssh agent can be used on Windows systems that have an SSH client installed, such as Git Bash or Windows Subsystem for Linux (WSL).
Conclusion: Embrace the Power of eval ssh agent!
As we reach the end of this enlightening journey, it is evident that eval ssh agent is a game-changer when it comes to SSH authentication. Its ability to simplify and streamline the authentication process, coupled with enhanced security, makes it an invaluable tool for developers, system administrators, and anyone working with SSH connections. So, don’t hesitate – unlock the power of eval ssh agent and revolutionize your SSH experience today!
We hope this article has provided you with a comprehensive understanding of eval ssh agent and its implications in the world of SSH connections. Remember, while eval ssh agent offers immense convenience and security benefits, it is crucial to prioritize the overall security of your systems, including the proper management of private keys and adherence to security best practices. Stay secure, stay informed, and keep harnessing the power of technology to drive your success!