
|
Уверен, с каждым пользователем была такая проблема, что со временем памяти на жестком диске становится катастрофически мало. Приходится решать этот вопрос и каждый действует, как умеет. Кто-то удаляет ненужные программы, игры и прочее, кто-то использует оптимизаторы для жесткого диска. Также некоторые начинают «гулять” по разделам жесткого диска в поиске файлов большого размера, чтобы их удалить. Если вы из последних, тогда наверняка находили такую папку «SoftwareDistribution”. Она присутствует на всех операционный системах Windows 7. Сегодня я расскажу вам, для чего именно нужна эта папка и можно ли ее удалять.
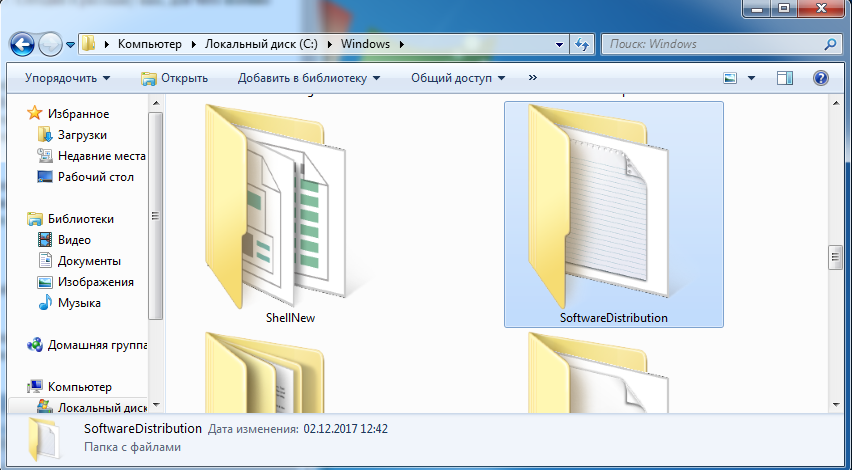
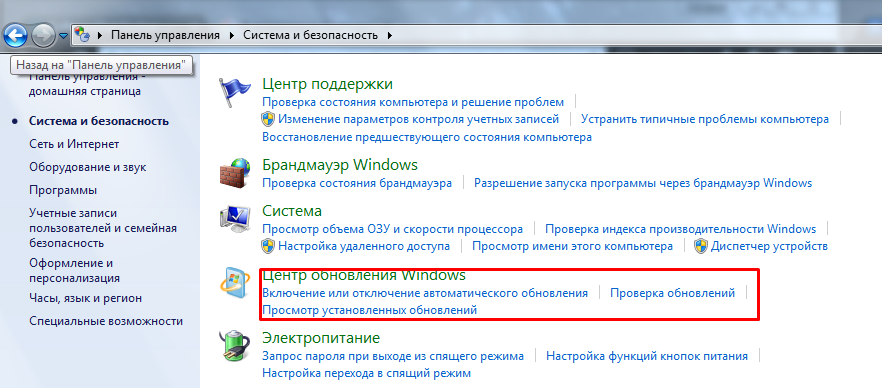
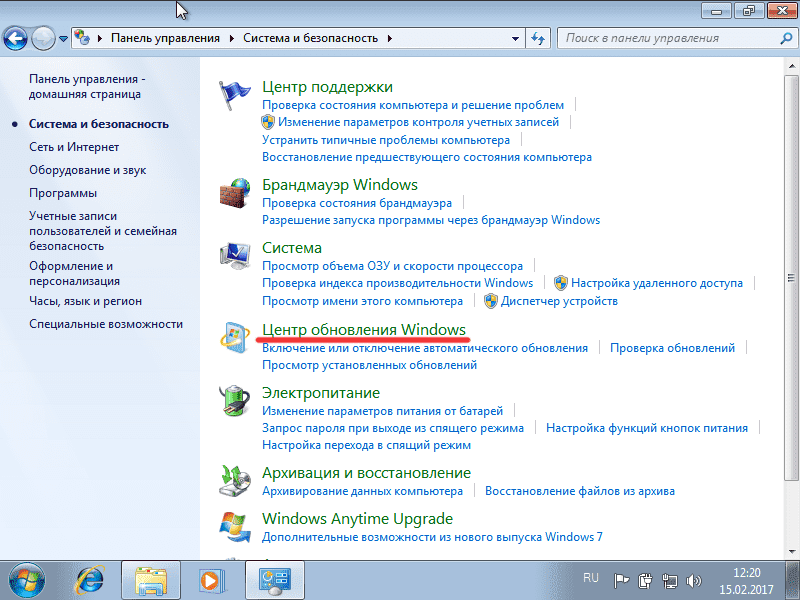
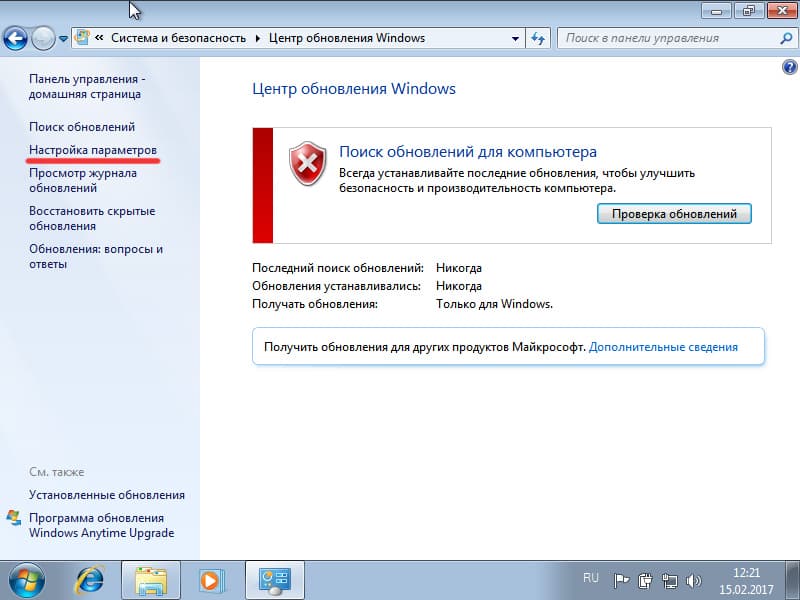
Для чего нужна папка SoftwareDistribution?На всех операционный система Windows, папка SoftwareDistribution находился на системном диске, к примеру по адресу «C:/Windows/SoftwareDistribution/”. В ней хранятся все файлы обновлений операционной системы. В директории C:\Windows\SoftwareDistribution\Download операционная система сохраняет апдейты, скачанные с сервера Microsoft. Информация, которая там храниться может весить несколько гигабайт. Если у вас жесткий диск небольшого объема и свободного места катастрофически не хватает, то содержимое папки можно смело удалять. После того, как произойдет следующее обновление, папка вновь будет создана и наполнится новым дистрибутивом. Удаляем папкуПеред тем, как удалить папку «SoftwareDistribution”, необходимо отключить автоматический запуск поиска и установку патчей для операционной системы. Для этого вызываем команду выполнить «win+r”, прописываем «control” и нажимаем «ок” или энтер.
После этого, в меню слева находим «Настройки параметров” и переходим туда. После этого переходим в папку «SoftwareDistribution” и смело все, что угодно. |
Категория: Новости Software(софт) | | Теги: папка SoftwareDistribution, как удалить SoftwareDistribution, для чего SoftwareDistribution |
-
О папке
-
Удаление
Рано или поздно, многие из нас сталкиваются с проблемой нехватки памяти на жестком диске. Каждый решает этот вопрос по своему: удаляет ненужные программы, пользуется оптимизаторами или ищет файлы, которые можно удалить. Если вы относитесь к третьей категории, вероятно уже столкнулись с SoftwareDistribution. Что это за папка Windows 7, для чего нужна и можно ли ее удалить, читайте в данной публикации.
О папке
Папка SoftwareDistribution расположена в C:\Windows\ и содержит файлы обновлений системы. Данный каталог могут найти пользователи Windows 7, 8 и 10. В директории C:\Windows\SoftwareDistribution\Download операционная система сохраняет апдейты, скачанные с сервера Microsoft. Они могут достигать нескольких гигабайт.
Если вы желаете освободить немного места, содержимое папки можно удалить. После очередного обновления, папка создастся вновь и будет содержать новый дистрибутив.
Совет! Чтобы освободить больше памяти, воспользуйтесь функцией “Очистка диска”.
Удаление
Прежде чем удалить SoftwareDistribution, отключите автоматический запуск поиска и установки патчей для Windows:
- Нажмите Win+R выполните команду
control
- Перейдите в “Система и безопасность” → “Центр обновления Windows”.

- Откройте “Настройка параметров”.
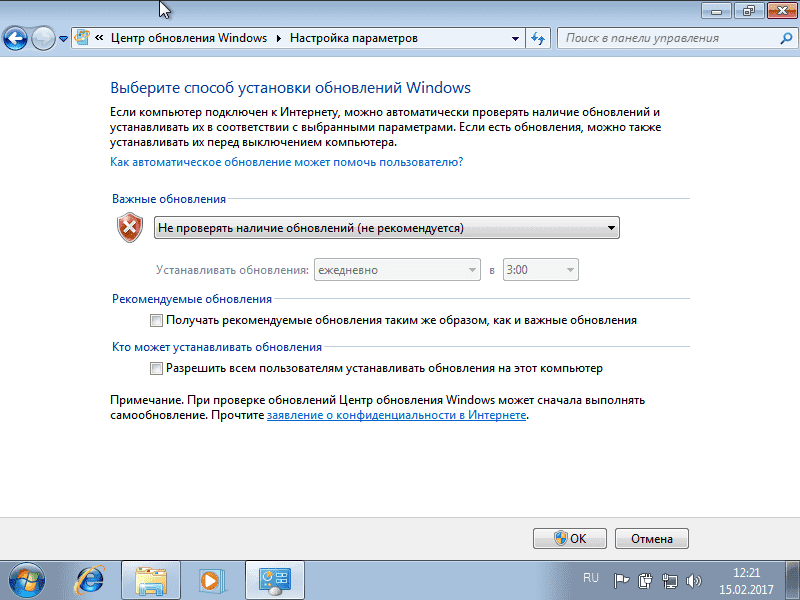
- Снимите галочки и выберите “Не проверять наличие обновлений (не рекомендуется)”.
Теперь вы можете выборочно удалить апдейты или полностью все содержимое SoftwareDistribution.
Для выборочного удаления:
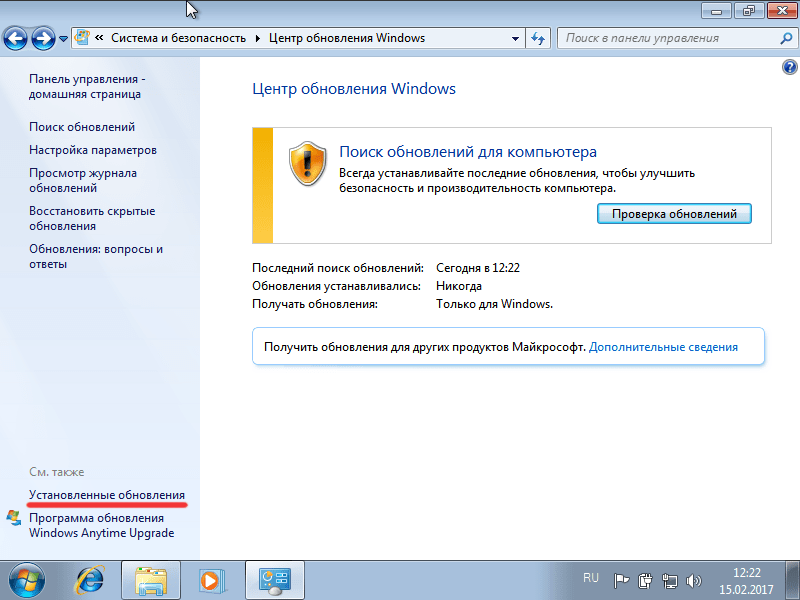
- Откройте “Установленные обновления”.
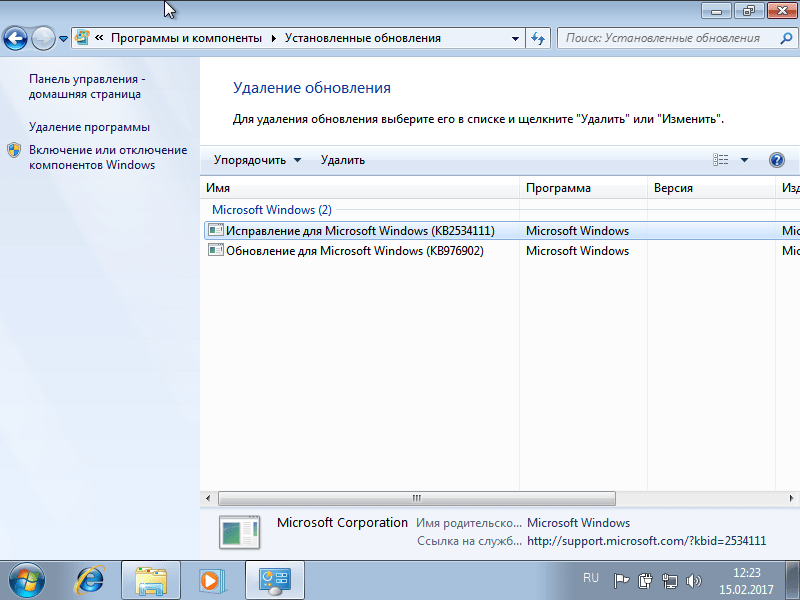
- Выберите те, которые необходимо деинсталлировать и нажмите “Удалить”.
Для очистки содержимого SoftwareDistribution:
- Выделите все файлы и нажмите “Удалить”.
- Если система не позволяет полностью провести операцию, воспользуйтесь утилитой Unlocker.
- Также, после работы с программой, SoftwareDistribution можно будет переименовать.

What is the Software Distribution folder?
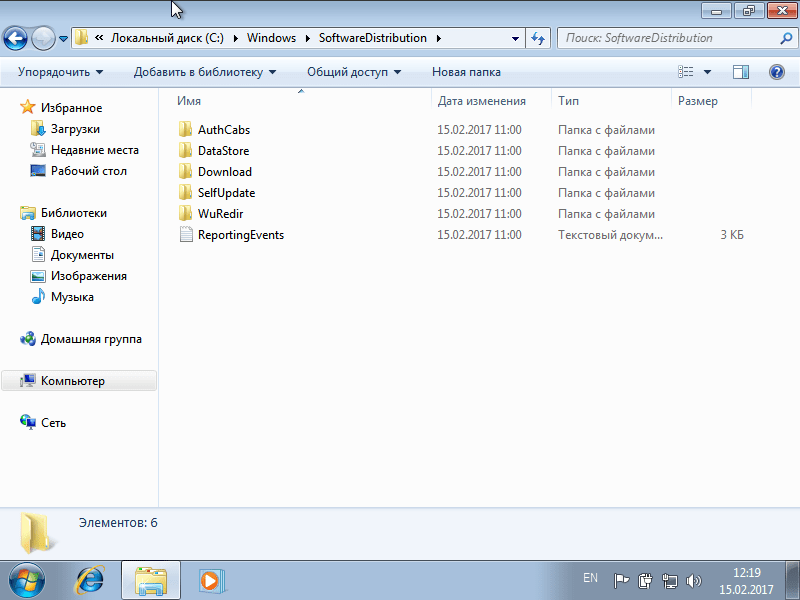
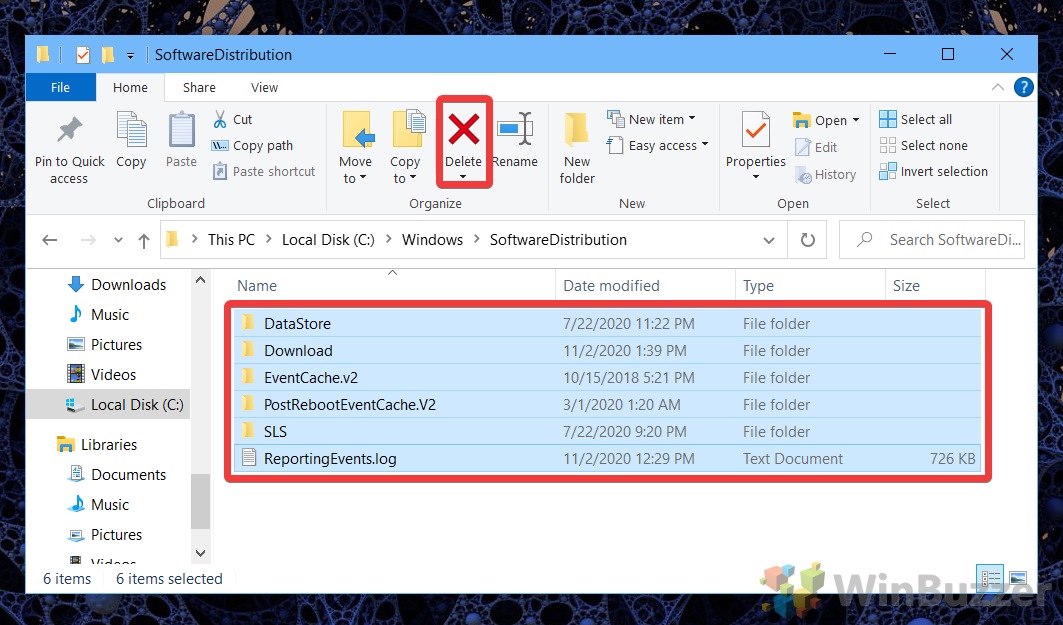
The SoftwareDistribution folder usually located in C:\Windows\SoftwareDistribution is used by Windows Update to preload downloaded updates and hotfixes before installing them. On Windows 10 you usually find the following folder-structure but there might exist other sub-folders as well:
- C:\Windows\SoftwareDistribution
- C:\Windows\SoftwareDistribution\Datastore
- C:\Windows\SoftwareDistribution\Download
- C:\Windows\SoftwareDistribution\EventCachte.v2
- C:\Windows\SoftwareDistribution\PostRebootEventCache.V2
- C:\Windows\SoftwareDistribution\SLS
While the SoftwareDistribution folder is managed completely by the Windows Update Agent (WUAgent) problems might occur that require a manual cleanup of its contents.
Automatically delete win download files in Windows 10
If you are facing issues with Windows Update you might try to use Windows Disk Cleanup in extended mode before moving forward with our tutorial. This might already fix incomplete or corrupted Windows Update files in the SoftwareDistribution folder by deleting them.
Is it safe to delete Windows\SoftwareDistribution-subfolders?
The method shown below to delete the SoftwareDistribution folder manually is generally safe as Windows Update will download all update files again when needed. To be sure that the issue you try to fix is related to the Windows SoftwareDistribution folder, you might want to temporarily rename it beforehand as shown below. This will preserve the files inside.
If you decide deleting the SoftwareDistribution folder, you will lose the Windows Update history which might be usuful to trace down problematic updates. Also Windows Update will need a bit longer afterwards until available updates are shown and downloaded because the WUAgent must check and re-create the Datastore information.
How to Cleanup the SoftwareDistribution folder?
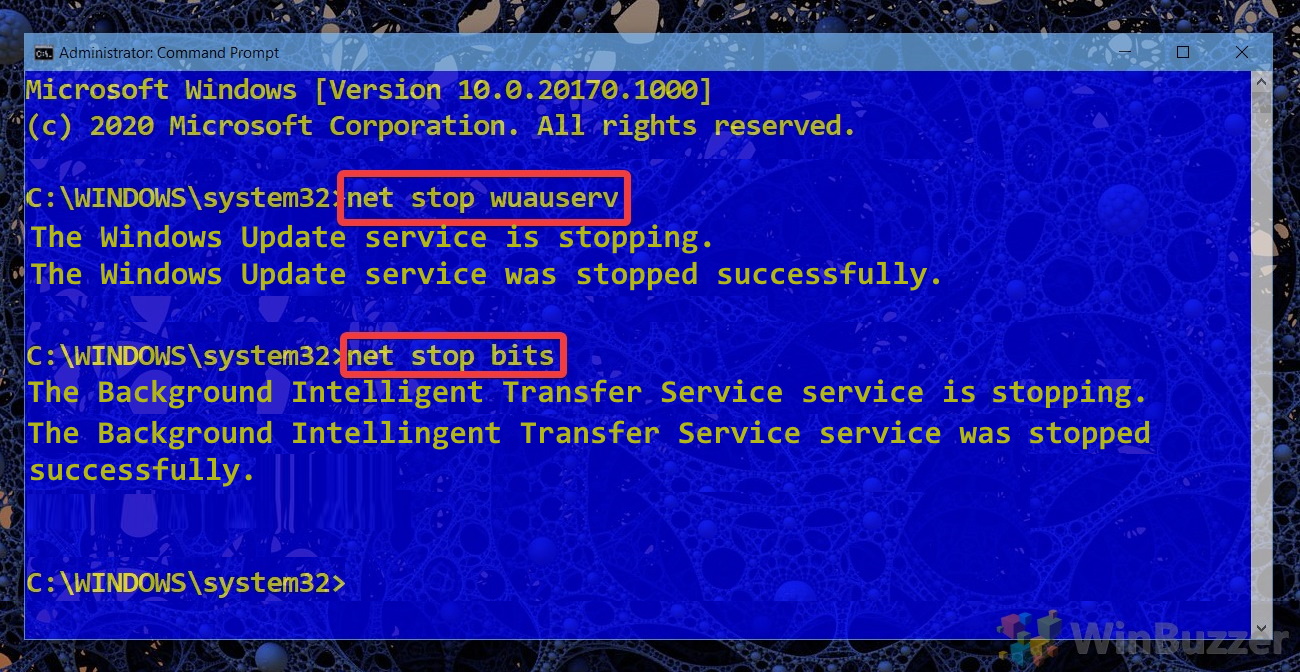
Before you can clear the SoftwareDistribution folder, you will have to stop both the Windows Update Service (wuauserv) and the Background Intelligent Transfer Service (bits).
- Open an elevated Command Prompt

- Use the net stop command to terminate services
Run the command
net stop wuauservto stop the Windows Update Service andnet stop bitsfor the Background Intelligent Transfer Service.
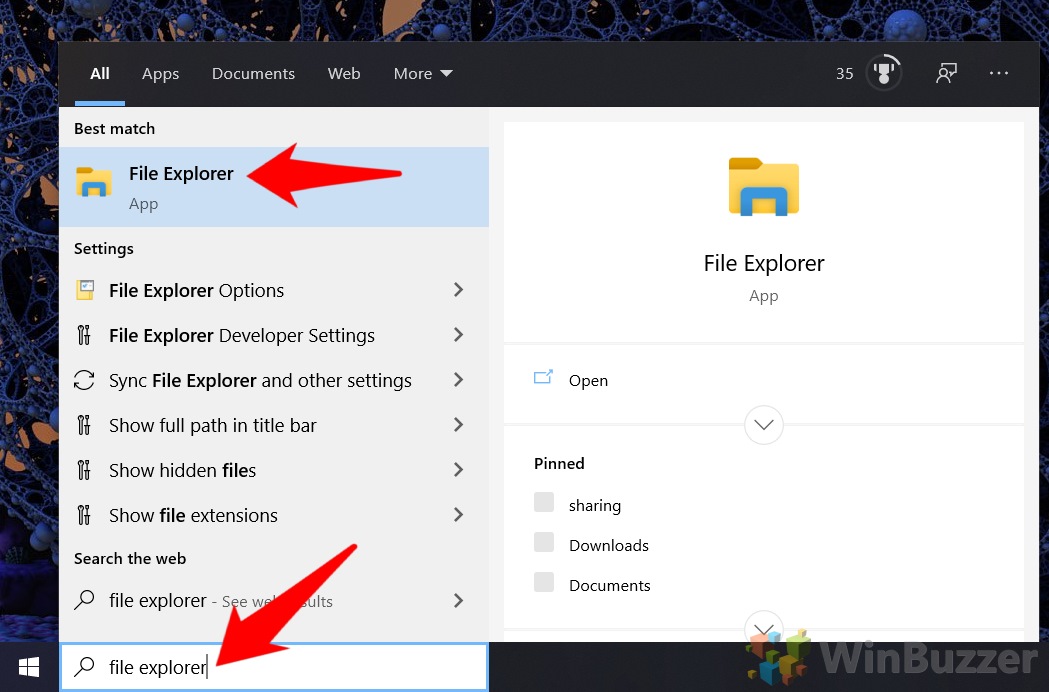
- Open file Explorer

- Delete contents/subfolders of C:\Windows\SoftwareDistribution

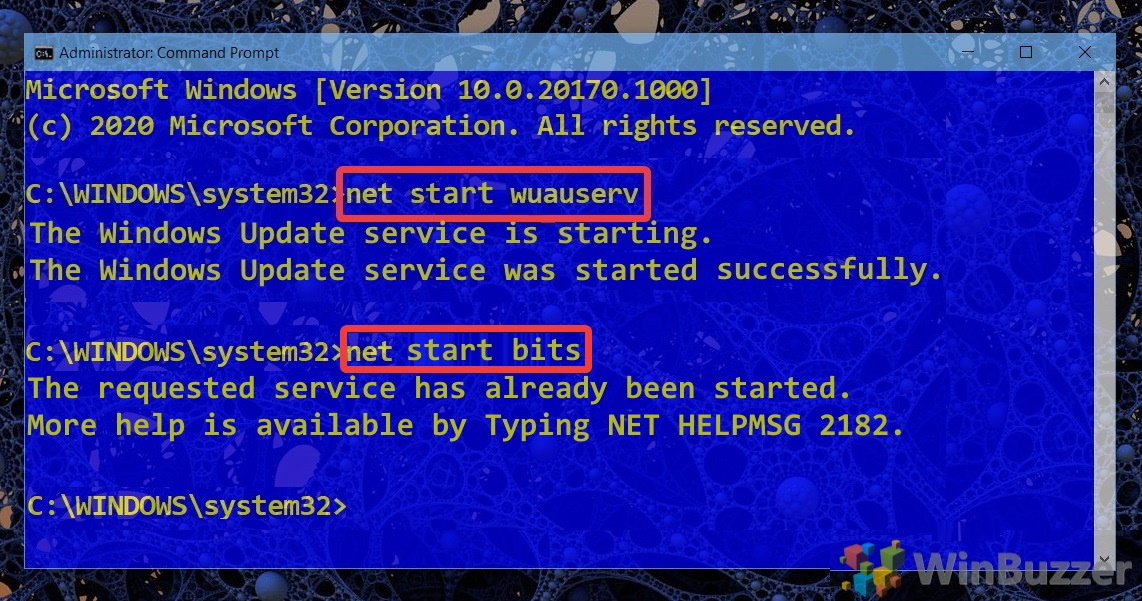
- Use the net stop command to restart services
Run the command
net start wuauservto re-launch the Windows Update Service andnet start bitsfor the Background Intelligent Transfer Service.

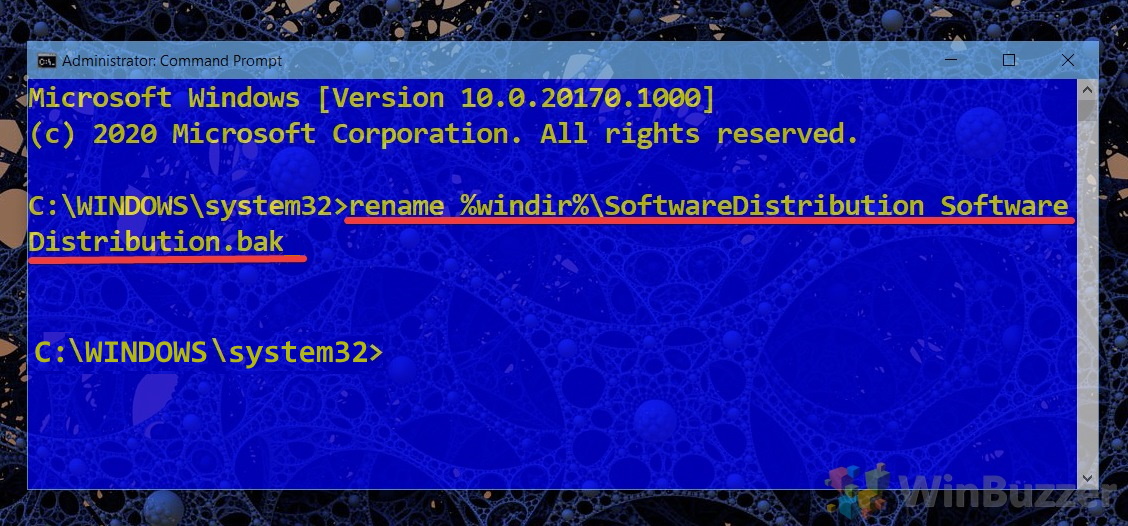
How to Rename the SoftwareDistribution folder
Renaming the SoftwareDistribution folder allows to quickly check if Windows Update files there are really causing the issue you are trying to resolve.
- Open Command Prompt
- Use the net stop command to terminate services
Run the command
net stop wuauservto stop the Windows Update Service andnet stop bitsfor the Background Intelligent Transfer Service.
- Rename the SoftwareDistribution folder with one command
Run the following command to rename SoftwareDistribution folder into SoftwareDistribution.bat:
rename %windir%\SoftwareDistribution SoftwareDistribution.bak
To revert this, you can apply the same procedure afterwards using this command:
rename %windir%\SoftwareDistribution.bak SoftwareDistribution

- Use the net stop command to restart services
Run the command
net start wuauservto re-launch the Windows Update Service andnet start bitsfor the Background Intelligent Transfer Service.


How to Pause, Defer, or Delay Quality and Feature Updates
If you deleted the SoftwareDistribution Folder´s contents to free up space you might also want to delete the $SysReset folder to gain even more. If necessary you can also tell Windows Update to Pause, Defer, or Delay Quality and Feature Updates if you don´t want to download new Windows Updates immediately again after clearing SoftwareDistribution.
Last Updated on August 27, 2021 3:53 pm CEST
When deep cleaning Windows to recover disk space, performing a SoftwareDistribution folder cleanup is one task that may help. This article explains how Windows uses the SoftwareDistribution folder and covers cleaning the folder to help free up disk space. This applies to current versions of Microsoft Windows, i.e. from Windows 7 to Windows 10. In summary it involves stopping the Windows Update service, deleting the SoftwareDistribution\Download folder, and restarting the Windows Update service.
What is the SoftwareDistribution Folder in Windows?
A laptop or Personal Computer (PC) running Windows regularly performs a Windows Update. The updates improve security, fix bugs and add or change functionality. The Windows update files download to a temporary folder on the PC. Once the files have finished downloading in the background, the update can be applied to the PC. The temporary folder is called Download under SoftwareDistribution in the Windows directory, i.e. C:\Windows\SoftwareDistribution\Download (unless Windows has been installed to a different drive or directory). If trying to view this folder in Windows Explorer you may need to give permission and be logged in as an Administrator, as well as turning on Hidden items in the View menu (or via Organise and Folder and search options in Windows 7).

Clean Up The SoftwareDistribution Folder in Windows to Free Up Disk Space
When the system drive runs low on disk space some free space may be reclaimed by deleting this Windows Update temporary downloads folder. Therefore, a full SoftwareDistribution folder delete is not done, just the Download folder in that directory. The SoftwareDistribution\Download folder delete may fix problems that stop the Disk Clean-up utility from finishing. (The Disk Clean-up utility can take quite a while to finish, and if still not finished after a few hours it may be stuck due to Windows Update conflicts.)
Apply Any Remaining Windows Updates
If the SoftwareDistribution\Download folder delete is performed before Windows Update has installed existing download files, then those files will download again. To stop this from happening ensure Windows Update has completed. Open Windows Update. In Windows select Settings (the gear icon) then Windows Update, or enter Update in the search box and select Check for updates. In Windows 7 select Windows Update from All Programs via the Start button (or Start then Control Panel then System and Security).
Select Check for updates to ensure that no updates are available. Install any Windows updates so that «Your device is up to date». (If low on disk space updates may fail to apply, try emptying the Recycle Bin, clearing browser caches or running the Disk Clean-up utility.)
Temporarily Stop the Windows Update Service
With all Windows updates applied stop the Windows Update service to safely remove the \Windows\SoftwareDistribution\Download folder. Run Task Manager (press the Ctrl-Alt-Delete keys all at once and select Task Manager or search for Task Manager and select it). Click the Services tab. Sort the list by name (click the Name column). Browse to the wuauserv entry and check the Status column. If it says Running stop the wuauserv service. To stop the service select Open Services at the bottom of Task Manager (or the Services button in Windows 7 Task Manager).
In Services click on the name column to sort the service alphabetically. Locate Windows Update. Select Stop the Service from the left hand column above description (or double-click on Windows Update to open the properties and click the Stop button, then click OK to close the properties).
Rename the \Windows\SoftwareDistribution\Download Folder
Using Windows Explorer rename the Download Folder in \Windows\SoftwareDistribution. E.g. bring up the context menu and select Rename call it something like Download-old. Windows will create a new Download folder when it needs it. The new Download folder will be empty until new Windows updates are available and are loaded.
On Windows 7 Restart the Windows Update Service
Windows will start the Windows Update service when it needs it. In Windows 7 select Start Service in Services or double-click on Windows Update and select the Start button, click OK to close the properties.
Delete the Renamed Folder
In Windows Explorer delete the renamed Download folder. For example if it was renamed Download-old then delete Download-old. Permission may need to be given to do this, if so click Continue on the message box that appears:

The Windows Update temporary Download folder, under the SoftwareDistribution folder, delete procedure has been completed.
See Also
- For a full list of all the articles in Tek Eye see the full site Index.
Archived Comments
Drew Meady on March 11, 2017 at 9:34 am said:
This was a very well worded, easy to follow and extremely helpful article. I’m glad I came across it, my problem was solved! Thanks!
Author: Published: Updated:
Кэш обновлений Windows — уже скачанные на компьютер файлы обновлений, готовые к установке. При возникновении проблем с их установкой, для освобождения места на диске или для того, чтобы после удаления обновлений они не отображались в Центре обновлений Windows с кнопкой «Установить», вы можете очистить этот кэш.
В этой пошаговой инструкции несколько простых способов очистить кэш обновлений в Windows 11 и Windows 10 встроенными средствами системы, все они безопасны и не должны привести к каким-либо проблемам в работе. Также может быть полезным: Сброс компонентов Центра обновлений (включая очистку кэша) в PowerShell.
Кэш обновлений в утилите «Очистка диска»
Самый простой способ очистки кэша обновлений — встроенная в Windows утилита «Очистка диска». Шаги будут следующими:
- Нажмите правой кнопкой мыши по кнопке «Пуск» и выберите пункт «Выполнить».
- Введите cleanmgr и нажмите Enter.

- При появлении запроса на выбор диска выберите диск C.
- Нажмите кнопку «Очистить системные файлы».
- Отметьте пункт «Очистка обновлений Windows».

- Нажмите «Ок» и дождитесь завершения очистки.


В Windows 11 и 10 вы также можете использовать функции очистки диска в «Параметрах», подробнее об этом в инструкциях Очистка диска Windows 11 встроенными утилитами, Автоматическая очистка диска Windows 10.
Очистка кэша обновлений вручную в командной строке
Кэш обновлений хранится в папке C:\Windows\SoftwareDistribution\Download и мы можем удалить её содержимое вручную с помощью командной строки. Для этого потребуется временно отключить службу Центра обновлений Windows с повторным её включением по завершении процесса.
- Запустите командную строку от имени Администратора. Для этого можно использовать поиск по «командная строка» в панели задач и пункт «Запуск от имени администратора».
- По порядку введите следующие команды
net stop wuauserv
cd C:\Windows\SoftwareDistribution
del /f /s /q Download
net start wuauserv


Удаление кэша обновлений Windows в проводнике
Этот способ, по своей сути повторяет предыдущий, но без использования командной строки:
- Нажмите клавиши Win+R на клавиатуре, введите services.msc и нажмите Enter.
- В списке служб найдите «Центр обновления Windows», дважды нажмите по ней и нажмите кнопку «Остановить».

- В проводнике перейдите в папку
C:\Windows\SoftwareDistribution\Download
- Выделите всё содержимое папки (клавиши Ctrl+A) и удалите его.
- Снова зайдите в «Службы» и запустите Центр обновления.

Сброс кэша обновлений и его параметров без фактического удаления
Если задача — исправить ошибки центра обновлений, а не выполнить удаление кэша, можно использовать следующий набор команд в командной строке, запущенной от имени администратора:
net stop wuauserv
net stop cryptSvc
net stop bits
net stop msiserver
ren C:\Windows\System32\catroot2 catroot2.old
ren C:\Windows\SoftwareDistribution SoftwareDistribution.old
net start cryptSvc
net start bits
net start msiserver
net start wuauserv
Если ошибки были исправлены, созданные папки SoftwareDistribution.old в папке Windows и catroot2.old в папке System32 можно будет удалить.
Очистка кэша обновлений также доступна в сторонних утилитах, предназначенных для исправления ошибок при обновлениях, подробно: Как исправить ошибки Центра обновлений Windows.
Также, в контексте рассмотренной темы могут быть полезными следующие материалы:
- Как удалить обновления Windows 11
- Как удалить обновления Windows 10
- Как отключить обновления Windows 11
- Как отключить обновления Windows 10