
В этой публикации, друзья, рассмотрим недавно взволновавшую тестирующих Windows 11 новость: компания Microsoft в блоге инсайдерской программы Windows Insider заявила, что начиная со сборок 22458 на Dev-канале и 22000.194 на Beta-канале к виртуальным машинам для установки на них Windows 11 применяются такие же системные требования, что и для физических компьютеров. В компании изъяснились как всегда расплывчато, мы же имеем факт — у Windows 11 много пунктов системных требований. И виртуальные машины с тем функционалом гипервизоров, что есть сейчас, по условию не смогут соответствовать всем этим требованиям. Как теперь работать с виртуальными машинами в программах VirtualBox, VMware Workstation Pro, VMware Workstation Player и Hyper-V?
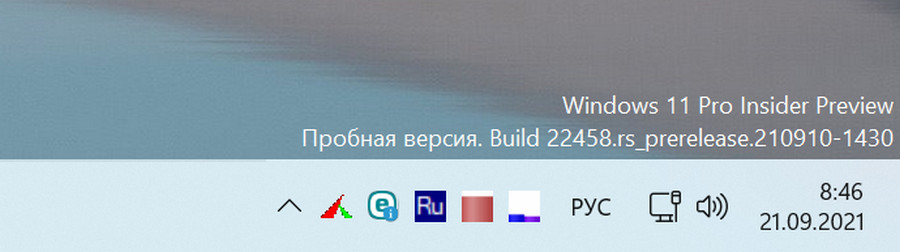
Итак, друзья, Microsoft внедрила для виртуальных машин уравниловку с физическими компьютерами в плане системных требований к Windows 11. Эта уравниловка действует начиная с инсайдерских сборок, с 22458 на Dev-канале и с 22000.194 на Beta-канале. И также это правило касается стабильной Windows 11. В ранних же инсайдерских сборках Windows 11 для виртуальных машин никаких требований нет. Но если мы захотим на виртуальной машине обновить более раннюю сборку вручную с использованием свежего установочного ISO, либо через центр обновлений,
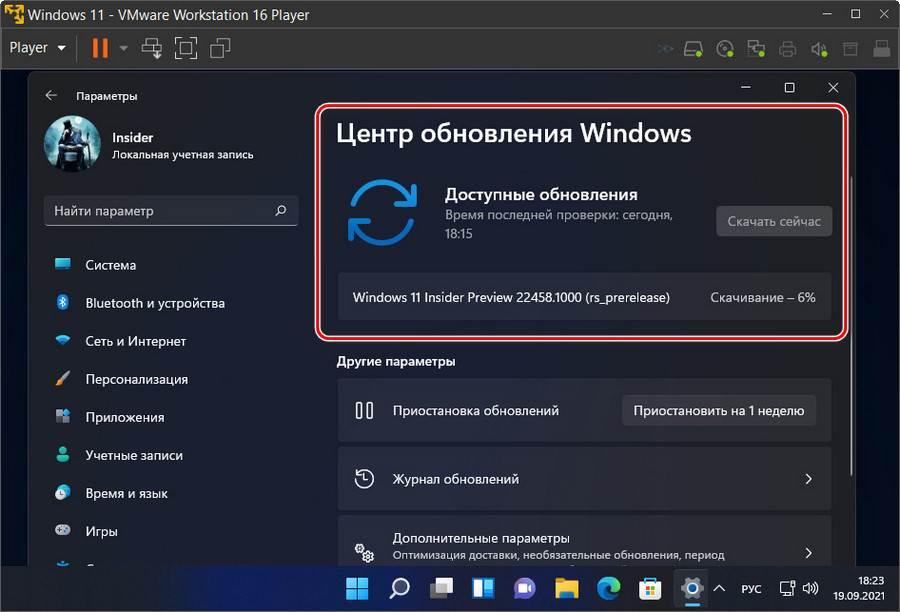
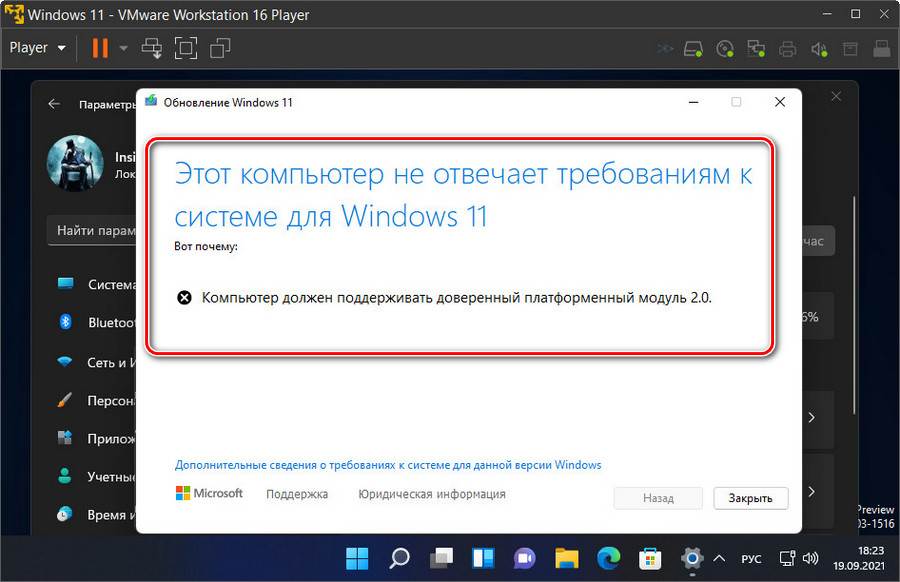
в процессе обновления получим этап проверки на совместимость с Windows 11 и неудовлетворительный результат этой проверки. Машина получит пресловутое уведомление «Этот компьютер не отвечает системным требованиям Windows 11» с констатацией, какому требованию именно не соответствует, либо без констатации вовсе.
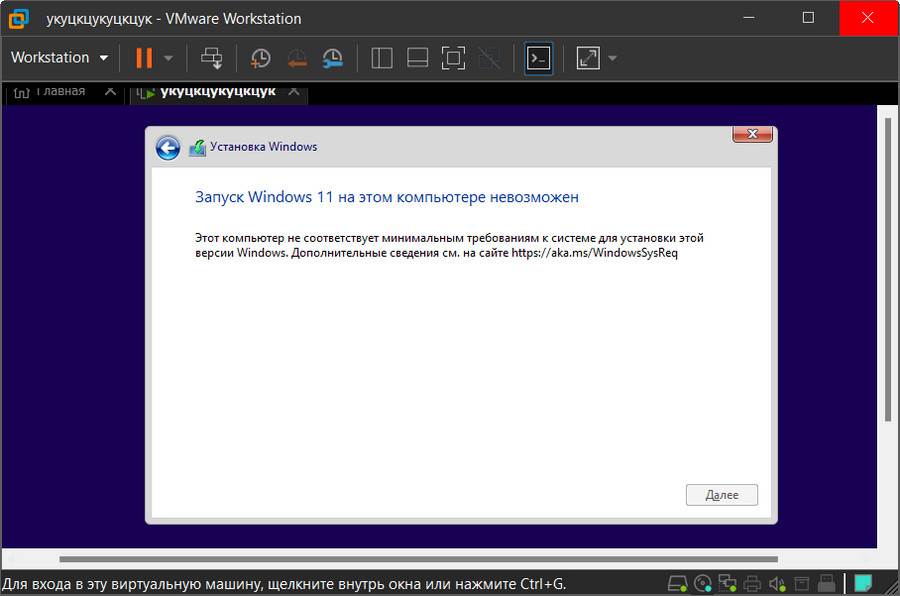
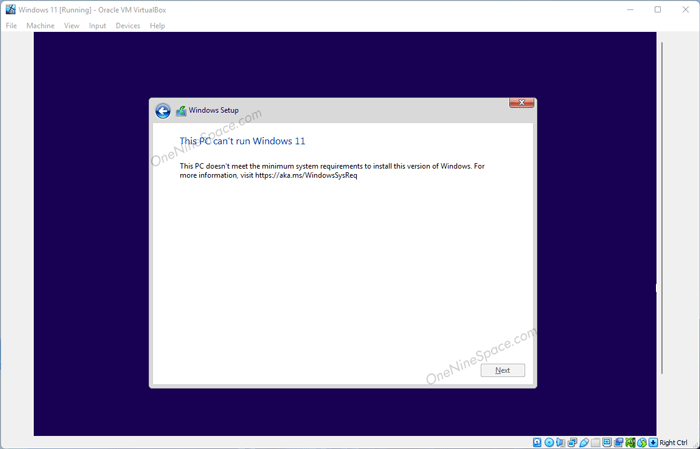
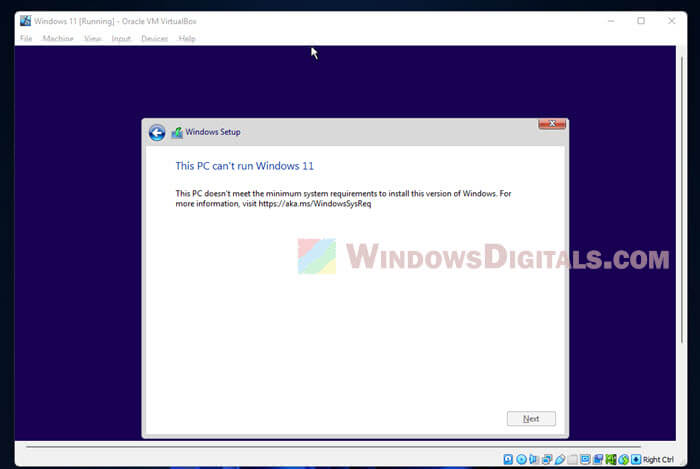
При новой установке на виртуальные машины Windows 11 в окне системного установщика будем видеть уведомление «Запуск Windows 11 на этом компьютере невозможен».
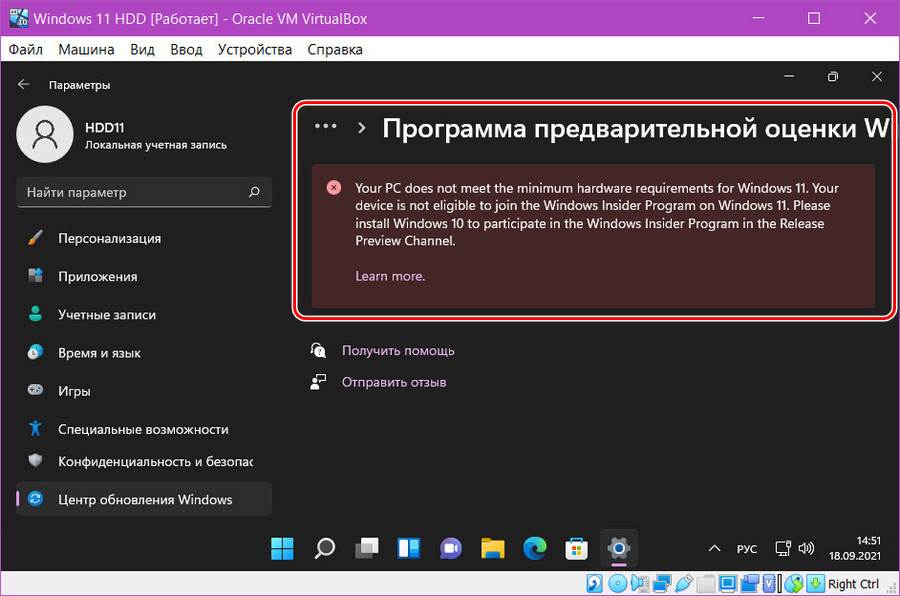
А на виртуальных машинах VirtualBox нам даже не будет доступна программа Windows Insider. При попытке подключиться к ней увидим уведомление «Your PC does not meet the minimum hardware requirements for Windows 11». Что значит, что машина не соответствует минимальным системным требованиям Windows 11.
Всё это, друзья, результат политики Microsoft. На деле пока что требования Windows 11 для виртуальных машин коснулись числа ядер процессора – не менее 2-х, объёма оперативной памяти – не менее 4 Гб, эмуляции прошивки UEFI и модуля безопасности TPM 2.0. А это значит, что официально установить свежие сборки Windows 11 и участвовать в её программе Windows Insider можно только в Hyper-V и актуальной версии программы VMware Workstation Pro (не ниже 14), ибо только они поддерживают эмуляцию TPM 2.0. Возможно, в будущем требования коснутся и самого процессора, т.е. чтобы используемый виртуальной машиной процессор был из перечня официально поддерживаемых. Друзья, если у вас несовместимый с Windows 11 процессор, и у вас с ним на виртуальной машине есть проблемы, отпишитесь в комментариях с описанием проблемы. Ну и давайте разбираться, что можно сделать с виртуальными машинами, чтобы на них можно было установить новые сборки Windows 11.
Обновлено: бесплатный гипервизор VirtualBox поддерживает эмуляцию всех необходимых устройств и технологий для официального использования Windows 11 только начиная с версии программы 7. Детали в статье «Как установить Windows 11 на VirtualBox 7 и выше».
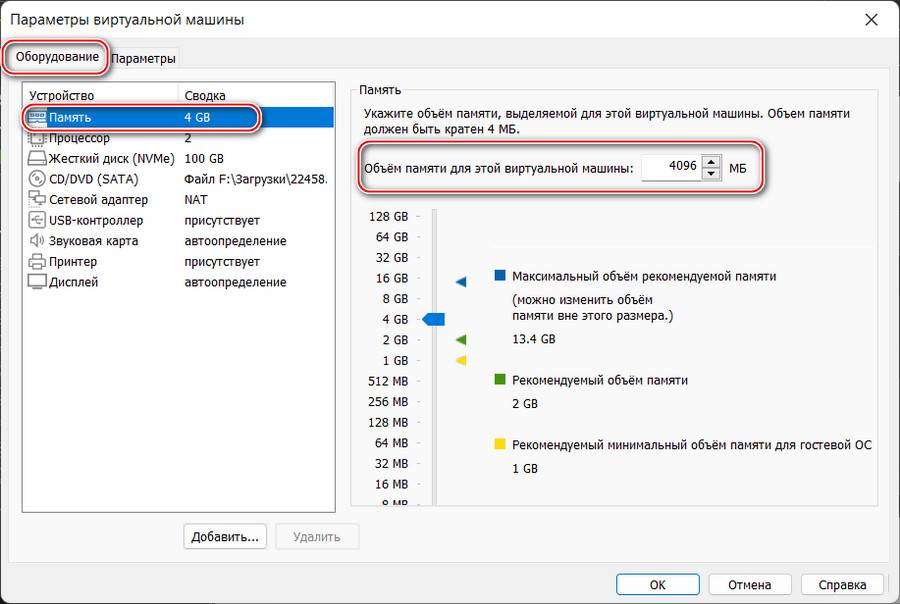
Чтобы благополучно работать с виртуальной машиной с официально установленной Windows 11 в программах VMware Workstation Pro и Workstation Player, нужны их версии не ниже 16.2. А параметры у виртуальной машины должны быть следующие. Во вкладке «Оборудование» в графе оперативной памяти её должно быть не меньше 4 Гб, т.е. не меньше 4096 Мб.
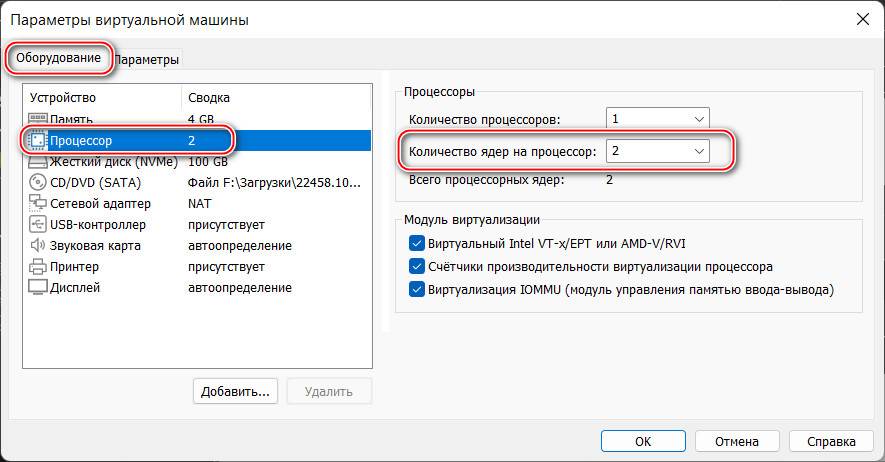
Во вкладке «Оборудование» в графе процессора должно стоять не менее 2-х ядер.
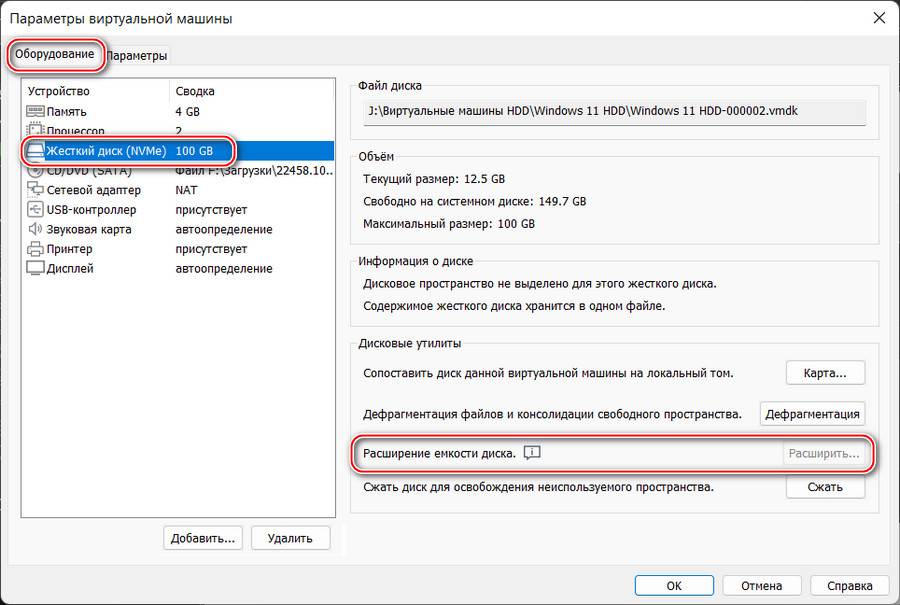
Во вкладке «Оборудование» в графе жёсткого диска должен быть указан виртуальный жёсткий диск с объёмом не меньше 64 Гб. Если у вас меньше, уберите снапшоты виртуальной машины и расширьте жёсткий диск, если он вас динамический.
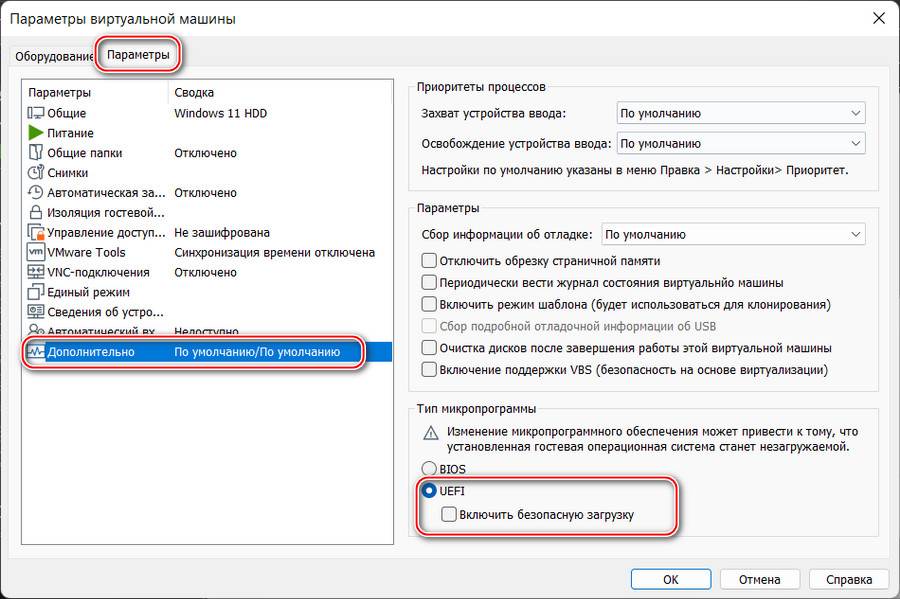
Во вкладке «Параметры» в графе «Дополнительно» должна быть активна эмуляция UEFI. Можете также выставить галочку безопасной загрузки. Пока что это не требуется, но в дальнейшем, возможно, эта настройка будет играть роль.
И необходимо в число оборудования виртуальной машины добавить эмуляцию TPM 2.0. Для этого не нужно, чтобы TPM 2.0 поддерживал ваш физический компьютер.
Обновлено: друзья, в версии VMware Workstation Player 17 и выше реализован улучшенный способ эмуляции TPM 2.0 на виртуальных машинах. Используйте его.
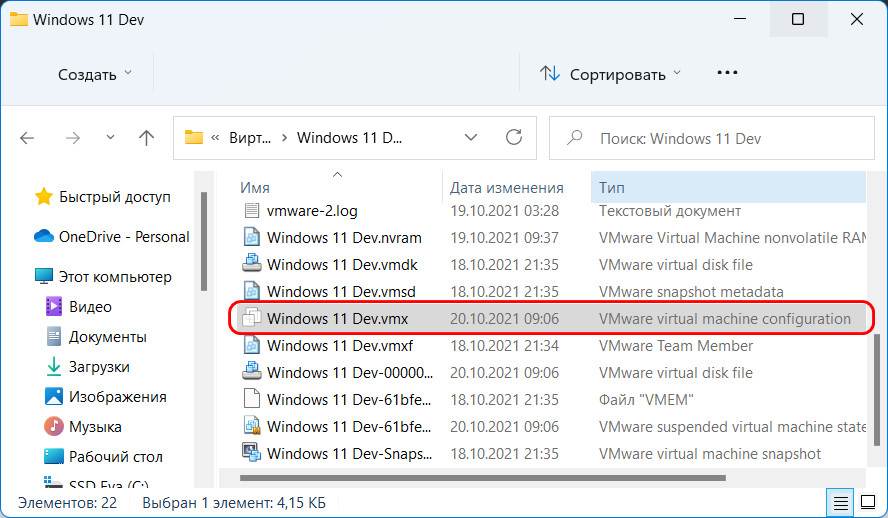
Выключаем виртуальную машину, на которой хотим добавить программный TPM 2.0. Идём по пути нахождения её файлов на жёстком диске. Здесь нам нужен файл конфигурации виртуальной машины с расширением «.wmx».
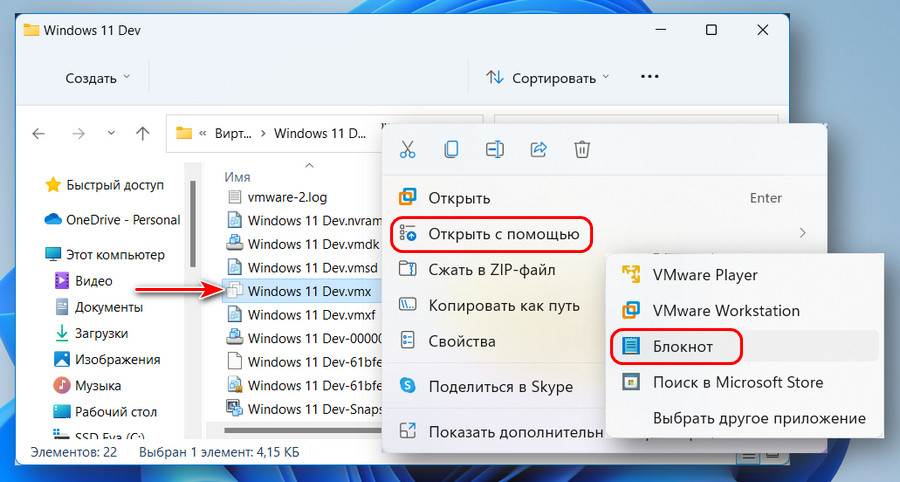
Открываем на этом файле контекстное меню, выбираем «Открыть с помощью» и открываем файл в блокноте Windows.
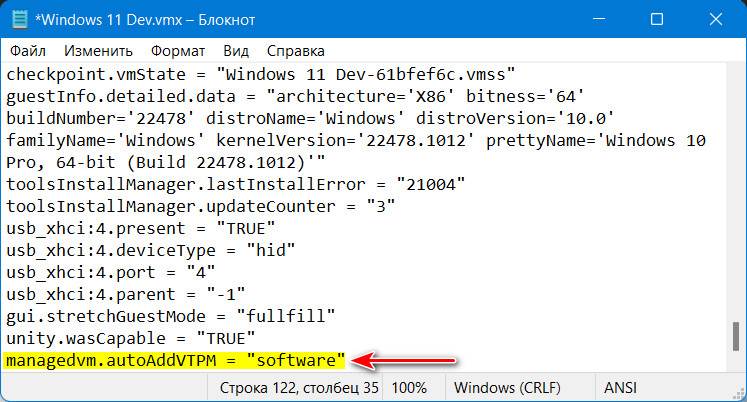
В конце файла вносим:
managedvm.autoAddVTPM = «software»
Жмём Ctrl+S и сохраняем внесённые изменения.
Друзья, комплексный мануал по созданию в этой программе виртуалки для установки на неё Windows 11 смотрите в статье «Как установить Windows 11 на виртуальную машину в программе VMware Workstation Pro».
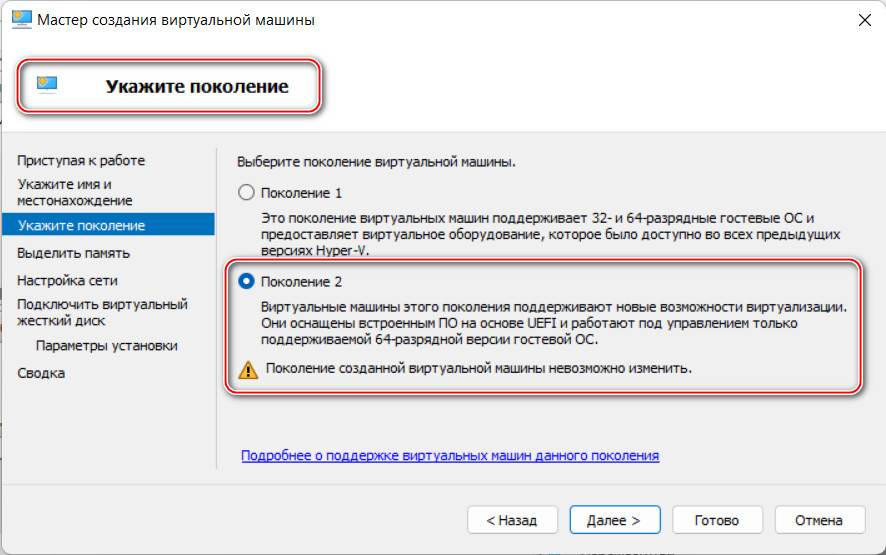
Чтобы без лишней волокиты работать с Windows 11 на виртуальной машине Hyper-V, нужен этот гипервизор с поддержкой машин 2-го поколения на базе UEFI. А это Hyper-V, входящий в состав серверных Windows Server не ранее 2012 R2, а также 64-битных редакций от Pro и выше клиентских Windows начиная с 8.1. В Hyper-V для работы с Windows 11 параметры виртуальной машины должны быть следующими. Сама машина должна быть 2-го поколения, это выбирается при создании машины и не может быть изменено впоследствии.
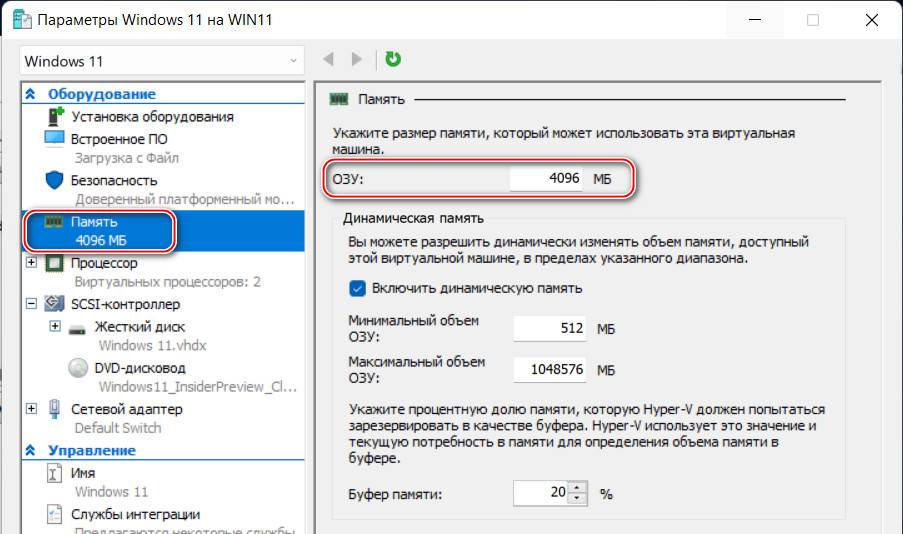
В параметрах оборудования «Память» у машины должно быть оперативной памяти не менее 4 Гб, соответственно, 4096 Мб.
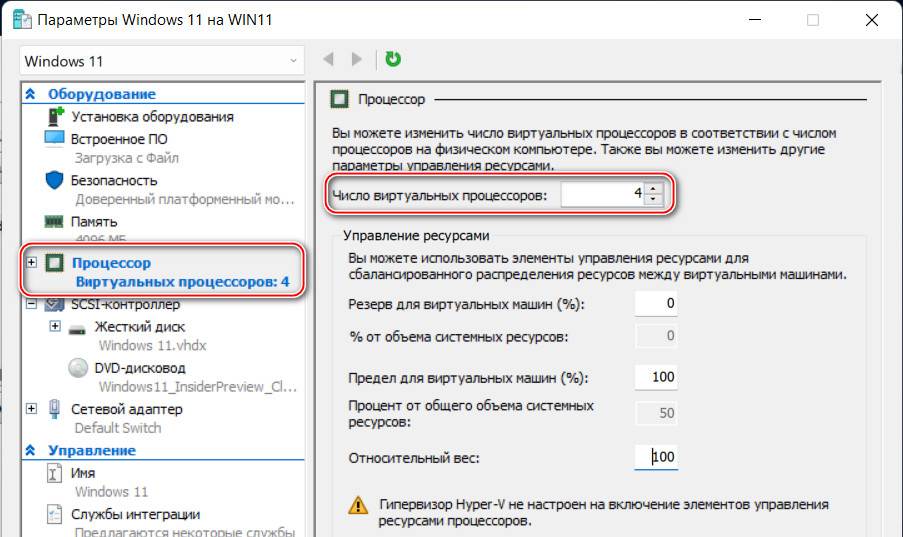
В параметрах оборудования «Процессор» число виртуальных процессоров, т.е. ядер процессора должно быть не менее 2-х.
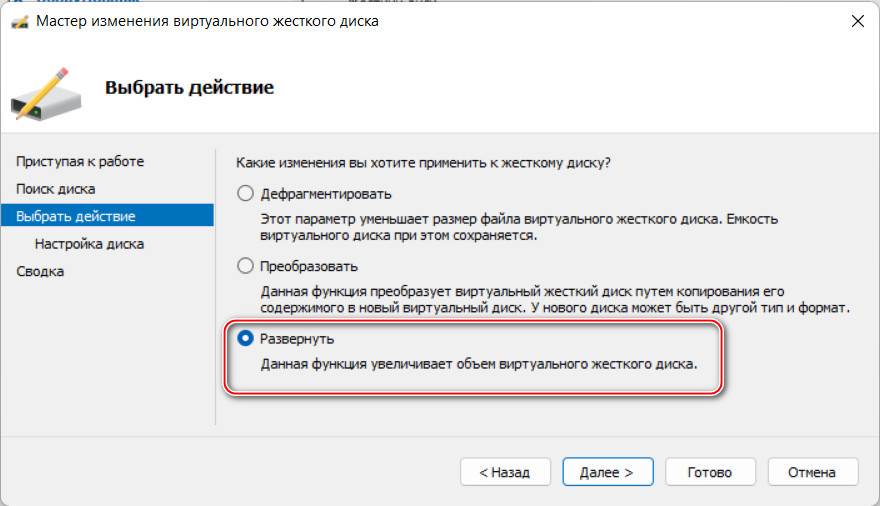
В параметрах оборудования «SCSI-контроллер» должен быть подключён виртуальный жёсткий диск с объёмом не меньше 64 Гб. Если у вас меньше, жмите «Правка».
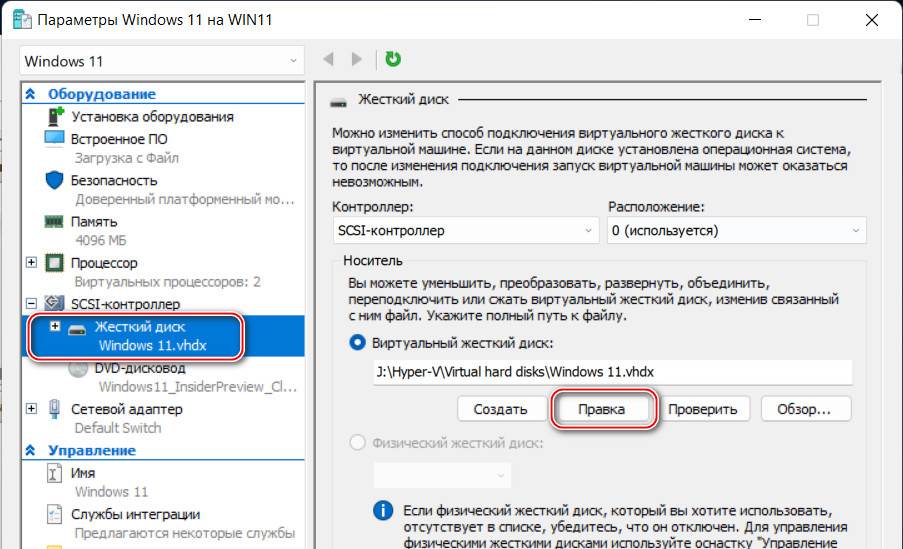
И увеличьте объём с помощью функции «Развернуть».
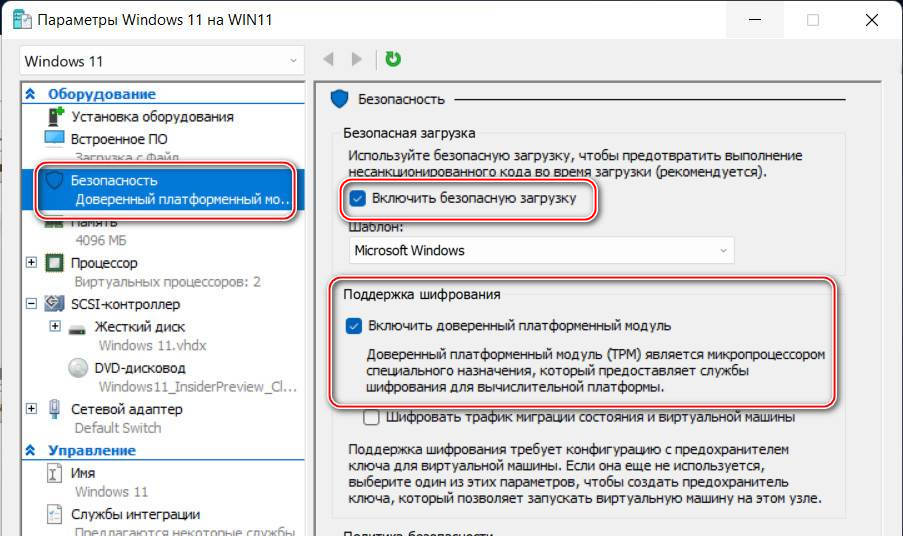
В параметрах оборудования «Безопасность», если у вас не включена настройка безопасной загрузки, можете включить её. Пока что она не является принципиальной, но в будущем может стать такой. Ну и, наконец, эмуляция TPM 2.0: ставим галочку функции «Поддержка шифрования». Это и есть добавление машине доверенного платформенного модуля TPM 2.0, даже если у вас его физически на компьютере нет.
Не забываем сохранить параметры, и на этом всё. Комплексный мануал по созданию виртуальной машины Hyper-V для установки Windows 11 смотрите в статье «Как создать виртуальную машину с Windows 11 в Hyper-V».
If you are unable to install Windows 11 in VirtualBox and getting This PC doesn’t meet the minimum system requirements to install this version of Windows error, here is how you can fix the issue with the help of this step-by-step tutorial. You can bypass TPM requirements to install Windows 11 in VirtualBox even if your host computer doesn’t have the Trusted Platform Module.
Windows 11 requires Trusted Platform Module or TPM 2.0 and Secure Boot to be installed on your computer. However, let’s assume that you are still using Windows 11 without upgrading your PC to the latest version and want to try Windows 11 in VirtualBox. In the initial days, Microsoft allows people to install Windows 11 in VirtualBox without TPM and Secure Boot. However, things are different now as they have lifted the relaxation. Now, your host computer must have TPM 2.0 and Secure boot to install Windows 11 in Virtual Box.
If you try to install Windows 11 in VirtualBox without TPM and Secure Boot, you will end up getting an error message saying:
This PC can’t run Windows 11
This PC doesn’t meet the minimum system requirements to install this version of Windows. For more information, visit https://aka.ms/WindowsSysReq
However, it is possible to bypass TPM requirement and install Windows 11 without any error in Oracle VirtualBox.
Unable to install Windows 11 in VirtualBox
To fix unable to install Windows 11 in VirtualBox error, follow these steps:
- Restart Windows 11 installation in VirtualBox.
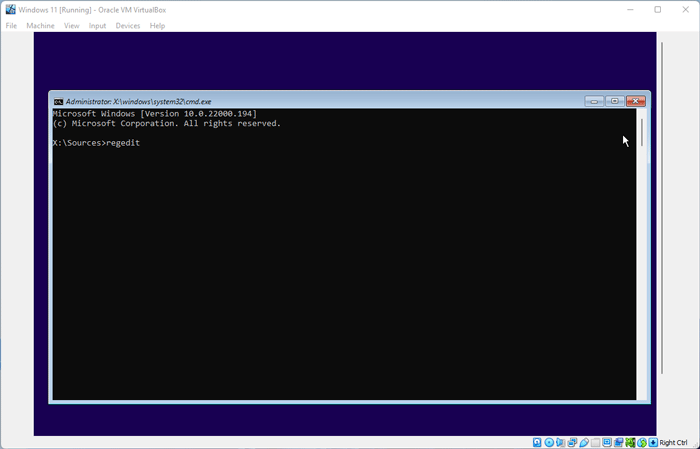
- Press Shift+F10 to open the Command Prompt.
- Type regedit and press the Enter button.
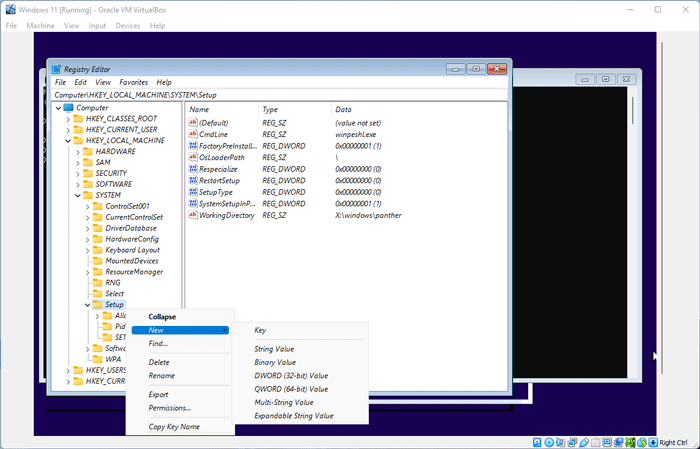
- Navigate to HKEY_LOCAL_MACHINE\SYSTEM\Setup.
- Right-click on Setup > New > Key.
- Name it as LabConfig.
- Right-click on LabConfig > New > DWORD (32-bit) Value.
- Name it as BypassTPMCheck.
- Double-click on it to set the Value data as 1.
- Create another DWORD value named BypassSecureBootCheck.
- Set the Value data as 1.
- Click the OK button.
To learn more about these steps, continue reading.
At first, you need to restart the Windows 11 installation. However, you do not need to go further than the first window displaying the Install and Repair your computer options. Once you get this window, press Shift+F10 to open the Command Prompt. Type regedit and hit the Enter button.
It opens the Registry Editor on your virtual machine. You need to navigate to the following path:
HKEY_LOCAL_MACHINE\SYSTEM\Setup
In the Setup key, you need to create a sub-key. For that, right-click on the Setup key, select New > Key, and name it as LabConfig.
After that, you need to create two DWORD values in the LabConfig key. To do so, right-click on the LabConfig key or the empty space on the right-hand side, select New > DWORD (32-bit) Value.
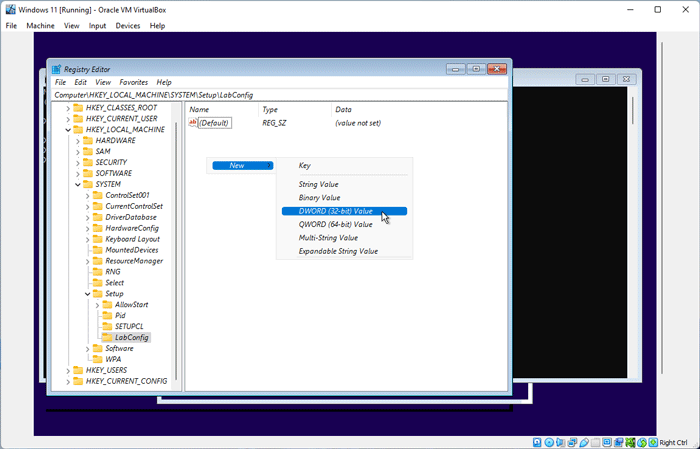
Name it as BypassTPMCheck. Then, double-click on it to set the Value data as 1.
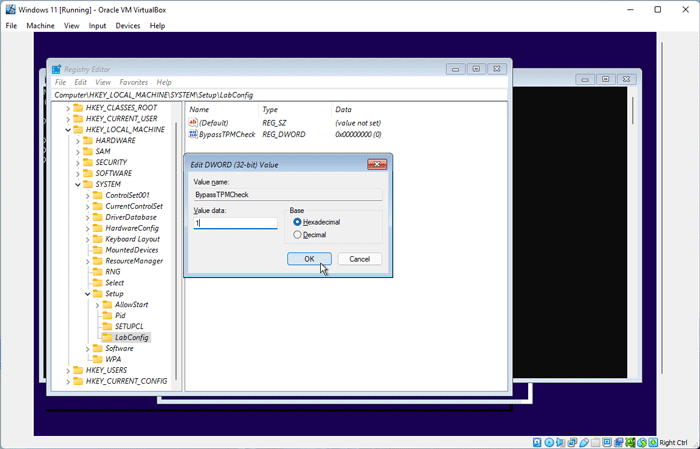
Click the OK button to save the change. Following that, you have to repeat these steps to create another DWORD value in the same key and name it as BypassSecureBootCheck.
Then, double-click on this DWORD value to set the Value data as 1 like before. Once done, close the Registry Editor and Command Prompt window.
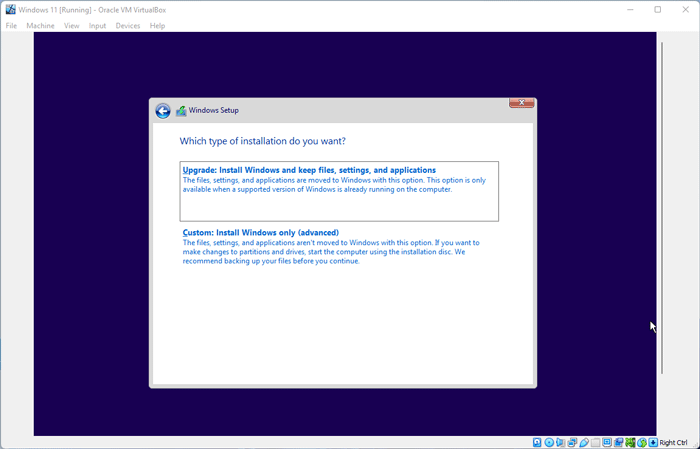
Now, you can install Windows 11 in VirtualBox without any TPM and Secure Boot errors.
How do you fix Cannot install Windows 11 on VirtualBox?
To fix Cannot install Windows 11 on VirtualBox error, you need to create one key and two DWORD values in the Registry Editor. For that, navigate to the HKEY_LOCAL_MACHINE\SYSTEM\Setup, and create a key named LabConfig. Then, create two DWORD values in this key and name them as BypassTPMCheck and BypassSecureBootCheck. At last, you need to set the Value data as 1.
That’s all! Hope this guide will help you bypass the TPM requirement and install Windows 11 in VirtualBox without any problem.
Related:
- How to enable TPM 2.0 in Gigabyte motherboard
- How to enable TPM 2.0 in BIOS MSI Motherboard
Sudip Majhi
The article, you are reading, is written by Sudip, who starts and ends the day with computer. He contributes to some top media publications after gathering 12 years of experience in content writing in technology field. Email him to say hello!
Windows 11 has much stricter system requirements than Windows 10, and this has caused a lot of people to see the error message “This PC can’t run Windows 11 – This PC doesn’t meet the minimum system requirements to install this version of Windows” when they try to install it on a virtual machine (VM) using VirtualBox or other VM software like VMware. In this guide, we’ll talk about the problem in detail and show you a way to get around the requirement check.
Also see: How to in-place upgrade to Windows 11 on unsupported hardware
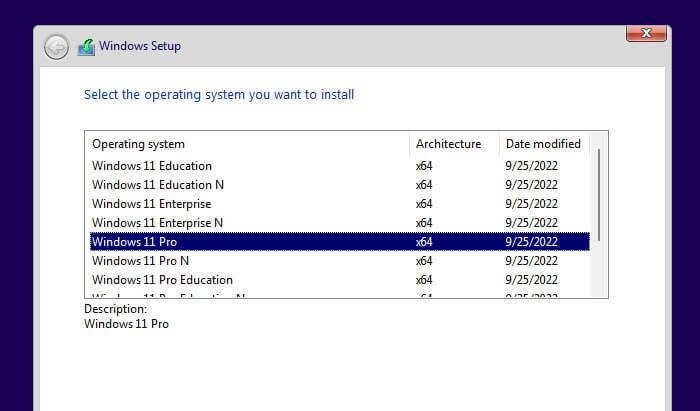
This issue usually shows up right after you select Windows 11 Pro (or another version) and hit “Next”. If your PC doesn’t meet the system minimum requirements, the installation stops in its tracks with that error message.
Linked issue: We couldn’t install Windows 11: Safe_OS with boot operation
Getting to know Windows 11’s minimum system needs
Let’s break down what your computer needs to have to play nice with Windows 11. These specs are there to make sure Windows 11 runs smoothly and keeps your system secure:
- A 64-bit processor that’s clocking at least 1 GHz with 2 or more cores
- At least 4 GB of RAM
- A minimum of 64 GB storage space
- Graphics that are friends with DirectX 12 and have a WDDM 2.0 driver
- A screen that’s 720p or better, 9 inches across or bigger
- UEFI firmware that can do Secure Boot
- TPM version 2.0
While this might sound like a lot, it’s all about making sure you get the best experience and security. But, yeah, it can be a bit much when trying to set up a VM with VirtualBox or VMware.
Recommended guide: How to Install Windows 11/10 with Digital License from USB
How to skip past the system check for Windows 11 on VirtualBox
Our trick to get around the system needs involves a bit of registry tweaking. It’s handy for testing stuff out but think twice if you’re planning to use it all the time, as it might not be the smoothest experience.
Step 1: Opening Command Prompt on the Windows install screen
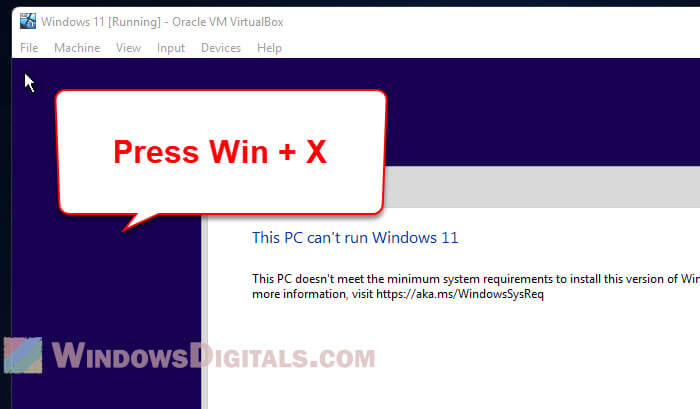
Hit Win + X when you see that error message. This gets you to the command prompt where the magic begins.
Step 2: Get into the Registry Editor
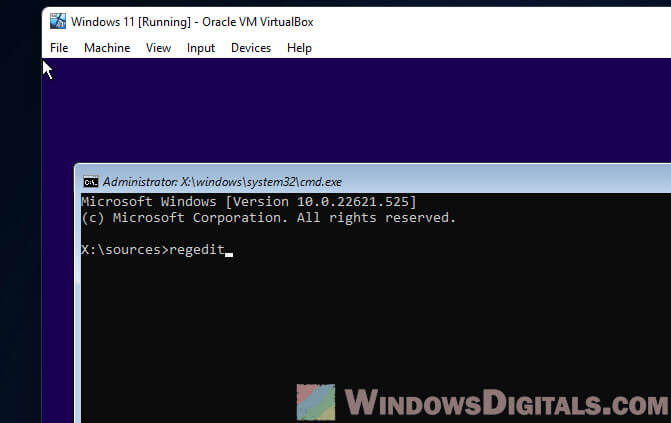
Type regedit in the command prompt and hit Enter. This opens up the Registry Editor for some tweaking.
Step 3: Head over to the Setup key
On the left side of the Registry Editor, navigate to:
Computer\HKEY_LOCAL_MACHINE\SYSTEM\Setup
Step 4: Making a new key called LabConfig
Right-click the Setup key and choose New > Key. Name it LabConfig.
Step 5: Creating a BypassCPUCheck value
With the LabConfig key selected, right-click in the right pane and pick New > DWORD (32-bit) Value. Call it BypassCPUCheck. Double-click it, set the value to 1, and hit OK.
Step 6: Adding more bypass values
Do the same thing for:
BypassRAMCheckBypassSecureBootCheckBypassTPMCheck
Set each of their values to 1 and click OK.
Step 7: Finishing up
Once you’re done, close the Registry Editor and the command prompt. You’re now good to go with your Windows 11 install without any nagging error messages. The tweaks you’ve made will let you bypass the system checks and get Windows 11 onto your VM.
Related resource: How to Open VMDK File in Windows 11

Watch out for these problems
Taking this shortcut might be handy, but it’s not without its bumps. Here’s what to keep an eye out for:
- Performance might take a hit: Skirting around the official requirements could mean Windows 11 doesn’t run as smoothly as you’d like on your VM.
- You could be opening up security gaps: Requirements like TPM and Secure Boot beef up your security. Skipping them might leave you more exposed.
- Help might be harder to find: Since this isn’t the Microsoft-approved route, you’re kind of on your own if things go sideways.
Think about these points before deciding to go ahead with the workaround.
Relevant problem: This host supports Intel VT-x, but Intel VT-x is disabled
One last note
When security is in the way, there is really not much of a choice but to really consider hardware that comes with those minimum requirements for installing Windows 11, specifically the TPM 2.0 and Secure Boot technology. Now, most motherboard manufacturers are already making sure all new models contain these technologies, but it means we will need to dig up some money for almost a brand new computer again. As for VM, well, you can try the workarounds but it’s not really meant for daily use if security is a concern.
-
davidortenn79
- Posts: 4
- Joined: 24. Sep 2022, 15:39
Can’t install Windows 11. Says does not meet minimum sys requirements?
I just bought a new PC. It has an Intel i9 9th gen, 1 GB of ram and 1 TB NVME SSD. I installed Linux Mint as my main OS. I installed Virtual Box and trying to install Windows 11. I setup the VM to have two processors, 8 GB of RAM, and an 80 GB hard drive that I told it to allocate the whole space up front. I searched the web. It says to make sure TPM is on. I checked my computer’s BIOS and it is on. Also virtualization is on. Any ideas?
-
multiOS
- Volunteer
- Posts: 1432
- Joined: 14. Sep 2019, 16:51
- Primary OS: Mac OS X other
- VBox Version: VirtualBox+Oracle ExtPack
- Guest OSses: Windows, Linux, BSD
- Location: United Kingdom
Re: Can’t install Windows 11. Says does not meet minimum sys requirements?
Post
by multiOS »
@davidortenn79
Yes, your Host Computer probably does have TPM, but the Virtual Machine you are trying to create doesn’t as Windows 11 is not fully supported by VirtualBox 6.1.xx, so you need to apply the same published workarounds for a Windows 11 install that you would with Hardware that does not meet the minimum Microsoft Spec to get the installation to work.
Alternatively, you could:
— try creating a modified the Windows 11 ISO to eliminate the hardware checks see: viewtopic.php?f=2&t=107198
— try the latest VirtualBox 7 Beta which does have support Windows 11, but is obviously still being tested — viewtopic.php?f=15&t=107088
The error notice appears when the Windows 11 installation determines that the current configuration of the PC or VirtualBox does not fulfill the Windows 11 minimum system requirements.
Before we discuss how to resolve the error by instructing the installation to skip all checks, let’s have a look at the Windows 11 system requirements.
- 1 GHz or faster two core 64-bit compatible processor
- 4 GB or more RAM
- 64 GB or larger storage space
- UEFI, Secure Boot capable system firmware
- TPM 2.0
- A graphics card compatible with DirectX 12 or later with WDDM 2.0 driver
Bypass Windows 11 system requirements
Click the exit button in the error window when you get the error.
Select Yes when asked “Are you sure to quit?”.


You will be prompted with the “Install now” screen. Press Shift + F10 at the same time when you are at this screen.
In the Command Prompt window, type regedit and press Enter.

When the Registry Editor opens, navigate to the following:
Computer\HKEY_LOCAL_MACHINE\SYSTEM\Setup

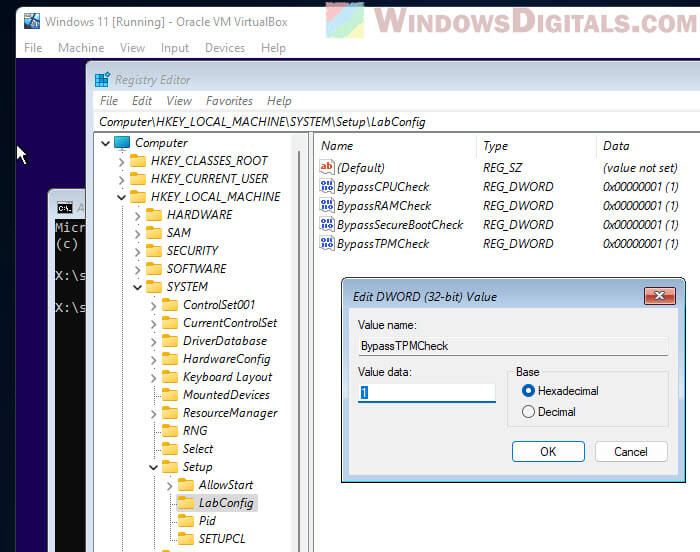
Right-click Setup, select New and choose the Key option. Rename the new key as LabConfig.
Select the LabConfig folder on the left pane.
On the right pane, right-click anywhere, select New, and choose DWORD (32-bit) Value.

Rename the new value as BypassSecureBootCheck.
Double-click on BypassSecureBootCheck and change its value from 0 to 1.
Right-click, select New, and choose DWORD (32-bit) Value. Name it as BypassTPMCheck.
Right-click again, select New, and choose DWORD (32-bit) Value, name the new value as BypassCPUCheck.
Right-click again, select New, and then select DWORD (32-bit) Value and rename it to BypassRAMCheck.
Double check that the values are changed from 0 to 1.

Close the Registry Editor.
Click on the Install now button to continue installing Windows 11 without the error. Follow the usual on-screen directions to complete installing Windows 11.
Rhousse
Commerce major. My training enabled me to fully use the various Microsoft Applications while also allowing to work around problems. I spent my high school years working as a campus writer and researcher, as I get older, I want to broaden my horizons and live life to the fullest.