
Если установщик Windows 11, а возможно и какая-то программа или игра (такое тоже возможно) сообщает о том, что его не устраивает состояние безопасной загрузки и её необходимо включить — сделать это сравнительно легко, но возможны нюансы.
В этой инструкции подробно о способах включить безопасную загрузку на вашем компьютере или ноутбуке, при условии, что это возможно. Обратите внимание, если задача — установка Windows 11, существуют возможности запуска установки и без включенной безопасной загрузки (Secure Boot), например — создание загрузочной флешки в Rufus с отключением проверки совместимости при чистой установке, или обновление с обходом требований для установки.
Проверка состояния безопасной загрузки, особенности работы после включения
Прежде чем начать, о том, где вы можете проверить текущее состояние безопасной загрузки в Windows 11 или Windows 10:
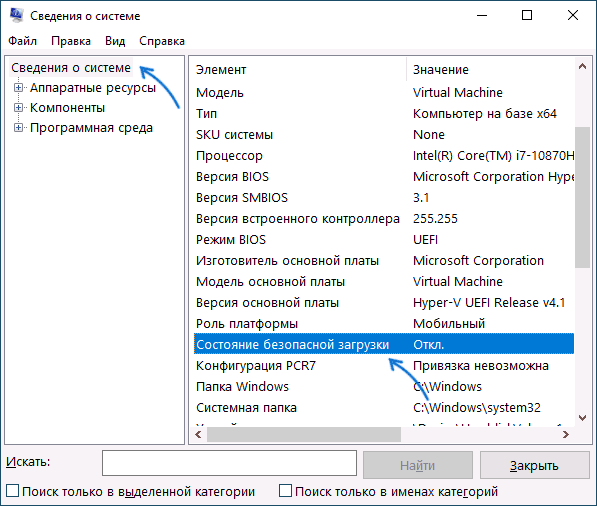
- Нажмите правой кнопкой мыши по кнопке «Пуск», выберите пункт «Выполнить», введите msinfo32 и нажмите Enter. В разделе «Сведения о системе» вы увидите пункт «Состояние безопасной загрузки» с её текущим статусом.

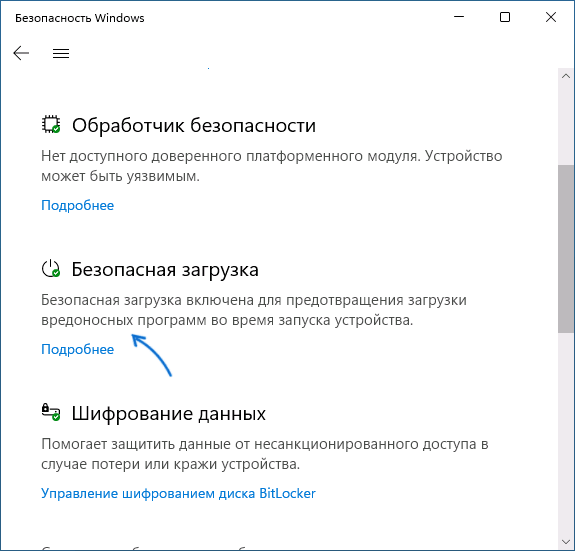
- Можно зайти в окно «Безопасность Windows», например, с помощью значка в области уведомлений и открыть раздел «Безопасность устройства». Если вы наблюдаете там пункт «Безопасная загрузка» с зеленой отметкой, она включена. Иначе — нет.

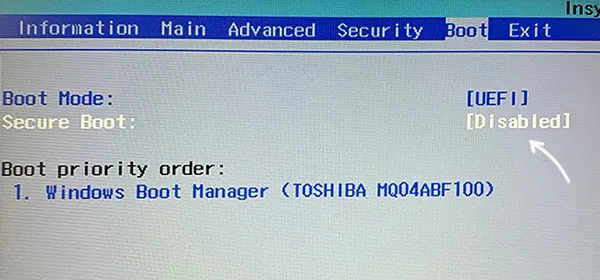
Ещё один важный момент: загрузка с включенной безопасной загрузкой возможна только для систем, установленных в UEFI-режиме на GPT диск.
Если, к примеру, у вас Windows 10 и установлена в Legacy-режиме на диск MBR, после включения Secure Boot она перестанет загружаться. Возможные варианты действий: конвертировать диск в GPT с помощью mbr2gpt.exe и включить UEFI-загрузку, либо использовать вариант с чистой установкой с флешки и обходом требований Windows 11, как было указано в начале статьи.
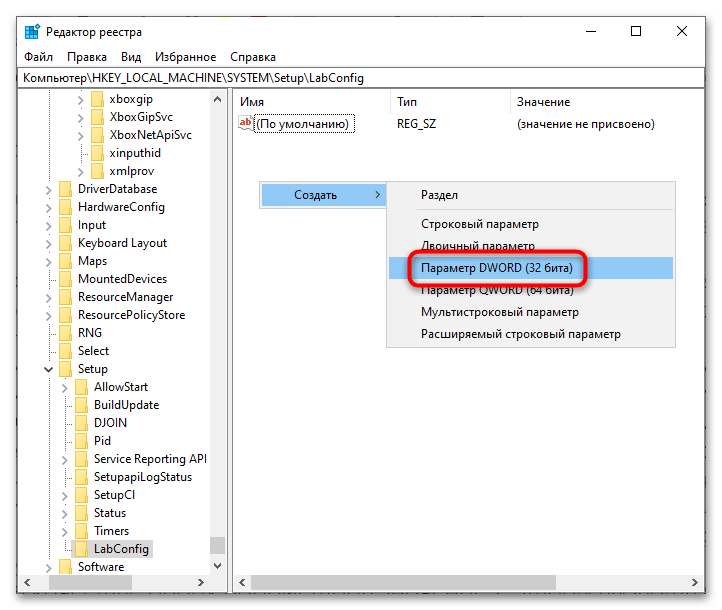
Включение безопасной загрузки Secure Boot в БИОС/UEFI
Само включение безопасной загрузки или Secure Boot выполняется не в Windows 11/10, а в БИОС/UEFI вашего компьютера или ноутбука. Для того, чтобы включить её, необходимо:
- Зайти в БИОС при включении/перезагрузке устройства. На ноутбуках для этого обычно используется клавиша F2 (или сочетание Fn+F2), которую необходимо ритмично нажимать сразу после появления заставки производителя (но бывают и другие варианты клавиши), на ПК как правило используется клавиша Delete. Более подробно: Как зайти в БИОС/UEFI на компьютере или ноутбуке.
- Найти раздел БИОС, на котором доступна опция включения (установка в Enabled) функции Secure Boot. Учитывайте, что на очень старых компьютерах такой настройки может и не быть. Как правило, она располагается где-то в разделе Security, Boot, System Configuration, иногда — Advanced Settings. Несколько примеров расположения будут приведены далее.
- Сменить состояние Secure Boot на Enabled (если ранее выполнялась очистка ключей Secure Boot, восстановить их), сохранить настройки БИОС/UEFI (обычно выполняется клавишей F10 или на вкладке Exit) и перезагрузиться обратно в систему.
Примеры расположения опции для включения безопасной загрузки (Secure Boot)
Ниже — несколько примеров, где можно найти опцию включения безопасной загрузки на разных материнских платах и ноутбуках. У вас может отличаться, но логика везде одна и та же.
Ещё раз отмечу: включить безопасную загрузку можно только в случае, если у вас включен режим загрузки UEFI, а режим Legacy/CSM отключен, иначе опция будет недоступна. В некоторых вариантах БИОС переключение в режим загрузки UEFI выполняется путем выбора типа операционной системы (OS Type) между Windows 11/10/8 и «Other OS» (нужно выбрать Windows).
ASUS
На разных версиях материнских плат и ноутбуков включение Secure Boot реализовано слегка по-разному. Обычно пункт «Secure Boot» можно найти на вкладке «Boot» или «Security». При этом для OS Type может потребоваться выставить Windows UEFI Mode (параметр может и отсутствовать).
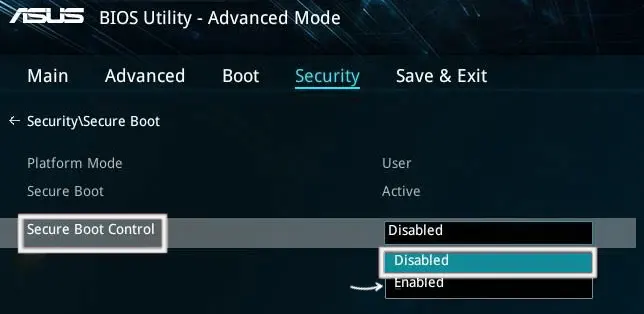
Также, для доступности пункта настройки безопасной загрузки в БИОС может потребоваться перейти в Advanced Mode, обычно — по клавише F7.
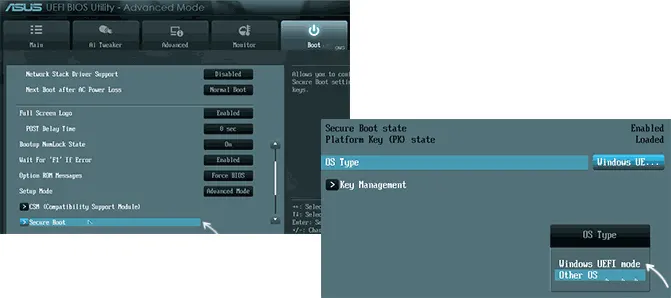
В некоторых случаях может потребоваться восстановление ключей безопасной загрузки, обычно выполняется следующим образом: в Advanced Mode в BIOS на вкладке Boot или в Secure Boot — Key Management выбираем Load Default PK и подтверждаем загрузку ключей по умолчанию.
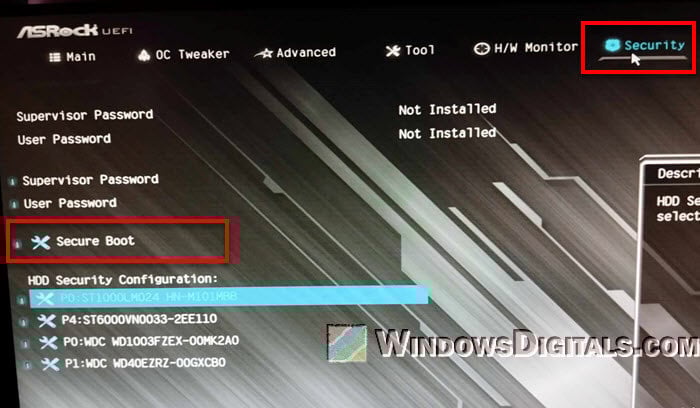
AsRock
Настройка для включения безопасной загрузки на материнских платах AsRock обычно находится в разделе «Security».

Зайдя в раздел необходимо будет установить значение Secure Boot в Enabled, а если выбор недоступен, включить стандартный Secure Boot Mode и установить ключи по умолчанию (Install default Secure Boot keys).

Acer
Как правило, опция включения Secure Boot на ноутбуках Acer находится либо в разделе Advanced — System Configuration, либо в Boot или Authentication.
Также помните, о том, что должен быть включен режим загрузки UEFI, а не Legacy/CSM для возможности изменения состояния безопасной загрузки на Enabled.
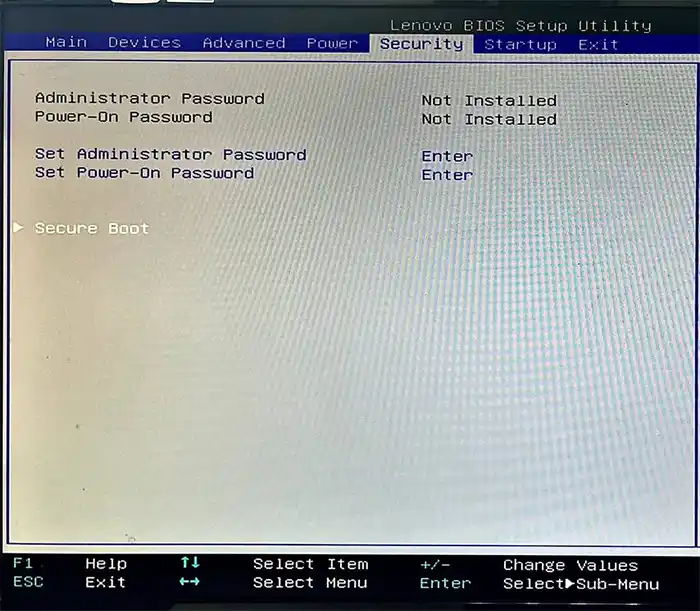
Lenovo
ПК и ноутбуки Lenovo имеют разные варианты интерфейса БИОС, но обычно нужная опция находится на вкладке Security, как на фото ниже:

Ещё один пример с ноутбука Lenovo:
Gigabyte
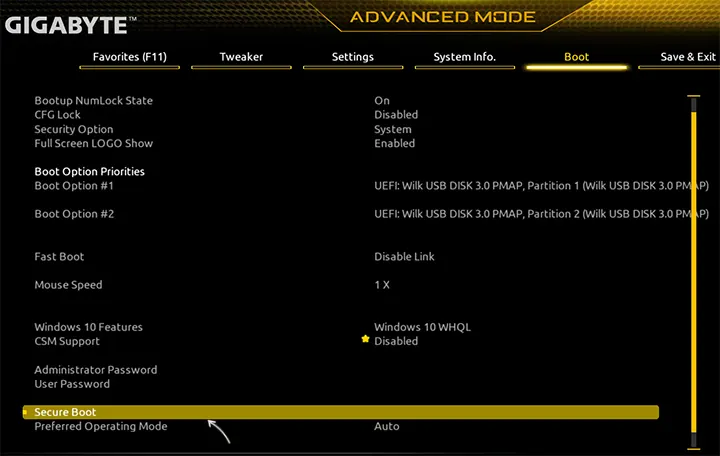
Варианты отключения Secure Boot на материнских платах и ноутбуках Gigabyte могут отличаться, обычно порядок действий следующий:
- На вкладке Boot или BIOS отключить CSM Support, и выбрать тип операционной системы или установить пункт Windows 8/10 Features в, соответственно, Windows 8/10, а не Other OS.
- После этого должен появиться пункт Secure Boot, в который необходимо зайти, чтобы включить безопасную загрузку.
Несколько дополнительных мест расположения опции включения Secure Boot (устанавливаем в Enabled) на старых Dell, Gigabyte, HP:

Также, если в вашем интерфейсе БИОС предусмотрен поиск, можно использовать его:

В случае, если вы не нашли способа включить безопасную загрузку на вашей материнской плате, либо её не удается перевести в Enabled, укажите её марку и модель в комментариях, я постараюсь подсказать, где именно требуется включать этот параметр. Кстати, часто достаточно просто сбросить настройки БИОС (Load Defaults на вкладке Exit), чтобы включить безопасную загрузку, так как на большинстве современных материнских плат она по умолчанию включена.
Вариант 1: Включение функции «Secure Boot»
Когда установщик Windows 11 требует наличия поддержки безопасной загрузки, это значит, что на компьютере должна быть включена функция «Secure Boot». Активация выполняется через BIOS, что довольно часто решает возникшую проблему.
Если при установке операционной системы нет никаких других причин, из-за чего Виндовс не может быть установлена, тогда в большинстве случаев достаточно включить «Secure Boot» и повторить проверку соответствия. Включить опцию можно, используя другую нашу статью по следующей ссылке.
Подробнее: Включение безопасной загрузки («Secure Boot») для Windows 11
Однако трудность может заключаться в том, что у некоторых пользователей по какой-то причине не выходит включить «Secure Boot» или же эта опция отсутствует, а значит заблокирована производителем материнской платы/ноутбука в BIOS. В такой ситуации следует обратиться ко второму варианту.
Вариант 2: Обход ограничения при установке
Когда не получается изменить статус безопасной загрузки, можно обойти эту проверку разными способами. В зависимости от ваших умений и возможностей установить Windows 11 в обход ограничения можно разными способами: при создании загрузочной флешки, путем использования специальной сборки ОС, редактирования установщика перед установкой или в процессе. Развернутые инструкции на эту тему рассмотрены в статье по ссылке ниже — выбирайте любую и пользуйтесь ей. Этот материал также позволяет обойти и другие ограничения, а не только отсутствие безопасной загрузки, — об этом читайте в Способе 4.
Подробнее: Как установить Windows 11 без TPM 2.0 и Secure Boot
Наша группа в TelegramПолезные советы и помощь
The Secure Boot security feature on your ASRock motherboard prevents booting from any devices that do not contain valid digital signatures.
In essence, only signed system level drivers can run if this feature is enabled. If any drivers on the operating system or the bootable drives are unsigned or infected-with malware, the UEFI or BIOS firmware won’t choose it as a boot device.
You can enable or disable this setting from within the Security tab of the UEFI or BIOS interface on your ASRock motherboard.
How to Disable Secure Boot on ASRock Motherboard
While Secure Boot is a security feature that protects your computer from external threats and access, you may need to disable it in a few situations.
For instance, I have both Windows and Linux as dual boot options on my computer. If I change the hardware components or the Linux kernel, the drivers or kernel on my Linux system may not have the necessary digital signature. It is possible to re-sign the software components. But since it’s tiring to do on each change, I usually keep Secure Boot disabled.
However, I also adopt all the preventive measures to prevent any sorts of malware or other threats on my system. If you are not sure that you can do the same, it’s best to leave it on.
Regardless, here’s how you can disable this feature.
- Restart or power up your computer.
- As soon as you see the ASRock logo on the screen, press F2 or Del keys to get to the UEFI setup.

- If you are in the EZ mode interface, press F6 to get to Advanced Mode.

- Head over to the Security tab and select Secure Boot.

- Select Secure Boot, set it to Disabled and press Enter.
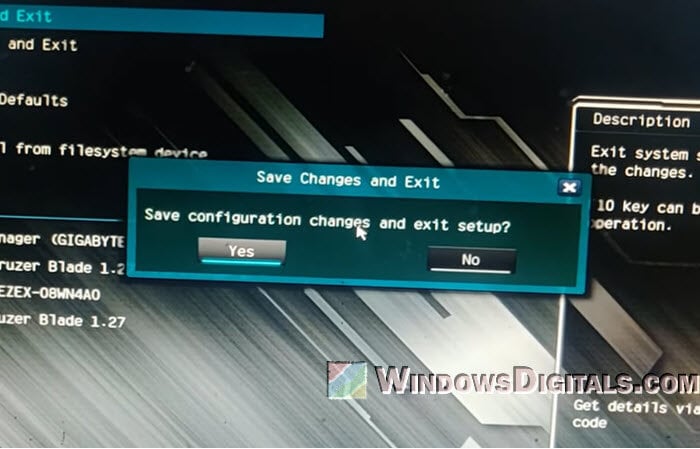
- Press F10 and click Yes to save the changes and exit the UEFI/BIOS.


You can also remove the keys altogether to disable Secure Boot in a more destructive manner. I don’t recommend doing so especially if you are using custom generated Secure Boot keys and have their backup. Regardless, here’s how you can do it:
- Go to the Security tab in the UEFI Advanced Mode.
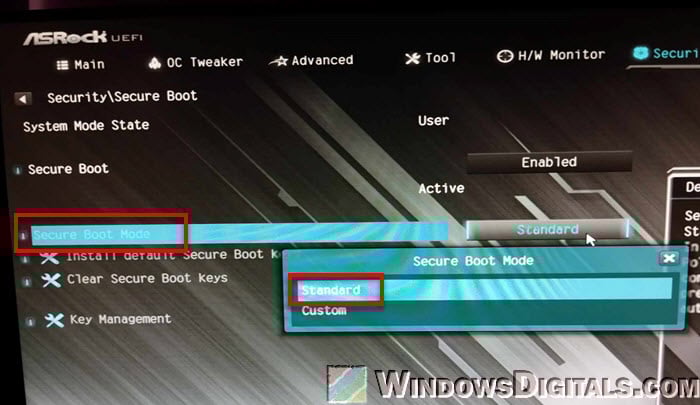
- Select Secure Boot and set Secure Boot Mode to Custom.
- Then click on Clear Secure Boot Keys.
- Choose Yes to confirm.
- Press F10 and click Yes to save the changes and exit the UEFI/BIOS.


Note: If you change your hardware devices after disabling Secure Boot, you may need to reset the BIOS before you can enable it again.
How to Enable Secure Boot on ASRock Motherboard
The process to enable Secure Boot is similar to that of disabling this feature. However, you will need to perform additional steps if your UEFI no longer contains the Secure Boot Keys.
Note:
If you wish to enable secure boot in order to upgrade to or install Windows 11, your firmware also needs to be in UEFI mode.
So you have to disable CSM, which carries legacy support. Also, if you have an MBR partition disk instead of a GPT one, you will need to convert it to GPT so that you can enable UEFI mode.
Depending on your motherboard’s BIOS version, you may need to change these settings in other situations as well.
- Power up or restart your computer.
- Press F2 or Del on the startup when you see the manufacturer’s logo. If you have enabled fast boot, it’s better to press the key repeatedly to get the timing right.
- If you are in the EZ mode interface, press F6 to get to Advanced Mode.
- Navigate to the Security tab and go inside Secure Boot.
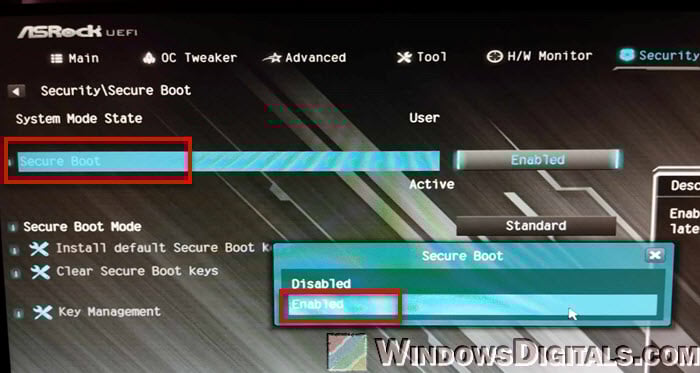
- Choose Secure Boot and set it to Enabled.
- If you don’t encounter any issues, press F10 and click Yes to save the changes and exit the BIOS/UEFI.

If you get the “Secure Boot can be enabled when System is in User Mode. Repeat operation after enrolling Platform Key(PK)” or a similar error, it means that your computer does not have the necessary Secure Boot keys.
Use one of the three methods below to generate the keys in this scenario.
Then, enable Secure Boot using the above steps. You may need to save the changes, restart your system and then get to the UEFI again to do so.
In some situations, your system may show that Secure boot is not active even when it is enabled in the BIOS. You will need to perform a BIOS update to resolve this issue.
Turning on TPM 2.0 (Trusted Platform Module) and Secure Boot on an ASRock motherboard is very important for today’s computers, especially if you like gaming or care a lot about security. TPM 2.0 provides security features built into the hardware to protect your important data. Secure Boot stops unapproved software from starting up on your computer, which makes it even safer. These security steps are getting more important, like in games such as Riot’s Valorant, which won’t start unless TPM 2.0 and Secure Boot are active.
Also see: Enabling TPM 2.0 and Secure Boot on Gigabyte Mobo

Knowing BIOS and UEFI firmware
Before we explain how to turn on TPM 2.0 and Secure Boot, you need to know about BIOS (Basic Input/Output System) and UEFI (Unified Extensible Firmware Interface) firmware. Most modern ASRock motherboards use UEFI firmware. It’s a newer version of the old BIOS and it’s generally much easier to use.
UEFI lets you use bigger hard drives, starts up your computer faster, and has better security features, including TPM and Secure Boot. We’ll use the UEFI settings to turn these features on. Next, we’ll start by showing you how to get into the UEFI settings on your ASRock motherboard.
Related resource: Can’t find TPM 2.0 and Secure Boot options in BIOS?
Step 1: Go into the UEFI settings on ASRock motherboard
The first step to enable TPM 2.0 and Secure Boot on an ASRock motherboard is to get into the UEFI (Unified Extensible Firmware Interface). The UEFI is a type of firmware that lets you adjust settings for your computer’s hardware.
- Start by restarting your computer. As it boots up, you need to enter the UEFI settings. You usually do this by pressing a certain key while the computer is starting.
- Watch the screen closely when your computer starts. Most ASRock motherboards tell you to press the F2 or Del key to get into the UEFI settings. Do this before your operating system begins to load. If you miss it, just restart your computer and try again.
- Once in the UEFI settings, you’ll see a graphical interface, which is different from the old text-based BIOS screens. Use your keyboard (and sometimes your mouse) to go through the menus.

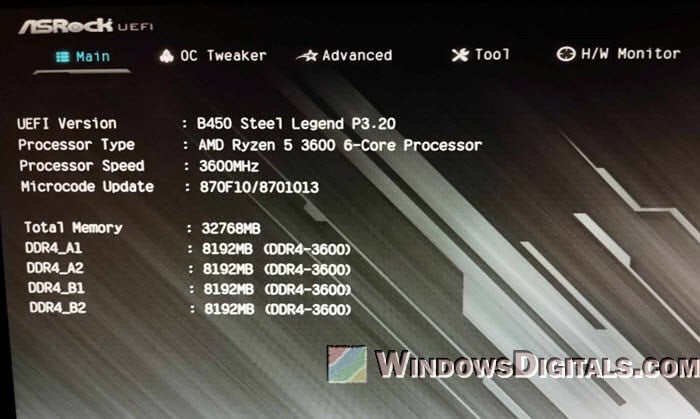
The UEFI interface might look a bit different depending on your ASRock motherboard model and firmware version. If you meet a problem or just don’t know how to get into the interface, check your motherboard’s manual for specific instructions for your model.
Pro tip: How to Allocate More RAM to a Game in Windows 11 or 10
Step 2: Enable TPM 2.0 on ASRock motherboard
After you get into the UEFI settings, the next step is to just turn on TPM 2.0. TPM (Trusted Platform Module) is a security feature that helps with secure booting, disk encryption, and more. The following are the steps to enable TPM 2.0 on your ASRock motherboard.
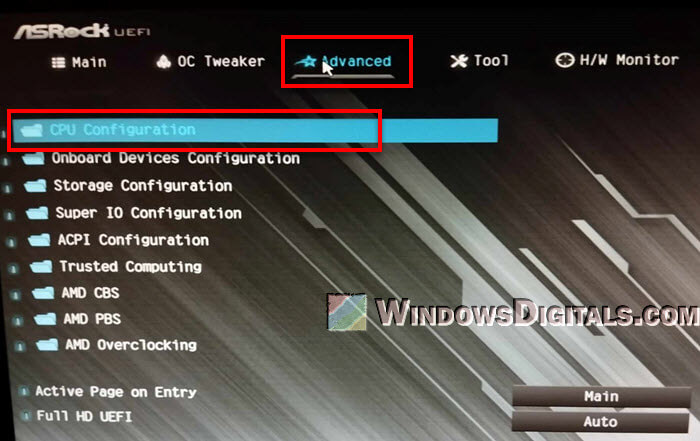
- Inside the UEFI interface, go to the Advanced tab or section. Here, you’ll find different settings to configure.
- Click on the CPU Configuration settings. The exact location and name might vary, so check your motherboard’s manual if you’re not sure.

- Look for an option like AMD fTPM (Firmware TPM for AMD CPUs), TPM 2.0, TPM State, or Intel PTT (Platform Trust Technology for Intel CPUs). Choose this option and change it to “AMD CPU fTPM” or just “Enabled“.

- After turning on TPM, don’t forget to save the changes. This is usually done by pressing F10 or going to the Exit tab and choosing Save Changes and Exit. Your computer will restart for the changes to take effect.
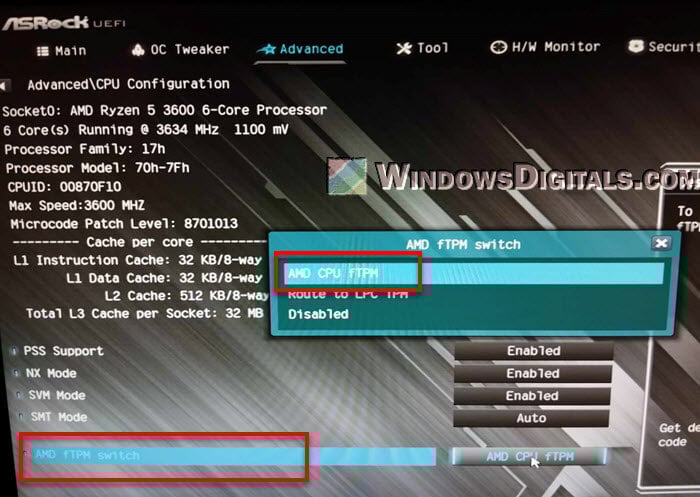
Know that enabling TPM might need a firmware update first, especially on older motherboards. If TPM 2.0 isn’t available or working on your ASRock motherboard, check the manufacturer’s website for a firmware update that could add or fix this feature.
Useful guide: Using Onboard Graphics And Graphics Card Simultaneously
Step 3: Enable Secure Boot on ASRock motherboard
After turning on TPM 2.0, the next step is to enable Secure Boot. Secure Boot is just a UEFI feature that makes sure your PC starts up only with firmware that the manufacturer trusts. This is quite important for stopping harmful software from messing with the boot process. Below is how you can turn on Secure Boot on your ASRock motherboard.
- In the UEFI settings, find the Security tab or section. This is where you’ll find Secure Boot settings.
- In the Security options, locate the Secure Boot setting and select it.

- There, before you can change the settings for “Secure Boot”, you need to set the “Secure Boot Mode” to “Standard“.

- Then, change the Secure Boot setting from “Disabled” to “Enabled“. In some rare cases, you might need to set the OS Type to Windows UEFI mode or something similar to fully turn on Secure Boot functionality.

- Like with the TPM setting, make sure to save your changes. Press F10 or go to the Exit tab and pick Save Changes and Exit. Your computer will restart with Secure Boot turned on.

Please note, turning on Secure Boot might cause problems with starting operating systems that don’t follow UEFI rules or with bootloaders that aren’t seen as secure. If you have a dual-boot system or use an older operating system, make sure everything is compatible before turning on Secure Boot.
Linked issue: Windows 11 Not Activated After BIOS Update
Some common issues you might encounter
Update UEFI firmware
If you can’t see the TPM 2.0 or Secure Boot options in your UEFI settings, your motherboard’s firmware might need an update. Go to the ASRock website, find your motherboard model, and download the latest UEFI firmware. Updating can fix many compatibility issues.
Compatibility mode
Some systems might need you to switch from Legacy to UEFI boot mode to turn on Secure Boot. You usually find this option under the Boot tab in the UEFI settings.
Operating system issues
If your operating system doesn’t start after you change these settings, it might not work well with Secure Boot or UEFI mode. Windows 10 and newer versions usually work fine, but older versions or some Linux setups might have problems.
Reset UEFI settings when needed
If you can’t start your computer after making changes, most motherboards let you reset the UEFI settings to their original state by pressing a specific key combination. Check your motherboard’s manual to find out how to do this.
Might be useful: How to Clear CMOS without Removing Battery or Jumper Cap
Check the manual again
Each motherboard model has its own UEFI layout and options. Look at your motherboard’s manual for specific guidance.
Turning on TPM and Secure Boot is a big change to your system’s security settings. If you’re not sure or if you keep having problems, think about getting help from a pro or the ASRock support community.
Secure Boot is an important security feature designed to prevent malicious software from loading when your PC starts up (boots). Most modern PCs are capable of Secure Boot, but in some instances, there may be settings that cause the PC to appear to not be capable of Secure Boot. These settings can be changed in the PC firmware. Firmware, often called BIOS (Basic Input/Output System), is the software that starts up before Windows when you first turn on your PC.
Note: This article is intended for users who are not able to upgrade to Windows 11 because their PC is not currently Secure Boot capable. If you are unfamiliar with this level of technical detail, we recommend that you consult your PC manufacturer’s support information for more instructions specific to your device.
How to enable Secure Boot on my PC
To access these settings, you can consult your PC manufacturer’s documentation or follow these instructions:
-
Go to Settings > Update & Security > Recovery and select Restart now under Advanced startup.
-
On the next screen, select Troubleshoot > Advanced options > UEFI Firmware Settings > Restart to make changes.
To change these settings, you will need to switch the PC boot mode from one enabled as “Legacy” BIOS (also known as “CSM” Mode) to UEFI/BIOS (Unified Extensible Firmware Interface). In some cases, there are options to enable both UEFI and Legacy/CSM. If so, you will need to choose for UEFI to be the first or only option. If you are unsure how to make any necessary changes to enable the UEFI/BIOS, we recommend that you check your PC manufacturer’s support information on their website. Here are a few links to information from some PC manufacturers to help get you started:
Dell | Lenovo | HP
While the requirement to upgrade a Windows 10 device to Windows 11 is only that the PC be Secure Boot capable by having UEFI/BIOS enabled, you may also consider enabling or turning Secure Boot on for better security.
Related articles
Windows 11 System Requirements
Ways to install Windows 11
Windows help & learning
Need more help?
Want more options?
Explore subscription benefits, browse training courses, learn how to secure your device, and more.