
Applies ToWindows 11 Windows 10 Windows 10 Mobile
Если у вас возникли проблемы с подключением к беспроводному дисплею, попробуйте выполнить следующие действия, чтобы устранить неполадки.
-
Убедитесь, что устройство Windows 11 поддерживает Miracast. Чтобы проверка на компьютере, нажмите клавишу с логотипом Windows + K. Если устройство не поддерживает Miracast, может появиться сообщение о необходимости подключения внешнего дисплея с помощью кабеля.
-
Убедитесь, что Wi-Fi включен. Для этого на компьютере щелкните значок Сеть в правой части панели задач, а затем проверка быстрый параметр Wi-Fi.
-
Убедитесь, что дисплей поддерживает Miracast и убедитесь, что он включен. Если ваш беспроводной дисплей не поддерживает Miracast, вам потребуется адаптер Miracast (иногда называемый аппаратным ключом), который подключается к порту HDMI.
-
Убедитесь, что на целевом компьютере установлено приложение Беспроводной дисплей. Если устройство, к которому вы подключаетесь, является другим компьютером с Windows, необходимо установить приложение беспроводного отображения (необязательное средство в Windows).
-
Если целевой компьютер недоступен для обнаружения, попробуйте ввести беспроводной дисплей в поле поиска на панели задач и выбрать его в списке результатов. Теперь проверка для этого устройства на устройстве, с которого вы хотите проецировать. Дополнительные сведения см. в разделе Использование зеркального отображения и проецирования экрана.
-
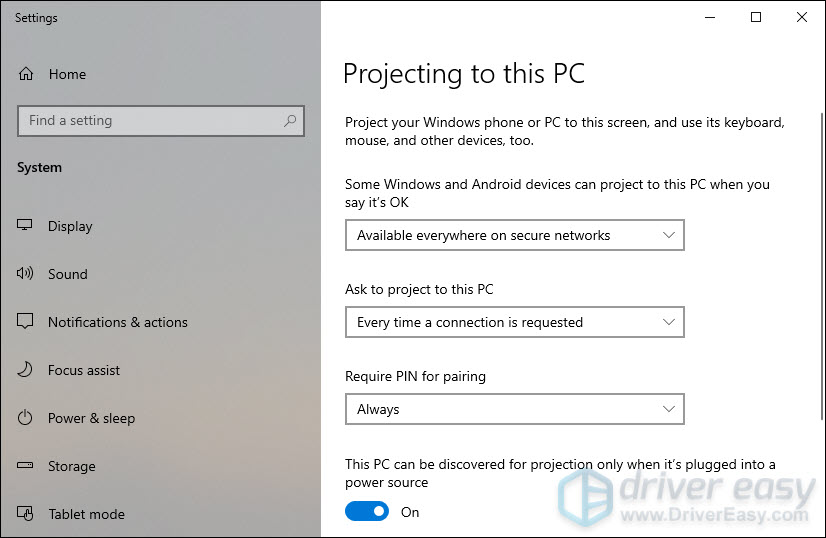
На целевом компьютере перейдите в раздел Параметры > системный > Проецирование на этот компьютер и убедитесь, что он настроен для обнаружения.
-
-
Убедитесь, что драйверы устройств обновлены и установлена последняя версия встроенного ПО для беспроводного дисплея или адаптера. Ознакомьтесь с информацией о поддержке на веб-сайте производителя для получения дальнейших инструкций или зайдите в Microsoft Store для поиска приложения производителя, которое поможет вам.
-
Перезагрузите компьютер и беспроводной дисплей.
-
Удалите беспроводной дисплей и снова подключите его. Чтобы удалить устройство, откройте раздел Параметры и выберите Bluetooth & устройства > устройства. В разделе Беспроводные дисплеи & док-станции выберите беспроводной дисплей или адаптер, который требуется удалить, а затем выберите Удалить устройство. После этого попробуйте повторно подключить устройство.
Нужна дополнительная помощь?
Нужны дополнительные параметры?
Изучите преимущества подписки, просмотрите учебные курсы, узнайте, как защитить свое устройство и т. д.
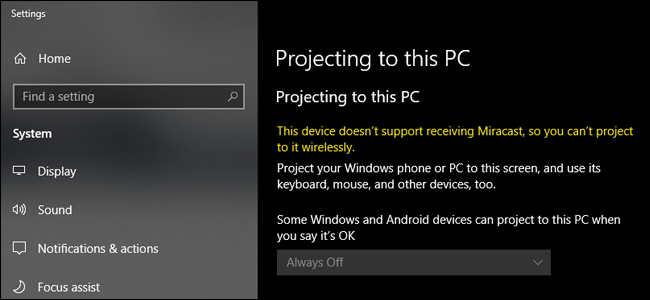
Windows 10 Projecting to this PC is a feature that allows you to wirelessly project your other devices to the screen of your computer. But when you try to use this feature, you might get an error message saying “This device doesn’t support receiving Miracast, so you can’t project to it wirelessly.”. To fix it, we’ll walk you through the steps in this article.

Try these fixes
You may not need to try them all; simply work your way down the list until you find the one that works for you.
- Check if your PC supports Miracast
- Check if WiFi is enabled on both devices
- Reinstall your wireless network adapter driver
- Verify your network driver if it’s compatible
- Update your network driver
- Set Auto for Wireless Mode Selection
- Disable third-party VPN
Fix 1: Check if your PC supports Miracast
Miracast is a wireless technology that makes it possible for users to mirror one’s device’s display to another device. Before using it, the first thing you need to do is check if your device supports it.
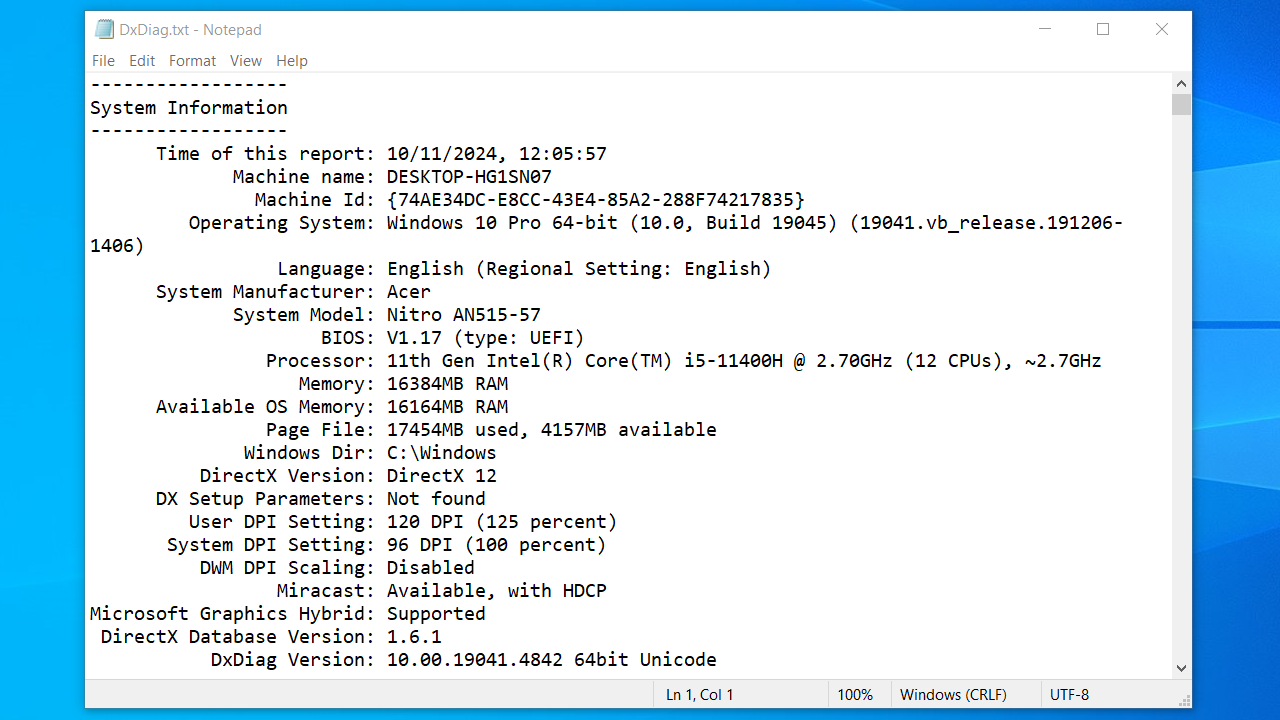
1) On your keyboard, press the Windows logo key and R at the same time to invoke the Run box.
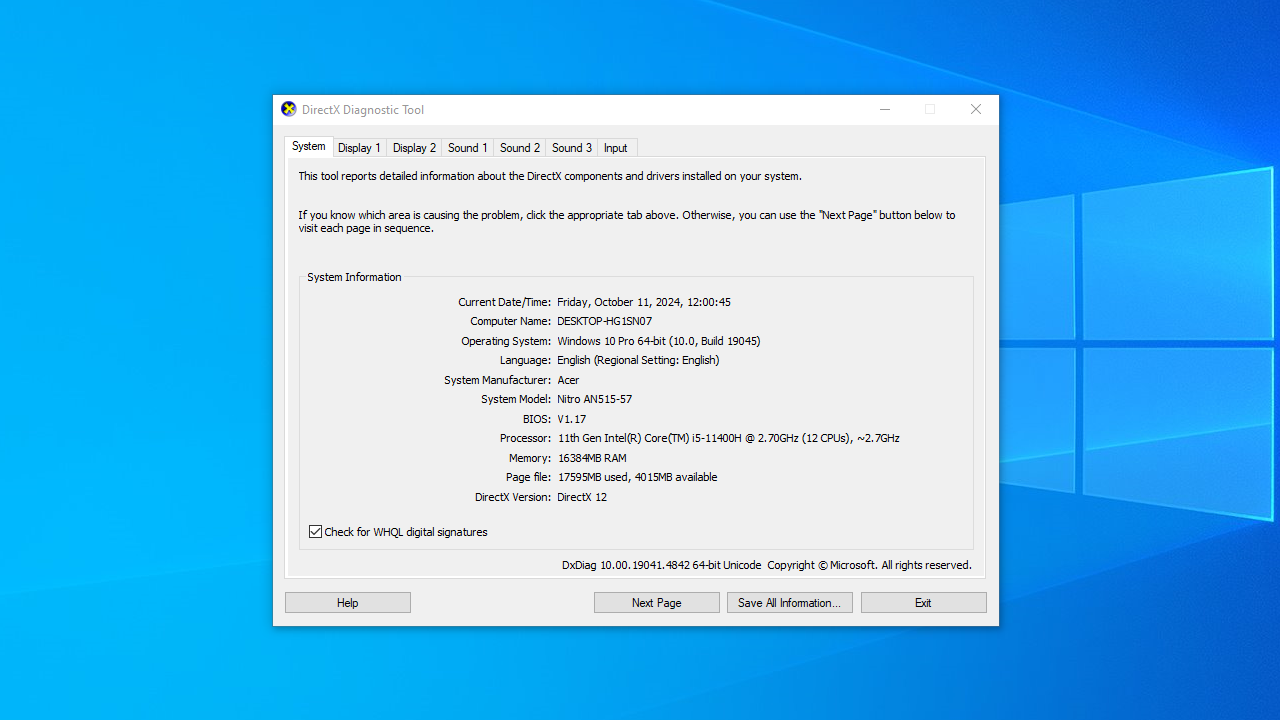
2) Type dxdiag, then press Enter on your keyboard.
3) In the DirectX Diagnostic Tool window, click Save All Information… at the bottom.
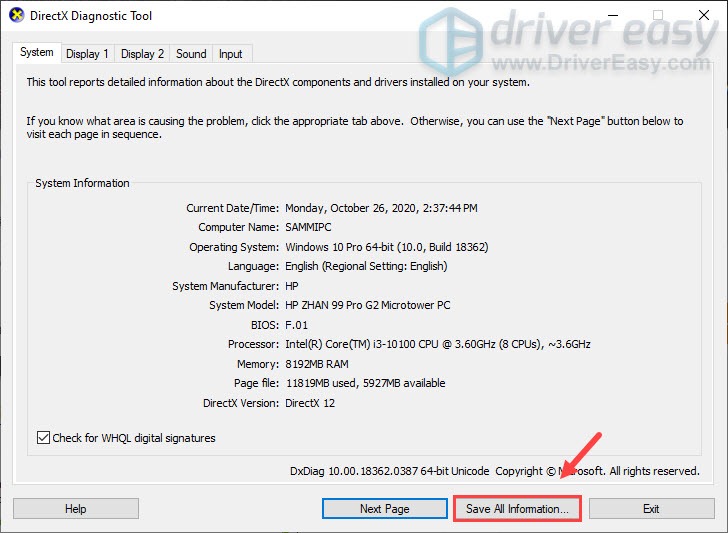
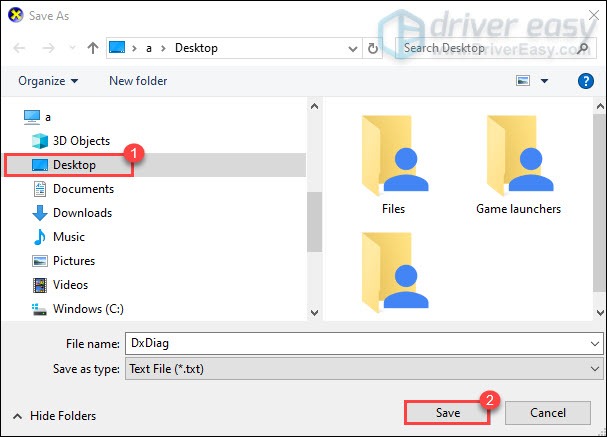
4) When the Save As window appears, select Desktop so that it’s easy to find. Then click Save.
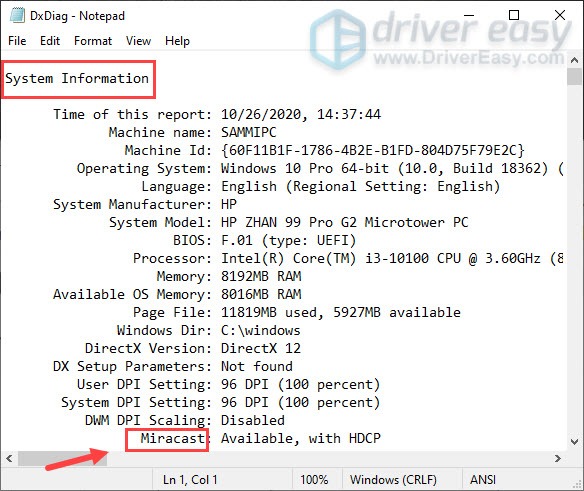
5) From your desktop, double-click on the DxDiag text file to open it.
6) Under the System Information section, look for Miracast. Now you can know whether it’s available or not. If it’s unavailable, then your PC doesn’t support Miracast.
If your computer doesn’t support Miracast, then you would need to buy a wireless adapter such as Microsoft Wireless Display Adapter.
Fix 2: Check if WiFi is enabled on both devices
Miracast is a WiFi standard. So to connect your computer to another device, you must use WiFi. Many users report that the reason they can’t use Miracast is that they were using Ethernet. After they switched to WiFi, they can connect their computer to other devices. Here’s how you can check if WiFi is enabled on your computer:
1) On your keyboard, press the Windows logo key and R at the same time to invoke the Run box.
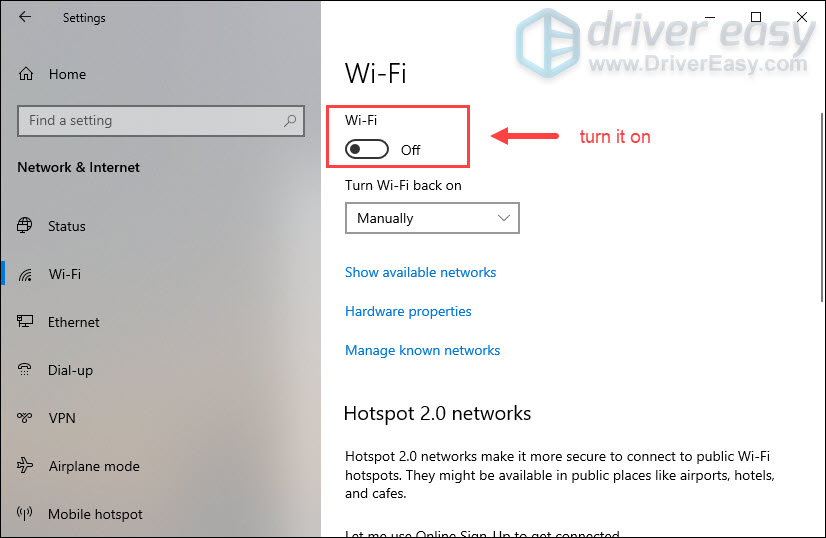
2) Type ms-settings:network-wifi, then press Enter on your keyboard.
3) Click on the toggle to activate WiFi if it’s deactivated.
4)Also, you need to check if WiFi is enabled on other devices. For iOS and Android users, you can usually activate WiFi from the Settings app.
Once enabling WiFi on both your PC and display device, connect them to the same network.
Now you can check if it works:
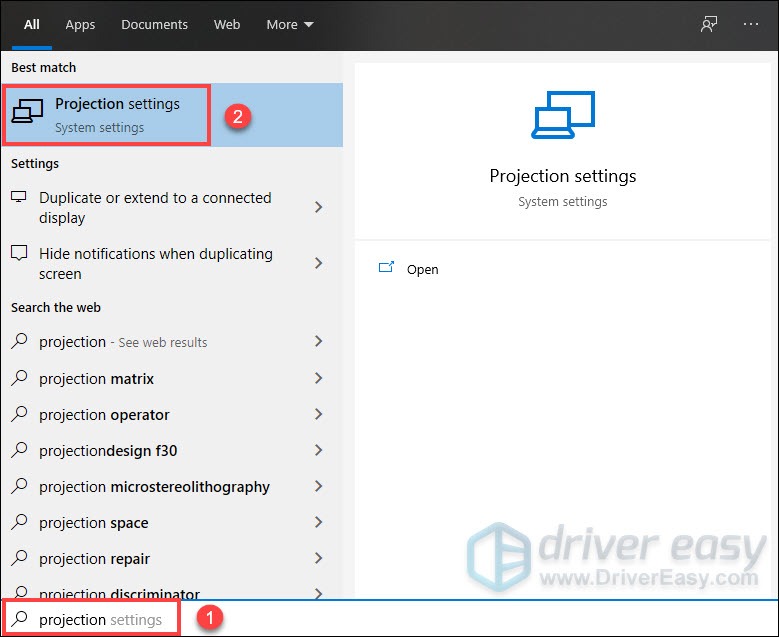
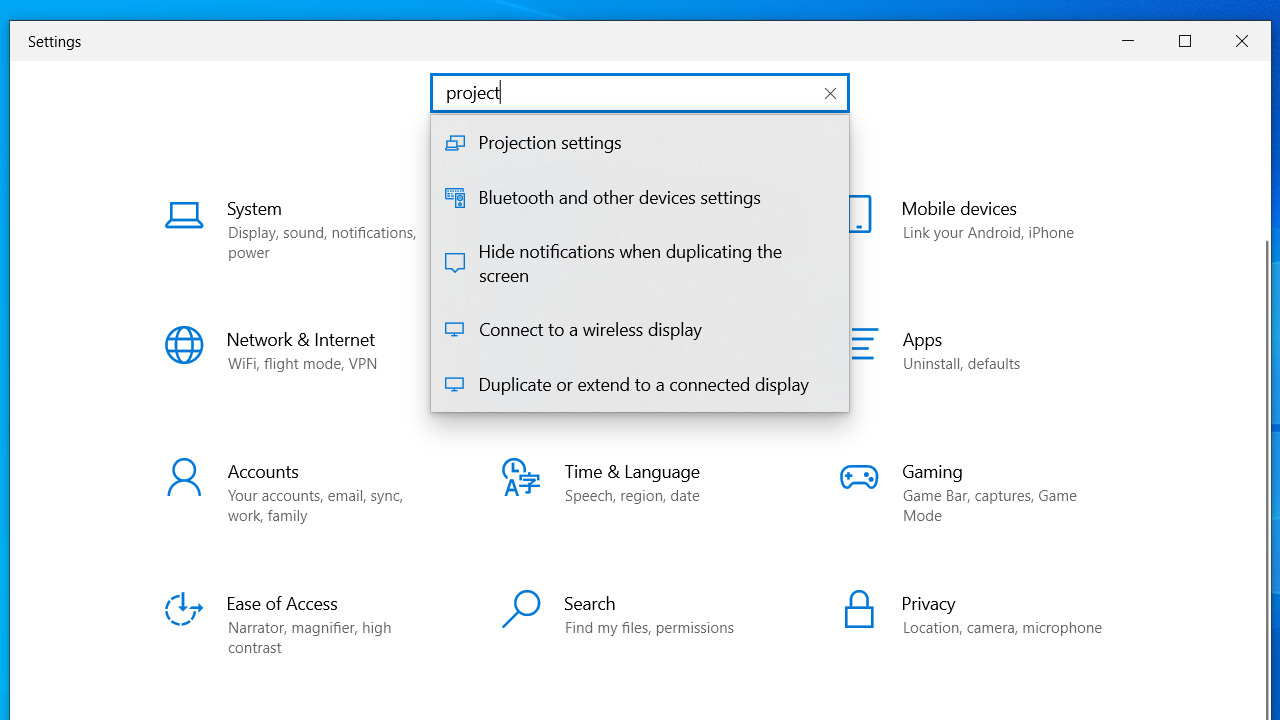
1) In the Search box, type projection. Select Projection settings from the result.
2) The error message should be gone.
If you still have the error message, don’t panic. There are a few other working fixes for you.
Fix 3: Reinstall your wireless network adapter driver
If you have WiFi enabled but can’t really connect to WiFi and still see the error message, you should reinstall the wireless network adapter driver. There is a possibility that your wireless network adapter driver is out of date or corrupted, which would prevent you from connecting your PC to the Internet. If the wireless driver is the culprit, reinstalling it will get you back online in minutes. Here’s how you can do this:
1) On your keyboard, press the Windows logo key and R at the same time to invoke the Run box.
2) Type devmgmt.msc, then press Enter on your keyboard.
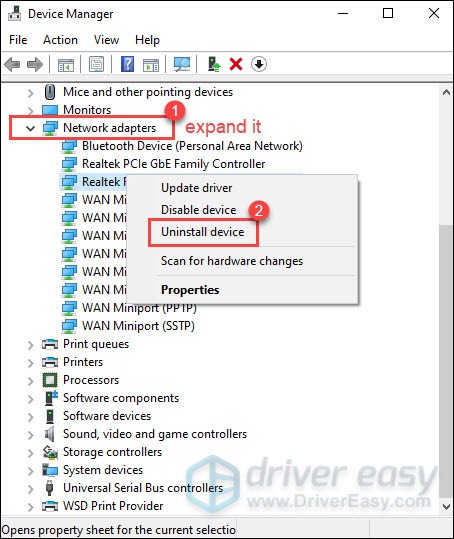
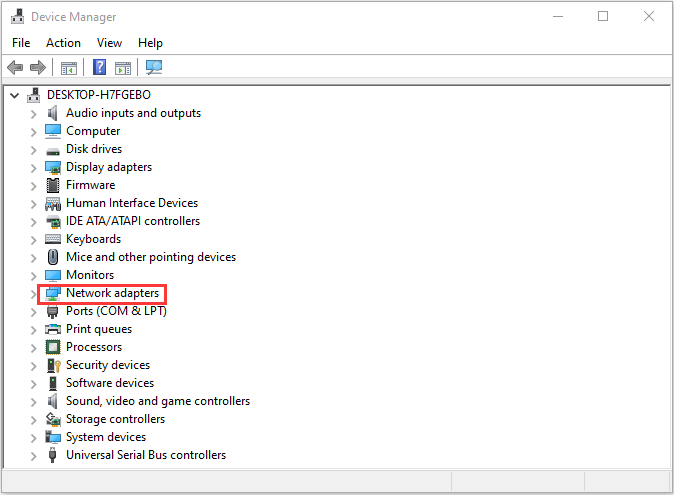
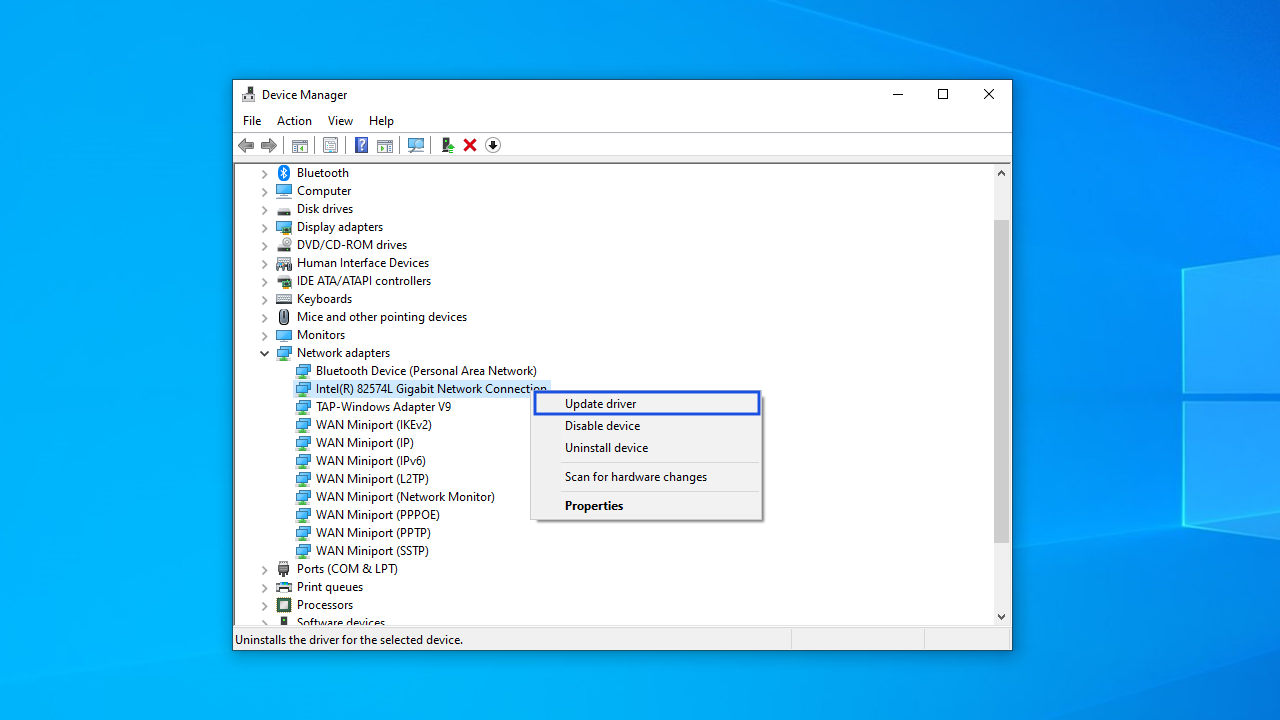
3) Expand Network adapters. Select your wireless network adapter driver, right-click on it and select Uninstall device.
4) Restart your computer and Windows will reinstall the driver automatically. (Note: you need to connect to the network.)
If reinstalling the wireless network adapter driver didn’t resolve your issue, you should verify your network driver to check if it’s compatible.
Fix 4: Verify your network driver if it’s compatible
To check if your network driver is compatible, you can follow the steps below:
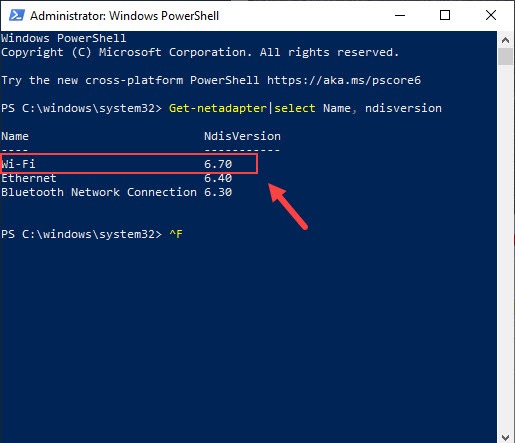
1) Right-click on the Start menu.Then select Windows PowerShell (Admin).
2) Click Yes when a prompt appears asking for the right.
3) Copy the command and past in the window. Then hit Enter.
Get-netadapter|select Name, ndisversion
Now you can check your NdisVersion. It should be above 6.30 for your wireless card to support Miracast. If it’s below 6.30, you need to update your wireless network driver.
Fix 5: Update your network drivers
If your network drivers are outdated or faulty, you will encounter connectivity issues. So to fix it, you need to check for updates.
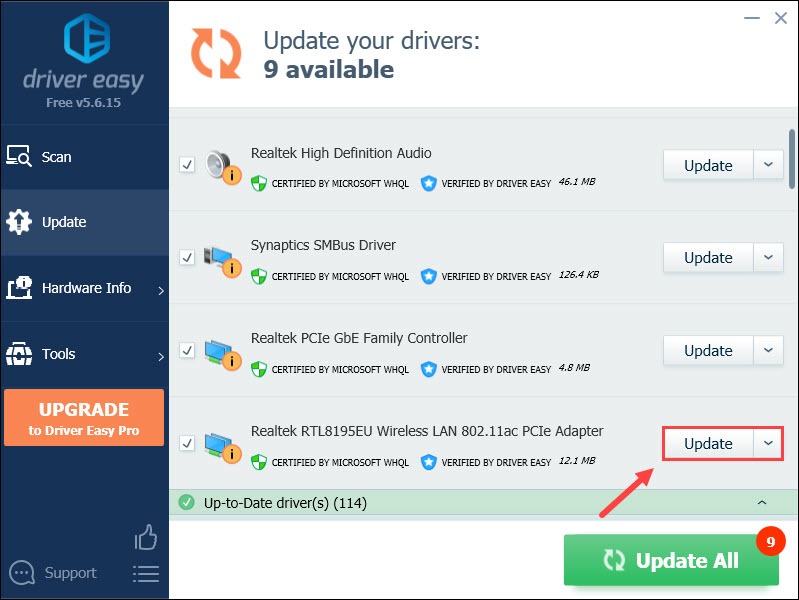
You can manually update your network drivers by going to manufacturers’ official websites to download and install the correct network drivers for your system. This can be time-consuming and you might risk downloading the wrong drivers for your system. So if you’re not comfortable doing it on your own, we recommend using Driver Easy to automatically update your network drivers.
1) Download and install Driver Easy.
2) Run Driver Easy and click the Scan Now button. Driver Easy will then scan your computer and detect any problem drivers. (Any problem drivers can cause issues. So we recommend checking for drivers updates on a regular basis.)

3) Click the Update button next to your wireless network adapter driver to automatically download the correct version of that driver, then you can manually install it (you can do this with the FREE version).
Or click Update All to automatically download and install the correct version of all the drivers that are missing or out of date on your system. (This requires the Pro version which comes with full support and a 30-day money-back guarantee. You’ll be prompted to upgrade when you click Update All.)
The Pro version of Driver Easy comes with full technical support. If you need assistance, please contact Driver Easy’s support team at support@drivereasy.com.
After updating your drivers, restart your computer for them to take effect.
Fix 6: Set Auto for Wireless Mode Selection
There is a possibility that your wireless adapter is on 5GHz or 802.11blg instead of Auto. To set it to Auto, follow these steps:
1) On your keyboard, press the Windows logo key and R at the same time to invoke the Run box.
2) Type devmgmt.msc, then press Enter on your keyboard.
3) Expand Network adapters. Select your wireless network adapter driver, right-click on it, and select Properties.

4) Select the tab Advanced. Set the Value to Auto. Then click OK.
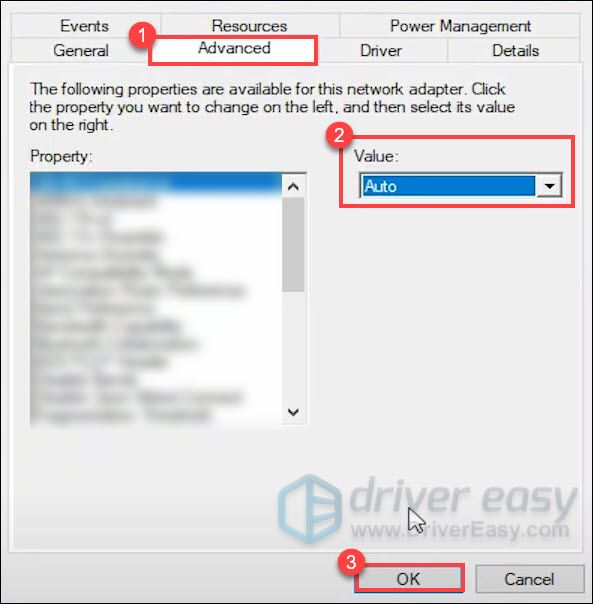
After applying the changes, try using the feature Projecting to this PC and the error message should be gone.
Fix 7: Disable third-party VPN
If you have any third-party VPN software such as Cisco AnyConnect running on your PC, they might be in conflict with you utilizing Miracast mirroring. So to fix it, you should disable them.
To conclude, the error “This device doesn’t support receiving Miracast, so you can’t project to it wirelessly.” can occur due to a variety of reasons which are mainly related to compatibility and network driver issues. So I hope with the fixes in this article, you can resolve your issue. If you have any ideas or questions, please leave us a comment below.
-
Home
-
News
- 4 Solutions to Fix the “Your PC Doesn’t Support Miracast” Issue
By Daisy | Follow |
Last Updated
Some users have been encountering the “Your PC or mobile device doesn’t support Miracast, so it can’t project wirelessly” error. This issue is mostly encountered on Windows 10 and Windows 8. Read this post from MiniTool to fix the “Your PC doesn’t support Miracast” issue.
Your PC Doesn’t Support Miracast
Miracast is an industry standard that allows devices to discover each other without the need for HDMI cables. It can be used to mirror the contents of your devices’ screens wirelessly. You can regard Micracast as a wireless HDMI cable.
Here are some main reasons for the “This device doesn’t support receiving Miracast” error.
1. Intel Graphics Hardware is disabled
2. One of the devices is not Miracast capable
3. Wi-Fi is turned off
4. Cisco AnyConnect or similar software stopping the Miracast connection
5. The wireless adapter is forced to 5Ghz
If your PC or mobile device doesn’t support Miracast, you can move down to the next part. Next, I will introduce the solutions to fix it.
How to Fix the “Your PC Doesn’t Support Miracast” Issue
- Verify If Your PC Is MiraCast Compatible
- Make Sure that Wi-Fi Is Enabled on Both Devices
- Change Wireless Adapter to Auto
- Uninstall the Wireless Network Adapter Driver
How to Fix the “Your PC Doesn’t Support Miracast” Issue
Solution 1: Verify If Your PC Is MiraCast Compatible
You should make sure that your device is equipped to support a MiraCast connection before you explore any other troubleshooting avenues. Here’s a quick guide with what you have to do:
Step 1: Press the Windows key + R key to open the Run dialog box. Then, type powershell and click OK to open a new Powershell window.
Step 2: Type the following command and press Enter:
Get-netadapter|select Name, ndisversion
Tip: If the returned NdisVersion is above 6.30, your PC is equipped to support Miracast from a network point of view.
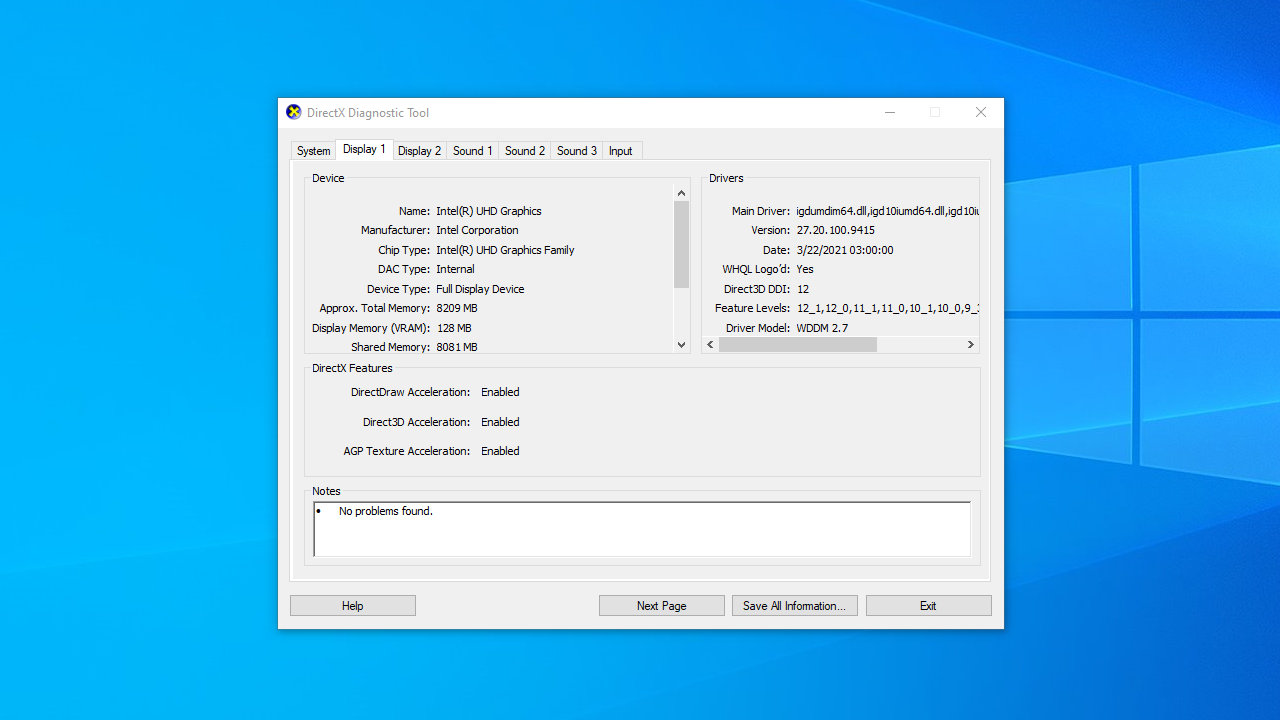
Step 4: Then open the Run dialog box again. Type dxdiag and click OK to open DirectX Diagnostic Tool.
Step 5: Navigate to the Display tab and find the Driver Model.
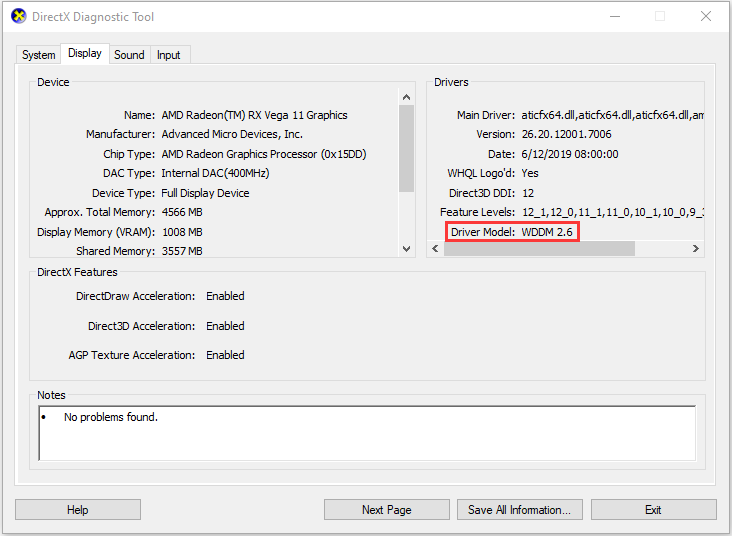
Tip: If the driver model does not state WDDM 1.3 or above, your system is not equipped to accommodate a Miracast connection.
If your computer is ready to support a Miracast connection, you can move to the next methods.
Solution 2: Make Sure that Wi-Fi Is Enabled on Both Devices
You should make sure that Wi-Fi is enabled on your computer, here is how to do it.
Step 1: Press the Windows key + R key to open the Run dialog box. Then, type ms-settings:network-wifi and click OK.
Step 2: In the Wi-Fi tab, ensure that the toggle associated with Wi-Fi is turned On.
If this method doesn’t work, you can move down to the next method.
Solution 3: Change Wireless Adapter to Auto
You can fix the “Your PC doesn’t support Miracast” issue by setting the Wireless Mode Selection back to Auto. Here’s a quick guide on how to do this:
Step 1: Press the Windows + R keys to open the Run dialog box. Then, type devmgmt.msc and click OK to open Device Manager.
Step 2: Expand the Network adapters drop-down menu, right-click your wireless network adapter and click Properties.
Step 3: Navigate to the Advanced tab, select the Wireless Mode Selection property and set it’s Value to Auto.
Step 4: Click OK and wait until the network connection is restored.
Then restart your computer and check if you are able to use the Miracast feature. If still not, move down to the next method below.
Solution 4: Uninstall the Wireless Network Adapter Driver
The last solution is to reinstall the Wireless Network Adapter driver. Here are the steps:
Step 1: Press the Windows key + R key to open the Run dialog box. Then, type devmgmt.msc and click OK to open Device Manager.
Step 2: Expand the Network adapters menu, then right-click your wireless network adapter and click Uninstall device.
Step 3: Then you need to click Uninstall.
Restart your computer and check if the issue is fixed.
Final Words
If you’re struggling to fix this particular issue, this post has provided you with a list of verified troubleshooting steps. You can try them one by one to fix the “Your PC doesn’t support Miracast” issue.
About The Author
Position: Columnist
Having been an editor at MiniTool since graduating college as an English major, Daisy specializes in writing about data backups, disk cloning, and file syncing as well as general computer knowledge and issues. In her free time, Daisy enjoys running and going with friends to the amusement park.
Table of contents
- How Does Miracast Work?
- Devices That Support Miracast
- Causes of the “This Device Doesn’t Support Receiving Miracast” Error
- How to Resolve the “Your PC or Mobile Device Doesn’t Support Miracast” Error
- Solution 1: Check if your computer supports Miracast
- Solution 2: Update or reinstall the wireless network adapter driver
- Solution 3: Make sure that Wi-Fi Is enabled on both devices
- Solution 4: Verify that the device has wireless display functionality
- Solution 5: Tweak wireless mode parameters
- Solution 6: Disable third-party VPN solutions
- Extra Tips
- Tip 1: Temporarily disable firewall
- Tip 2: Enable integrated graphics
- This Device Doesn’t Support Miracast: Solved
- FAQ
In this article, we’ll show you how Miracast works, explore the causes of the error, and find ways to fix this problem on Windows 10 .
If you’re having the “ This device doesn’t support receiving Miracast ” error on your Windows 11 PC, check out this guide .
Watch this short video for a quick fix. For more detailed steps, continue reading the full article:
How Does Miracast Work?
Miracast relies on Wi-Fi Direct wireless network connections to stream video from your device to an external display. It can stream video in up to 1080p Full HD resolution with 5.1 surround sound.
That said, if you want to use Miracast, your device must be able to establish a direct wireless connection to the external display. Miracast can function independently of your home wireless network.
Miracast connections are very secure. That’s because your device establishes a wireless network that uses the Wi-Fi Protected Setup (WPS) wireless networking standard and is encrypted with WPA2 .
You can use Miracast to broadcast video or audio from your smartphone to an external display. You can also display DVDs, CDs, DRM-protected files, and any other media files.
Devices That Support Miracast
After its introduction in 2012, Miracast has gained a huge following, including tech companies. Numerous devices support Miracast, and more are being certified daily.
All big tech players support Miracast on their software and devices. Windows 10 and 11 support it , as well as most Android smartphones and tablets, thanks to manufacturers’ customized implementations of the standard, like Huawei’s Cast and Samsung’s SmartView.
Various manufacturers offer a wide variety of smart TVs, and many of them support Miracast. However, even if your TV doesn’t support Miracast, you can still buy a Miracast adapter.
Since Google doesn’t have built-in Miracast support for Android, you can only use it if your smartphone’s manufacturer has created its own implementation of the Miracast standard.
Causes of the “This Device Doesn’t Support Receiving Miracast” Error
Below are some of the causes of the “This device doesn’t support receiving Miracast” error:
- The device doesn’t support Miracast
You may face the ‘“This device doesn’t support receiving Miracast” error because your device actually doesn’t support Miracast. So, your first step should be to check if it does.
- Outdated graphics or network drivers
If your computer’s graphics card or network drivers are outdated , you may receive the “ This device doesn’t support Miracast ” error message. Updating them is the next recommended step to fix the problem.
- Disabled Wi-Fi
For Miracast to function, you must turn your Wi-Fi on. So, if you suspect that your PC or mobile device doesn’t support Miracast, it could simply be a matter of Wi-Fi being disabled on one of the devices.
- The wireless adapter is forced to 5 GHz
Your wireless adapter may have been changed to the 5 GHz mode, which is why you’re facing this Miracast error. You might resolve the issue by changing the wireless adapter settings.
- Screen resolution
It may also be that Miracast won’t work because the screen resolution you’re using is too low. So, you’ll have to change the resolution to fix the error.
How to Resolve the “Your PC or Mobile Device Doesn’t Support Miracast” Error
If you’ve been experiencing the error message “Your PC or mobile device doesn’t support Miracast, so you can’t project to it wirelessly,” below is a list of proven methods to fix it.
Go through all of them to find the one that works for you.
Solution 1: Check if your computer supports Miracast
The first thing you have to do before using Miracast is check if your device supports it.
The Miracast connection is powered by two components, namely your graphics card and network adapter. Check if your network adapter and graphics drivers can support the connection.
Follow these steps to do so:
- To test the graphics driver, open the Run dialog by pressing
Windows logo key + Ron your keyboard. - Type
dxdiagin the text box and click OK or pressEnteron your keyboard.

- On the DirectX window, click on the button that says Save All Information.
- Select a folder to save the text file. Click OK.
- Press
Windows key + Q.
- Search for
Notepadin Cortana.
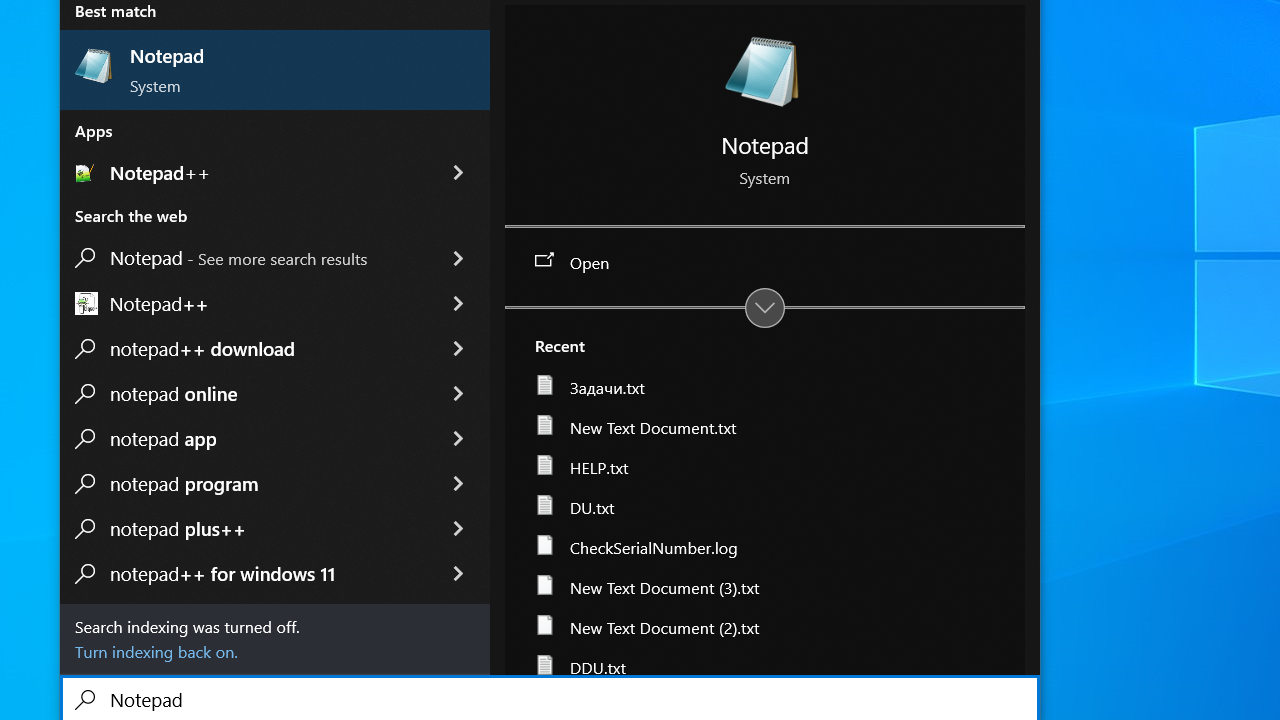
- In Notepad, click on File > Open.
- Open DxDiag.txt to see your system information. If you see the Available, with HDCP message next to Miracast under System Information, the connection is supported on your device.
Alternatively, on the DirectX Diagnostic Tool window, click on the “Display” tab and check your graphics driver model. You’ll find it at the bottom of the Drivers column. If the “Driver Model” value is equal to or above “WDDM 1.3,” it means your system supports Miracast.
After you’ve seen that your graphics driver can support Miracast, the next thing to do is check the compatibility of your network adapter. Here’s how:
- Hit
Windows key + Xon your keyboard and select Windows PowerShell (Admin).
- Copy the following command in the PowerShell window and press
Enter:
Get-netadapter|select Name, ndisversion
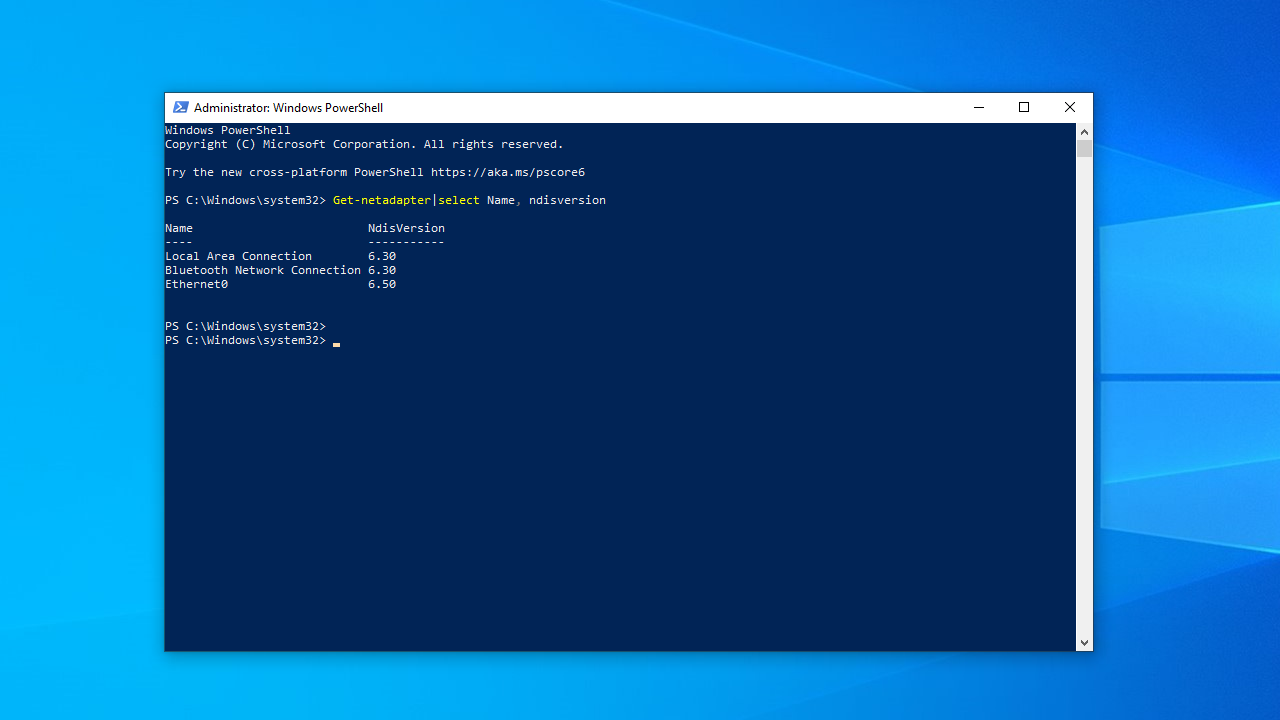
For your PC to support Miracast, the NdisVersion should be above 6.30. If it is under that value, you should try updating your wireless network adapter’s driver.
Fix this issue quickly
You can try using a safe and totally free tool developed by the Auslogics team of experts.
A few simple steps to troubleshoot the issue:
Download the tiny Auslogics TroubleShooter tool.
Run the application (no installation is needed).
The app will check for the issue mentioned in the article. When the scan is done, check that this is the issue you were looking to solve and click ‘Apply now’ to apply the recommended fix.
You can use the app to troubleshoot other malfunctions for free by simply typing in a brief description of the issue your PC is experiencing. Or you can scan your PC for performance issues using the My Scanner tab.
Also read: Most Useful Powershell Commands: Cheat Sheet with Examples
Solution 2: Update or reinstall the wireless network adapter driver
Updating or reinstalling the wireless network adapter driver has proved effective for many users. Follow these steps to update it manually:
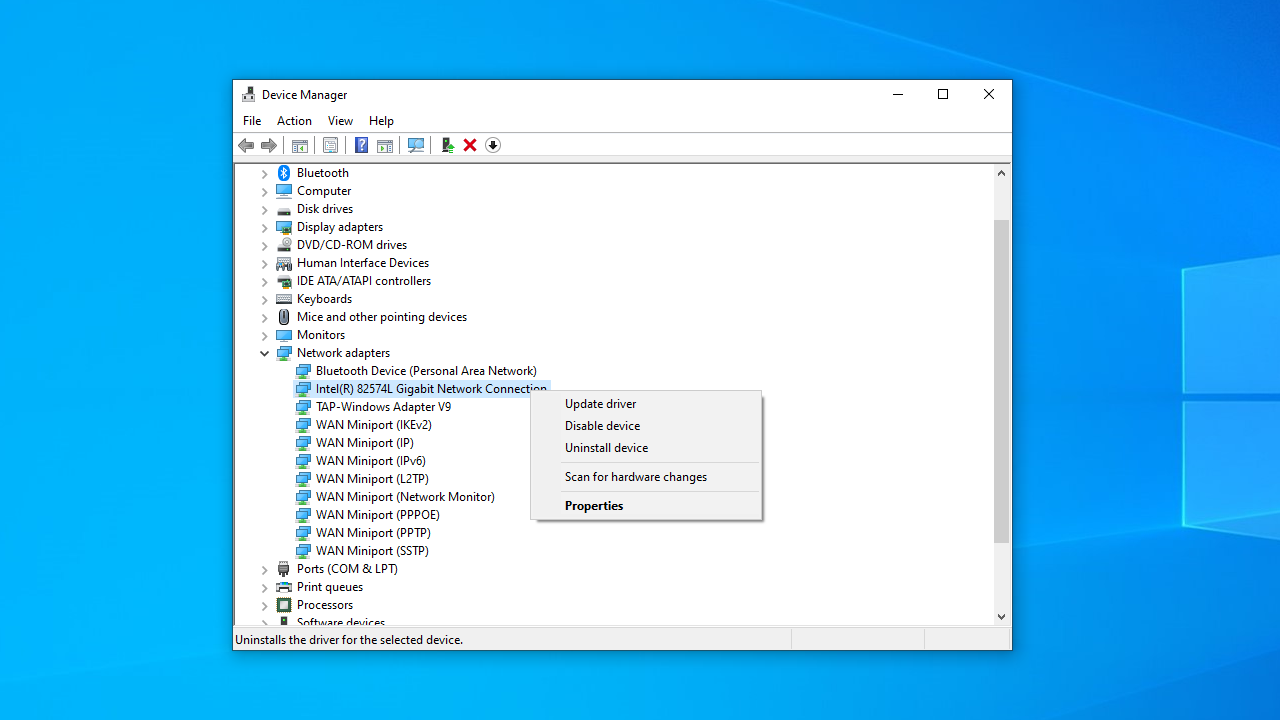
- Open the Run dialog by pressing
Windows logokey+ Ron your keyboard. - Type
devmgmt.mscin the text box and click “OK” to open Device Manager. - Expand “Network adapters.”
- Right-click on your wireless network adapter and select “Update driver.”
- Click “Search automatically for drivers.”
- Update the driver and check if Miracast works now.
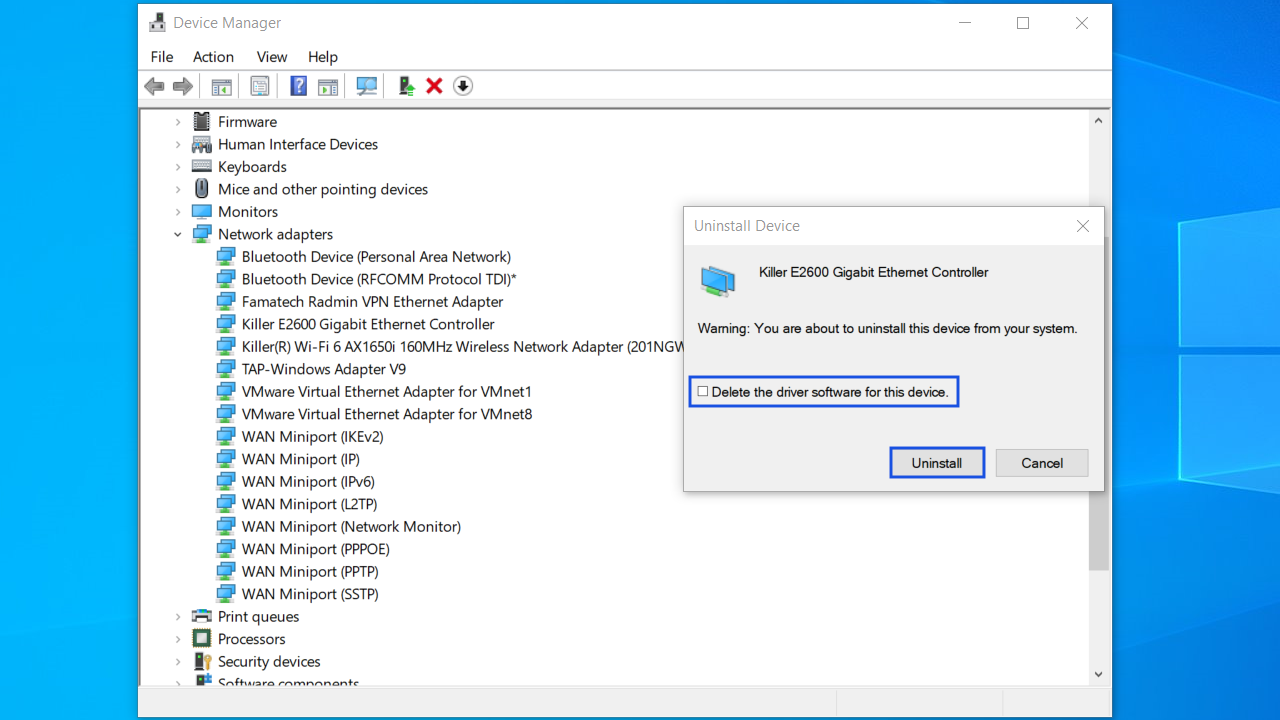
If you still get the “ This device doesn’t support Miracast ” error message, try reinstalling the driver. Here’s how:
- Repeat steps 1–3 from the previous list.
- Select “Uninstall device” from the menu.
- C heck the “Delete the driver software for this device” box and click the “Uninstall” button in the “Uninstall Device” window.
- Restart your computer, and Windows will reinstall the driver automatically.
Related: How to Fix the “Windows Could Not Find a Driver for Your Network Adapter” Error
However, manually updating the drivers doesn’t guarantee that the system will install the latest available driver.
If you want to keep all your drivers up to date, you can use Auslogics Driver Updater , a reputable tool that automates the process. It scans your system for all missing and outdated drivers and allows you to install the newest ones with a click of a button.
Solution 3: Make sure that Wi-Fi Is enabled on both devices
If you have confirmed that your devices actually support Miracast but you still get the error message, check if both devices have Wi-Fi enabled.
To check if Wi-Fi is enabled on Windows 10, follow this procedure:
- Press
Windows logo key + Rto open the Run dialog. - Type
ms-settings:network-wifiin the text box. Press Enter or click “OK.” - You’ll be led to the “Wi-Fi” tab of the “Network and Internet” menu in Settings. Click on the toggle to activate Wi-Fi if it is deactivated.
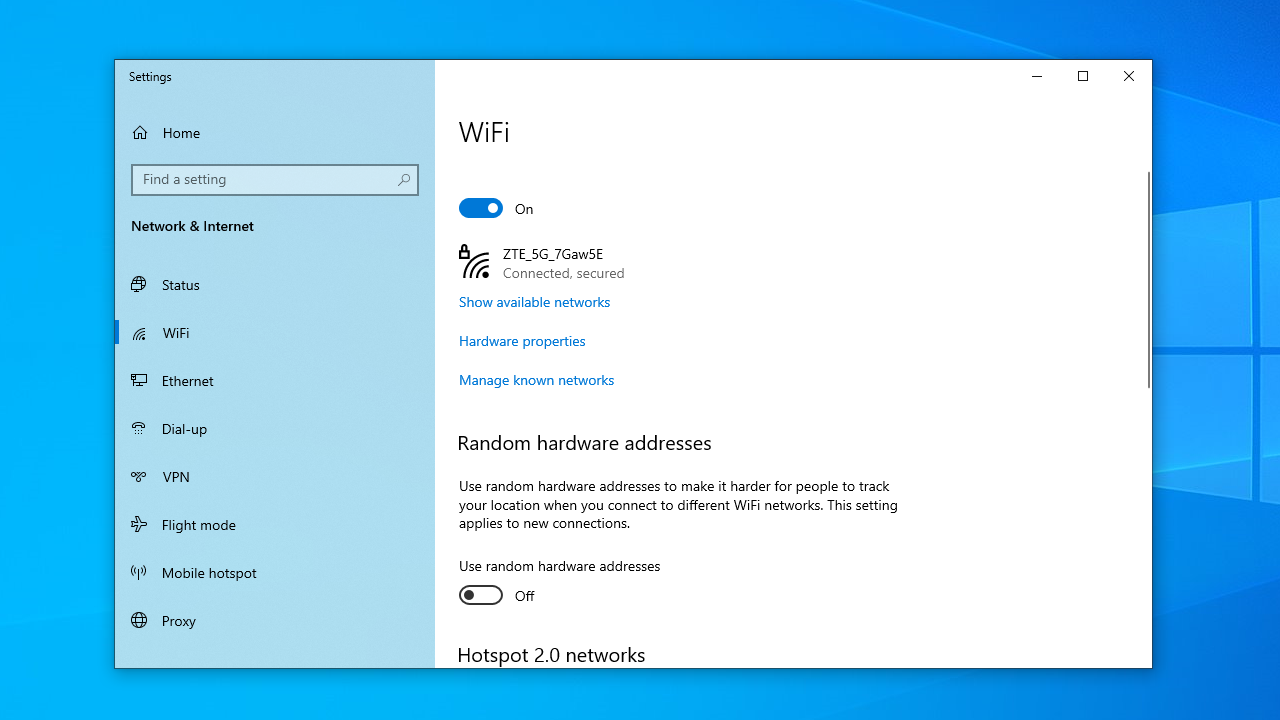
Also, check if Wi-Fi is activated on the other device. How to do so depends on the device in question. On Android and iOS platforms, you can enable Wi-Fi through the Settings app.
Related: Why Does My Internet Keep Going In and Out?
Solution 4: Verify that the device has wireless display functionality
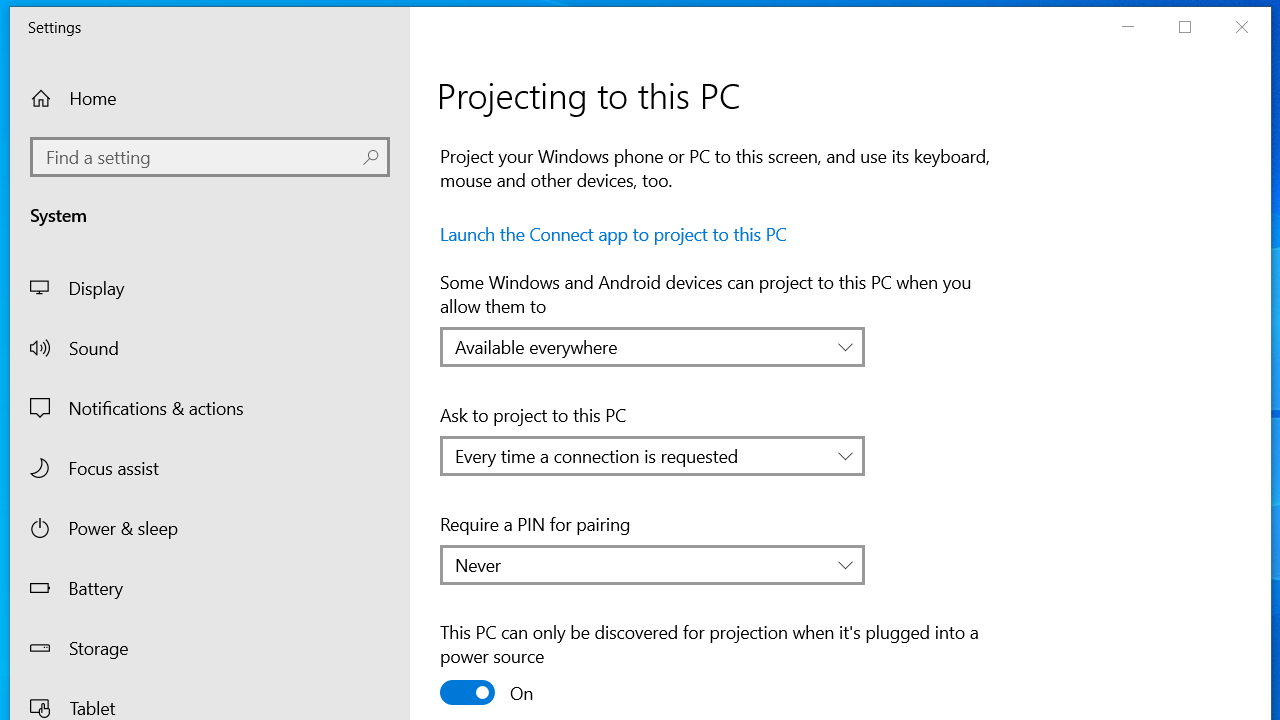
Make sure the wireless display functionality is enabled on the computer you’re trying to project to. Here are the steps to do that:
- First, type
manage optional featuresin the search bar and hitEnter.

- Look for Wireless Display or click Add a feature and add the Wireless Display option.
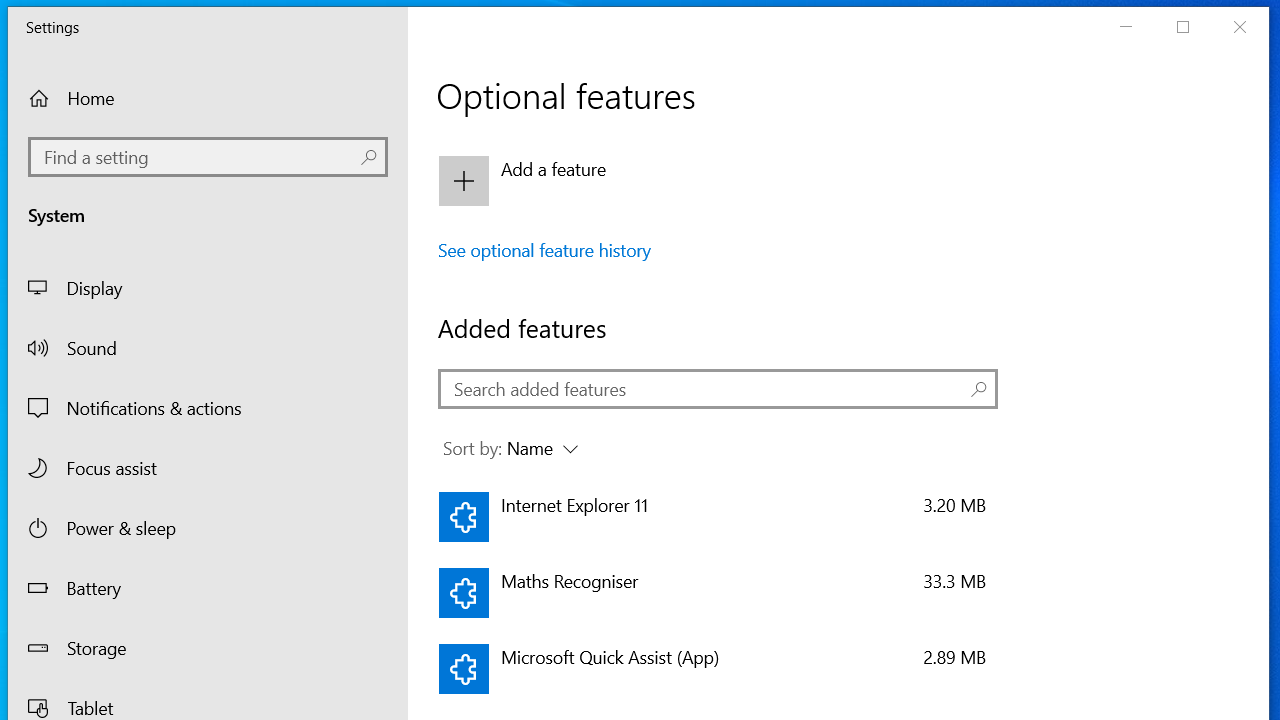

- After that, navigate to Settings and click the Projecting to this PC option.
- Select Available everywhere from the drop-down menu under Some Windows and Android devices can project to this PC when you say it’s OK.
Solution 5: Tweak wireless mode parameters
If your wireless adapter is set to 5GHz or 802.11blg, then you are likely to run into the “Your PC or mobile device doesn’t support Miracast, so it can’t project wirelessly” error.
Setting the wireless mode to “Dual Band 802.11 a/b/g” gives your device the compatibility it needs to work smoothly with Miracast. To apply this setting, follow the steps below:
- Right-click on the Start button. Select Device Manager.
- Go to the Network adapters drop-down and expand it.
- Right-click on your wireless network adapter and select Properties.
- Go to the Advanced tab.
- Under the Property list, select 802.11 a/b/g Wireless Mode.
- Click on the Value drop-down menu on the right-hand side and select 6. Dual Band 802.11 a/b/g .
- Click the OK button.
Restart your computer to see if the problem with Miracast has been resolved.
Solution 6: Disable third-party VPN solutions
If you have third-party VPN software on your PC, it will most likely identify Wi-Fi Direct (the Miracast technology) as a split tunnel connection that poses security risks and will not allow establishing a connection.
To fix it, disable any such third-party software and restart your PC.
Fix this issue quickly
You can try using a safe and totally free tool developed by the Auslogics team of experts.
A few simple steps to troubleshoot the issue:
Download the tiny Auslogics TroubleShooter tool.
Run the application (no installation is needed).
The app will check for the issue mentioned in the article. When the scan is done, check that this is the issue you were looking to solve and click ‘Apply now’ to apply the recommended fix.
You can use the app to troubleshoot other malfunctions for free by simply typing in a brief description of the issue your PC is experiencing. Or you can scan your PC for performance issues using the My Scanner tab.
Tip 1: Temporarily disable firewall
If your firewall, for some reason, recognizes your device as suspicious, it may prevent this device from projecting. Disabling your firewall will allow you to check if that’s the case.
Here’s how:
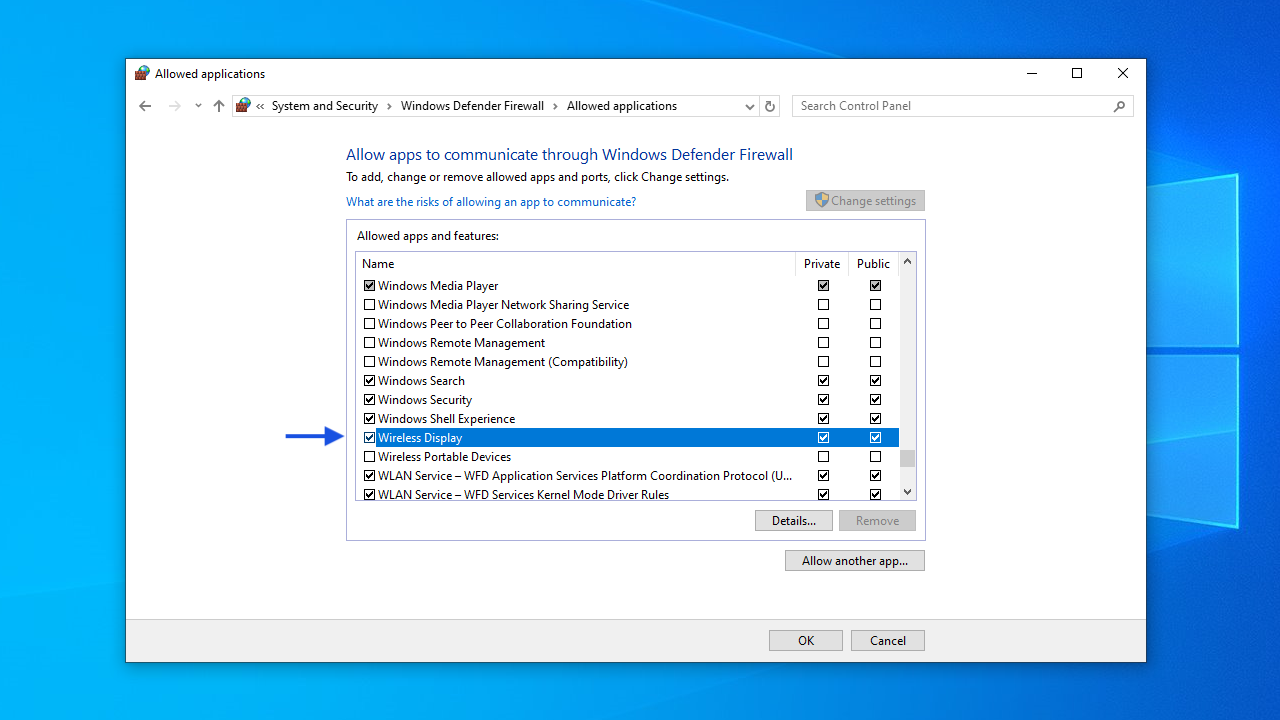
- Click on the search icon in the taskbar, type “Windows Defender Firewall,” and hit Enter.
- Click on “Turn Windows Defender Firewall on or off” in the left-side panel.
- Turn Windows Defender Firewall off for both private and public networks.
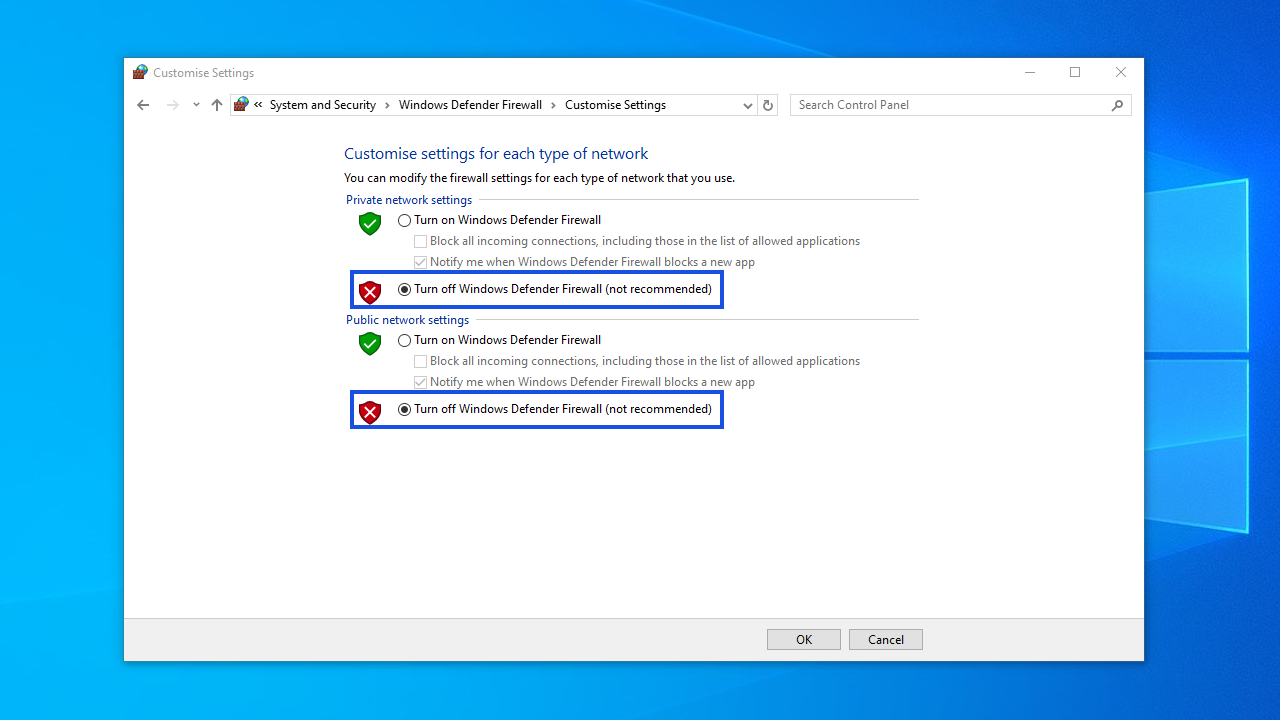
Check if Miracast works now. If it does, you can try to add the “Wireless Display” feature to the list of apps and features allowed by Defender Firewall. Follow these steps:
- Click on the search icon in the taskbar, type “Windows Defender Firewall,” and hit Enter.
- Click on the “Allow an app or feature through Windows Defender Firewall” option in the left-side panel.
- Finally, tick the boxes in both the “Private” and “Public” columns next to “Wireless Display” and click “OK.”
You should regularly check your PC to make sure it is properly protected against online threats .
Using Auslogics Anti-Malware as an addition to your primary antivirus solution will add another layer of protection and help you defend your system from malware that may sneak past your main antivirus.
Also read: Does Windows 10 Need Antivirus?
Tip 2: Enable integrated graphics
Most modern computers have integrated graphics. So, if Miracast doesn’t work because of issues with the graphics card, enabling integrated graphics in BIOS will potentially allow you to bypass this problem. The steps for enabling integrated graphics depend on your motherboard. You need to know your PC/laptop model and search online to find out the required steps.
This Device Doesn’t Support Miracast: Solved
In this guide, we’ve covered all aspects of the “This device doesn’t support receiving Miracast” error, including its causes and solutions to resolve it.
If you’ve found this article helpful, share it with your friends and let us know your thoughts or additional tips in the comments below!
FAQ
How do I bypass “This device doesn’t support Miracast”?
To bypass the “ This device doesn’t support Miracast ” error, make sure your device is compatible with Miracast. Sometimes, restarting your device and the monitor can fix the problem. If you’re still experiencing the error, update your drivers.
Why can’t I connect to Miracast?
If you can’t connect to Miracast, it may be that your device doesn’t support the Miracast technology. Make sure that Wi-Fi is enabled on your device, as Miracast requires it for connection. Also, ensure that your device and the display are situated within the suggested range of 25–35 feet (7–10 meters). Additionally, physical interference from other electronic devices can sometimes cause the connection to break.
How do I enable Miracast on my device?
Go to the Settings menu and choose “Connectivity” or “Display settings.” There should be a “screen mirroring,” “casting,” or “wireless display” option available. The name of this option may vary depending on the manufacturer and model of your device. To enable Miracast, just select the appropriate setting and toggle it on. Remember that the exact steps vary depending on the device you use.
What is required to support Miracast?
For your device to support Miracast , it should be able to connect wirelessly using Wi-Fi and Bluetooth. It should also be running an operating system that’s compatible with Miracast, like Windows 10 and 11.