
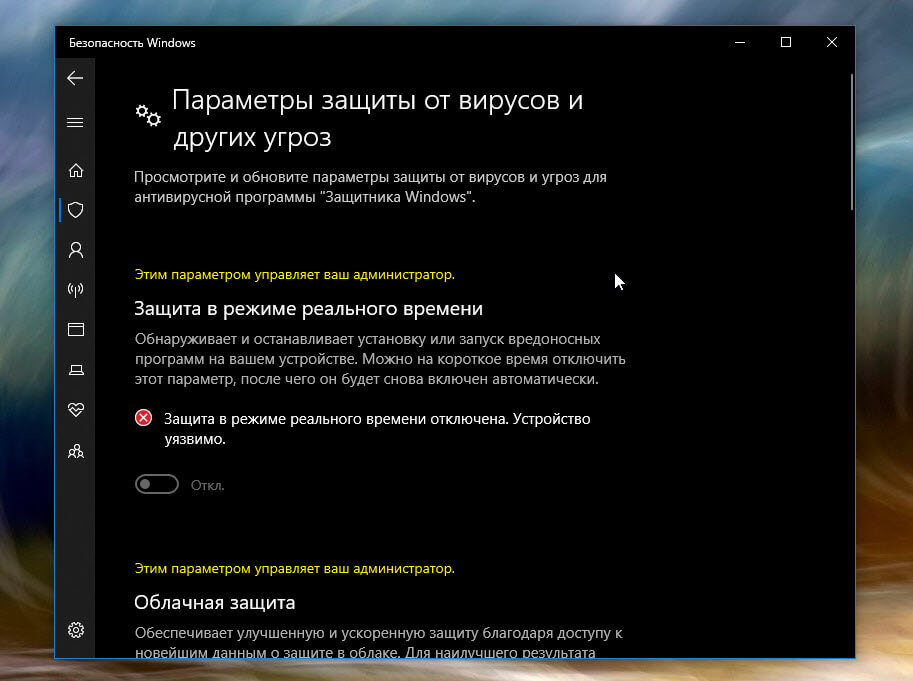
Некоторые пользователи Windows 10 и Windows 11, зайдя в окно «Безопасность Windows» с целью настроить какие-либо параметры Microsoft Defender (ранее — Защитник Windows) могут обнаружить, что некоторые параметры заблокированы и увидеть надпись «Этим параметром управляет ваш администратор».
Далее в инструкции подробно о том, почему появляется уведомление о том, что этим параметром управляет ваш администратор в параметрах безопасности Windows, как это исправить и нужно ли это делать.
Что значит «Этим параметром управляет ваш администратор» в Microsoft Defender

Как правило, непонимание по поводу рассматриваемого уведомления возникает у пользователей, которые сами являются единственным администратором текущего компьютера или ноутбука. Переживать не стоит — никто посторонний компьютером не управляет. За исключением варианта, когда речь идёт о компьютере организации и параметры действительно заданы администратором.
Причина такого уведомления — настройки политик Защитника Windows, которые были выполнены не через интерфейс его настроек в окне «Безопасность Windows», а одним из следующих способов:
- С помощью ручной настройки параметров Microsoft Defender в редакторе локальной групповой политики.
- Путем изменения параметров защиты от вирусов с помощью реестра.
- С помощью сторонних программ для отключения Защитника Windows, оптимизации параметров работы системы, отключения «слежки» Windows, которые также внесли изменения в реестр.
- В редких случаях изменение параметров защиты от вирусов и угроз бывает выполнено вредоносными программами.
Подводя итог, сообщение «Этим параметром управляет ваш администратор» в параметрах защиты и безопасности Windows говорит лишь о том, что некоторые из настроек были выполнены «в обход» интерфейса настроек, доступных в окне «Безопасность Windows».
Что делать и как убрать надпись «Этим параметром управляет ваш администратор»
Если ранее вы целенаправленно меняли настройки встроенного антивируса Windows 10 или Windows 11 с помощью редактора реестра, редактора локальной групповой политики или сторонних программ и результат вас устраивает, то какие-либо действия не требуются: на надпись об управлении параметром вашим администратором можно не обращать внимания.
Если же задача — разблокировать эти параметры, потребуется вернуть политики Microsoft Defender или Защитника Windows к значениям по умолчанию. Сделать это можно с помощью редактора локальной групповой политики или редактора реестра.
Если на вашем компьютере установлена Pro или Enterprise версия Windows, можно использовать редактор локальной групповой политики:
- Нажмите правой кнопкой мыши по кнопке «Пуск», выберите пункт «Выполнить», введите gpedit.msc и нажмите Enter.
- В редакторе локальной групповой политики перейдите к разделу Конфигурация компьютера — Административные шаблоны — Компоненты Windows — Антивирусная программа Microsoft Defender.
- Внутри этого раздела пройдите по всем вложенным подразделам, обращая внимание на значения разных политик в правой панели редактора. По умолчанию все значения равны «Не задана». Если вы встретили политики с отличающимся значением, дважды нажмите по таким пунктам, изменение значение на «Не задана» и примените настройки.

- Повторите те же действия для раздела Конфигурация компьютера — Административные шаблоны — Компоненты Windows — Антивирусная программа Безопасность Windows.

Процесс можно и ускорить, подробнее об этом: Как сбросить локальные групповые политики в Windows.
В Windows 11 и Windows 10 домашняя gpedit.msc отсутствует, но удалить настроенные политики можно с помощью редактора реестра:
- Нажмите клавиши Win+R на клавиатуре, введите regedit и нажмите Enter.
- Перейдите к разделу реестра
HKEY_LOCAL_MACHINE\SOFTWARE\Policies\Microsoft\Windows Defender\
- По умолчанию в этом разделе в правой панели не должно быть никаких значений, кроме стокового значения «По умолчанию» (если есть другие — их можно удалить), а если раскрыть этот раздел, то в нем может присутствовать пустой подраздел «Policy Manager» без каких-либо значений и никаких других подразделов, иначе их можно удалить (правый клик — удалить).
- Если в реестре присутствует раздел
HKEY_LOCAL_MACHINE\SOFTWARE\Policies\Microsoft\Windows Defender Security Center\
его можно удалить целиком вместе со всеми подразделами, по умолчанию в реестре этот раздел отсутствует, так как какие-либо политики центра безопасности Windows не настроены.


Как правило, сделанные изменения начинают действовать сразу, без перезагрузки компьютера, но окно «Безопасность Windows» потребуется закрыть и открыть снова.
В ситуации, когда политики работы защитника Windows появляются снова, можно предположить, что это результат работы какого-то стороннего ПО, не исключено, что вредоносного. Имеет смысл проверить компьютер на вирусы и использовать специальные средства удаления вредоносных программ с компьютера.
When using Windows Defender/Security in Windows 11/10, you may get the error this setting is managed by your administrator. How can you fix this annoying issue to use this antivirus software to prevent threats? In this post, MiniTool collects some useful solutions and now let’s go to try them.
This Setting Is Managed by Your Administrator Windows Defender Windows 11/10
Windows Defender, also known as Windows Security is the built-in professional antivirus program in Windows 11/10 that offers real-time protection to keep your PC from viruses and malware. However, sometimes you are blocked from making some settings and the error message appears on the screen – this setting is managed by your administrator.
This error can be seen above options within the Virus & threat protection settings, App & browser control, and Core isolation of Device security tabs and these are the primary settings:
- Real-time protection
- Cloud-delivered protection
- Automatic sample submission
- Tramper Protection
- Check apps and files
- Core isolation memory integrity
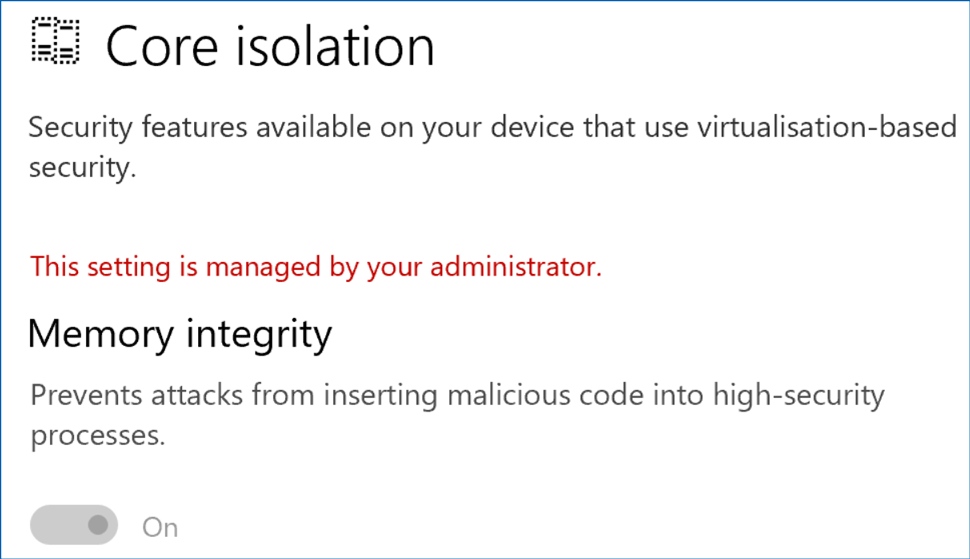
Related post: Windows 11 Memory Integrity Is Off? – Here Are 6 Fixes for You
Once you get this error message in Windows 11/10, you cannot turn on the important settings of Windows Security since the options are greyed out. Even if you are the administrator, this antivirus won’t let you do this thing.
So, how can you fix this setting is managed by your administrator virus and threat protection/core isolation/tramper protection, etc.? Move to the next part to find out what you should do.
Fixes – This Setting Is Managed by Your Administrator Windows Defender Windows 11/10
Install Windows Update
Check if your PC has any pending updates to install since these updates may include the patches for this issue and try to do this thing.
Step 1: Press Win + I to open Settings and go to Update & Security > Windows Update (Windows 10) or go to Windows Update.
Step 2: Check for available updates. If Windows detects them, download and install them on your PC.
This requires several system restarts. After that, go to check if this setting is managed by your administrator real-time protection Windows 10/11 or core isolation this setting is managed by your administrator is fixed. If not, continue the fixes.
Uninstall Third-Party Antivirus Software
If you have installed a third-party antivirus program on your PC, it may impact Windows Defender and lead to unavailable settings of this app along with the error this setting is managed by your administrator. Thus, try to uninstall this third-party antivirus tool to let Windows Security regain full control.
Step 1: In Windows 11/10 search box, type appwiz.cpl into it and press Enter to open the Programs and Features window.
Step 2: Right-click on the target antivirus program and choose Uninstall.
Step 3: Complete the uninstallation by following the wizards on the screen.
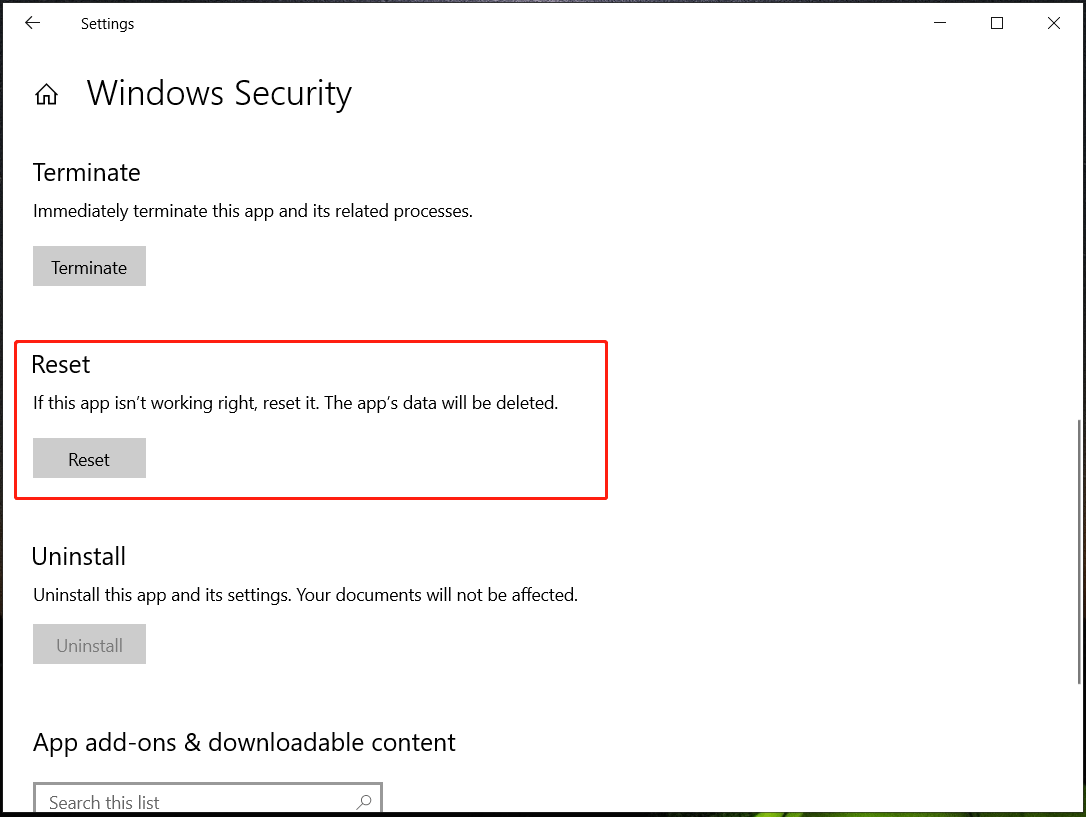
Reset Windows Security
Errors in Windows Security may be responsible for this setting is managed by your administrator in Windows 11/10. So, try to reset this app.
In Windows 10, go to the start menu to find Windows Security, right-click on it and choose App settings. Then, click the Reset button.
In Windows 11, you can go to Settings > Apps > Installed apps/Apps & features > Windows Security, click the three dots to choose Advanced options, and then tap on Reset.
Edit Windows Registry
According to reports, many users have solved the Windows Security administrator problem by tweaking the registry key. Before you do, you had better use the System Restore feature to create a restore point to avoid system crashes due to mistaken operations.
Then, start the change in these steps:
Step 1: Launch Registry Editor by typing regedit in the search box and clicking the app.
Step 2: Go to Computer\HKEY_LOCAL_MACHINE\SYSTEM\CurrentControlSet\Control\DeviceGuard\Scenarios\HypervisorEnforcedCodeIntegrity.
Step 3: Double-click on the Enabled key from the right pane and set its value data to 0.
If you cannot find the HypervisorEnforcedCodeIntegrity item on your PC, do the following operations.
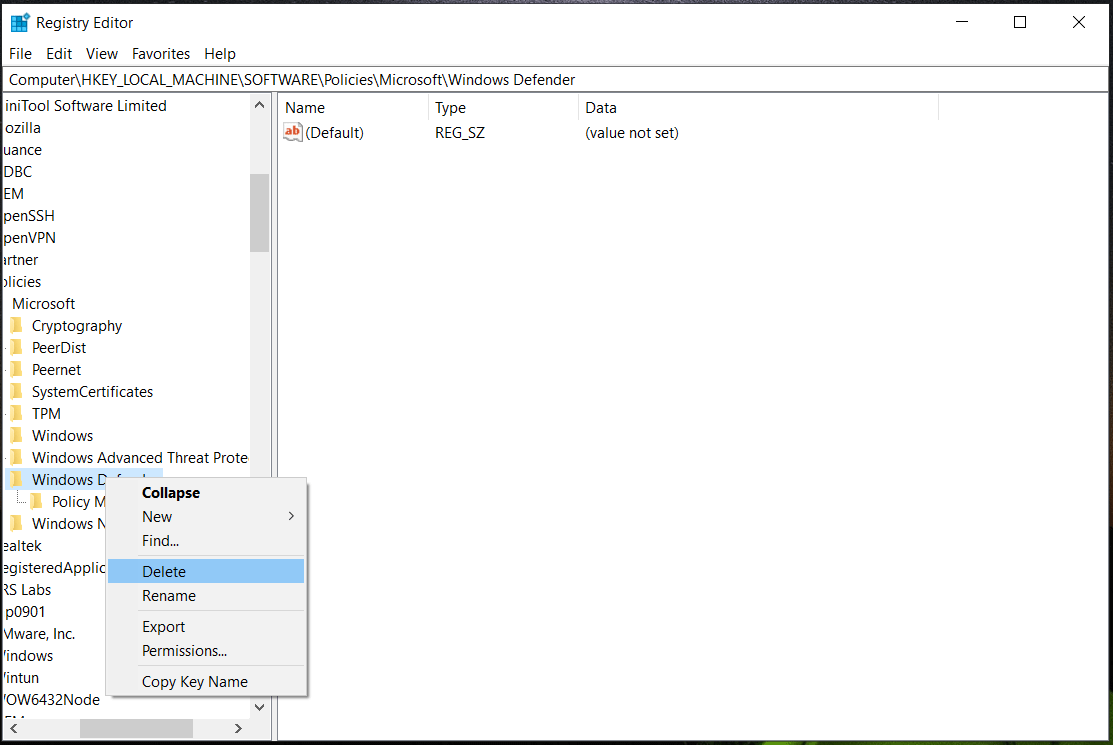
Step 1: Go to Computer\HKEY_LOCAL_MACHINE\SOFTWARE\Policies\Microsoft\Windows Defender.
Step 2: Right-click on Windows Defender, choose Export, and name it Windows Defender. Also, export these two keys – Policy Manager and Real-Time Protection. Based on your PC, the subkeys are different and just make a backup for them using the Export feature.
Step 3: Right-click Windows Defender and choose Delete. Then click Yes to confirm.
Step 4: After that, restart your PC and try to use Windows Defender to see if this setting is managed by your administrator core isolation/real-time protection is addressed.
Edit Group Policy settings
If you change policies regarding Windows Security in Local Group Policy Editor, you may encounter the Windows Security administrator issue in Windows 11/10. Go to edit the settings to the correct one in Pro or higher edition of Windows.
Step 1: Type gpedit.msc into the search box and press Enter.
Step 2: Go to Computer Configuration > Administrative Templates > Windows Components > Microsoft Defender Antivirus > Real-time Protection.
Step 3: Make sure all the policies in the right pane are set to Not Configured. If one is set to Enabled, double-click on this policy and change the properties.
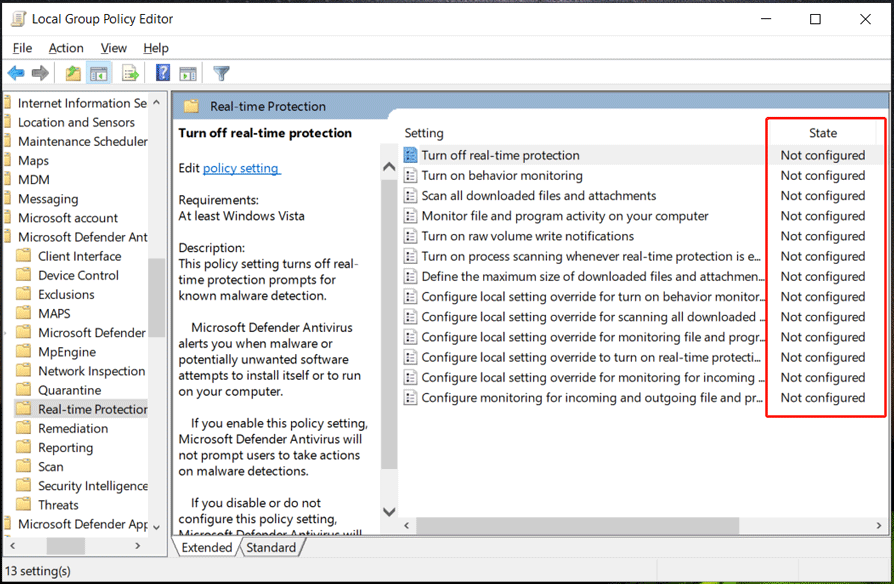
This way is very helpful to fix this setting is managed by your administrator real-time protection Windows 10/11. So, just have a try.
Final Words
Now you should have successfully fixed this setting is managed by your administrator in Windows Security on Windows 11/10. As a professional and excellent antivirus program, Windows Security is powerful to prevent your PC from malware and viruses.
But it goes wrong now and then, for example, you meet some common issues like Windows Defender not working, Windows Defender keeps turning off, error 0x8007139f, etc.
Besides, only running Windows Security is not enough to keep your PC safe since some potential attacks cannot be detected by this app. As a result, your PC data is vulnerable and system crashes may happen. So, to safeguard your computer, running a professional PC backup software is recommended. Double insurance is a good solution.
To back up your PC, MiniTool ShadowMaker is a good assistant since it is helpful to create a backup and recovery of files, folders, disks, partitions, and systems. To know how to back up, refer to our previous post – How to Back up Windows 11 (Focuses on Files & System).
MiniTool ShadowMaker TrialClick to Download100%Clean & Safe
Служба «Безопасность Windows» — это исходная точка для просмотра информации о безопасности и работоспособности устройства, а также управления соответствующими функциями.
Часто, после установки вредоносных программ или в следствии сбоя системы, интерфейс страницы параметров «Безопасность Windows» ранее известного как «Защитник» может показать сообщение:
- «Некоторые параметры управляются вашей организацией»
- «Параметрами защиты от вирусов и угроз управляет ваша организация».
- «Этим параметром управляет ваш Администратор»
- «Нет активного поставщика антивирусной программы. Устройство уязвимо»
Кроме того, защита в режиме реального времени и облачные и другие параметры защиты могут быть полностью отключены и заблокированы, вы не можете изменить их, переключатели просто не активны.
Страница Параметры для Защитника Windows может выглядеть следующим образом:

Элемент управления для защиты в режиме реального времени полностью отключен и заблокирован. Это говорит вам, что необходимо возобновить нормальную работу Службы «Безопасность Windows», сделать это можно, удалив записи реестра связанных политик Защитника, которые ранее были изменены или добавлены вредоносными программами.
Если вы установили другой антивирус, Служба Безопасности Windows (Защитник Windows) — автоматически отключается. Это нормально. Но после удаления стороннего антивируса все должно вернутся в норму.
Если этого не происходит и вы по-прежнему видите одно из предупреждений «Параметрами защиты от вирусов и угроз управляет ваша организация» или «Этим параметром управляет ваш администратор», следуйте нашему руководству чтобы исправить проблему.
Убедитесь, что вы полностью удалили вредоносное ПО. Процедура удаления вредоносных программ является сложной, и выходит за рамки данной статьи. После полного удаления вредоносных программ, удалите записи реестра для Защитника Windows, которые были добавлены вредоносными программами.
Как удалить раздел Политики «Защитника Windows» с помощью редактора реестра.
Примечание: Эта процедура не применима и не будет работать, если ваша система подключена к домену, в котором применяются политики центральной группы. Эта статья предназначена для обычных систем, где вирус или вредоносное ПО полностью отключил «Службу Безопасности Windows» и заблокировали настройки.
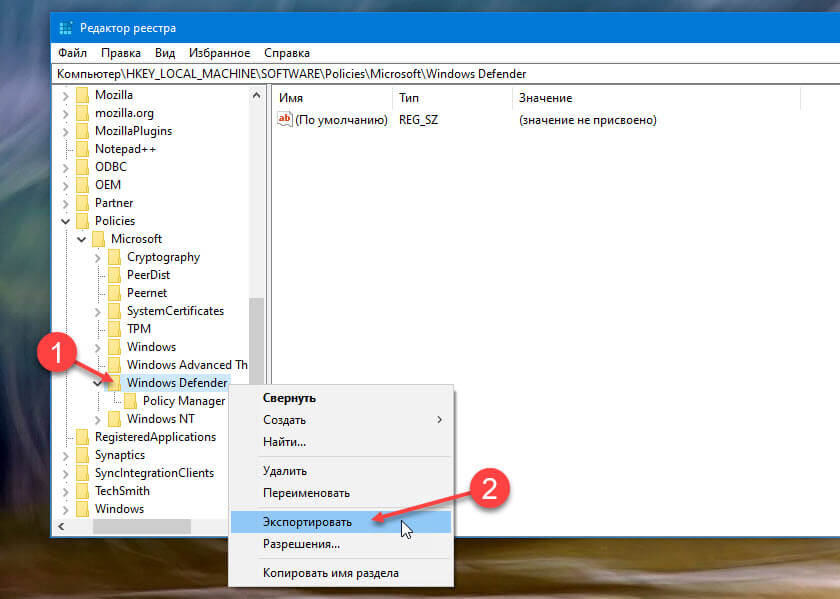
Шаг 1: Запустите редактор реестра и перейдите к следующему разделу:
HKEY_LOCAL_MACHINE\SOFTWARE\Policies\Microsoft\Windows Defender
Шаг 2: В целях безопасности сделайте резервную копию данного раздела, для этого кликните правой кнопкой мыши на раздел «Windows Defender» и выберите в контекстном меню пункт «Экспортировать».
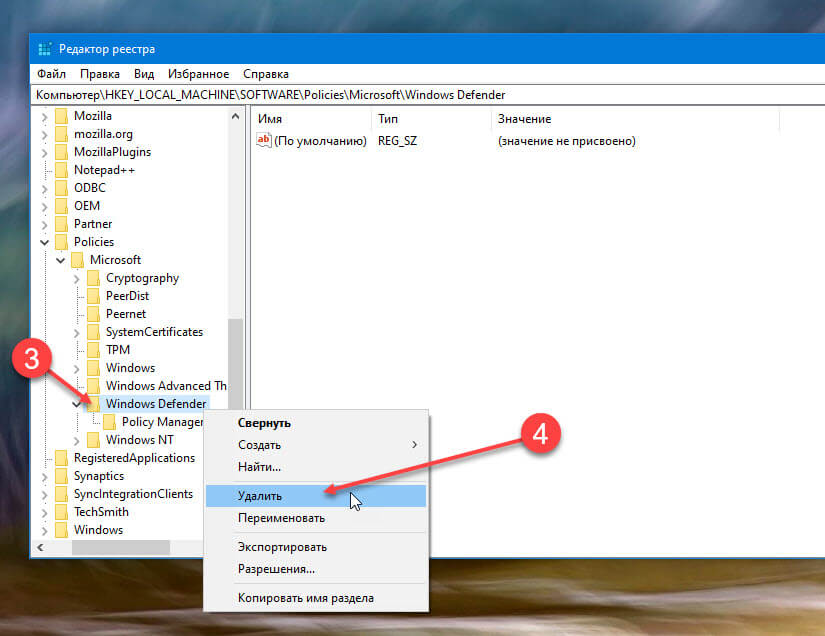
Шаг 3: Затем снова кликните правой кнопкой мыши на раздел «Windows Defender» и выберите команду «Удалить».
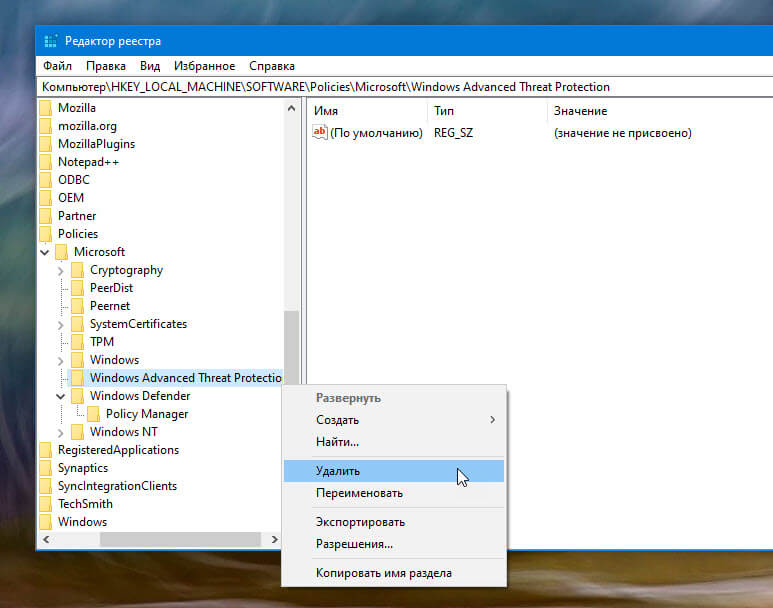
Шаг 4: Кроме того, сделайте резервное копирование и удалите следующий раздел:
HKEY_LOCAL_MACHINE\SOFTWARE\Policies\Microsoft\Windows Advanced Threat Protection
Шаг 5: Закройте редактор реестра и перезагрузите компьютер.
Примечание: Если вы используете Windows 10 версии 1903, выполните обязательно шаг номер 6, в ранних версиях системы он не обязателен.
Шаг 6: Откройте приложение «Параметры» и перейдите «Обновление и безопасность» → «Безопасность» → «Защита от вирусов и угроз» → «Управление настройками» и включите «Защиту от подделки».
Чтобы сэкономить ваше время мы подготовили готовый reg файл для изменения реестра:
- Загрузите архив: Защитник-удаление-политик.reg.
- Распакуйте и запустите вложенный файл REG, это исправит ситуацию.
- После выполнения, вы можете открыть редактор реестра, чтобы убедиться, что ключ политики «Windows Defender» не существует. После этого, перезагрузите Windows, чтобы изменения вступили в силу.
Обратите внимание, Это действие вернет параметры политики «Защитника Windows» в первоначальное состояние. По умолчанию, при чистой установке Windows 10, никаких политик не установлено.
Все! Защитник Windows включен.
Getting the “Your IT administrator has limited access” error when accessing the Windows Security program in Windows 11 is pretty common. It could appear for various reasons. But despite that, it could also be easily fixed. And, this is what this guide will show you.
If you’re getting the same error when using Windows Security on the PC, read this in-depth fixes guide to know how to fix “Your IT administrator has limited access” error in Windows 11.
Why Does “Your IT Administrator Has Limited Access” Appear in Windows 11?
Your user account may not have administrative privileges, because of which the “Your IT administrator has limited access” error message is appearing. But besides this, there could be several more reasons for it. Below, we’ve listed all other potential reasons for this issue:
- Interruptions by Third-Party Antivirus
- Unnecessary School Accounts on the PC
- Enabled Turn Off Microsoft Defender Antivirus Policy
- Buggy Windows Security App
- Interference From Microsoft Defender Firewall
- Bugs and Glitches in the PC
- Viruses and Malware
- Outdated Windows 11
- Limitations From the IT Desk
Fix “Your IT Administrator Has Limited Access” Error in Windows 11
In this section, we’ll share some working fixes to fix this error in Windows 11. You can follow the mentioned ways to fix “Your IT administrator has limited access” in Windows 11:
1. Change Your User Account to an Admin Account
One of the most common reasons for the “Your IT administrator has limited access” error in Windows 11 is the lack of admin rights. Thus, we suggest you change your current user account to an admin account. Follow the below-mentioned steps to know how to do this:
1. Open the Settings app and move to the Accounts section from the left navigation menu.
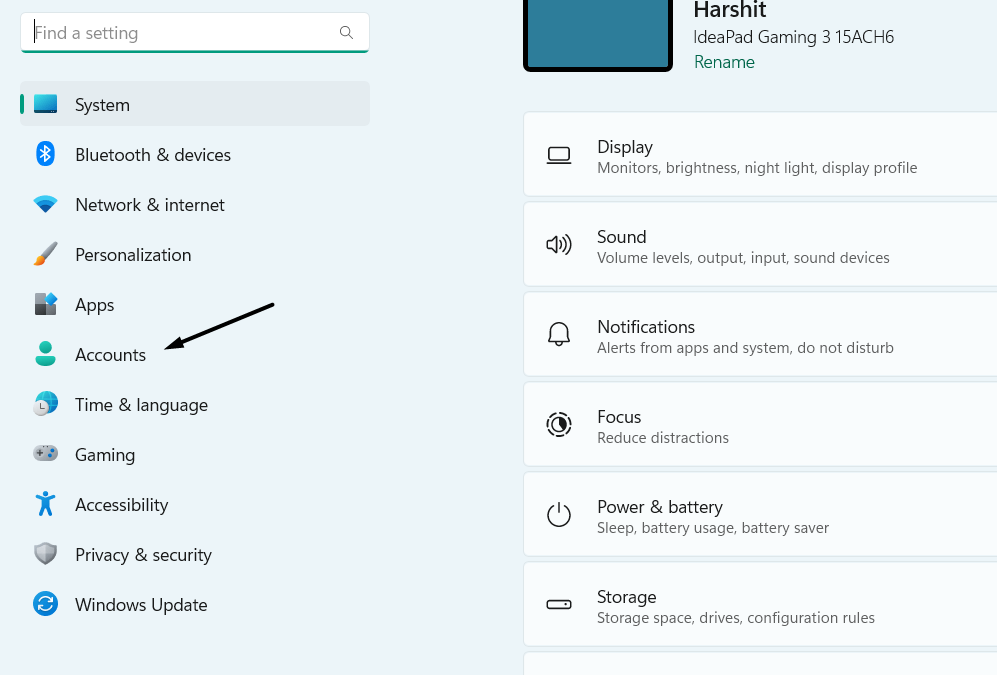
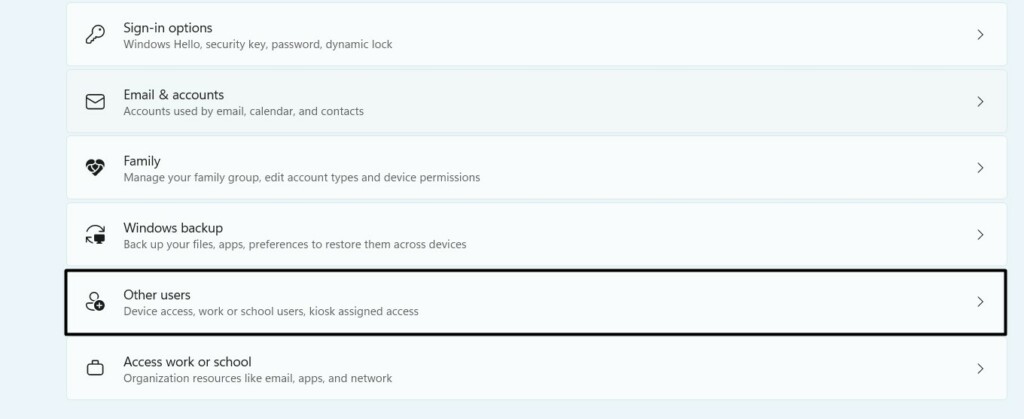
2. In the Accounts section, choose Other users under Account settings to view the active accounts.
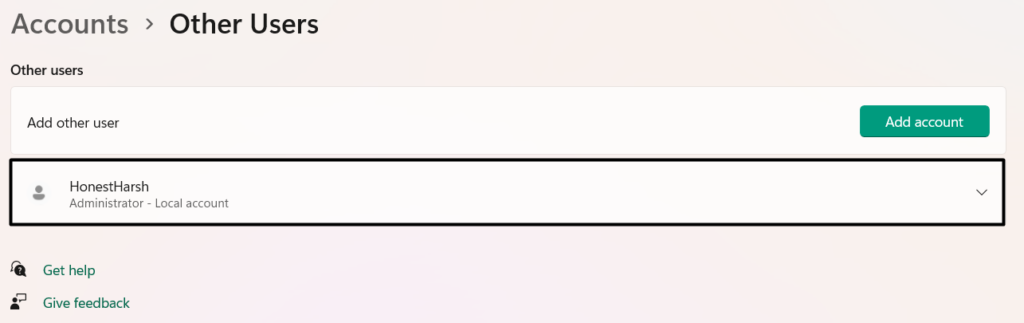
3. On the next screen, select your user account, and check if Administrator is added under it.
4. If not, click the Change account type button, and choose Administrator from the dropdown.
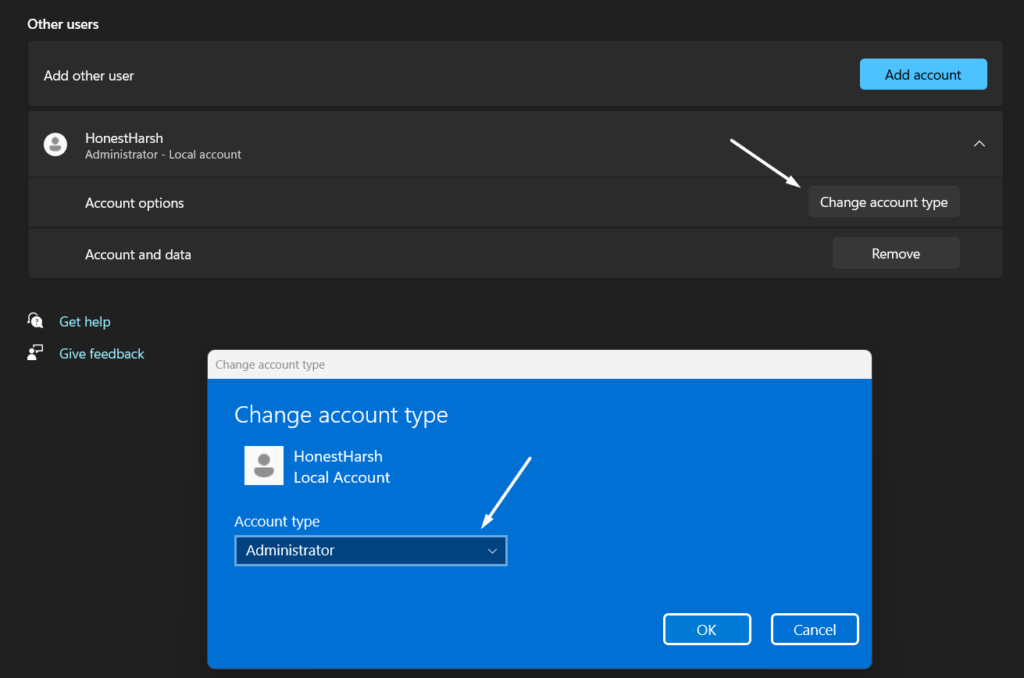
5. Once done, click OK to apply this change, and then simply restart your Windows 11 PC.
2. Create Another Administrator Account
If the issue is still there, create a new administrator account on your PC, as it could be possible that the current account has some issues. So try the same on your PC. You can check the below-mentioned steps to learn how to create another administrator account on your PC:
1. To create a new admin account on your Windows 11 system, go to the Accounts section of it.
2. In the Accounts window, choose Other users, and then click Add account to get a new prompt.
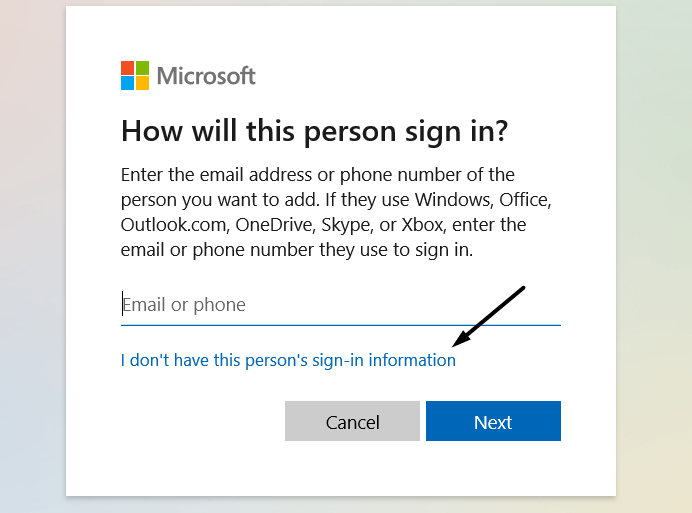
3. In the Microsoft account window, select the I don’t have this person’s sign-in information text.
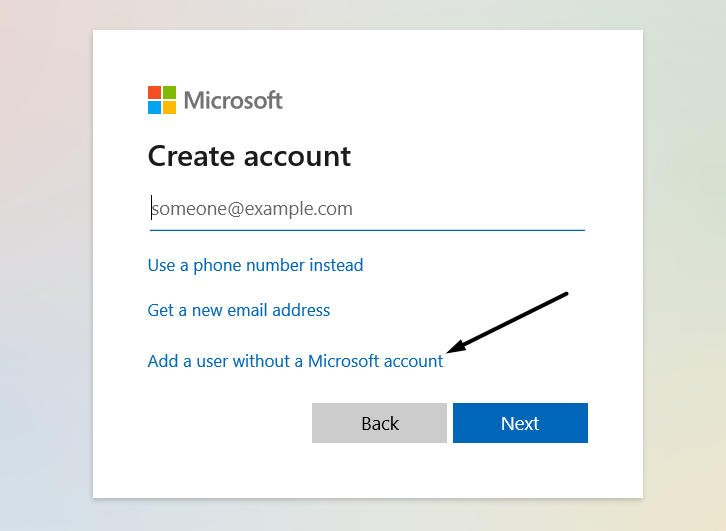
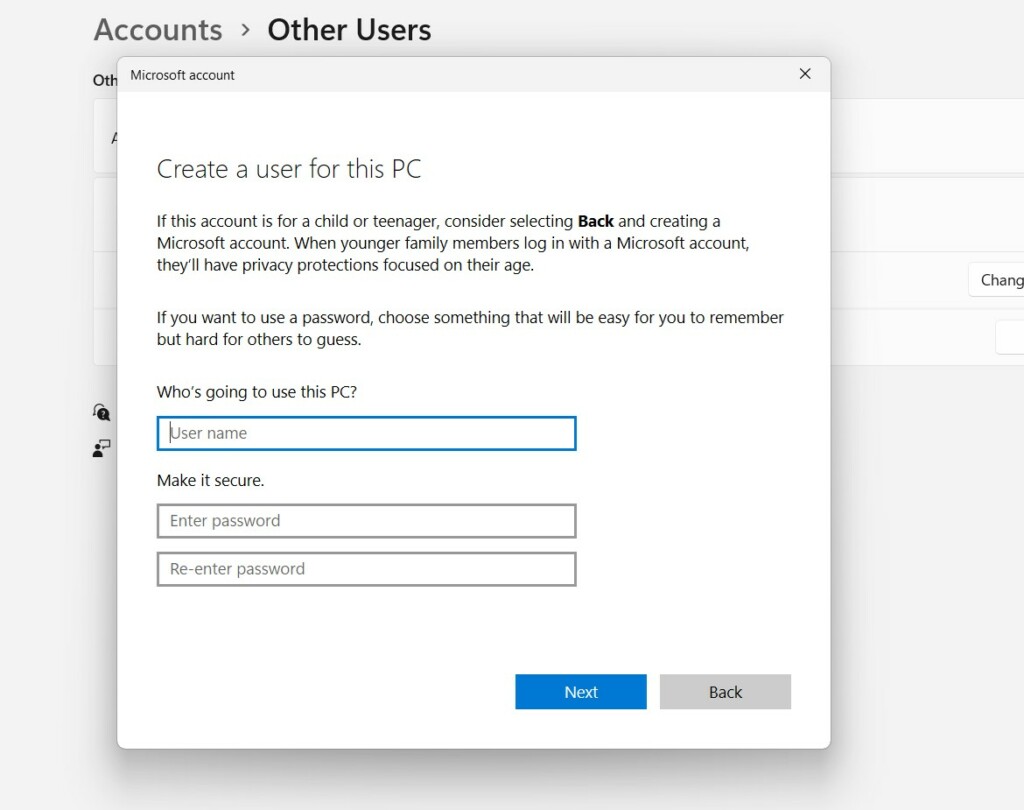
4. On the next screen, select Add a user without a Microsoft account and then enter the required details.
5. Follow the on-screen instructions to create a new admin account on your Windows 11 PC.
6. Finally, log in with the new account on your PC and check whether the issue is gone now.
3. Turn On the Hidden Administrator Account
Even if creating a new admin account doesn’t fix the issue on the PC, consider enabling the hidden admin account on it. You can easily enable it by running a few simple commands in Command Prompt. Check the mentioned prompts to know how to easily turn it on:
1. To enable the hidden admin account, boot your Windows 11 PC into Safe mode using any method.
2. Once you’re in Safe mode, open Command Prompt and copy-paste the below command in it:
net user administrator /active:yes
3. Once done, hit the Enter key to immediately ON the hidden administrator user account.
4. Reboot your Windows PC and choose the hidden admin account when logging into the PC.
4. Remove Any Work or School Accounts
Before trying other fixes, we want to give you a small suggestion, which is deleting any work or school accounts from the PC. It could be possible that your PC is connected to any other account, which doesn’t have rights to access Windows Security. Follow the below steps to do so:
1. Go to the Accounts category of Settings and then scroll to Access work or school navigation.
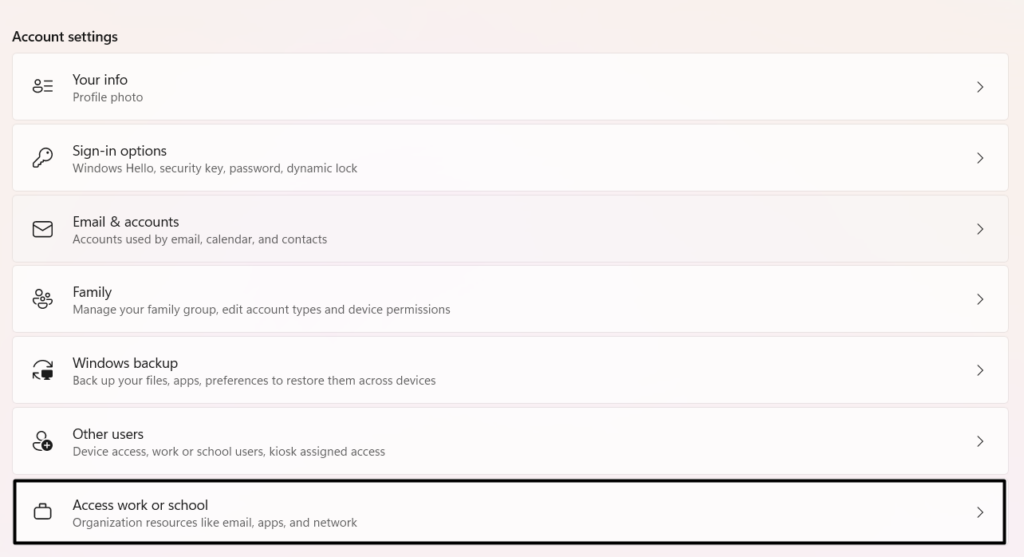
2. Under Access work or school navigation, look for the connected work or school account, and select it.
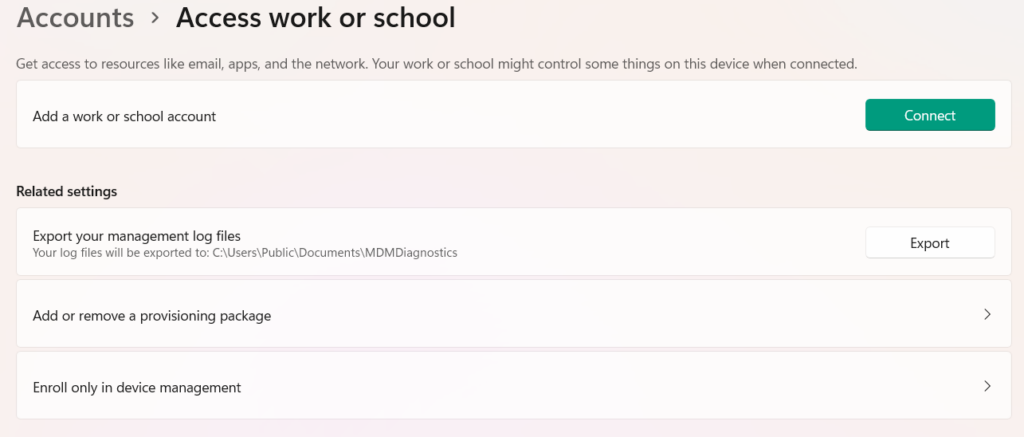
3. Hit Disconnect next to the account to disconnect it and once done, reboot your system.
5. Uninstall Other Security Apps
If you’ve recently installed a third-party security app on your PC, consider uninstalling it, as it could be possible that it’s interrupting the Windows Security app’s working and causing this issue. To know how to uninstall apps and programs in Windows 11, check the below steps:
1. Type the security app in the Windows Search Box, and choose Uninstall from the search results.
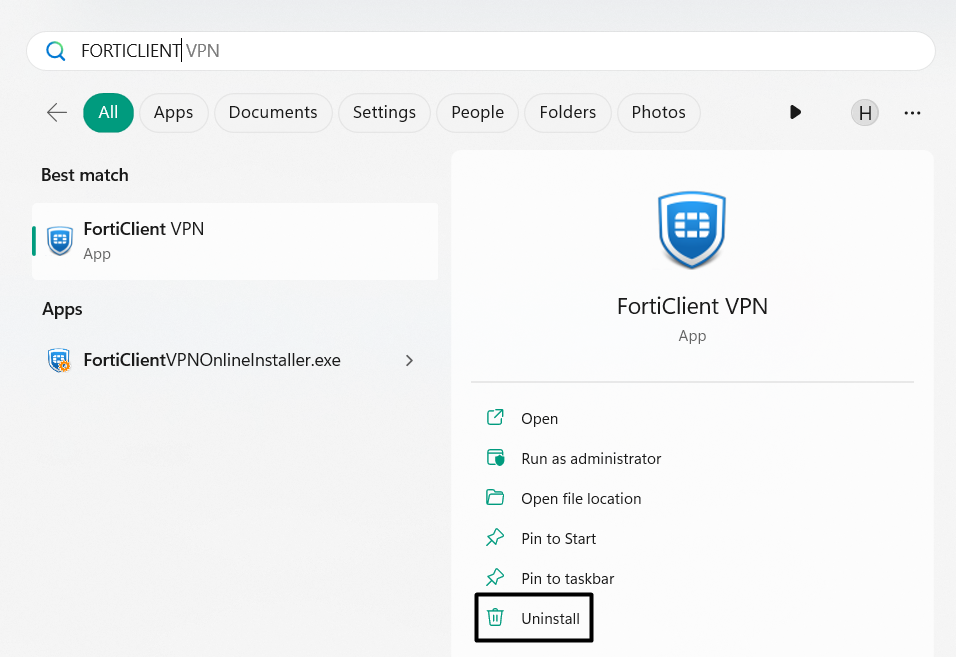
If you don’t see the Uninstall option in the search results, go to the below path in the Settings app:
Settings App > Apps > Installed Apps > Search for the App > Click Three-Dots (…) > Uninstall

2. Choose the Uninstall button in the next prompt that appears after following any above methods.
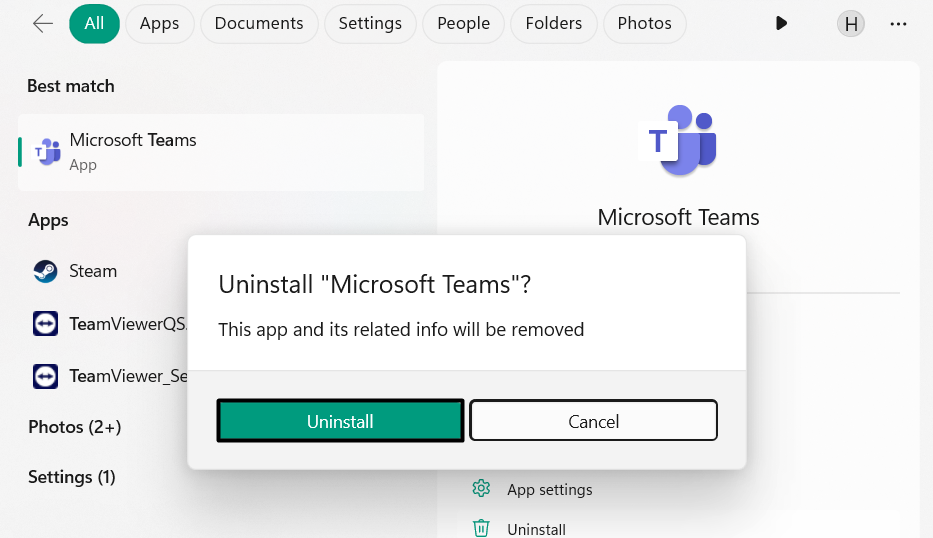
3. After uninstalling the app, restart your Windows 11 PC and check whether the issue is still there.
6. Disable the Turn Off Microsoft Defender Antivirus Policy
Some Windows Pro and Enterprise users in the Microsoft forum mentioned that they’re getting the “Page not available” error. If you’re also one of them, you need to disable the Turn Off Microsoft Defender Antivirus Policy in the Group Policy Editor on your PC. You can do this on your Windows 11 PC by taking the help of the below-mentioned steps:
1. Open the Group Policy Editor app and double-click the Computer Configuration option.
2. Select Administrative Templates in the app’s side menu and expand Windows Components.
3. Click Microsoft Defender Antivirus and open Turn off Microsoft Defender Antivirus on the left.
4. In the Turn off Microsoft Defender Antivirus window, choose the Disabled radio button and then select OK.
5. Open the Allow antimalware to startup with normal priority policy and then disable that too.
6. Choose the Client Interface policy in the same folder, and then double-click Enable headless UI mode.
7. Choose the Disable option to turn off this policy, and then click Apply to apply this change.
8. Lastly, close the opened window, and then restart your PC to check if the issue is fixed.
7. Run this PowerShell Command
One easy way to fix the “Your IT administrator has limited access” error is to run some commands in PowerShell. If you also get this error or “Page not available” error when trying to open Windows Security, do the same and check if it helps. Follow the added steps:
1. Open the Windows Search Box on your PC and then type Windows PowerShell in it.
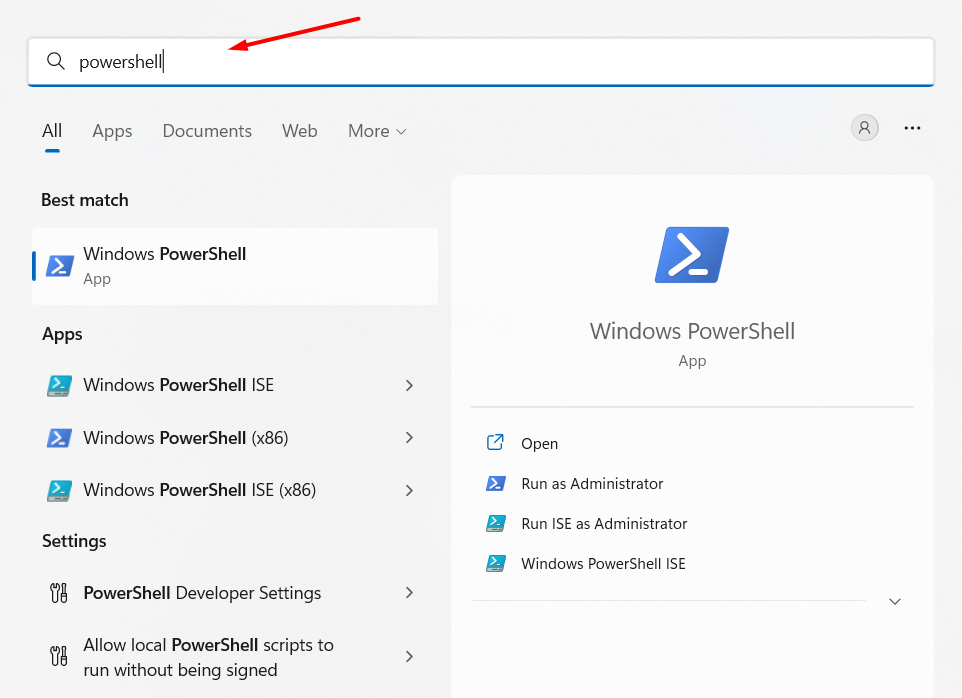
2. Choose Windows PowerShell from the search results under Best match to open the console.
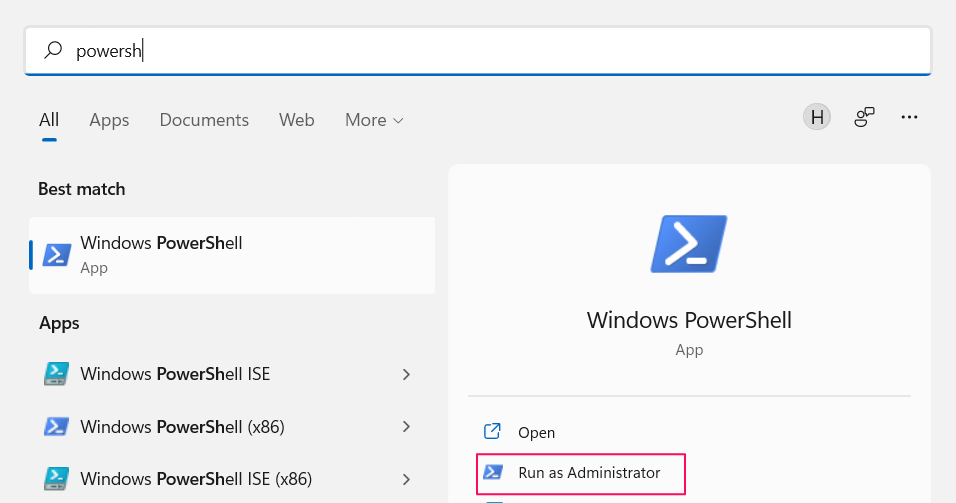
3. In the PowerShell window, copy-paste the following command, and then press enter to run MpPreference:
set-MpPreference -UILockdown4. Finally, exit Windows PowerShell and then reboot your PC to get rid of this error message.
8. Repair or Reset the Windows Security App
Another way to get rid of the “Your IT administrator has limited access” error in Windows 11 is to repair and reset the Windows Security app. This will fix all the temporary bugs and glitches with it, and, also eliminate the error. So check the below steps to know the process:
1. Open the Settings app on your Windows 11 PC and from the left navigation pane, choose Apps.

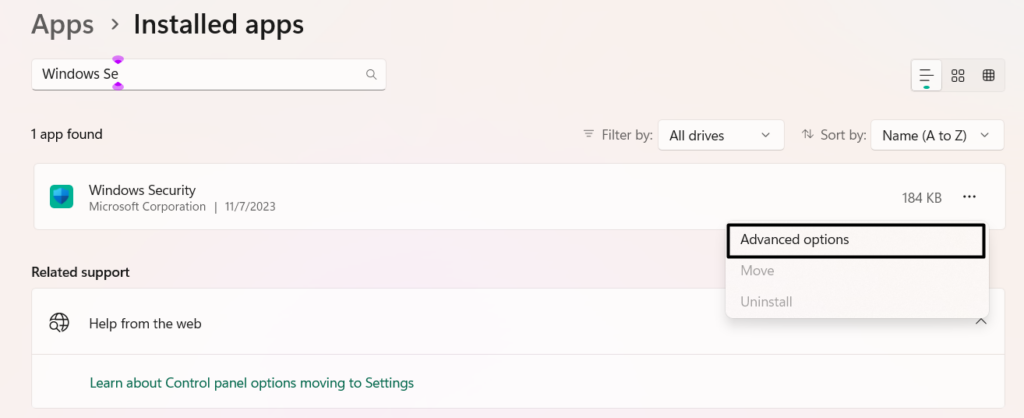
2. Choose Installed apps and on the next screen, find Windows Security and click three dots (…) next to it.
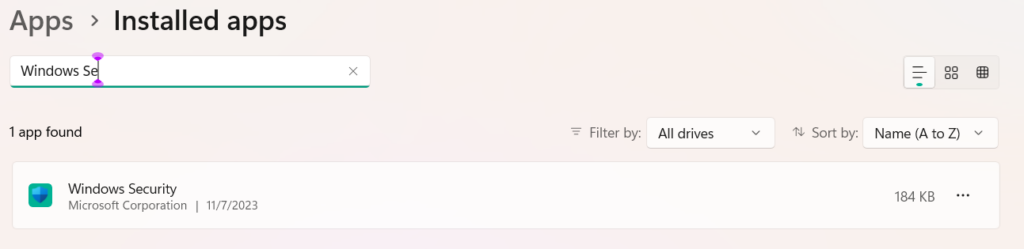
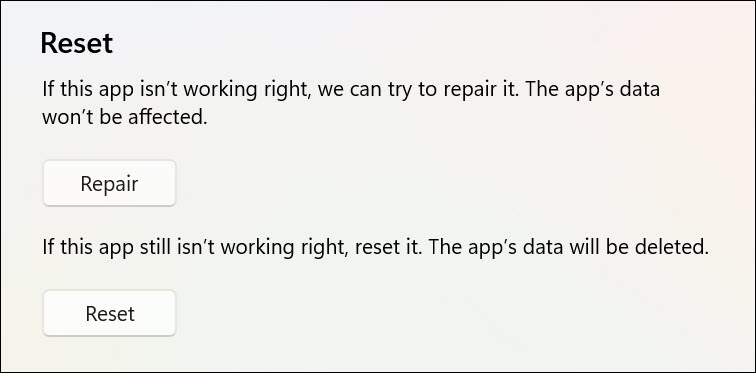
3. From the dropdown, choose Advanced options, go to the Reset section, and click Reset.
4. Once done, click Repair in the same section to begin repairing the Windows Security app now.
5. Exit the Settings app, and then check if the “Your IT administrator has limited access” error still appears.
9. Modify the Registry via Command Prompt
Some users in the online forums mentioned that they eliminated the “Your IT administrator has limited access” error by running some simple commands in Command Prompt. We suggest you implement the same by following the mentioned steps:
1. Type Command Prompt in the search box, and choose Run as administrator from the results.

2. In the Command Prompt window, execute the following commands one by one to make the changes:
reg delete "HKLM\Software\Microsoft\Windows\CurrentVersion\Policies" /freg delete "HKLM\Software \Microsoft\WindowsSelfHost" /freg delete "HKLM\Software\Policies" /freg delete "HKLM\Software\WOW6432Node\Microsoft\Policies" /freg delete "HKLM\Software\WOW6432Node\Microsoft\Windows\CurrentVersion\Policies" /freg delete "HKLM\SOFTWARE\Policies\Microsoft\Windows Defender" /v DisableAntiSpywarereg delete "HKCU\Software\Microsoft\Windows\CurrentVersion\Policies" /freg delete "HKCU\Software\Microsoft\WindowsSelfHost" /freg delete "HKCU\Software\Policies" /freg delete "HKLM\Software\Microsoft\Policies" /f3. Once done, type exit in the same window to close the console and get rid of this error message.
10. Search for Viruses and Malware
Malware and viruses in the PC could also be the reason for the “Your IT administrator has limited” access error in Windows 11. This could be the same in your case. Thus, we suggest you make sure that your PC is malware-free. Follow the below steps to ensure this:
1. As Windows Security isn’t working well, you need to use another method to run the antivirus scan on it. So, open Command Prompt with admin rights on your PC to do the same.
2. In the Command Prompt window, type in the below-mentioned command to open the antivirus tool:
cd C:\ProgramData\Microsoft\Windows Defender\Platform\4.18*3. Type in the below command in it and then hit the Enter key to run the antivirus scan right now:
MpCmdRun -SignatureUpdate4. Lastly, wait for the antivirus scan to complete on the PC, and once done, check the issue’s status.
11. Erase Windows Defender Records
An easy solution to fix “Your IT administrator has limited access” is to erase the Windows Defender records. You need to delete them in Registry Editor. Try the steps to do so:
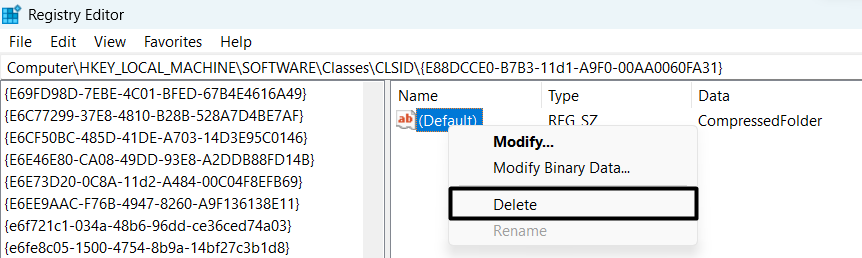
1. To delete the Windows Defender records from your Windows 11 PC, open Registry Editor on it.
2. In the Registry Editor program, navigate to the below-mentioned location using the address bar at the top:
HKEY_LOCAL_MACHINE\SOFTWARE\Policies\Microsoft\WindowsDefender\Policy Manager
3. Once you’re there, delete all the files in it, and then restart your PC to check the issue’s status.
12. Turn Off Microsoft Defender Temporarily
It may be possible that the Microsoft Defender Firewall is constantly interrupting the Windows Security app’s working, which is why the “Your IT administrator has limited access” error is appearing.
In that case, we suggest you turn off the firewall temporarily to check if it’s the cause of this error on the PC. You can simply follow the below-mentioned steps to know how to disable Windows Defender Firewall in Windows 11:
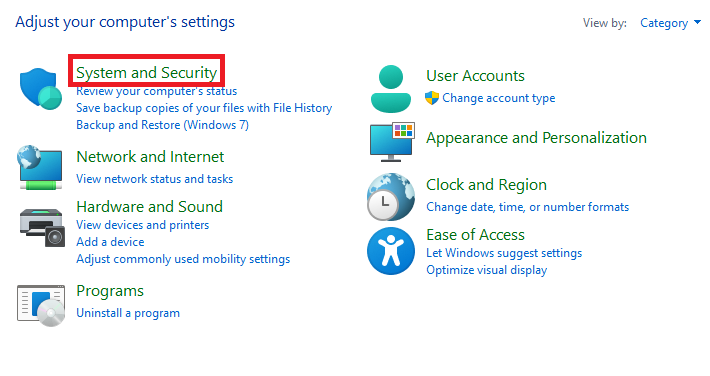
1. As we’re unable to launch the Windows Security app, we’ll use the Control Panel app to turn it off. So open Control Panel on your computer and go to System and Security.
2. In the System and Security window, choose Windows Defender Firewall and then select Turn Windows Defender Firewall on or off on the left navigation menu of the utility.
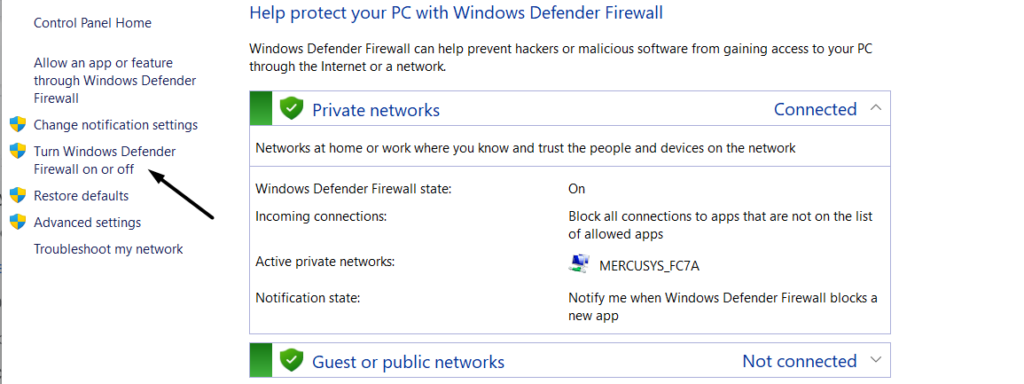
3. On the next screen, under both sections, choose Turn off Windows Defender Firewall (recommended).
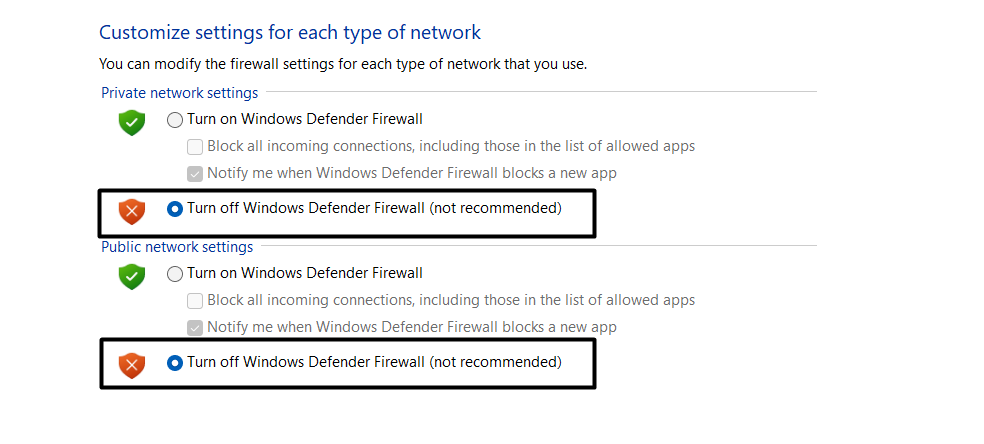
4. In the end, click OK to apply all the changes and then restart your Windows 11 PC or laptop.
13. Contact Your IT Helpdesk
It may be possible that your IT administrator has put restrictions on your user account, which is why the “Your IT administrator has limited access” error is appearing when accessing the Windows Security app on your PC.
In that case, you need to contact your IT helpdesk and ask them if that’s true. If yes, then ask them to give you the right permissions to use the Windows Security app on your Windows 11 PC without any issues.
14. Reset the PC
If none of the mentioned solutions help you get rid of the “Your IT administrator has limited access” error, then you’ve no other option left than resetting the Windows 11 PC back to default. Also, you don’t need to sacrifice your valuable data in this process. If you’re ready to reset your Windows 11 PC, follow the below-mentioned steps to do the same:
1. To reset your Windows 11 PC, open the Settings app and go to Recovery section of it.

2. In the Recovery section of the Settings app, hit the Reset PC button next to Reset this PC.

3. In the next window, choose the Keep my files option and then the Cloud install option.
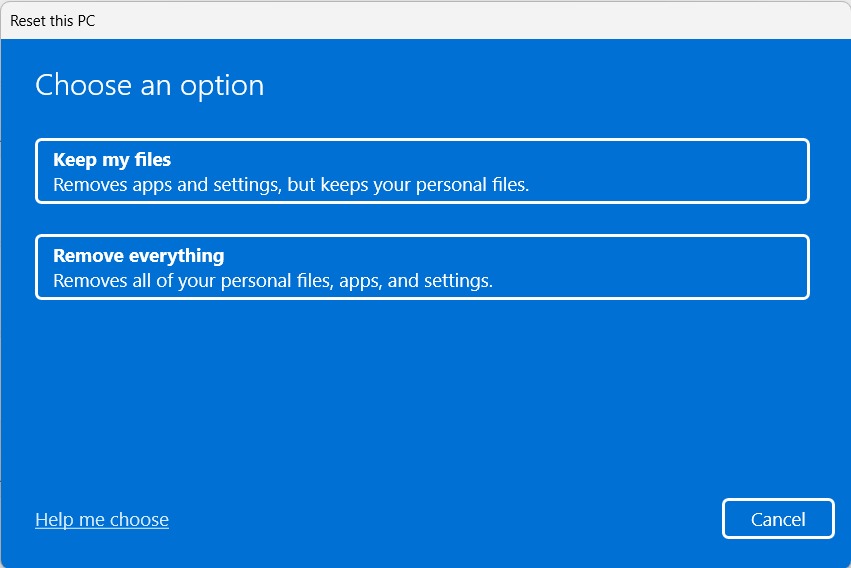
4. In the end, follow the on-screen instructions to reset your Windows 11 PC back to default.
FAQs
How Do You Fix Your IT Administrator Has Limited Access to Some Areas of This App?
It could be possible that your user account doesn’t have admin rights, which is why “Your IT administrator has limited access to some areas of this app” is appearing when trying to open it.
How Do I Fix Page Not Available in Windows 11?
If you’re getting an error when trying to open a page in Windows 11, consider restarting your Windows 11 PC. In case this doesn’t resolve the issue, update the particular app on your PC.
How Do I Enable Headless UI Mode?
You need to enable the Headless UI mode on your Windows 11 PC in the Registry Editor app.
How Do I Disable Antivirus on Windows 11?
Follow the below path to enable the integrated antivirus utility on your Windows 11 PC or laptop:
Open the Windows Security App > Choose Virus & Threat Protection App > Manage Settings > Toggle off Real Time Protection.
How Do I Allow Administrator Permission in Windows 11?
You can assign your user account admin rights in the Accounts section of the Settings program on your PC.
Final Words
So, these are some good solutions (at least, according to us) that can quickly and easily fix the “Your IT administrator has limited access” error message in Windows 11. Here in this guide, we mentioned some great fixes to get rid of the “Your IT administrator has limited access” error.
We hope the fixes we shared in this guide helped you get rid of it with ease. If yes, do let us know which mentioned workarounds helped you resolve this issue.