
В этой статье мы покажем, как подключить сетевой каталог, расположенный на Windows Server 2012 R2 как отдельное хранилище (datastore) на хосте VMware ESXi и использовать его для хранения файлов виртуальных машин и ISO образов. VMWare ESXi не умеет напрямую работать с общими папками Windows (по протоколу SMB), поэтому нам придется воспользоваться другим способом.
ESXi позволяет использовать в качестве датастора следующие типы хранилищ:
- Локальный диск или LUN на внешнем устройстве хранения, подключенном по Fibre Channel или iSCSI
- Network File System (NFS) –этот сетевой протокол преимущественно используется для удаленного доступа к файловой системе в среде Unix/Linux
Функционал NFS сервера в серверной платформе Microsoft появился еще в Windows Server 2003 R2, и до сих пор поддерживается и в Windows Server 2012 R2.
Совет. Использование каталога NFS в качестве хранилища файлов виртуальных машин VMWare рекомендуется только в тестовых, лабораторных и не критичных продуктивных средах.
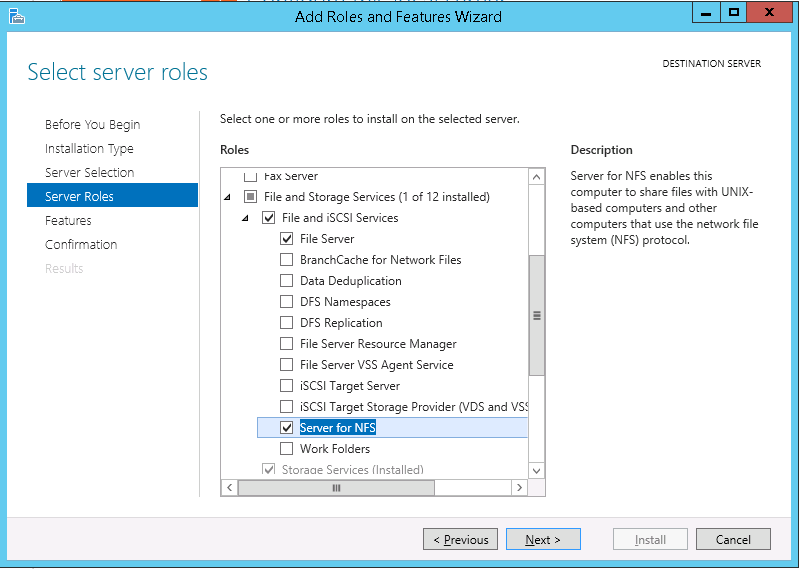
Итак, нам в первую очередь нужно настроить NFS каталог на Windows 2012 R2 и подключить его в качестве хранилища на хосте ESXi. Предположим, у нас уже имеется сервер Windows с установленной ролью файловых служб (File and Storage Services). Чтобы установит функционал NFS сервера:
- Откройте консоль Server Manager и выберите Manages -> Add Roles and Features
- В разделе ролей разверните роль File and Storage Services -> File and iSCSI Services

- И отметьте опцию Server for NFS
- Нажмите Next. После окончания работы установщика роли, закройте консоль Server Manager.

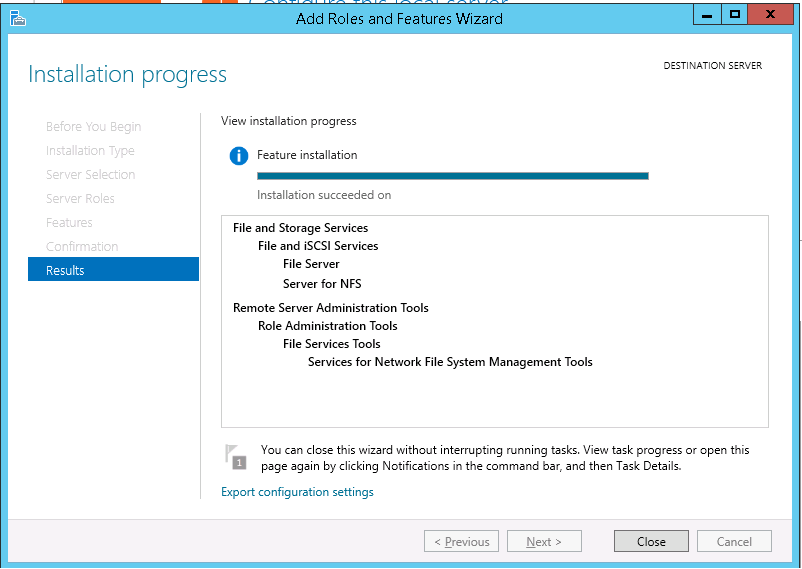
Совет. Установить фичу Server for NFS можно всего одной командой Powershell:
Add-WindowsFeature "FS-NFS-Service"
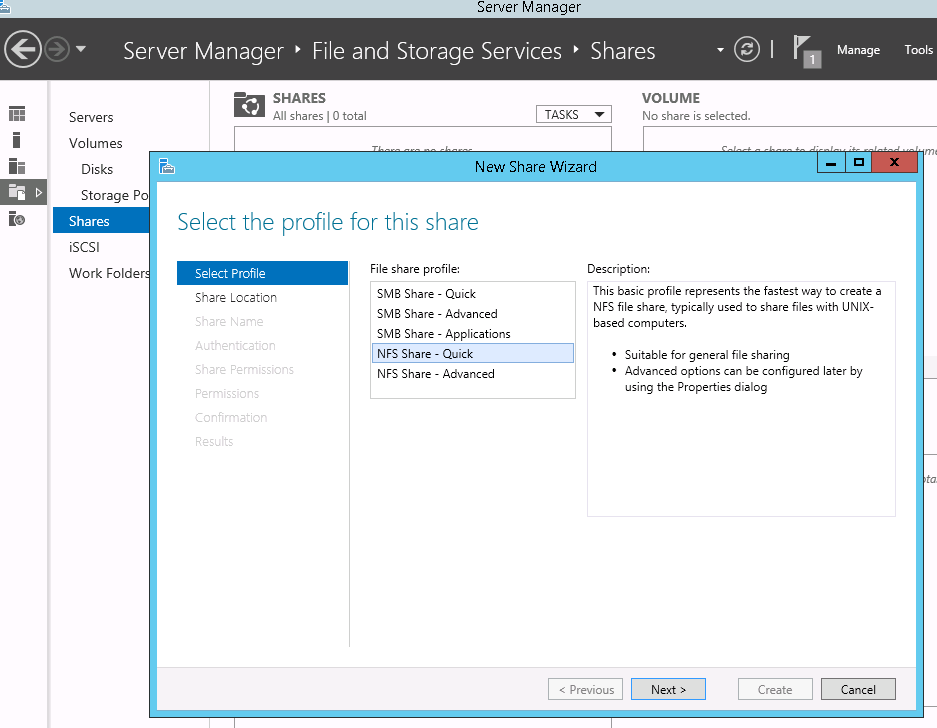
Далее нужно создать каталог Windows, который будет использоваться как точка монтирования NFS. В качестве примера, мы создали каталог c:\nfs (на самом деле это не лучшее место для создания общей папки, предпочтительнее отдельный диск, или папка с назначением жесткой квоты).
В консоли Server Manager перейдите в раздел File and Storage Services-> Shares. Запустите мастер создания нового ресурса (Tasks -> New Share) и выберите NFS Share-Quick.
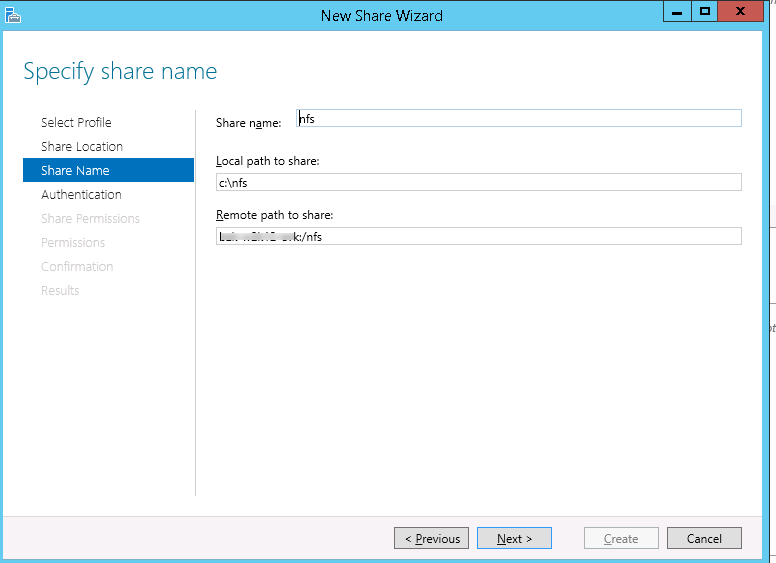
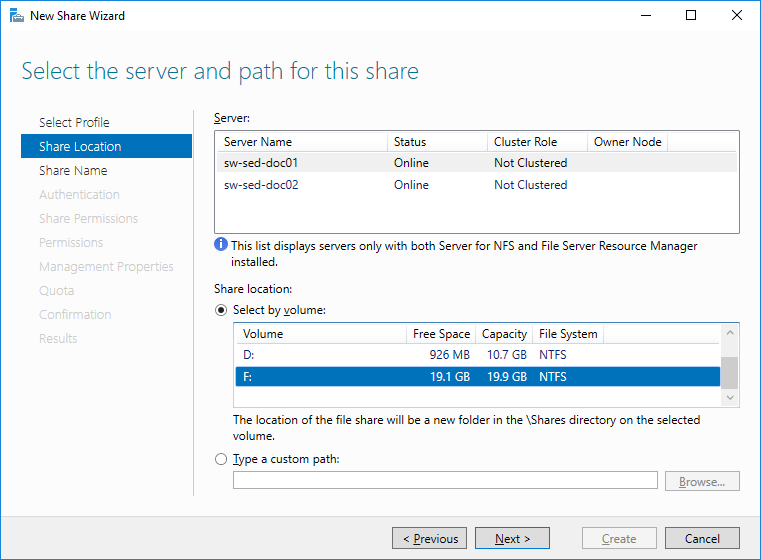
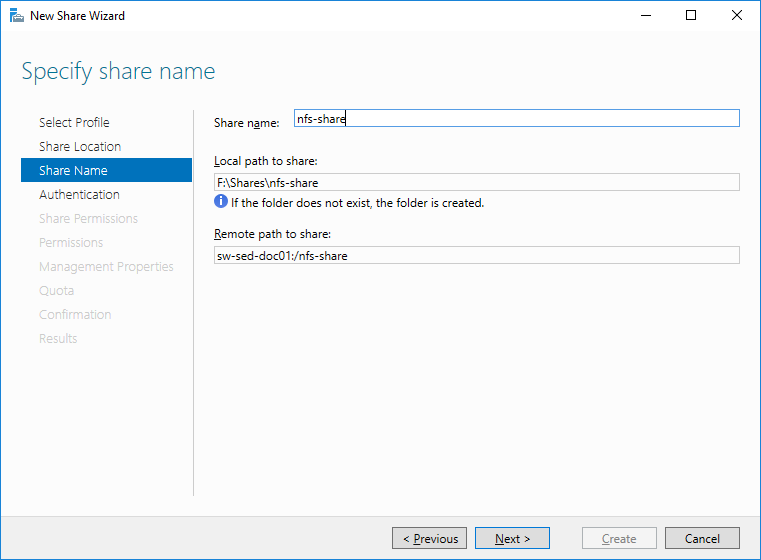
Укажите путь к каталогу и его имя. В нашем примере он называется nfs. В данном случае, полный NSF путь (путь к удаленной шаре), который будет использоваться в среде Unix для доступа к этому каталогу будет таким: msk-fs01:/nfs
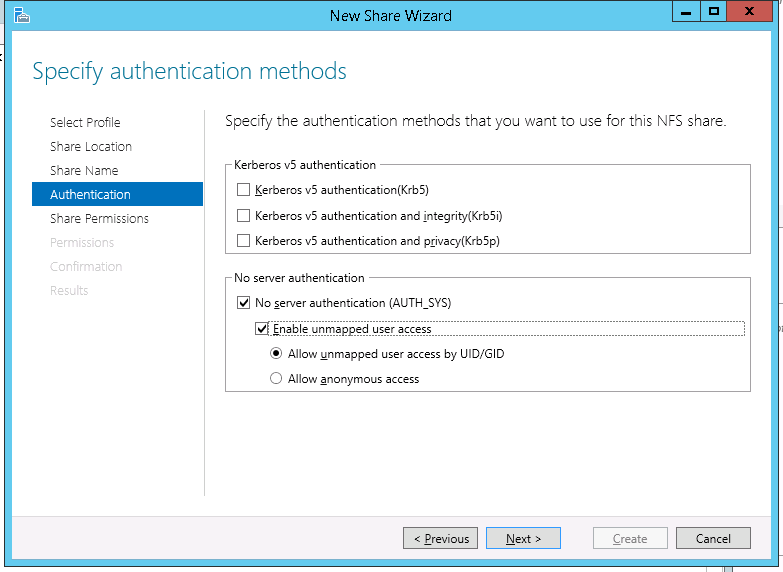
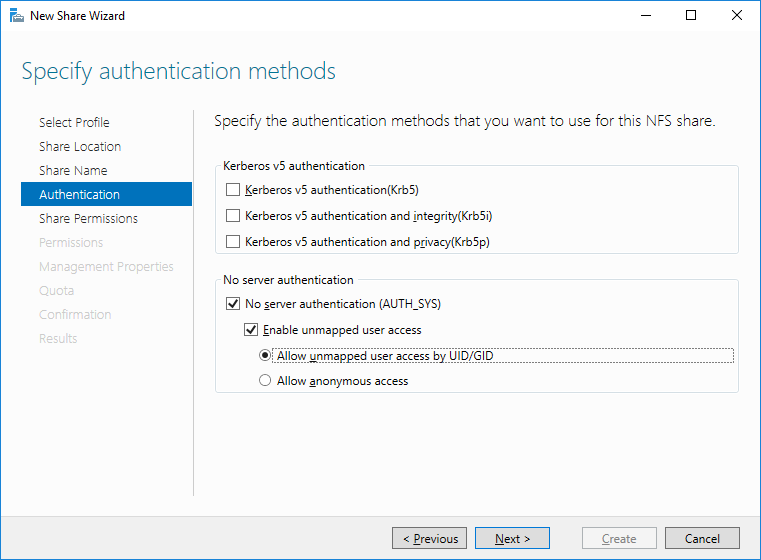
На вкладке с типами аутентификации, отключите Kerberos аутентификацию, и выберите “No Server authentication” и “Enable unmapped user access”.
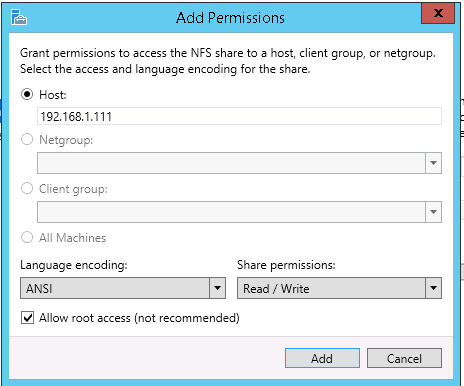
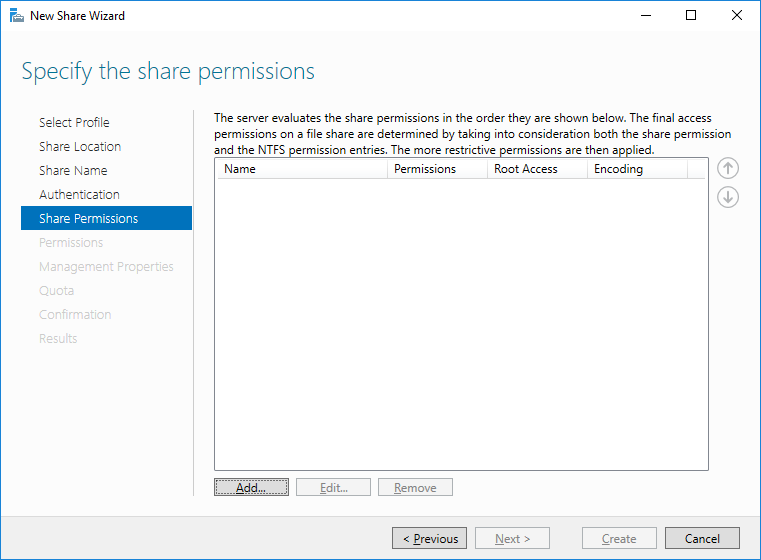
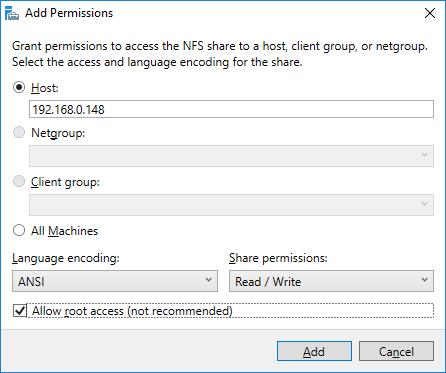
Ограничим доступ к каталогу по IP адресу хоста ESXi. Для этого укажем IP адрес сервера и предоставим ему права Read/Write и Allow root access.
Совет. Также доступ к NFS сервису можно ограничить с помощью Windows Firewall, ограничив доступ отовсюду, кроме определённых IP адресов или подсетей.
Создать общий каталог NFS и ограничить доступ к нему можно также с помощью PowerShell:
New-NfsShare -Name "NFS " -Path "c:\nfs" -AllowRootAccess $true -Permission Readwrite -Authentication sys
Grant-NfsSharePermission -Name “NFS” -ClientName 192.168.1.11 -ClientType host -LanguageEncoding ANSI
Итак, мы создали новый общий сетевой каталог NFS на Windows Server 2012 R2. Осталось подключить его в качестве хранилища на хосте VMWare ESXi.
Совет. Прежде, чем перейти к следующим шагам, убедитесь, что порт vmkernel настроен на вашем сервере ESXi.
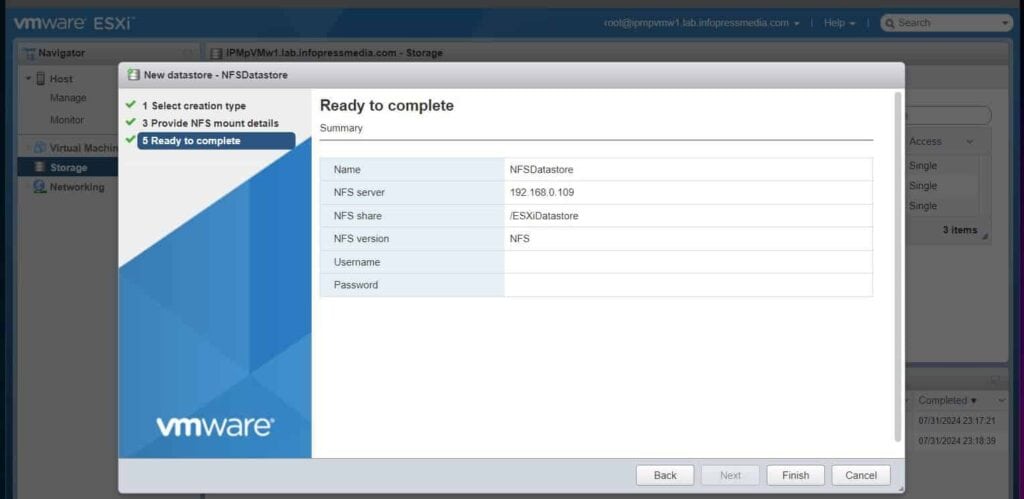
- Подключитесь к вашему сервере vSphere или ESXi. В меню Action выберите Storage > New Datastore

- Выберите тип хранилища NFS

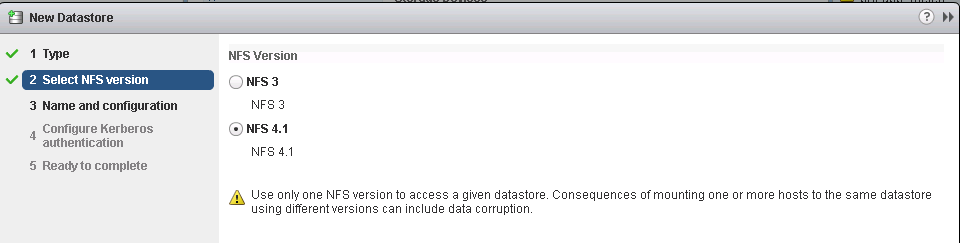
- Выберите версию NFS 4.1 (поддерживается в Windows Server, начиная с версии 2012)

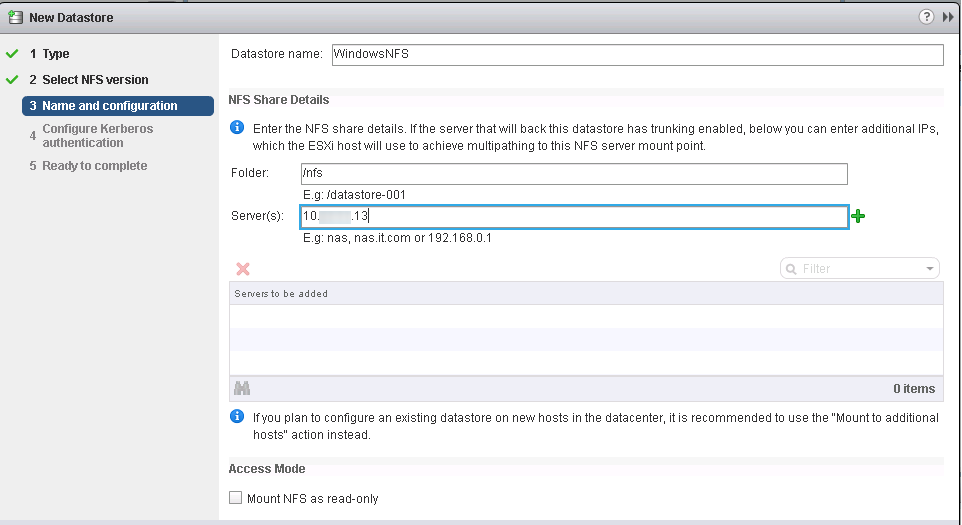
- Укажите имя датастора (WindowsNFS), укажите каталог NFS (/nfs) и адрес NFS сервера (IP адрес или DNS имя)

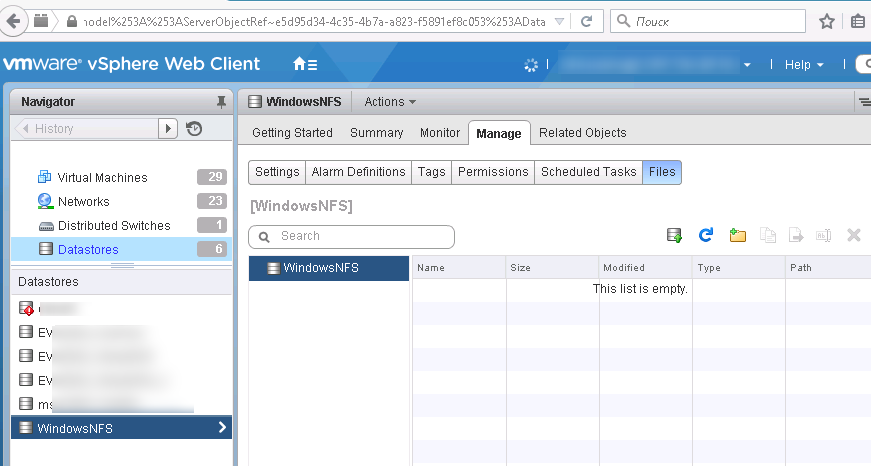
После успешного добавления NFS хранилища, оно появится в списке доступных хранилищ хоста. Вы можете использовать это пустое хранилище для хранения файлов ВМ или ISO образов.

StarWind Pre-Sales Team Lead. Ivan has a deep knowledge of virtualization, strong background in storage technologies, and solution architecture.
StarWind Pre-Sales Team Lead. Ivan has a deep knowledge of virtualization, strong background in storage technologies, and solution architecture.
Introduction
Many words were said about NFS (Network File System), but what exactly NFS can give us? In general, NFS used as the ISO library or just simple network file share with easy access from any Windows or Linux based machine. However, starts from NFS 3.0 protocol can give us the good performance and can be as the shared storage for ESXi or any Linux based Hypervisors. In this article I will create the NFS share on the Windows Server 2016 and then mount NFS share on the ESXi 6.5 and will create the VM on it.
Creating NFS File Share on Windows 2016
First of all, we need to install the Server Roles on the Windows-based server, such as File Server, Fileserver Resource Monitor and NFS server.

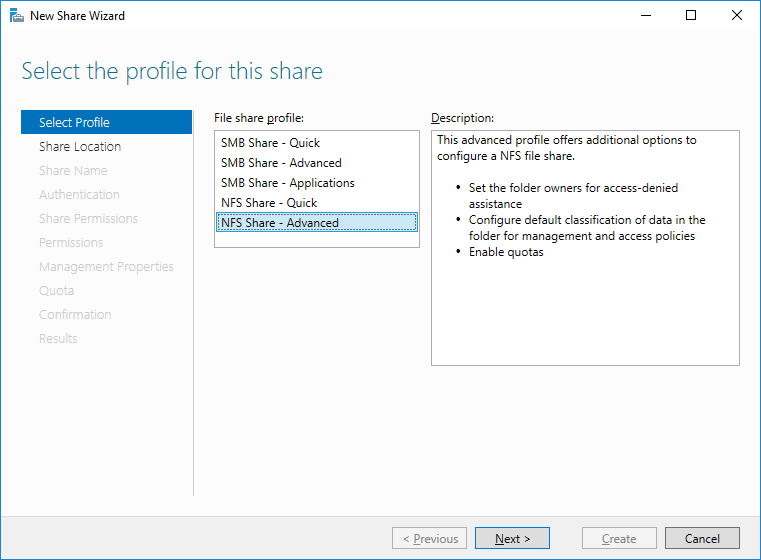
Then we can create the NFS share in Server Manager’s Shares tab. I decided to create “Advanced NFS Share” to specify more properties for share.
Select Server and specify the disk for NFS share
In this window, we should specify the share name.
In this step, we need to specify the Authentication method for our share. You are free to use any of them. In my case, I have created simple NFS share with no server authentication and unmapped user access (Note: to mount the NFS share on the Linux-based machine you must use “Unmapped user access by UID/GID”).
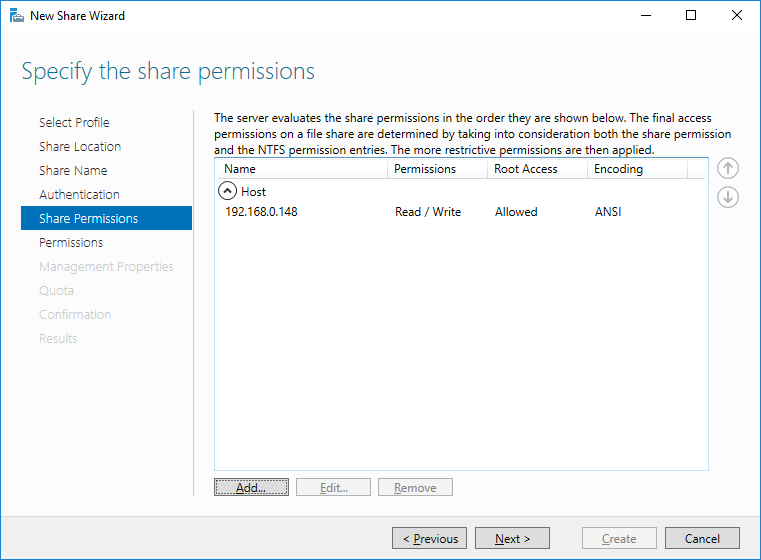
Click “Add” to specify the Share Permissions. You can either specify the Host IP with Language encoding and read/write permissions or allow the access for each machine in network.
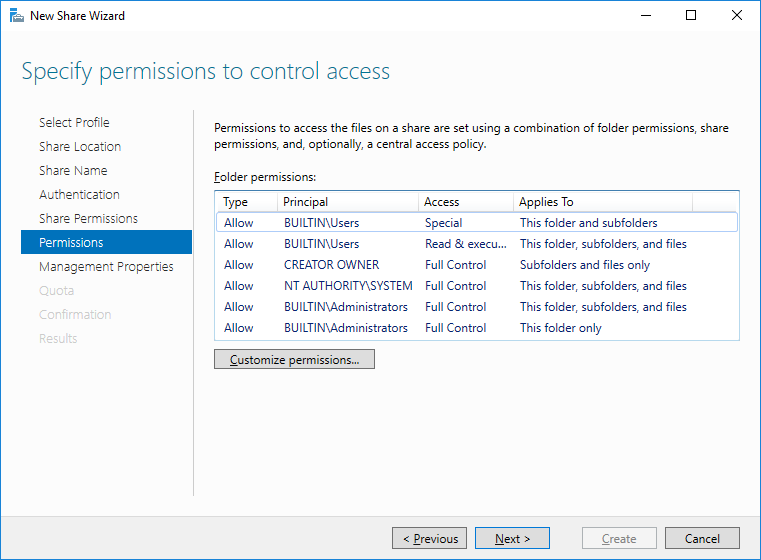
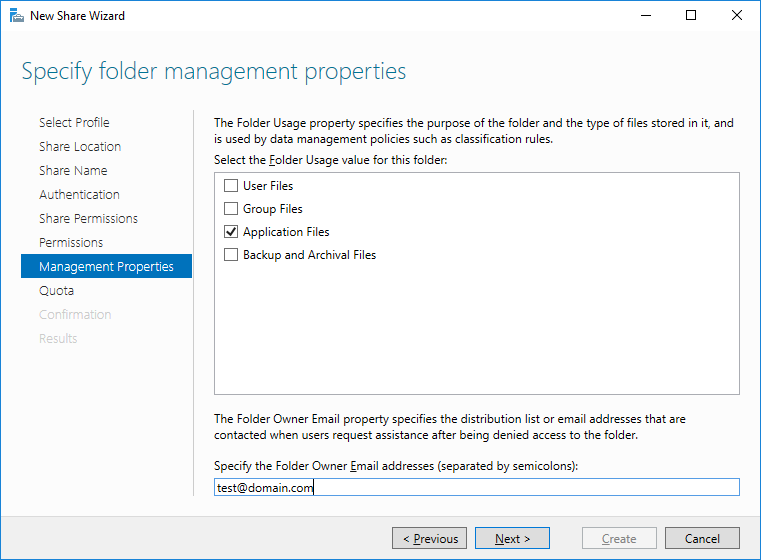
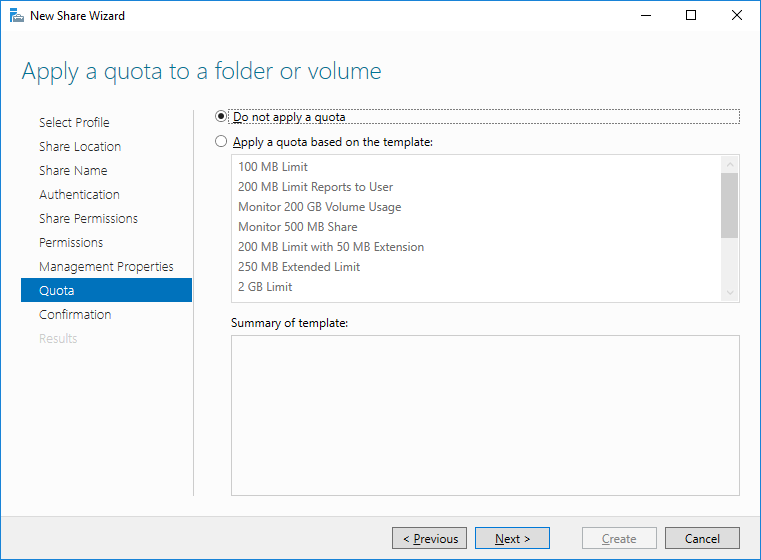
In next 3 steps you can specify the local Windows Permissions, Management Properties and Quota for NFS share by your requirements and needs.
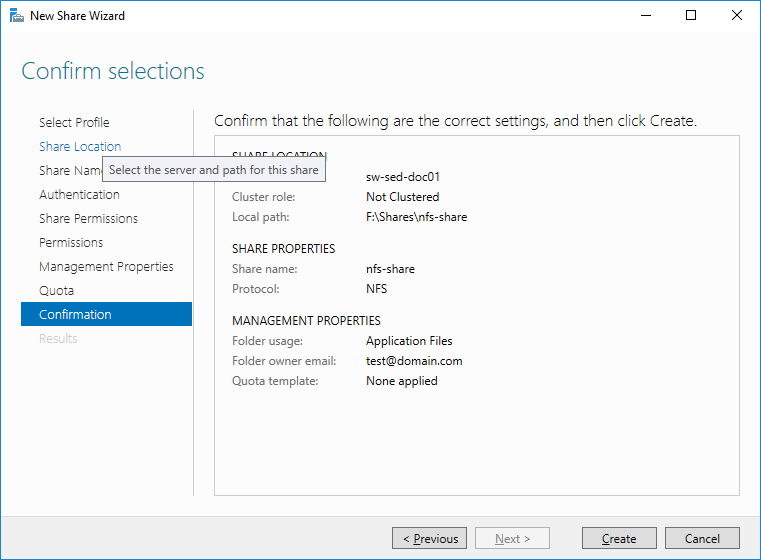
Click “Create” to complete the Wizard and let’s mount this NFS Share in our ESXi 6.5 Hypervisor
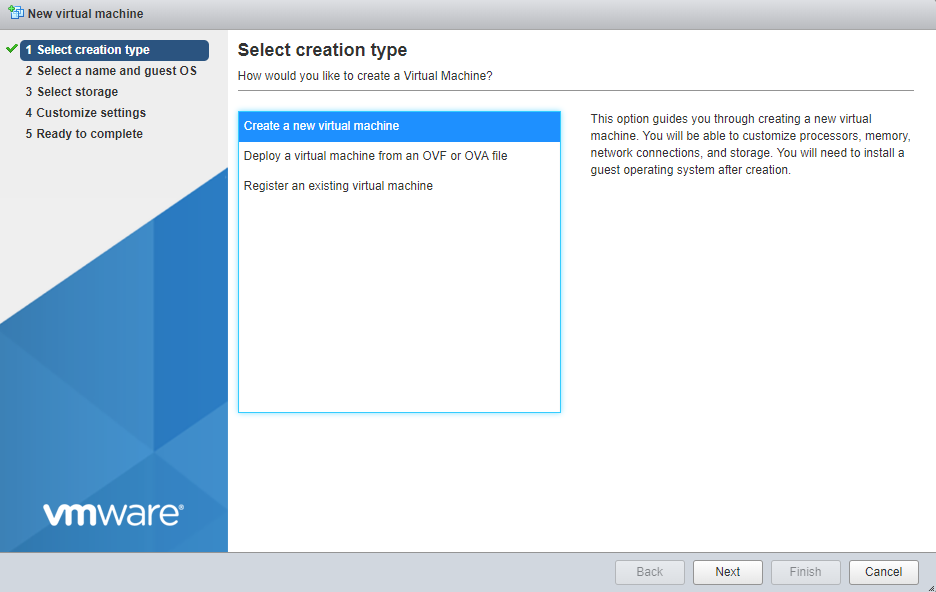
Mounting NFS to ESXi and creating the VM
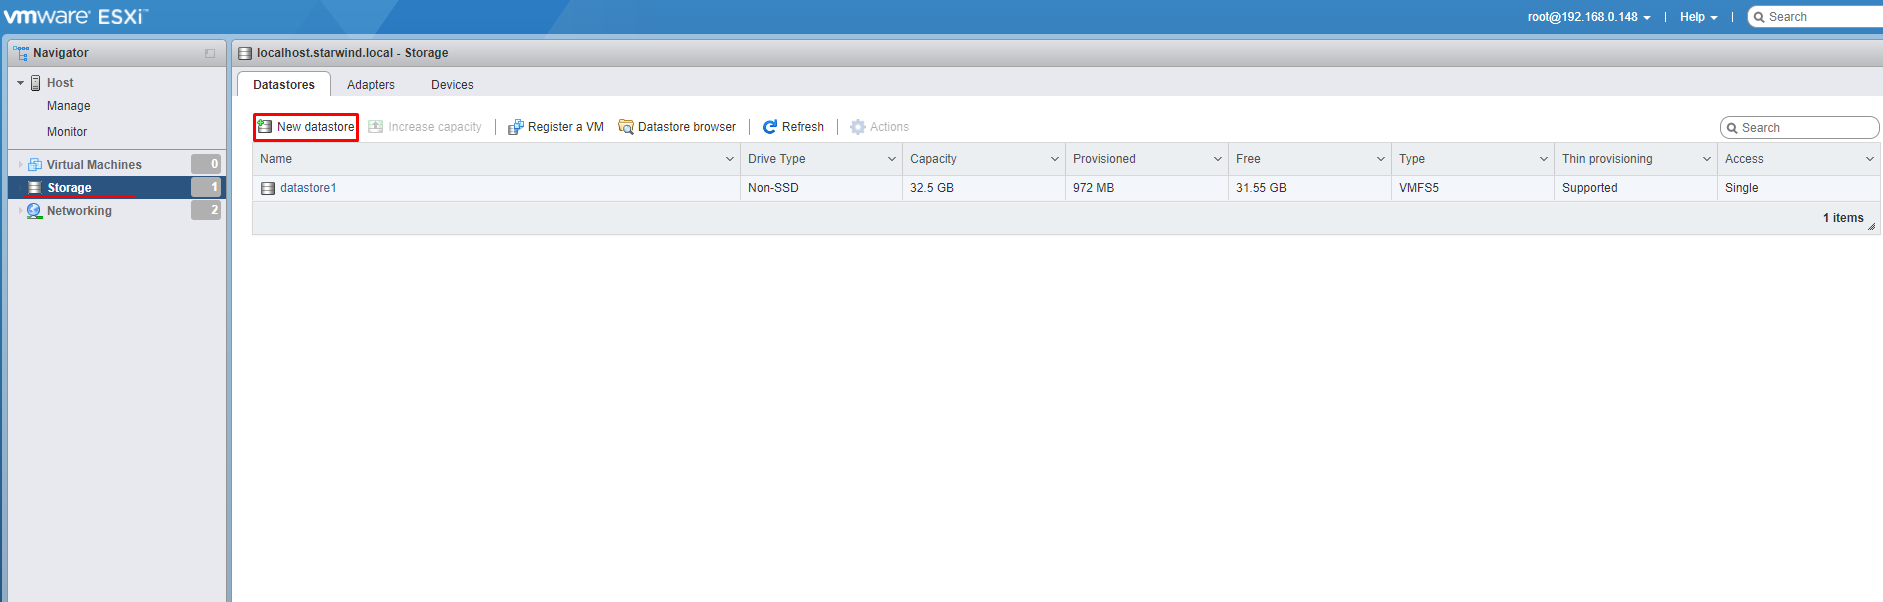
In ESXi console, navigate to Storage tab and click “Add datastore”
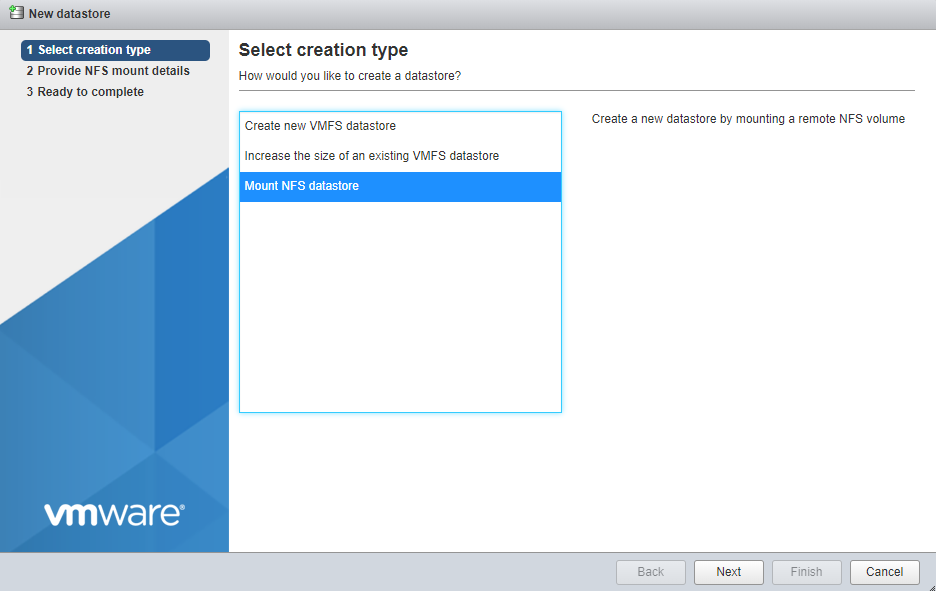
Then select “Mount NFS datastore”
Specify the Name for Datastore, IP/FQDN/Server Name of NFS server and actual name of the share.
Disclaimer:
Windows Server 2016 supports all NFS protocols including NFS 4.1. I have tried to add my share as NFS 4.1 share and it was successfully mounted, but while creating the VM I have received an error that ESXi can’t create vmx files on it.
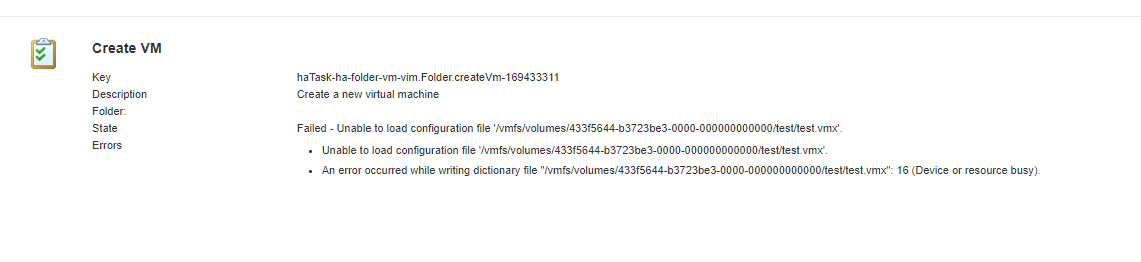
The quick research showed that some people encountered the same issue while mounting NFS share from Linux-based machine as well – https://communities.vmware.com/thread/553432
First thought I had that it could be an issue with web-based GUI on Standalone ESXi 6.5, so I deployed vCenter and tried one more time. No luck.
Then I have tried to create the VM on the local datastore and migrate it over to the NFS share. Once again, the same issue.
I’ve thought that the issue can be on Microsoft level. So, I deployed Ubuntu 16.04 LTS and install the nfs-kernel-server, created share folder called nfs at /var/ directory and started the sharing.
I mounted Linux-based NFS share on ESXi 6.5 and finally I was able to mount NFS share via protocol NFS4.1 and create the VM on top of the NFSv4 share.
So, it is looks like the ESXi can work with Microsoft NFS shared folder only via NFSv3 protocol.
Now in Datastores tab we can see our NFS share. In the next steps, we will create the Test VM on this NFS share.

Click “Create/Register VM” in Virtual Machine tab and choose “Create a new Virtual Machine” option.
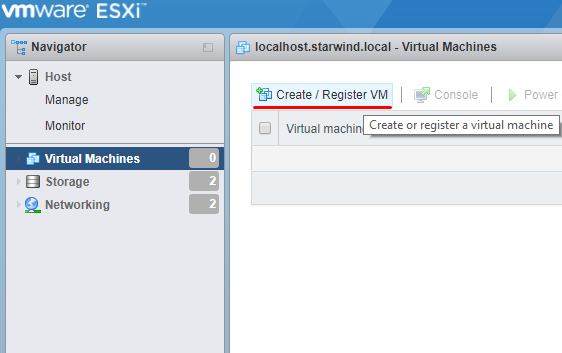
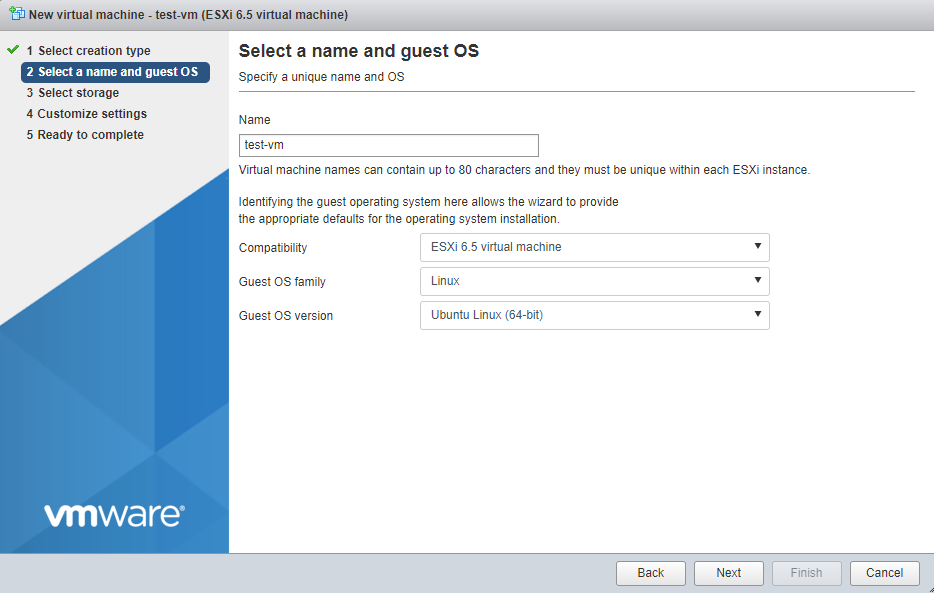
Specify the name for VM and Guest OS.
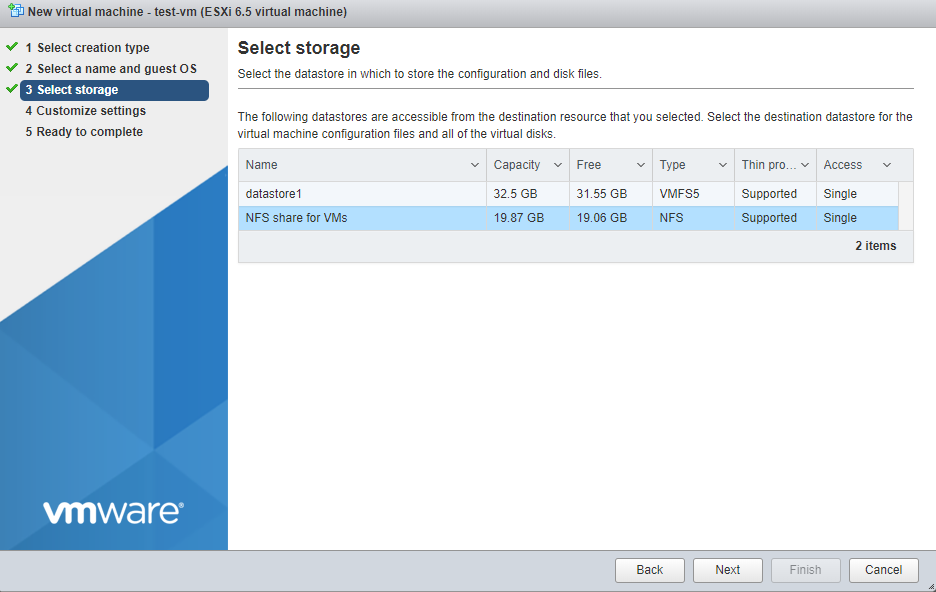
Select our newly mounted NFS datastore and click “Next”.
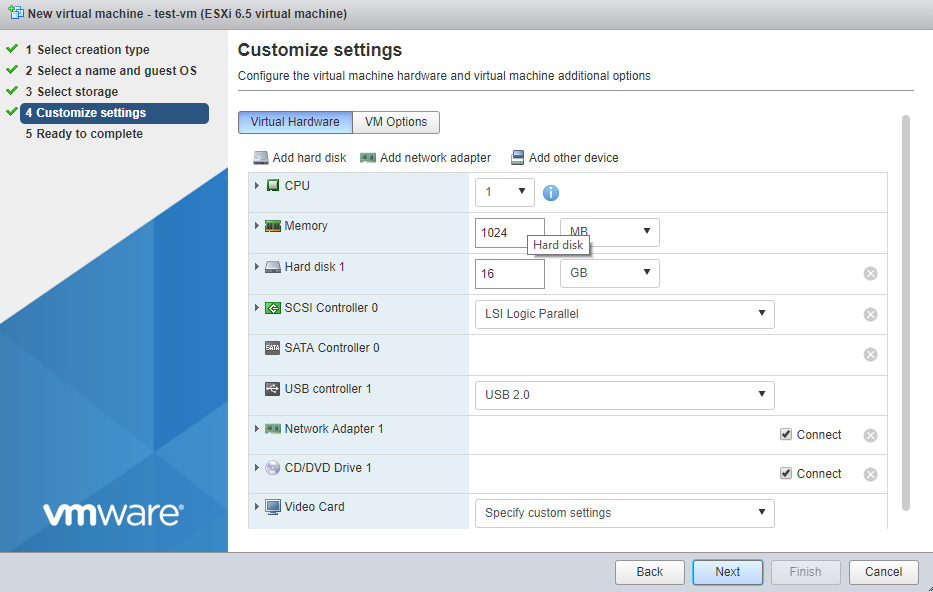
Specify the settings for your VM.
We have the VM which is located on NFS datastore. We can mount the same NFS datastore on other ESXi Server and register the same VM. Moreover, the NFS datastore can be used as the shared storage on multiple ESXi hosts.

Conclusion
As a result, you have the NFS shared storage-based on Microsoft Windows Server 2016 for your VMs in ESXi. Speaking of availability, you can achieve the High Availability with StarWind VSAN and Microsoft Failover Cluster for your NFS server and improve the availability for your data inside the NFS share.
- Network File System: access your files remotely as easily as if they were local
- Hyper-V VMs on an NFS share on Windows Server 2016 – is that real?
In this article we will take a look on how to connect a network folder from Windows Server as a datastore on the VMware ESXi host and use it to store files of your virtual machines (VMs) or ISO images. VMWare ESXi cannot work directly with Windows shares (over SMB protocol), so we have to use it in another way to mount windows folder esxi configuration, allowing you to have an additional VMFS datastore along with your existing VMFS datastore.
VMware ESXi storage types
ESXi host can use 2 types of storage as a VMFS datastore:
- Local disk or LUN from an external storage device connected over Fibre Channel or iSCSI
- Network File System (NFS) — network protocol for remote access to file systems, commonly used in Unix/Linux environment
- These are formatted with the VMware VMFS file system and VMFS partitions
Microsoft NFS storage services
Firstly, Microsoft implemented basic NFS server functionality in Windows Server 2003 R2, which is still present in the latest version — Windows Server 2022.
Tip. NFS directory usage as a storage for VMWare VM’s files should be considered only for the test or non-critical production environment.
Configuring Microsoft NFS storage services
So, at first we first need to configure NFS share in Windows Server and then connect it as a datastore on ESXi host which will house the VMFS partition. We already have a Windows machine configured with the File and Storage Services role. To install NFS Server feature:
- Open Server Manager console and select Manage > Add Roles and Features.
- On the Server Roles tabs expand section File and Storage Services > File and iSCSI Services.

- Tick the item Server for NFS.
- After installation is finished, click on “Close”.


Tip. You can install Server for NFS Features even easier with a single Powershell command:
Add-WindowsFeature "FS-NFS-Service"
Next you need to create a new Windows directory that will be used as an NFS mount point for the VMFS volume. In this example we created folder c:\nfs , and it is not the best practice.
Switch to the Server Manager console and go to File and Storage Services > Shares. Run New Share Wizard (Tasks > New Share) and then select NFS Share-Quick.

Specify share path and desired name. In this example we are using share name nfs. In this case, full NSF path (Remote path to share), that can be used on Unix environment looks like this: srv_fs01:/nfs

On authentication method page disable Kerberos authentication methods and select only “No Server authentication” and “Enable unmapped user access”.

To configure Windows share permissions enter your ESXi host FQDN name / IP address, select Read/Write permissions and tick Allow root access for NFS sharing.

Tip. Also you can restrict access to NFS service using Windows Firewall by denying access except the required IP address or subnet.
You can create an NFS share and restrict access to it via PowerShell (not command prompt window):
New-NfsShare -Name "NFS " -Path "c:\nfs" -AllowRootAccess $true -Permission Readwrite -Authentication sys

Grant-NfsSharePermission -Name “NFS” -ClientName 192.168.1.111  -ClientType host -LanguageEncoding ANSI
Connect the Windows share to VMware ESXi Host
So we have created a new network NFS share on Windows Server 2012 R2. It remains to connect it as a datastore to VMWare host.
Tip. Make sure that vmkernel port is configured on your ESXi server.
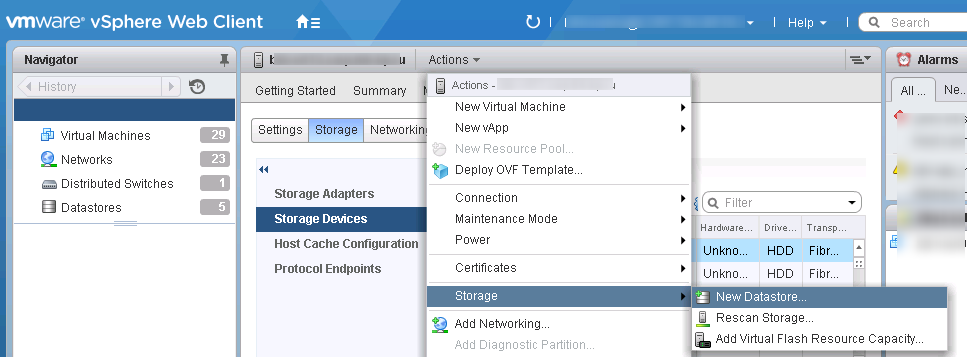
- Login to your vSphere server / ESXi host and select your host. From Action menu select Storage > New > Datastore on your existing or new VMware ESXi host.

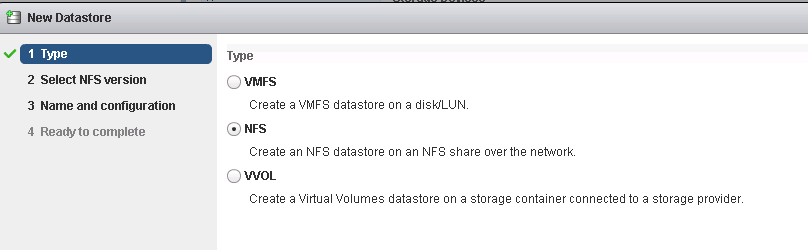
- Select NFS as a datastore type.

- Select NFS 4.1 (supported on Windows Server starting from Server 2012).

- Give your Datastore a name (WindowsNFS), enter NFS Folder (/nfs) and NFS server name (IP address or DNS name).


After successfull adding the NFS datastore, it appears in the list of available host datastores. You can use this datastore (yet empty) to place the VM files or store operating systems ISO images.

Windows NFS and VMware ESXi FAQs
-
1. Can VMware ESXi work directly with Windows shares over SMB protocol?
No, VMware ESXi cannot work directly with Windows shares over SMB protocol. You’ll need to use an alternative method, such as mounting a Windows folder in the ESXi configuration, to create an additional VMFS datastore.
-
2. What storage types can ESXi use as a VMFS datastore?
ESXi can use two types of storage as a VMFS datastore: a local disk or LUN from an external storage device connected over Fibre Channel or iSCSI, and Network File System (NFS) – a network protocol for remote access to file systems, commonly used in Unix/Linux environments. These are formatted with the VMware VMFS file system and VMFS partitions.
-
3. Can NFS directory be used as storage for VMware VM’s files in a production environment?
It is recommended to use NFS directory as storage for VMware VM’s files only for test or non-critical production environments.
-
4. How can I install the Server for NFS feature in Windows Server?
You can install the Server for NFS feature using the Server Manager console or with a single PowerShell command: Add-WindowsFeature “FS-NFS-Service”.
-
5. Can I restrict access to the NFS service using Windows Firewall?
You can restrict access to the NFS service using Windows Firewall by denying access, except for the required IP address or subnet.
-
6. How do I connect a Windows share to a VMware ESXi host?
After creating a new network NFS share on your Windows Server, log in to your vSphere server or ESXi host, and select your host. From the Action menu, select Storage > New > Datastore. Choose NFS as the datastore type, NFS 4.1 as the version, and enter the Datastore name, NFS folder, and NFS server name. Once the NFS datastore is added successfully, it will appear in the list of available host datastores.
Cyril Kardashevsky
I enjoy technology and developing websites. Since 2012 I’m running a few of my own websites, and share useful content on gadgets, PC administration and website promotion.
Read this guide to learn how to set up a Windows Server 2022 NFS Folder share and use it to create an ESXi NFS datastore.
Overview and Background
When I built my VMware/vCenter home lab, I used a Windows iSCSI target server for the ESXi datastore. However, whenever I move a VM to the iSCSI datastore it freezes and everything crashes.
I believe the iSCSI storage was failing due to network congestion. To fix this problem, I used a Windows NFS share instead.
Below are the detailed steps to install the Windows Server NFS role, create an NFS share, and configure the share as an ESXi host datastore.
Step 1: Install the Server for NFS Role
Open PowerShell as administrator on the server you want to create the share and run the command below:
Install-WindowsFeature -Name FS-NFS-Service -IncludeManagementTools
The two subsections in this section explain how to create a folder and then use it to create an NFS share.
Run this command in PowerShell
New-Item -Name ESXiDatastore -Path E:\ -ItemType Directory
- Right-click the folder and select Properties.
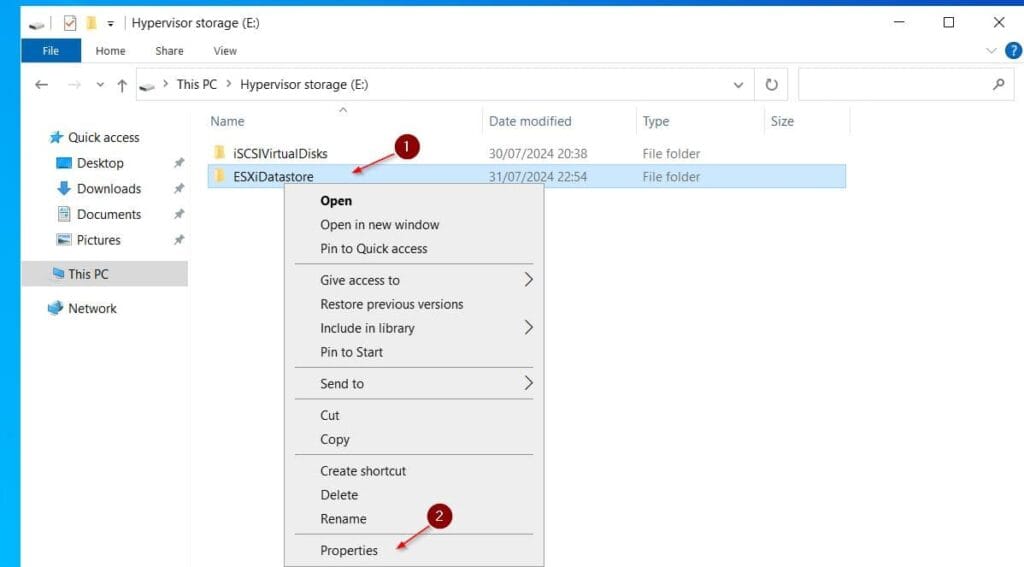
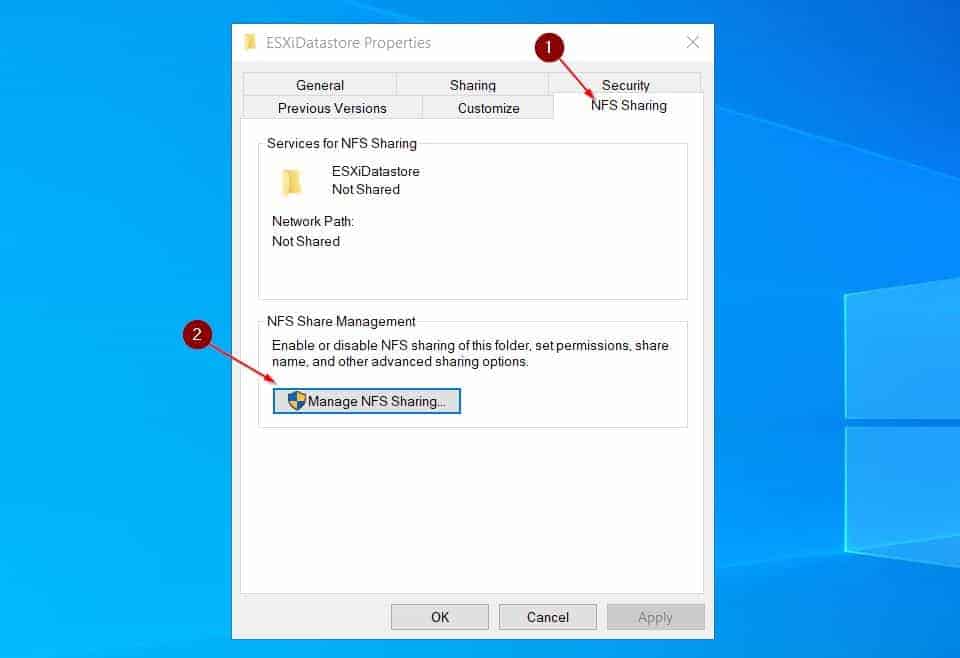
- Choose the NFS Sharing tab and then click Manage NFS Sharing.
- Check the “Share this folder” checkbox on the NFS Advanced Sharing screen. After that, click the Permissions button.
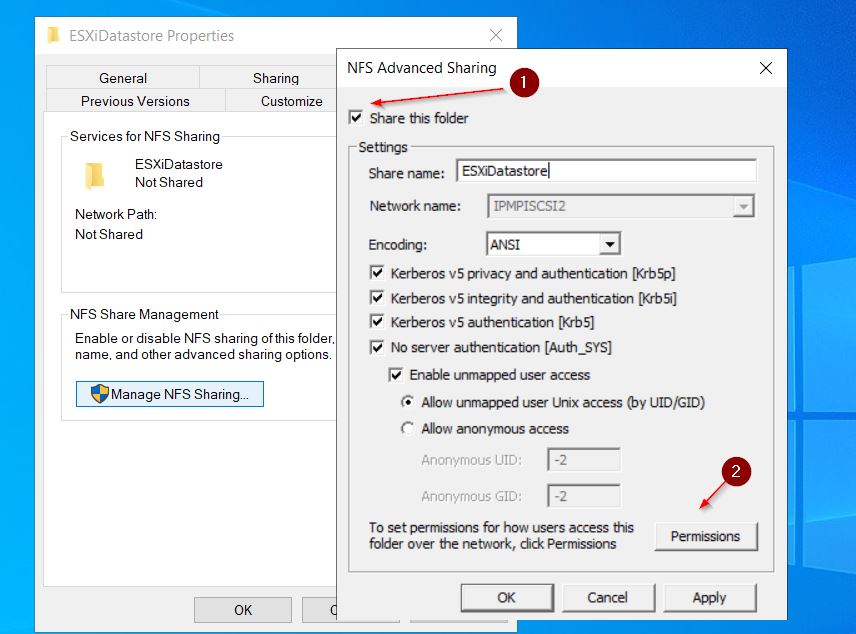
- On the permissions page, ALL MACHINES are allowed Read-only access by default. You can add individual computers by clicking the Add button.
However, for my home lab, I will allow all machines Read-write by selecting the option from the Type of access drop-down. Also, to allow root access, I’ll check the checkbox, Allow root access.

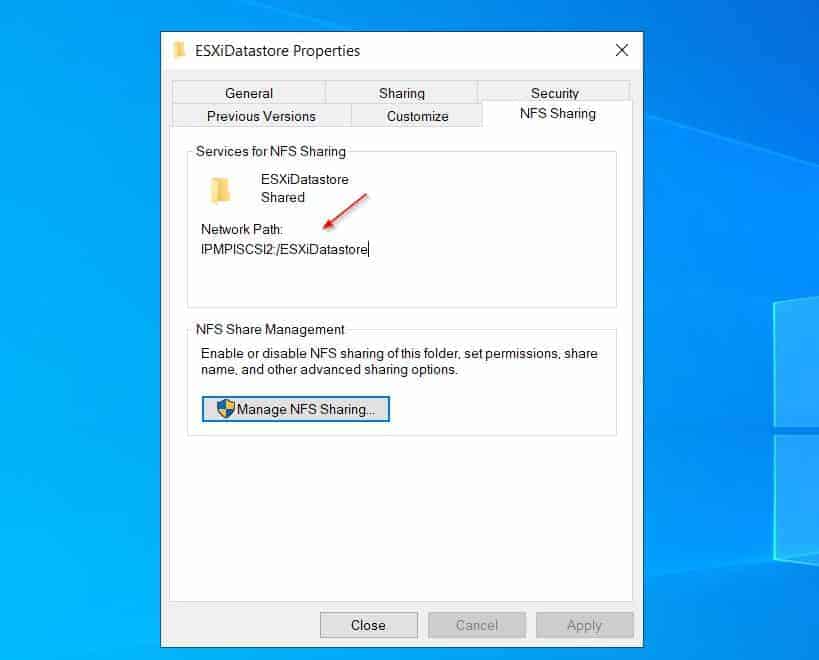
- Click OK until you get to the folder’s properties sheet. Then, note the NFS Share network path.
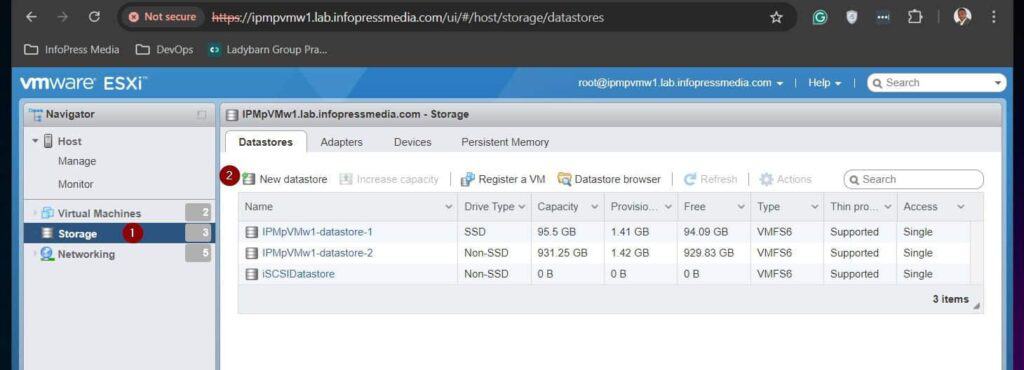
- Sign in to the ESXi host in a web browser. After that, click the Storage node, then the New Datastore button.
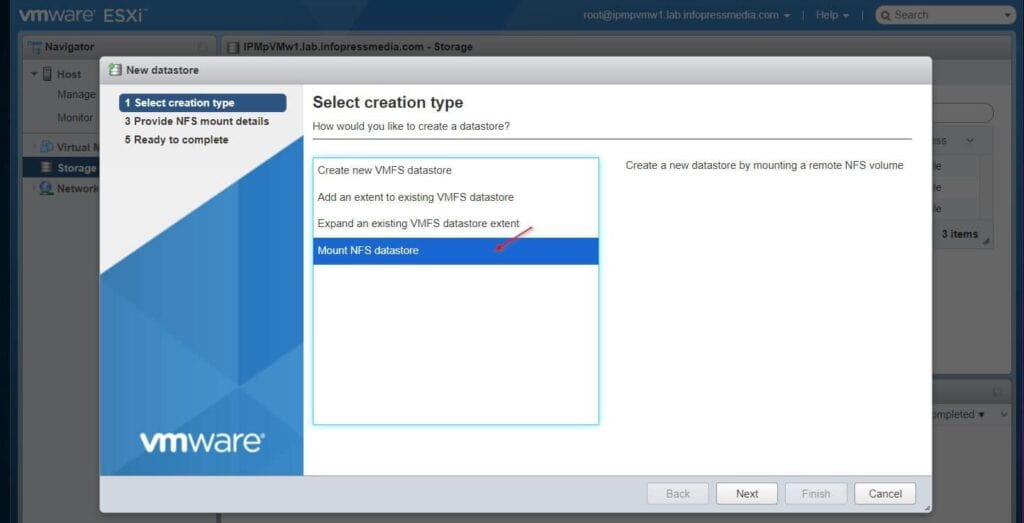
- On the first page of the New datastore wizard, choose the Mount NTS Datastore option and click Next.
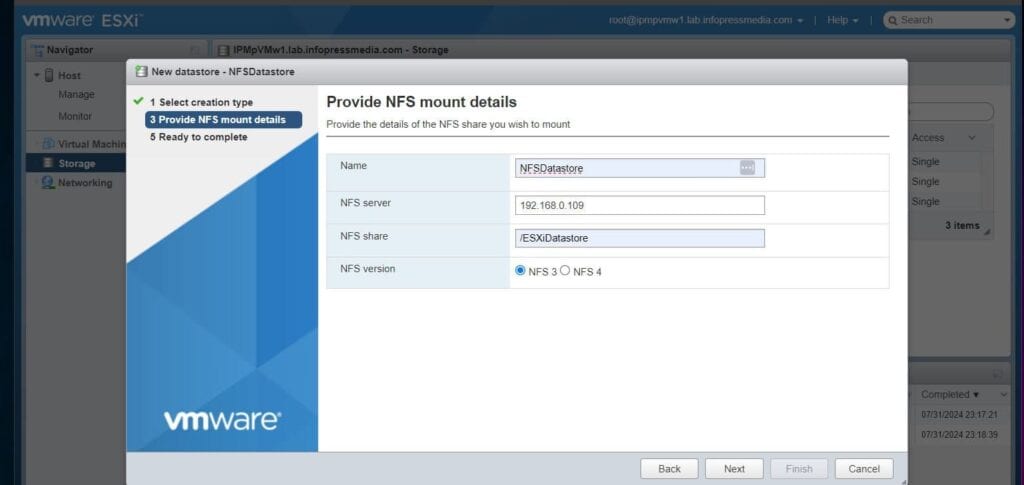
- On the configuration page, give the datastore a name, enter the IP address or the FQDN of the Windows Server that hosts the NFS share, and the share name (add a “/” before the share name). Finally, on the final page, review your settings and click Finish.
If everything goes according to plan, ESXi will take a short while to add the NFS datastore.
Repeat the above steps to add the same NFS to other ESXi hosts you wish to share the same datastore.
Conclusion
Since changing the ESXi host datastore to use the Windows NFS share as its datastore, it has been stable, unlike when I use the Windows iSCSI server.
Based on this, I can conclude that a Windows Server NFS Share performs better than a Windows iSCSI target server when used as an ESXi host datastore. In this guide, I have explained the steps to install the Server for the NFS Role Windows Server role.
Then, create an NFS folder share. Finally, I showed how to mount the NFS share as an EXSi datastore.
- Was this page helpful?
- YesNo
VMWare ESXi add and create NFS datastore
In the earlier article Microsoft Windows 2016 Install and configure NFS server for ESXi and Linux, I shown on installing and configuring NFS server on Microsoft Windows 2016 sever. NFS datastores is one of the file type of datastore to keep virtual machines on VMWare Esxi server, This is also good options to keep ISO and VM templates, NFS datastores can be very economical for the this purpose, it is also capable of running Production environment. NFS protocol uses existing IP TCP/IP based network protocol and it is relatively easy to design and deployment. With high performance supported storage on VMware HCL and 10 Gig network cards you can run high IOPs required applications and VMs without any issues.
Warning: Windows NFS server is not listed on VMWare HCL as Esxi NFS datastore. I am using it as a demo purpose.
There are two types datastores filesystem supported on VMWare Esxi, VMFS and NFS. NFS file system protocol is very handy and supports some of the below notable features.
- VMware DRS and VMware HA
- Virtual machine snapshots
- vMotion
- ISO images, which are presented as CD-ROMs to virtual machines
I have small diagram here, it shows how I have separate network path on Esxi to connect to NAS / NFS storage.

Related Article
MICROSFOT WINDOWS 2012 R2 ISCSI TARGET STORAGE SERVER FOR ESXI AND HYPERV
Microsoft Powershell: Windows 2016 Install and configure NFS server
I use NFS datastore to mainly store ISO images and templates (On tier 3 drives), also use it when migrating Virtual Machines between at Esxi located at different location, Once svmotion vm to NFS datastores, data or VMs are easily portable by mounting NFS datastores to another ESXi. If NFS is on portable small NAS device it makes very easy to task get done by shipping devices and NFS doesn’t require any extra configuration. Configuring NFS datastore on Esxi requires VMKernel portgroup to be exist, The VMkernel TCP/IP stack handles iSCSI, NFS, and vMotion. I have already written one article to configure VMkernel portgroup for Iscsi, but can be used here as well —> VMWARE ESXI CONFIGURE (VSWITCH) VMKERNEL NETWORK PORT FOR ISCSI STORAGE.
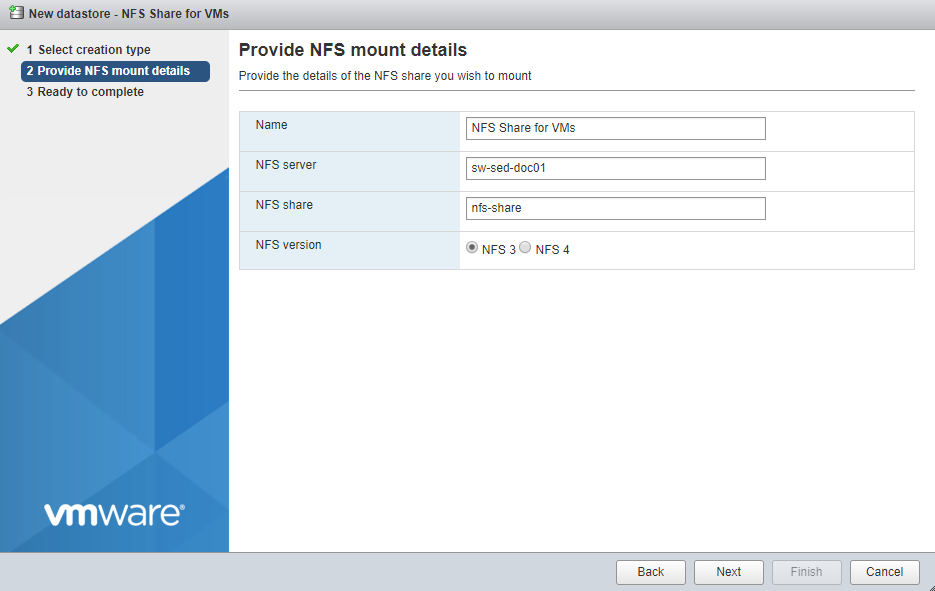
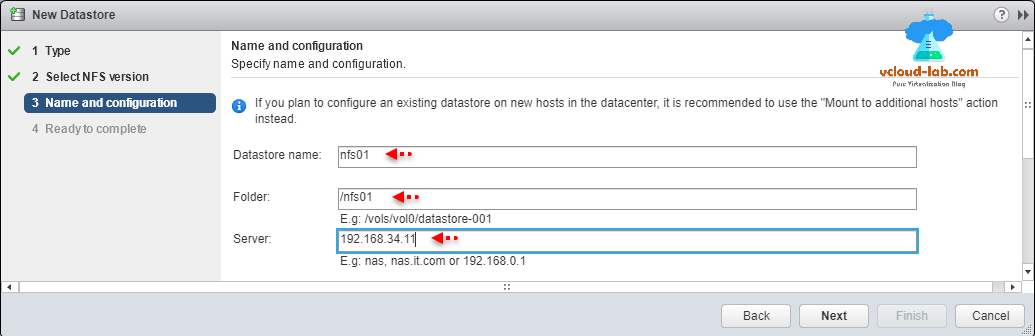
In the VMWare vSphere Web Client, Select ESXi server, go to Configure tab, Select Datastores from list, Click on Create a new datastore. This opens new datastore wizard.

In the New Datastore wizard, select and specify datastore type NFS (Create an NFS datastore on an NFS share over the network).

Select NFS 3 version, make sure you use only one NFS version to access a given datastore. Consequences of mounting one or more hosts to the same datastore using different versions can include data corruption.

In the Name and configuration, Specify datastore name, folder and server name to mount NFS datastore. Access mode should be Read/Write if it is intended to run Virtual machines. Also another thing is If you plan to configure an existing datastore on new hosts in the datacenter, it is recommended to use the «mount to additional hosts» action instead.
To view this information you can check earlier blog screenshot to view current NFS configuration.
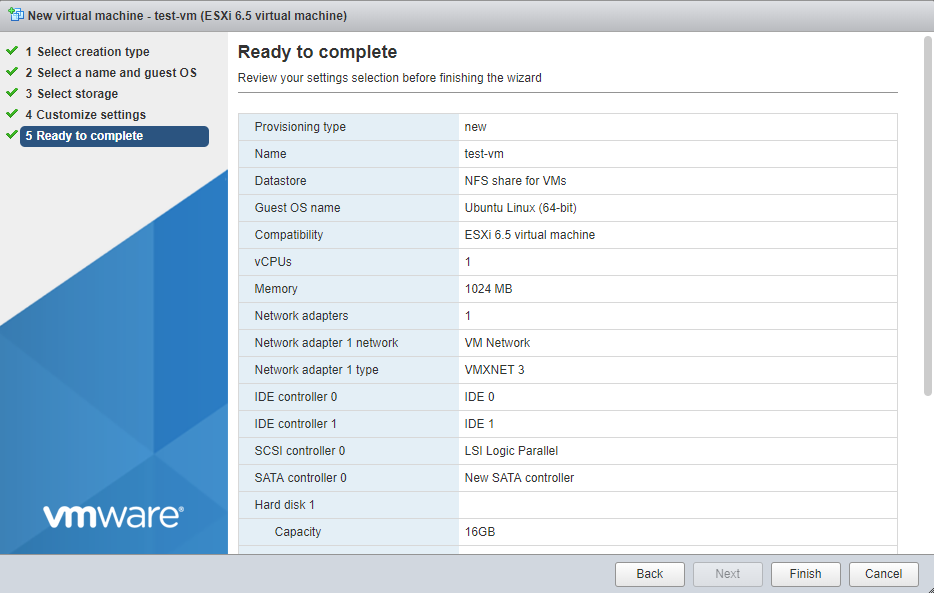
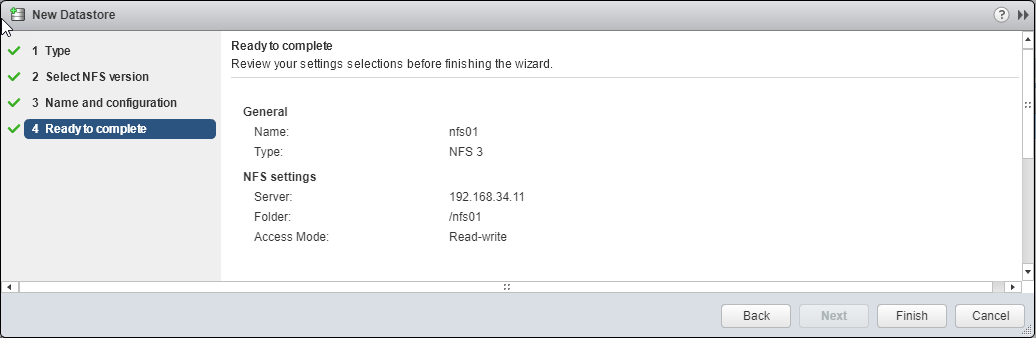
This is last step of configuration of New Datastore. In the Ready to complete page, review your settings selections before finishing the wizard.
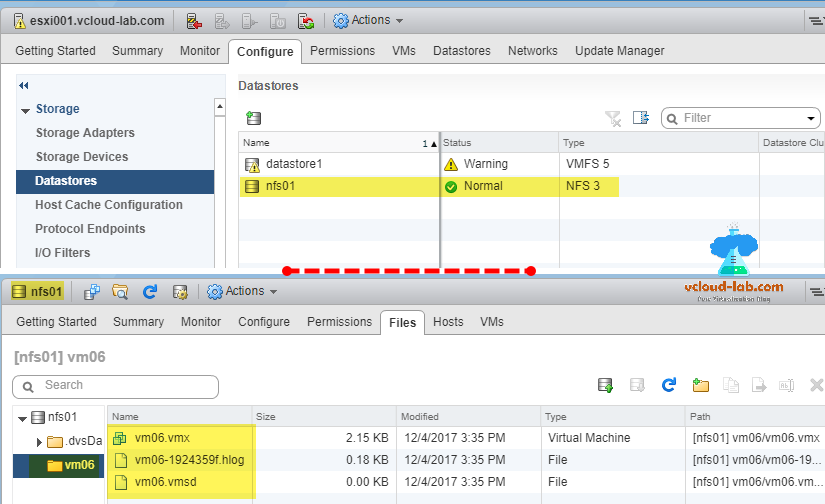
Once Datastore is created successfully, it can be listed under Datastores. I have migrated one virtual machine to this NFS datastore to check everything is working, Once browsed it VM is located and I have correct access. Next contrary to VMFS datastore mount, you will have to mount NFS share on each esxi server individually and there is a separate procedure which can be found on Mount NFS share to multiple ESXi hosts.
Useful Article
VMWARE ESXI CONFIGURE (VSWITCH) VMKERNEL NETWORK PORT FOR ISCSI STORAGE
VMWARE ESXI INSTALL AND CONFIGURE SOFTWARE ISCSI STORAGE ADAPTER FOR VMFS VERSION 6 DATASTORE
VMWARE VCENTER STORAGE MIGRATE/SVMOTION VM AND PORT BINDING MULTIPATHING TESTING
MICROSFOT WINDOWS 2012 R2 ISCSI TARGET STORAGE SERVER FOR ESXI AND HYPERV
Unmount NFS datastores from VMware ESXi and NFS is in use
Add NFS datastores to VMware ESXi hosts using PowerCLI
Go Back