
ESP-IDF Tools Installer for Windows
Download
ESP-IDF Tools Installer for Windows download page: https://dl.espressif.com/dl/esp-idf/
Video with installation of ESP-IDF

Universal Online Installer, Espressif-IDE Offline Installer, Offline Installer
All releases of Installer are available on the download page: https://dl.espressif.com/dl/esp-idf/ (older versions are in the bottom table)
Tip
Online Installer is the recommended way of the installation.
Command-line parameters
Windows Installer esp-idf-tools-setup provides the following command-line parameters:
/CHECKPATH=[yes|no]— Check whether the installation path does not contain spaces or special characters or if it’s too long. Set tonoto disable checks. Default: yes./CONFIG=[PATH]— Path toiniconfiguration file to override default configuration of the installer. Default:config.ini./GITCLEAN=[yes|no]— Perform git clean and remove untracked directories in Offline mode installation. Default: yes./GITDEPTH=[number]— Clone repository in shallow mode E.g. 1. Default: empty./GITRECURSIVE=[yes|no]— Clone recursively all git repository submodules. Default: yes/GITREPO=[URL|PATH]— URL of repository to clone ESP-IDF. Default: https://github.com/espressif/esp-idf.git/GITRESET=[yes|no]— Enable/Disable git reset of repository during installation. Default: yes./GITSUBMODULEURL=[URL]— Update URL in submodules after cloning to custom URL. Default: »./GITUSEMIRROR=[yes|no]— Use Git mirror for cloning. Clone non-recursive and update URL of submodules. Default: no./HELP— Display command line options provided by Inno Setup installer./IDFDIR=[PATH]— Path to directory where it will be installed. Default:{userdesktop}\esp-idf}/IDFUSEEXISTING=[yes|no]— Indicates whether installer should be initialized in update mode of existing IDF. Default: no./IDFVERSION=[v4.3|v4.1|master]— Use specific IDF version. E.g. v4.1, v4.2, master. Default: empty, pick the first version in the list./IDFVERSIONSURL=[URL]— Use URL to download list of IDF versions. Default: https://dl.espressif.com/dl/esp-idf/idf_versions.txt/LOG=[PATH]— Store installation log file in specific directory. Default: empty./OFFLINE=[yes|no]— Execute installation of Python packages by PIP in offline mode. The same result can be achieved by setting the environment variable PIP_NO_INDEX. Default: no./USEEMBEDDEDGIT=[yes|no]— Use Embedded Git for the installation. Set tonoto enable Git selection screen. Default: yes./USEEMBEDDEDPYTHON=[yes|no]— Use Embedded Python version for the installation. Set tonoto allow Python selection screen in the installer. Default: yes./PYTHONNOUSERSITE=[yes|no]— Set PYTHONNOUSERSITE variable before launching any Python command to avoid loading Python packages from AppData\Roaming. Default: yes./PYTHONWHEELSURL=[URL]— Specify URLs to PyPi repositories for resolving binary Python Wheel dependencies. The same result can be achieved by setting the environment variable PIP_EXTRA_INDEX_URL. Default: https://dl.espressif.com/pypi/SKIPSYSTEMCHECK=[yes|no]— Skip System Check page. Default: no./VERYSILENT /SUPPRESSMSGBOXES /SP- /NOCANCEL— Perform silent installation.
Unattended installation
The unattended installation of IDF can be achieved by following command-line parameters:
esp-idf-tools-setup-x.x.exe /VERYSILENT /SUPPRESSMSGBOXES /SP- /NOCANCEL
The installer detaches its process from the command-line. Waiting for installation to finish could be achieved by following PowerShell script:
esp-idf-tools-setup-x.x.exe /VERYSILENT /SUPPRESSMSGBOXES /SP- /NOCANCEL
$InstallerProcess = Get-Process esp-idf-tools-setup
Wait-Process -Id $InstallerProcess.id
Custom Python and custom location of Python wheels
The IDF installer is using by default embedded Python with reference to Python Wheel mirror.
Following parameters allows to select custom Python and custom location of Python wheels:
esp-idf-tools-setup-x.x.exe /USEEMBEDDEDPYTHON=no /PYTHONWHEELSURL=https://pypi.org/simple/
Manual installation of drivers
The installer takes care of driver installation.
The installation is pefromed by idf-env.exe driver install —espressif —ftdi —silabs —wch.
The tool is downloading and installing following drivers:
- Espressif JTAG: https://dl.espressif.com/dl/idf-driver/idf-driver-esp32-usb-jtag-2021-07-15.zip
- FTDI: https://www.ftdichip.com/Driver/CDM/CDM%20v2.12.28%20WHQL%20Certified.zip
- Silabs: https://www.silabs.com/documents/public/software/CP210x_Universal_Windows_Driver.zip
- WCH: https://www.wch.cn/downloads/CH341SER_ZIP.html
The recommended tool for adding libusb support to driver (e.g. debugging of Wroower kit):
- UsbDriverTool
Developer documentation
This directory contains source files required to build the tools installer for Windows.
The installer is built using Inno Setup.
The main source file of the installer is src/InnoSetup/IdfToolsSetup.iss. PascalScript code is split into multiple *.iss files in directory src/InnoSetup.
Some functionality of the installer depends on additional programs:
-
Inno Download Plugin — used to download additional files during the installation.
-
7-zip — used to extract downloaded IDF archives.
-
cmdlinerunner — a helper DLL used to run external command-line programs from the installer, capture live console output, and get the exit code.
Installation of dependencies via Chocolatey
Run with Administrator privileges:
choco install inno-download-plugin
Building the installer
Building Online Installer on Windows
The minimalistic version of the installer.
.\Build-Installer.ps1 -InstallerType online
Output file: build\esp-idf-tools-setup-online-unsigned.exe
Building Offline Installer on Windows
The version which bundles all packages into one installer file which does not requires internet connection to complete the installation.
.\Build-Installer.ps1 -InstallerType offline
Output file: build\esp-idf-tools-setup-offline-unsigned.exe
Building the installer by GitHub Actions
Build script is stored in .github\workflows
Building the installer in Docker with Linux image
The project contains multi-stage Dockerfile which allows build of the installer even on macOS or Linux. The build is using Wine.
Build the image:
docker build . -t wine-innosetup
Copy installer from the container
docker run --name builder --rm wine-innosetup && docker cp builder:/opt/idf-installer/build/esp-idf-tools-setup-online-unsigned.exe . && docker stop builder
Another option is to execute the build manually:
docker run -it wine-innosetup
.\Build-Installer.ps1 -InstallerType online
Testing the installer in Docker with Linux image
It’s possible to build the installer using Docker with Linux image, but it’s not possible to make full test of the installer. Wine is not working correctly with Windows version of Git. The recommended approach for testing in containers is to use Docker with Windows image.
Windows development env with WSL2 and Windows Docker Containers
The best approach to quickly develop and test all aspects of the build process is to use Windows with WSL2.
Requirements:
- WSL2 and Ubuntu distribution via Microsoft Store
- Install Windows Terminal — https://github.com/microsoft/terminal
- Install Docker and switch container runner to Windows
- Install Visual Studio Code — install plugin for Inno Setup and Docker
- Install Inno Setup —
choco install innnosetup
The first build of the installer
This step is bootstrapping the whole process. Open Windows Terminal, click + sign and select Ubuntu.
.\Build-Installer -InstallerType online
The setup will download the necessary dependencies and it will build the installer.
Build of offline version of the installer
The offline version is built by setting /DOFFLINE=yes to ISCC on the command-line. To speed up build, it’s possible to redirect stdout of ISCC to the file.
.\Build-Installer.ps1 -InstallerType offline -OfflineBranch v4.4 >out.txt
To speed up development build it’s possible to disable compression which is set by default to lzma.
.\Build-Installer.ps1 -InstallerType offline -Compression none -SignInstaller $false -OfflineBranch v4.4 >out.txt
Build of Espressif-IDE installer which contains also latest stable ESP-IDF:
.\Build-Installer.ps1 -InstallerType espressif-ide -Compression none -SignInstaller $false -OfflineBranch v4.4
Development work in idf_tool_setup.iss
Open Inno Setup and open file src\InnoSetup\IdfToolsSetup.iss. This is the main file of the installer
Press CTRL+F9 to rebuild the whole installer. Inno Setup detects changes only in the main file. If you change anything in include files, you need to explicitly press CTRL+F9 to build and Run.
Press F9 to run the installer.
Additional parameters to speed up development could be passed via Run — Parameters
Manually, step by step
-
Build cmdlinerunner DLL.
- On Linux/Mac, install mingw-w64 toolchain (
i686-w64-mingw32-gcc). Then build the DLL using CMake:mkdir -p cmdlinerunner/build cd cmdlinerunner/build cmake -DCMAKE_TOOLCHAIN_FILE=../toolchain-i686-w64-mingw32.cmake -DCMAKE_BUILD_TYPE=Release .. cmake --build .This will produce
cmdlinerunner.dllin the build directory. - On Windows, it is possible to build using Visual Studio, with CMake support installed. By default, VS produces build artifacts in some hard to find directory. You can adjust this in CmakeSettings.json file generated by VS.
- On Linux/Mac, install mingw-w64 toolchain (
-
Download 7zip.exe («standalone console version») and put it into
unzipdirectory (to getunzip/7za.exe). -
Download idf_versions.txt and place it into the current directory. The installer will use it as a fallback, if it can not download idf_versions.txt at run time.
-
Create the
distdirectory and populate it with the tools which should be bundled with the installer. At the moment the easiest way to obtain it is to useinstall.sh/install.batin IDF, and then copy the contents of$HOME/.espressif/distdirectory. If the directory is empty, the installer should still work, and the tools will be downloaded during the installation. -
Build the installer using Inno Setup Compiler:
ISCC.exe idf_tools_setup.iss.
Testing of the installer
Development and testing of the installer can be simplified by using command line parameters which can be passed to the installer.
Select Run — Parameters in Inno Setup and add parameters.
Example of parameters:
/SKIPSYSTEMCHECK=yes /IDFVERSIONSURL=https://dl.espressif.com/dl/esp-idf/idf_versions.txt /GITRESET=no /GITREPO=C:/projects/esp-idf /GITRECURSIVE=no
These combinations of parameters will result:
SKIPSYSTEMCHECK=yes— The screen with System Check will be skipped.IDFVERSIONURL— idf_versions.txt will be downloaded from localhost:8000- it’s possible to add branch name into idf_versions.txt, e.g. feature/win_inst
GITRESET=no— Git repository won’t be reset after clone, it can save time and add custom changes in case of the zip archive with repositoryGITREPO— The version will be cloned from the specific location, e.g. from a local directoryGITRECURSIVE=no— The clone of the repo won’t contain modules, it speeds up the cloning process. Use when modules are not necessary.
Documentation of parameters is available in api-guides/tools/idf-windows-installer.rst
Testing installation directly on Windows
Recommendation: For higher level of isolation you can use Docker with Windows containers described in the next chapter.
Test can be executed by following commands which will peform the installation and execute tests by accessing desktop link to PowerShell and CMD:
cd src\PowerShell
.\Install-Idf.ps1 -Installer ..\..\build\esp-tools-setup-online-unsigned.exe -IdfPath C:\idf-test -IdfVersion v4.2
Testing installation in Docker with Windows containers
The testing script is stored in docker-compose.yml. The test performs full silent installation and executes the build of get-started example.
Commands for testing of online and offline installer with support for cache of dist and releases:
cd src\Docker
$env:IDF_VERSION="v4.1"; docker-compose.exe run idf-setup-online-test
$env:IDF_VERSION="release/v4.2"; docker-compose.exe run idf-setup-online-test
$env:IDF_VERSION="master"; docker-compose.exe run idf-setup-online-test
Command for testing offline type of installer which contains everything but kitchen sink.:
$env:IDF_VERSION="v4.2"; docker-compose.exe run idf-setup-offline-test
$env:IDF_VERSION="release/v4.2"; docker-compose.exe run idf-setup-offline-test
The installation log is not displayed immediately on the screen. It’s stored in the file and it’s displayed when the installation finishes.
Recommendation: Use Visual Studio Code with Docker plugin to work with container.
The log file is then accessible under Docker — Containers — Container — Files — Temp — install.txt — right click — Open.
Testing multiple installations at once
Docker compose contains definition of multiple scenarios. The test can be launched by command:
$env:IDF_VERSION="v4.2"; docker-compose up --force-recreate
Note: --force-recreate is necessary otherwise the container will be just resumed from previous state.
Testing the installation in Hyper-V
Docker does not support the test of installation with GUI and enabled Windows Defender. These tests can be executed in Hyper-V available on Windows. Launch Hyper-V Manager, create VM, and connect to it.
Use the following command to copy the installer to Hyper-V machine with the name «win10»:
Copy-VMFile "win10" -SourcePath C:\projects\esp-idf\tools\windows\tool_setup\Output\esp-idf-tools-setup-unsigned.exe -DestinationPath "C:\Users\Tester\Desktop\esp-idf-tools-setup-unsigned.exe" -CreateFullPath -FileSource Host -Force
Signing the installer
-
Obtain the signing key (e.g
key.pem) and the certificate chain (e.g.certchain.pem). Set the environment variables to point to these files:export KEYFILE=key.pemexport CERTCHAIN=certchain.pem
-
Run
sign_installer.shscript. This will ask for thekey.pempassword and produce the signed installer in the Output directory. If you plan to run the script multiple times, you may also setKEYPASSWORDenvironment variable to thekey.pempassword, to avoid the prompt.
Contributing L10N
Localization messages for the installer are stored in src/InnoSetup/Languages.
Adding new localization:
- create issue on GitHub
- register new language in src/InnoSetup/IdfToolsSetup.iss
Files can be converted to XLIFF using Translate Toolkit — ini2po and po2xliff.
File format is INI in UTF-8 with BOM header. Without BOM header the localization is not correctly displayed. Use VS Code to save the file with BOM header.
Setting up translation environment
python -m pipenv shell
pip install translate-toolkit iniparse
Transforming file for translation
cp file.isl file.ini
ini2po file.ini file.po
po2xliff file.po file.xliff
Processing handback
xliff2po file.xliff file.po
po2ini -t file.ini file.po file.ini
cp file.ini file.isl
- add BOM header using Save function in Visual Studio Code
Bundle Git
Repackage of Git for Windows. Git for Windows is provided in .7z.exe format, the workflow with script repackages it to .zip format and uploads it to Espressif’s download server where it is used by IDF-installer.
How to use bundle Git
- Check the version of Git on the website https://git-scm.com/download/win
- Use the version as input into the manual workflow run
- Run the workflow «`.github/workflow/bundle-git.yaml`
- On success the Git version will be on Espressif’s download server
Automatic release of IDF Windows Installer
There is the workflow for the automatic release of IDF Windows installer (build-installer-any), in this workflow few parameters have to be specified:
- Installer Type — choose the installer type (offline, online, espressif-ide)
- ESP-IDF version — needed for offline installer type, version of ESP-IDF in the format
X.YorX.Y.Z - Espressif IDE version — needed for espressif-ide installer type, version of ESP-IDE in the format
X.Y.Z - Online Installer version — needed for online installer type, version of online installer (application) in the format
X.Y
The offline installer buttons on the index page are created based on the variable SUPPORTED_IDF_VERSIONS which has to be edited in the workflow file if the change is needed.
This workflow will edit all necessary files and create PR, after the PR is reviewed and merged the workflow for updating the index.html is triggered and release will be available on the web page.
In this tutorial, we will show you how to install ESP-IDF in Windows and then configure it with VS Code. The official IoT Development Framework for the ESP32, ESP32-S, and ESP32-C line of SoCs is known as ESP-IDF. It offers an independent SDK for creating any type of generic application on various platforms using C and C++ programming languages. VS Code is a source code editor designed for Windows, macOS, and Linux which is used in building and debugging applications.
We will be required to download and install the latest version of Python in our system in order to work with VS Code. Below we have provided you with a guide to successfully install Python 3.7 or the latest version in Windows operating system.
ESP32 Development board: You can buy from here.
Installing Python in Windows
Click this link. This will download the latest version of Python3 according to the operating system on your computer.
Now the .exe file will get downloaded in your system. Opening the file prompts the user to Run the following file.
After we click the Run button the following window will appear. Tick “Add Python 3.9 to Path” and then click Install Now.
Your installation will be completed in a few moments.
We will first start by setting up ESP-IDF in Windows.
ESP-IDF Windows Installer Download
Open the following link: (https://docs.espressif.com/projects/esp-idf/en/latest/esp32/get-started/index.html). This opens the official ESP32 getting started webpage by Espressif. Scroll down until you reach the Manual Installation section. Here click ‘Windows Installer.’
This will open the Standard Setup of Toolchain for Windows webpage. Scroll down until you reach ESP-IDF Tools Installer section. Here, click Windows Installer Download.
This opens the ESP-IDF Windows Installer Download webpage. You can choose the version of the installer that you want to download. There are options for both online and offline installers.
We will download the Universal Online Installer 2.15 as highlighted below:
After you click the download button, an .exe file will start downloading.
ESP-IDF Tools Setup Installation
After the download is completed click on it and the setup for ESP-IDF-Tools opens up.
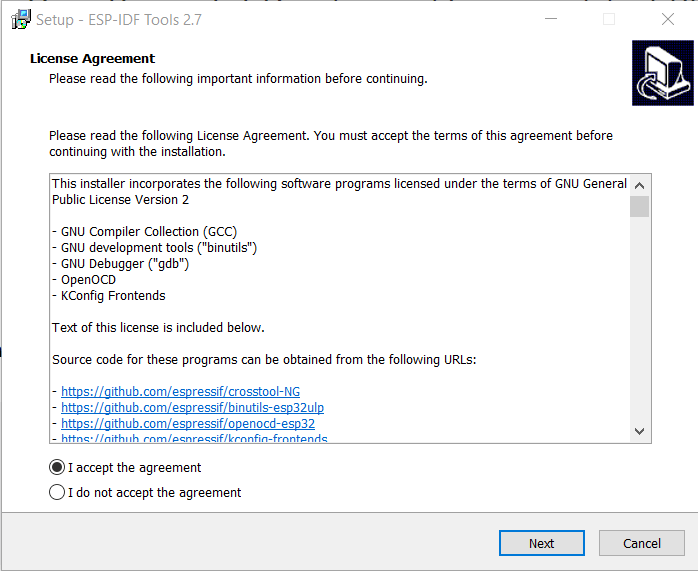
It will first ask you to select the language to use during installation. We choose ‘English.’ Next the license agreement opens. Accept the agreement and click Next to proceed further.
Next, there is a pre-installation system check. If there is any issue with the system check, you can click the ‘Apply Fixes’ button to resolve it. After the check is compete, click Next.
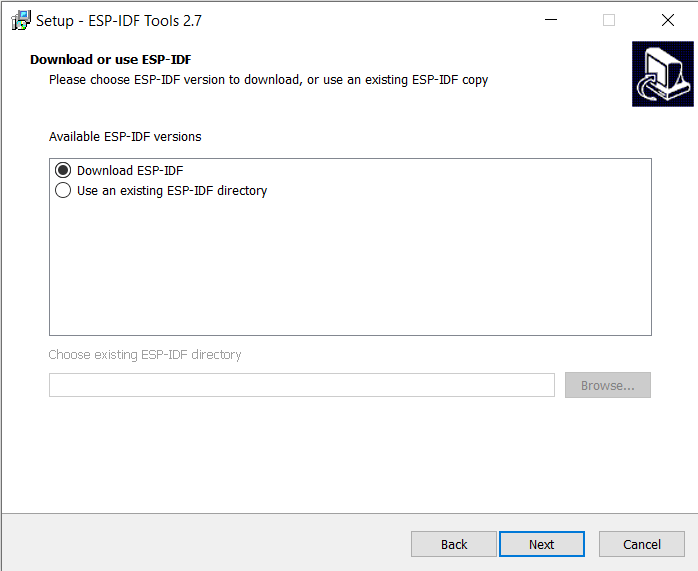
Here we will select ‘Download ESP-IDF’ as we want to download a new one.
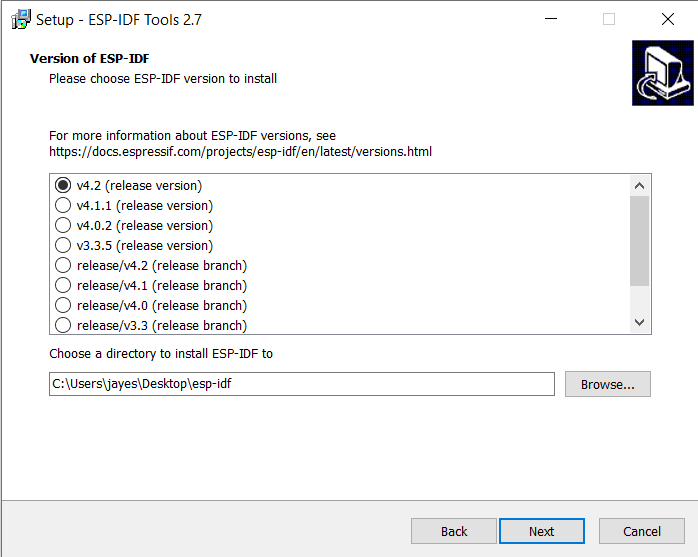
Next we select the version of ESP-IDF that we want to install. There are multiple options to choose from as you can see below. Normally, we install the latest version available but in this case we are selecting v4.3.3 which is the current stable release at the moment.
Moreover, choose a directory where ESP-IDF will be installed. Click the Browse button to select your preferred location. We are using the default location.
Click Next to proceed further.
Next, select the location for the ESP-IDF tools installation. We are using the default location.
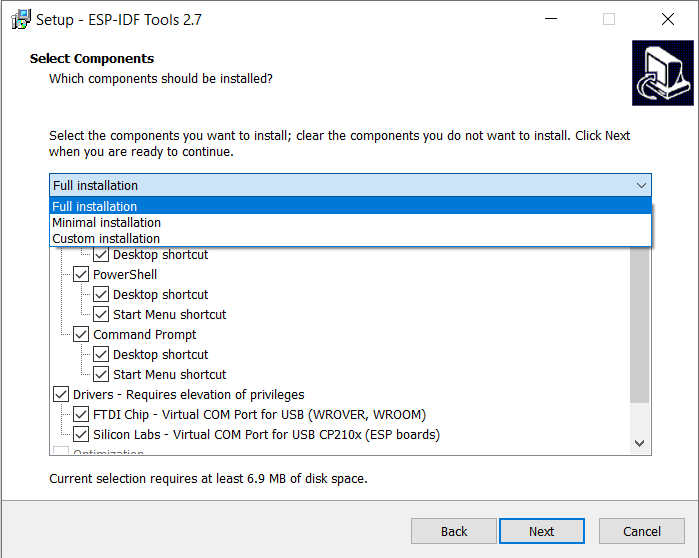
Select the components you want to install and then click Next.
Now the installation begins. It will take some time for the installation to complete. When the ESP-IDF is completely installed, the following appears. Click the Finish button to exit the setup.
Now we have three new icons in our desktop that open up the ESP-IDF command prompt, ESP-IDF PowerShell and Espressif-IDE respectively.
Testing the ESP-IDF Installation
Now let us test our ESP-IDF installation to make sure everything is working properly. Open the ESP-IDF PowerShell and wait for a while until all the variables are properly loaded.
We are in the directory C:\Espressif\frameworks\esp-idf-v4.3.3
Let us open the explorer of this directory. This has the examples folder that contains various basic examples with ESP-IDF. Let us build one of the examples to test our ESP-IDF installation.
You can see the different examples that are available:
We will open the get-started folder that contains the three getting started examples.
Opening the hello_world project directory, you can view different files highlighted in the green box.
Build Project
Let us build this project. Type idf.py build and press enter. The project starts building.
It will take some time for the project to build completely for the first time. As our project built successfully as seen by the output in the image below, hence everything is working fine.
These command prompts (ESP-IDF Command & ESP-IDF PowerShell) are generally very handy to use as they have all the environments variables set up for ESP-IDF.
Installing VS Code
To download and install the visual code editor IDE, click here. The following window appears. We have highlighted the red box which shows “Download for Windows Stable Build.” Click this button to start the download. The drop down menu also allows the user to select the system bit type. Choose according to your system.
However, if you are using another operating system e.g. Linux then click the ‘Download’ button at the top right.
Now your .exe file will start downloading. After the download is complete, click it. The following License Agreement window opens up. Here you will accept the agreement and then press ‘Next.’
You will be asked to specify the location for the installation of the VS Code setup.
Additionally, you can also select additional tasks according to your needs. After that click Next.
Now the setup is ready to install. The red block highlights the options we ticked on our way. Finally, click the “Install” button.
After we click the Finish button, the setup installation completes and launches the VS Code.
The VS Code getting started page will open up.
We have successfully installed Visual Studio Code in our system. Now let us move ahead and install the ESP-IDF extension in our IDE.
Integrating ESP-IDF with VS Code
Go to extensions by pressing Ctrl + Shift + X or click its icon. Type ‘espressif idf’ in the search bar and install it. It will take a few minutes for the installation to complete. Make sure the plugin is enabled.
No go to View > Command Palette (Ctrl + Shift + P). A menu will open. Type ‘ESP-IDF: Configure ESP-IDF extension.’ This will open the following startup page:
We will select the EXPRESS version. It is a simpler and faster option than the ADVANCED.
Now specify the following parameters. We are choosing Github as the download server. For the ESP-IDF version, we select the option of ‘Find ESP-IDF in your system’ as we already have it downloaded in our system. Select the same ESP-IDF and ESP-IDF Tools directory where we previously installed them. Click the Install button to start the process.
It will take some time for the process to complete which happens in three steps, where first the IDF prerequisites are installed, then ESP-IDF is installed and lastly the python virtual environment is set up.
After all three processes are ticked, we have successfully configured the ESP-IDF extension. You can close this window now.
Testing ESP-IDF Extension in VS Code
No go to View > Command Palette (Ctrl + Shift + P). A menu will open. Type ‘ESP-IDF: New Project.’ This will open a new window to add the project details.
Specify the project name and directory. We have named our project ‘esp_test.’ For the ESP-IDF board we have chosen the custom board option. For ESP-IDF target, we have chosen ESP32 module. Click ‘Choose Template’ button to proceed forward.
Note: When naming your project, do not use spaces. It will not work.
In the Extension, select ESP-IDF option:
We will click the ‘sample_project’ under the get-started tab. Now click ‘Create project using template sample_project.’
You will get a notification that the project has been created. To open the project in a new window, click ‘Yes.’
This opens our ESP_TEST project that we created inside the EXPLORER tab. As you can see there are several folders inside our project folder (ESP_TEST). This is the same for every project which you will create through ESP-IDF Explorer. The main folder contains the source code meaning the main.c file will be found here. Inside the main.c we will write our program code.
Go to main > main.c and open it. We will define the functions and the program code here. Here we have written a simple program that prints Hello World as an output:
By default, IntelliSense is present, but the environment may not give any indication if there is a problem. To fix that, go to .vscode > settings.json and set the C_Cpp.intelliSenseEngine to Default. Previously it was set to ‘Tag Parser.’ Now if there is an error in the main.c file, a red wavy line appears beneath that code.
Tools
In the bottom bar of your window you can view the following icons:
- ESP-IDF Select Port to use: This allows the user to select the available serial port where their device is connected.
- ESP-IDF Select Espressif device target: This allows the user to set the device target.
- ESP-IDF Current Project: This selects the current folder.
- ESP-IDF SDK Configuration Editor
- ESP-IDF Full Clean: This cleans the project whereby the user can build the project from the start.
- ESP-IDF Build: This will compile the program code and will help in checking for potential errors.
- ESP-IDF Select flash method: This allows the user to select the flash method from JTAG, UART, and DFU.
- ESP-IDF flash device: This will download the project in the chip.
- ESP-IDF Monitor device: This gives the serial output of the chip.
- ESP-IDF Build, Flash, and Monitor
- ESP-IDF Open ESP-IDF Terminal: Clicking on this icon opens the terminal. If the terminal was already opened then it refreshes the terminal.
- ESP-IDF Execute custom task
Compile Project
Now you can either click the 6th icon (Build) or the 10th icon (Build, Flash and Monitor) to test the above script. We will first open the terminal by clicking the open ESP-IDF terminal icon. This opens the terminal which is very similar to the PowerShell. It has all the variables of the environment already set up.
If you type idf.py in the terminal, the output gives you the various processes that can be performed with this command for example, clean, flash, build etc.
In order to build our project, we will type idf.py build in the terminal. Our project will start building. It will take some time for it to be built completely.
Our project built successfully as seen by the output in the image below, hence ESP-IDF is working fine with VS Code.
To flash the chip and monitor the output, type the following command in the terminal.
idf.py flash monitorAlternatively, you can just click the flame icon (Build, Flash, and Monitor) that will automatically build, flash and monitor the script.
Here is the result of a successful flashing of the esp32 chip:
This is the output we get in the serial monitor for the Hello World script.
Where to go next?
- Getting Started with ESP32 using ESP-IDF
- ESP32 GPIO with ESP-IDF with LED Blinking example
- ESP32 Push Button with ESP-IDF (Digital Input)
- ESP32 ADC with ESP-IDF Measure Analog Inputs
- ESP32 PWM ESP-IDF LED Brightness Control Example
We are a team of experienced Embedded Software Developers with skills in developing Embedded Linux, RTOS, and IoT products from scratch to deployment with a demonstrated history of working in the embedded software industry. Contact us for your projects: admin@esp32tutorials.com
Espressif’s IoT Development Framework (ESP-IDF) is the native software development framework for the ESP-32. It contains software libraries and source code in an application program interface for ESP32 and scripts to operate the Toolchain. ESP-IDF gives a classy approach to writing a program with its Command Line Interface (CLI). In this tutorial, we show you how to set up the ESP-IDF on Windows.
ESP-IDF is compatible with following boards of Espressif Systems:
- ESP32-DevKitC
- ESP-WROVER-KIT
- ESP32-PICO-KIT
- ESP32-Ethernet-Kit
- ESP32-DevKit-S(-R)
- ESP32-PICO-KIT-1
- ESP32-PICO-DevKitM-2
- ESP32-DevKitM-1
Prerequisites Before Getting Started
- An ESP32 board
- USB cable – USB A to micro USB B
- A computer running Windows
Note: only 64-bit versions of Windows are supported.
You have a choice to either download and install the following software manually:
- Toolchain to compile code for ESP32
- Build tools – CMake and Ninja to build a full application for ESP32
- ESP-IDF containing API for ESP32 and scripts to operate the Toolchain
Or get through the onboarding process using the following official plugins for integrated development environments (IDE)
- Eclipse Plugin
- VS Code Extension
Installing ESP-IDF
Download the ESP-IDF Tools Installer here. You can choose either Online Installer or Offline installer, whichever you prefer. Online Installer is smaller (3.1MB) and allows the installation of all available releases of ESP-IDF. The installer will download only necessary dependencies, including Git for Windows, during the installation process.
Offline Installer (1.2 GB) does not require any network connection. The installer contains all required dependencies, including Git for Windows.
In this article, we use the online installer for further demonstration. Once you download the installer, read and accept the license agreement, then click on the “Next” button.
The setup will perform a pre-installation check on your system. You will see this process in a window where the installation process is taking place. Click on the “Next” button to proceed further once the pre-installation check is done.
Select the “Download ESP-IDF” option, then click on the “Next” button. You can refer to the below image for the same. Additionally, the setup itself provides the option to download and install recommended Python and Git versions during the installation procedure, in case the dependencies are not present on your local machine. If prompted, allow the installation of embedded Python 3.8.7 or greater and Git version 2.30.1 or greater.
Now, select an appropriate build version with a proper path for installation. Click on the “Next” button to select the location to install the toolchain.
You will see a “Select Components” window on your screen. Select the type of installation according to your choice and set your preferences to proceed further.
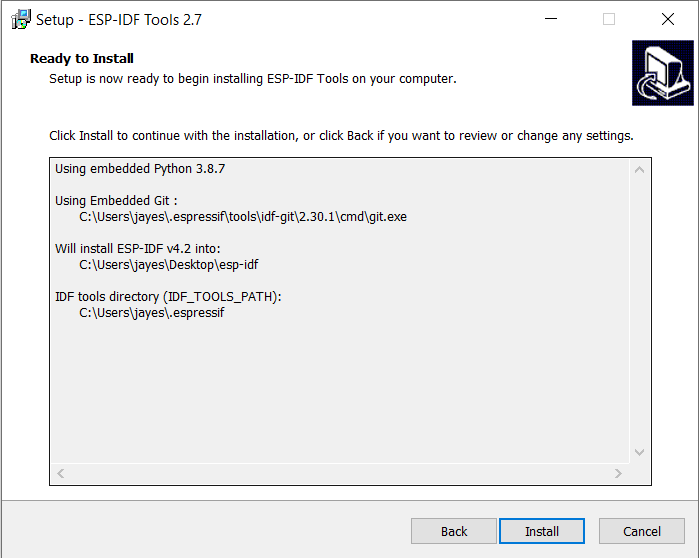
Please note that at least 8.5 MB of free disk space is required for the setup files. Also, the online setup will download additional files of around 979.62 MB during the installation process. The size is may vary depending on the installation preferences set by you. You will see a summary of things for installation, as you can see in the below image. Confirm the choices you made during the process and click on the “Install” button.
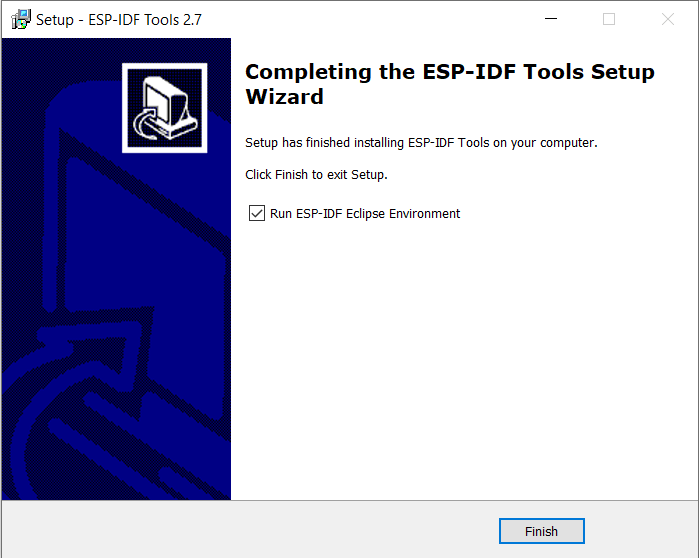
The installation process may take some time. Click on the “Finish” button once the installation process is over. You can deselect the “Run ESP-IDF Eclipse Environment” option before clicking the “Finish” button if you don’t want to launch the program immediately.
Setting Up the Programming Environment
Once the installation is complete, you can choose between the “ESP-IDF PowerShell Environment” or the “ESP-IDF Command Prompt (cmd.exe) Environment.”
The following is the ESP-IDF 4.2 PowerShell Environment.
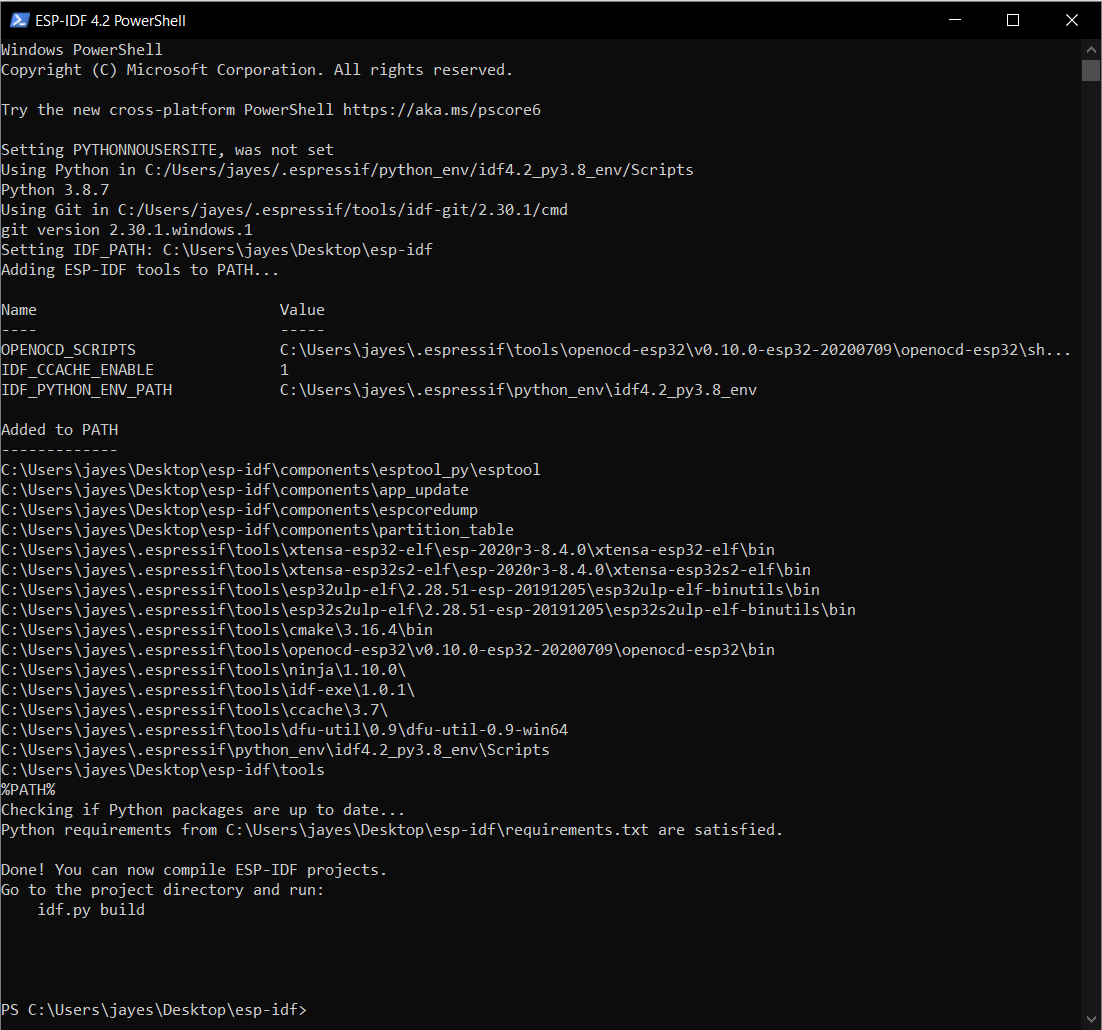
For the remaining steps in this tutorial, we we use the Command Prompt Environment.
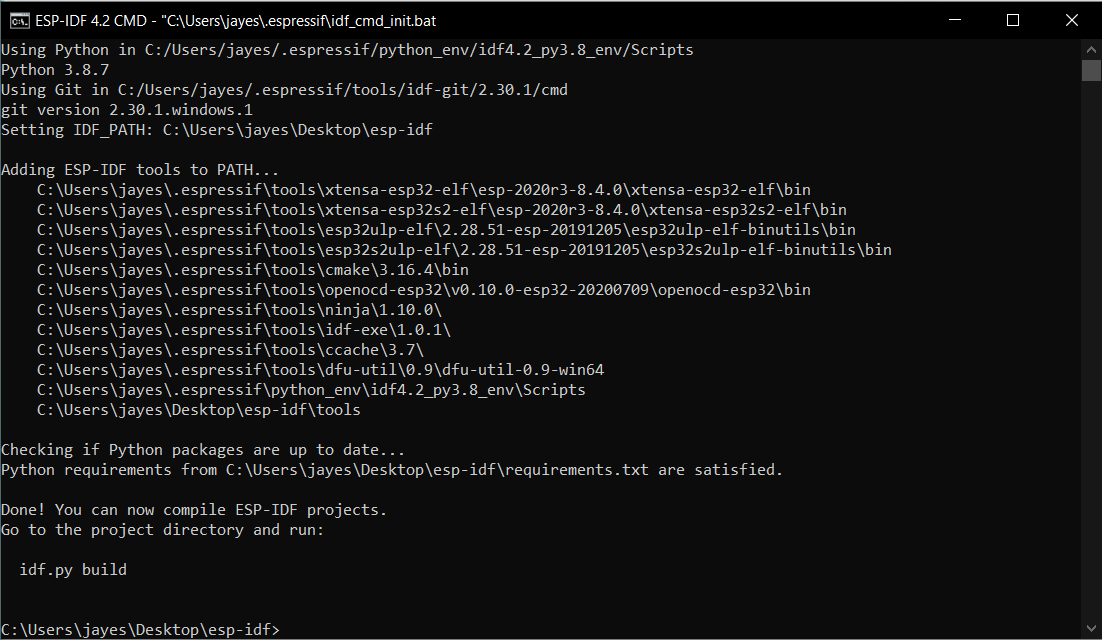
To build with the framework, run “ESP-IDF 4.2 CMD” from the start menu. ESP-IDF 4.2 CMD will have all the necessary environment variables.
When ESP-IDF 4.2 CMD is launched, the environment is set up automatically with all the tools added to proper paths.
Running the Hello World Program with ESP-IDF
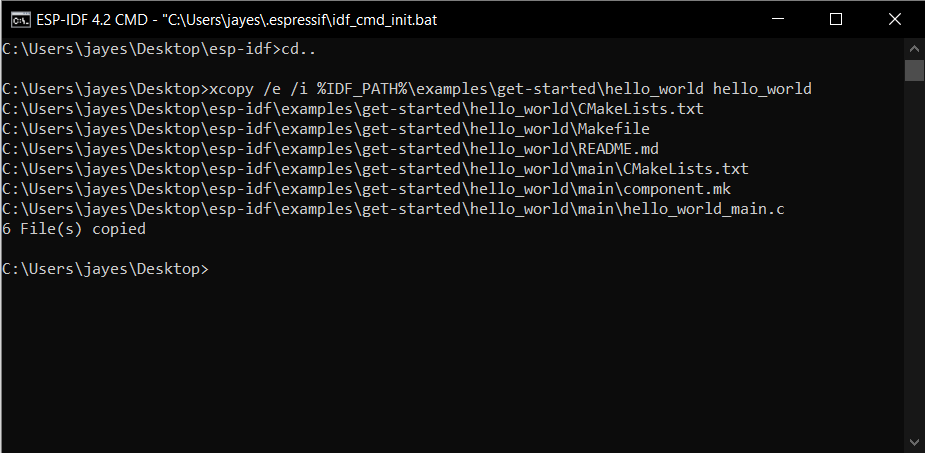
Assuming you are in the ESP-IDF directory, change the directory using cd, then navigate to the desired directory.
Copy the Hello World program files from the program directory to the current directory using the xcopy /e /i %IDF_PATH%\examples\get-started\hello_world hello_world command.
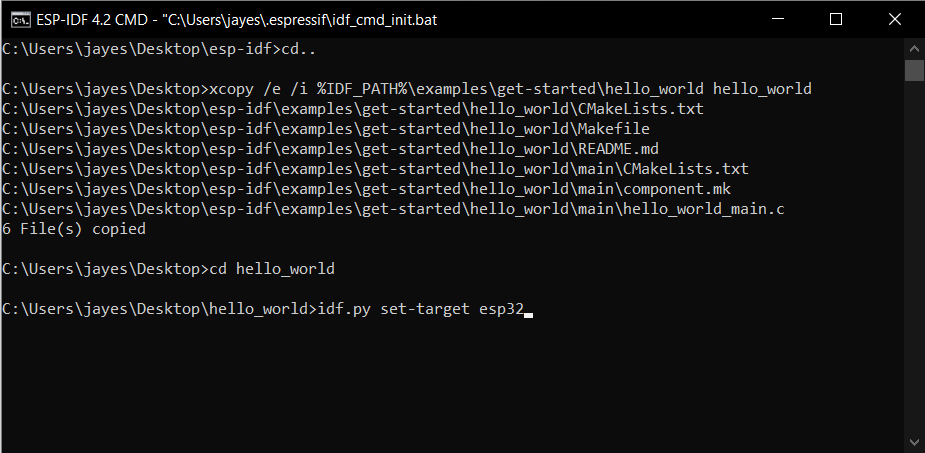
Now, change the directory to get into the newly made hello world folder.
Instruct the compiler to run the code with the command idf.py set-target esp32. You can refer to the below image.
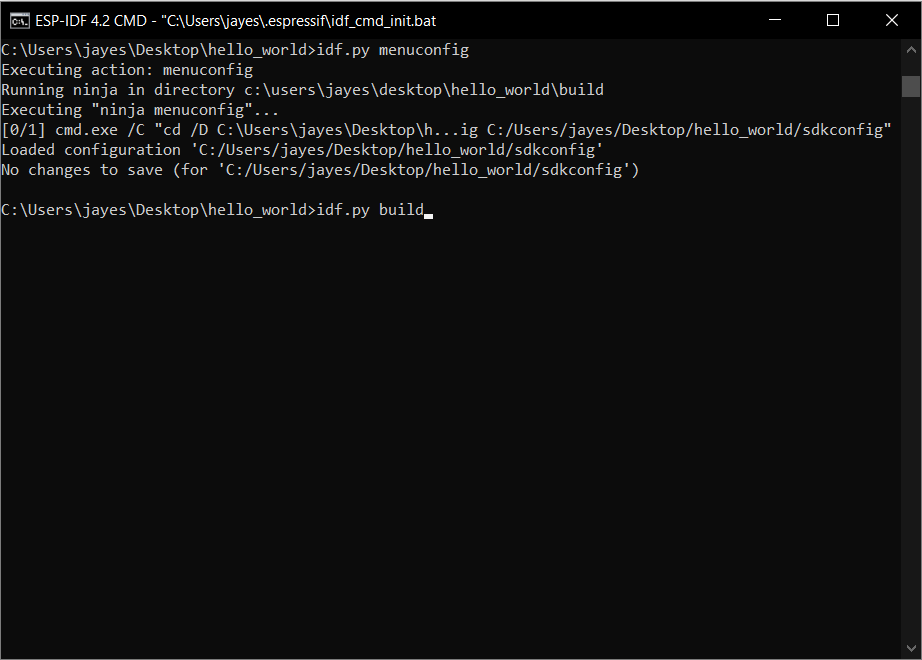
Now run the configuration using theidf.py menuconfig command. You will see the executing action of “menuconfig,” and it will run a ninja operation in the build directory.

You can play around with the Menu Config window. After exploring, leave the settings as default, press S to save, and Esc to leave the configuration.
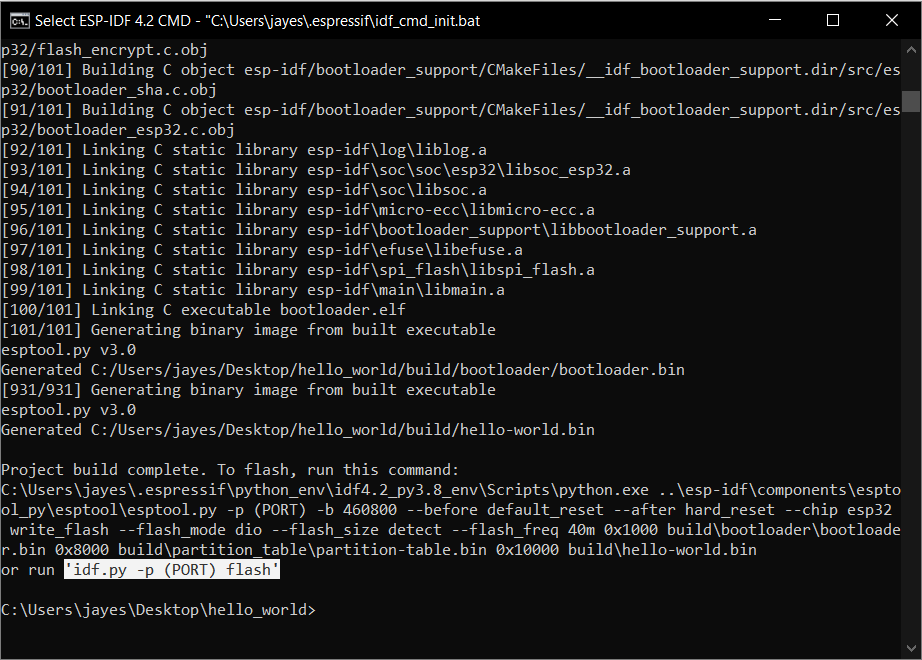
Now, build the code using the idf.py build command.
Once the build process is complete, the ESP32 can now be flashed using the command idf.py -p (PORT) flash.
You can find the port name from the device manager after connecting the ESP32 via USB and installing proper drivers.
Before flashing, don’t forget to put the ESP32 in programming mode by long-pressing the boot button and simultaneously pressing the reset button once, then releasing the boot button.
In this way, the ESP-IDF for ESP32 Boards was completely configured with the installation of ESP-IDF 4.2 CMD Environment and the setting of tools in proper paths, necessary environment variables, the addition of toolchains, and building/flashing of the Hello World program.
Coding in ESP-IDF provides an insight into the inner workings of the code and the nuances in the flow structure, unlike Eclipse IDE for ESP and VS Code Extension, which has an IDE built to simplify the coding experience. Also, troubleshooting and debugging are easy as we follow a line-by-line or command-by-command approach in the coding procedure. If you don’t want to work with ESP-IDF and still want to use the ESP boards, follow this tutorial for working with the ESP32-WROOM board on Arduino IDE.
Saumitra Jagdale
Saumitra Jagdale is a Backend Developer, Freelance Technical Author, Global AI Ambassador (SwissCognitive), Open-source Contributor in Python projects, Leader of Tensorflow Community India, and Passionate AI/ML Enthusiast. You can find him at open mics performing stand-up comedy and spoken word poetry during weekends.
Installing ESP-IDF (Windows)
Note, if you are going to use Visual Studio Code then you can let its Espressif plugin handle installing ESP-IDF – see here
Espressif guides
https://docs.espressif.com/projects/esp-idf/en/stable/get-started/
Setting up a Windows PC to program the ESP32
Create the required GNU-compatible environment with toolchain (the programs to compile and build your applications)
Download the Windows all-in-one toolchain from https://docs.espressif.com/projects/esp-idf/en/stable/esp32/get-started/windows-setup.html
Use the Universal installer.
Pre-installation system check
If the Apply Fixes button is enabled, let the installer apply the fixes it needs and then re-check your system setup.
Selecting software packages
Ensure ESP-IDF is selected
Once installation is complete
ESP-IDF x.x CMD
Windows start menu and desktop will have a new “ESP-IDF x.x CMD” shortcut added.
Opens the Command Prompt and sets up all the required environment variables.
ESP-IDF x.x PowerShell
Windows start menu and desktop will have a new “ESP-IDF x.x PowerShell” shortcut added.
Opens PowerShell and sets up all the required environment variables.
Examples
Will be located in: C:\Espressif\frameworks\esp-idf-vX.X.X\examples
Important notes
- The ESP-IDF build system does not support spaces in the paths to projects.
Where things are installed
C:\Users\YOUR_USERNAME\.espressif\
C:\Espressif\
Path to Python
C:\Espressif\python_env\idfX.X_pyX.X_env\Scripts\python.exe
C:\Espressif\frameworks\esp-idf-vX.X.X\tools\idf.py
Updating Packages
Updating ESP-IDF
See “Updating ESP-IDF” on this page: https://docs.espressif.com/projects/esp-idf/en/stable/esp32/get-started/
USEFUL?
We benefit hugely from resources on the web so we decided we should try and give back some of our knowledge and resources to the community by opening up many of our company’s internal notes and libraries through mini sites like this. We hope you find the site helpful.
Please feel free to comment if you can add help to this page or point out issues and solutions you have found, but please note that we do not provide support on this site. If you need help with a problem please use one of the many online forums.
ESP32-C3 Wireless Adventure: A Comprehensive Guide to IoT
Setting up ESP-IDF Development Environment on Windows
1. Download ESP-IDF tools installer
💡 Tip
It is recommended to set up the ESP-IDF development environment on Windows 10 or above. You can download the installer from https://dl.espressif.com/dl/esp-idf/. The installer is also an open-source software, and its source code can be viewed at https://github.com/espressif/idf-installer.
-
Online ESP-IDF tools installer
This installer is relatively small, around 4 MB in size, and other
packages and code will be downloaded during the installation
process. The advantage of the online installer is that not only can
software packages and code be downloaded on demand during the
installation process, but also allows the installation of all
available releases of ESP-IDF and the latest branch of GitHub code
(such as themasterbranch). The disadvantage is that it requires
a network connection during the installation process, which may
cause installation failure due to network problems. -
Offline ESP-IDF tools installer
This installer is larger, about 1 GB in size, and contains all the
software packages and code required for environment set up. The main
advantage of the offline installer is that it can be used on
computers without Internet access, and generally has a higher
installation success rate. It should be noted that the offline
installer can only install stable releases of ESP-IDF identified by
v*.* or v*.*.*.
2. Run the ESP-IDF tools installer
After downloading a suitable version of the installer (take ESP-IDF
Tools Offline 4.3.2 for example here), double-click the exe file to
launch the ESP-IDF installation interface. The following demonstrates
how to install ESP-IDF stable version v4.3.2 using the offline
installer.
-
In the «Select installation language» interface shown in Figure 4.4, select the language to be used from the drop-down list.
Figure 4.4. «Select installation language» interface -
After selecting the language, click «OK» to pop up the «License agreement» interface (see Figure 4.5). After carefully reading the installation license agreement, select «I accept the agreement» and click «Next».
Figure 4.5. «License agreement» interface -
Review the system configuration in the «Pre-installation system check» interface (see Figure 4.6). Check the Windows version and the installed antivirus software information. Click «Next» if all the configuration items are normal. Otherwise, you can click «Full log» for solutions based on key items.
Figure 4.6. «Pre-installation system check» interface 💡 Tip
You can submit logs to https://github.com/espressif/idf-installer/issues for help.
-
Select the ESP-IDF installation directory. Here, select
D:/.espressif, as shown in Figure 4.7, and click «Next». Please note that.espressifhere is a hidden directory. After the installation is completed, you can view the specific contents of this directory by opening the file manager and displaying hidden items.Figure 4.7. Select the ESP-IDF installation directory -
Check the components that need to be installed, as shown in Figure 4.8. It is recommended to use the default option, that is, complete installation, and then click «Next».
Figure 4.8. Select the components to install -
Confirm the components to be installed and click «Install» to start the automated installation process, as shown in Figure 4.9. The installation process may last tens of minutes and the progress bar of the installation process is shown in Figure 4.10. Please wait patiently.
Figure 4.9. Preparing for installation Figure 4.10. Installation progress bar -
After the installation is complete, it is recommended to check «Register the ESP-IDF Tools executables as Windows Defender exclusions…» to prevent antivirus software from deleting files. Adding exclusion items can also skip frequent scans by antivirus software, greatly improving the code compilation efficiency of the Windows system. Click «Finish» to complete the installation of the development environment, as shown in Figure 4.11. You can choose to check «Run ESP-IDF PowerShell environment» or «Run ESP-IDF command prompt». Run the compilation window directly after installation to ensure that the development environment functions normally.
Figure 4.11. Installation completed -
Open the installed development environment in the program list (either ESP-IDF 4.3 CMD or ESP-IDF 4.3 PowerShell terminal, as shown in Figure 4.12), and the ESP-IDF environment variable will be automatically added when running in the terminal. After that, you can use the
idf.pycommand for operations. The opened ESP-IDF 4.3 CMD is shown in Figure 4.13.Figure 4.12. Development environment installed Figure 4.13. ESP-IDF 4.3 CMD