
ESD USB Как Вернуть?
«Я по неосторожности превратил свой внешний жесткий диск емкостью 1 ТБ в ESD-USB». «Как я могу восстановить обратно свои файлы?»
Если вы случайно преобразовали внешний жесткий диск в формат ESD-USB и теперь видите его как диск ESD-USB, а не NTFS, в этой статье мы подробно расскажем, как это исправить. Много людей написали на различных платформах социальных сетей, что у них не получается решить данную проблему самостоятельно. Один из таких примеров приведен выше. Мы подробно расскажем о том, как лучше всего восстановить данные с диска, преобразованного в ESD-USB. Затем мы дадим вам несколько хороших советов, как избежать этой ошибки в будущем.
- Часть 1: Что такое ESD USB?
- Часть 2: Как Восстановить Потерянные Данные После Преобразования Привода в ESD-USB Привод?HOT
-
Часть 3: ESD USB Как Вернуть Обратно в Нормальное Состояние?
- Решение 1: Форматирование внешнего жесткого диска
- Решение 2: Отмена ESD-USB через Command Prompt
- Решение 3: Создайте Новый Том
- Часть 4: Советы по Предотвращению Потери Данных с USB-накопителей
-
Вопрос-Ответ о ESD-USB
- 1. Как убрать ESD с USB?
- 2. Что такое USB ESD в Windows 10?
- 3. Можно ли отформатировать ESD USB?
Если вам интересно, что такое ESD-USB, продолжайте читать данный раздел. Вы узнаете ответ, ведь ESD – это всего лишь аббревиатура, означающая электронную доставку программного обеспечения. А значение ESD USB относится к формату устройства хранения данных, обычно используемому для установки Windows на компьютер. Он необходим для установки Windows (включая Windows 11). Обычно форматируется весь диск перед выделением раздела 32 ГБ с устройства под этот формат.
Часть 2: Как Восстановить Потерянные Данные После Преобразования Привода в ESD-USB Привод?
При случайном преобразовании диска в ESD-USB привод он может быть отформатирован, и поэтому вы можете потерять хранящиеся на нем данные. Программа Tenorshare 4DDiG Data Recovery поможет восстанавливать данные с внешних жестких дисков, которые были случайно отформатированы, удалены или заражены вирусом. Он работает со всеми производителями устройств. С помощью этой утилиты вы можете восстановить данные после преобразования привода в ESD-USB привод. Теперь выполните три шага, чтобы восстановить потерянные данные с внешних жестких дисков.
- Восстановление потерянных файлов с отформатированных дисков.
- Восстановление файлов с Windows/ Mac/ USB-накопителей/ флешек/ SD-карт/ внешних жестких дисков/ цифровых камер и т.д.
- Поддержка различных случаев потери, например, удаление, форматирование, RAW, повреждение, порча и т.д.
- Поддержка 1000+ типов данных, например, фотографии, видео, аудио, документы и т.д.
- Быстрое сканирование со 100% безопасностью.
- Подключение и выбор USB-накопителя
- Отсканируйте USB-накопитель
- Предварительный Просмотр и Восстановление Файлов
Для начала загрузите и установите программу Tenorshare 4DDiG Data Recovery. Запустите приложение, подключите отформатированный USB-накопитель к компьютеру и выберите его для начала процесса сканирования.
4DDiG выполнит поиск отсутствующих данных на USB-накопителе, при этом вы можете приостановить или завершить поиск в любое время, если нашли файлы, которые вам требуется восстановить. В TreeView вы найдете такие категории, как Удаленные файлы, Существующие файлы, Потерянное местоположение, файл в формате Raw и файлы тегов. Вы также можете использовать Просмотр файлов для просмотра типов файлов, включая видео, фото, документы, электронную почту, аудио и т.д. Кроме того, вы можете искать нужные в левой части панели или использовать фильтр для уточнения поиска.
После обнаружения требуемых файлов вы можете предварительно просмотреть и восстановить их в новое безопасное место. Пожалуйста, не сохраняйте файлы в том же разделе, где были потеряны данные на случай перезаписи диска и необратимой потери данных.
Это все касаемо того, как восстановить потерянные данные после преобразования накопителя в ESD-USB-накопитель.
Часть 3: ESD USB Как Вернуть Обратно в Нормальное Состояние?
Существует три способа вернуть ваш ESD-USB в нормальное состояние. Давайте рассмотрим их по очереди.
Решение 1: Форматирование внешнего жесткого диска
Этот шаг удалит данные с вашего жесткого диска и восстановит их в желаемом формате: NTFS. Этот формат позволяет хранить и передавать файлы на внешний жесткий диск. Чтобы осуществить это, выполните следующие действия:
- В Windows запустите проводник файлов.
- Выберите внешний жесткий диск.
- Выберите Формат из контекстного меню, кликнув по нему правой кнопкой мыши.
- Файловая система настроена на NTFS, а размер единицы выделения установлен равным 2048 байтам.
- Выберите “Быстрый формат” и начните процесс.
Теперь вы можете пользоваться данным устройством в обычном режиме.
Решение 2: Отмена ESD-USB через Command Prompt
Command Prompt – это внутренняя программа операционной системы, которая позволяет быстро выполнять настройки компьютера и его периферийных устройств, используя командные строки, требуя ручного выбора параметров в настройках. Найдите диск в File Explorer и запомните букву, присвоенную этому диску. Затем откройте Command Prompt от имени администратора, нажав правой кнопкой мыши на кнопке Windows и выбрав в появившемся меню пункт Command Prompt (admin).
После этого введите следующую команду, заменив Y буквой, которая присвоена вашему диску.
Дождитесь завершения выполнения команды. Должны автоматически обнаружиться и устраниться все проблемы с внешним жестким диском.
Форматирование внешнего жесткого диска – еще один вариант решения этой проблемы с помощью командной строки. Выполните следующие команды:
- Diskpart
- List disk
Найдите в списке дисков номер диска, соответствующий вашему внешнему диску.
- X (где номер вашего диска заменяет x).
- Clean
- Create partition primary
- Format fs=ntfs
- Assign
Это позволит вручную отформатировать внешний диск обратно в NTFS.
Решение 3: Создайте Новый Том
Создание нового раздела также приведет к уничтожению всех ваших данных, поэтому, если вы хотите сохранить данные на этом диске, воспользуйтесь процедурой, описанной в части 2. Поскольку ESD-USB форматирует ваш диск и выделяет для этого формата только 32 ГБ общей емкости, вы можете использовать формат NTFS для оставшегося места.
- Откройте Управление дисками Windows, выполнив поиск в меню Пуск.
- Найдите внешний жесткий диск в списке дисков и нажмите правой кнопкой мыши на нераспределенном пространстве.
- Нажмите “Создать Простой Том” и укажите размер раздела (мы рекомендуем ввести максимально возможное пространство на диске).
- Выберите форматирование этого тома и формат NTFS на следующем экране после этого.
- Выберите “Выполнить быстрое форматирование” и нажмите продолжить.
После этого вы сможете снова использовать жесткий диск в качестве устройства для хранения ваших данных.
Часть 4: Советы по Предотвращению Потери Данных с USB-накопителей
Некоторые пользователи Windows не знают, что программа Windows Media Creation Tool удаляет все данные с внешних устройств хранения. Поэтому, чтобы избежать потери данных перед преобразованием внешних устройств хранения в ESD USB, мы подготовили для вас несколько полезных советов.
Совет 1: Создайте Загрузочный Диск на Пустом Жестком Диске
Эта проблема всегда возникает, когда клиент пытается создать загрузочный диск для Windows на своем жестком диске. Хотя вы можете использовать свой главный внешний диск, вы рискуете потерять все свои данные. Поэтому мы рекомендуем использовать дополнительный диск. Например, USB с емкостью 32 ГБ или более, а не ваш основной. Это поможет избежать подобных проблем в будущем.
Совет 2: Создайте Резервную Копию Данных На Другом Источнике
Второй совет, который вы можете сделать, чтобы предотвратить потерю данных в будущем, пока у вас не возникла непредвиденная проблема ESD-USB – это создать резервную копию диска. Это можно сделать различными способами, некоторые из которых приведены ниже:
- Перенести файлы с одного внешнего жесткого диска на другой.
- Скопировать файлы в другое место на компьютере, например, в папку документов.
- Включить автоматическое резервное копирование в облаке Google или OneDrive при каждом подключении диска к ПК. Поскольку объем памяти в этих облачных сервисах хранения ограничен, рекомендуется использовать эту опцию только в том случае, если вы не используете много места на внешнем жестком диске.
Вопрос-Ответ о ESD-USB
1. Как убрать ESD с USB?
Шаг 1: Подключите внешний диск к компьютеру и запустите Управление Дисками.
Шаг 2: Найдите и кликните правой кнопкой мыши раздел ESD-USB 32GB вашего устройства, затем выберите «Удалить том».
Шаг 3: Чтобы подтвердить, нажмите «ОК».
Шаг 4: Выберите диск и начните сканирование.
Шаг 5: Внимательно изучите и просмотрите отсканированные файлы.
Шаг 6: Верните потерянные данные в новое надежное место.
2. Что такое USB ESD в Windows 10?
При обновлении с предыдущей версии Windows 10 до последней сборки Windows 10 создается файл ESD. Файл ESD USB Windows 10 содержит все файлы, необходимые для установки операционной системы Windows 10, и обычно они весят меньше, чем файл ISO для той же версии и издания Windows 10.
3. Можно ли отформатировать ESD USB?
Да, ESD USB можно отформатировать в Windows; запустите Проводник. Выберите внешний жесткий диск, затем выберите Форматировать из контекстного меню, кликнув по нему правой кнопкой мыши. Файловая система по умолчанию настроена на NTFS, а размер единицы распределения установлен на 2048 байт. После форматирования диска вы можете потерять данные на нем. Если это произошло не беспокойтесь, просто воспользуйтесь утилитой для восстановления данных с USB, которая может восстановить любые отформатированные, удаленные и поврежденные данные.
4.Как использовать ESD USB?
Файлы Microsoft ESD, используемые при установке обновлений программного обеспечения, не следует открывать вручную (если они не преобразованы, как будет объяснено). Они используются Windows для процесса обновления.
Резюме
Мы надеемся, что эта статья продемонстрировала, как устранить проблему с ESD-USB и извлечь содержимое с устройства, которое было случайно изменено на формат ESD-USB. Не забудьте воспользоваться программой для восстановления данных Tenorshare 4DDiG data recovery software, которая поможет восстановить все потерянные файлы с USB-накопителя!
Tenorshare 4DDiG Data Recovery
4DDiG — это ваш непревзойденный выбор для восстановления всех потерянных данных на компьютере Windows / Mac после различных сценариев потери, таких как удаление, форматирование, RAW и т.д. с более высокой вероятностью успеха.
Скачать Бесплатно
Скачать Бесплатно
Купить Сейчас
Купить Сейчас
Привет друзья! Во всех дистрибутивах Windows 8.1 и Windows 10, которые можно было скачать на официальном сайте Майкрософт ещё год назад, находился файл-образ операционной системы под названием install.wim. Файл install.wim, это образ диска, в котором в сжатом состоянии находятся файлы операционной системы. В процессе установки Windows все файлы разархивируются из образа install.wim на диск (C:), по большему счёту, это основной этап установки операционной системы на наш компьютер. Также существует инструмент под названием Dism, с помощью которого можно интегрировать в файл install.wim драйвера и обновления, включать и отключать различные компоненты операционной системы, восстанавливать целостность системных файлов Windows и т.д. Но в последнее время во всех дистрибутивах Windows 8.1, Windows 10 вместо файла install.wim находится файл-образ операционной системы install.esd. Что это за зверь такой, мы и разберём в сегодняшней статье.
Вопросы:
1. Что такое файл install.esd и install.wim
2. Чем отличается файл install.esd от файла install.wim
3. Есть ли инструменты у Майкрософт для проведения конвертации install.esd в install.wim или искать программы сторонних разработчиков?
4. Можно ли после конвертации использовать в дистрибутиве Windows 10 файл install.wim вместо install.esd или нужно будет делать обратную конвертацию файла install.wim в install.esd?
Что такое файл install.esd и как конвертировать install.esd в install.wim
Автор Владимир!
Приветствую всех! Файлы install.esd и install.wim, находящиеся в дистрибутиве (ISO-образе) Windows 10, представляют из себя архивы, в которых в сжатом состоянии находятся файлы операционной системы Windows 8.1 или Windows 10, а Dism, это инструмент для работы с этими архивами.
Архивы .wim или .esd могут содержать в себе один или несколько других архивов (релизов) операционных систем (Профессиональная, Домашняя и др.) Архивы, находящиеся внутри файлов Wim или Esd называются — Образы (Image). Любому Образу (Image) в архиве всегда присваивается индекс 1, 2, 3, 4…
Например, мы с вами скачали дистрибутив Windows 10 и подсоединили его к виртуальному дисководу (E:), заходим в папку «sources» дистрибутива и видим файл-архив install.esd,
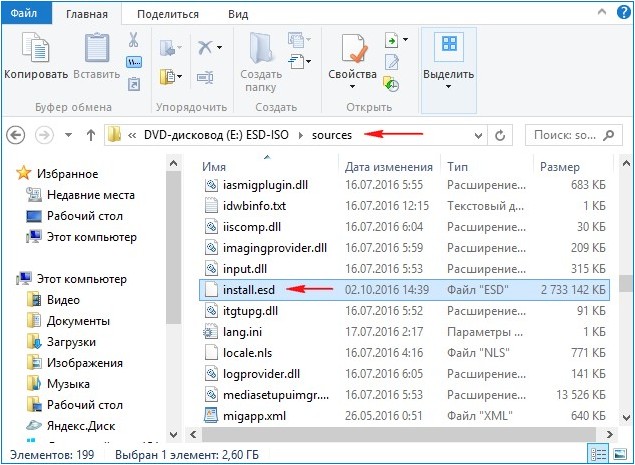
чтобы узнать какие Образы (Image) находятся внутри архива, вводим в командной строке команду:
Dism /Get-WimInfo /WimFile:E:\sources\install.esd
где E:\sources\, это путь к файлу install.esd
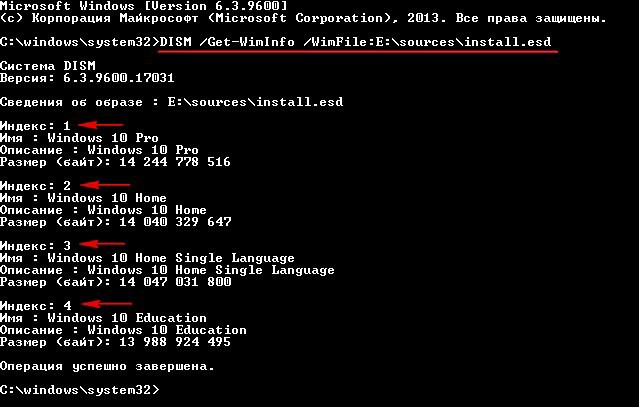
Как видим, в архиве install.esd находится четыре Образа (Image) Windows с индексами: 1, 2, 3, 4.
Сведения об образе : E:\sources\install.esd
Индекс: 1
Имя : Windows 10 Pro
Описание : Windows 10 Pro
Размер (байт): 14 244 778 516
Индекс: 2
Имя : Windows 10 Home
Описание : Windows 10 Home
Размер (байт): 14 040 329 647
Индекс: 3
Имя : Windows 10 Home Single Language
Описание : Windows 10 Home Single Language
Размер (байт): 14 047 031 800
Индекс: 4
Имя : Windows 10 Education
Описание : Windows 10 Education
Размер (байт): 13 988 924 495
Чем отличается файл install.esd от файла install.wim
Важно знать, что при создании нового архива операционной системы Windows 8.1, 10 всегда создаётся файл архива WIM (install.wim), в архиве создаётся Образ (Image) (например Windows 10 Pro) и ему присваивается индекс 1. Затем с помощью инструмента Dism в архив добавляются другие Образы (Image). Добавленному второму образу будет присвоен индекс 2, а следующему добавленному образу 3 и так далее. Создаваемые образы могут иметь три типа сжатия:
/compress:none (без сжатия)
/compress:fast (быстрое сжатие)
/compress:maximum (максимальное сжатие), если при создании образа не указывать параметр /compress, то сжатие будет Fast (быстрое сжатие).
Microsoft в 2014 году разработала ещё один тип сжатия Recovery (максимальнее максимального)
Данный тип сжатия сжимает файлы Windows в архив ещё сильнее, в результате файл install.esd весит меньше файла install.wim на 30%.
С типом сжатия recovery работают только 3 параметра Dism:
Dism /Export-Image…… /compress:recovery
Dism /apply-image.
Dism /Get-WimInfo
Чтобы легче было работать c архивами, архиву с образами, сжатыми в Recovery, обычно ставят расширение ESD. Расширение esd ставить желательно, но необязательно. Неправильно считать, что если у архива разрешение esd, то сжатие может быть только recovery, так же если у архива разрешение wim, то сжатие может быть только fast, max и none, мне несколько раз попадались файлы wim c сжатием recovery. Dism работает не по расширению, а по сжатию — можно при создании образа поставить разрешение ESD и Dism -создаст образ со сжатием «fast». Сделал на эту тему небольшое видео https://yadi.sk/i/B_8mfOjfxhqSk
Надеюсь, теперь вы поняли, чем отличается файл install.esd от файла install.wim. Оба файла: install.esd и install.wim, это архивы с файлами Windows, и отличаются они типом сжатия. Файл-архив — install.esd сжат сильнее и весит меньше.
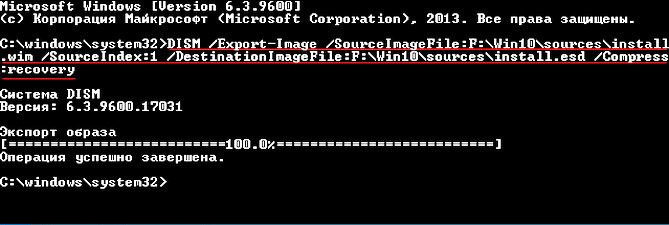
Также важно знать, что при создании нового архива операционной системы Windows 8.1, 10 тип сжатия — /compress:recovery не поддерживается. Сжать в recovery можно только уже созданный образ WIM, например, введём в командной строке команду:
Dism /Export-Image /SourceImageFile:F:\Win10\sources\install.wim /SourceIndex:1 /DestinationImageFile:F:\Win10\sources\install.esd /Compress:recovery
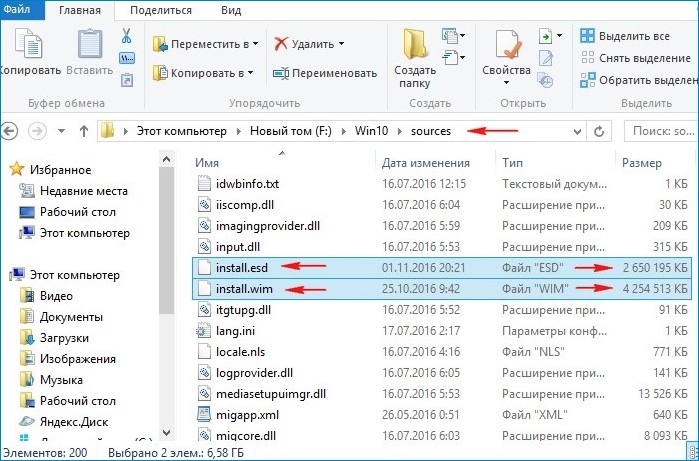
данной командой мы сжимаем типом сжатия recovery файл install.wim, находящийся по адресу F:\Win10\sources, в файл install.esd, находящийся по адресу F:\Win10\sources. В результате в папке «sources» рядом с файлом install.wim появляется ещё файл install.esd. Оба файла содержат сжатые файлы Windows, но объём у файла install.esd меньше. Изменение типа сжатия обычно называют конвертацией.
К сожалению, с помощью параметра Dism /Export-Image нельзя конвертировать архив ESD в архив WIM.
Архив ESD нужно сначала разархивировать, а затем заархивировать заново в WIM-файл при помощи сжатия fast или maximum.
The ESD file gets created when you upgrade from previous build of Windows 10 to the latest Windows 10 via Settings app. The ESD (ESD stands for Electronic Software Delivery) file contains all the files required to install Windows 10 operating system, and is usually smaller when compared to the ISO file of the same version and edition of Windows 10.
Since none of the bootable USB creation software out there support ESD files, we need to first convert the ESD file to ISO. So it’s important to first extract the ESD file and create an ISO image to be able to create the bootable media of Windows 10.
If you have an ESD file of Windows 10 and want to create bootable USB using the same ESD file to perform clean install or upgrade, you just need to follow the given below instructions.
Method 1 of 1
We are using the ESD Decrypter tool to decrypt the ESD file and then convert the same to ISO image. Although the popular NTLite software also supports converting ESD to ISO image, it doesn’t support encrypted ESD files. Since it’s impossible to differentiate between encrypted and decrypted ESD files without opening the same with a software, we are going to use the ESD Decrypter which supports both encrypted and decrypted ESD files.
In this method, we will first convert the ESD file to ISO using ESD Decrypter before using the popular Rufus tool to create bootable USB from the ISO image file.
Step 1: The first step is to download ESD File Decrypter from here. Extract the downloaded .7z file to a New Folder using 7-Zip or WinRAR.
Note that the drive where you create New Folder must have at least 10 GB of free space as the size of the ISO file that we are going to create will be larger than the ESD file. In addition to that, ESD Decrypter creates a backup copy of the original ESD file before converting the same to ISO. So in order to run out of disk space during the file conversion job, it’s important to create the New Folder on a drive with at least 10 GB of disk space.
Step 2: Copy Windows 10 ESD file to the New Folder that contains extracted files of ESD Decrypter tool.

Step 3: Right-click the Decrypt.cmd file, click Run as administrator, and then click Yes button when you see the User Account Control dialog box to see the Command Prompt window.

Step 4: Here, simply press “1”key to begin creating the ISO image file out of the ESD file. This process might last up to 20 to 40 minutes, depending on available system resources and the size of the ESD file.

NOTE: ESD Decrypter automatically backs up the ESD file just in case something goes wrong. So the ESD file will still be available even after converting the ESD file to ISO image.

Step 5: Once done, you can find the new ISO file under the New Folder that you created in Step 2.

Step 6: Now that you have Windows 10 ISO image file, you can use Rufus, Windows USB/DVD Download Tool, or our how to install Windows 10 from USB guide to create the bootable USB of Windows 10 from the ISO image file. In this guide, we will use the Rufus as it’s not just easy to use but stable as well.
Step 7: Download Rufus 2.0. Connect your USB drive that you want to use to install Windows 10 and then run Rufus software.
Step 8: Select your USB drive from device list (if there are more than one connected USBs), and then select the partition scheme and target type as MBR partition scheme for BIOS or UEFI computers, or GPT partition scheme for UEFI computer (if you are sure that the disk type is GPT).
Step 9: Next, choose the file system as FAT32 as it’s compatible with both BIOS and UEFI.
Step 10: Finally, click the CD drive icon next to Create a bootable disk using option (make sure that the ISO image is selected as shown in the below picture) to browse and select the Windows 10 ISO image that you have obtained by converting ESD to ISO.
NOTE: When you select Windows 10 ISO, you’ll see Standard Windows installation and Windows To Go options. Be sure that the first option titled Standard Windows installation is selected before proceeding further as selecting the latter option will create Windows To Go drive of Windows 10.
Step 11: Finally, click Start button, click OK button when you see “all files on the selected USB drive will be erased” message to begin preparing the bootable USB of Windows 10.’

NOTE: If you’re getting “The file system currently selected can no be used with this type of ISO” error, please change the file system from the previously selected FAT32 to NTFS and click Start button again.

That’s it! You can now use the bootable USB of Windows 10 to to perform clean install of Windows 10.
Tip: There is another program to create a bootable USB of Windows from ESD file without converting the ESD file to ISO image but the utility doesn’t support Windows 10 yet. We will update this guide with another method once the software is updated to support Windows 10.
Hope this helps!
If you’ve ever wondered how to install Esd files on Windows 10, you’re not alone. Most new computers come with this file format. Microsoft uses it to deliver the Windows OS install files to your PC. However, if you don’t have the software you need to install the OS, you can download and install a free tool called ESD Toolkit. This tool will let you extract the content from the ESD file and create an ISO file that you can use to install the operating system.
ESD files are used by Microsoft when they install updates and other components to your computer. They are not meant to be opened manually. Instead, Windows uses them internally to install and remove software. These files are typically stored in the AppDataLocalMicrosoft folder, under the WebSetupDownload subfolder. You can also open documents stored in the ESD format with AutoData or the ExpertScan Survey program.
Where is Install ESD Windows 10?
If you are trying to install Windows 10 on your PC, you may be wondering, “Where is Install ESD Windows 10?” You probably know that it’s a file that’s created when you upgrade to a new version of the OS. ESD stands for Electronic Software Delivery, and it’s a compressed file that contains the entire Windows 10 installation file. Unlike ISO files, ESD files are not supported by bootable USB creation software. If you have an ESD file, you need to convert it into an ISO image before you can install Windows 10.
The ESD decrypter tool is based on the ESD decrypter command line tool, which is useful for decrypting encrypted files. Using the ESD toISO tool requires the correct RSA key. This is because Microsoft can ship a new version of Windows with a different RSA key. However, this is unlikely to happen if you use the latest version of Windows. Instead, you can use a backup copy of your ESD file to restore it.
How Do I Open an ESD File in Windows 10?
An ESD file is a small, compressed data file used during the Windows 10 upgrade process. It contains all of the necessary files for a successful upgrade, and is generally smaller than an ISO image. To create a bootable USB, you’ll need to convert the ESD file to an ISO image before you can use it. Here’s how to do it. If you’re using Windows 10, you can use AutoData to do this.
First, you need to open the file. The ESD file contains a Windows imaging format (.WIM) file that Microsoft uses to supply upgrades and components for Windows. Because it’s encrypted, you can’t open it like a regular ISO file. The best way to open an ESD file is to use the /Compress argument. You can use the maximum option to get the best compression, but it will take longer to capture the image. The fast option will compress the image faster, but you’ll end up with a larger file. If your ESD file contains push-button reset images, you can choose to export them from Windows. However, it won’t remove the files required for a reset.
After extracting the ESD file’s content, you can then use a command-line tool called ESD Toolkit to convert the file to an ISO file. The conversion process can take anywhere from 15 minutes to 30 minutes, depending on the size of the file and the available system resources. Once complete, the ISO file is stored in the directory where ESD Toolkit is installed. From here, you can use it to create a bootable Windows 10 USB drive or CD. NTLite is an excellent free program for creating bootable Windows 10 images.
What Program Opens a ESD File?
The error message “What program opens a ESD file?” may appear because you do not have the right software to open the file. Windows will either look up the program to open the file online or you can manually set the file association to the correct program. To set the file association, go to Control Panel > Default Programs and select the file type, then click Change Program. You should then see the file appear in your browser.
For Mac and Windows users, you can use a different software to open the file. You can also install the ExpertScan program on your computer and try it out. You can download it for free from AutoData Systems. Just make sure to install the software before you open the file. This software is compatible with a number of file formats and is available for download in a secure manner. To download the software, visit AutoData Systems and follow the instructions on the installation page.
Is ESD Bootable USB?
Are you wondering, “Is ESD Bootable USB on Windows 10?” This article will provide some tips on the process of creating your own bootable USB. Before you can boot from it, you need to format it. ESD files are created by the Windows 10 update and are smaller than an ISO file. However, to create a bootable USB, you need to convert an ESD file into an ISO image.
First, you must download ESD Decrypter and extract it to a folder. Make sure your hard drive has at least eight to ten gigabytes of space. Once you have extracted the ESD Decrypter, you can now use the ESD Decrypter to create a bootable USB disk with Windows 10! It’s easy to use! It will make a backup copy of the ESD file and a bootable USB disk of Windows 10.
Once you’ve downloaded the Decrypter, you need to extract it to a folder. Once extracted, right-click the ESD Decrypter utility file and select ‘Run as administrator’. Then, follow the instructions that are displayed on the screen. After that, you’ll be ready to use the bootable USB. You can even export it to a PDF file and use it in a Windows 10 system.
Is Install ESD the Same As Install Wim?
Is Install ESD the same as installing WIM on Windows 10? This question has many answers. For starters, ESD is a new file format for deploying Windows operating systems. However, it differs from WIM in several ways. For one, ESD is read-only. Secondly, ESD files are used internally by Windows to deploy updates and applications. This article will explain why ESD is better than WIM and the benefits that each format offers.
Unlike ESD, WIM is an image format used in Microsoft Windows since the Vista operating system. It contains compressed image files and is intended for use on Windows systems. This compression method creates a smaller file, which is 30% smaller than WIM. The main drawback of recovery compression is its resource-intensive nature, as the process can take tens of minutes to complete.
How Do I Convert ESD Files?
In the past, Microsoft used to use a proprietary file format called ESD to install software upgrades, such as security updates, patches, and other updates. Although Microsoft has switched to a UUP-based format, you might still need to use an ESD file to run an application or download a program. ESD files are compressed versions of WIM files and must be decrypted before you can use them. Windows doesn’t natively support ESD files and they cannot be mounted, so you must first convert them into ISO files.
Once you have extracted the content of your ESD file, you will need to convert it into a WIM file in order to run a deployment program. You can then import the newly created wim into SCCM or MDT to run the installation process. You can also convert ESD files to PDF for easy sharing and distribution. Here are some simple steps to follow. Let’s get started. This article is not a replacement for professional help, but a companion piece to your existing IT team.
If you want to change the install ESD files on your Windows 10 computer, you need to first understand what these files are. Despite looking like the same thing, ESD files and EDS files are not the same. Both files use different file extensions and require different programs to install. Here’s how to change the install ESD files on Windows 10 and other versions of Windows. But note that you’ll have to change the install ESD files for future versions of Windows 10.
First, download the ESD-Decrypter files. You’ll need to extract these files to a separate folder. Next, copy the ESD-Decrypter files to the folder named Install. To run the Decrypt command file, press the Windows key+X and select “Run as administrator.” From the resulting menu, choose the first option, and press Enter. If the Windows 10 installer has failed to update, you can try downloading the ESD-Decrypter file again.
Learn More Here:
1.) Windows Help Center
2.) Windows – Wikipedia
3.) Windows Blog
4.) Windows Central
Whenever a person upgrades to a newer build of Windows 10 through Windows Update, the ESD (Electronic Software Delivery) format is used to provide their computer with the installation files it needs to install the new Windows 10 build. Among these installation files is the install.esd file – a compressed and encrypted version of the install.wim file that is typically used to perform clean installs of the Windows Operating System. The install.wim file has everything you need for a complete Windows installation from scratch.
Many Windows 10 users wondered whether or not they can convert the installation files downloaded during Windows Updates into bootable Windows 10 ISOs that can be burned to DVDs/USBs and then used to perform clean installs of Windows 10. Well, this is, through a bit of hardship, entirely possible. The install.esd file that is downloaded to your computer when you choose to upgrade to a newer build of Windows 10 via Windows Update can be used to create a bootable Windows 10 ISO to be burned to a DVD/USB and used for a Windows 10 install from scratch instead of an upgrade.
There are three phases to turning a Windows 10 install.esd file into a traditional Windows 10 ISO file – downloading and setting up a little utility known as ESDtoISO, procuring an install.esd file and using ESDtoISO to create a bootable Windows 10 ISO from a Windows 10 install.esd file.
Phase 1: Downloading and setting up the ESDtoISO tool
Click here to navigate to the OneDrive page from which you can download the ESDtoISO (by TenForums). Once the OneDrive page loads up, right-click on the ESDtoISO folder and click on Download in the contextual menu to begin downloading a .ZIP file containing the ESDtoISO utility.
Once the .ZIP file containing the ESDtoISO tool has been downloaded, navigate to and double-click on it to open it. Click on Extract All in the File Explorer In the window that pops up, specify a destination folder for the contents of the .ZIP file and click on Extract to begin the extraction. Among the contents of the .ZIP file will be a file named ESDtoISO.cmd – this is the actual ESDtoISO utility.
Phase 2: Download an install.esd file
In order to create a bootable Windows 10 ISO from an install.esd file for a build of Windows 10, you are actually going to need an install.esd file. An install.esd file is only downloaded to your computer and saved to a hidden folder when you choose to install a Windows Update that contains a new build of Windows 10. To obtain an install.esd file, you need to:
Open the Start Menu.
Click on Settings.
Click on Update & Security.
Navigate to Windows Update in the right pane.
Click on Check for updates in the left pane.
If an update to a new build of Windows 10 is available, let Windows Update download it.
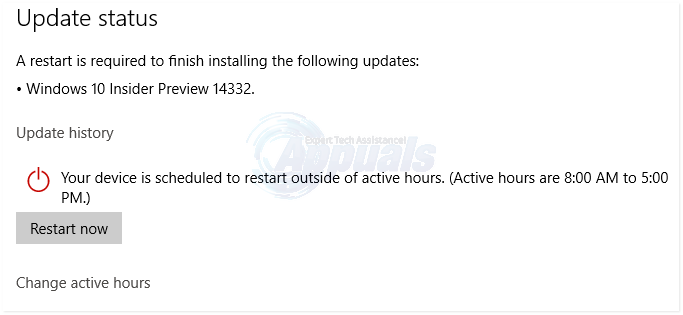
As soon as the esd file has been downloaded to your computer and Windows Update has prepared the update, it will inform you that a restart of your computer has been scheduled.
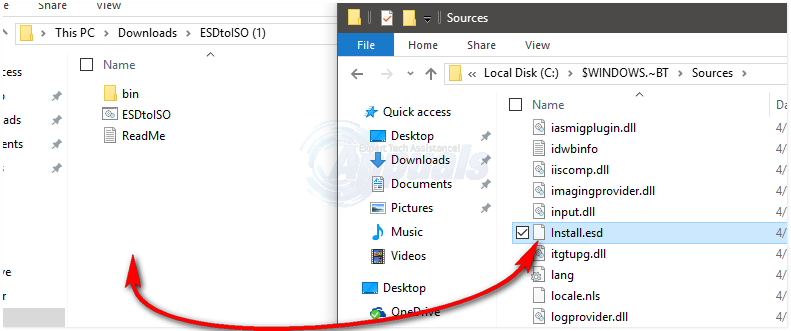
It is at this point that you will see an esd file when you launch File Explorer (by pressing the Windows Logo key + E) and navigate to the following hidden directory:
C:\$Windows.~BT\Sources
Note: Delay the Windows Update. DO NOT choose to restart your computer at that very moment.
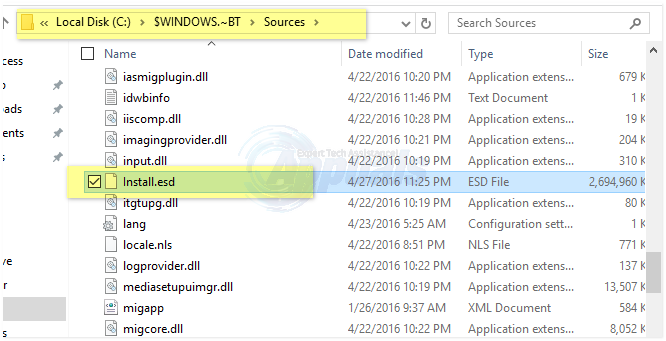
Move the esd file to the same folder you extracted the contents of the .ZIP file you downloaded in Phase 1 to, i.e. the same folder that contains the ESDtoISO.cmd file.
Phase 3: Using ESDtoISO to create a Windows 10 ISO from an install.esd file
Once the ESDtoISO tool has been downloaded and setup, all there is left is actually using it to create a Windows 10 ISO from an install.esd file for a build of Windows 10. In order to do so, you are going to have to:
Navigate to the directory that contains the cmd file.
Right-click on cmd and click on Run as administrator. This will launch the ESDtoISO tool and it will automatically find the install.esd file you placed in the same folder that it is in.
Select the bootable Windows 10 ISO file that you want to create by pressing 1 (for a Windows 10 ISO that contains an wim file), 2 (for a Windows 10 ISO that contains an install.esd file) or 0 (to quit the utility) and press Enter. Both of these options can be used in the same way to clean install Windows 10 – burned to a DVD/USB and then used to install Windows 10 from scratch on a virtual drive or a computer. However, if you’re not really sure which option to go with, just know that an install.wim based ISO will take longer to be created but will clean install Windows 10 faster, whereas an install.esd based ISO will be created relatively quicker but will take longer to clean install Windows 10.
As soon as you have made a decision as to whether you will be going with Option 1 or Option 2, the ESDtoISO utility will get cracking on creating a bootable Windows 10 ISO file for you, which can take up to half an hour (or even more) depending on the hardware of the computer you are using. During the process, the utility may display an error pertaining to a missing key – ignore this error. When ESDtoISO is done working its magic, you’ll have a Windows 10 ISO file that you can burn to a DVD or USB and use to clean install Windows 10.
Kevin Arrows
Kevin Arrows is a highly experienced and knowledgeable technology specialist with over a decade of industry experience. He holds a Microsoft Certified Technology Specialist (MCTS) certification and has a deep passion for staying up-to-date on the latest tech developments. Kevin has written extensively on a wide range of tech-related topics, showcasing his expertise and knowledge in areas such as software development, cybersecurity, and cloud computing. His contributions to the tech field have been widely recognized and respected by his peers, and he is highly regarded for his ability to explain complex technical concepts in a clear and concise manner.