
Последнее обновление: 09.11.2016
ErrorProvider не является полноценным визуальным компонентом, тем не менее он позволяет настраивать визуальное отображение ошибок при вводе
пользователя. Этот элемент применяется преимущестенно для проверки и индикации ошибок.
Так, определим на форме два текстовых поля с именами nameBox и ageBox. И далее перетащим с панели инструментов на форму элемент ErrorProvider.
ErrorProvider оторазится под формой, а в окне свойств мы также сможем управлять его свойствами:
Среди его свойств можно выделить следующие:
-
BlinkRate: задает частоту мигания значка ошибки
-
BlinkStyle: задает, когда значок ошибки будет мигать
-
Icon: устанавливает сам значок ошибки. По умолчанию это красный кружок с восклицательным знаком, но можно установить любую
другую иконку.
В коде формы приложения пропишем следующее:
using System;
using System.ComponentModel;
using System.Windows.Forms;

namespace HelloApp
{
    public partial class Form1 : Form
    {
        public Form1()
        {
            InitializeComponent();
            nameBox.Validating += nameBox_Validating;
            ageBox.Validating += ageBox_Validating;
        }

        private void nameBox_Validating(object sender, CancelEventArgs e)
        {
            if (String.IsNullOrEmpty(nameBox.Text))
            {
                errorProvider1.SetError(nameBox, "Не указано имя!");
            }
            else if (nameBox.Text.Length < 4)
            {
                errorProvider1.SetError(nameBox, "Слишком короткое имя!");
            }
            else
            {
                errorProvider1.Clear();
            }
        }

        private void ageBox_Validating(object sender, CancelEventArgs e)
        {
            int age = 0;
            if (String.IsNullOrEmpty(ageBox.Text))
            {
                errorProvider1.SetError(ageBox, "Не указан возраст!");
            }
            else if (!Int32.TryParse(ageBox.Text, out age))
            {
                errorProvider1.SetError(ageBox, "Некорретный возраст!");
            }
            else
            {
                errorProvider1.Clear();
            }
        }
    }
}
Здесь для обоих текстовых полей задано событие Validating, которое срабатывает при вводе пользователя и призвано управлять валидацией вода. Это событие
имеется и у других элементов управления, не только у текстовых полей. В обработчике события Validating мы смотрим на введенный текст, и если он не удовлетворяет условиям,
то с помощью метода errorProvider1.SetError() для определенного элемента добавляем ошибку. Если все условия соблюдены, то, наоборот, удаляем все ошибки
с помощью метода errorProvider1.Clear().
Запустим приложение и при некорректном вводе мы увидим ошибку:
Здесь есть небольшая деталь — валидация элемента будет происходить, когда мы завершим ввод и перейдем на другой элемент. Если же нам надо валидировать
элемент по мере ввода, то тогда мы можем обрабатывать событие TextChanged у тех же текстовых полей.
Introduction
In this example, we will see how to use the ErrorProvider control in Windows forms to provide validations in Windows Forms and display user-friendly error messages to the user if the validation fails.
Figure 1. Error Provider Sample
The complete code listing is provided at the end of the sample.
Create a new Visual C# Windows Forms application. The project will create a default form, Form1.cs. Add controls as shown in the figure below and set the properties of the controls as indicated in the table.
Figure 2. Sample Form Layout
| Control | Property Name | Property Value |
| Label | Text | «Setup Driving Test Appointment» |
| Label | Text | «Name» |
| TextBox | Text | «» |
| Label | Text | «Age» |
| TextBox | Text | «» |
| Label | Text | «Test Date» |
| DateTimePicker | Text | «Create Appointment» |
| Button | Text |
Table 1. Properties for Sample Form Layout Controls
Now add an ErrorProvider control to the Form. In Visual Studio.Net, you can drag and drop the control from the toolbox. The control is added to the form and displayed in the control tray in the Windows form in the Design view. If you are not using Visual Studio.Net, then you can add the control in the code. Please refer to the code listing provided at the end of the article.
Now create an event handler for the «Validating» event of the textBox1 control. We will validate the TextBox to ensure that the user has entered a value.
private void textBox1_Validating(object sender, System.ComponentModel.CancelEventArgs e)
{
    ValidateName();
}
private bool ValidateName()
{
    bool bStatus = true;
    if (textBox1.Text == "")
    {
        errorProvider1.SetError(textBox1, "Please enter your Name");
        bStatus = false;
    }
    else
    {
        errorProvider1.SetError(textBox1, "");
    }
    return bStatus;
}
Code Snippet: Validate the Name TextBox
Next, we will add the validations for the textBox2 control which accepts Age as the data input. We will ensure that the Age is mandatory, is in numeric format and the user is 18 years or older.
private void textBox2_Validating(object sender, System.ComponentModel.CancelEventArgs e)
{
    ValidateAge();
}
private bool ValidateAge()
{
    bool bStatus = true;
    if (textBox2.Text == "")
    {
        errorProvider1.SetError(textBox2, "Please enter your Age");
        bStatus = false;
    }
    else
    {
        errorProvider1.SetError(textBox2, "");
        try
        {
            int temp = int.Parse(textBox2.Text);
            errorProvider1.SetError(textBox2, "");

            if (temp < 18)
            {
                errorProvider1.SetError(textBox2, "You must be at least 18 years old to setup a test");
                bStatus = false;
            }
            else
            {
                errorProvider1.SetError(textBox2, "");
            }
        }
        catch
        {
            errorProvider1.SetError(textBox2, "Please enter your age as a number");
            bStatus = false;
        }
    }

    return bStatus;
}
Code Snippet: Validate the Age TextBox
Now we will add the validations for the DateTimePicker controls which collects the Test Date information. We will implement the business rule to allow test appointments to be set up on weekdays only using validation on the form.
private void dateTimePicker1_Validating(object sender, System.ComponentModel.CancelEventArgs e)
{
    ValidateTestDate();
}
private bool ValidateTestDate()
{
    bool bStatus = true;
    if ((dateTimePicker1.Value.DayOfWeek == DayOfWeek.Sunday) ||
        (dateTimePicker1.Value.DayOfWeek == DayOfWeek.Saturday))
    {
        errorProvider1.SetError(dateTimePicker1, "Appointment cannot be scheduled on the weekend. Please select a weekday.");
        bStatus = false;
    }
    else
    {
        errorProvider1.SetError(dateTimePicker1, "");
    }
    return bStatus;
}
Code Snippet: Validate the Date Selection
Invoking the SetError method of the ErrorProvider control displays an error indicator image next to the control specified as the first argument to the SetError method. The string specified in the second argument in the function invocation is displayed as the tooltip when the mouse is moved over the Error indicator.
When the user enters data in the controls that fail validation, a blinking error image is displayed on the form next to the control, and the error message is displayed as a tooltip to the error image.
You can display multiple error indications on a form at the same time using the same ErrorProvider control. You can also display errors that occur in DataSets. You need to set the DataSource, DataMember, and ContainerControl properties of the ErrorProvider control to set the error for a databound control. To display the dataset column error, invoke the SetColumnError method of the ErrorProvider.
You can customize the ErrorProvider control to set the BlinkRate and BlinkStyle. You can also display a custom error image instead of the default image.
Now we will add code in our sample to validate the complete form when the «Create Appointment» button is clicked.
private void ValidateForm()
{
    bool bValidName = ValidateName();
    bool bValidAge = ValidateAge();
    bool bValidTestDate = ValidateTestDate();
    if (bValidName && bValidAge && bValidTestDate)
    {
        MessageBox.Show("Appointment will be created now");
    }
    else
    {
        MessageBox.Show("Please enter valid data");
    }
}
Code Snippet: Validate all form controls when the Create Appointment button is clicked
If the user clicks the Create Appointment button and the data is not valid, error indicators are displayed next to the controls with invalid data.
Validation in Action
Figure 3. Validation Form
Figure 4. Validation Errors
Figure 5. Error message displayed in addition to the form error indicators.
Complete Code Listing: Save as ValidatingForm.cs.
using System;
using System.Drawing;
using System.Collections;
using System.ComponentModel;
using System.Windows.Forms;
using System.Data;
namespace SampleApp
{
    public class Form1 : System.Windows.Forms.Form
    {
        private System.Windows.Forms.Label label1;
        private System.Windows.Forms.TextBox textBox1;
        private System.Windows.Forms.TextBox textBox2;
        private System.Windows.Forms.Label label2;
        private System.Windows.Forms.Label label3;
        private System.Windows.Forms.DateTimePicker dateTimePicker1;
        private System.Windows.Forms.Label label4;
        private System.Windows.Forms.Button button1;
        private System.Windows.Forms.ErrorProvider errorProvider1;
        public Form1()
        {
            this.label1 = new System.Windows.Forms.Label();
            this.textBox1 = new System.Windows.Forms.TextBox();
            this.textBox2 = new System.Windows.Forms.TextBox();
            this.label2 = new System.Windows.Forms.Label();
            this.label3 = new System.Windows.Forms.Label();
            this.dateTimePicker1 = new System.Windows.Forms.DateTimePicker();
            this.label4 = new System.Windows.Forms.Label();
            this.button1 = new System.Windows.Forms.Button();
            this.errorProvider1 = new System.Windows.Forms.ErrorProvider();
            this.SuspendLayout();
            // Label1
            this.label1.Location = new System.Drawing.Point(8, 40);
            this.label1.Name = "label1";
            this.label1.Size = new System.Drawing.Size(80, 16);
            this.label1.TabIndex = 0;
            this.label1.Text = "Name";
            this.label1.Click += new System.EventHandler(this.label1_Click);
            // TextBox1
            this.textBox1.Location = new System.Drawing.Point(96, 40);
            this.textBox1.Name = "textBox1";
            this.textBox1.Size = new System.Drawing.Size(104, 20);
            this.textBox1.TabIndex = 1;
            this.textBox1.Text = "";
            this.textBox1.Validating += new System.ComponentModel.CancelEventHandler(this.textBox1_Validating);
            // Label2
            this.label2.Location = new System.Drawing.Point(8, 64);
            this.label2.Name = "label2";
            this.label2.Size = new System.Drawing.Size(80, 16);
            this.label2.TabIndex = 3;
            this.label2.Text = "Age";
            // TextBox2
            this.textBox2.Location = new System.Drawing.Point(96, 64);
            this.textBox2.Name = "textBox2";
            this.textBox2.Size = new System.Drawing.Size(104, 20);
            this.textBox2.TabIndex = 4;
            this.textBox2.Text = "";
            this.textBox2.Validating += new System.ComponentModel.CancelEventHandler(this.textBox2_Validating);
            // Label3
            this.label3.Location = new System.Drawing.Point(8, 88);
            this.label3.Name = "label3";
            this.label3.Size = new System.Drawing.Size(80, 16);
            this.label3.TabIndex = 5;
            this.label3.Text = "Test Date";
            // DateTimePicker1
            this.dateTimePicker1.Location = new System.Drawing.Point(96, 88);
            this.dateTimePicker1.Name = "dateTimePicker1";
            this.dateTimePicker1.TabIndex = 6;
            this.dateTimePicker1.Validating += new System.ComponentModel.CancelEventHandler(this.dateTimePicker1_Validating);
            // Label4
            this.label4.Font = new System.Drawing.Font("Microsoft Sans Serif", 8.25F, System.Drawing.FontStyle.Bold, System.Drawing.GraphicsUnit.Point, ((System.Byte)(0)));
            this.label4.Location = new System.Drawing.Point(16, 8);
            this.label4.Name = "label4";
            this.label4.Size = new System.Drawing.Size(184, 23);
            this.label4.TabIndex = 7;
            this.label4.Text = "Setup Driving Test Appointment";
            // Button1
            this.button1.Location = new System.Drawing.Point(80, 128);
            this.button1.Name = "button1";
            this.button1.Size = new System.Drawing.Size(120, 23);
            this.button1.TabIndex = 8;
            this.button1.Text = "Create Appointment";
            this.button1.Click += new System.EventHandler(this.button1_Click);
            // ErrorProvider1
            this.errorProvider1.DataMember = null;
            // Form1
            this.AutoScaleBaseSize = new System.Drawing.Size(5, 13);
            this.ClientSize = new System.Drawing.Size(320, 173);
            this.Controls.AddRange(new System.Windows.Forms.Control[] { this.button1, this.label4, this.dateTimePicker1, this.label3, this.label2, this.textBox2, this.textBox1, this.label1 });
            this.Name = "Form1";
            this.Text = "Form1";
            this.Load += new System.EventHandler(this.Form1_Load);
            this.ResumeLayout(false);
        }
        [STAThread]
        static void Main()
        {
            Application.Run(new Form1());
        }
        private void label1_Click(object sender, System.EventArgs e)
        {
        }
        private void Form1_Load(object sender, System.EventArgs e)
        {
            errorProvider1.ContainerControl = this;
        }
        private void textBox1_Validating(object sender, System.ComponentModel.CancelEventArgs e)
        {
            ValidateName();
        }
        private void textBox2_Validating(object sender, System.ComponentModel.CancelEventArgs e)
        {
            ValidateAge();
        }
        private void dateTimePicker1_Validating(object sender, System.ComponentModel.CancelEventArgs e)
        {
            ValidateTestDate();
        }
        private void button1_Click(object sender, System.EventArgs e)
        {
            ValidateForm();
        }
        private void ValidateForm()
        {
            bool bValidName = ValidateName();
            bool bValidAge = ValidateAge();
            bool bValidTestDate = ValidateTestDate();

            if (bValidName && bValidAge && bValidTestDate)
            {
                MessageBox.Show("Appointment will be created now");
            }
            else
            {
                MessageBox.Show("Please enter valid data");
            }
        }
        private bool ValidateName()
        {
            bool bStatus = true;

            if (textBox1.Text == "")
            {
                errorProvider1.SetError(textBox1, "Please enter your Name");
                bStatus = false;
            }
            else
            {
                errorProvider1.SetError(textBox1, "");
            }

            return bStatus;
        }
        private bool ValidateAge()
        {
            bool bStatus = true;
            if (textBox2.Text == "")
            {
                errorProvider1.SetError(textBox2, "Please enter your Age");
                bStatus = false;
            }
            else
            {
                errorProvider1.SetError(textBox2, "");

                try
                {
                    int temp = int.Parse(textBox2.Text);
                    errorProvider1.SetError(textBox2, "");

                    if (temp < 18)
                    {
                        errorProvider1.SetError(textBox2, "You must be at least 18 years old to setup a test");
                        bStatus = false;
                    }
                    else
                    {
                        errorProvider1.SetError(textBox2, "");
                    }
                }
                catch
                {
                    errorProvider1.SetError(textBox2, "Please enter your age as a number");
                    bStatus = false;
                }
            }

            return bStatus;
        }
        private bool ValidateTestDate()
        {
            bool bStatus = true;

            if ((dateTimePicker1.Value.DayOfWeek == DayOfWeek.Sunday) ||
                (dateTimePicker1.Value.DayOfWeek == DayOfWeek.Saturday))
            {
                errorProvider1.SetError(dateTimePicker1, "Appointment cannot be scheduled on the weekend. Please select a weekday");
                bStatus = false;
            }
            else
            {
                errorProvider1.SetError(dateTimePicker1, "");
            }
            return bStatus;
        }
    }
}
Note. This article is purely for demonstration. This article should not be construed as the best practices white paper. This article is entirely original unless specified. Any resemblance to other material is an unintentional coincidence and should not be misconstrued as malicious, slanderous, or anything else hereof.
Conclusion
In this example, we learned how to invoke validate input to Windows Forms controls and display user-friendly informative error messages.
Доброго времени суток, друзья. В этой статье мы посмотрим на то, как работать с элементом ErrorProvider в C#
Элемент ErrorProvider помогает проверять корректность ввода в полях формы и отображать ошибку пользователю приложения, если ввод неверен. К примеру, с помощью ErrorProvider можно проверить текст в каком-нибудь текстовом поле на форме (хотя проверку не обязательно делать именно для текстовых полей — в общем случае вы можете использовать любой элемент, который наследуется от стандартного класса Control).
На панели стандартных элементов он представлен следующим образом:
В этой статье мы рассмотрим пример небольшой программы (приложение для Windows Forms), демонстрирующей возможности элемента ErrorProvider. В конце статьи вы найдете ссылку на архив, содержащий исходные коды полного примера и исполняемый файл приложения.
Наша программа будет содержать одну простую форму для ввода некоторого имени (например, это может быть имя пользователя для отправки каких-то данных). Имя можно будет вводить только кириллицей (латинские буквы, цифры и спецсимволы будут запрещены к вводу), а элемент ErrorProvider будет показывать иконку ошибки и текст сообщения с описанием ошибки рядом с текстовым полем, если пользователь заполнил поле неверно. Также на тестовой форме будут кнопки «Отправить» и «Выход». При нажатии на «Отправить» просто выведем тестовое сообщение, а «Выход» будет отвечать за завершение программы.
Так будет выглядеть наша программа при корректном вводе имени, когда использована кириллица:
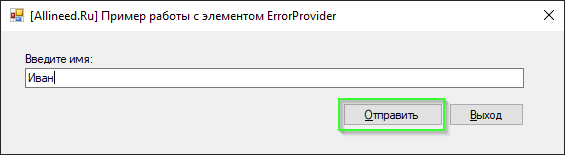
Как видим, кнопка «Отправить» доступна для нажатия и нет никаких иконок и сообщений об ошибках.
А так будет выглядеть форма при вводе имени латинскими буквами:

Заметим, что кнопка «Отправить» недоступна, а рядом с текстовым полем присутствует иконка с ошибкой (она как раз и выводится при помощи элемента ErrorProvider). Кроме этого, если навести курсор мыши на иконку, мы будем видеть сообщение об ошибке:

Итак, разберём по шагам написание нашего тестового приложения.
Создание нового проекта
Создайте новый проект в среде разработки Microsoft Visual Studio для языка C#, а тип проекта выберите «Приложение Windows Forms (.NET Framework)». В качестве имени проекта укажите ErrorProviderSample.
После создания проекта в окне «Обозреватель решений» выделите файл формы Form1.cs и переименуйте его в FrmErrorProviderSample.cs
Должно получиться следующее:
Настройка главной формы и размещение элементов форме
Для главной формы установим следующие значения свойств:
- FormBorderStyle — FixedSingle
- Text — [Allineed.Ru] Пример работы с элементом ErrorProvider
- Size — 579; 162
- StartPosition — CenterScreen
- Name — FrmErrorProviderSample
- MaximizeBox — False
- MinimizeBox — False
Теперь на главную форму приложения из панели элементов поместим следующие элементы:
- 1 элемент Label
- 2 элемента Button
- 1 элемент TextBox
- 1 элемент ErrorProvider
и установим для них следующие свойства:
элемент Label:
- Text — Введите имя:
- Location — 21; 21
- Name — LabelName
1-й элемент Button:
- Text — &Отправить
- Location — 342; 72
- Size — 100; 23
- Name — ButtonSubmit
2-й элемент Button:
- Text — &Выход
- Location — 448; 72
- Size — 75; 23
- Name — ButtonExit
элемент TextBox:
- Location — 24; 37
- Size — 499; 20
- Name — TextBoxName
элемент ErrorProvider:
- Name — ErrorProviderForName
Программирование элементов формы
Дважды кликнем на кнопке «Выход» из представления конструктора формы — сгенерируется метод-обработчик с именем ButtonExit_Click, который будет вызываться при каждом нажатии кнопки «Выход». В него пропишем вызов Application.Exit() для завершения приложения:
        private void ButtonExit_Click(object sender, EventArgs e) {
            Application.Exit();
        }
Аналогичным образом дважды кликнем по кнопке «Отправить» из конструктора формы и пропишем в его обработчик нажатия следующий код:
        private void ButtonSubmit_Click(object sender, EventArgs e) {
            MessageBox.Show("Привет, " + TextBoxName.Text + "! Спасибо за корректный ввод.", "Сообщение", MessageBoxButtons.OK, MessageBoxIcon.Information);
        }
Здесь мы по нажатию на кнопку «Отправить» просто выводим диалоговое окно с сообщением пользователю о том, что его ввод был корректен. В параметрах к методу Show() класса MessageBox передаются — текст сообщения, заголовок диалогового окна, комбинация кнопок на диалоговом окне (только кнопка OK) и иконка, которая в нашем случае будет отражать, что это информационное сообщение (тип иконки — MessageBoxIcon.Information).
Выглядеть это будет примерно так:
Если попробовать запустить приложение на данном этапе, то в текстовое поле можно вводить что угодно, и при нажатии на кнопку «Отправить» этот введённый текст будет отображён в диалоговом окне.
Но мы хотим посмотреть на работу элемента ErrorProvider и его возможности. Приступим к реализации этой части.
Вернёмся в представление конструктора формы и дважды кликнем на текстовом поле — в результате будет сгенерирован метод-обработчик события TextChanged. Это событие вызывается каждый раз, когда каким-либо образом изменяется содержимое текстового поля, т.е. при вводе символов в поле. Мы хотим на этом этапе проверять, что именно введено в поле, и, если ввод содержит что-то недопустимое (латинские буквы, цифры или спецсимволы), то мы задействуем возможности элемента ErrorProvider.
Проверку корректности ввода мы будем делать при помощи регулярных выражений. Это отдельная большая и сложная тема, поэтому в данной статье она не разбирается, лишь в общих чертах будет описано, как работают регулярные выражения.
Чтобы регулярные выражения были доступны в коде нашей формы, в самом верху кода формы пропишем следующий импорт:
using System.Text.RegularExpressions;Это сделает для нас доступными классы, необходимые для работы с регулярными выражениями, в частности Regex и MatchCollection, которые нам понадобятся.
Теперь напишем следующий код в обработчике события TextChanged:
        private void TextBoxName_TextChanged(object sender, EventArgs e) {
            Regex regexMatchAnyCyrillicChar = new Regex(@"(.*[a-zA-Z0-9\W]+.*)|(^[а-я]+.*$)");

            MatchCollection regexMatches = regexMatchAnyCyrillicChar.Matches(TextBoxName.Text);

            if (regexMatches.Count > 0) {
                ErrorProviderForName.SetError(TextBoxName, "Вводите имя в кириллице, с большой буквы. Латинские буквы, цифры и спецсимволы запрещены.");
                ErrorProviderForName.SetIconPadding(TextBoxName, 10);
                TextBoxName.ForeColor = Color.Red;
            } else {
                TextBoxName.ForeColor = SystemColors.WindowText;
                ErrorProviderForName.Clear();
            }
            EnableDisableSubmitButton();
        }
Здесь разберём детально, что именно происходит. Сначала мы создаём объект регулярного выражения:
Regex regexMatchAnyCyrillicChar = new Regex(@"(.*[a-zA-Z0-9\W]+.*)|(^[а-я]+.*$)");Внутри конструктора для класса Regex передаётся строка, которая задаёт шаблон (pattern) для регулярного выражения. Он состоит из группы двух круглых скобок, разделённых вертикальной чертой. Это форма записи обозначает альтернативы — т.е. проверяемая нами строка может соответствовать правилам из первой группы скобок, либо правилам из второй группы. В самих скобках задаются те символы, которые мы в нашем примере считаем запрещёнными для ввода пользователем — запись [a-ZA-Z0-9\W]+ обозначает «один или более символ из тех, что не относятся к символам кириллицы». Слева и справа от диапазона стоят выражения .*, которые обозначают «любое количество любых символов». Во второй группе скобок у нас задано выражение ^[а-я]+.*$ и оно обозначает следующее — «строка обязательно начинается с какой-то маленькой кириллической буквы и далее идут любые другие символы». Это правило нужно, чтобы запретить ввод имени с маленькой буквы.
Следующей строкой идёт:
MatchCollection regexMatches = regexMatchAnyCyrillicChar.Matches(TextBoxName.Text);Она проверяет соответствие введённого текста в текстовом поле при помощи вызова метода Matches() для объекта регулярного выражения и возвращает результат в виде объекта класса MatchCollection. Далее нам остаётся лишь проверить количество совпадений — если оно больше 0, значит ввод ошибочный (поскольку шаблоном регулярного выражения мы задавали правила для недопустимого ввода). И наоборот, если 0 совпадений, то пользователь ввёл кириллические буквы, причём имя начинается с большой буквы, как мы и хотим.
Теперь самое интересное — работа с элементом ErrorProvider. В следующих строках мы устанавливаем ошибку для текстового поля при помощи вызова метода SetError(), а также устанавливаем отступ (padding) для иконки — от правого края текстового поля и устанавливаем цвет шрифта для поля в красный (для индикации ошибочного ввода):
                ErrorProviderForName.SetError(TextBoxName, "Вводите имя в кириллице, с большой буквы. Латинские буквы, цифры и спецсимволы запрещены.");
                ErrorProviderForName.SetIconPadding(TextBoxName, 10);
                TextBoxName.ForeColor = Color.Red;
В случае же, когда ошибки нет, мы сбрасываем цвет шрифта на системный — SystemColors.WindowText и очищаем наш экземпляр ErrorProvider при помощи метода Clear():
                TextBoxName.ForeColor = SystemColors.WindowText;
                ErrorProviderForName.Clear();
Очистка приведёт к сокрытию иконки с ошибкой справа от текстового поля, это значит, что ввод корректен.
Последней строкой идёт вызов ещё несуществующего метода EnableDisableSubmitButton(), он у нас ещё не написан, и давайте добавим его к форме. Он будет регулировать доступность кнопки «Отправить», в зависимости от наличия/отсутствия ошибки при вводе:
        private void EnableDisableSubmitButton() {
            string currentError = ErrorProviderForName.GetError(TextBoxName);
            ButtonSubmit.Enabled = currentError.Length == 0 && TextBoxName.TextLength > 0;
        }
Он использует вызов GetError() для элемента ErrorProvider, передавая ему экземпляр текстового поля — для того, чтобы получить текст текущей ошибки в строковую переменную currentError. С её помощью мы проверим — надо ли блокировать кнопку «Отправить», ведь когда ошибка есть, т.е. длина строки больше нуля, кнопка должна быть заблокирована. Также признаком блокировки кнопки является отсутствие какого-либо текста в текстовом поле, что мы и проверяем при помощи TextBoxName.TextLength > 0.
Последнее, что нам осталось сделать — дважды кликнуть на форме из представления конструктора формы, чтобы сгенерировался обработчик загрузки формы. В нём мы добавляем единственную строку, сразу регулируя доступность кнопки, как только форма загружается при старте программы:
        private void FrmErrorProviderSample_Load(object sender, EventArgs e) {
            EnableDisableSubmitButton();
        }
Наше приложение готово! Можете запустить и попробовать его в действии. При запуске программы видно, что элемент ErrorProvider успешно выполняет свою задачу и отображает иконку с ошибкой напротив текстового поля, а также убирает иконку, когда ввод в поле верный.
Напоследок отмечу два интересных и полезных свойства элемента ErrorProvider — это BlinkRate и BlinkStyle:
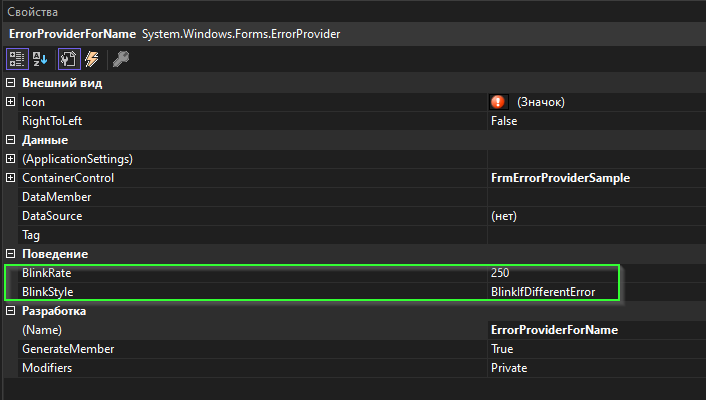
Они регулируют частоту мерцания иконки и тип мерцания. Если вы не хотите, чтобы иконка с ошибкой напротив текстового поля вообще мерцала — установите для BlinkStyle значение NeverBlink и посмотрите на результат, запустив приложение.
Вы также можете поменять свойство Icon для элемента ErrorProvider, указав путь к своей иконке для индикации ошибки.
На этом всё, спасибо за внимание. Пробуйте и делитесь отзывами в комментариях под статьёй. Архив с готовым примером доступен по ссылке.
- Posted:
04 Jun 2023 - Updated:
27 Sep 2024 - Author:
-
- Views:
7750
- Views:
- C#.Net
- VB.Net
- Windows Forms
- ErrorProvider
Download Code

In this article I will explain with an example, how to use
ErrorProvider
control in Windows Forms (WinForms) Application using C# and VB.Net.
What is ErrorProvider?
The
ErrorProvider
control is used to display an alert (an icon with message) to the user, when controls on the Form has error associated with it.
When the mouse hovers over the icon, a
ToolTip
appears showing the Error Message only if an error description string (message) is specified for the control.
The
ErrorProvider
control is present in the
Components
Tab of the Visual Studio
ToolBox
as shown below.
The
ErrorProvider
control has many properties, some of them are as following.
1.
Icon
— Gets or sets the Icon which will be displayed next to a control.
2.
BlinkRate
— Gets or sets the rate at which the error icon flashes. It is measured in milliseconds.
The
ErrorProvider
has following methods.
1.
SetError
— Sets the error description string for the specified control. The message will be displayed
Tooltip
.
2.
Clear
— Clears all settings associated with this component.
Note: For more details about
ErrorProvider
, please refer MSDN.
Form Design
The Form consists of following controls:
– For labelling TextBox.
Implementing ErrorProvider control
– For capturing user input.
The TextBox has been assigned with the
Validating
event handler.
– For submitting the Form.
– For displaying Error Message with icon.
Namespaces
You will need to import the following namespaces
C#
using System.ComponentModel;
VB.Net
Imports System.ComponentModel
Validating TextBox in C# and VB.Net
When the Button is clicked, the
Validating
event handler of
TextBox
is executed.
Validating
Inside this event handler, a check is performed whether the
TextBox
is empty or not.
If found empty or NULL, then
Error Provider
message is set to empty else the Error Message is displayed with icon.
C#
private void txtName_Validating(object sender, CancelEventArgs e)
{
if (!string.IsNullOrEmpty(txtName.Text.Trim()))
{
epName.SetError(txtName, string.Empty);
}
else
{
epName.SetError(txtName, «Name is required.»);
}
}
VB.Net
Private Sub txtName_Validating(sender As Object, e As CancelEventArgs) Handles txtName.Validating
If Not String.IsNullOrEmpty(txtName.Text.Trim) Then
epName.SetError(txtName, String.Empty)
Else
epName.SetError(txtName, «Name is required.»)
End If
End Sub
Screenshot
Downloads
I agree, get more examples here: https://www.e-iceblue.com/Introduce/free-products.html
Wednesday, March 12, 2014
The ErrorProvider alerts the user that something is wrong.
In this example I will use a Display Warning icon, Wrong icon (when an incorrect expression is entered ) or a Tick icon depending upon the data entered in the text box so that the user can determine that data entered is correct or incorrect.
Let’s Begin as in the following:
1. Create a new Windows Forms Application.
2. Place two text boxes (for getting name and age) and three ErrorProvider controls from the toolbox.

Set text boxes are named txt_name and txt_age. I have also created a button but there is no use for it (in the example).

3. Set the Icon for errorprovider1 (warning), errorprovider2 (wrong or cross) and errorprovider3 as a tick mark (for a correct entry). I will use the warning errorprovider when the user leaves a text box blank, use a cross or wrong when the user enters incorrect informat (for the Age text box) and a tick icon for when all conditions are satisfied.
4.In addition to defaults imports, I am adding Regular Expression library support for the txt_age text box as in the following:
using System.Text.RegularExpressions;
5. Now we need to create validating events for both text boxes. Right-click on the TextBox then click on «Properties».then click on the lightening bolt (Events) icon at the top of the window, then double-click on validating event.
6. Enter these codes between the generated codes.
void Txt_nameValidating(object sender, System.ComponentModel.CancelEventArgs e)
{
if(txt_name.Text==string.Empty)
{
errorProvider1.SetError(txt_name,«Please Enter Name»);
errorProvider2.SetError(txt_name,«»);
errorProvider3.SetError(txt_name,«»);
}
else
{
errorProvider1.SetError(txt_name,«»);
errorProvider2.SetError(txt_name,«»);
errorProvider3.SetError(txt_name,«Correct»);
}
}
void Txt_ageValidating(object sender, System.ComponentModel.CancelEventArgs e)
{
if(txt_age.Text==string.Empty)
{
errorProvider1.SetError(txt_age,«Please provide age»);
errorProvider2.SetError(txt_age,«»);
errorProvider3.SetError(txt_age,«»);
}
else
{
Regex numberchk=new Regex(@»^([0-9]*|\d*)$»);
if(numberchk.IsMatch(txt_age.Text))
{
errorProvider1.SetError(txt_age,«»);
errorProvider2.SetError(txt_age,«»);
errorProvider3.SetError(txt_age,«Correct»);
}
else
{
errorProvider1.SetError(txt_age,«»);
errorProvider2.SetError(txt_age,«Wrong format»);
errorProvider3.SetError(txt_age,«»);
}
}
}
In the «txt_nameValidating()» event, if txt_name is left empty then it shows error. This is done using the «setError()» method. The setError method sets the error description string for the specified control. If the user hovers the mouse over the error icon then it shows an error description string that we have declared in the setError() method.
7. Build and run the code.
Preview:
You can also download the source code of this example.
(Download Source Code)
Hope you like it.
Thanks.