
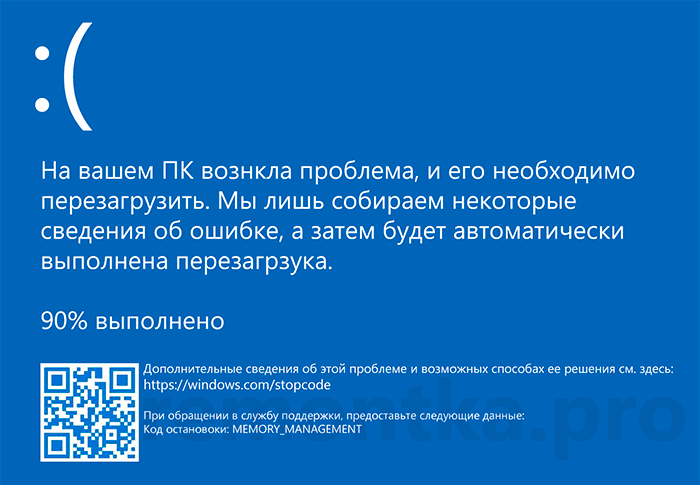
Синий экран MEMORY_MANAGEMENT в Windows 10 — распространенная, и, одновременно, часто сложная в диагностике проблема, однако, выяснить её причины и устранить обычно оказывается возможным.
В этой инструкции подробно о возможных методах исправить ошибку MEMORY MANAGEMENT в Windows 10 и о том, чем она может быть вызвана.
- Простые способы исправить ошибку MEMORY MANAGEMENT
- Синий экран MEMORY MANAGEMENT — поиск причины и исправление
- Что делать, если ошибка возникает до загрузки Windows 10
Простые способы исправить ошибку MEMORY MANAGEMENT
В связи со сложностью определения причин синего экрана MEMORY MANAGEMENT начинающими пользователями, рекомендую начать с простых подходов, которые, возможно, смогут достичь решения проблемы, не прибегая к более сложным манипуляциям.
Эти методы подойдут в случае, если Windows 10 запускается и какое-то время работает, а синий экран появляется позже:
- Если ошибка возникла после недавних обновлений системы или драйверов, возможно, использования каких-либо программ для оптимизации и ускорения Windows 10, попробуйте использовать точки восстановления системы (Панель управления — Запуск восстановления системы).
- Если точек восстановления нет, а вы обновляли какие-то драйверы, попробуйте зайти в диспетчер устройств (правый клик по кнопке «Пуск» — «Диспетчер устройств»), выбрать устройство, драйвер которого обновлялся, открыть его свойства и на вкладке «Драйвер» проверить доступность кнопки «Откатить».
- Если вы точно знаете, после установки какой программы появилась проблема, а программа работает в фоновом режиме (автоматически загружаясь с системой), возможно, стоит удалить эту программу или убрать её из автозагрузки Windows 10.
- Если устанавливались какие-либо сторонние антивирусы, они могут быть причиной ошибки. Проверьте, будет ли она проявлять себя, если отключить или удалить этот антивирус.
- Если синий экран MEMORY MANAGEMENT стал появляться сразу после чистой установки Windows 10 на компьютер или ноутбук, возможно, причина в том, что те драйверы, которые установила сама система не вполне подходят. Вручную скачайте и установите официальные драйверы с сайта производителя ноутбук или материнской платы (если это ПК) — включая драйверы чипсета и другие драйверы.
- Если вы включали какие-то опции ускорения памяти, процессора, видеокарты в БИОС/UEFI или с помощью сторонних программ, попробуйте отключить их.
- Если ошибка MEMORY_MANAGEMENT появляется только при запуске определенной игры или программы, проблема может быть именно в этой программе или, если игра или программа платная, а вы её не совсем купили, то в антивирусе (попробовать запуск при отключенном антивирусе, в том числе встроенном Защитнике Windows).
К сожалению, не всегда указанные простые подходы к решению проблемы оказываются результативными. В этом случае переходим к более сложным вариантам определения причин проблемы и исправления ошибки.
Синий экран MEMORY_MANAGEMENT — ищем причину и исправляем ошибку
Следующие этапы могут помочь разобраться в том, что именно вызывает появление рассматриваемого синего экрана. Опять же, предполагается, что вы можете зайти в Windows 10 и работать в ней. Если же синий экран MEMORY MANAGEMENT появляется до загрузки системы — об этом в последнем разделе инструкции.
Чистая загрузка Windows 10
В качестве первого шага следует попробовать выполнить чистую загрузку Windows 10 без сторонних служб и программ в автозагрузке — это позволит выяснить, не являются ли какие-либо сторонние программы причиной ошибки. Для того, чтобы сделать это, выполните следующие шаги:
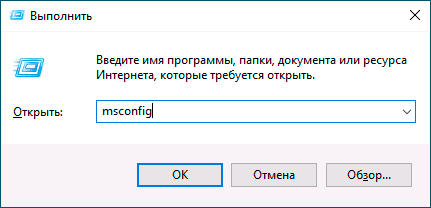
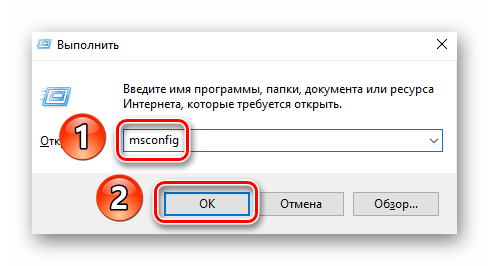
- Нажмите клавиши Win+R на клавиатуре, введите msconfig в окно «Выполнить» и нажмите Enter.

- На вкладке «Общие» отметьте пункт «Выборочный запуск» и снимите отметку «Загружать элементы автозагрузки».
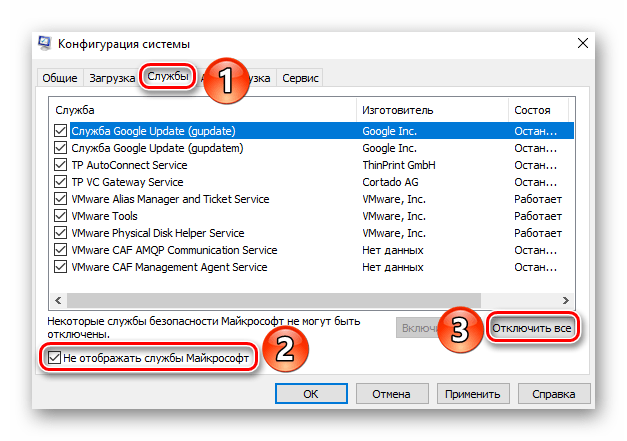
- Перейдите на вкладку «Службы», отметьте «Не отображать службы Майкрософт», а затем нажмите «Отключить все».

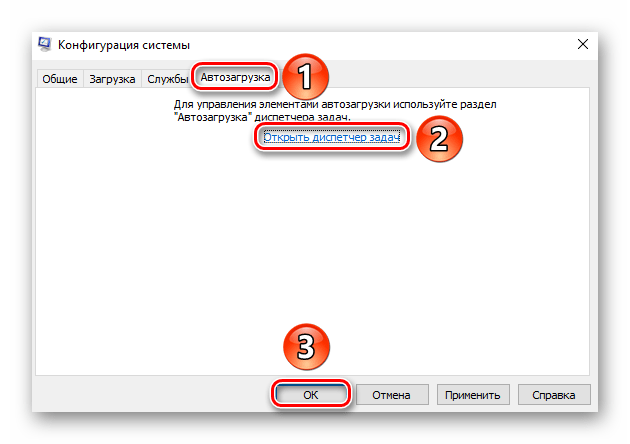
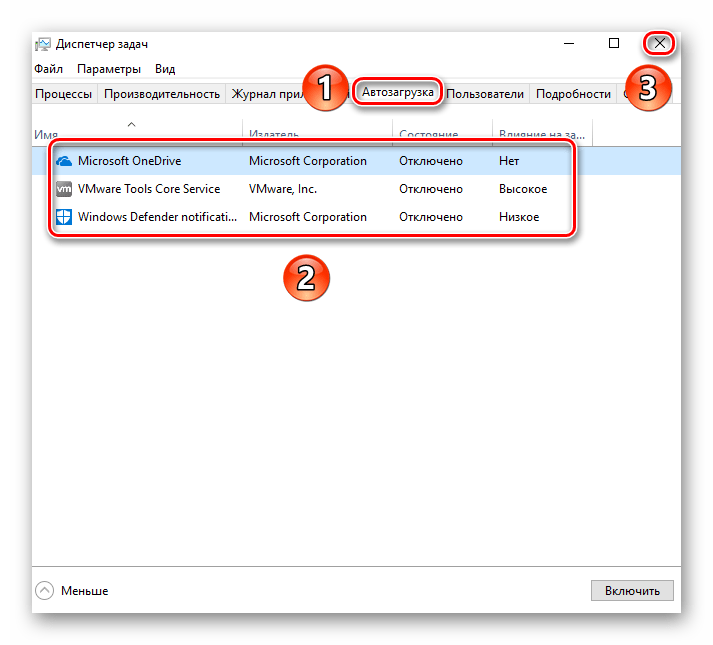
- Желательно также зайти на вкладку «Автозагрузка» перейти в параметры автозагрузки диспетчера задач и там отключить все пункты (даже нужные).
- Примените настройки и перезагрузите компьютер.

Если после перезагрузки ошибка MEMORY_MANAGEMENT больше не появляется, по-видимому, причина в одной из программ в автозагрузке или какой-то сторонней службе. Можно попробовать включать элементы по одному или несколько, пока снова не появится проблема, чтобы выяснить, что именно её вызвало и после этого принимать решения о возможном удалении этого стороннего ПО или других действиях.
Проверка драйверов
Синий экран MEMORY MANAGEMENT часто может быть вызван проблемой с драйверами. Для того, чтобы выявить сбойный драйвер оборудования, можно использовать встроенную утилиту для проверки драйверов:
- Перезагрузите компьютер в безопасном режиме. Самый простой метод сделать это — нажать клавиши Win+R на клавиатуре, ввести msconfig и нажать Enter, отметить «Безопасный режим» на вкладке «Загрузка», применить настройки и перезагрузить компьютер.
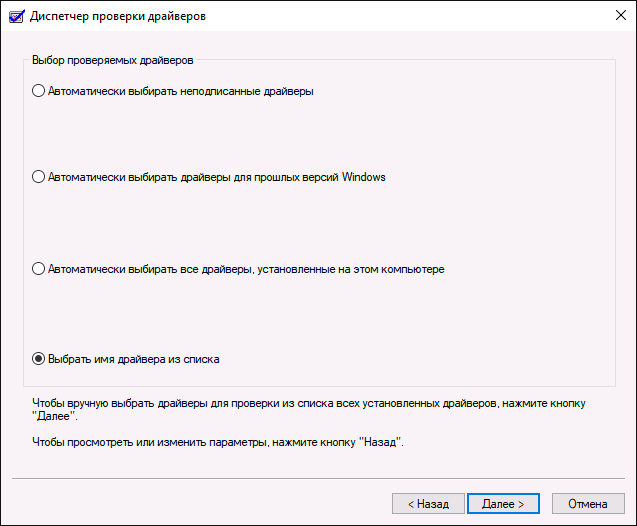
- В безопасном режиме нажмите клавиши Win+R и введите verifier для запуска диспетчера проверки драйверов.
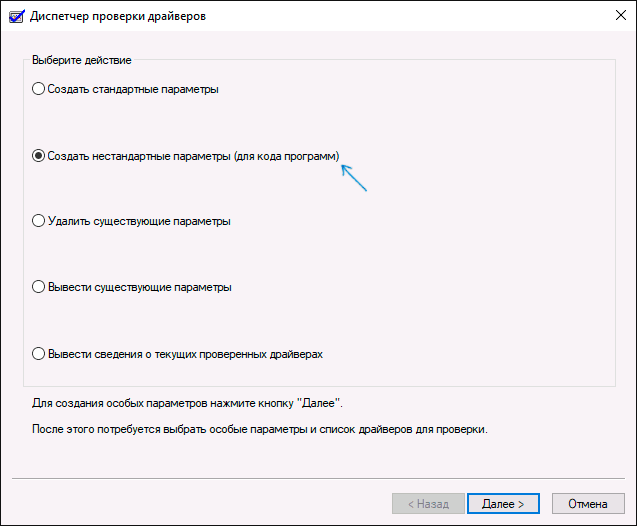
- На первом экране выберите «Создать нестандартные параметры (для кода программ)».

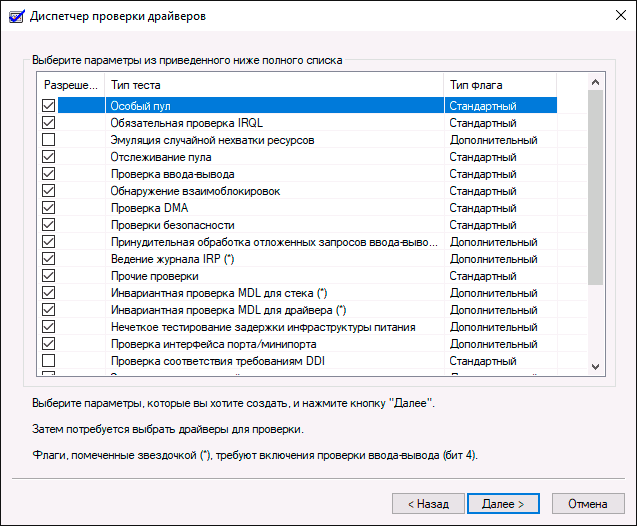
- Далее отметьте все пункты, кроме «Эмуляция случайной нехватки ресурсов» и двух пунктов, связанных с проверкой соответствия требованиям DDI.
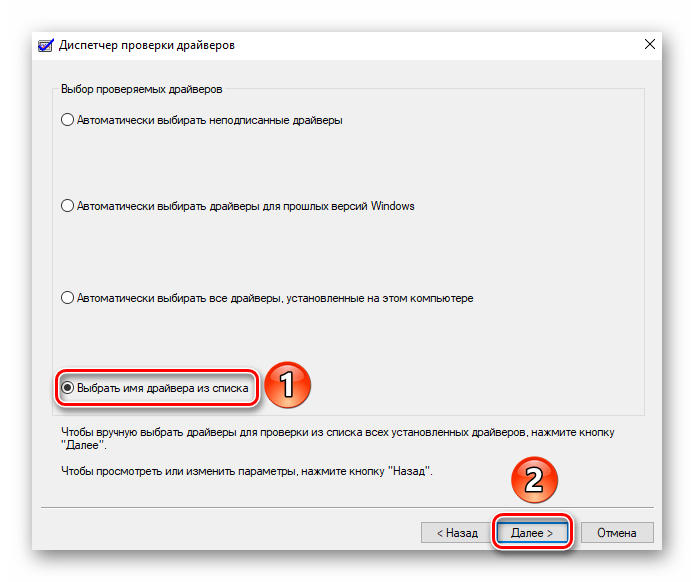
- Выберите пункт «Выбрать имя драйвера из списка».
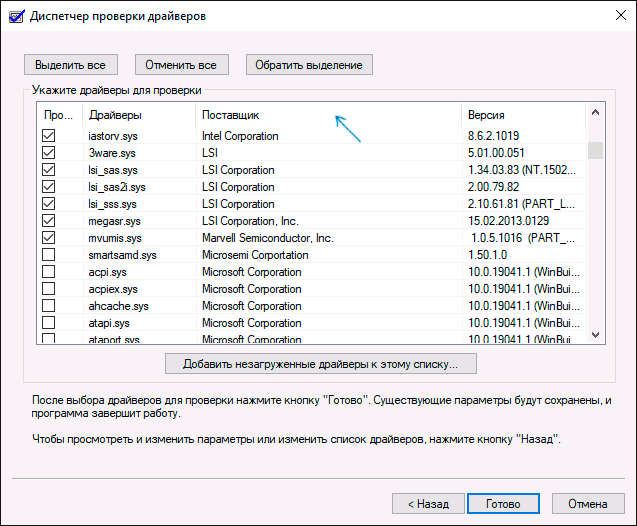
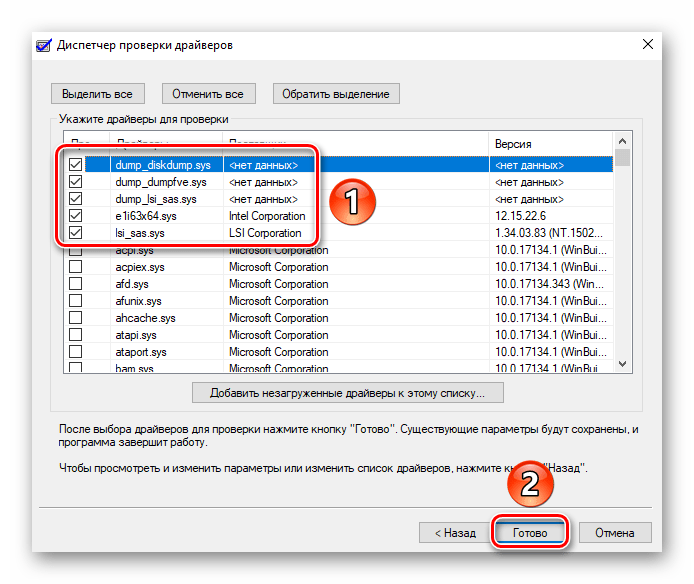
- Отсортируйте драйверы по колонке «Поставщик» (нажав на заголовок столбца) и отметьте все драйверы, кроме предоставленных Microsoft. Нажмите кнопку «Готово».
- Если вы запускали безопасный режим с помощью msconfig, снова зайдите (как на первом шаге) и отключите загрузку в безопасном режиме.
- Перезагрузите компьютер.
После этого возможны следующие варианты развития событий:
- Система загрузится, некоторое время проработает, а затем появится синий экран с прежней ошибкой MEMORY_MANAGEMENT или новой, наподобие DRIVER_VERIFIED_DETECTED_VIOLATION с указанием имени файла .sys (если имя файла указано — запомните или запишите его, это и есть сбойный драйвер).
- Система покажет синий экран еще до загрузки системы.
В первом случае перезагрузите компьютер и отключите проверку драйверов, для этого запустите командную строку от имени администратора и введите команду verifier /reset
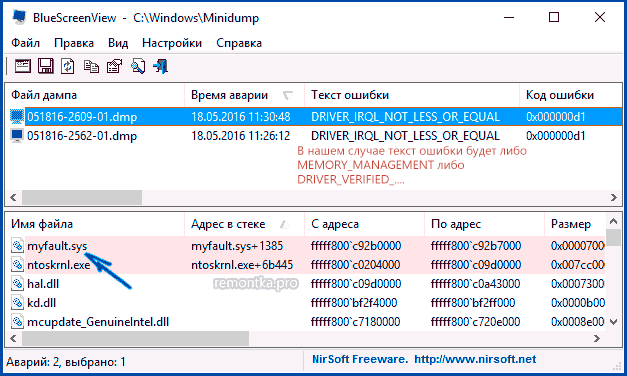
После этого, если на синем экране отображалось имя сбойного драйвера, найдите в Интернете, что это за драйвер — по всей видимости, проблема именно в нем. Если имя драйвера не отображалось, попробуйте использовать бесплатную утилиту BlueScreenView и в ней посмотреть, какой именно файл вызвал последний сбой (на скриншоте пример для другого синего экрана). Утилита доступна на официальном сайте https://www.nirsoft.net/utils/blue_screen_view.html
Если система не запускается, то после двух сбоев загрузки вы получите возможность открыть дополнительные параметры и инструменты восстановления и там, запустив командную строку, отключить проверку драйверов с помощью команды verifier /reset а затем перезагрузить компьютер. Далее, можно использовать действия из предыдущего абзаца.
После выявления вызывающего неполадки драйвера вы можете предпринять действия по его обновлению (в идеале — путем скачивания вручную с официального сайта производителя оборудования) или откату на предыдущую версию.
Проверка оперативной памяти и целостности системных файлов, ошибок диска
Иногда ошибка может быть вызвана проблемами с оперативной памятью. Если у вас есть подозрения на то, что дело в этом, то для начала рекомендую отключить любые ускорения RAM, если раньше вы их применяли, а затем попробовать выполнить проверку оперативной памяти на ошибки.
Еще пара рекомендаций — выполнить проверку целостности системных файлов Windows 10 и проверку жесткого диска на ошибки.
Исправление ошибки, если система не запускается

В случае, если сообщение об ошибке MEMORY MANAGEMENT появляется еще до загрузки системы, то после двух неудачных загрузок вы должны получить доступ в дополнительные параметры восстановления в разделе «Поиск и устранение неисправностей», где вы можете:
- Попробовать загрузку в безопасном режиме (пункт «Параметры загрузки»).
- Выполнить восстановление из точек восстановления (пункт «Восстановление системы»).
- Удалить последние установленные обновления Windows
И в крайнем случае, можно прибегнуть к сбросу системы в исходное состояние.
The Memory Management BSOD (Blue Screen of Death) error is a common issue on Windows 10 and 11, indicating a problem with the system’s memory management. This error can occur due to faulty hardware, corrupted system files, or outdated drivers, leading to system crashes and instability. If you’re facing this blue screen error, it’s important to troubleshoot and resolve it to prevent further system crashes.
In this guide, we’ll walk you through how to fix the Memory Management BSOD error on Windows 10/11 using several troubleshooting methods.
Methods to Fix Memory Management BSOD Error on Windows 10/11?
The computer’s operating system experiences a memory management error message because of a memory management issue. This error typically arises when the system memory becomes corrupt or the drivers managing it are outdated.
Here, we’ll see some easy methods to troubleshoot the memory management BSOD error on Windows 10/11.
Method 1: Disconnect External Devices & Restart Your PC
Whenever you see a blue screen, unplug all external devices such as USB drivers, printers, or external storage devices. This helps find if they’re causing the problem.
Then Restart Your Computer to see if the error goes away, restarting your computer is crucial. This basic step resolves glitches, and conflicts in software causing the error Blue Screen of Death (BSOD).
Step 1: Close all active windows and open windows on your desktop.
Step 2: Simultaneously press Alt and F4.
Step 3: A popup window titled «Shut Down Windows» will appear, offering several options. From the dropdown menu, select «Restart«
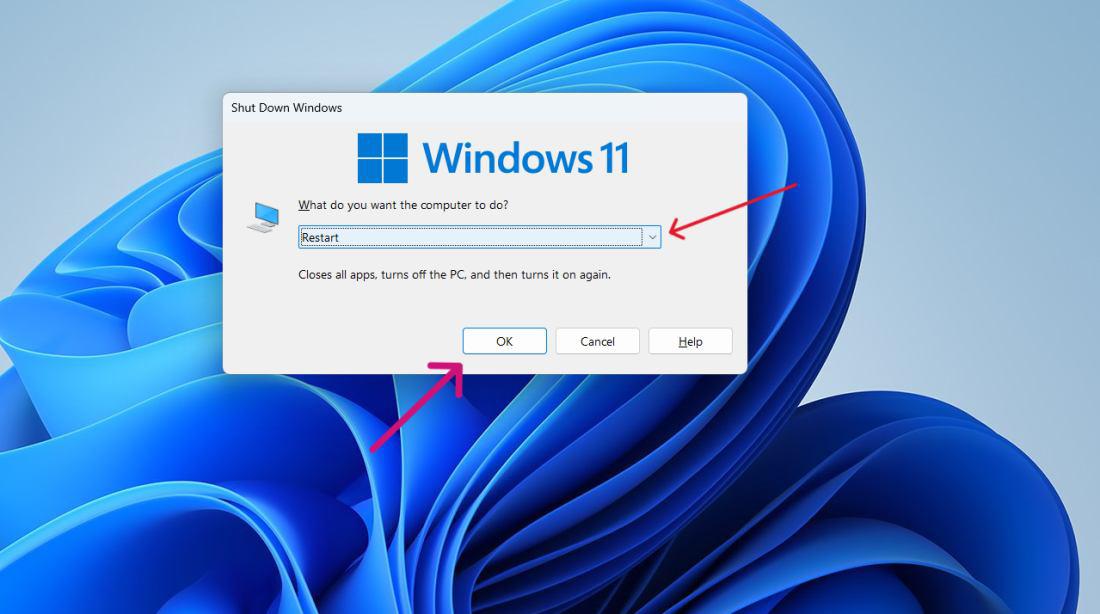
Step 4: Choose OK to confirm your choice
Method 2: Update Windows Computer
To ensure smooth operation, regularly update your Windows operating system. Updates provide essential patches for security vulnerabilities and bug fixes that may resolve the Memory Management BSOD Error.
Step 1: Press the Windows key + I to open the settings application
Step 2: Then on the left side bar click on the «Windows Update«
Step 3: Click on “Check for updates”. then download and update if any are available

Step 4: Restart Your computer
Method 3: Quick scan your PC using Windows Security
Windows Security safeguards your device from harmful software threats, like viruses, malware, and spyware. It monitors emails, apps, the cloud, and the web. A quick scan detects and removes these threats swiftly and effectively.
Step 1: Open the settings app by pressing Windows Key + I
Step 2: Then, Go to Privacy & Security > Windows Security.
Step 3: Click on “Open Windows Security«
Step 4: Click “Virus & Threat Protection”.
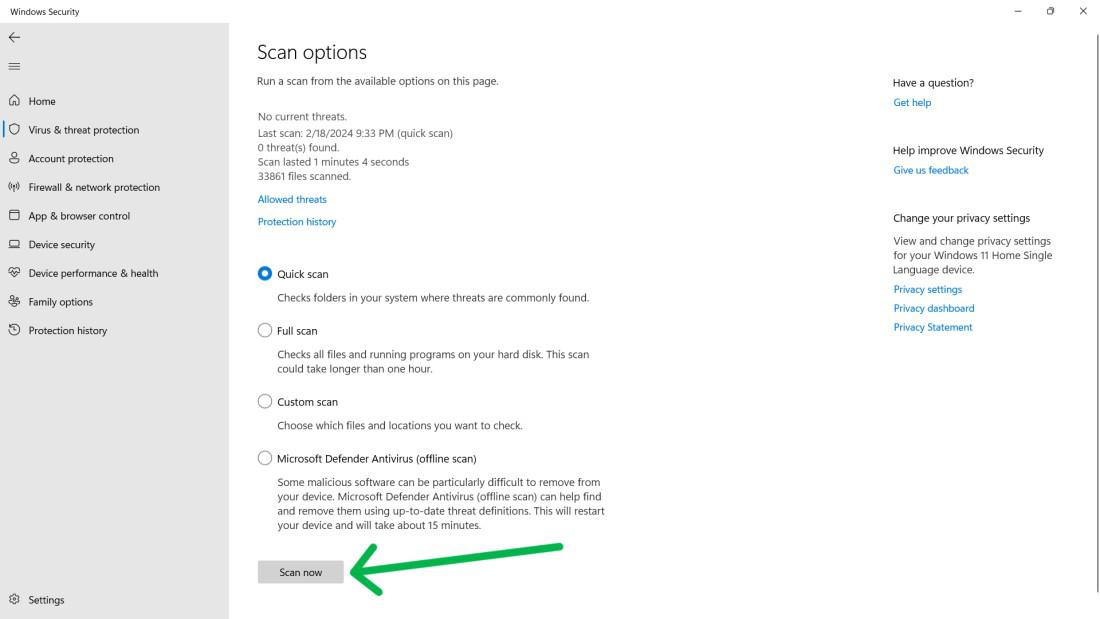
Step 5: Then Click on “Scan Options«
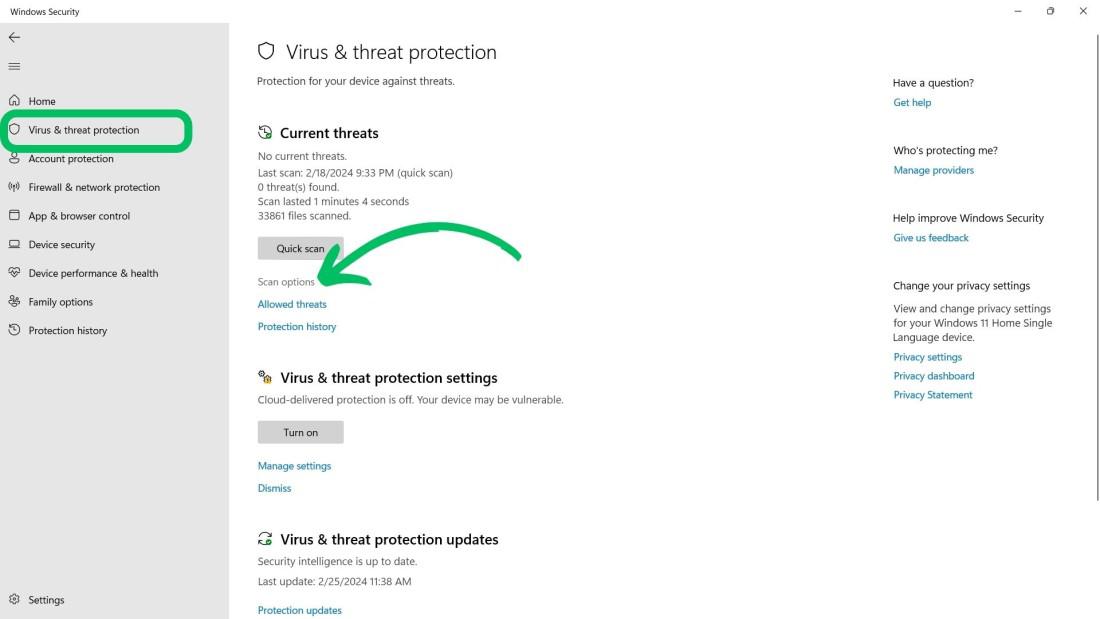
Step 6: Click on “Scan Now” after selecting “Full Scan«
Method 4: Update GPU Driver
The GPU driver handles communication between the computer’s graphics hardware and OS. An outdated driver can create problems like the MEMORY MANAGEMENT error.
Step 1: Press Windows Key + S to open the search bar on the search bar type «dxdiag» and then open it
Step 2: Then navigate «Display» tab
Step 3: Your system GPU details will show here

Step 4: Visit your GPU manufacturer’s website, download the latest driver, install it on your PC, and then reboot your system.
Method 5: Run a disk check
Check the disk to spot faults on your computer. These errors may cause «MEMORY MANAGEMENT» issues. Perform a full disk check. Fix the problems found.
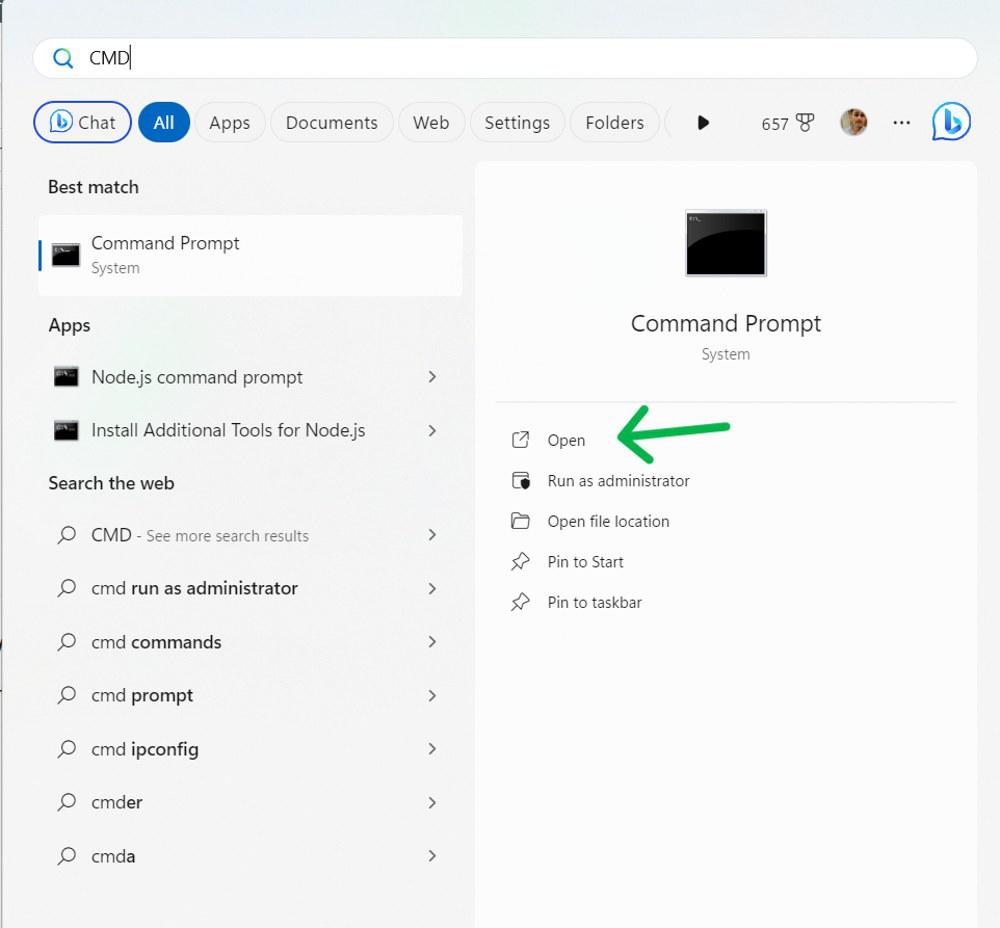
Step 1: Press Windows Key + S to open the search bar then on the search bar type «CMD» and run as administrator.
Step 2: Then, In CMD type this command and press enter button
chkdsk /f /r

Step 3: Then press Y.
Step 4: Close the CMD
Method 6: Run Windows memory diagnostic test
Run the Memory Diagnostic to scan your computer’s memory. That process checks for errors that may indicate faulty RAM. This is especially useful if you think your RAM may be faulty.
Step 1: Press Windows Key + R then on run dialog type «mdsched.exe» and hit Enter
Step 2: From pop up menu select «Restart now and check for problems (recommended) «

Step 3: During the test, you’ll see the progress and passes displayed on the screen.
Method 7: Repair system files
The System File Checker tool fixes corrupt or missing system files. These files could cause the MEMORY MANAGEMENT BSOD error. So, run the checker to repair them.
Step 1: Press Windows Key + S to open the search bar then on the search bar type «CMD» and run as administrator
Step 2: Then, In CMD type the following commands one by one
DISM /online /cleanup-image /restorehealth
sfc /scannow
-Tool.jpg)
Method 8: Reset Windows 11
Step 1: Press Win + I to open settings and start the reset process.
Step 2: From the right-hand menu, select «System,» followed by «Recovery«.
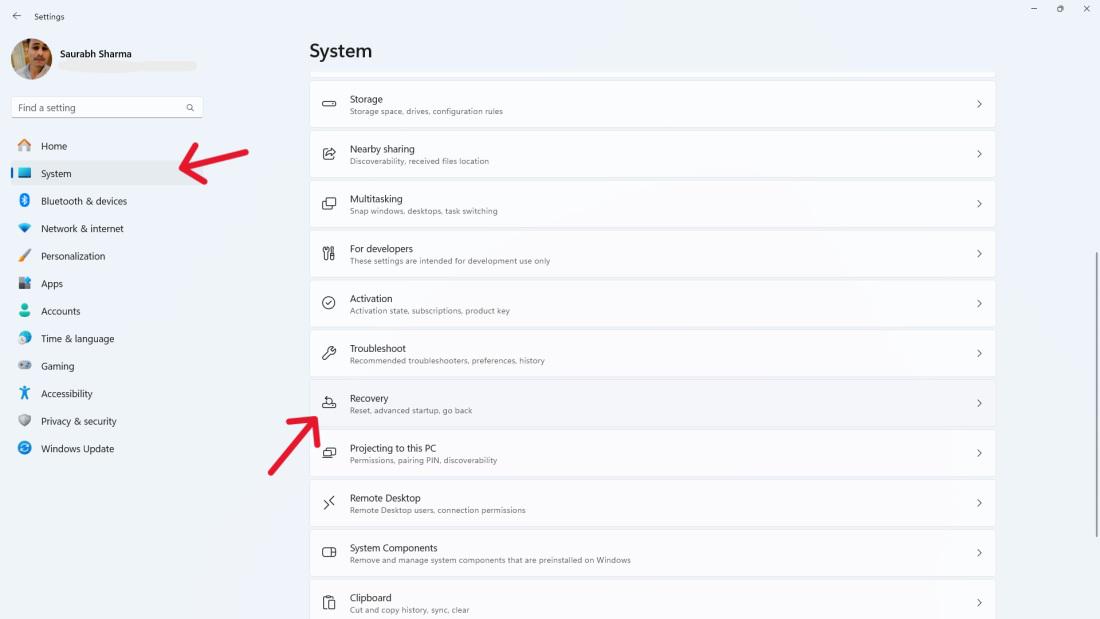
Step 3: Click on “Reset PC«
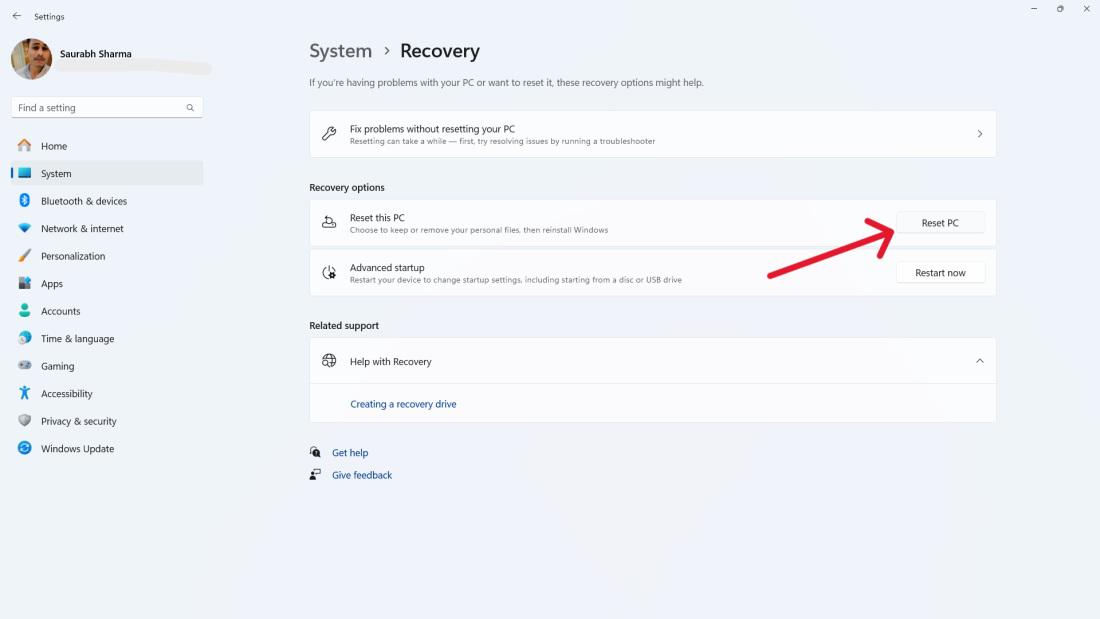
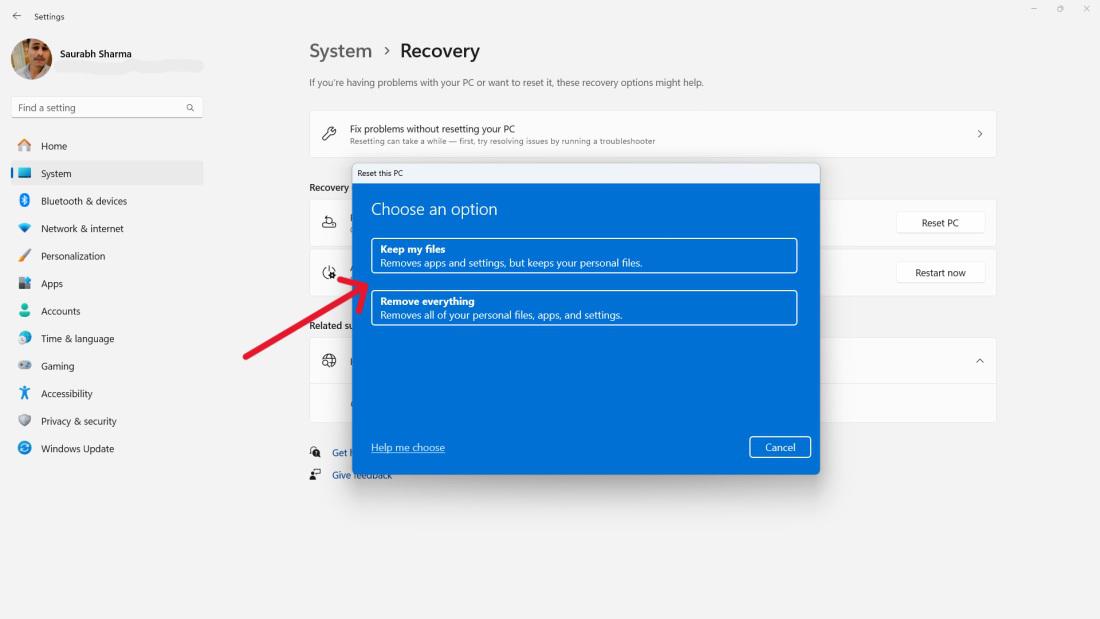
Step 4: Within the «Reset this PC» window, select:
Keep My Files: Deletes apps and settings but keeps personal files.
Remove everything. Deletes apps, settings, and personal files. Use it for selling or giving away your device.
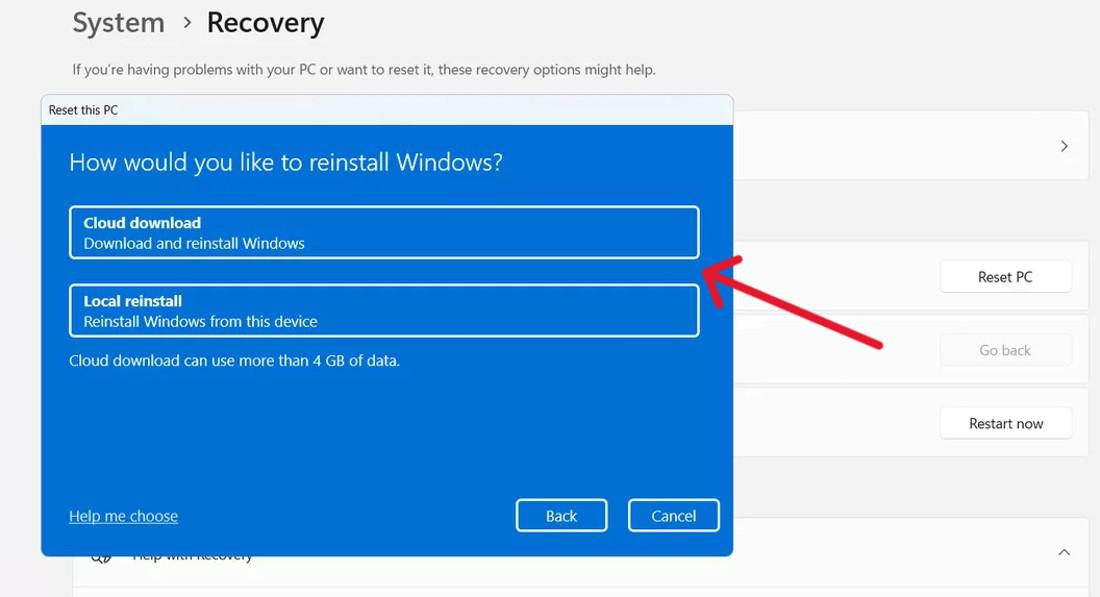
Step 5: At the «How Would You Like to Reinstall Windows» screen:
Cloud Downloads: This option allows you to reinstall from the cloud.
Local Reinstall: Select this option to perform a local reinstallation of Windows 11.
Method 9: Scan for Virus or Malware Infection
Viruses or malware can cause Windows crashes and blue screens. Run a full system scan using Windows Security or another antivirus to remove harmful programs. Follow these steps to perform scan for virus & malware.
Step 1: Open Windows Security App on your PC.

Step 2: Click On Virus & threat Protection

Step 3: Click on Scan Options to select type on scan.

Step 4: Choose Full scan from the available options and click Scan Now button at the bottom. It start full scan and resolve any potential threat.
Malware threats can cause various system issues such as memory management error. By performing Scan for Virus or Malware Infection, we can resolve the Memory Management BSOD Error .
Also, check if your computer is overheating, as this can cause problems too.
Reasons for Memory Management BSOD Error on Windows 10 and 11
The «Memory Management» Blue Screen of Death (BSOD) error on Windows 10 and 11 can occur due to a variety of hardware and software issues, each capable of destabilizing your PC and triggering that infamous blue screen. Understanding the reasons behind this error is the first step to fixing it. Here are the primary reasons
- Faulty Physical Memory (RAM): Defective or failing RAM modules can cause memory management issues. If your RAM has hardware defects—due to age, overheating, or manufacturing flaws—Windows may struggle to read or write data properly, leading to a crash.
- Outdated or Incompatible Device Drivers: Drivers act as bridges between your hardware and Windows. When they’re outdated, buggy, or incompatible with Windows 10 or 11, they can mismanage memory resources, resulting in the BSOD error.
- Corrupted System Files: Essential Windows files can become corrupted due to malware, improper shutdowns, or disk errors. When these files—responsible for memory management—are damaged, the system may fail to allocate memory correctly, triggering the error.
- Software Conflicts: Running incompatible or poorly coded applications (e.g., overzealous antivirus software or memory-intensive programs) can interfere with Windows’ memory management processes, causing instability.
- Overclocking or Hardware Overheating: Pushing your RAM, CPU, or GPU beyond their default speeds (overclocking) without proper cooling can lead to memory errors. Overheating hardware may also corrupt memory operations, prompting the BSOD.
- Disk Errors or Bad Sectors: A failing hard drive or SSD with bad sectors can disrupt how memory is swapped between RAM and virtual memory (paging file), contributing to the error.
- Recent Windows Updates or Bugs: Occasionally, a flawed Windows update or an unresolved bug in Windows 10 or 11 can introduce memory management glitches, especially if the update conflicts with existing drivers or hardware.
How to Avoid Memory Management BSOD Error on Windows 10 and 11
Prevention is better than cure so if you don’t want a memory management BSOD error on Windows, then you can follow the below tips.
- Keep Drivers Updated: Regularly update your device drivers (especially for graphics, chipset, and storage) via Device Manager, manufacturer websites (e.g., NVIDIA, Intel), or tools like Windows Update to ensure compatibility and proper memory handling.
- Maintain Healthy RAM: Test your RAM periodically using Windows Memory Diagnostic (type «mdsched» in Run) to catch hardware issues early. Replace faulty modules and avoid overclocking unless you’re confident in your cooling setup.
- Run System File Checks: Use the System File Checker (SFC) and DISM tools (sfc /scannow and DISM /Online /Cleanup-Image /RestoreHealth in Command Prompt) monthly to repair corrupted system files that could destabilize memory management.
- Avoid Software Conflicts: Install only trusted, compatible applications, and keep antivirus software updated but configured to avoid aggressive memory scans that might interfere with Windows processes.
- Monitor Hardware Health: Use tools like HWMonitor to check for overheating (CPU, GPU, RAM) and ensure proper ventilation. Clean dust from your PC and replace thermal paste if needed to prevent heat-related memory errors.
- Manage Windows Updates: Install Windows updates promptly to patch known bugs, but check forums (e.g., Microsoft Community) for reports of update-related issues before applying them. Roll back problematic updates via Settings > Update & Security > Recovery if needed.
- Optimize Virtual Memory: Let Windows manage your paging file (Settings > System > About > Advanced system settings > Performance > Virtual Memory) to ensure sufficient memory allocation without manual tweaks that could backfire.
- Maintain Disk Integrity: Run chkdsk /f /r in Command Prompt periodically to fix bad sectors on your drive, preventing memory swap issues between RAM and storage.
Conclusion
By following these troubleshooting steps, you can effectively fix the Memory Management BSOD error and restore system stability on your Windows 10 or 11 device. Whether the issue is caused by faulty RAM, outdated drivers, or corrupted system files, resolving this error will help prevent further crashes and ensure your system runs smoothly.
Also Read
- Fix ‘Page Fault in Non-Paged Area’ BSOD in Windows 10
- How to Fix Blue Screen of Death Errors On Windows 11?
- How to Fix the System Service Exception Stop Code in Windows 10?
Все способы:
- Методы исправления ошибки «MEMORY_MANAGEMENT»
- Способ 1: Запуск ОС без стороннего ПО
- Способ 2: Определение кода и названия проблемного файла
- Вопросы и ответы: 0
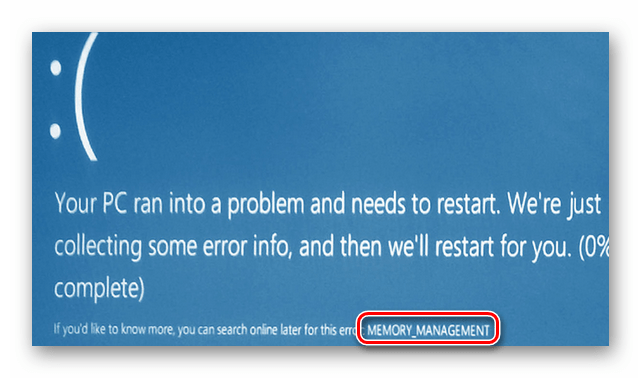
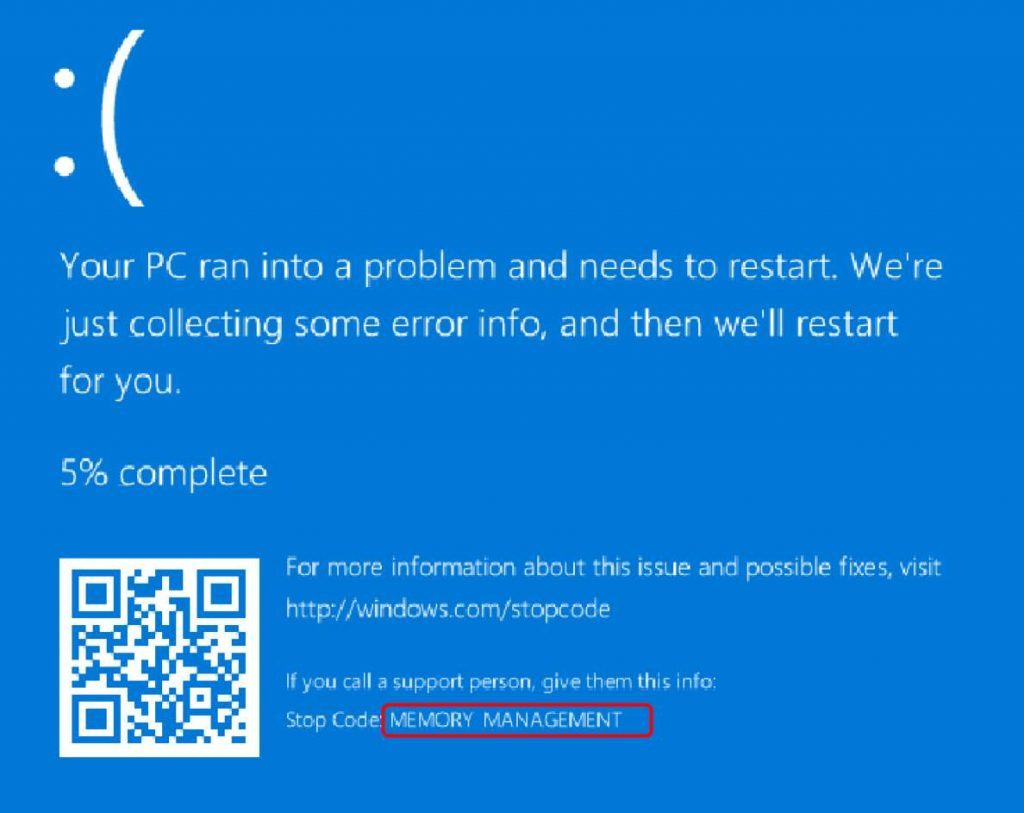
Ни один пользователь не может защититься на 100% от появления ошибок во время использования операционной системы. Самая неприятная разновидность сбоев – Blue Screen Of Death (BSOD или Синий Экран Смерти). Подобные ошибки сопровождаются зависанием ОС и потерей всех несохраненных данных. В этой статье мы расскажем вам о том, как можно избавиться от BSOD под названием «MEMORY_MANAGEMENT» в Windows 10.
Методы исправления ошибки «MEMORY_MANAGEMENT»
Описываемая проблема на практике выглядит следующим образом:
К сожалению, причиной появления такого сообщения могут быть самые различные факторы. Чаще всего ошибка возникает из-за конфликта Windows со сторонними приложениями. Но иногда подобный сбой случается из-за следующего:
- Поврежденный или неправильно установленный драйвер
- Сбой в работе системных файлов
- Негативное влияние вирусного ПО
- Проблема настройки схемы электропитания
- Физическая неисправность оперативной памяти
Мы расскажем вам о двух действенных способах, которые нужно использовать в первую очередь при появлении сообщения «MEMORY_MANAGEMENT».
Способ 1: Запуск ОС без стороннего ПО
Сперва необходимо выяснить, какие именно файлы нарушают корректную работу ОС – системные или же файлы стороннего программного обеспечения. Для этого делаем следующие действия:
- Запускаем системную утилиту «Выполнить» с помощью комбинации клавиш «Windows» + «R».
- В единственное поле появившегося окна вводим команду
msconfig, а после этого жмем кнопку «Enter» на клавиатуре либо «OK» в самом окне. - Откроется окно «Конфигурация системы». В первой вкладке «Общие» следует установить отметку напротив строки «Выборочный запуск». Убедитесь, что строка «Загружать системные службы» тоже отмечена. При этом с позиции «Загружать элементы автозагрузки» галочку следует убрать.
- Далее переходим во вкладку «Службы». В нижней части окна активируйте чекбокс напротив строчки «Не отображать службы Microsoft». После этого список служб заметно уменьшится. Необходимо их все отключить. Просто уберите отметку напротив каждой строки или нажмите кнопку «Отключить все».
- Теперь следует открыть вкладку «Автозагрузка». В ней нужно нажать на строку «Открыть диспетчер задач». После этого нажмите кнопку «OK» в окне «Конфигурация системы», чтобы применить все изменения. После этого появится окно с предложением перезагрузить систему. Пока ничего в нем не нажимайте и не закрывайте его.
- В открывшейся вкладке «Автозагрузка» «Диспетчера задач» необходимо отключить все программы. Для этого нажмите на названии элемента правой кнопкой мышки и выберите из контекстного меню пункт «Отключить». После отключения всех приложений закройте «Диспетчер задач».
- Теперь вернитесь к окну перезагрузки системы и нажмите в нем кнопку «Перезагрузка».

После перезагрузки системы следует проделать те действия, которые привели к возникновению синего экрана и ошибке «MEMORY_MANAGEMENT». Если она более не повторится, значит, виной всему была одна из отключенных ранее служб или программ в автозагрузке. В таком случае вам придется повторить все описанные выше действия, но при этом включать поочередно службы и элементы автозагрузки. Когда виновник ошибки будет найден, следует обновить/переустановить обнаруженную программу или драйвер. Если при удалении программного компонента у вас возникли проблемы (к примеру, приложение отказывается удаляться), вам поможет наша статья, посвященная их решению:
Подробнее: 6 лучших решений для полного удаления программ
Способ 2: Определение кода и названия проблемного файла
Если первый метод не помог, или же вы просто не хотите его использовать, тогда можно пойти альтернативным путем. Далее мы расскажем о том, как узнать код ошибки, так как по умолчанию на синем экране смерти эта информация отсутствует. По найденному значению и его описанию вы сможете точно определить причину появления BSOD.
- Сперва необходимо загрузить ОС в безопасном режиме, при этом включить поддержку командной строки. Один из способов сделать это – во время загрузки Windows активно нажимать кнопку «F8» на клавиатуре. В появившемся окне потребуется выбрать строку с одноименным названием.

О других методах запуска ОС в безопасном режиме вы можете узнать из отдельной статьи.
Подробнее: Безопасный режим в Windows 10
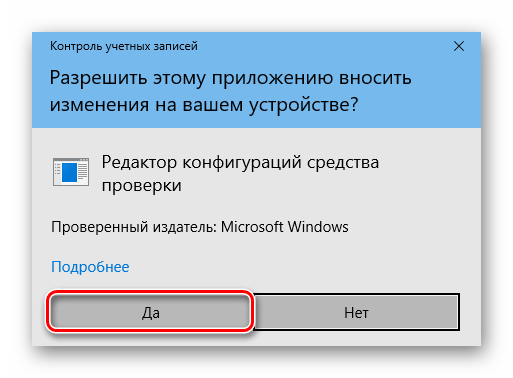
- После выполнения указанных манипуляций необходимо запустить «Командную строку» от имени администратора. В поле поиска на «Панели задач» введите команду «verifier». Нажмите по названию найденной программы ПКМ, после чего из контекстного меню выберите пункт «Запуск от имени администратора».
- Если у вас включен контроль учетных записей, то появится следующее окно:

Нажмите в нем кнопку «Да».
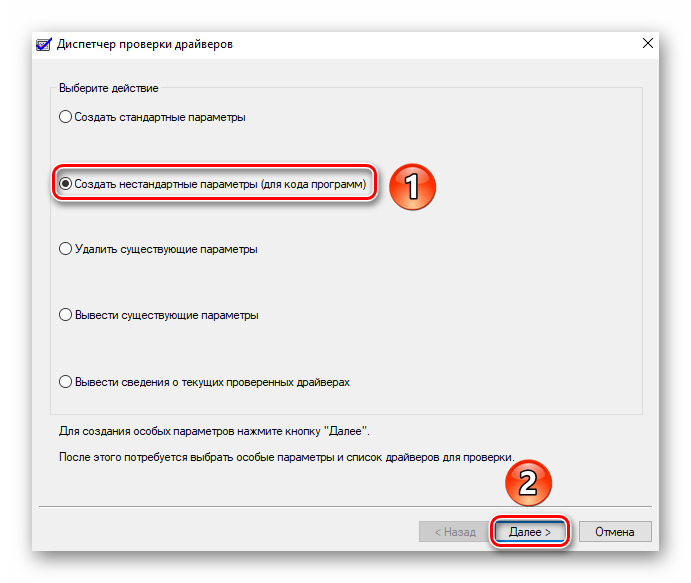
- В появившемся окне нужно поставить отметку напротив строки «Создать нестандартные параметры (для кода программ)». Затем нажмите «Далее» в этом же окне.
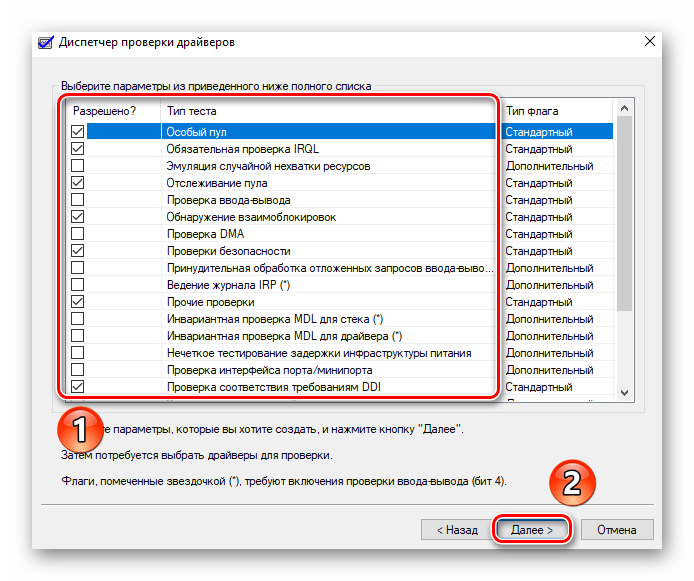
- Следующим пунктом будет включение определенных тестов. Необходимо активировать те из них, которые мы отметили галочкой на скриншоте ниже. После того как нужные пункты будут отмечены, нажмите кнопку «Далее».
- В следующем окне установите маркер напротив строки «Выбрать имя драйвера из списка» и снова нажмите «Далее».
- Подождите несколько секунд, пока загрузится вся информация об установленных драйверах. В новом окне нажмите по строке «Поставщик». Это позволит отсортировать список софта по изготовителю. Вам необходимо поставить галочки напротив всех строк, в графе «Поставщик» которых не стоит «Microsoft Corporation». Рекомендуем внимательно прокрутить весь список, так как нужные элементы могут находиться в самом конце перечня. По окончании необходимо нажать кнопку «Готово».
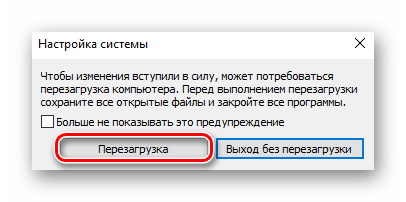
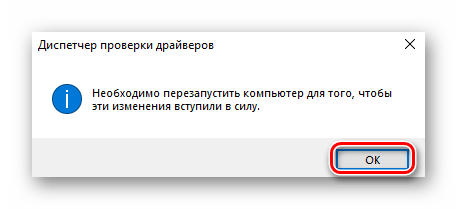
- В результате вы увидите сообщение о том, что необходимо перезагрузить компьютер. Жмем в данном окне кнопку «OK» и перезагружаем систему вручную.
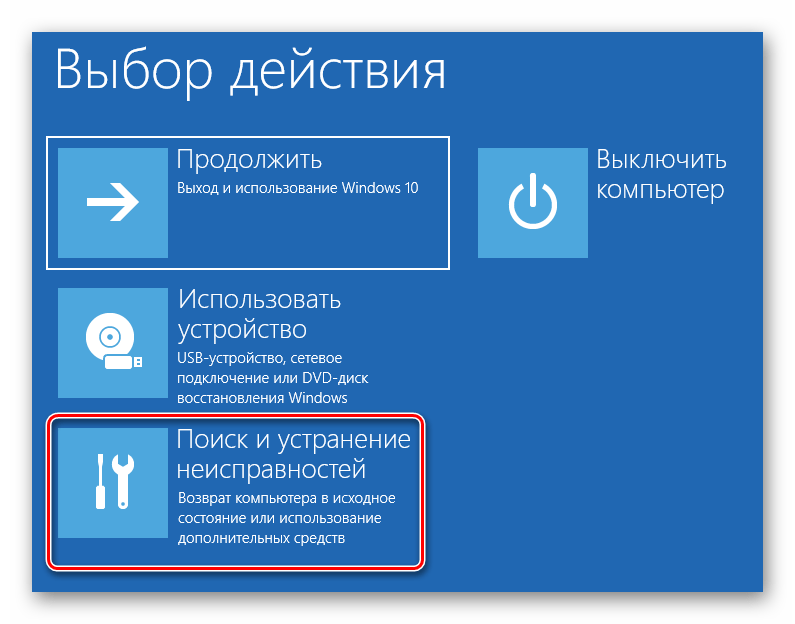
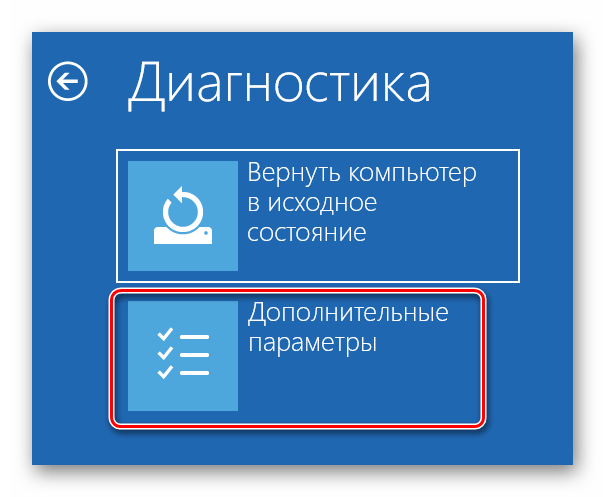
- Далее есть два варианта развития событий – либо система загрузится нормально, либо же вы снова увидите синий экран смерти со знакомой ошибкой. Стабильная загрузка ОС означает, что проблем с драйверами не обнаружено. Обратите внимание, что при появлении ошибки с BSOD система может начать циклически перезагружаться. После двух попыток на экран будут выведены дополнительные варианты загрузки. В первую очередь выберите пункт «Поиск и устранение неисправностей».
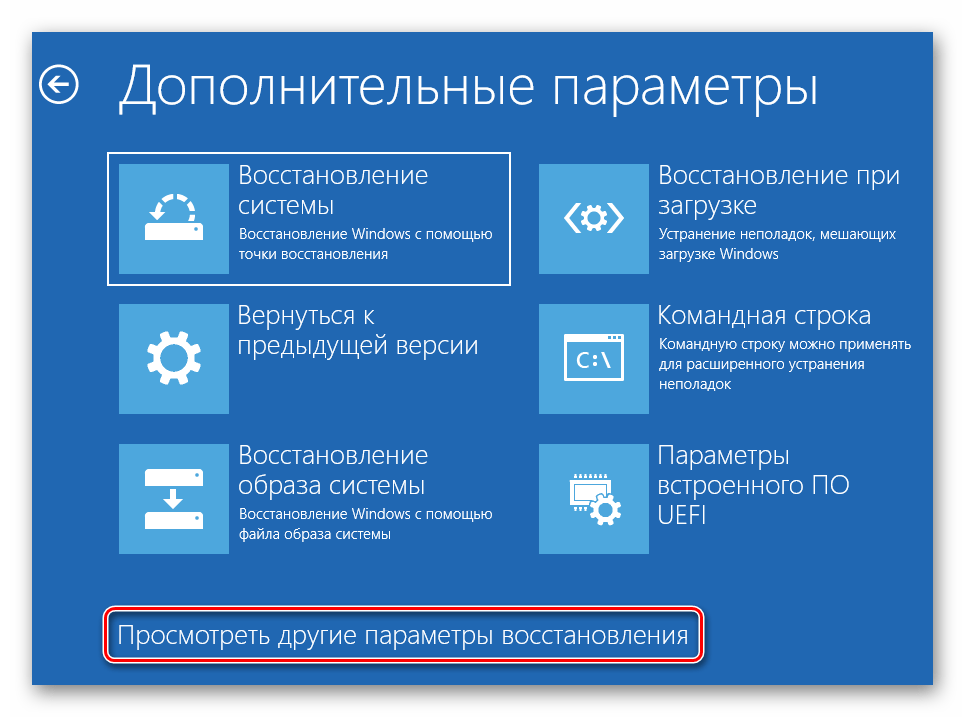
- Далее откройте вкладку «Дополнительные параметры».
- Затем нужно нажать на строку «Просмотреть другие параметры восстановления».
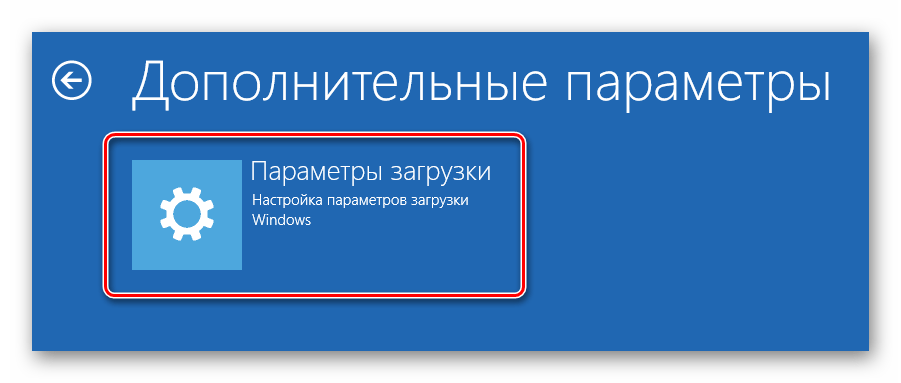
- В заключении жмем кнопку «Параметры загрузки».
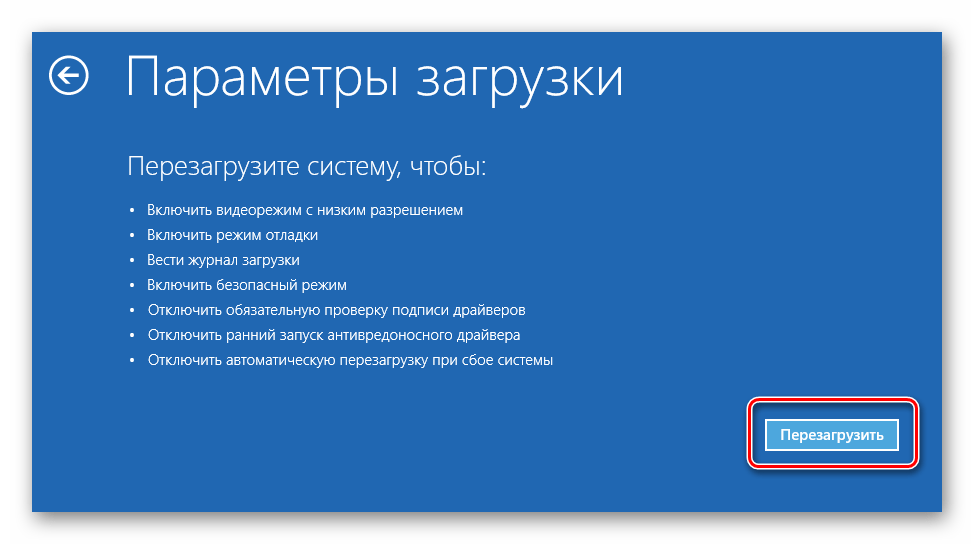
- В следующем окне нажимаем «Перезагрузить».
- Появится перечень вариантов загрузки. Следует выбрать «Безопасный режим с поддержкой командной строки».
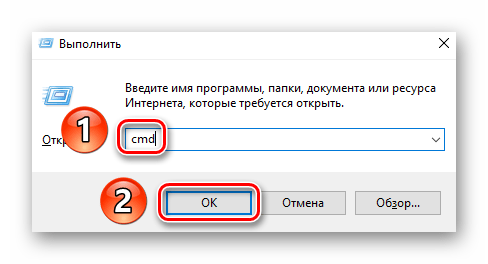
- После загрузки системы в безопасном режиме нужно запустить «Командную строку» с правами администратора. Для этого нажмите на клавиатуре комбинацию клавиш «Windows+R», введите в окно «Выполнить» команду
cmd, а после этого нажмите «Enter». - В «Командной строке» необходимо поочередно ввести следующие команды:
verifier /reset
shutdown -r -t 0Первая позволит отключить проверку и зацикливание системы, а вторая – перезагрузит ее в обычном режиме.
- Когда ОС перезагрузится, нужно перейти по следующему пути в «Проводнике»:
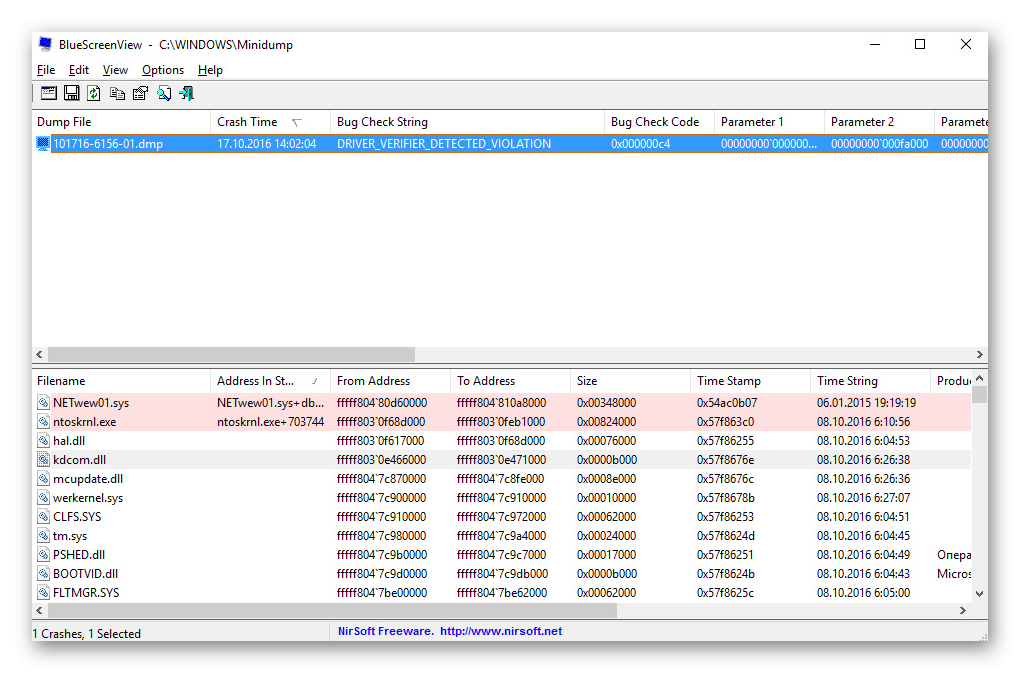
C:\Windows\Minidump - В папке «Minidump» вы найдете файл с расширением «DMP». Его следует открыть одной из специализированных программ.
Подробнее: Открываем дампы памяти DMP
Мы рекомендуем использовать BlueScreenView. Открываем с ее помощью файл дампа и видим приблизительно следующую картину:

В нижней части окна розовым цветом будут выделены названия файлов, которые и были причиной возникновения ошибки «MEMORY_MANAGEMENT». Вам остается лишь скопировать название из графы «Filename» в любую поисковую систему и определить, к какому ПО он относится. После этого стоит удалить проблемный софт и установить его повторно.


На этом наша статья подошла к своему логическому завершению. Надеемся, что один из предложенных способов помог вам избавиться от возникшей проблемы. Если же попытки не увенчались успехом, тогда стоит попробовать выполнить такую стандартную процедуру, как проверка операционной системы на присутствие вредоносного ПО и ошибок.
Подробнее:
Проверка компьютера на наличие вирусов без антивируса
Проверка Windows 10 на наличие ошибок
Владельцам ноутбуков в случае появления сообщения «MEMORY_MANAGEMENT» стоит также попробовать изменить схему электропитания. В самом крайнем случае нужно обратить внимание на оперативную память. Возможно, причиной проблемы стала ее физическая неисправность.
Наша группа в TelegramПолезные советы и помощь
When users encounter a BSOD (Blue Screen of Death) error of Memory Management on their Windows 10 they either get worried or angry. Although this error is not fatal for your Windows system, the ignorance of people regarding this error makes it difficult to resolve. If you are experiencing this error on your computer, then don’t worry we are here to help you. In this guide, we will study the nature and causes of this error and explain in detail how to fix Memory Management errors in Windows 10.
Memory Management error, as the name suggests, relates to the memory of your computer. This includes the RAM (random access memory) and ROM (read-only memory) of your computer. Does this mean that this error only appears when the RAM or ROM on your computer becomes faulty? Absolutely not. In reality, this error is shown by Windows whenever it categorizes a problem as related to the functioning of your computer’s memory.
Therefore, when you encounter a Memory Management error, it might be caused due to multiple reasons. Maybe the system memory has become faulty, maybe the graphics card memory is corrupted, this error can be caused due to outdated graphics card drivers, etc. In short, before you can solve this error you must determine what the cause behind it is.
What Causes Memory Management Error in Windows 10
The memory management feature of Windows is responsible for managing the primary memory of a Windows computer. Whenever Windows is unable to perform this function properly it displays a Memory Management error.
The main causes of BSOD Memory Management errors on Windows 10 are:
- Graphics Card Drivers: If your graphics card drivers have gotten outdated, broken or damaged, then Windows will be unable to properly access the memory of your graphics card and you will end up encountering this error.
- Windows Update: Sometimes after updating Windows this error appears. That’s primarily because the new update was faulty or it didn’t get installed properly.
- Faulty RAM: Maybe the RAM on your computer has developed problems and needs replacement.
- Disk Errors: Your storage disks have developed errors that need to be rectified.
- Hardware Issues: Some hardware on your computer which has memory installed in it has developed hardware problems. It’s most commonly associated with graphics cards.
- Virus Infection: If a computer virus damages Windows system files, then you can also encounter this error.
- Software Issue: Missing operating system files or corrupt software files can also cause this error in Windows 10.
- Software or Hardware Conflict: Maybe you have installed some new software or driver that is causing a conflict with a pre-existing software or hardware driver. This can also cause this error.
How to Fix Memory Management Error in Windows 10
As you know by now, there are multiple reasons why memory management errors can cause Windows 10. Therefore, the solutions available for this error are also multiple in numbers. You can try these solutions one-by-one or if you know the cause behind this error on your computer, then follow the solution accordingly.
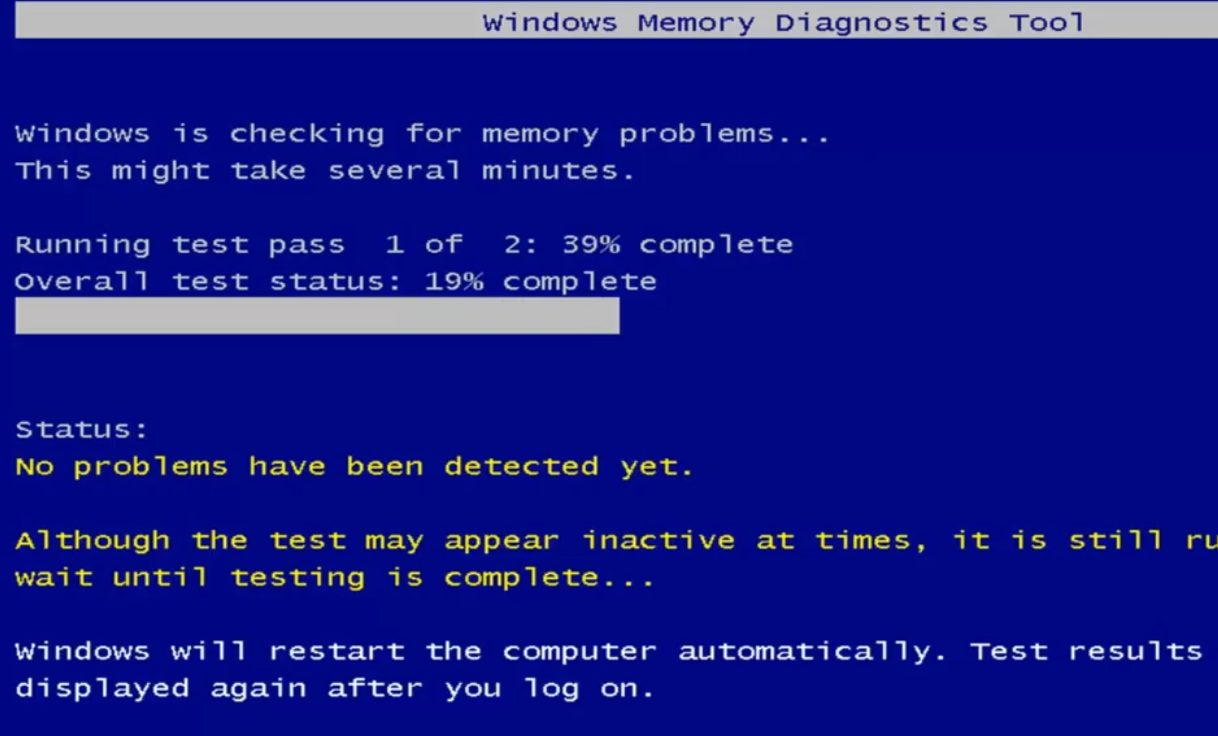
1) Run Windows Memory Diagnostic Tool
Faulty SDRAM on your computer will cause this Memory Management error. The easiest way to diagnose a faulty SDRAM is by running the Windows Memory Diagnostic tool. This tool will test SDRAM and if it finds any problems in it, then will report it to you. This tool can only be run in Safe Mode, therefore, you must first restart your computer in Safe Mode, then continue with the rest of the process.
Follow the steps given below in their exact order to complete this solution:
- Click on the ‘Start’ button, then click on the ‘Power’ button and finally click on the ‘Restart’ while holding the ‘Shift’ key on your keyboard.
- Wait for Windows to restart in Safe Mode.
- Among the available options, click on the ‘Troubleshoot’ button.
- Under Troubleshoot, click on the ‘Advanced options’ button.
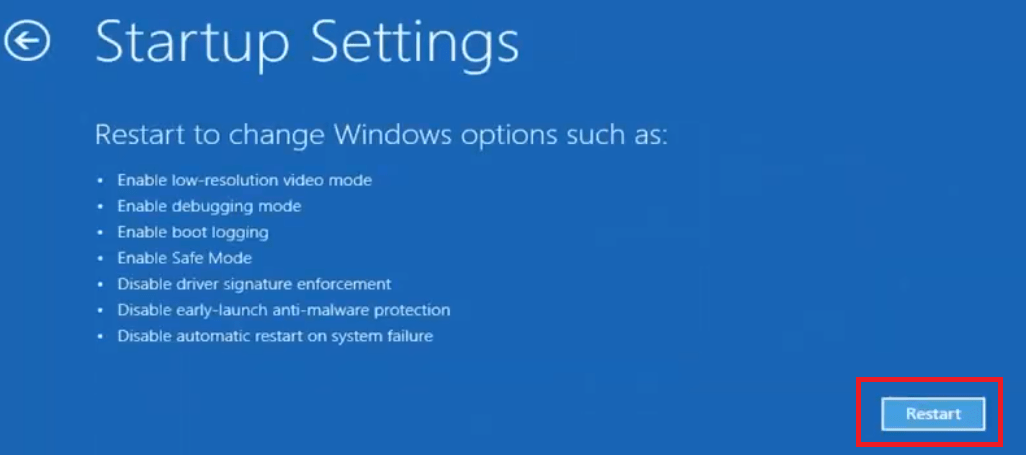
- Under Advanced options, click on the ‘Startup Settings’ button.
- Finally, in the Startup Settings page, click on the ‘Restart’ button.

- After restarting, you will see a list of the various Windows start modes available. Press the Function key associated with the mode number you want to choose. For example, to select ‘Enable Safe Mode’, press F4 key. Read the options carefully.In this case, we want to select ‘Enable Safe Mode with Networking’ and its associated number is 5, so we pressed ‘F5’ key on the keyboard.
- Wait for Windows to start in Safe Mode.
- When Windows Desktop appears, you will see “Safe Mode” written on the corner of the screen.
- Search for “Windows Memory” in the search box and click on ‘Windows Memory Diagnostic’ from the search results.
- In the Windows Memory Diagnostic window, select ‘Restart now and check for problems’ option.
- Wait for Windows to restart.
- Wait as the Windows Memory Diagnostic checks your computer memory for errors. This whole process may take several minutes so you must wait patiently for its completion.

- Wait for Windows to start after diagnosis is complete.
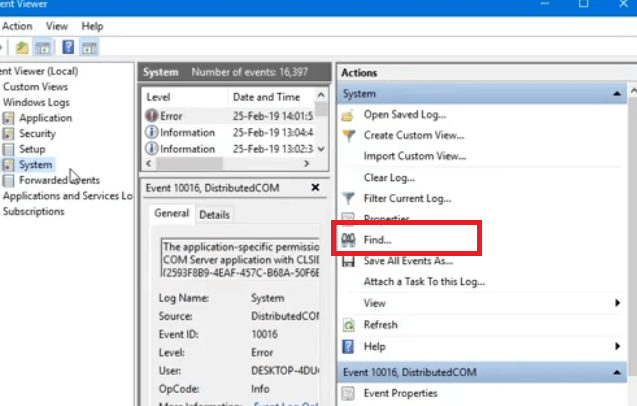
- Now, you must check the results of the Windows Memory Diagnostic tool. To do that, type ‘event viewer’ in the search box. From the search results, choose “Event Viewer“.
- In the Event Viewer right-pane, click to expand ‘Windows Logs’, then choose ‘System’ option.
- Click on the “Find” option in the Actions section of the Event Viewer.

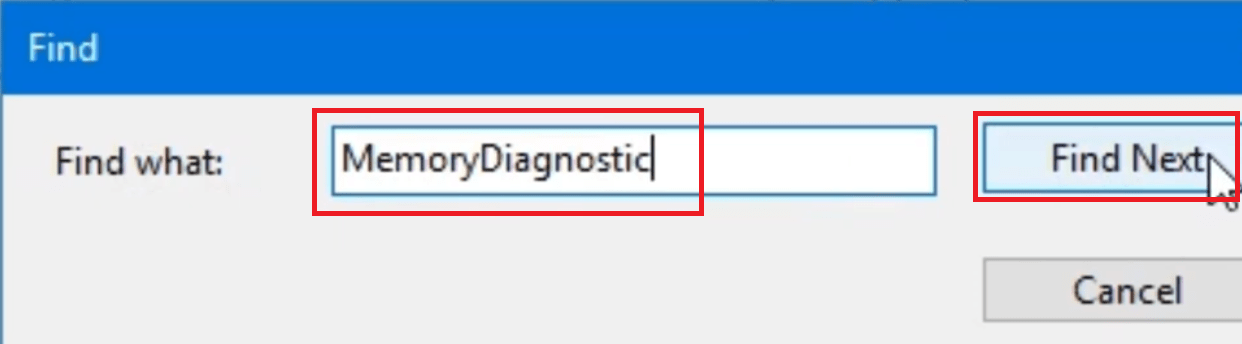
- In the search box, type ‘MemoryDiagnostic’ (without any space between the words) and click on ‘Find Next’ button.

- Select ‘Information‘ from the System box.
- The Event Properties window will appear. In this example, the diagnostic tool found no error. However, if in your case some error is found, then it’s time to replace the SDRAM of your computer and the Memory Management error will get resolved.
- If in your computer this diagnostic tool doesn’t find any error, then try the next solution given below.
2) Run SFC Scanner
Microsoft provides SFC Scanner in Windows which can be used to detect and rectify memory management problems in Windows 10. You can run this scanner through the command prompt. Preferably, you should run this scanner in Safe Mode. So, first restart your Windows computer in Safe Mode, then proceed with the steps given below.
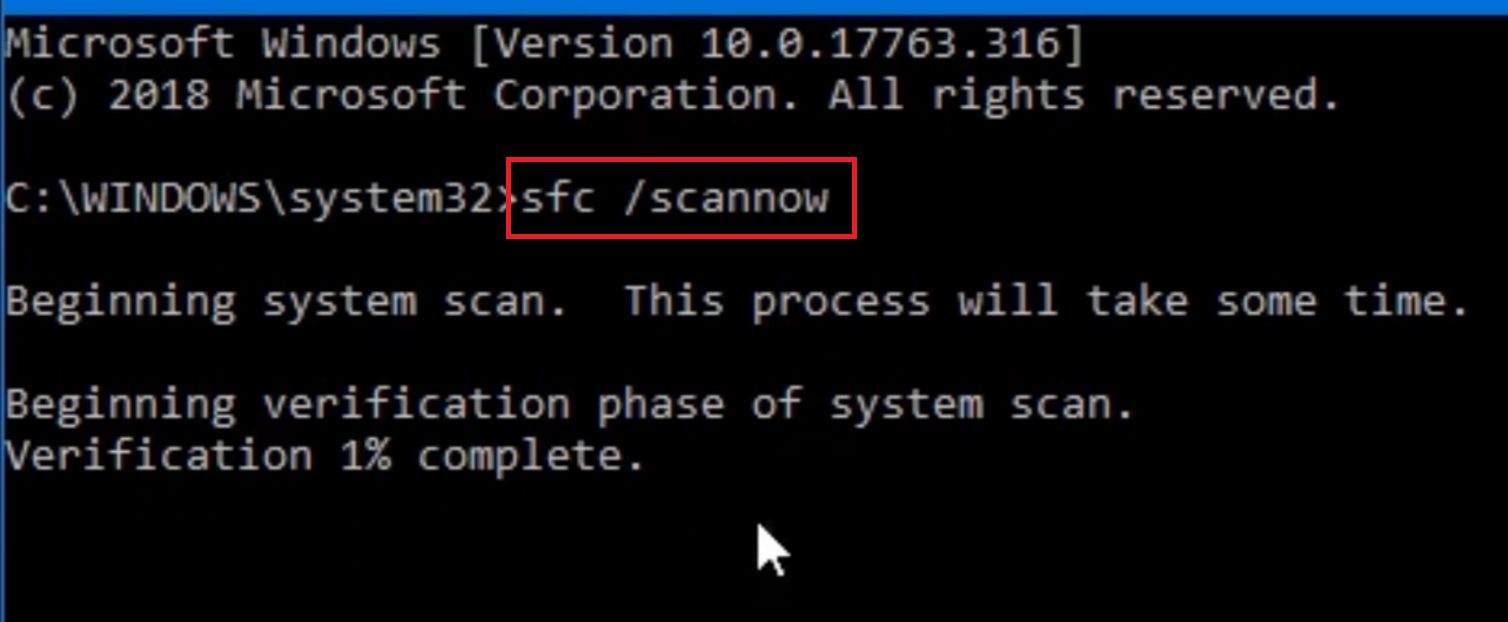
- Type ‘command prompt’ in the search box. In the search results, select and right-click ‘Command Prompt’ and choose ‘Run as administrator’ from the options.
- In the Command Prompt window, type ‘sfc /scannow’ command, then press ‘Enter’ and wait for the process to complete.

- Once the process is completed you will see the details of the actions performed by the SFC Scanner. For more details about the repairs performed by the scanner, you can view the log file created during the process. The address on that log file will be included in the scan results.

- If running the SFC Scanner doesn’t solve your problem, then try updating your graphics card drivers.

3) Update Graphics Card Drivers
Memory Management errors are commonly caused due to broken or outdated graphics card drivers. That’s because every graphics card has an in-built memory module in it and when Windows is unable to manage that memory properly, then it displays a Memory Management error. Usually, this mismanagement of memory occurs due to faulty graphic card drivers.
Therefore, if it’s been a long time since you updated your graphics card driver, then it’s better to do it now. Also, if you updated them recently, then maybe they didn’t update properly and you should try updating them again. Follow the steps given below to properly update your graphics card drivers.
- Type ‘device manager’ in the search box and click on ‘Device Manager’ in the search results.
- In the Device Manager, click to expand ‘Display adapters’ option and double-click your graphics card name.
- In the Properties window, click on the ‘Driver’ tab and select ‘Update Driver’ button.
- In the Update Driver window, click on the ‘Search automatically for updated driver software’ option.
- Wait for the Windows to automatically search and update the latest drivers it can find for your graphics card.
- Finally, you can see the changes Windows made on your graphics card drivers.
- If there are no changes made, then maybe you should try updating Windows as doing that will automatically update several outdated drivers on your computer.
4) Run Windows Update
When you run Windows Update on your computer you not only update the Windows OS files with their latest available versions, but you also update the device drivers on your computer with their latest versions. Therefore, running Windows Update can solve driver related issues on your computer, which includes the Memory Management error.
- Type ‘update’ in the search box and click on ‘Check for updates’ in the search results.
- Click on ‘Check for updates’ button to start Windows update.
- Wait for the Windows Update to finish and check if the Memory Management error has been resolved on your computer or not. If none of the above solutions worked for you, then the final solution will be to reset your Windows PC.
5) Reset Windows 10
Resetting Windows 10 is not the best solution for this problem as you may end up losing some data, software and other important stuff. However, if you are highly annoyed by the Memory Management error BSOD screen, then you can try resetting your Windows. Follow the steps given below to reset your Windows PC.
- Type ‘reset’ in the search box and click on the ‘Reset this PC’ option in the search results.
- In the Recover section, click on the ‘Get started’ button below ‘Reset this PC’.
- From here on, choose the options and follow the instructions according to your requirements.
- Resetting your PC can have many implications on your Windows, so you must choose your options wisely.
The BSOD screen of Memory Management error is difficult to get rid of unless you know the exact cause and its proper solution. In this guide, we have shared several solutions that can help you fix Memory Management errors in Windows 10. If none of the above solutions work for you, then you should contact a hardware professional (Local computer shop) as most probably your computer requires some hardware replacements or upgrades.
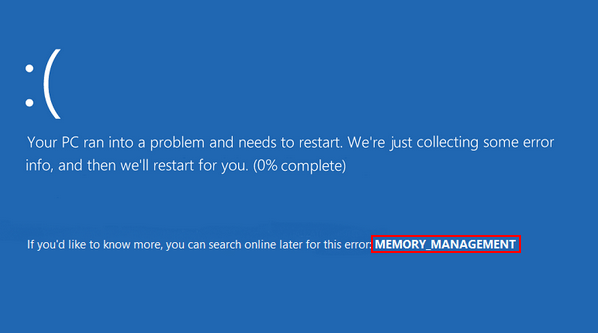
Have you ever been working away on your computer when suddenly the dreaded Blue screen of Death (BSOD) appears, telling you there’s been a MEMORY MANAGEMENT error?
Well, you’re not alone. A lot of Windows users are having the same problem.
But the good news is we have five solutions you can try to fix this memory management error.
Try these fixes for the MEMORY MANAGEMENT blue screen error:
Here are 7 fixes for you to try. You may not have to try them all. Just work your way down the list until you find the one that works for you.
To try these fixes you need to be logged into Windows on the problem computer. If you can’t log into Windows normally, shut down your computer, turn it back on in Safe Mode, then try the fix.
- Update video card driver
- Run Windows memory diagnostic test
- Run a disk check
- Check newly installed software and hardware
- Scan for possible virus infection
- Repair system files
- Final thought
Fix 1: Update the video card driver
A common cause of the MEMORY MANAGEMENT error is a damaged, outdated or incorrect video card driver. And so to fix the error you need to update your video card driver to the most recent correct version.
There are two ways to update the driver: manually and automatically.
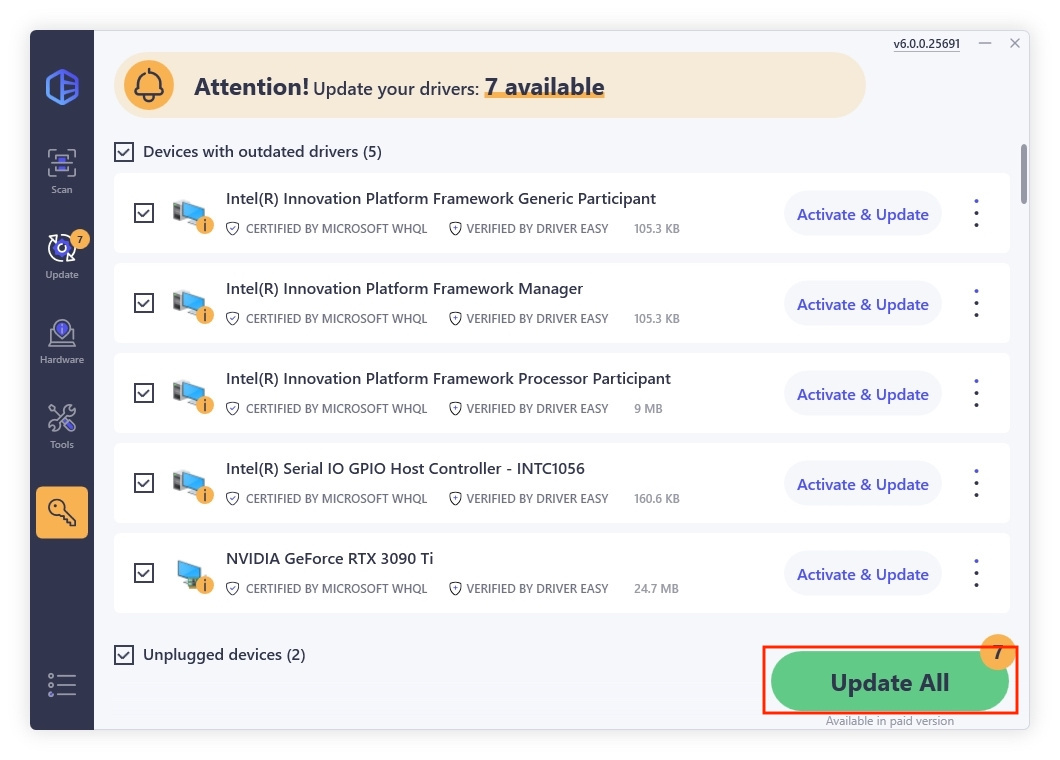
Manual driver update – To manually update the driver, head to the video card manufacturer’s website and search for the most recent correct video driver. Unless you’re getting the error on a laptop, in which case you should always go to the laptop manufacturer’s website. The video drivers provided by the chipset or hardware manufacturer may not include the customized features.
Automatic driver update – If you don’t have the time, patience, or computer skills to update your drivers manually, you can do it automatically with Driver Easy. Driver Easy will automatically find the correct driver for your video card, download it, and install it correctly. You don’t need to know exactly what system your computer is running, you don’t need to risk downloading and installing the wrong driver, and you don’t need to worry about making mistakes when installing.
You can update your drivers automatically with either the 7 days free trial or the Pro version of Driver Easy. It takes just 2 clicks, and you get full support and a 30-day money-back guarantee with the Pro version:
- Download and install Driver Easy.
- Run Driver Easy and click the Scan Now button. Driver Easy will then scan your computer and detect any problem drivers.

- Click the Activate & Update button next to the flagged device to automatically download and install the correct version of this driver.
Or click Update All to automatically download and install the correct version of all the drivers that are missing or out of date on your system (You’ll need the Pro version for this – when you select Update All, you’ll get a prompt to upgrade. If you’re not prepared to purchase the Pro version yet, Driver Easy provides a 7-day trial at no cost, granting access to all Pro features like fast downloads and easy installation. No charges will occur until after your 7-day trial period ends.)

- After updating, restart your computer to take effect.

If you don’t get any more MEMORY MANAGEMENT errors, then you’ve found the culprit. But if the BSODs keep happening, here’s another solution you can try…
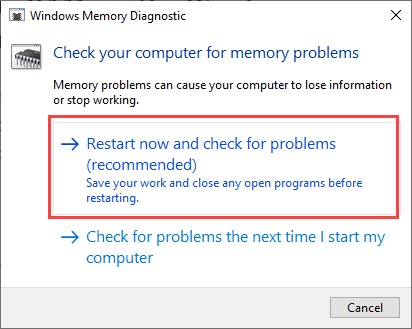
Fix 2: Run Windows memory diagnostic tool
The fact your computer is having a problem with memory management could mean there’s a problem with its Random Access Memory (RAM).
Fortunately, Windows comes with a tool that can test your RAM and let you know if there are any issues with it. Here’s how to use it.
To see if this is also your case, you can run the built-in Windows Memory Diagnostic tool:
- Press the Windows logo key and R on your keyboard to invoke the Run box.
- Type mdsched.exe, then click OK.
- Click Restart now and check for problems (recommended).
IMPORTANT: Make sure to save all your work before restarting.

- Windows will run diagnosis automatically, which can take a few minutes. When it’s finished, your PC will reboot.
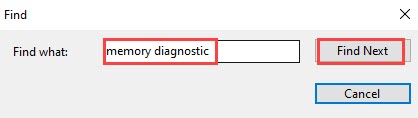
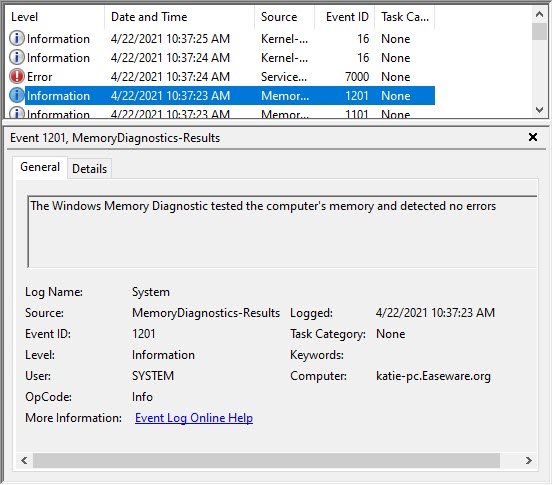
- The results will be shown on your desktop. If you don’t see any notification, right-click the Start menu then click Event Viewer.
- Click Windows Logs >> System >> Find.

- Type memory diagnostic, then click Find Next.

- If you see “no errors”, your RAM is functioning well and is not the culprit to the Memory Management blue screen of death error. Then please move on to the next method.

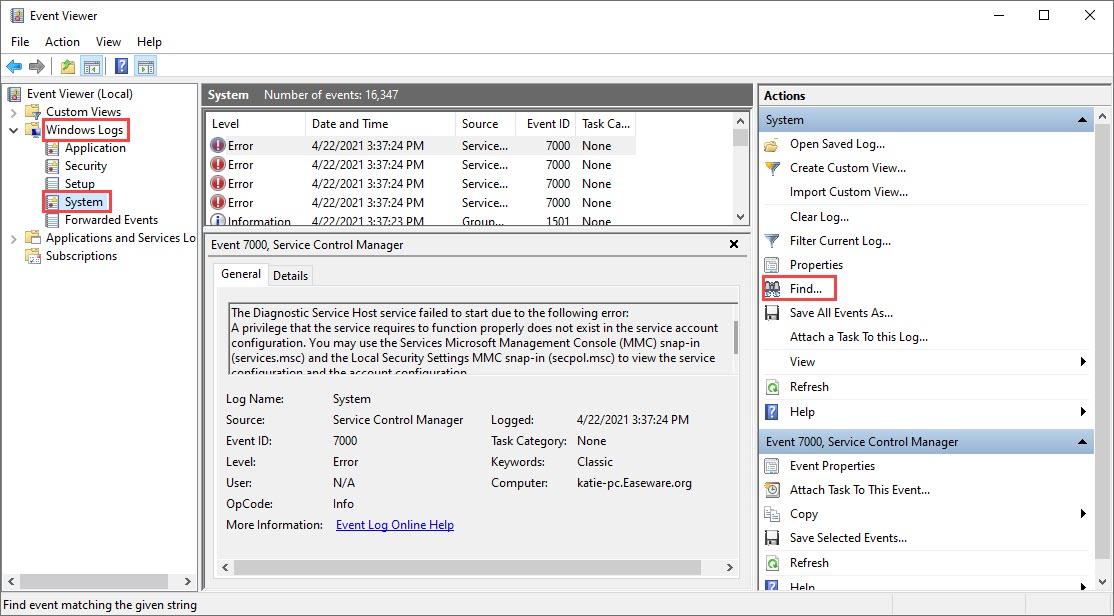
If you do see an error, you may consider replacing your RAM sticks. You will need to check if your device is still under warranty or consult your machine’s manufacturer for assistance if you’re not tech-savvy enough to do this on your own.
This means you should now try the next fix…
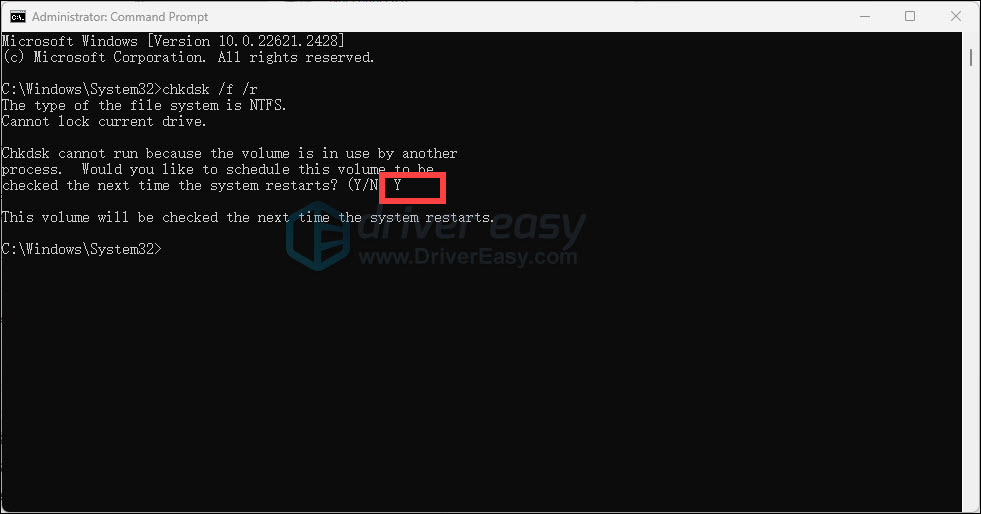
Fix 3: Run a disk check
The BSOD error could also be caused by a corrupted NTFS volume. Here’s how to resolve the problem.
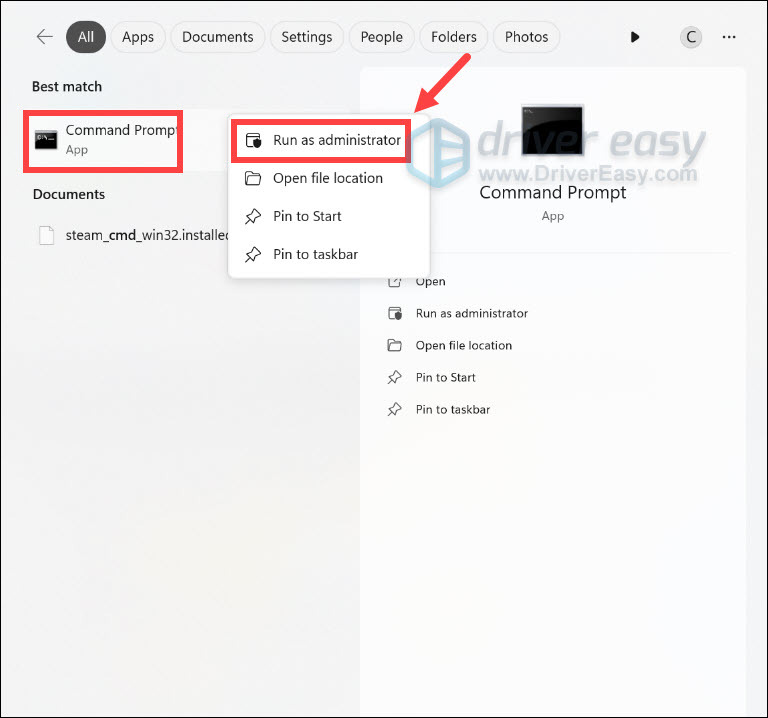
- On your keyboard, hold down the Windows logo key and press the S key to bring up the search box, and type cmd.
- Right-click Command Prompt and select Run as administrator.

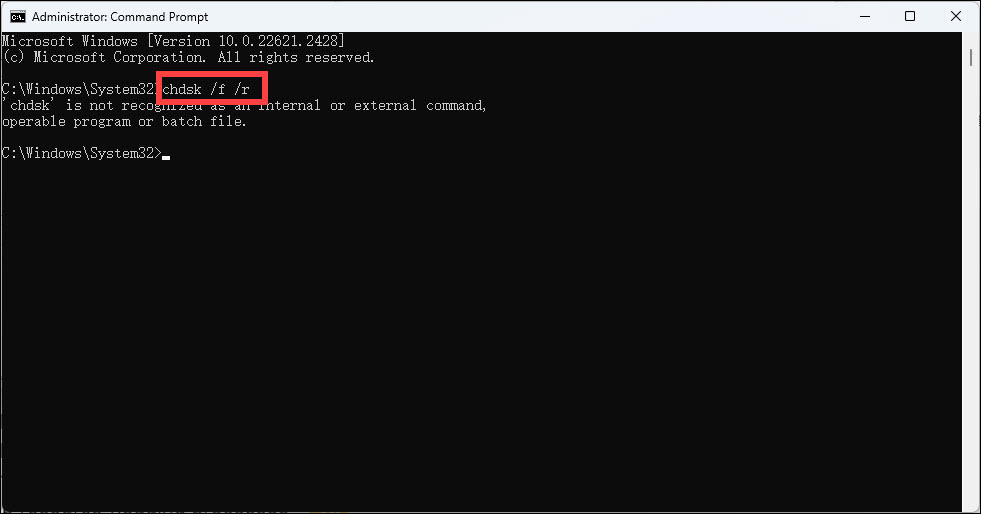
- Type chkdsk /f /r, and press Enter on your keyboard.

- When asked “Would you like to schedule this volume to be checked next time the system restarts?”, press Y.
- Exit the Command Prompt and restart your computer.
If that fixed the problem, great. But if not, here’s what to try next…
Fix 4: Check newly installed software and hardware
Have you installed any new hardware or software recently? If any of them are incompatible with your operating system or conflicting with your other programs, they could be triggering the error, and you should uninstall them to see.
If that doesn’t resolve the problem, there’s still one more thing you can try…
Fix 5: Scan for a virus infection
In some rare cases, the MEMORY MANAGEMENT blue screen of death error could be caused by a virus.
If you haven’t scanned your computer for viruses with your antivirus program, do it now.
If you don’t have a third-party antivirus program installed, use the one that comes with Windows—Windows Defender.
Fix 6: Repair system files
The MEMORY MANAGEMENT blue screen of death error may be related to system files. When the system files were broken or corrupted, it may cause a Blue screen issue.
1) On your keyboard, press the Windows logo key and R at the same time. Type cmd and press Ctrl+Shift+Enter at the same time to run Command Prompt as administrator.
Click Yes when prompted for permission to make changes to your device.
2) In the Command Prompt window, copy and paste the following command and hit Enter.
sfc /scannow
3) System File Checker will then scan all system files and repair any corrupted or missing ones it detected. This may take 3-5 minutes.
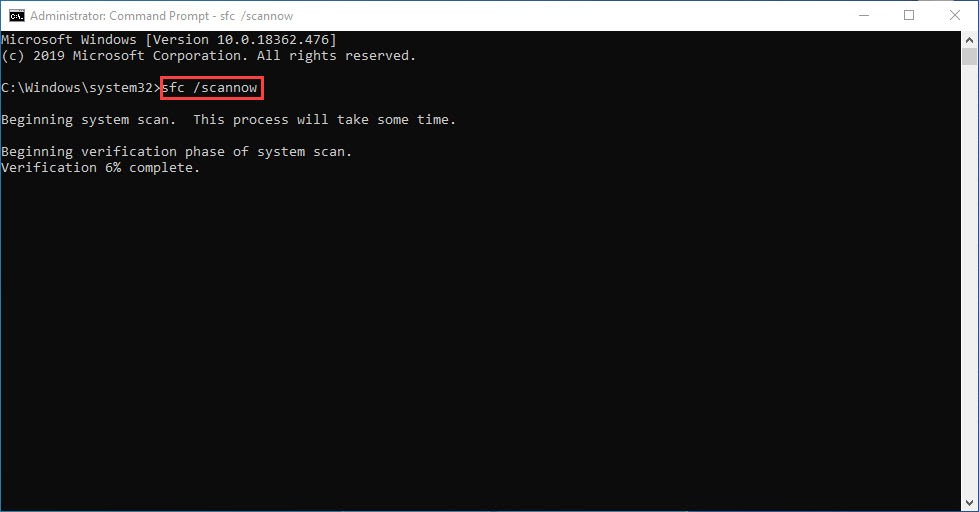
4) Restart your computer to check whether the blue screen issue is fixed or not.
If the result indicates there are broken files but SFC can’t fix them, you can turn to DISM to see if it helps:
1) On your keyboard, press the Windows logo key and R at the same time. Type cmd and press Ctrl+Shift+Enter to run Command Prompt as administrator.
Click Yes when prompted for permission to make changes to your device.
2) In the Command Prompt window, copy and paste the following commands and hit Enter after each line:
dism.exe /online /cleanup-image /scanhealth
dism.exe /online /cleanup-image /restorehealth
2) When the process finishes:
- If the DISM tool gives you errors, you can always try this command line. This will take up to 2 hours.
dism /online /cleanup-image /startcomponentcleanup
- If you get Error: 0x800F081F, reboot your computer, then open Command Prompt as administrator again (step 1) and run this command line instead:
Dism.exe /Online /Cleanup-Image /AnalyzeComponentStore
When these tests are done, restart your computer to see if the MEMORY MANAGEMENT error remains. If the problem still persists, please move on to the next fix.
Last resort
If none of the above helps to fix the the MEMORY MANAGEMENT blue screen of death error, you may need to consider a Windows reset: it wipes out all software incompatibilities and problems, it’s also the rule of thumb in telling a software problem from a hardware one: if the problem remains even after a system reset, then it’s definitely a hardware problem.
To reinstall or reset your computer, here’s a post for your reference: Reinstall/Reset Windows 10 [Step By Step]
If the blue screen problem remains not working even after a reset, then the next thing you should do is seek help from a hardware technician to see if your hardware components (the motherboard or the memory sticks) are at fault.
If you’re interested in knowing more about memory management…
What is memory management?
In a nutshell, memory management is the process that manages memory usage in your computer.
It keeps track of every byte of memory in your computer, and whether it’s free or being used. It decides how much memory to allocate to certain processes (including the programs you launch), and when to give it to them. It also ‘frees up’ memory when you close a program by marking it as available to be used by something else.
But like all processes running on your computer, sometimes it can crash. And when it does, you’ll probably see the MEMORY MANAGEMENT error message soon after.
Why would I have the MEMORY MANAGEMENT BSOD error?
According to Microsoft, the Memory Management blue screen of death error appears when there’s been a severe memory management error.
Sounds horrible, doesn’t it? But don’t worry – it’s not fatal.
Tools such as WhoCrashed and BlueScreenView can help you figure out what’s causing the horrifying BSOD on your computer. But chances are it will be one of these:
- software or hardware conflict
- virus infection
- faulty video driver
- faulty memory
- disk errors
- corrupted system files
Hope this post meets your needs. If you have any questions or suggestions, welcome to leave comments.