
Skip to content
Navigation Menu
Provide feedback
Saved searches
Use saved searches to filter your results more quickly
Sign up
Description
when try to open it said :
Error: this pack is for windows 10 version 1709 and later
my version is 2016 LTSB Build 14393
Metadata
Metadata
Development
No branches or pull requests
Issue actions
,
The following issue(s) may occur when you try to install the Windows 10 Update 1709, also known as ‘Fall Creators Update’: The Update fails to install or the update downloading procedure is stuck. In this tutorial you ‘ll find instructions on how to resolve the following issues when downloading or installing the Windows 10 Fall Creators Update 1709:
Issue No1: When the download of Windows 10 Fall Creators Update version 1709 is completed, Windows asks to restart the system to install the update. After the system’s restart, the Fall Creator Update is not installed and at the Update history you receive the following error: «Feature update to Windows 10, version 1709: Failed to install…» (error: 0x80080008)
Issue No2: After checking for new updates, Windows is starting to download the Fall Creators Update for Windows 10 version 1709, but during the Downloading Updates operation, is stuck at xx% (e.g. at 85% or 99%) with error 0x80d02002.

In this tutorial you ‘ll find detailed instructions to resolve problems when installing the Windows 10 Fall Creators Update 1709.
How to fix: Feature update to Windows 10, version 1709 Failed to install.
Suggestions: Before proceeding to update your system:
1. Completely uninstall the antivirus program or any other security program from your system.
2. Disconnect any USB connected devices that you don’t need. (e.g. USB Wireless Mouse or Keyboard Receiver, USB Wireless Network Card, etc.).
3. Be patient…the update takes a few hours to download and install.
4. Before applying the methods mentioned below, run first the Windows Update Troubleshooter from Settings > Update & Security > Troubleshoot > Windows Update.
Method 1. Delete the Windows Update Folder.
Method 2. Download and install the Windows 10 Update Manually.
Method 3. Repair System Files with SFC.
Method 4. FIX Windows corruption errors with the DISM tool.
Method 5. Repair Windows 10 with an in-place Upgrade.
Method 6. Prevent Windows 10 Automatic Update.
General troubleshooting guide for Windows 10 updates.
Method 1. Delete the Windows Update folder.
The Windows Update folder (C:\Windows\SoftwareDistribution), is the location where Windows stores the new updates after downloading them. In many cases, the «SoftwareDistribution» folder’s contents become corrupted and cause problems during downloading or installing updates. At these cases all these problems can be easily bypassed if you delete the «SoftwareDistribution» folder.
To delete the Windows Update folder:
1. Simultaneously press the Win + R keys to open the run command box.
2. Type the following command and press OK.
- services.msc
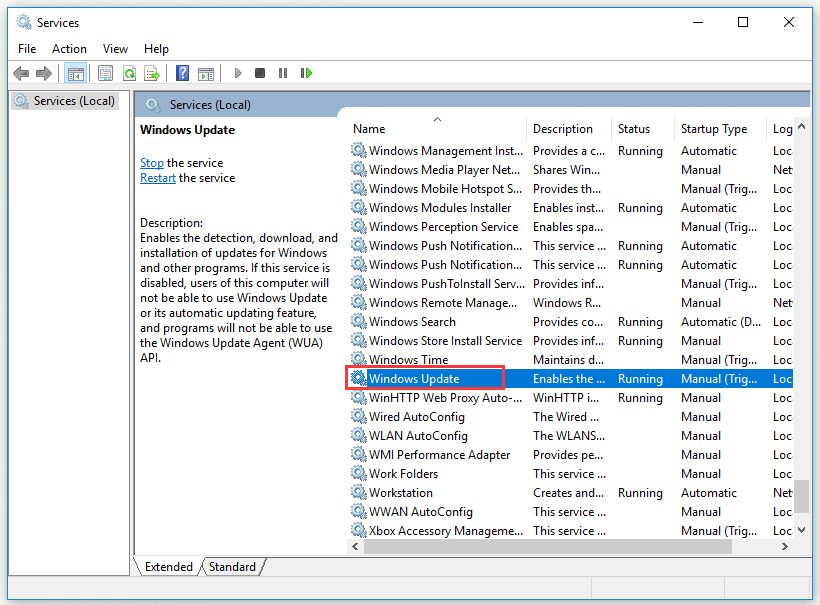
3. From the list of services, at the right pane locate the Windows Update service.
4. Right click on «Windows Update» service and choose Stop. *
5. Close «Services» window.
* Note: If you cannot stop the Windows Update service, then:
a. Double click on it to open its Properties.
b. Set the Startup type to Disabled and click OK.
c. Restart you computer.
d. After restart, continue to the next step.

6. Open Windows Explorer and navigate to C:\Windows folder.
7. Locate and then Delete the SoftwareDistribution folder. *
* Notes:
1. If you cannot delete the folder with error «Folder in use – try again», then restart Windows in «Safe Mode» and repeat the procedure.
2. If you have disabled the Windows Update service (Startup type = Disabled), then go to services and set the Startup type to Automatic.
8. Restart your computer.
9. After the restart, go to Start > Settings > Update & Security.
10. Check for updates and install them.
Method 2. Download and install the Windows 10 v1709 Update Manually.
The next method, to resolve the issues while downloading or installing the Windows 10 Fall Creators update 1709, is to download and install the update using the «Windows Update Assistant»: To do that:
1. Navigate to Windows 10 download site and click the Update now button.

2. When asked, click to Run the «Windows10Upgrade9252.exe» file to start the installation immediately, or click the Save button to run the installer later.

3. Finally click the Update Now button and follow the on screen prompts to install the Update.

Method 3. Repair System Files with SFC.
If you still experience problems with the Windows Update installation, then try to repair Windows System files by using the SFC command line tool. To do that:
1. Open Command Prompt as Administrator. To do that:
a. In the Search box type: cmd (or command prompt).
b. Right click on the command prompt (result) and select Run as Administrator.

2. Type the following command and press Enter:
- SFC /SCANNOW

3. When the SFC scan is completed, try to install the Windows 10 Fall Creators 1709 update again.
Method 4: FIX Windows corruption errors with the DISM command line tool.
The next method to fix Windows 10 Update v1709 installation problems, is to repair the Windows image using the DISM command.
1. Open Command Prompt as Administrator.
2. At the command prompt window, type the following command & press Enter:
- Dism.exe /Online /Cleanup-Image /Restorehealth

3. Be patient until DISM repairs component store.
4. When the operation is completed, you should be informed that the component store corruption was repaired.

5. Close command prompt window and restart your computer.
6. Check for updates and install them.
Method 5. Repair Windows 10 with an in-place Upgrade.
Another method that usually works, to fix Windows 10 update problems, is to perform a Windows 10 Repair-Upgrade. For that task follow the detailed instructions on this article: How to repair Windows 10.
That’s it! Let me know if this guide has helped you by leaving your comment about your experience. Please like and share this guide to help others.
If this article was useful for you, please consider supporting us by making a donation. Even $1 can a make a huge difference for us in our effort to continue to help others while keeping this site free:
- Author
- Recent Posts
Konstantinos is the founder and administrator of Wintips.org. Since 1995 he works and provides IT support as a computer and network expert to individuals and large companies. He is specialized in solving problems related to Windows or other Microsoft products (Windows Server, Office, Microsoft 365, etc.).
If you failed to install feature update to windows 10, version 1709, you are in the right place. This post offered by MiniTool Solution will help you. It will show you some workable solutions. You can try to delete the Windows Update folder, download and install the update with Windows Update Assistant and more.
When you try to install the Windows 10 Update 1709 (Fall Creators Update), you may encounter the problem: The Update fails to install or the update downloading procedure is stuck. To resolve this issue, you can read this post to get some instructions.
Method 1: Delete the Windows Update Folder
If feature update to Windows 10 version 1709 failed to install, now, the first method you can try is to delete the Windows Update folder.
Windows stores the new updates in the Windows Update folder (SoftwareDistribution) after downloading these updates. However, if the contents of the Windows Update folder become corrupted, some problems will occur during downloading or installing updates.
In this case, you can simply delete the SoftwareDistribution folder to fix the issue. Here is a quick guide on how to do that.
Step 1: Press the Win key + R key to open the Run dialog box. Next, type services.msc and press OK.
Step 2: Locate the Windows Update service from the list of services.
Step 3: Right-click Windows Update and choose Stop.
Step 4: Close the Services window.
Step 5: Open Windows Explorer and navigate to C:\Windows\SoftwareDistribution.
Step 6: Delete the SoftwareDistribution folder and restart your computer.
After that, the “feature update to Windows 10 version 1709 failed to install” issue should be solved. Now you can check for updates and install them.
Method 2: Download and Install the Windows 10 Version 1709 Update Manually
The next method you can try to resolve the issues is to download and install the update with Windows Update Assistant. Here are the steps.
Step 1: Click this link to enter the Windows 10 download site. Next, click Update now.
Step 2: When a window pops up to ask you “What do you want to do with Windows10Upgrade9252.exe(6.0 MB)? From: download.microsoft.com”, click Run to start the installation immediately or click Save to run the installer later.
Step 3: When the User Account Control window pops up, click Yes.
Step 4: Once the Windows 10 Update Assistant window appears, click Update now.

Step 5: Then, follow the instructions to finish installing the Update.
After that, check if the “feature update to Windows 10 version 1709 failed to install” issue is solved.
Method 3: Repair System Files with SFC
Another solution you can try is to repair Windows System files with the SFC command line tool. Here are the steps to do this job.
Step 1: Type cmd in the Search bar, navigate to Command Prompt and then choose Run as administrator.
Step 2: Now, type this command: sfc /scannow and press Enter.
After the SFC scan is completed, try to install the Windows 10 Fall Creators 1709 update again and check if the “feature update to Windows 10 version 1709 failed to install” issue is fixed.
Method 4: Fix Windows Corruption Errors by Running the DISM
The next method to fix this problem is to repair the Windows image with the DISM command line tool.
Step 1: Type cmd in the Search bar, navigate to Command Prompt and then choose Run as administrator.
Step 2: Once the command prompt window, type this command: Dism.exe /Online /Cleanup-Image /Restorehealth and press Enter.
Step 3: Be patient until the DISM repairs component store. When the operation is completed, you should be informed that the component store corruption was repaired.
Step 4: Close command prompt window and restart your computer.
The “feature update to Windows 10 version 1709 failed to install” issue should be solved. Check for updates and install them.
Method 5: Repair Windows 10 with an In-Place Upgrade
To fix Windows 10 update problems, performing a Windows 10 Repair-Upgrade usually works. To do that, follow the detailed instructions from this post: Windows 10 In-Place Upgrade: a Step-by-Step Guide.
After that, check if the problem is solved.
Bottom Line
To sum up, this post has shown you how to fix the error if Windows 10 Update 1709 fails to install. After reading this post, you should manage to fix this error.
Do you encounter Feature Update to Windows 10 Version 1709 Error 0x80d02002? The main Possible causes of this issue are corruption of update cache, driver software, incompatibility of an application installed on your computer. You will find here the promising fix for the problem whether any reason affects it.
Multiple people are complaining Error 0x80d02002 during feature update when they receive it through Update & security area. Unfortunately, Installing it ends up with this stop code and doesn’t settle after restarting or normal workarounds.
How to Fix Feature Update to Windows 10 Version 1709 Error 0x80d02002
Solution 1 – Reset Update Cache
The Common reason of Windows update error is the corruption of the cache. So first of all, you should try to reset it with the simple straightforward process ahead.
Step 1 – To purge the Feature update cache click on Start then type cmd. Perform a right click on Command prompt (Desktop app) and single out the choice “Run as administrator” from the list.
Step 2 – Let the UAC pop pass through by selecting Yes.
Step 3 – Copy the below commands paste in the “command prompt” and gently strike Enter –
net stop wuauserv

net stop cryptSvc

net stop bits

net stop msiserver

ren C:\Windows\SoftwareDistribution SoftwareDistribution.old

ren C:\Windows\System32\catroot2 catroot2.old

net start wuauserv

net start cryptSvc

net start bits

net start msiserver

pause
Step 4 – Type Exit on the command prompt, press Enter and go to Settings => Update & security. Click on Check for updates then look over if Feature Update to Windows 10 Version 1709 Error 0x80d02002 no longer annoys.
Solution 2 – Run SFC and DISM Tools
If Error 0x80d02002 persists then it indicates that you need to run SFC and DISM Tools further. SFC will modulate the corrupt files moreover restore the good one. DISM will check then revive the health of the system image. Hence, follow the instructions to run both tools one after another –
Step 1 – Once more launch elevated command prompt with help of Step 1 in the first solution. Now type the piece of command SFC /SCANNOW, press the Enter key and allow execution for few minutes.
Now Reboot the PC and ascertain that the flaw of Feature Update to Windows 10 Version 1709 is fixed.
Step 2 – Now type DISM.exe /Online /Cleanup-image /Restorehealth moreover depress the Enter key on the keyboard.
Again wait for a length of time furthermore restart the system after the completion.
Try to reinstall the feature update and make sure that everything is fine.
Solution 3 – Check Language Settings
Many times 0x80d02002 error occurs because of incorrect language settings. Choose the language of the country where you are at present available means if you are in USA then choose English (United States).
Step 1 – Press Winkey+I and select Time & Language on the Settings application.
Step 2 – Select Region & Language on the left pane then navigate to the adjacent right. You can reach here directly by clicking ms-settings:regionlanguage. Verify that the applicable language meeting with the location is set, otherwise, change it and install a language pack for the same.
Finally, attempt to feature update your Windows 10 machine to the Version 1709 as it should proceed without any obstruction.
Conclusion
The issue becomes more complex because it does not display a definite cause or suggestin except the stop code. We hope that these workarounds will successfully fix Feature Update to Windows 10 Version 1709 Error 0x80d02002. The solutions will be pretty effective to get Fall creator update on your computer barring a hindrance.
Are you the one facing issues while trying to install the Windows 10 update 1709 also called the Fall Creators Update “The update gets stuck or fails to download”, then this article is for you. In this tutorial find out the entire information and fixes for the Windows 10 fall Creators update 1709 issues while downloading or installing the update 1709.
The Fall Creator Update 1709 is the fourth major update of Windows 10 and brings lots of new features and improvements for the users.
Millions of users have already installed the Fall Creators update on their system. And in a report, it is confirmed that nearly 79% of Windows 10 users are running the fall Creators update.
But still, there are cases seen when the update fails to install and shows errors. And it is very difficult to know the exact cause of the issue as each update is different as target different issues.
So in this article check out the different solutions that worked for many users to fix Windows 10 update 1709 fails to install.

But before moving forward check the Windows 10 1709 issues while downloading or installing the fall Creators update.
# Issue 1: After completing the download of Windows 10 Fall Creators update version 1709, a message appears to restart the system to install the update. But when the system restarts, users are receiving the message Fall Creators update is not installed and at the update history the error message appears: “Feature update to Windows 10, version 1709: Failed to install…” (error: 0x80080008)
#Issue 2: While checking for the latest updates, Windows start downloading the Fall Creators Update for Windows 10 version 1709, but while downloading the update operation gets stuck at 85 % or 99% and displays an error code 0x80d02002.
These are the two Windows 10 update 1709 issues, now check out the detailed ways to resolve Windows 10 Fall Creators update.
How to Fix Feature Update to Windows 10 Version 1709 Failed to Install
There is no any exact solution that helps you to resolve Windows 10 1709 update fails to install issues, so you need to carry out possible workarounds.
But before moving forward, first, follow the certain easy tweaks that worked to resolve various Windows 10 update related issues.
- First of all, restart your system and run the Windows Update Troubleshooter. This inbuilt tool allows the users to fix various update errors. To access it go to Settings> Update & Security > Troubleshoot > Windows Update
- Uninstall the antivirus or any other security program from your system completely
- Also disconnect USB connected devices that are not required such as USB Wireless Mouse, USB Wireless Network Card, etc
If still unable to install the feature update to Windows 10 version 1709, then follow the below-given workarounds one by one.
Solution 1: Delete the Windows Update folder
The folder (C:\Windows\SoftwareDistribution), is the place where Windows stores the latest updates after downloading them. Sometimes the “SoftwareDistribution” folder gets corrupted and causes issues during downloading or installing the updates.
So deleting the “SoftwareDistribution” folder fixes the Windows 10 Windows 10 update 1709 fails to install issues:
Follow the instruction:
- Hit Win+ R keys > and in the command box > type services.msc > OK

- Then from the list of services locate Windows update service
- Right click on “Windows Update” service > Stop > and close“Services”
But in case you are unable to stop the Windows update service then try the below-given steps
- Double click on Windows update service > open Properties.
- And set the Startup type to Disabled > OK.
- Restart your system
- Now open Windows Explorer > navigate to C:\Windows
- Find and Delete the SoftwareDistribution
Please Note: If while deleting the folder an error “Folder in use – try again” appears, then restart Windows in “Safe Mode” > repeat the above steps. And if you have disabled the Windows Update service Startup type to Disabled, then go to services > set to Automatic > restart your system.
And check for the update and try installing them. Hope this works for you, but if not then follows the second solution.
You May Also Read:
- 5 Methods to Fix Windows 10 Update Error Code 0x80070652
- Top 7 Ways to Fix Update Error 0x8024a105 on Windows 10
- How To Fix Windows 10 Most Common Upgrade Errors
Solution 2: Perform SFC
In many cases, the corrupted Windows system files cause the Windows update errors, so here try to run the SFC scan to repair the corrupted system files.
Follow the steps to do so:
- Open command prompt (Admin) > type sfc/scannow > press Enter
- And the repairing process starts, wait for the whole process to complete.
And try installing the Windows 10 1709 update again.
Hope this works for you but if not then try running the DISM command, this is used to resolve the Windows update related issues.
To Know More Read This: Methods to Utilize DISM Command to Fix Windows 10 Image
Solution 3: Try Downloading and Installing the Update Manually
You can try to download and install the Windows 10 Fall Creators update 1709 update manually by using the Windows Update Assistant:
Follow the steps to do so:
- Go to Microsoft Windows site > click update now button

- When prompted click Run to start the installation immediately or click Save button to run the installer later.
- And click Update Now button and follow the on-screen instruction for installing the update.

Solution 4: Updating Time, Region and Language Settings
This is another uncommon solution that worked for many. The incorrect time zone can also cause the failure to update. So update the time and language settings.
Follow the steps to do so:
- Press Win + s key> type “settings”in the dialogue box > open the result.
- Now check your date and time are set correctly or not > uncheck the “set time automatically” > “set timezone automatically”.
- And click “Change” under Change date and time > set time accordingly > select your time zone as well > disable “Auto-sync time”.
- Next press win + s key again > type language > open the first result that comes forth.
- In the language settings > use English United Kingdom/US.
- Then in the settings window > click “Additional time, date & regional settings”.
- And you will be redirected to another window having same settings > click them one by one > check if settings match and are the same as you set.
- As the changes are finished > close all Windows > restart your system.
Now try installing the update again and check if this helps you to fix Windows 10 fall Creators Update 1709 failed to install.
Solution 5: Disconnect Internet before Updating
This is the last solution that worked for many users – disconnect the internet before updating the operating system.
Follow the steps given:
- Click on network icon presented in the bottom right corner
- If you are connected to WiFi click on “Airplane Mode” your internet will be disabled. But if connected to Ethernet > disconnect cable from your computer
- And start installing the update
Hopefully, this works in your case.
Check Your Windows PC/Laptop Health
You can make use of the professional recommended solution Windows Repair tool, to fix various Windows update errors and other related issues. This is the advanced tool that scan, detect and repair various Windows operating system issues such as corruption, damages of the Windows system files, malware/viruses, protect you from file loss, hardware issues and many more. You can also fix various issues like BSOD error, DLL error, Registry issues, drivers issues, games related issues, application error and many others. This not only fixes the errors but also optimize your Windows PC performance and fix other issues without any hassle.
Conclusion:
The Windows Fall Creators update version 1709 is undoubtedly very important to make your system more secure and get various improvements and new features as well.
In this article try the solutions given to fix Windows 10 Update 1709 fails to install error.
Hope after following the fixes you are able to install the Windows 10 Fall Creators Update version 1709.
Also, check the device drivers and update them, delete the temporary files, scan your system with good antivirus software and remove unwanted software time to time to maintain the Windows PC performance and other issues.
Additionally, if you find the article helpful or have any query, comment, questions or suggestions related, then please feel free to share it with us in the comment section below or you can also go to our Fix Windows Errors Ask Question Page.
Good Luck!!!

Summary
Article Name
Windows 10 1709 Issues – Solved Windows 10 Fall Creators Update 1709 Fails to Install
Description
Struggling with Windows 10 1709 issues – Windows 10 update 1709 fails to install or feature update to Windows 10 version 1709 failed to install, then follow the detailed solutions to fix Windows 10 Fall Creators Update fails to install or stuck issues.
Author
Publisher Name
Fix Windows Error Blog
Publisher Logo