
Skip to content
Navigation Menu
Provide feedback
Saved searches
Use saved searches to filter your results more quickly
Sign up
Appearance settings
Description
Describe the bug
A clear and concise description of what the bug is.
When using vcpkg install, an error occurred: in triplet x64-windows: Unable to find a valid Visual Studio instance
Could not locate a complete Visual Studio instance
Environment
- OS: Windows10,x86_64
- Compiler: Visual Studio Code
To Reproduce
Steps to reproduce the behavior:
- .\vcpkg install thrift
- See error
Error: in triplet x86-windows: Unable to find a valid Visual Studio instance
Could not locate a complete Visual Studio instance
3 minute read
Welcome to my updated demo of a Google Test “Hello, World!” project on Windows using MSYS2, MinGW-w64, and vcpkg. In this guide, we’ll walk through:
- Adjusting environment variable priority in Windows so the correct
g++is picked up. - Installing and configuring MSYS2, MinGW-w64, and vcpkg.
- Dealing with common issues such as “Unable to find a valid Visual Studio instance” and how to ensure we’re using the
x64-mingw-dynamictriplet. - Building and running a minimal Google Test example.
1. Prioritize the Correct Compiler in Windows
When you have multiple versions of g++ on your system (from MSYS2, Cygwin, or elsewhere), it’s important that MSYS2’s MinGW-w64 compiler is picked up first. You can check which ones are visible in PATH by opening Command Prompt (not MSYS2) and running:
C:\Users\Gordon> where g++
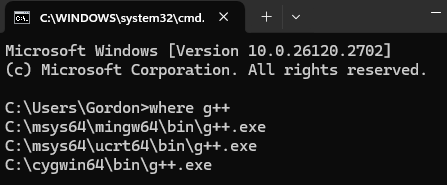
If you see multiple paths, reorder your Windows environment variables so that:
appears before any others in the PATH. This ensures that when you run g++, Windows uses the MinGW-w64 version first.
- Open “System Properties” → “Advanced” → “Environment Variables.”
- Edit the
Pathvariable and moveC:\msys64\mingw64\binto the top. - Apply changes and restart any open terminals so the updated PATH is recognized.
2. Installing MSYS2 and MinGW-w64
-
Install MSYS2
Download MSYS2 and run through the official installer. - Open MSYS2 and update packages with:
(Follow on-screen prompts, then reopen MSYS2 if necessary.)
- Install Required Tools (in MSYS2 MingW64 shell):
pacman -S --needed git base-devel mingw-w64-x86_64-toolchain \ mingw-w64-x86_64-clang mingw-w64-x86_64-cmake - Create a Symlink for
make
By default, MinGW’s make is namedmingw32-make.exe. To ease usage:cd /mingw64/bin ln -s mingw32-make.exe make.exe
3. Bootstrapping vcpkg in MSYS2
3.1 Clone vcpkg
In the MingW64 terminal:
cd /mingw64/bin
git clone https://github.com/microsoft/vcpkg.git
cd vcpkg
3.2 Run the Bootstrap Script

4. Common Installation Pitfall
If you try installing GTest before specifying your triplet, you may see:
error: in triplet x64-windows: Unable to find a valid Visual Studio instance
Could not locate a complete Visual Studio instance

This happens because vcpkg defaults to the x64-windows triplet, expecting Visual Studio.
5. Setting the Correct Triplet
To use MinGW-w64, export these environment variables first:
export VCPKG_DEFAULT_TRIPLET=x64-mingw-dynamic
export VCPKG_DEFAULT_HOST_TRIPLET=x64-mingw-dynamic
Then install GTest again:

6. Integrate vcpkg (Optional)
Run:
./vcpkg integrate install

This instructs you to use:
-DCMAKE_TOOLCHAIN_FILE=C:/msys64/mingw64/bin/vcpkg/scripts/buildsystems/vcpkg.cmake
in your CMake commands.
7. Verifying Installed Packages
Check what’s installed with:

You should see gtest:x64-mingw-dynamic listed.
8. Creating a Minimal GTest Project
Here’s a simple folder structure for a “Hello, World!” project:
gtest_MinGW64_vscode_win_helloworld/
├── CMakeLists.txt
├── src/
│   └── main.cpp
└── tests/
    └── test_helloworld.cpp
CMakeLists.txt
cmake_minimum_required(VERSION 3.10)
project(GTestHelloWorld CXX)

# Option A: Hard-code the vcpkg toolchain file here
#set(CMAKE_TOOLCHAIN_FILE "C:/msys64/mingw64/bin/vcpkg/scripts/buildsystems/vcpkg.cmake" CACHE STRING "" FORCE)

# Option B: Omit the line above and specify via command line

set(CMAKE_CXX_STANDARD 17)
set(CMAKE_CXX_STANDARD_REQUIRED True)

add_executable(helloworld src/main.cpp)

find_package(GTest CONFIG REQUIRED)

add_executable(tests tests/test_helloworld.cpp)
target_link_libraries(tests PRIVATE GTest::gtest GTest::gtest_main)

enable_testing()
add_test(NAME MyHelloWorldTest COMMAND tests)
src/main.cpp
#include <iostream>

int main() {
    std::cout << "Hello, World!" << std::endl;
    return 0;
}
tests/test_helloworld.cpp
#include <gtest/gtest.h>

// Sample function to test
int add(int a, int b) {
    return a + b;
}

TEST(HelloWorldTest, TestAdd) {
    EXPECT_EQ(add(2, 2), 4);
    EXPECT_EQ(add(-1, 1), 0);
}

TEST(HelloWorldTest, AnotherTest) {
    EXPECT_TRUE(true);
}
9. Building and Running Tests
- Create a
builddirectory and go inside it:cd gtest_MinGW64_vscode_win_helloworld mkdir build && cd build - Invoke CMake using the MinGW Makefiles generator and the vcpkg toolchain:
cmake -G "MinGW Makefiles" \ -DCMAKE_TOOLCHAIN_FILE=C:/msys64/mingw64/bin/vcpkg/scripts/buildsystems/vcpkg.cmake \ -DVCPKG_TARGET_TRIPLET=x64-mingw-dynamic \ .. - Build the project:
This produces
helloworld.exeandtests.exe. - Run the tests:
You should see Google Test’s output indicating 2 passing tests.
Conclusion
By prioritizing the correct g++ in your Windows PATH and setting the x64-mingw-dynamic triplet, you can avoid the Visual Studio dependency and run GTest projects with MSYS2 + MinGW-w64. The vcpkg package manager simplifies installing libraries like GTest, and you’re free to expand this skeleton into a more advanced project.
If you have any questions or run into issues, feel free to reach out. Happy coding!
Okay I think I managed to build a statically linked binary with commit e5c47e911b2e94bc2864db915ed259af1ee9a765.
Here are the steps:
Building with MinGW64 (MSYS2)
1. Get Vulkan SDK and install dependencies
pacman -Syu git make mingw-w64-x86_64-SDL2 mingw-w64-x86_64-cmake mingw-w64-x86_64-qt5 mingw-w64-x86_64-toolchain
python-pip and some other libraries do not seem to be used.
2. Setup environment variables
PATH={Absolute path to the Bin folder in Vulkan SDK}:$PATH
export VCPKG_DEFAULT_HOST_TRIPLET=x64-mingw-static
export VCPKG_DEFAULT_TRIPLET=x64-mingw-static
We have to manually set some VCPKG variables for some reason.
This issue probably already exists in the original Yuzu.
3. Generating makefile
mkdir build && cd build
cmake -G "MSYS Makefiles" -DSUYU_USE_BUNDLED_VCPKG=ON -DSUYU_TESTS=OFF -DVCPKG_TARGET_TRIPLET=x64-mingw-static ..
Also have to overwrite DVCPKG_TARGET_TRIPLET to x64-mingw-static here.
I have also tried -DSUYU_ENABLE_LTO=ON, which leads to the linker error above.
4. Build suyu
make -j4 suyu
The reason we are not using make all is that linker will fail.
This is because Yuzu developer didn’t set linker flags properly in their CMakeLists.txt for some reason. So we have add something manually.
VERBOSE=1 make suyu
This will shows the exact link command, should be something like:
cd ***/src/suyu && /mingw64/bin/c++.exe -O3 -DNDEBUG -Wl,--subsystem,windows -Wl,--whole-archive ...
Copy the command line and add the following arguments:
-static-libstdc++ -lws2_32 -s -Wl,--Map,../../bin/suyu.map
Explanation of the extra arguments:
-static-libstdc++: Force usage of static libstdc++, without this argument the binary will have no entrypoint.-lws2_32: Link the ws2_32.a provided by mingw.-s: Optional, strip the symbols from the output binary.-Wl,--Map,../../bin/suyu.map: Optional, output a separated linker map to../../bin/suyu.map
Please note that-lw2_32is already added, but the order is not correct and hence cause linking fails.
Now the built executable should work properly. Repeating step 4 should build suyu-cmd as well.
Some dll (e.g., Qt) are still required as they cannot being linked statically. Copying dll from the latest release also works.
Summary
After all, there could be three issues.
1. Update the Outdated Building Guide
As above.
2. Fix (Static) Linking
Add some option to CMakeLists.txt so that we could build static linked binaries properly with the build system.
For example, adding something like:
if (MINGW and SUYU_STATIC_BUILD)
    set_target_properties(suyu PROPERTIES LINK_FLAGS "-static-libstdc++ -lws2_32")
    set_target_properties(suyu PROPERTIES LINK_FLAGS_RELEASE "-s -Wl,--Map,../../bin/suyu.map")
endif()
to src/suyu/CMakeLists.txt and src/suyu-cmd/CMakeLists.txt.
I am not very familiar with cmake so this may not be totally correct.
And, please note that adding -lws2_32 is just a temporary solution.
The link order should be fixed properly in CMakeList.txt as well.
3. Fix Broken LTO Option
When link time optimization (LTO) is enabled, link process would be somehow broken.
I am not pretty sure what was the cause, but it’s likely because the link order is not correct as mentioned previously.
Okay I think I managed to build a statically linked binary with commit `e5c47e911b2e94bc2864db915ed259af1ee9a765`.
Here are the steps:
—
# Building with MinGW64 (MSYS2) #
## 1. Get Vulkan SDK and install dependencies ##
«`
pacman -Syu git make mingw-w64-x86_64-SDL2 mingw-w64-x86_64-cmake mingw-w64-x86_64-qt5 mingw-w64-x86_64-toolchain
«`
`python-pip` and some other libraries do not seem to be used.
## 2. Setup environment variables ##
«`
PATH={Absolute path to the Bin folder in Vulkan SDK}:$PATH
export VCPKG_DEFAULT_HOST_TRIPLET=x64-mingw-static
export VCPKG_DEFAULT_TRIPLET=x64-mingw-static
«`
We have to manually set some VCPKG variables for some reason.
This issue probably already exists in the original Yuzu.
## 3. Generating makefile ##
«`
mkdir build && cd build
cmake -G «MSYS Makefiles» -DSUYU_USE_BUNDLED_VCPKG=ON -DSUYU_TESTS=OFF -DVCPKG_TARGET_TRIPLET=x64-mingw-static ..
«`
Also have to overwrite `DVCPKG_TARGET_TRIPLET` to `x64-mingw-static` here.
I have also tried `-DSUYU_ENABLE_LTO=ON`, which leads to the linker error above.
## 4. Build suyu ##
«`
make -j4 suyu
«`
The reason we are not using `make all` is that linker will fail.
This is because Yuzu developer didn’t set linker flags properly in their `CMakeLists.txt` for some reason. So we have add something manually.
«`
VERBOSE=1 make suyu
«`
This will shows the exact link command, should be something like:
«`
cd ***/src/suyu && /mingw64/bin/c++.exe -O3 -DNDEBUG -Wl,—subsystem,windows -Wl,—whole-archive …
«`
Copy the command line and add the following arguments:
«`
-static-libstdc++ -lws2_32 -s -Wl,—Map,../../bin/suyu.map
«`
Explanation of the extra arguments:
— `-static-libstdc++`: Force usage of static libstdc++, without this argument the binary will have no entrypoint.
— `-lws2_32`: Link the ws2_32.a provided by mingw.
— `-s`: Optional, strip the symbols from the output binary.
— `-Wl,—Map,../../bin/suyu.map`: Optional, output a separated linker map to `../../bin/suyu.map`
Please note that `-lw2_32` is already added, but the order is not correct and hence cause linking fails.
Now the built executable should work properly. Repeating step 4 should build `suyu-cmd` as well.
Some dll (e.g., Qt) are still required as they cannot being linked statically. Copying dll from the latest release also works.
—
# Summary #
After all, there could be three issues.
## 1. Update the Outdated Building Guide ##
As above.
## 2. Fix (Static) Linking ##
Add some option to `CMakeLists.txt` so that we could build static linked binaries properly with the build system.
For example, adding something like:
«`
if (MINGW and SUYU_STATIC_BUILD)
set_target_properties(suyu PROPERTIES LINK_FLAGS «-static-libstdc++ -lws2_32»)
set_target_properties(suyu PROPERTIES LINK_FLAGS_RELEASE «-s -Wl,—Map,../../bin/suyu.map»)
endif()
«`
to `src/suyu/CMakeLists.txt` and `src/suyu-cmd/CMakeLists.txt`.
I am not very familiar with `cmake` so this may not be totally correct.
And, please note that adding `-lws2_32` is just a temporary solution.
The link order should be fixed properly in `CMakeList.txt` as well.
## 3. Fix Broken LTO Option ##
When link time optimization (LTO) is enabled, link process would be somehow broken.
I am not pretty sure what was the cause, but it’s likely because the link order is not correct as mentioned previously.
После изучения руководства по vcpkg с cmake. Cmake не смог распознать «MinGW Makefiles» с помощью vcpkg.
Некоторая информация о моей системе
Я использую 64-разрядную версию Windows и скачал mingw из winlibs и добавил его в «PATH», а cmake (версия 3.31.3) скачал с официального сайта в виде zip-файла, также добавил его в «PATH», и vcpkg с в руководстве добавлено добавление «VCPKG_ROOT» и пути к нему в качестве переменной ENVIRONMENT и еще раз в «PATH».
каталог helloworld:
- vcpkg.json:
- Cmakelists.txt
Код: Выделить всё
cmake_minimum_required(VERSION 3.10)

project(HelloWorld)

find_package(fmt CONFIG REQUIRED)

add_executable(HelloWorld helloworld.cpp)

target_link_libraries(HelloWorld PRIVATE fmt::fmt)
- vcpkg-configuration.json
Код: Выделить всё
{
"default-registry": {
"kind": "git",
"baseline": "80d54ff62d528339c626a6fbc3489a7f25956ade",
"repository": "https://github.com/microsoft/vcpkg"
},
"registries": [
{
"kind": "artifact",
"location": "https://github.com/microsoft/vcpkg-ce-catalog/archive/refs/heads/main.zip",
"name": "microsoft"
}
]
}
- helloworld.cpp
Код: Выделить всё
#include

int main()
{
fmt::print("Hello World!\n");
return 0;
}
- CMakePresets.json
Код: Выделить всё
{
"version": 2,
"configurePresets": [
{
"name": "vcpkg",
"generator": "MinGW Makefiles",
"binaryDir": "${sourceDir}/build",
"cacheVariables": {
"CMAKE_TOOLCHAIN_FILE": "$env{VCPKG_ROOT}/scripts/buildsystems/vcpkg.cmake"
}
}
]
}
- CMakeUserPresets.json
Код: Выделить всё
{
"version": 2,
"configurePresets": [
{
"name": "default",
"inherits": "vcpkg",
"environment": {
"VCPKG_ROOT": "C:/vcpkg"
}
}
]
}
Проблема
После помещения всего этого в каталог helloworld. Я использовал команду «cmake —preset=default» внутри каталога helloworld, и она вывела следующую ошибку:
Код: Выделить всё
Preset CMake variables:

CMAKE_TOOLCHAIN_FILE="C:/vcpkg/scripts/buildsystems/vcpkg.cmake"

Preset environment variables:

VCPKG_ROOT="C:/vcpkg"

-- Running vcpkg install
Fetching registry information from https://github.com/microsoft/vcpkg (HEAD)...
error: in triplet x64-windows: Unable to find a valid Visual Studio instance
Could not locate a complete Visual Studio instance

-- Running vcpkg install - failed
CMake Error at C:/vcpkg/scripts/buildsystems/vcpkg.cmake:904 (message):
vcpkg install failed.  See logs for more information:
C:/helloworld/build/vcpkg-manifest-install.log
Call Stack (most recent call first):
C:/cmake/share/cmake-3.31/Modules/CMakeDetermineSystem.cmake:146 (include)
CMakeLists.txt:3 (project)

CMake Error: CMake was unable to find a build program corresponding to "MinGW Makefiles".  CMAKE_MAKE_PROGRAM is not set.  You probably need to select a different build tool.
CMake Error: CMAKE_C_COMPILER not set, after EnableLanguage
CMake Error: CMAKE_CXX_COMPILER not set, after EnableLanguage
-- Configuring incomplete, errors occurred!
и внутри «C:/helloworld/build/vcpkg-manifest-install.log» это:
Код: Выделить всё
Fetching registry information from https://github.com/microsoft/vcpkg (HEAD)...
error: in triplet x64-windows: Unable to find a valid Visual Studio instance
Could not locate a complete Visual Studio instance
Я должен упомянуть, что cmake может распознавать «MinGW Makefiles», но без vcpkg.
Поэтому я не думаю, что это проблема в моем «PATH». «, или любую переменную среды в моей системе.
Это «version_info.txt» для используемой версии winlib:
Код: Выделить всё
winlibs personal build version gcc-14.2.0-llvm-19.1.1-mingw-w64ucrt-12.0.0-r2

This is the winlibs Intel/AMD 64-bit standalone build of:
- GCC 14.2.0
- GDB 15.2
- LLVM/Clang/LLD/LLDB 19.1.1
- MinGW-w64 12.0.0 (linked with ucrt)
- GNU Binutils 2.43.1
- GNU Make 4.4.1
- PExports 0.47
- dos2unix 7.5.2
- Yasm 1.3.0
- NASM 2.16.01
- JWasm 2.12pre
- ccache 4.10.2
- CMake 3.30.4
- ninja 1.12.1
- Doxygen 1.12.0
- Universal Ctags 6.1.0
- Cppcheck 2.15.0

Thread model: posix
Runtime library: UCRT (Windows 10 or higher, or when [Update for Universal C Runtime](https://support.microsoft.com/en-us/topic/update-for-universal-c-runtime-in-windows-c0514201-7fe6-95a3-b0a5-287930f3560c) is installed on older Windows versions, not supported on systems older than Windows 7 SP1 and Windows Server 2008 R2 SP1)
Решение
После этого вопроса об использовании пользовательских триплетов с vcpkg и CMake, а также документации vcpkg.
Я добавил триплеты dir и внутри он x64-mingw-dynamic и x64-mingw-static загружен с github здесь и изменен CmakePresets.json на:
Код: Выделить всё
{
"version": 2,
"configurePresets": [
{
"name": "vcpkg",
"generator": "MinGW Makefiles",
"hidden": true,
"binaryDir": "${sourceDir}/build",
"cacheVariables": {
"VCPKG_OVERLAY_TRIPLETS": "${sourceDir}/triplets",
"CMAKE_TOOLCHAIN_FILE": "$env{VCPKG_ROOT}/scripts/buildsystems/vcpkg.cmake"
}
},
{
"name": "mingw64",
"hidden": true,
"cacheVariables": {
"VCPKG_TARGET_TRIPLET": "x64-mingw-static",
"VCPKG_HOST_TRIPLET": "x64-mingw-static"
}
}
]
}
и изменил CmakeUserPresets.json на:
Код: Выделить всё
{
"version": 2,
"configurePresets": [
{
"name": "default",
"inherits": ["vcpkg", "mingw64"],
"environment": {
"VCPKG_ROOT": "C:/vcpkg"
}
}
]
}
, и я запустил «cmake —preset=default»thin «cmake —build build»thin наконец «./build/HelloWorld.exe», и он вывел: «Hello World !».
Подробнее здесь: https://stackoverflow.com/questions/793 … sing-vcpkg
In this troubleshooting guide, we will explore how to resolve the issue when CMake is unable to locate any instance of Visual Studio on your system. This error may occur while building a project that requires CMake and Visual Studio.
Table of Contents
- Introduction
- Prerequisites
- Verify Visual Studio Installation
- Install the Required Workloads and Components
- Set CMake Environment Variables
- Upgrade CMake
- FAQ
Introduction
The ‘CMake Could Not Find Any Instance of Visual Studio’ issue usually occurs when CMake is unable to locate the Visual Studio installation on your system. This error may prevent you from building or compiling projects that require CMake and Visual Studio. In this guide, we will walk you through the necessary steps to fix this issue.
Prerequisites
Before diving into the troubleshooting steps, ensure you have the following software installed on your system:
- CMake
- Visual Studio
Verify Visual Studio Installation
First, verify that Visual Studio is installed correctly on your system by following these steps:
- Open Visual Studio.
- Click on Help in the menu bar.
- Select About Microsoft Visual Studio.
- Check the version number and ensure it is up to date.
If Visual Studio is not installed, you can download it from the official website.
Install the Required Workloads and Components
To ensure that CMake can find Visual Studio, you need to install the required workloads and components. Follow these steps:
- Open Visual Studio Installer.
- Click on Modify for the installed Visual Studio edition.
- In the Workloads tab, ensure that the Desktop development with C++ workload is selected.
- Switch to the Individual components tab, and ensure the following components are selected:
- C++ CMake tools for Windows
- MSVC v142 — VS 2019 C++ x64/x86 build tools (Latest)
- Windows 10 SDK (10.0.x.x) for Desktop
- Click on Modify to install the selected workloads and components.
Once the installation is complete, try running CMake again to see if the issue has been resolved.
Set CMake Environment Variables
If the issue persists, try setting the CMake environment variables manually by following these steps:
- Press
Win + Xand select System. - Click on Advanced system settings.
- In the System Properties window, click on Environment Variables.
- Under System variables, click on New.
- Set the following environment variables:
- Variable name:
CMAKE_ROOT - Variable value:
<path_to_cmake_installation>
- Click on OK to save the changes.
Now, restart your system and try running CMake again to see if the issue has been resolved.
Upgrade CMake
If the issue still persists, consider upgrading CMake to the latest version. You can download the latest version of CMake from the official website.
FAQ
1. How can I check the version of CMake installed on my system?
Open a command prompt and type cmake --version. This command will display the version number of your installed CMake.
2. Can I have multiple versions of Visual Studio installed on my system?
Yes, you can have multiple versions of Visual Studio installed on your system. However, ensure that you have the required workloads and components installed for each version.
3. How do I update Visual Studio to the latest version?
Open the Visual Studio Installer, click on the Update button next to the installed Visual Studio edition, and follow the on-screen instructions to update Visual Studio.
4. What if I don’t have the required workloads and components for Visual Studio?
If you don’t have the required workloads and components installed, you can follow the steps mentioned in the Install the Required Workloads and Components section to install them.
5. Can I use CMake with Visual Studio Code?
Yes, you can use CMake with Visual Studio Code by installing the CMake Tools extension from the Visual Studio Code marketplace.
- CMake Official Documentation
- Visual Studio Documentation
- CMake Tools Extension for Visual Studio Code