
— by: C. Smith
If you are trying the Linux Subsystem for Windows feature for the first time, you will probably receive the following error message when you boot any Linux distribution:
Installing, this may take a few minutes…
WslRegisterDistribution failed with error: 0x8007019e
Error: 0x8007019e The Windows Subsystem for Linux has not been enabled.
Plenty of developers face this problem regardless of the web technology used. So this is not a node.js, angular, express, web
This is true even if you have enabled virtualization in the BIOS. The error occurs because WSL is not enabled by default, so you have to do it yourself.
To do this, open the start menu and start typing Turn Windows feature on or off .

Click on the result to open and scroll to the bottom of the list. You need to enable two features:
Virtual Machine PlatformWindows Subsystem for Linux

The installation is quick, just a few seconds. After that, you have to restart Windows.
Windows Version
Microsoft Windows [Version 10.0.22621.2715]
WSL Version
2.0.12.0
Are you using WSL 1 or WSL 2?
- WSL 2
- WSL 1
Kernel Version
5.15.133.1-1
Distro Version
No response
Other Software
Docker Desktop
Repro Steps
wsl —install
Expected Behavior
wsl —install should install default distro as Ubuntu, and Docker Desktop should be able to create docket-desktop-data and docker-desktop.
Actual Behavior
Executing wsl --install command returns an error «0x8007019e The Windows Subsystem for Linux has not been enabled.».
wsl —install
Ubuntu is already installed.
Launching Ubuntu…
Error: 0x8007019e The Windows Subsystem for Linux has not been enabled.
Press any key to continue…
The operation completed successfully.
Diagnostic Logs
No response
WINDOWS
Introduction
With the rise of cross-platform development and the increasing popularity of Linux in the programming community, Microsoft has integrated the Windows Subsystem for Linux (WSL) into its operating systems. WSL allows developers to run a Linux environment directly on Windows, enabling them to utilize Linux tools and software without the need for a separate virtual machine. However, many users encounter issues while setting it up, the most common being the error code 0x8007019e, indicating that WSL has not been enabled. This guide will help you understand this error and provide step-by-step solutions to get WSL running smoothly on your Windows 11 machine.
Understanding Windows Subsystem for Linux (WSL)
Before diving into the resolution, it’s essential to understand WSL and its versions.
What is WSL?
-
WSL 1: Introduces a compatibility layer for running Linux binary executables natively on Windows 10 and Windows 11.
-
WSL 2: A complete Linux kernel, enhancing file system performance and allowing the use of full Linux distributions.
Use Cases for WSL
-
Development: Access Linux-native development tools directly from Windows.
-
Scripting: Run bash scripts natively in a Windows environment.
-
Containerization: Work with Docker and other container tools that rely on Linux.
Causes of Error 0x8007019e
The error 0x8007019e typically arises when the Windows Subsystem for Linux is not activated or configured correctly on your Windows system. Possible causes include:
-
WSL Not Enabled: The feature may not be enabled in the Windows Features settings.
-
Windows Version Incompatibility: WSL is not supported on certain versions of Windows.
-
Incomplete Installation: A damaged or incomplete WSL installation can trigger this error.
How to Resolve the 0x8007019e Error
Step 1: Check Windows Version
Make sure you are running Windows 11 version 2022 or later which supports WSL 2. To check your Windows version:
-
Press
Win + Rto open the Run dialog. -
Type
winverand press Enter. -
Make sure your version is compatible with WSL.
Step 2: Enable Windows Subsystem for Linux
If WSL is not enabled, follow these steps:
-
Open Windows Features:
-
Press
Win + R, typeoptionalfeatures, and hit Enter.
-
-
Enable WSL:
-
In the Windows Features dialog, scroll down to find “Windows Subsystem for Linux”.
-
Check the box next to it.
-
Additionally, check “Virtual Machine Platform” for WSL 2 support.
-
-
Click OK and wait for the changes to apply.
-
Restart Your Computer: A restart is necessary for changes to take effect.
Step 3: Install a Linux Distribution
To use WSL effectively, you must have a Linux distribution installed. Here’s how to install one:
-
Open Microsoft Store.
-
Search for “Linux” or your preferred distribution (e.g., Ubuntu).
-
Click on the distribution you want to install and hit “Get”.
Step 4: Update WSL
You can ensure you’re using the latest version of WSL with these commands:
-
Open Windows Terminal or Command Prompt as Administrator.
-
Run the following command:
Step 5: Set WSL 2 as Default (Optional)
If you want to ensure that new installations use WSL 2:
-
Open Windows Terminal or Command Prompt as Administrator.
-
Run:
wsl --set-default-version 2
Step 6: Verify Installation
You can check whether WSL is properly installed and configured:
-
Open Command Prompt or Windows Terminal.
-
Type:
This command will display the installed distributions and their WSL versions.
Additional Troubleshooting Tips
-
Check Windows Update: Ensure your Windows is up to date. Go to Settings > Update & Security > Windows Update.
-
Run System File Checker: Corrupted system files could affect WSL. Run the following command:
-
Reinstall WSL: If all else fails, consider uninstalling and reinstalling WSL, or even resetting your Linux distribution via the Settings app.
Conclusion
Encountering the error 0x8007019e while trying to set up WSL on Windows 11 can be frustrating. However, by following this comprehensive guide, you can resolve this issue effectively. Once WSL is enabled and configured, you’ll unlock a plethora of development possibilities directly within your Windows environment.
Feel free to leave comments or questions if you encounter any difficulties along the way. Happy coding!
Suggested Articles
WINDOWS
WINDOWS
WINDOWS
WINDOWS
WINDOWS
WINDOWS
The wslregisterdistribution failed with error: 0x8007019e issue may be fixed by enabling the Windows Subsystem for Linux (WSL) feature. This may be accomplished by turning Windows Features On or using Windows PowerShell, as elaborated later in this guide.
Most of the affected users get the WSL register distribution failed with error: 0x8007019e/0x8000000d when trying to launch the command line. At first glance, the error message may appear as though it has been triggered by a faulty WSL installation. However, it could just be a false positive binary classification error.
In most cases, it occurred simply because Windows 10 functions are not supported, making it impossible for you to run the WSL command line. Throughout this guide, you will learn the possible causes of the problem, and the various solutions you can apply to fix it.
What is the WSL Feature?
The Windows Subsystem for Linux (WSL) by Microsoft is essentially a series of Microsoft components. The components are meant to allow the Linux Linkable Format (ELF64), and the 64-bit Executable binaries to run on the Windows kernel, especially for the Windows 10 operating system (OS).
With the WSL feature enabled in Windows 10, you will be able to run the Linux Bash She’ll to install the Ubuntu user-mode image. In this case, the Ubuntu image will run on top of the Windows kernel layer as it will allow ELF64 binaries to operate in the Windows environment.
Following a successful installation, you will also be able to run other Ubuntu package repository files, navigate the file system, and even execute scripts using command-line interface (CLI) utilities. The WSL architecture allows the Linux distro calls to be passed to and handled by the Windows kernel.
Though useful for Linux developers on the Windows environment, you may encounter an error message when you try to open the WSL feature. The error message reads:
“Installing, this may take a few minutes…
wslRegisterDistribution failed with error: 0x8007019e/0x8000000d
Error: 0x8007019e/0x8000000d The parameter is incorrect.
Press any key to continue.”
This error message renders it impossible for developers to launch and use the WSL command line. It may be triggered by several problems on your computer, including:
Corrupted Linux Terminal App Modules
Corrupted Linux distribution app files can trigger the WSL register distribution failed error code 0x8007019e or 0x8000000d. If this happens to be the problem, you have to repair the corrupted modules using the Repair tool on the Windows Settings menu of your computer.
In some cases, the corrupted modules may be beyond repair. In such a case, you just have to reinstall the distribution afresh.
Windows Subsystem for Linux is Disabled
In most cases, you will get this error message when the WSL feature in your Windows 10 computer is disabled. The WSL feature is essential for the Linux distribution to run in a Windows environment. To fix such a problem, you only need to enable the subsystem for the Linux option on your computer.
LxssManager Service Failure
The Linux instance life cycle service (LxssManager) runs in the background of your Windows computer to keep several things under control. Though rare, this service may get stuck in operation, or happen to be in an error state.
Such a scenario will also result in the WSL register distribution error: 0x8007019e. You can fix this glitch by just restarting the LxssManager service on your computer, as explained later on in this guide.
Outdated Linux Distribution
You may also be getting this WSL failure error message just because you are using an outdated version of the Linux distro. If you are running an outdated version, updating it could resolve the WSL failure issue know your computer. Rather than having to reinstall the application entirely, you can use the Command Prompt to update it, as illustrated below.
How To Fix the wslregisterdistribution Failed with Error: 0x8007019e
With the WSL feature enabled on Windows 10, developers can use advanced development languages like Python, and Ruby through Windows. Additionally, it allows you to use most of the common Linux tools within a Windows environment.
However, this does not always work as smoothly as it is expected to; you may end up getting the WSL register distribution error message. Before trying the more advanced solutions for this problem, it is advisable to try launching the Linux console from the Search Bar (Positioned on the Taskbar).
If this does not seem to fix the problem, you can try out the following methods and procedures to fix the problem once and for all:
Method 1: Enable the Windows Subsystem for Linux Feature
If the Windows subsystem for Linux optional component is not enabled on your Windows 10 PC, you will get the WSL failure error code 0x8007019e. As such, you first need to ensure that the WSL feature on your computer is enabled.
The Windows Subsystem for Linux feature on Windows 10 may be enabled in a number of ways, including:
By Toggling the Turn Windows Features ON/Off Option
On your Windows 10 Taskbar, click on the Windows Search bar, type ‘Control Panel’ into it, and then press Enter. On the search results, select the Control panel to open it. Open the ‘Uninstall a program’ category on the Control Panel.
Now navigate to the left lane and click on the ‘Turn Windows Feature On or Off’ option. Scroll downwards, to locate and enable the ‘Windows Subsystem for Linux’ Option. If this feature is already enabled, you should disable it, and restart the computer.
After the computer has started, follow the above-described steps to activate the ‘Windows Subsystem for Linux’ feature. Once you are done, close the window and restart the computer. Check to see whether the error has been fixed.
Enable the WSL from the Microsoft Store
A bug may affect the system in such a way that it triggers the WSL register distribution failure error when launched from the command prompt or shortcut. If so, launching the application right from the Microsoft Store interface may solve the problem.
To do this, click on the Windows Search box on your Taskbar, type ‘Microsoft Store’, and press the Enter button to run the search. Click on the Microsoft Store entry on the search results to open it. Next, click on the horizontal Ellipses icon, located in the top-right corner of the window. From the context menu that comes up, select ‘My Library’.
You should then select the Installed option from the left lane and then select your Linux distro App from the right pane. Finally, click on the Launch button and allow the process to complete. Check to see whether the wslregisterdistribution Failed with Error: 0x8007019e has been fixed.
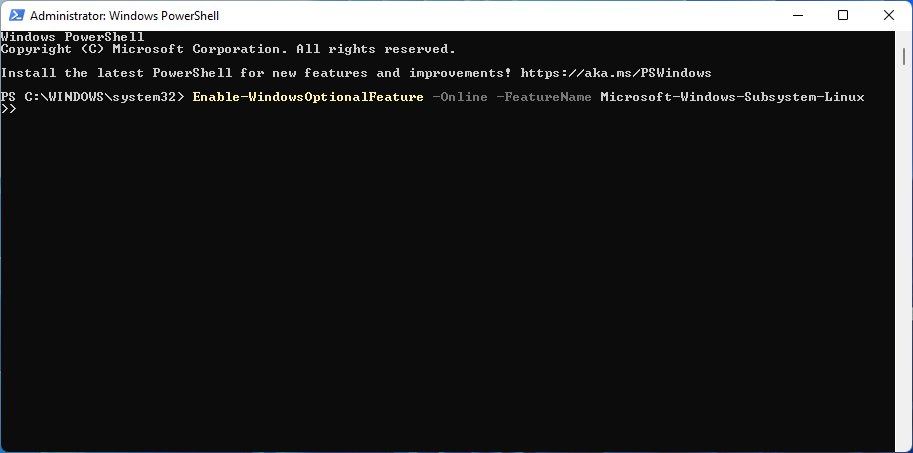
Using the PowerShell
You can also enable the WSL feature on your computer from PowerShell. In this regard, you first need to launch PowerShell as an Administrator. With PowerShell, you should use it to run the following command:
Enable-WindowsOptionalFeature -Online -FeatureName Microsoft-Windows-Subsystem-Linux
If executed successfully, the system will start an automatic search for the missing/corrupted files and install them accordingly. When prompted, type Y to finalize the process and restart the computer.
Method 2: Restart the LxssManager Service
As mentioned earlier in this guide, a fault in the LxssManager service on your computer can also trigger the wsl register distribution Failed error code 0x8007019e message. If you think this to be the cause of the WSL failure in your computer, you should just restart the service to clear the error message.
To achieve this, press the Windows + R keyboard shortcut to launch a Run dialog box. Next, you need to type ‘Services.msc’ into the dialogue box, and either press OK or press the Enter key. Scroll through the list of services displayed to locate the LxssManager service.
Once you find it, click on it and then click on the Restart button on the left lane. Having restarted the service, you can now relaunch the terminal to check whether the error has been resolved.
Method 3: Update the Linux Terminal Using the Command Prompt
If the above-discussed methods have not cleared the ‘wslregisterdistribution failed with error: 0x8007019e message, you should try updating the Terminal. Rather than having to reinstall your Linux Terminal, you can just use a command prompt to update it.
The following procedure will help you accomplish this:
Step 1: Click o the Windows Search box on your Taskbar, type ‘Command Prompt’, and press the Enter key to run the search.
Step 2: On the list of results you get, right-click on the Command Prompt entry and select ‘Run as Administrator’.
Step 3: Type the following commands into the prompt, and press the Enter key after entering each of them to run them separately:
C:\> bash
$ sudo apt-get update
$ sudo apt-get dist-upgrade
$ <CTRL-D>
C:\> exit
Once all the commands have been executed successfully, try launching your Linux Terminal to check whether the error has cleared.
Method 4: Repair Your Linux Terminal App
The installation files for the Linux distribution on your computer may also be corrupted, resulting in this error message. The corrupted files may be repaired using the repair tool on the Windows settings menu. To run this repair tool, right-click on the Windows button, and then select Settings from the Stay Menu.
Next, you need to select Apps, and then locate the Linux Distribution Application (such as Ubuntu). Now scroll down towards the end, and click on the Repair button. Wait until the repair process is completed to check whether the error has cleared.
If not, navigate to the Advanced options, as described in the above. Now select the Reset button. Note that this operation will delete your data/settings. Once done, launch the distro to see whether the error has cleared.
Method 5: Reinstall the Linux Console Application
If the repair process failed to resolve the ‘wslregisterdistribution Failed with Error: 0x8007019e’ problem, the corrupted modules may simply be beyond repair. In such a case, the right solution would be to uninstall and then reinstall the application once again.
To do this, right-click on the Windows button on your desktop, and select Settings from the context menu that comes up. On this settings menu, locate and click on your Linux distribution app. Next, click on the Uninstall button, and follow the on-screen prompts to remove the distribution from your computer.
Once you have removed the distro, you need to disable the Subsystem for Linux Option (using the procedure described in method 1). Now restart the computer, and enable the Subsystem for Linux feature. Having enabled the WSL, you can now install a genuine copy of the Linux Console Application.
Method 6: CMD Bypass Solution
This is a convenient workaround that may be used to navigate around the ‘wslregisterdistribution Failed with Error: 0x8007019e’ error screen. This method requires you to open a command prompt on your computer. You can do this by searching for it using the search bar on your start menu or using the Ctrl + R keyboard shortcut.
Next, you need to run the following commands on the command prompt (enter each of them separately and press Enter before running the next command).
wslconfig.exe /setdefault kali-rolling
bash
cd
You may be using this method to start your Kali Linux from the command line. Well, it is not a recommended way to do it, but will serve as a temporary solution.
Final Verdict
The WSL register distribution failed error means that Windows 10 functions are not supported. As a result, the error will not allow you to use the WSL command line on your computer. As mentioned earlier in this guide, the error message may be triggered by multiple things, ranging from faulty LxssManager service to disabled WSL feature.
The above-discussed methods address the various causes of the problem and will help you fix it once and for all. If none of the methods worked, you need to reinstall your Windows 10 OS again or reset it to a version that worked. Regardless of the scenario, this guide will ensure that you do not get the ‘WslRegisterDistribution failed’ error message when launching the WSL command line.
Readers help support Windows Report. We may get a commission if you buy through our links.
Read our disclosure page to find out how can you help Windows Report sustain the editorial team. Read more
Ubuntu is an open-source Linux distribution that can run on Windows 11, but some users have reported errors.
WSL is not designed for regular Windows users. It is for system administrators and developers who enjoy coding.
However, in some cases, when you want to run Ubuntu on Windows 11, you receive different error messages. These errors occur for many reasons, such as upgrading, installation issues, or some missing components in WSL.
To fix Windows 11’s Ubuntu errors, you first need to know what they are. Therefore, before solving them, we explain the most common ones that you can get when running it on Windows 11.
What are 0x8007003, 0x8007019e, and 0x800701bc WslRegisterDistribution Failed errors?
- 0x80070032 error: 0x80070032 is an error that appears when you want to upgrade WSL to the next version. This error also shows that your Virtual machine platform is disabled.
- 0x8007019e error: 0x8007019e error occurs when you don’t have permission to run the command line in Linux. Just like the first error, it shows that WSL is disabled. Also, many users have reported recieving 0x8007019e when trying to install Ubuntu from Microsoft store. However, you can easily troubleshoot it by enabling components in Windows 11. We will provide you with some instructions to solve this error in the next sections.
- 0x800701bc error: 0x800701bc is a Linux Kernel issue when you attempt to install Ubuntu. In this case, you should download WSL2 Linux Kernel. Hopefully, Microsoft provides the latest update on WSL that you can download.
How can I fix Windows 11’s WSL Ubuntu errors?
1. Fix the 0x80070032 error
Reset Microsoft Store
- First, open the Start menu. Right-click on Microsoft Store and select App settings.

- Now scroll down a bit and click on the Reset button.

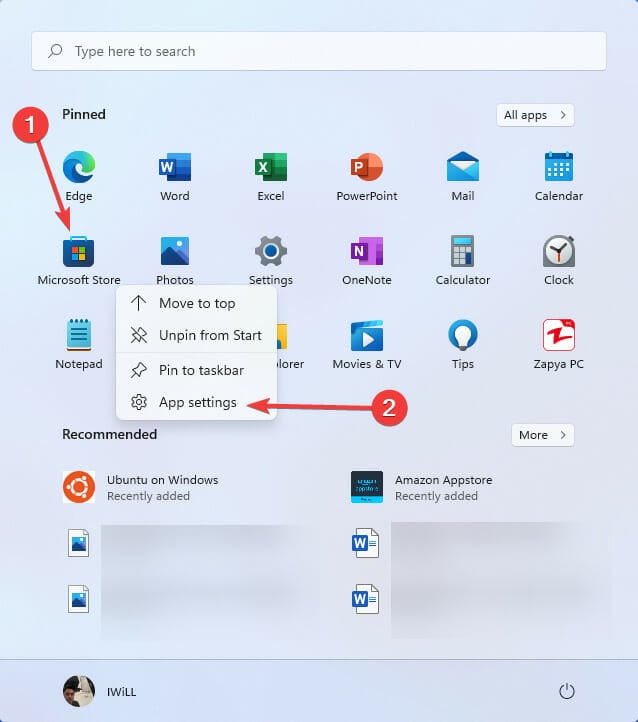
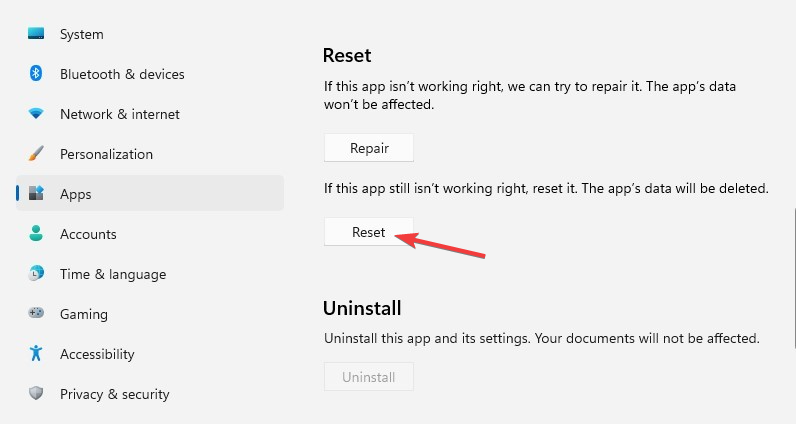
As we mentioned earlier, 0x80070032 error arises from reinstalling or upgrading WSL. Therefore, we need to reset/reinstall Microsoft Store or clear its cache.
Reinstall Microsoft Store
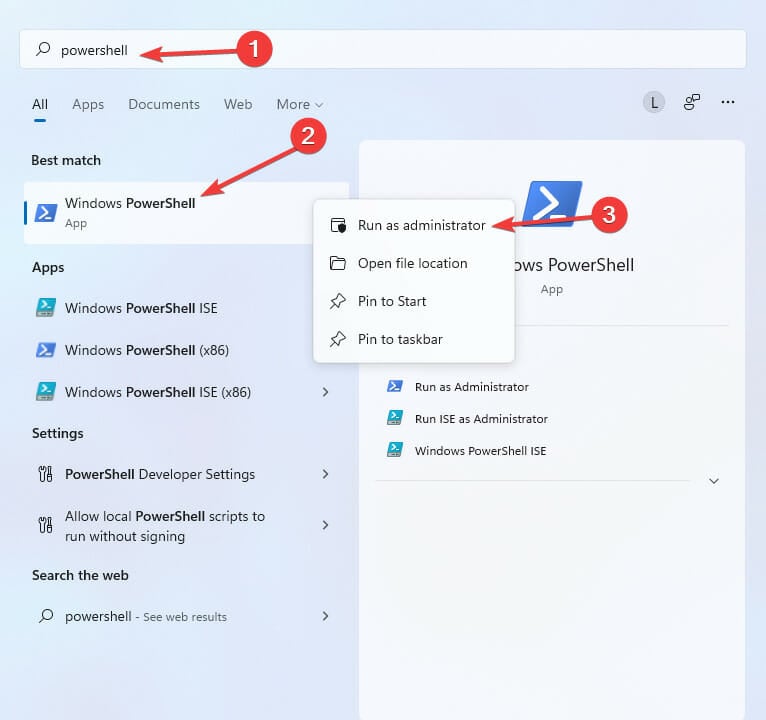
- Click on the Start menu and type PowerShell then right-click on it and select Run as an administrator.

- Type the following command then hit Enter:
get-appxpackage -alluser Microsoft.WindowsStore - Now, copy the PackageFullName value. In our example, PackageFullName is as below:
Microsoft.WindowsStore_2202.1402.2.0_X64__8wekyb3d8bbwe
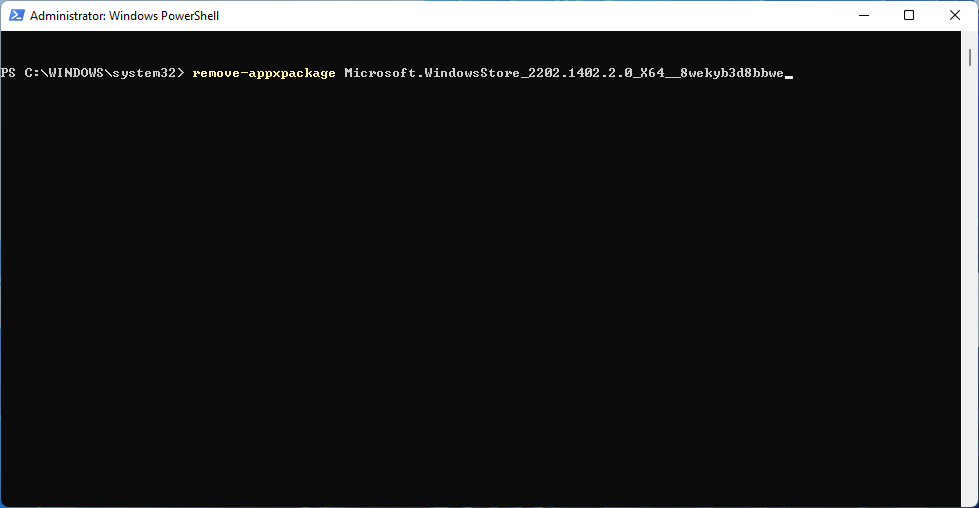
- Type your PackageFullName after remove-appxpackage command then hit Enter. So, in our case, the command line is as below:
remove-appxpackage Microsoft.WindowsStore_2202.1402.2.0_X64__8wekyb3d8bbwe
- To reinstall Microsoft Store, type the following command and press Enter:
Get-AppXPackage *WindowsStore* -AllUsers | Foreach {Add-AppxPackage -DisableDevelopmentMode -Register "$($_.InstallLocation)\AppXManifest.xml"} - When the command is executed, close PowerShell and restart your system.

Sometimes resetting Microsoft Store doesn’t solve this issue, and you have to reinstall Microsoft Store.
Enable Virtual Machine Platform
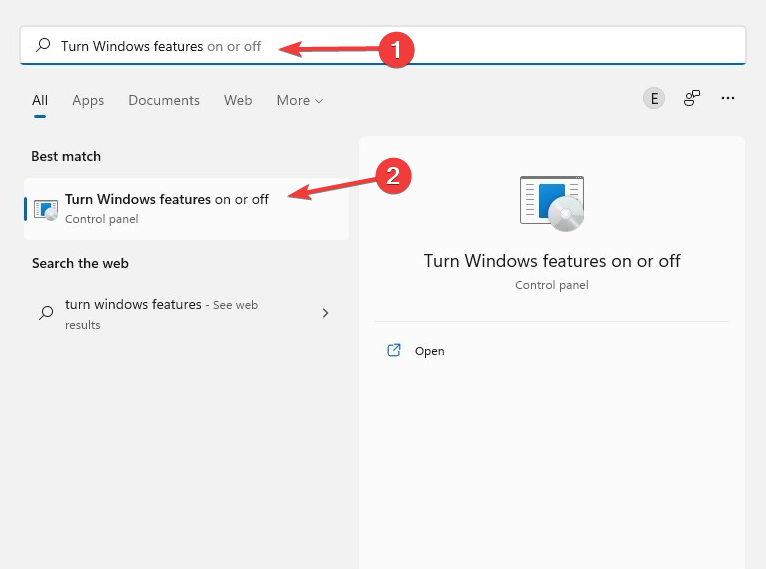
- Open the Start menu and type Turn Windows features, then select Turn Windows features on or off.

- Scroll down and select the Virtual Machine Platform checkbox. Then, click on OK.


It is necessary to enable Virtual Machine to run WSL. When you install this feature, you can upgrade WSL without any problem.
- Microsoft releases Windows 11 (KB5058411, KB5058405) May 2025 Patch Tuesday
- You can now share an app/browser window with Copilot Vision to help you with different tasks
Clear Microsoft Store cache
- Open Run dialogue by holding down Windows + R keys.
- Type wsreset.exe then press Enter.

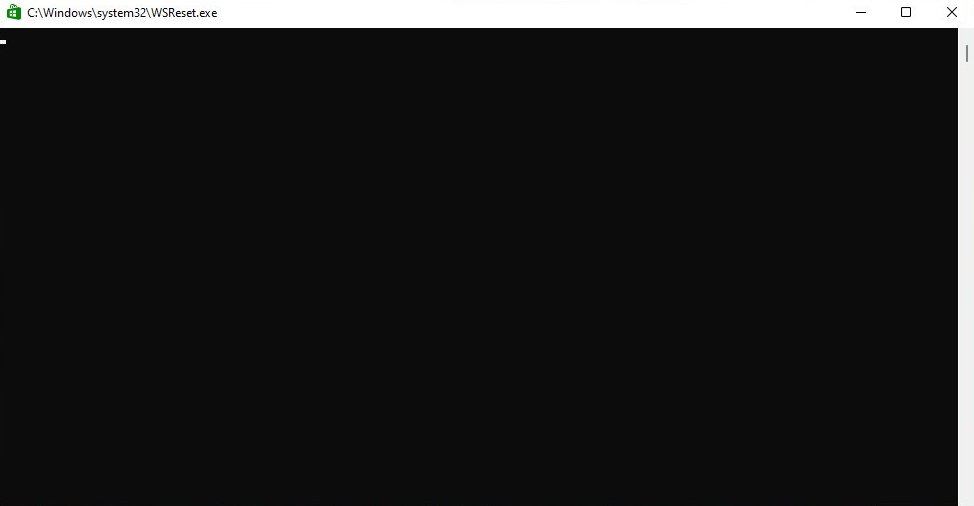
Now a black window will pop up and close automatically. Finally, when it is completed, it cleans your Microsoft Store cache.
0x8007019e error is one of the common issues. However, you have to enable the WSL feature or use Windows PowerShell to troubleshoot this problem. So, here’s how you do it.
2. Fix the 0x8007019e error
Enable WSL feature
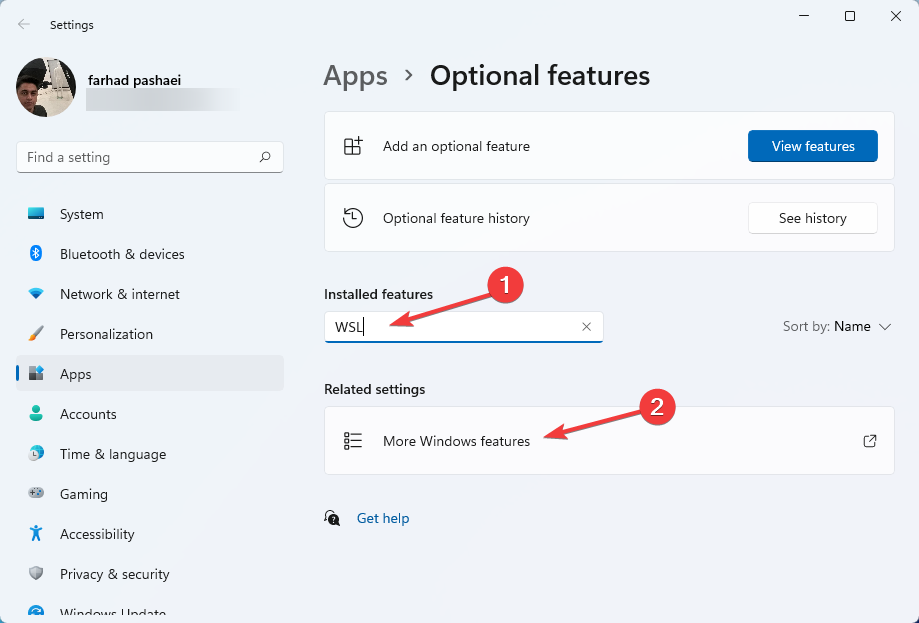
- First, open the Start menu and type Optional features then hit Enter.

- Under the Installed features section, search WSL and select More Windows features.

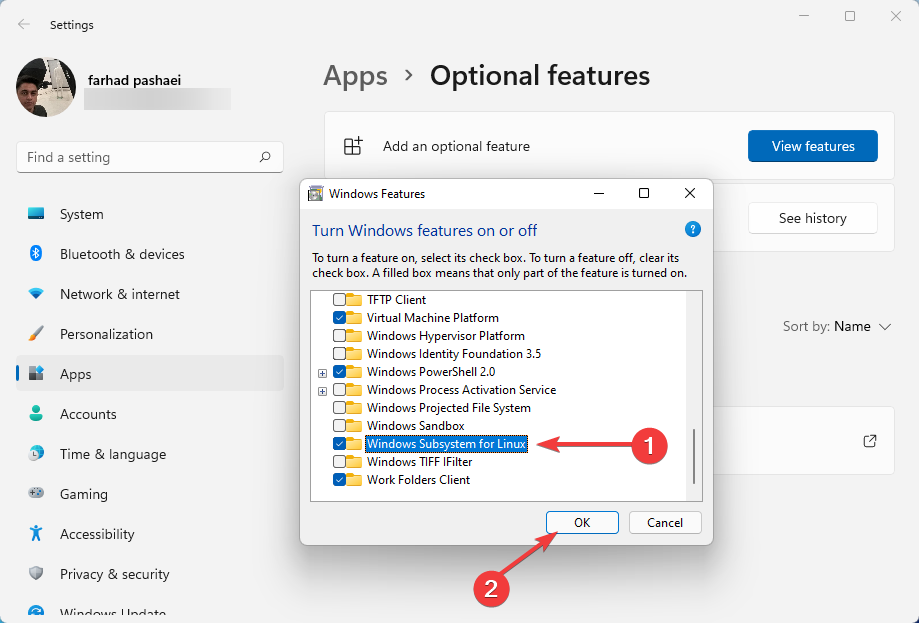
- Now, choose Windows Subsystem for Linux and click on OK in the Windows Features box.
- After that, Windows will install the required features.
- Finally, restart your computer.

Alternatively, you can use Windows PowerShell to enable this feature:
- Click the Start menu, type PowerShell, then right-click it and choose Run as administrator.
- Type the following command and press Enter:
Enable-WindowsOptionalFeature -Online -FeatureName Microsoft-Windows-Subsystem-Linux
- After that, type the following letter and hit Enter to restart your computer:
Y
3. Fix the 0x800701bc error
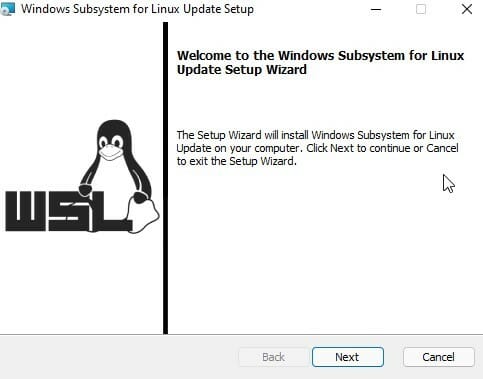
- To begin, visit this link to download the Linux kernel update package.

- Once you have downloaded the kernel package, run it as an administrator.
- Wait until Windows completes WSL update package installation. Then follow the on-screen instructions.

- After that, open Ubuntu. Now command prompt window opens up and requests you to create a new UNIX user name and password.
- Enter your desired password and username. Now let CMD finish the installation.

0x800701bc is a kernel error that you can solve by downloading the latest WSL2 Linux Kernel version. If you no longer need it, this article will show you how to uninstall WSL on Windows 11.
Why should I run Ubuntu on Windows 11?
In case you’re a Linux developer who occasionally needs to access the Windows world, the WSL capability is like a godsend.
Developers, sysadmins, and enthusiasts who work in both the Microsoft operating system and Linux worlds appreciate the convenience that Windows Subsystem for Linux provides. But WSL, as useful as it is, has been constrained by a number of limitations.
If you’ve ever tried to get graphical apps to function on WSL, you’ll know it was not always as simple as it should be, and it required a few third-party software.
However, both of these issues have been resolved in Windows 11. Ubuntu is an open-source operating system that you can run on Windows 11, but when mounting on Windows 11, you encounter Linux kernel or WSL errors.
Also, do not hesitate to read this post if you’re having trouble dual booting Ubuntu on Windows 10. Some tips may be applied by Windows 11 users too.
The most common Ubuntu error is 0x80070032 which you can solve by clearing the Microsoft Store cache.
Let us know what error you encountered and whether or not you were able to fix it in the comments below.
Farhad Pashaei
As a technophile, Farhad has spent the last decade getting hands-on experience with a variety of electronic devices, including smartphones, laptops, accessories, wearables, printers, and so on.
When he isn’t writing, you can bet he’s devouring information on products making their market foray, demonstrating his unquenchable thirst for technology.