
Все способы:
- Общие рекомендации
- Способ 1: Изменение DNS
- Windows 11
- Windows 10 и ниже
- Способ 2: Сброс параметров сети и кеша
- Вариант 1: Автоматический сброс
- Вариант 2: Самостоятельный сброс
- Способ 3: Проверка состояния службы
- Способ 4: Поиск вируса
- Способ 1: Использование другого DNS
- Способ 2: Сброс сетевых настроек
- Способ 3: Удаление лишнего софта
- Вопросы и ответы: 0
Общие рекомендации
Перед тем как переходить к выполнению инструкций в статье, попытайтесь определить причину появления ошибки 105. Поскольку она вызывается разными событиями, вполне возможно, что в вашем случае никакие изменения в работу ОС вносить и не понадобится.
- Когда появление ошибки носит разовый характер (не открывается только конкретный ресурс), скорее всего, все дело в нем, а не в вашем устройстве или интернет-соединении. Удостоверьтесь, что вы ввели правильный URL (если пытались попасть на сайт путем ручного ввода адреса), а также воспользуйтесь другим браузером или режимом инкогнито в текущем. Если сайт не открывается нигде, вы вводите либо несуществующий адрес, либо этот сайт не работает — временно или его закрыли насовсем. А вот если в другом веб-обозревателе или в приватном окне он открывается, значит, всему виной ваш браузер. Первым делом нужно очистить cookie, поскольку из-за конфликта этих файлов сайт вполне может перестать загружаться.
Подробнее: Удаление cookie в Яндекс Браузере / Microsoft Edge / Opera / Firefox
При условии, что это не помогло, отключите или удалите расширения, которые как-либо влияют на подключение.
Подробнее: Как удалить расширения в Google Chrome / Яндекс Браузере / Opera
- Исключите мелкие сбои в работе роутера. Проще всего это сделать, попросту перезагрузив его через кнопку на корпусе или ненадолго вытащив вилку из розетки.
У кого подключение происходит напрямую по LAN, можно отключить шнур от ПК. Или же переподключите его программно через «Параметры» либо «Панель управления». То, как попасть в нужный раздел, косвенно показано в Способе 1.
- Не забывайте о том, что некоторые сайты могут перестать быть доступными для вашей страны. О блокировках крупных ресурсов можно узнать, поискав упоминания и новости в интернете.
Способ 1: Изменение DNS
DNS напрямую влияет на доступность ряда сайтов, соответственно, эта инструкция помогает чаще всего. Чаще всего у пользователей установлено автоматическое получение адреса от провайдера, но кто-то мог ранее установить и собственные, не самые стабильные значения. В обоих случаях стоит изменить DNS на другие, более популярные и работоспособные. Ниже даны две инструкции, где вторая — универсальная для всех Windows, а первая предназначена только для Windows 11.
Обратите внимание! Если этот способ решит проблему, вы можете изменить настройки DNS на уровне роутера. Это позволи всем устройствам, которые к нему подключены, иметь возможность открывать сайт без изменения DNS на своих устройствах.
Windows 11
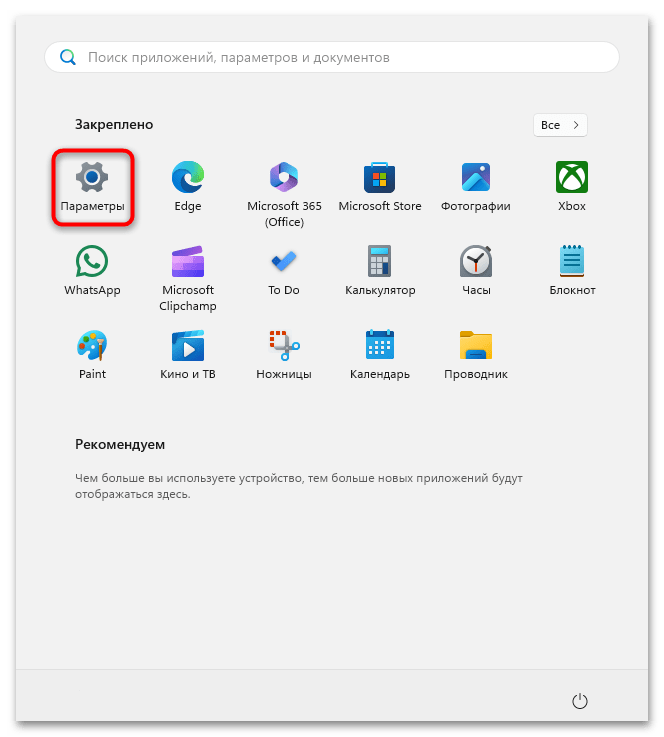
- Откройте «Пуск» и через него вызовите системное приложение «Параметры».
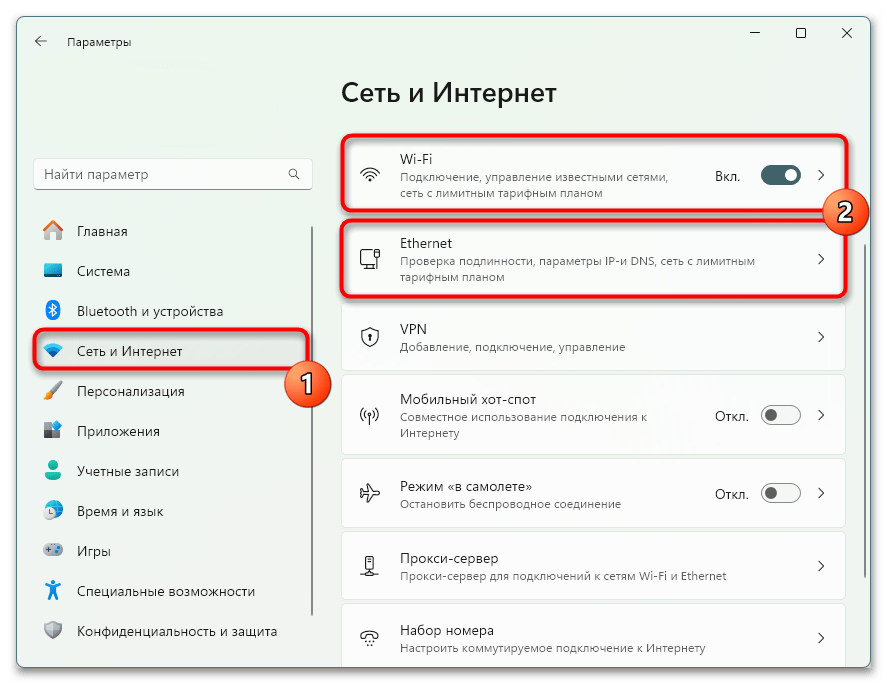
- Через панель слева переключитесь на вкладку «Сеть и Интернет», а правее выберите тип вашего подключения.
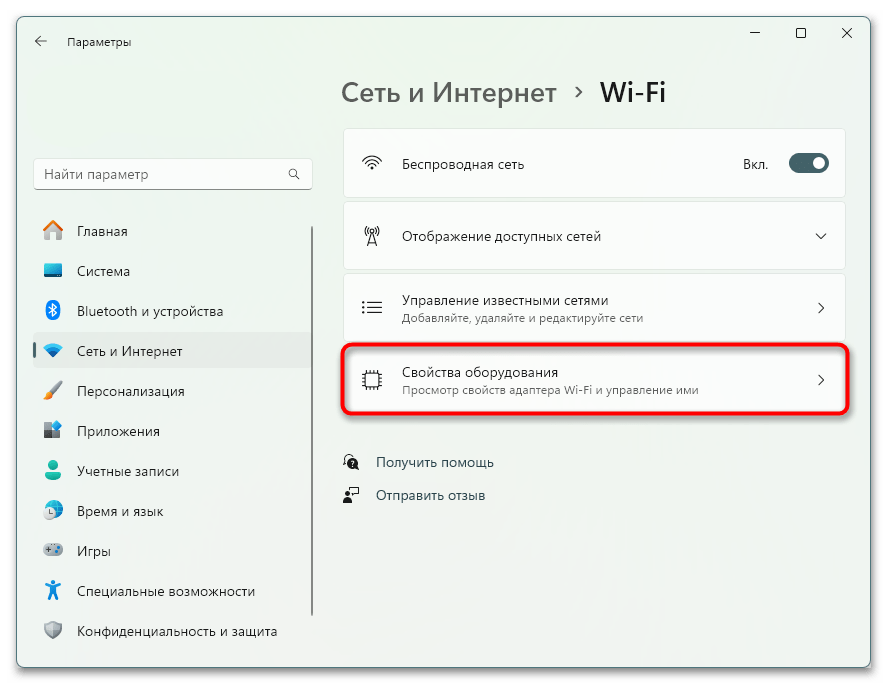
- Если вы настраиваете Wi-Fi-подключение, понадобится дополнительно перейти в подраздел «Свойства оборудования».
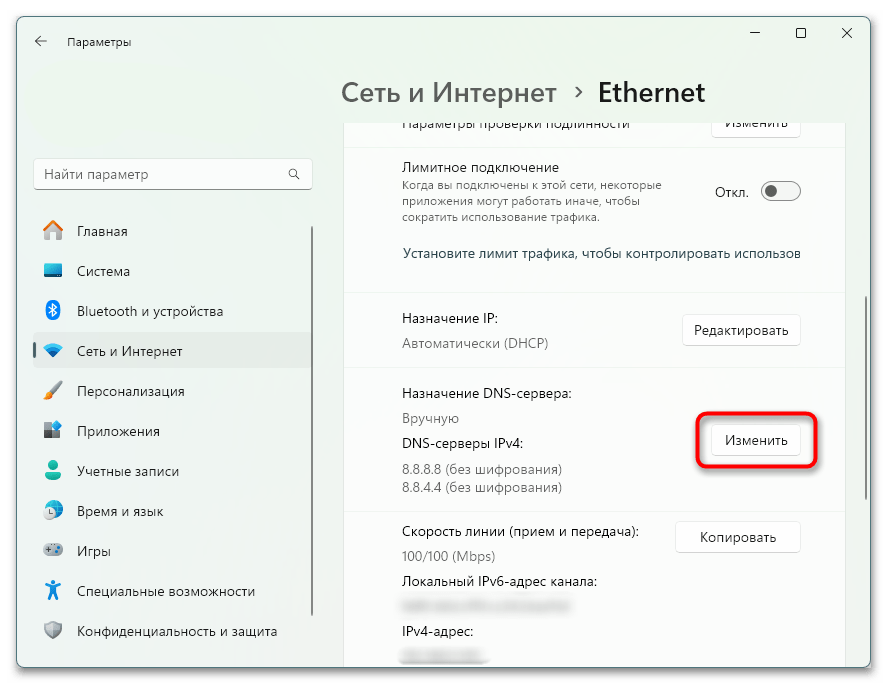
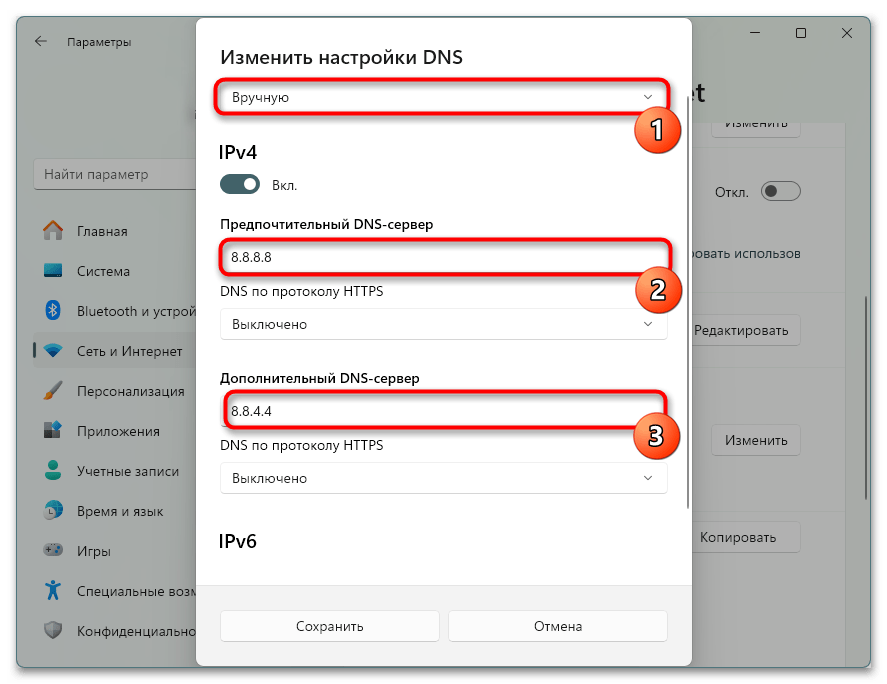
- Найдите строку «Назначение DNS-сервера» и кликните по кнопке «Изменить».
- Выставьте значение «Вручную» и в поля «Предпочитаемый DNS-сервер» и «Дополнительный DNS-сервер» введите следующие адреса:
8.8.8.8и8.8.4.4. Это адреса от Google, но вы можете выбрать и другие — свои DNS также предоставляет Яндекс, Cloudflare, OpenDNS.
Для достоверности можете перезагрузить компьютер и проверить, появился ли доступ к сайту.
Windows 10 и ниже
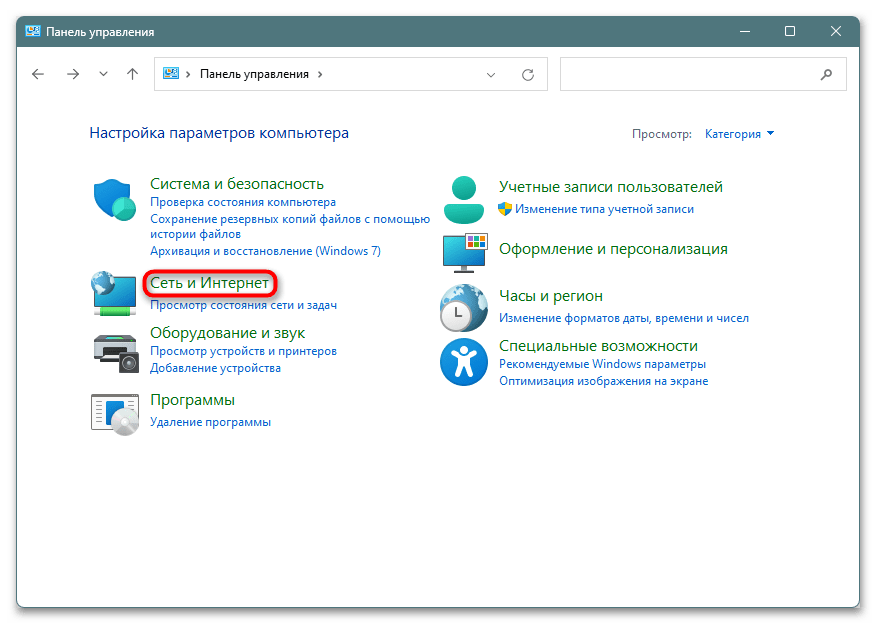
- Откройте «Пуск» и запустите «Панель управления». В ней перейдите к категории «Сеть и Интернет».
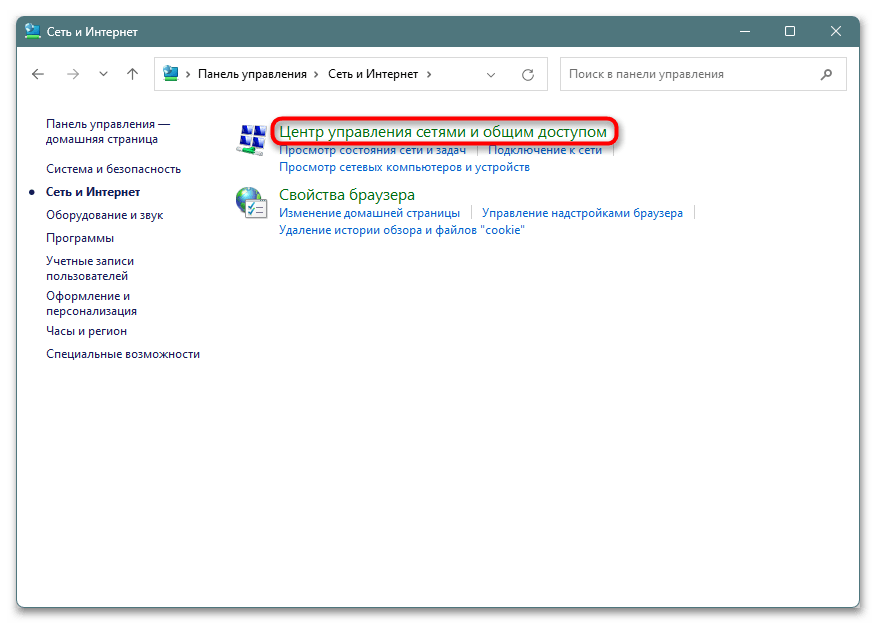
- Кликните по ссылке «Центр управления сетями и общим доступом».
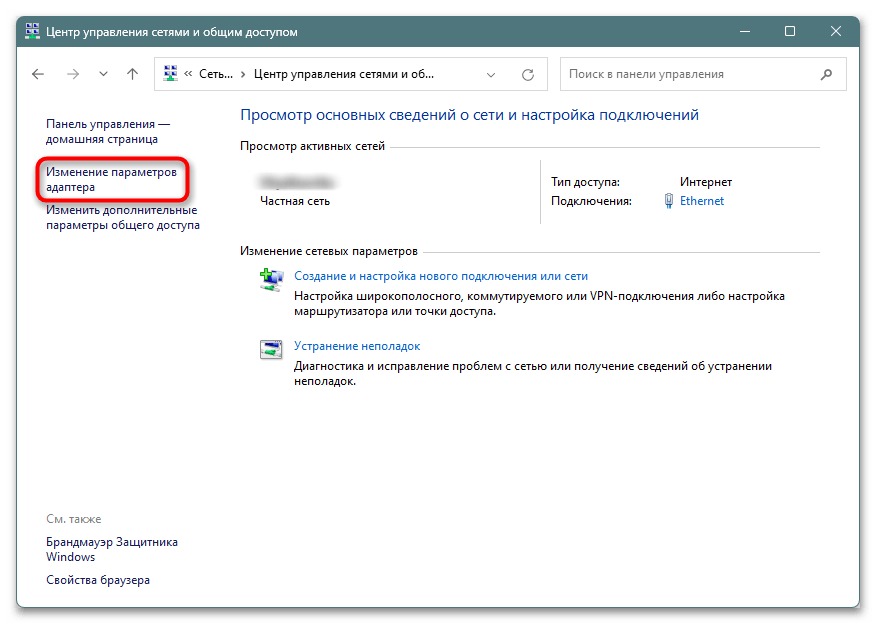
- Через панель слева переключитесь в «Изменение параметров адаптера».
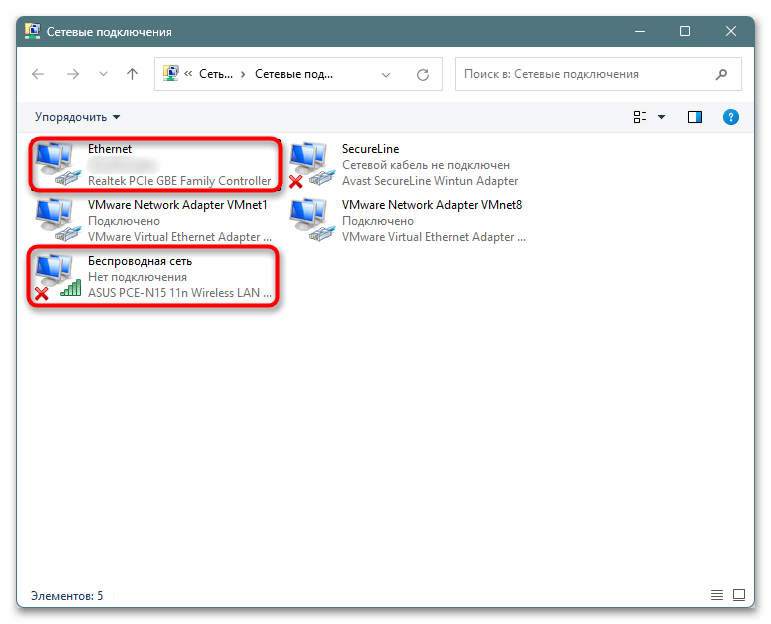
- Найдите ваш тип подключения: «Ethernet» — для проводного, «Беспроводная сеть» — для Wi-Fi. Иногда названия могут чуть отличаться.
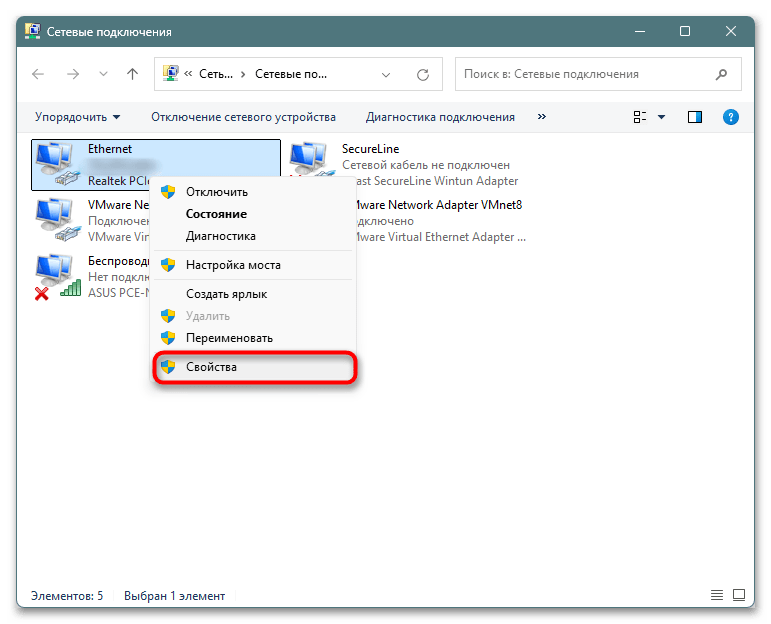
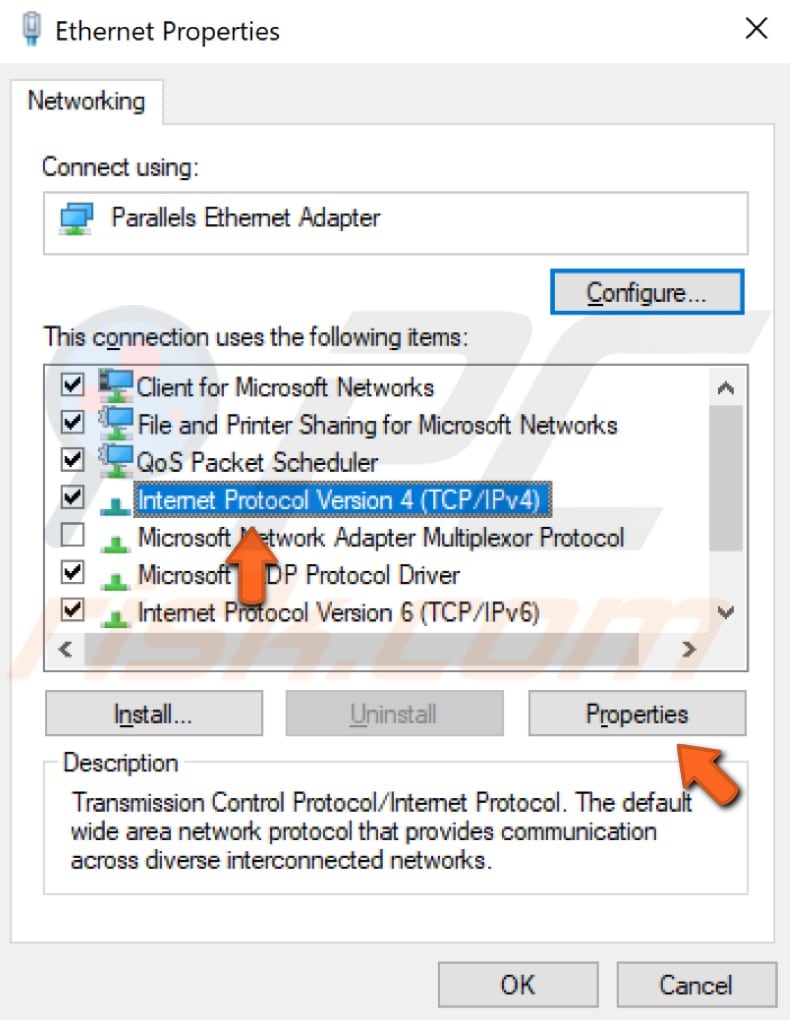
- Откройте контекстное меню используемого подключения, нажав по нему правой кнопкой мыши, и перейдите в «Свойства».
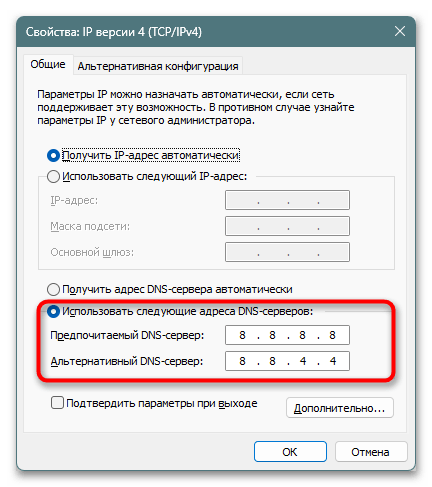
- Выделите строку «IP версии 4 (TCP/IPv4)» и нажмите кнопку «Свойства».
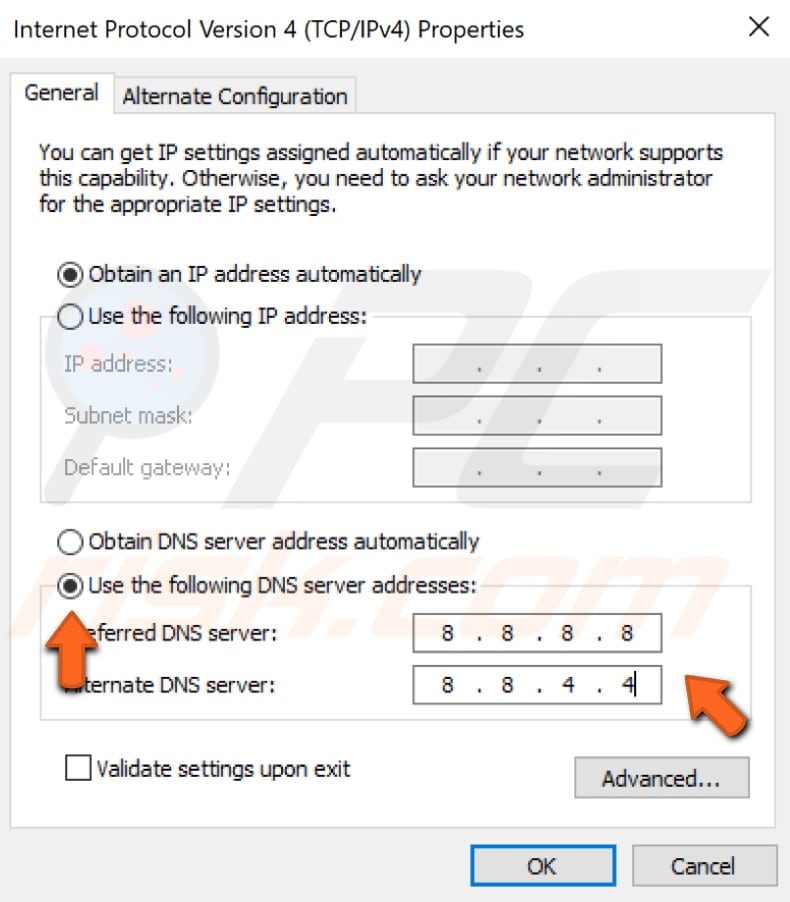
- Активируйте пункт «Использовать следующие адреса DNS-серверов:» и в полях пропишите
8.8.8.8и8.8.4.4соответственно. Как уже было сказано выше, в инструкции для Widows 11, вместо этих адресов от Google можете использовать любые другие публичные адреса от тех компаний, которые их предоставляют.
Желательно перезагрузить ПК и проверить, стал ли доступен сайт.
Способ 2: Сброс параметров сети и кеша
В ряде ситуаций не удается получить доступ к одному или нескольким сайтам по причине сетевых ошибок. Верным решением станет их сброс и очистка кеша сетевых инструментов. В Windows 11 и 10 предпочтительнее всего будет использование автоматического сброса, а универсальная для всех ОС этого семейства инструкция заключается в использовании консольных команд.
Вариант 1: Автоматический сброс
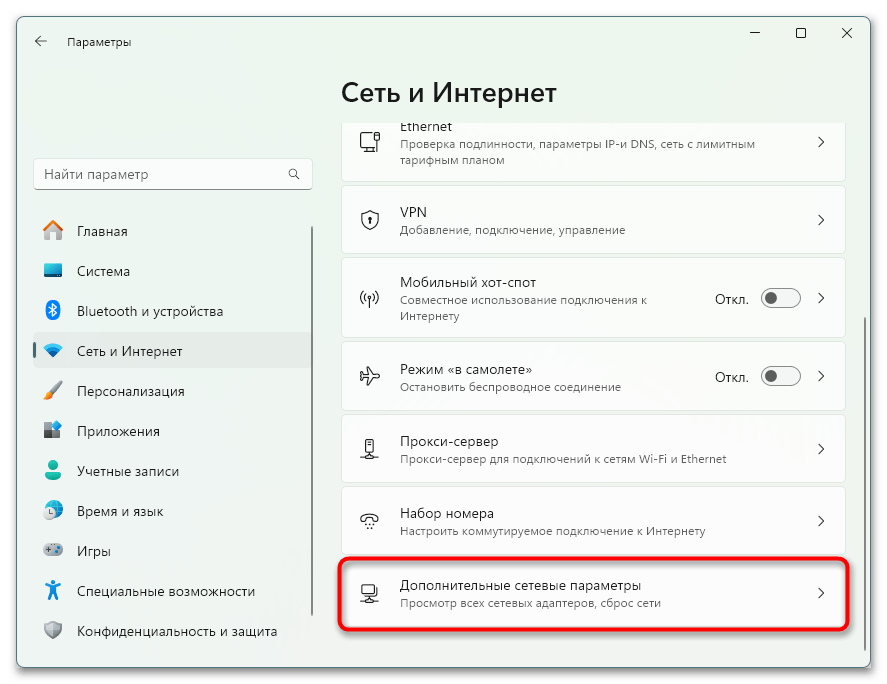
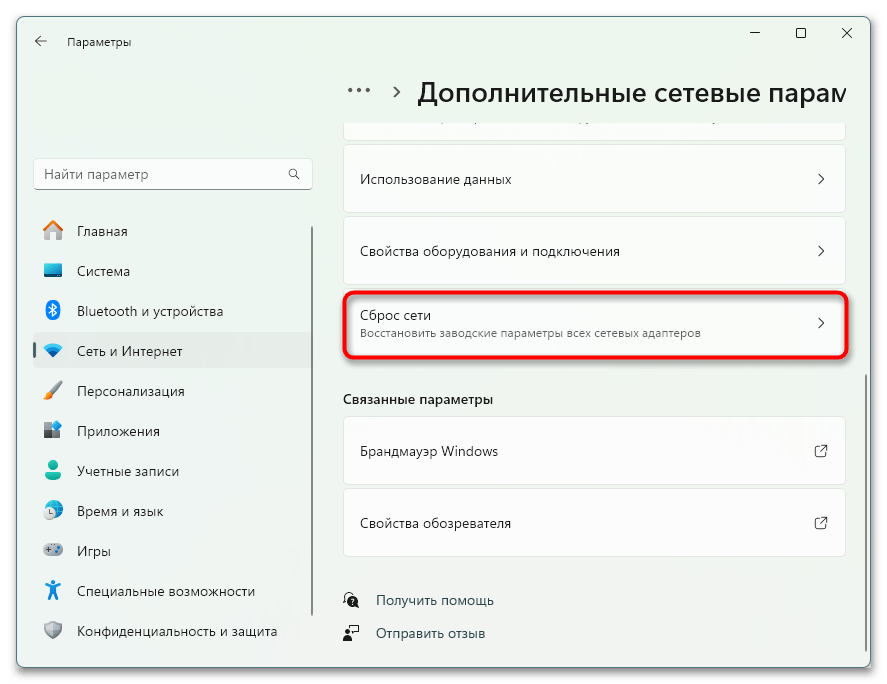
- Откройте «Параметры» через «Пуск» и перейдите в раздел «Сеть и Интернет», как это было показано в предыдущем способе. Но на этот раз прокрутите правую часть окна вниз до пункта «Дополнительные сетевые параметры».
В Windows 10 достаточно перейти в «Сеть и Интернет» и прокрутить основную часть окна до ссылки «Сброс сети».
- Выберите здесь пункт «Сброс сети».
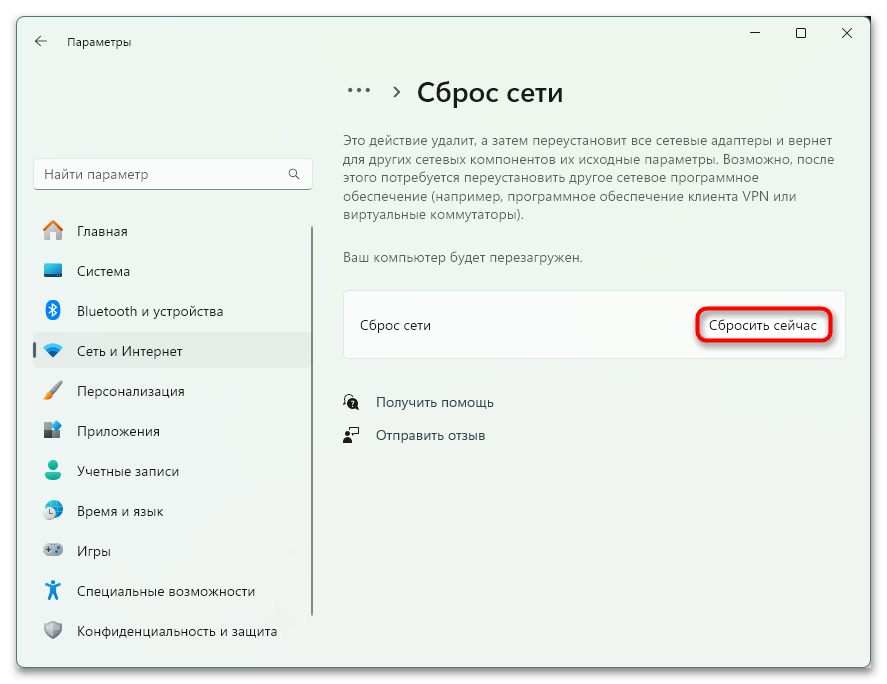
- Откроется окно, в котором прочитайте информацию о том, что произойдет в процессе, и если согласна, кликните по «Сбросить сейчас».
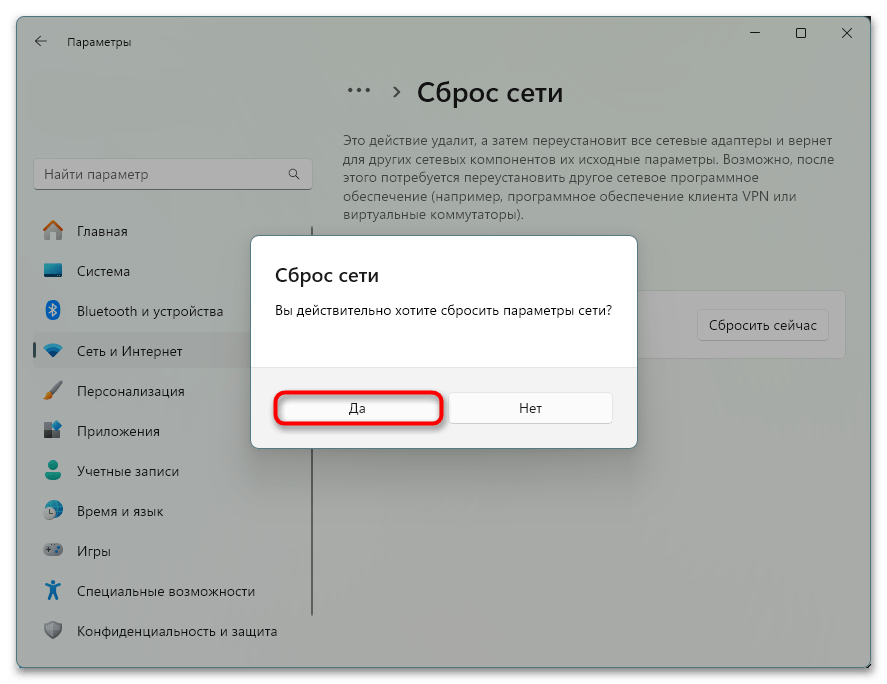
- Подтвердите решение кнопкой «Да» и либо перезагрузите компьютер самостоятельно, либо дождитесь автоматического перезапуска, который произойдет спустя 5 минут.
Вариант 2: Самостоятельный сброс
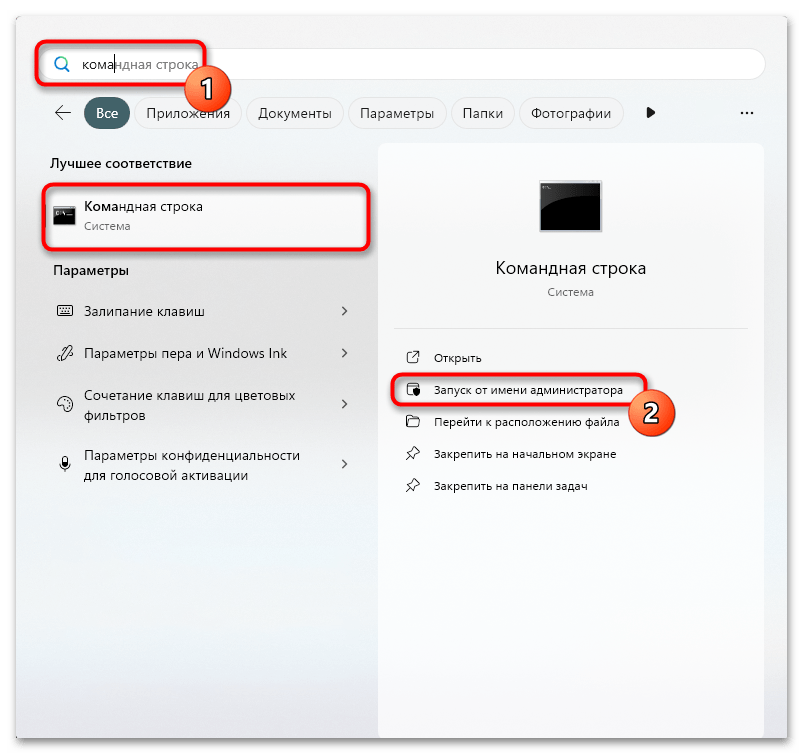
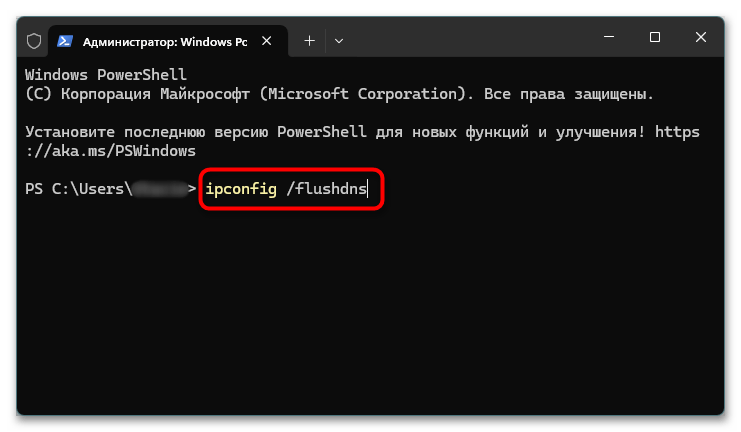
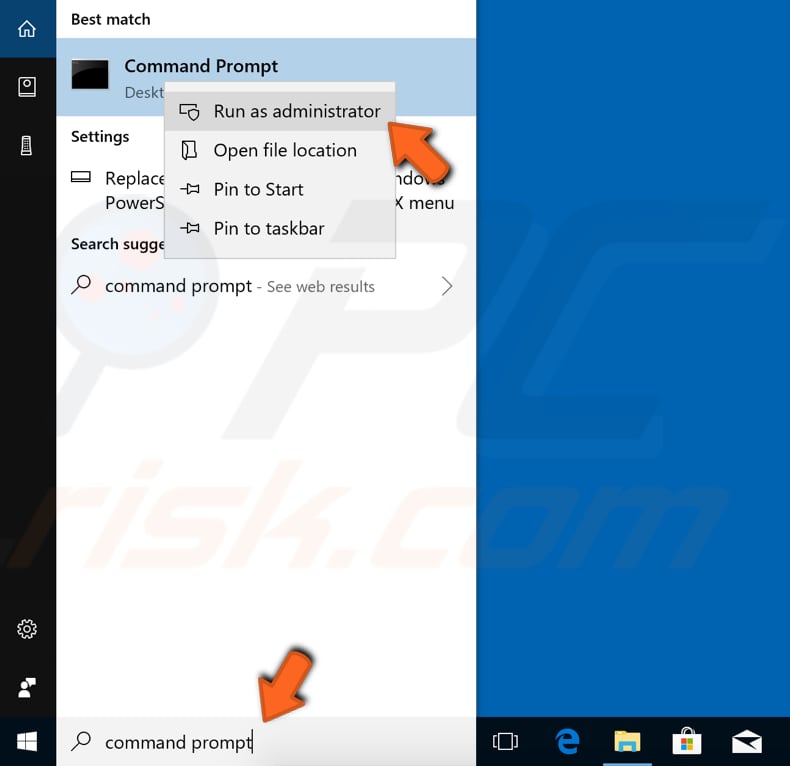
- Запустите «Командную строку от имени администратора».

В Windows 11 и 10 можно кликнуть ПКМ по «Пуску» и выбрать «Терминал (Администратор)».
- Вставьте или впишите команду
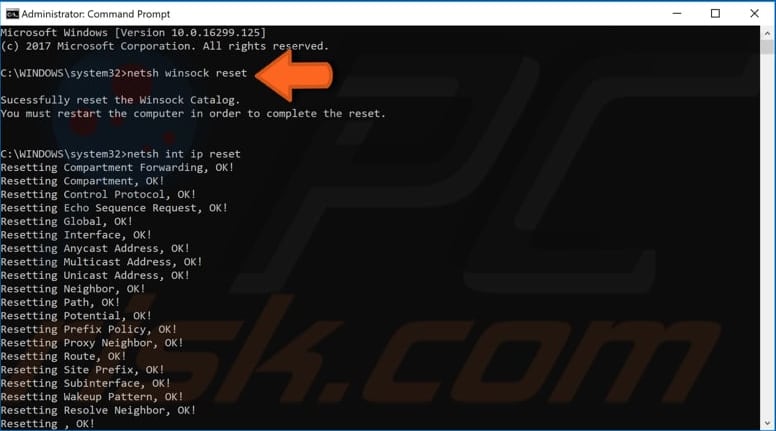
ipconfig /flushdnsи нажмите Enter. Это сбросит кеш DNS. Если ее выполнение не помогло, впишите следующие команды:netsh winsock reset
netsh int ip reset
ipconfig /release
ipconfig /renew
Возможно, понадобится перезагрузить ПК, чтобы вернуть доступ к сайту.
Способ 3: Проверка состояния службы
На появление ошибки 105 влияет одна из системных служб — если та работает неправильно, некоторые или все сайты не будут открываться.
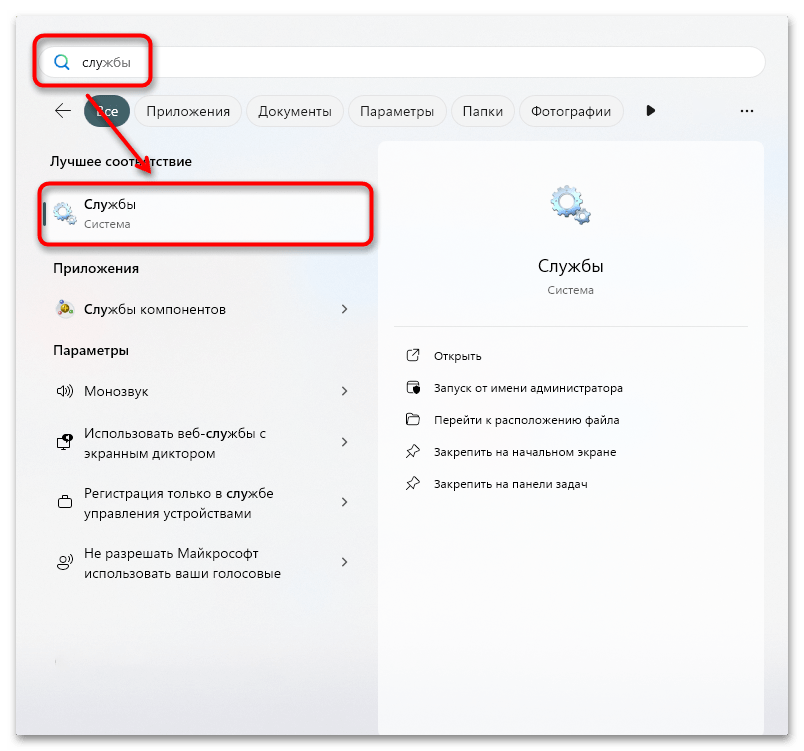
- Запустите приложение «Службы», отыскав его в «Пуске».
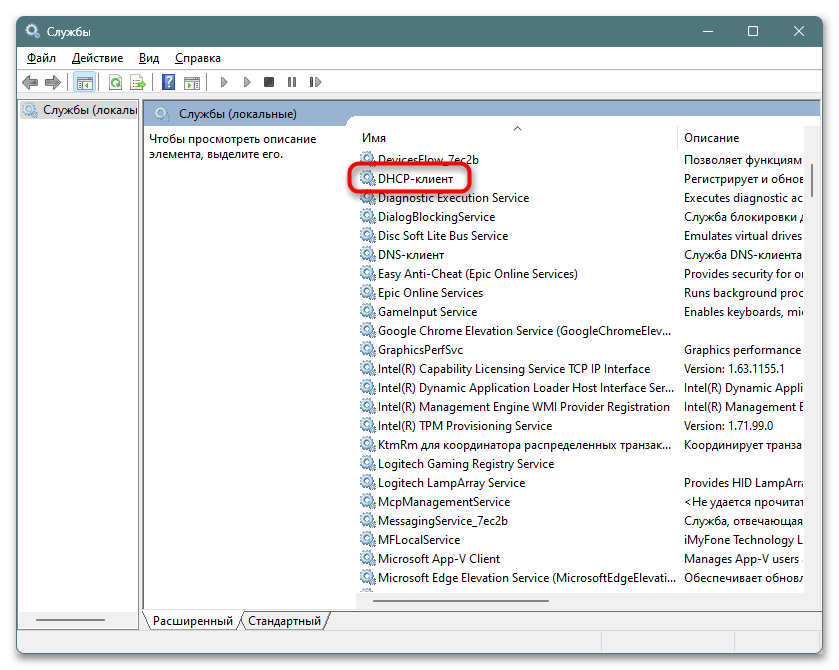
- Среди списка отыщите «DHCP-клиент» и откройте ее двойным кликом ЛКМ.
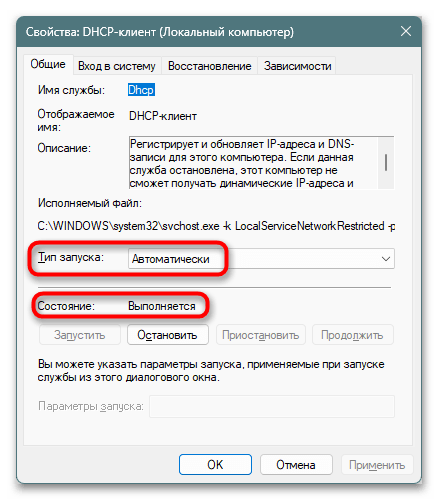
- Убедитесь, что тип запуска выставлен «Автоматически», а состояние — «Выполняется». Если у вас не так, измените значения на указанные и проверьте, возобновилась ли нормальная работа интернета.
Способ 4: Поиск вируса
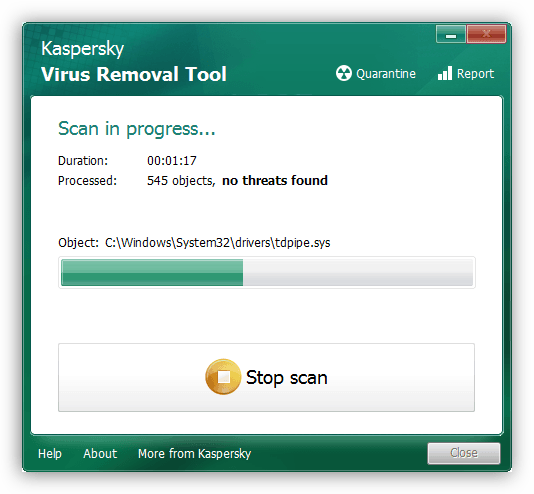
Когда ничего не помогает и вы уверены, что дело не в провайдере, попробуйте просканировать компьютер на наличие вредоносных утилит. Эта рекомендация применима, если не открываются вообще все сайты, хотя ранее ничего подобного не наблюдалось. Используйте инструкции из нашей статьи по ссылке ниже.
Подробнее: Борьба с компьютерными вирусами
Дополнительно: исправление ошибки на смартфоне
Реже, но эта же ошибка появляется и на смартфонах. Часть причин схожа с упомянутыми выше, но решаетя несколько иначе.
Способ 1: Использование другого DNS
Советуем использовать эту инструкцию, если изменение DNS на компьютере вам помогло, но возможности изменить адреса на роутере нет возможности. Или когда есть проблемы с другим подключением, отличным от того, что на ПК. В Android и iOS изменение DNS происходит практически идентично, поэтому рассмотрим только одну платформу:
- Откройте системные «Настройки» и перейдите в «Wi-Fi».
- Нажмите по иконке в виде буквы i в кружочке справа от той сети, к оторой вы подключены.
- В Android найдите пункт «Настройки IP», в iOS он так и называется — «Настройки DNS».
- Добавьте DNS: первый —
8.8.8.8, второй —8.8.4.4. Вместо этих DNS от Google можете использовать другие по своему усмотрению.
Способ 2: Сброс сетевых настроек
Как и в Windows, на смартфонах эта ошибка так же может появляться из-за мелких сбоев в сетевых параметрах. Единственным рабочим решением является сброс. Сейчас эта функция доступа во всех современных моделях вне зависимости от платформы. Кликните по используемой вами платформе, чтобы воспользоваться подходящей инструкции.
Подробнее: Сброс сетевых настроек в Android / iOS
Способ 3: Удаление лишнего софта
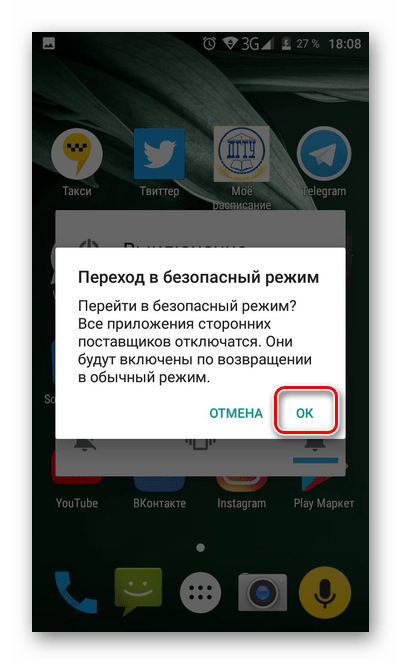
Когда вы сталкиваетесь с ошибкой только на смартфоне (обычно в Android) и лишь с несколькими URL, рекомендуется очистить смартфон от приложений, которые могут влиять на подключение и контролировать работу смартфона. Это, например, антивирусы, чистильщики, ускорители интернета и прочие бесполезные утилиты, имитирующие поддержку ОС в хорошем состоянии. В Android вместо удаления сперва можно перейти в «Безопасный режим», в котором не работают никакие пользовательские приложения — только системный софт. Если там сайт открывается, причина точно в установленном ПО.
Подробнее: Как включить «Безопасный режим» в Android
Наша группа в TelegramПолезные советы и помощь
Если при попытке открыть какой-либо сайт в браузере Google Chrome на компьютере или телефоне вы видите ошибку ERR_NAME_NOT_RESOLVED и сообщение «Не удается получить доступ к сайту. Не удалось найти IP-адрес сервера» (ранее — «Не удается преобразовать DNS-адрес сервера»), то находитесь на верном пути и, надеюсь, один из изложенных ниже способов исправить эту ошибку вам поможет. Методы исправления должны работать для Windows 10, 8.1 и Windows 7 (также в конце есть способы для Android).
Проблема может появиться после установки какой-либо программы, удаления антивируса, изменения сетевых настроек пользователем или же в результате действий вируса и другого вредоносного программного обеспечения. Кроме этого, сообщение может являться и результатом некоторых внешних факторов, о которых тоже поговорим. Также в инструкции присутствует видео об исправлении ошибки. Похожая ошибка: Превышено время ожидания ответа от сайта ERR_CONNECTION_TIMED_OUT.
Первое, что следует проверить, прежде чем приступать к исправлению
Есть вероятность, что с вашим компьютером все в порядке и ничего особенно исправлять не нужно. А поэтому, прежде всего обратите внимание на следующие пункты и попробуйте их использовать, если вас застала эта ошибка:
- Убедитесь, что вы ввели адрес сайта правильно: если ввести URL несуществующего сайта, Chrome выдаст ошибку ERR_NAME_NOT_RESOLVED.
- Проверьте, ошибка «Не удается преобразовать DNS адрес сервера» появляется при входе на один сайт или на все сайты. Если на один — то, возможно, на нем что-то меняют или временные проблемы у хостинг-провайдера. Можно подождать, а можно попробовать очистить кэш DNS с помощью команды ipconfig /flushdns в командной строке от имени администратора.
- Если имеется возможность, то проверьте, ошибка появляется на всех устройствах (телефонах, ноутбуках) или только на одном компьютере. Если на всех — возможно, проблема у провайдера, стоит либо подождать, либо попробовать Google Public DNS, о чем будет далее.
- Эту же ошибку «Не удается получить доступ к сайту» можно получить, если сайт закрылся и больше не существует.
- Если подключение осуществляется через Wi-Fi роутер, выключите его из розетки и включите снова, попробуйте зайти на сайт: возможно, ошибка исчезнет.
- Если подключение без Wi-Fi роутера, попробуйте зайти в список подключений на компьютере, отключить Ethernet (Локальная сеть) подключение и снова включить его.
Используем Google Public DNS, чтобы исправить ошибку «Не удается получить доступ к сайту. Не удалось найти IP-адрес сервера»
Если вышеописанное не помогло исправить ошибку ERR_NAME_NOT_RESOLVED, пробуем проделать следующие простые шаги
- Зайдите в список подключений компьютера. Быстрый способ сделать это — нажать клавиши Win+R на клавиатуре и ввести команду ncpa.cpl

- В списке подключений выберите то, которое используется для выхода в Интернет. Это может быть L2TP подключение Билайн, Высокоскоростное подключение PPPoE или же просто подключение по локальной сети Ethernet. Кликните по нему правой кнопкой мыши и выберите пункт «Свойства».
- В списке компонентов, используемых подключением, выберите «IP версии 4» или «Протокол Интернета версии 4 TCP/IPv4) и нажмите кнопку «Свойства».
- Посмотрите, что установлено в параметрах DNS-сервера. Если установлено «Получить адрес DNS-сервера автоматически», отметьте «Использовать следующие адреса DNS-серверов» и укажите значения 8.8.8.8 и 8.8.4.4. Если же в этих параметрах установлено что-то иное (не автоматически), то для начала попробуйте задать автоматическое получение адреса DNS-сервера, это может помочь.

- После того, как вы сохранили настройки, запустите командную строку от имени администратора и выполните команду ipconfig /flushdns (эта команда очищает кэш DNS, подробнее: Как очистить кэш DNS в Windows).


Снова попробуйте зайти на проблемный сайт и посмотрите, сохранилась ли ошибка «Не удается получить доступ к сайту»
Проверьте, запущена ли служба DNS-клиент

На всякий случай, стоит посмотреть, включена ли служба, отвечающая за преобразование DNS-адресов в Windows. Для этого зайдите в Панель управления и переключитесь к видам «Значки», если у вас стоят «Категории» (по умолчанию). Выберите пункт «Администрирование», а затем — «Службы» (также можно нажать Win+R и ввести services.msc, чтобы сразу открыть службы).

Найдите в списке службу DNS-клиент и, если она «Остановлена», а запуск происходит не автоматически, кликните дважды по названию службы и установите соответствующие параметры в открывшемся окне, а заодно нажмите кнопку «Запустить».
Сброс параметров TCP/IP и Интернета на компьютере
Еще один возможный вариант решения проблемы — сбросить параметры TCP/IP в Windows. Раньше это часто приходилось делать после удаления Avast (сейчас, кажется, нет) для того, чтобы исправить ошибки в работе Интернета.
Если на вашем компьютере установлена Windows 10, то сбросить параметры Интернета и протокола TCP/IP можно таким образом:
- Зайдите в Параметры — Сеть и Интернет.
- Внизу страницы «Состояние» нажмите по пункту «Сброс сети»

- Подтвердите сброс сети и перезагрузите компьютер.

Если же у вас установлена Windows 7 или Windows 8.1, поможет отдельная утилита от Майкрософт для сброса параметров сети.
Скачать утилиту Microsoft Fix it со страницы официального сайта http://support.microsoft.com/kb/299357/ru (На той же странице описано, как можно сбросить параметры TCP/IP вручную.)
Проверка компьютера на наличие вредоносных программ, сброс hosts
Если ничто из вышеперечисленного не помогло, а вы уверены, что ошибка не вызвана какими-либо внешними по отношению к вашему компьютеру факторами, рекомендую провести проверку компьютера на наличие вредоносных программ и сбросить дополнительные параметры Интернета и сети. При этом, даже если у вас уже установлен хороший антивирус, попробуйте использовать специальные средства удаления вредоносных и нежелательных программ (многие из которых ваш антивирус не видит), например AdwCleaner:
- В AdwCleaner зайдите в настройки и включите все пункты как на скриншоте ниже

- После этого перейдите в пункт «Панель управления» в AdwCleaner, запустите сканирование, а затем выполните очистку компьютера.

Как исправить ошибку ERR_NAME_NOT_RESOLVED — видео
Также рекомендую посмотреть статью Страницы не открываются ни в одном браузере — она также может оказаться полезной.
Исправление ошибки Не удается получить доступ к сайту (ERR_NAME_NOT _RESOLVED) на телефоне
Эта же ошибка возможна и в Chrome на телефоне или планшете. Если вы столкнулись с ERR_NAME_NOT_RESOLVED на Android, попробуйте такие шаги (при этом учитывайте все те же моменты, которые были описаны в начале инструкции в разделе про «Что проверить перед исправлением»):
- Проверьте, проявляется ли ошибка только по Wi-Fi или и по Wi-Fi и по мобильной сети. Если только по Wi-Fi, попробуйте перезагрузить роутер, а также установить DNS для беспроводного подключения. Для этого зайдите в Настройки — Wi-Fi, удерживайте имя текущей сети, затем выберите в меню «Изменить эту сеть» и в дополнительных параметрах установите Статический IP с DNS 8.8.8.8 и 8.8.4.4.
- Проверьте, а появляется ли ошибка в безопасном режиме Android. Если нет, то виновато, по всей видимости, какое-то недавно установленное вами приложение. С большой вероятностью, какой-то антивирус, ускоритель интернета, чистильщик памяти или подобное ПО.
Надеюсь, один из способов позволит вам исправить проблему и вернуть нормальное открытие сайтов в браузере Chrome.
You have just encountered the err_name_not_resolved Windows 10 and 11 problem. Here is all you need to know.
We access the Internet daily, but sometimes problems with the network connection can occur.
One such problem that Windows 10 and 11 users reported is Err_name_not_resolved error in Google Chrome. The problem might be with the Wi-Fi or DNS connection, as well as with the router.
A variant of the error is This site cannot be reached err_name_not_resolved, and the issue has also been reported in Internet Explorer.
In any of the mentioned situations, try one of the troubleshooting steps listed in this guide.
Why do I keep getting Err_name_not_resolved?
It is advisable to start by refreshing the DNS cache on your OS since this is one of the most frequent reasons for the err_name_not_resolved problem. Depending on the OS, the DNS flush technique varies.
An old or outdated browser may also trigger the browser. Additionally, users have also pointed out that old browser data may contribute to this error.
Typically the error resolves around your network connections and server settings, and it may come in any of the following variants:
- Err_name_not_resolved in Chrome for Windows 10 users
- Your err_name_not_resolved while using Opera
- Err_name_not_resolved VPN issue
- The err_name_not_resolved in Windows 10 while using Edge
- Err_name_not_resolved localhost
Quick Tip:
If you don’t want to spend time figuring out how to bypass this error, you can easily switch to an alternative browser. Opera One is a reliable and faster alternative.
It has a free bundle of advantageous features that you can activate or use depending on your needs. Customizable workspaces, messenger tabs, VPN, ad-blocker, battery savers or AI are just a few.
Opera One
Switch to Opera One and hassle-free from any previous search engine is only two clicks away.
How do you fix err_name_not_resolved in Windows 10?
1. Flush the DNS
- Right-click on the Start menu and select Windows terminal (Admin) or Command Prompt (Admin) on windows 10.
- When Command Prompt opens, enter the commands below and hit Enter after each one.
ipconfig /flushdnsipconfig /renewipconfig /registerdns - Restart the browser and verify that the error has disappeared.
Few users reported that this issue could affect other browsers such as Internet Explorer or Microsoft Edge, and you should be able to fix this problem by typing the following in Command Prompt and pressing Enter:
netsh winsock reset
2. Change your DNS
- Click the Start menu, type control panel, and select Network and Sharing Center.

- From the left pane, click Change adapter settings.

- Locate and right-click your network, then click Properties.
- Click on Internet Protocol Version 4 (TCP/IPv4) and click the Properties button.
- Select Use the following DNS server addresses and set the Preferred DNS server to 8.8.8.8 and the Alternate DNS server to 8.8.4.4. Click OK to save the changes.


After making these changes, check if Err_name_not_resolved error is still there.
3. Reinstall Chrome / Try Beta or Canary version
- Click on the Start menu, type control panel, and select the Uninstall a program option.

- Click on Google Chrome on the list of programs, then click on the Uninstall option.

- Follow the wizard to complete the uninstallation.
- Navigate to the Chrome website, and click on Download Chrome.

- Click on the downloaded file and follow the wizard to reinstall Chrome.


According to users, an Err_name_not_resolved error can occur if your Chrome installation is damaged. This can occur for various reasons, and if you want to fix this problem, it’s advised to reinstall Chrome.
There are several ways to do that, but the best is using dedicated software. It will remove Chrome and any related files, enabling a clean and error-free reinstallation.
A dedicated PC cleaning utility such as CCleaner will completely delete all files and registry entries associated with Chrome, ensuring that the issue doesn’t reappear.
The process is straightforward: download the PC cleaning utility and open it. Many of these tools have built-in uninstallers so that you can remove your program from the same UI.
Uninstall Chrome, run the PC cleaning utility, and remove any related files.
Some users are also recommending trying the Beta or the Canary versions. These are the upcoming versions of Chrome, and they frequently have the latest updates and fixes available, so if you need to fix the problem as soon as possible, you might try one of these versions.
4. Disable DNS Prefetching in Chrome
- Press the Menu button in the top right corner and choose Settings.
- When the Settings window opens, scroll down to the bottom of the screen and click Advanced.

- Scroll to the Privacy section and uncheck Use a prediction service to load pages more quickly.

- After you uncheck this option, restart Chrome.


5. Flush Chrome’s DNS cache
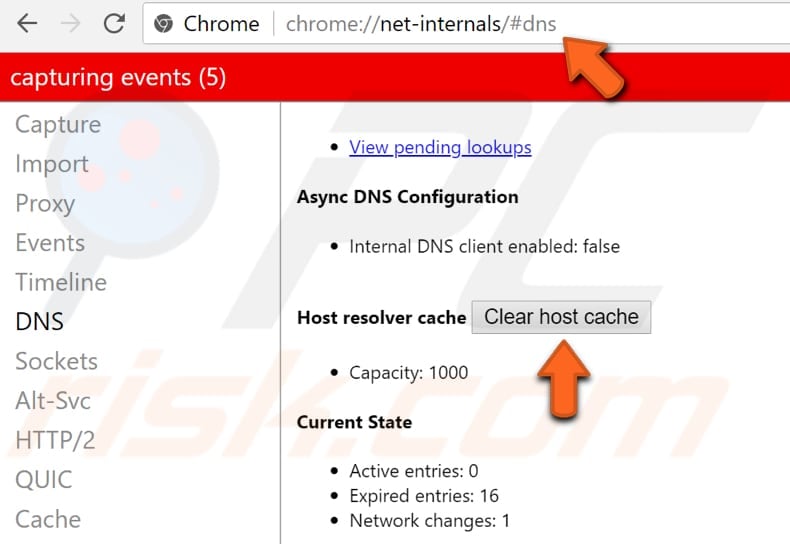
- Open a new tab in Chrome, enter the path below, and then hit Enter.
chrome://net-internals/#dns - Now click the Clear host cache button.

- Finally, restart the browser.

6. Update your drivers
- Right-click on the Start menu and select Device manager.
- Right-click on your network adapter and click Update driver.

- Select Search automatically for drivers.


This issue can sometimes occur if your network adapter driver is outdated; therefore, we recommend that you update it.
To do so, you can use the CD that you got with your device, or you can download the necessary drivers from your network adapter manufacturer’s website.
If you can’t access the Internet on your PC, you’ll have to use a different device to download the necessary drivers.
We recommend using a third-party tool driver updater to download all the outdated drivers on your PC automatically.
7. Install the latest updates
- Click the Menu icon in the top-right corner.
- Choose Help, then click About Google Chrome from the menu.

- Chrome will now check for available updates in a new tab. If any updates are available, they will be downloaded and installed automatically in the background.


Once the updates are installed, restart Chrome and check if the Err_name_not_resolved message is still there.
8. Disable all extensions
- Launch the browser.
- Click the Menu icon in the top-right corner and go to More tools, then Extensions.

- Locate the extension you want to disable and click the little switch icon next to it. Repeat this step for all available extensions.

- Once you disable all extensions, restart Chrome.


When Chrome starts, check if the problem is still there; if not, an extension was certainly causing this issue.
To fix the issue, enable all disabled extensions one by one until the problem starts appearing again. Once you find the problematic application, remove it, and the issue will be permanently resolved.
- Should You Continue Running Background Apps When Google Chrome is Closed?
- How to Get a Custom Cursor for Chrome
- Present Like a Pro With the Slides Timer Chrome Extension
9. Restart your router
The issue might be your router if you’re getting an Err_name_not_resolved error in Chrome. Temporary network glitches can occur; to fix them, you’ll need to restart your modem/router.
To do that, press the Power button on your router and wait for 30 seconds. Then press the Power button again, and wait until your router boots completely. Once your router boots, check if the issue is still there.
10. Reset Chrome
- Launch your browser.
- On the Address bar, paste the link below and hit Enter.
chrome://settings/reset - Click the Restore settings to their original defaults on the right pane.

- Click the Reset settings button to confirm.


After Chrome resets, check if the problem is still there.
What can I do when getting Err name not resolved in Windows 11?
You should note that the reasons for this error on Windows 10 and 11 are the same. Also, the solutions discussed in this article will work regardless of the Windows version.
However, depending on your version, there may be slight UI changes. Still, typically, once you can resolve it in one windows OS, you should be able to apply the exact solutions across other editions.
The Windows 10 and 11 err_name_not_resolved error can prevent you from accessing the Internet, and if you have this problem in Google Chrome, we advise you to, in turn, try all solutions from this article.
You may also want to reinstall your browser only as a last resort because you may lose important data if it is not adequately backed up.
We’d like to know which one worked for you, so feel free to contact us using the comments section.
Milan Stanojevic
Windows Toubleshooting Expert
Milan has been enthusiastic about technology ever since his childhood days, and this led him to take interest in all PC-related technologies. He’s a PC enthusiast and he spends most of his time learning about computers and technology.
Before joining WindowsReport, he worked as a front-end web developer. Now, he’s one of the Troubleshooting experts in our worldwide team, specializing in Windows errors & software issues.
How to Fix ERR_NAME_NOT_RESOLVED Google Chrome Error on Windows 10
If you’re using Google Chrome, you may have encountered the ERR_NAME_NOT_RESOLVED error and are looking for a solution. This article features several guides that will help you fix this error.

The ERR_NAME_NOT_RESOLVED Google Chrome error usually indicates that the domain name cannot be resolved and, thus, you cannot open the website (or websites). In other words, there is a DNS resolution problem.
There are many causes to this error, including configuration problems on your computer or Google Chrome browser, or the website you are trying to visit might be down and cannot be accessed. However, the most probable cause of the error is computer and browser issues.
To resolve ERR_NAME_NOT_RESOLVED, you may need to clear the browser data cache, flush and renew DNS settings, change your DNS address, clear Google Chrome host cache, and temporarily disable the antivirus or firewall. In the guide below, we outline several ways to resolve this issue.
Video Showing How to Fix ERR_NAME_NOT_RESOLVED Error:
Table of Contents:
- Introduction
- Clear Browsing Data
- Switch to Google DNS
- Reset Network Settings
- Temporarily Disable Your Antivirus
- Disable Prediction Service
- Restart Your Router
- Video Showing How to Fix ERR NAME NOT RESOLVED Error
Download Computer Malware Repair Tool
It is recommended to run a free scan with Combo Cleaner — a tool to detect viruses and malware on your device. You will need to purchase the full version to remove infections. Free trial available. Combo Cleaner is owned and operated by Rcs Lt, the parent company of PCRisk.com read more.
Clear Browsing Data
Browsing data consists of a record of web pages that you have visited in past browsing sessions and typically includes the name of the website and its corresponding URL. Other private data components such as cache, cookies, saved passwords, etc., are also saved during your browsing session. This stored data can slow down the browser or prevent you from accessing websites and cause the «ERR_NAME_NOT_RESOLVED» error.
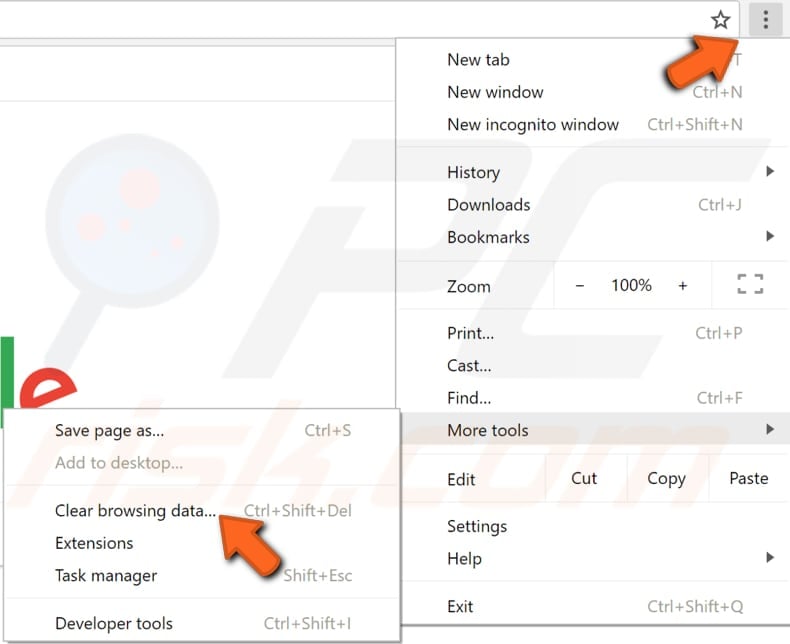
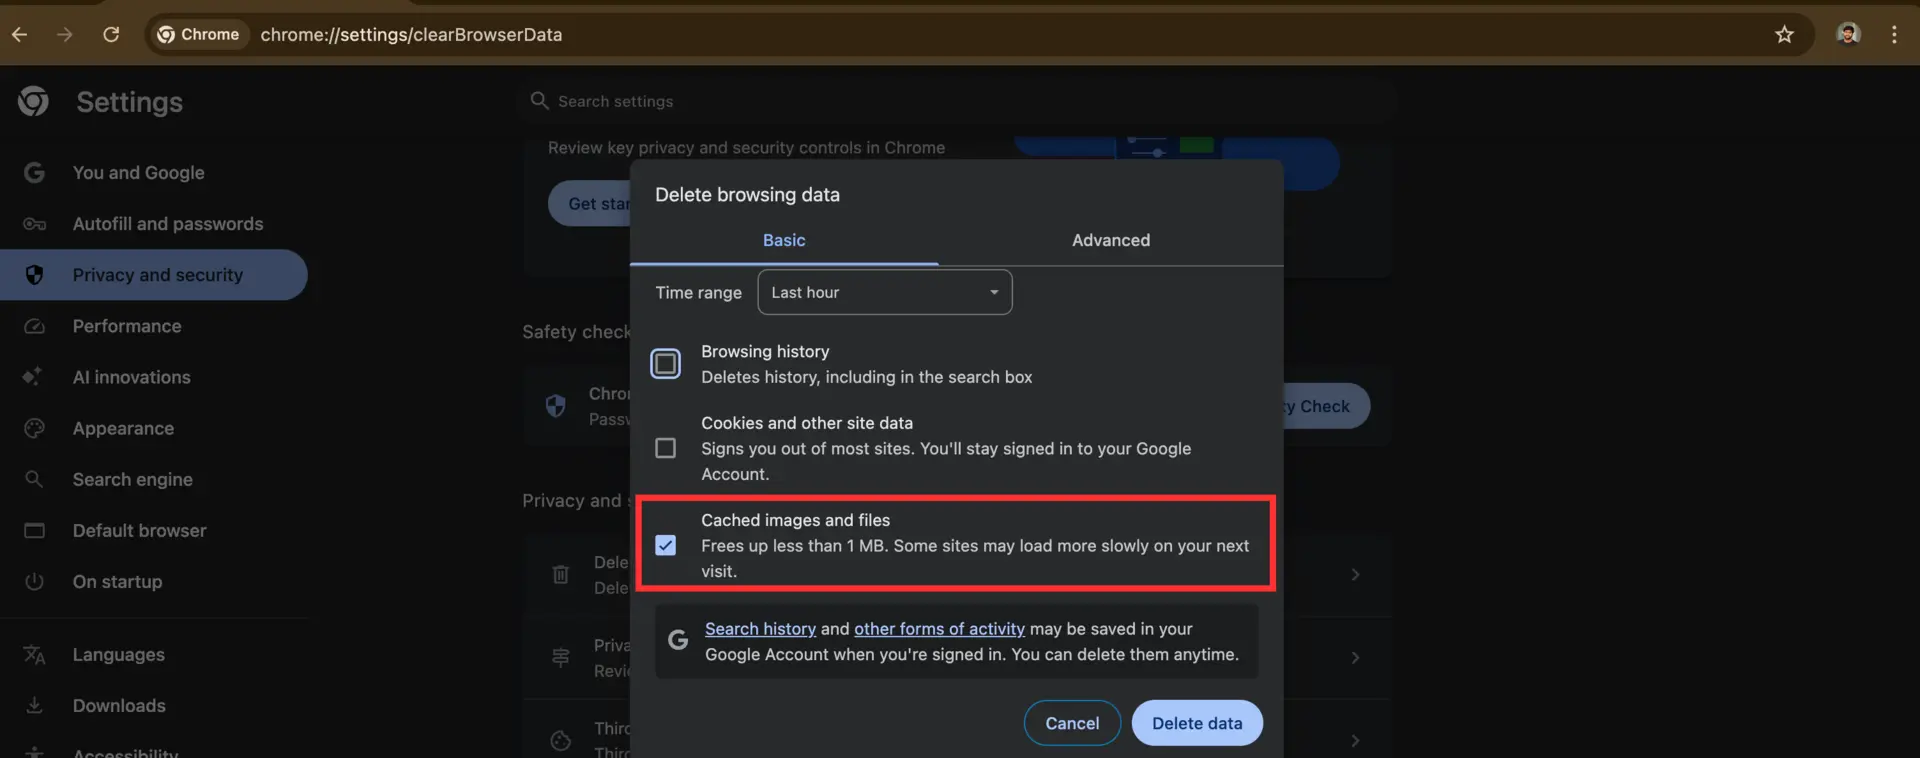
To clear Google Chrome’s browsing data cache, click the three dots in the top-right corner, select «More tools» and click «Clear browsing data…».
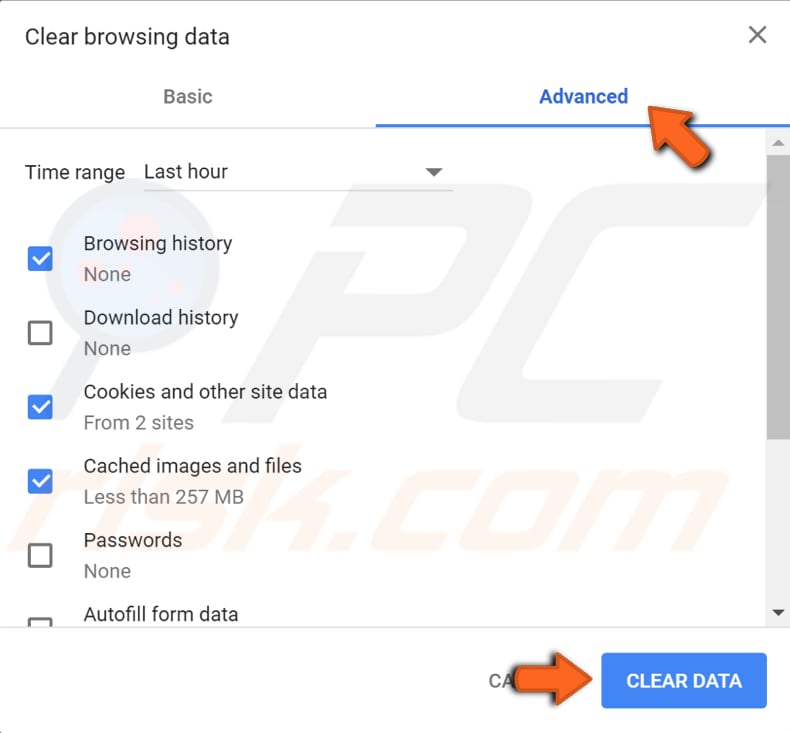
In the ‘Clear browsing data’ window, select the data you want to remove from the Google Chrome data cache and click the «CLEAR DATA» button. Ensure that you select to remove «Cookies and other site data» (other items such as «Cached images and files» and «Hosted app data» are optional).
Restart Google Chrome and see if you still get the error.
Clearing the Google Chrome Host Cache might also help. Open Google Chrome and a new Incognito window by clicking the three dots in the top-right corner and selecting «New incognito window».
Alternatively, press the Ctrl + Shift + N keys on your keyboard. In the incognito window, click the address bar and type this address: «chrome://net-internals/#dns». Then press Enter. Find and click the «Clear host cache» button. See if this fixed error.
[Back to Table of Contents]
Switch to Google DNS
Google’s Public DNS is a free alternative Domain Name System (DNS) service offered to Internet users worldwide. The public DNS service and servers are maintained and owned by Google. The DNS service functions as a recursive name server providing domain name resolution for any host on the Internet.
We recommend that you use Google DNS for a faster and secure connection. Furthermore, using Google DNS might also fix the «ERR_NAME_NOT_RESOLVED» error. You must change the DNS manually, and we describe how.
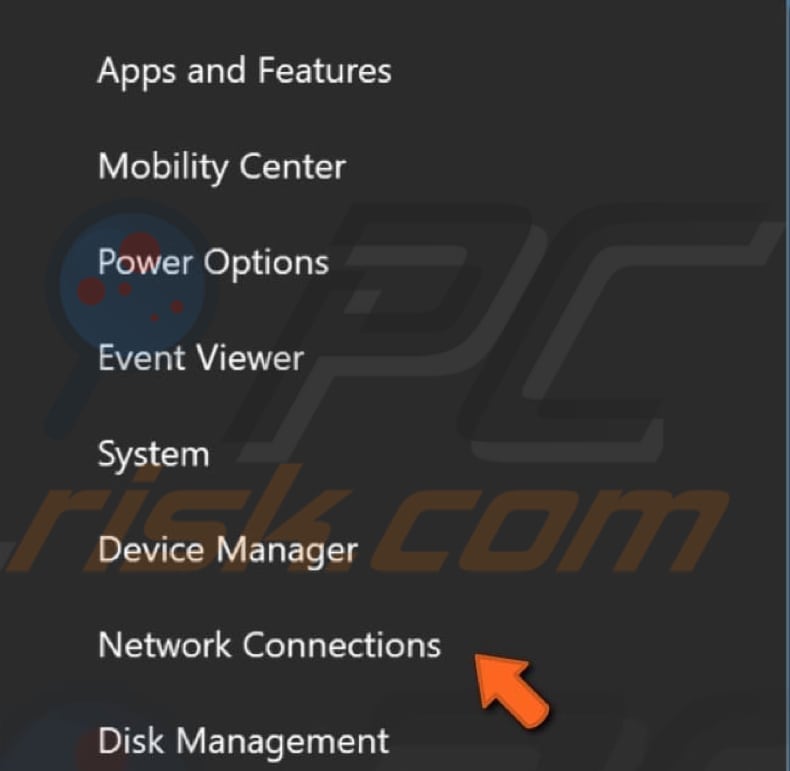
To change your DNS server to Google’s DNS server, go to Network Connections settings. Right-click the Start menu and select «Network Connections», or go to Settings and click «Network & Internet».
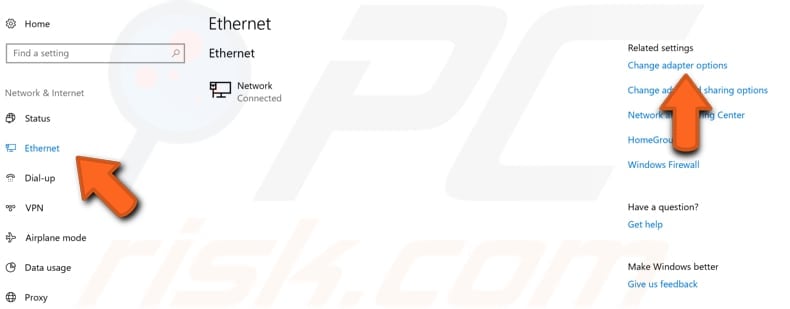
In the Network & Internet settings window, select your connection type (in our case, «Ethernet») on the left pane and then click «Change adapter options» on the right pane.
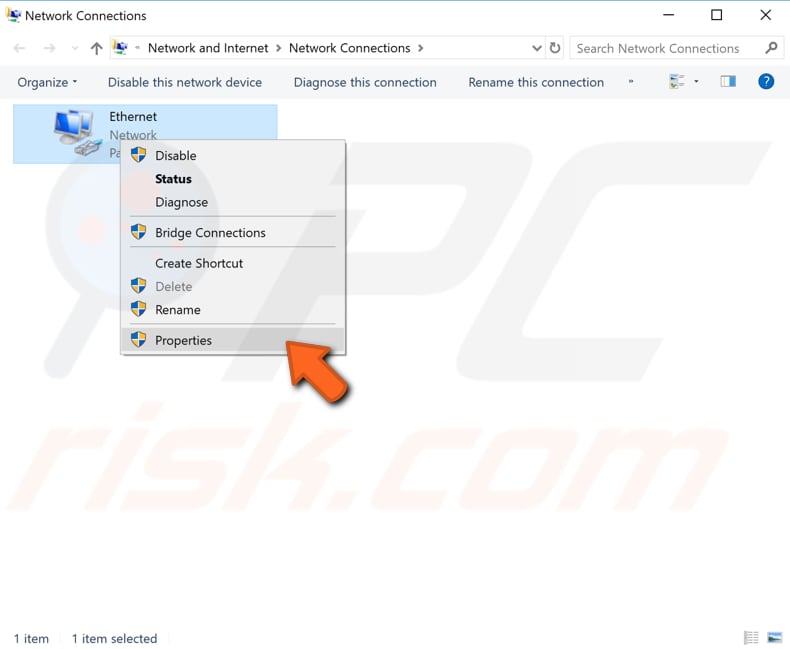
Right-click on your connection and select «Properties» from the drop-down menu.
Select «Internet Protocol Version 4 (TCP/IPv4)» and click «Properties».
In the Internet Protocol Version 4 (TCP/IPv4) Properties window, select «Use the following DNS server addresses», enter 8.8.8.8 as the «Preferred DNS server» and 8.8.4.4 as the «Alternate DNS server». Click «OK» to save the changes.
Restart your computer, open Google Chrome, and see if the error was fixed.
[Back to Table of Contents]
Reset Network Settings
To reset network settings, you will need to execute several commands using Command Prompt. This method includes entering and executing «ipcofig» and «netsh» commands.
Ipconfig is a command-line tool that displays the current configuration of the installed IP stack on a networked computer. Using this tool, we can flush and reset the contents of the DNS client resolver cache and renew the DHCP configuration.
Netsh is a command-line scripting utility that allows you to, either locally or remotely, display or modify the network configuration of a computer that is currently running. Netsh also provides a scripting feature to run a group of commands in batch mode against a specified computer.
The commands require an elevated Command Prompt opened with administrator privileges. To open elevated Command Prompt, type «command prompt» in Search and right-click on the «Command Prompt» result. Choose «Run as administrator» to run it with administrative privileges.
When you select «Run as administrator», a User Account Control prompt will appear asking if you allow the Command Prompt to make changes to your computer. Click «Yes».
Now type these commands and press Enter after each:
ipconfig /release
ipconfig /all
ipconfig /flushdns
ipconfig /renew
netsh int ip set dns
netsh winsock reset
Restart your computer when you have finished, launch Google Chrome, and see if the error persists.
[Back to Table of Contents]
Temporarily Disable Antivirus Software
Your antivirus (anti-malware) software may be blocking access to some or all websites, and thus you are receiving the «ERR_NAME_NOT_RESOLVED» error. To ensure that installed third-party antivirus software is not the cause of this error, we recommend that you temporarily disable it and check if the error persists.
If disabling (or uninstalling) your antivirus software helps, we recommend that you switch to other antivirus software or reinstall the currently-installed package. If you are not sure how to disable your antivirus software, read this guide, where you can find instructions on how to disable some of the most popular antivirus programs. If you are using a VPN client or a firewall, temporarily disable them and see if the error persists.
[Back to Table of Contents]
Disable Prediction Service
This feature allows Chrome to load pages faster when you attempt to access them. Prefetching is also known as «prerendering». When enabled, the feature caches pages that are linked on the web page you are currently on. So, the next time you open the same web page, it will load faster.
The downside of this feature is that you will download resources from pages you visited but may never visit again. This can use more system resources and, in some cases, prevent you from accessing certain websites and cause the «ERR_NAME_NOT_RESOLVED» error.
To access this feature, go to «Customise and control» (three dots on the upper-right corner) and then click «Settings».
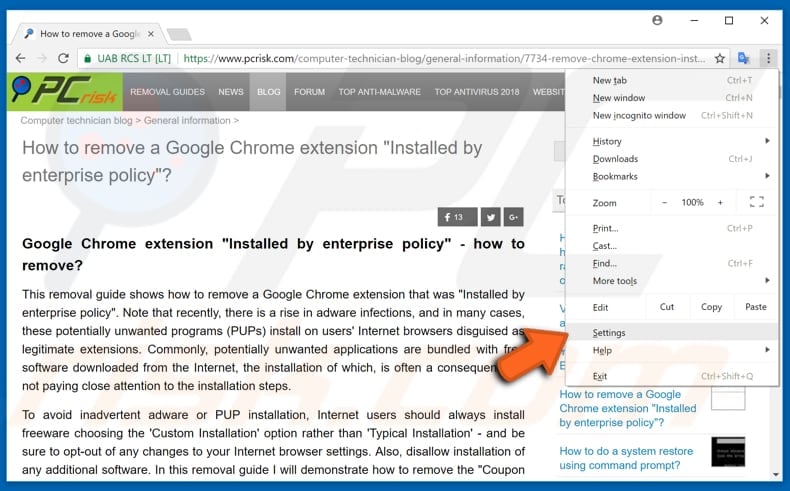
When the «Settings» page appears, click «Advanced».
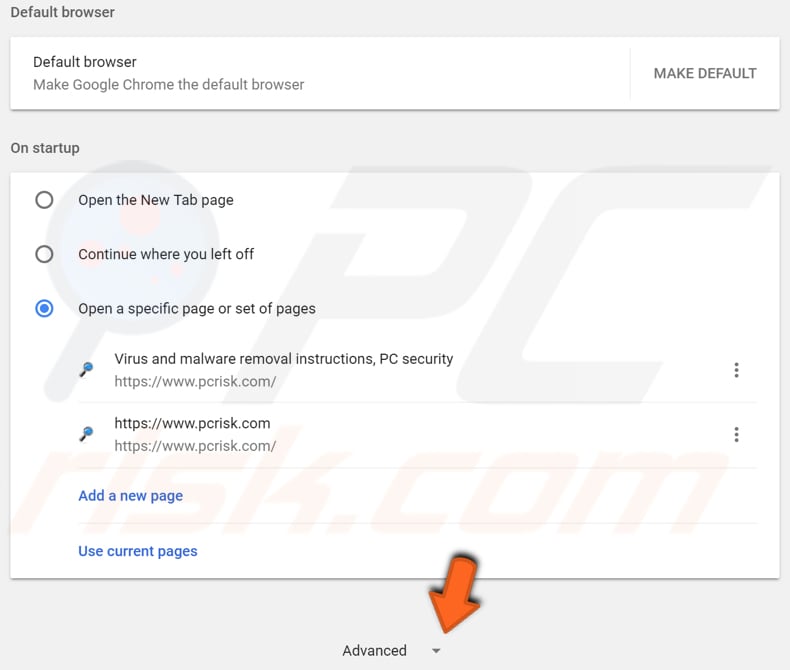
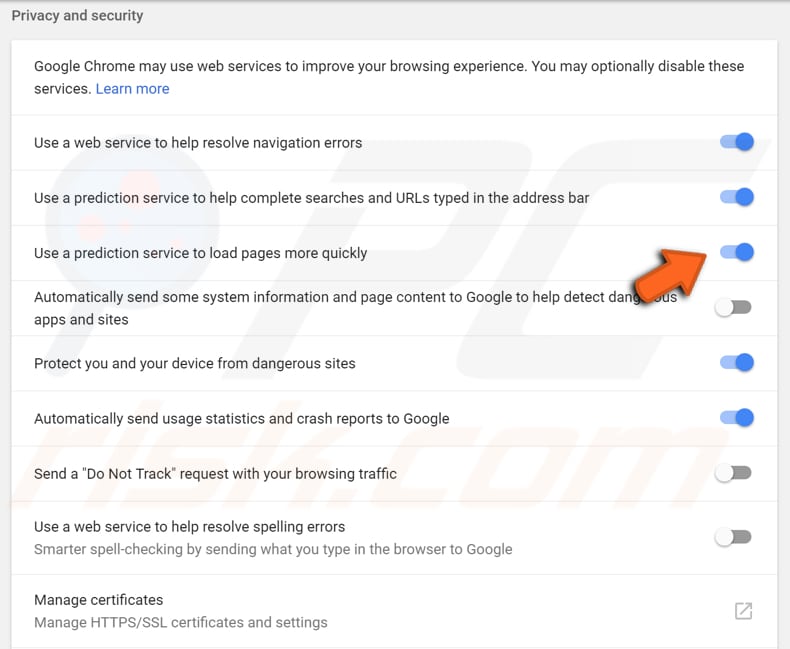
In the «Privacy and security» section, find «Use a prediction service to load pages more quickly» and disable it by toggling the switch to the «Off» position (the switch should be grayed out).
[Back to Table of Contents]
Restart the Router
Unplug your modem (or router) from the main power supply and leave it unplugged for several minutes. Then plug it back in again and wait until it finishes the startup (self-test) process. See if the error was fixed.
We hope one of these methods solved the problem and fixed the «ERR_NAME_NOT_RESOLVED» Google Chrome error.
[Back to Top]
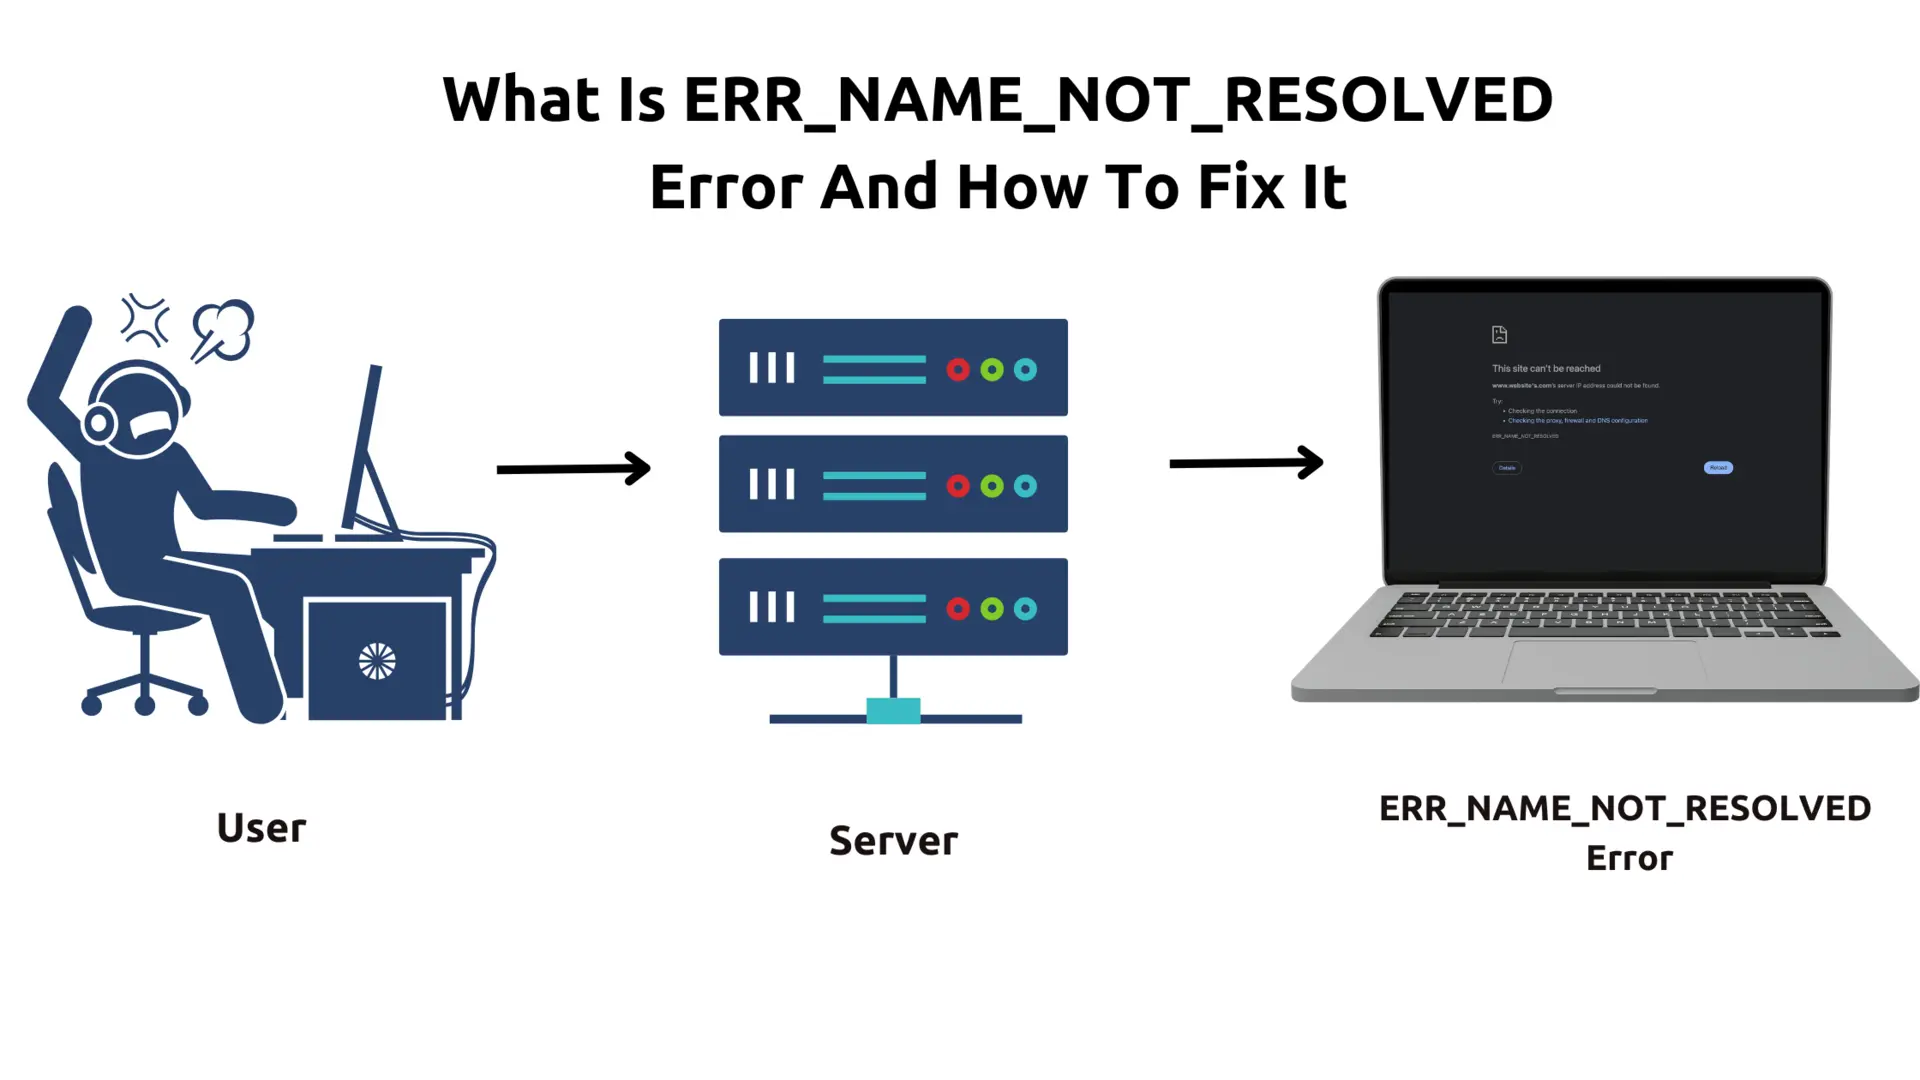
Encountering the ERR_NAME_NOT_RESOLVED error can be frustrating and disruptive, particularly when you’re trying to access an important or urgent website. This error is displayed by browsers such as
Chrome,
Firefox, and
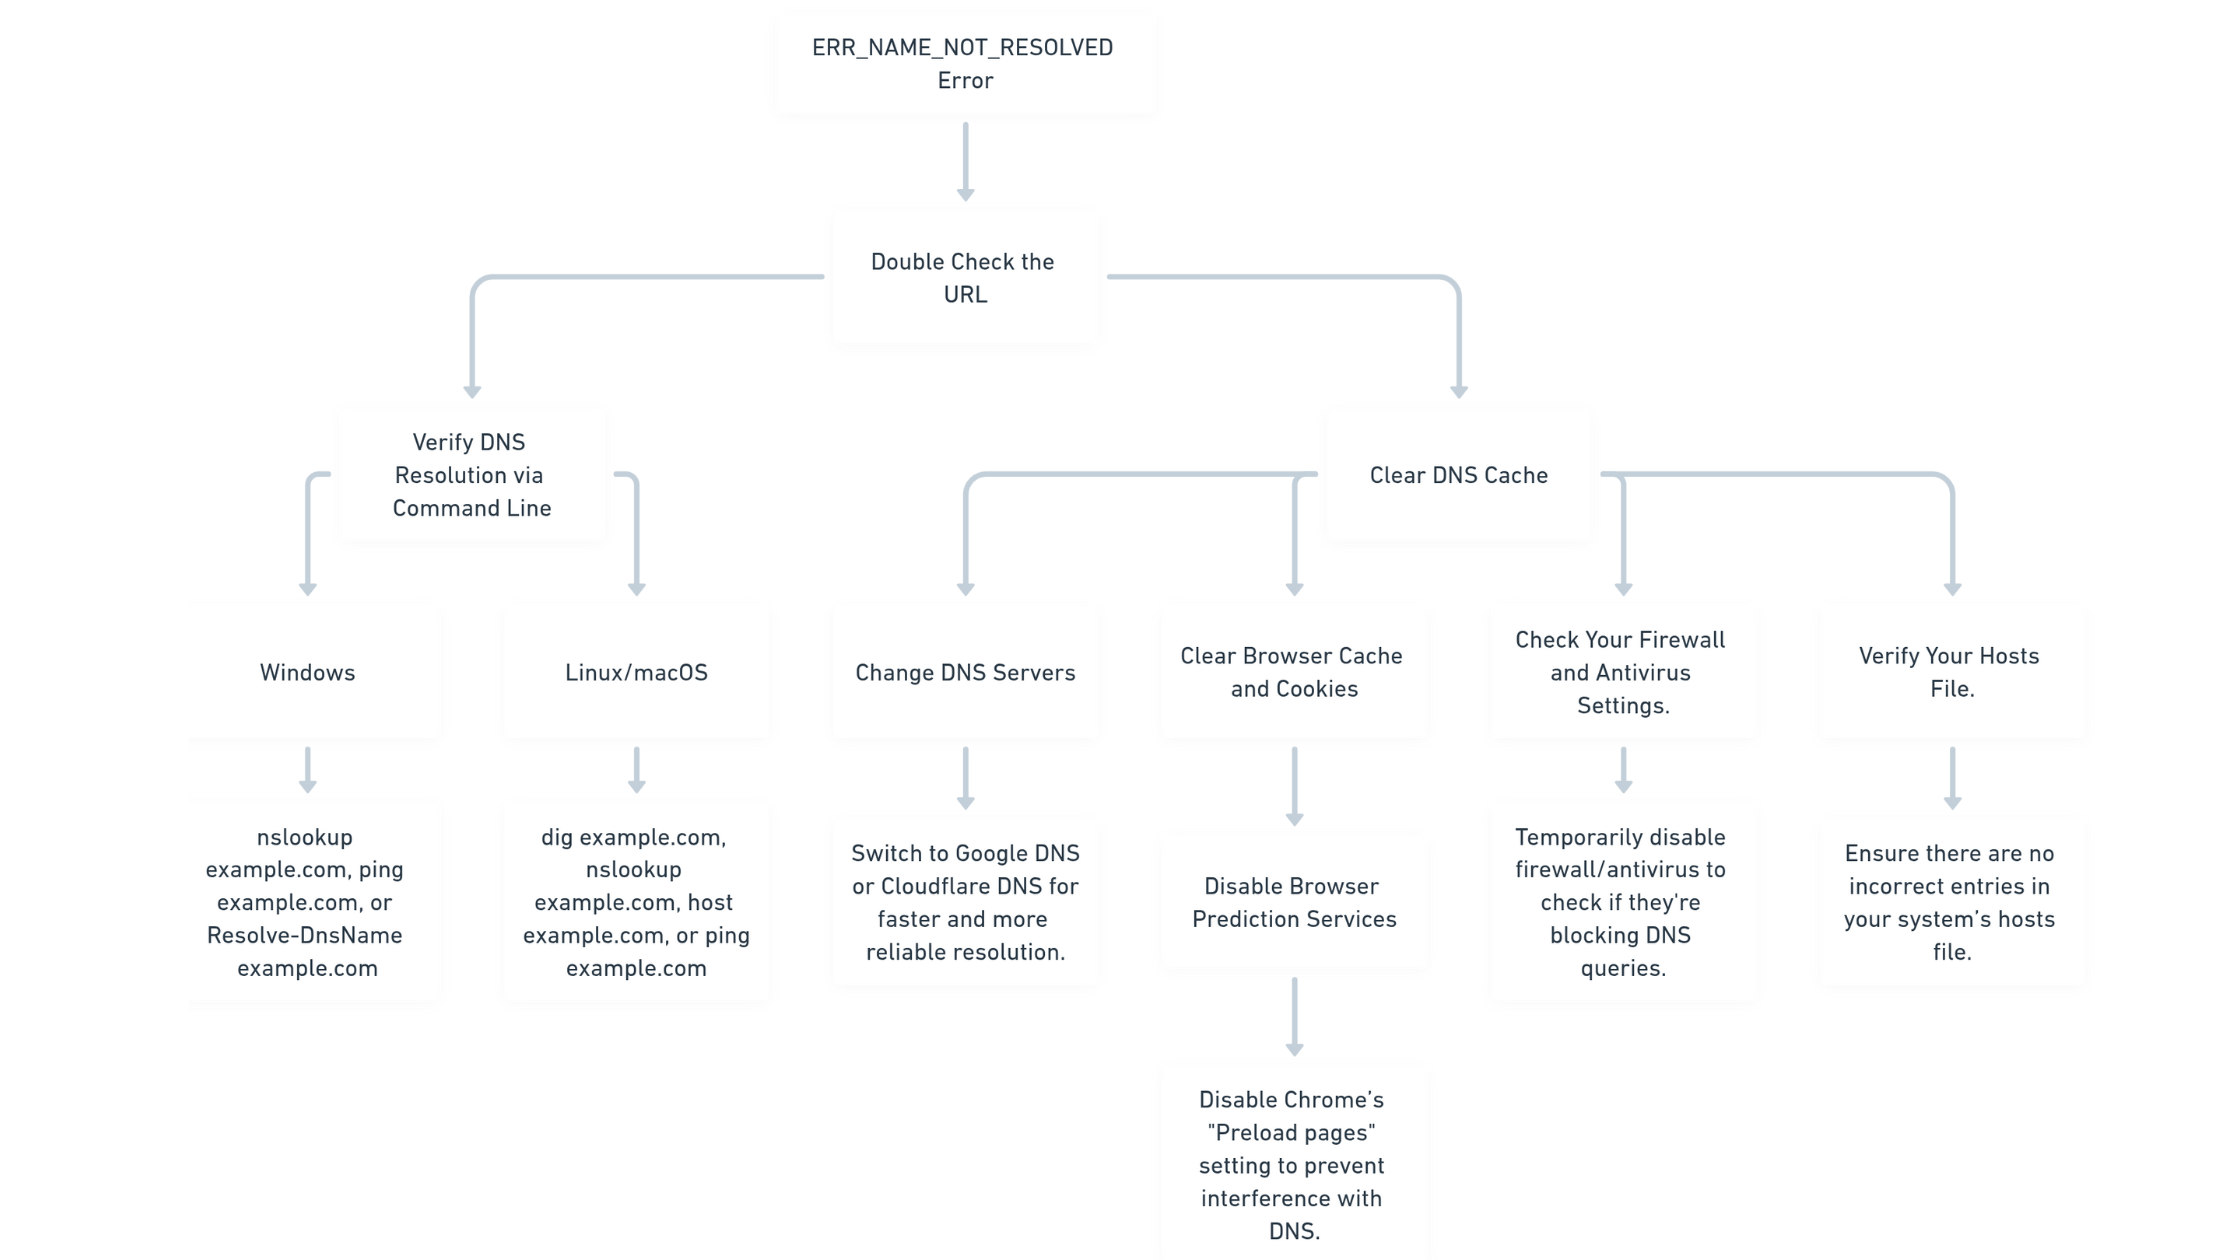
Edge when the Domain Name System (DNS) fails to translate a domain name into its corresponding Internet Protocol (IP) address. DNS is a fundamental service that translates human-friendly website addresses (URLs) into numerical IP addresses that computers understand. When DNS resolution fails, browsers can’t establish a connection, resulting in the ERR_NAME_NOT_RESOLVED error.
Summary
- Double Check the URL
- Make sure there are no typos, spaces, or extra characters in the website address.
Here’s a cleaner, manager-style summary of that point:
- Verify DNS Resolution via Command Line
-
Use command-line tools to ensure DNS is working properly:
-
Windows:
nslookup example.com,ping example.com, orResolve-DnsName example.com(PowerShell) -
Linux/macOS:
dig example.com,nslookup example.com,host example.com, orping example.com
These commands help quickly identify DNS or connectivity issues.
-
- Clear DNS Cache
- Flush your DNS cache to remove outdated data.
- Windows:
ipconfig /flushdns - macOS:
sudo dscacheutil -flushcache
- Windows:
- Flush your DNS cache to remove outdated data.
- Change DNS Servers
- Switch to Google DNS or Cloudflare DNS for faster and more reliable resolution.
- Google DNS:
8.8.8.8and8.8.4.4
- Google DNS:
- Switch to Google DNS or Cloudflare DNS for faster and more reliable resolution.
- Clear Browser Cache and Cookies
- Clear your browser’s cache and cookies to fix DNS issues caused by stored data.
- Disable Browser Prediction Services
- Disable Chrome’s “Preload pages” setting to prevent interference with DNS.
- Check Your Firewall and Antivirus Settings
- Temporarily disable firewall/antivirus to check if they’re blocking DNS queries.
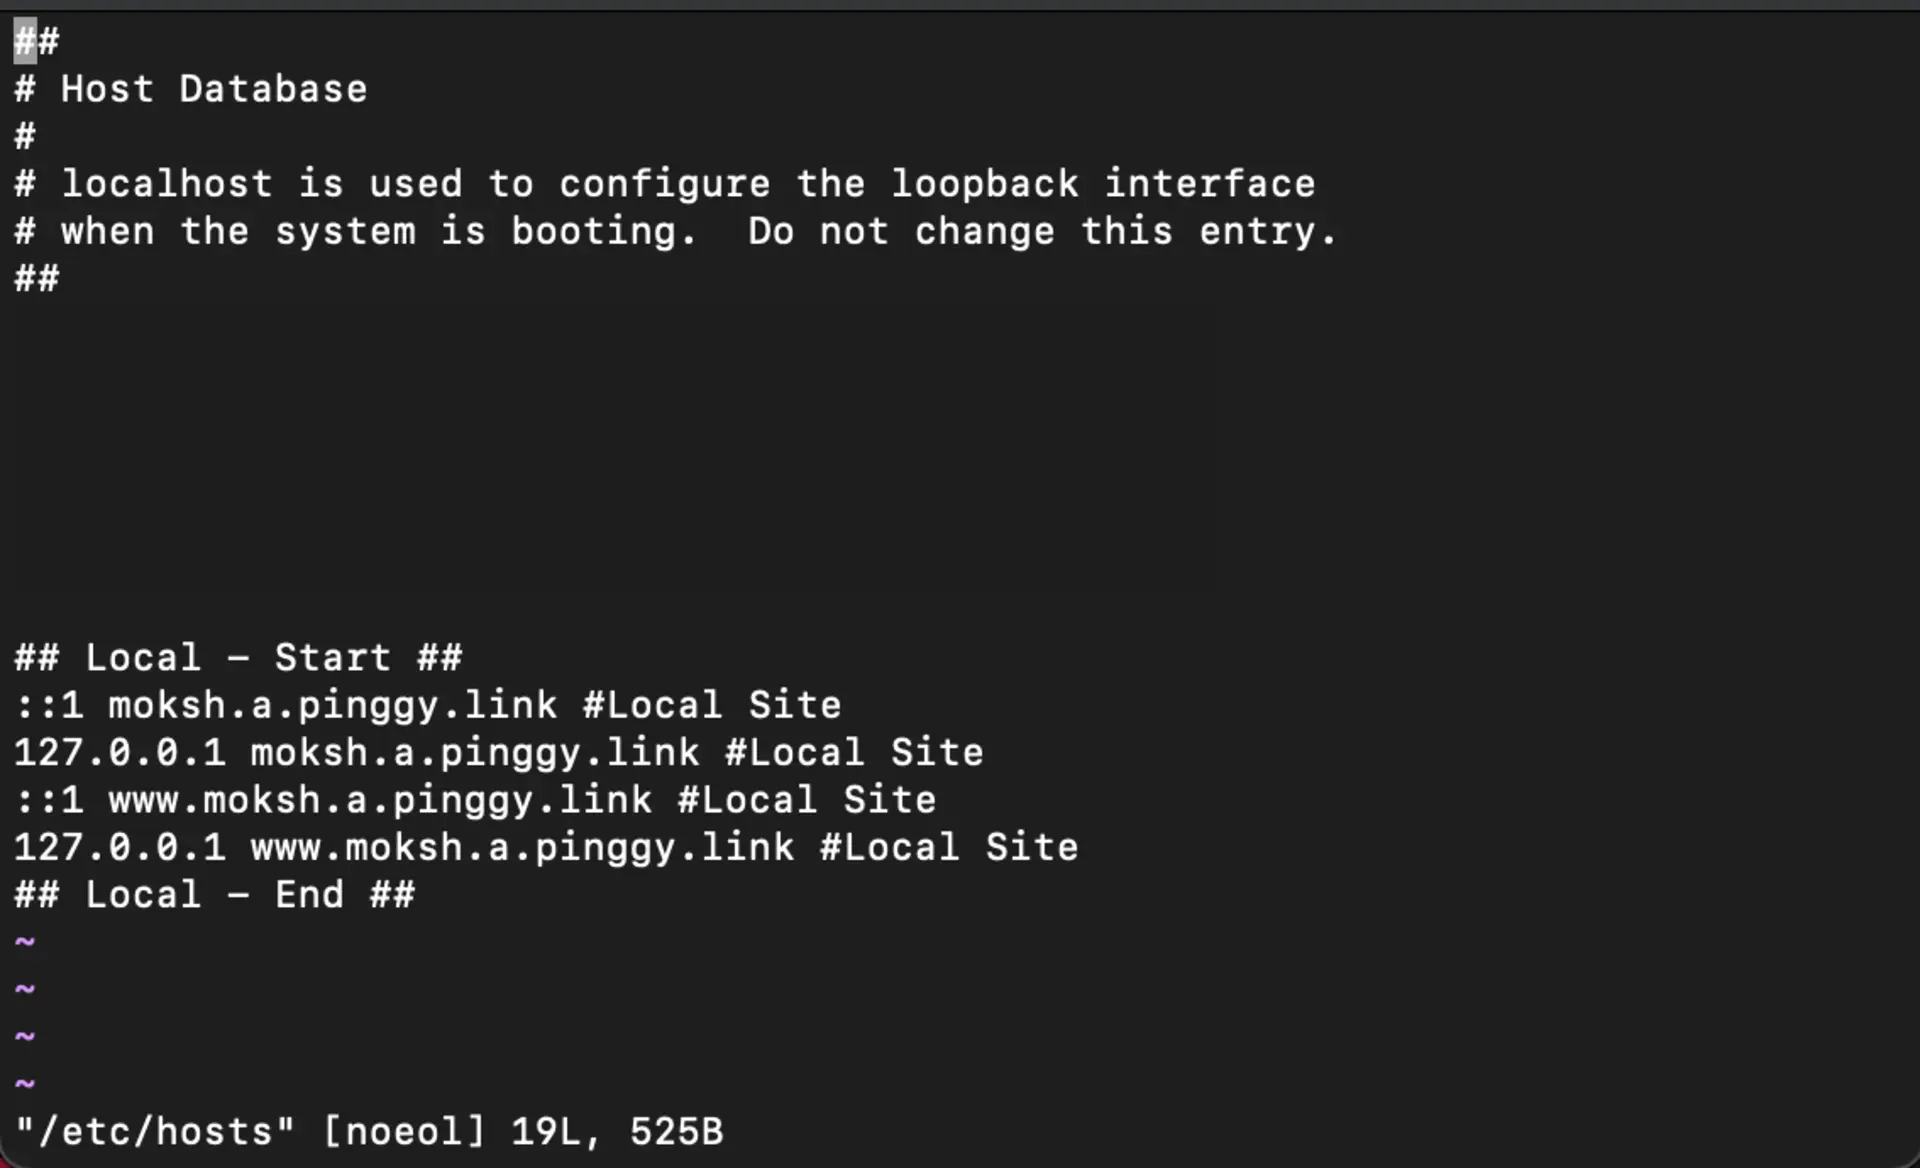
- Verify Your Hosts File
- Ensure there are no incorrect entries in your system’s hosts file.
What Causes ERR_NAME_NOT_RESOLVED?
The ERR_NAME_NOT_RESOLVED error can occur due to several common reasons, each impacting your browsing experience differently:
-
Incorrect URL: One of the simplest and most frequent causes is an incorrect website URL. This includes typos, misspellings, unnecessary spaces, or accidental additional characters that lead to domain resolution failure.
-
DNS Server Issues: If your DNS server is temporarily down, slow, or experiencing technical issues, it cannot process DNS requests efficiently, resulting in resolution failures and the
ERR_NAME_NOT_RESOLVEDerror. -
DNS Cache Problems: Your operating system and browser store previously resolved domain names to speed up future access. However, this cache can become outdated or corrupted, causing the DNS to resolve to incorrect IP addresses and leading to errors.
-
Misconfigured Network Settings: Incorrect or outdated DNS server settings on your device can disrupt the proper functioning of DNS queries. If your system attempts to connect to an inactive or misconfigured DNS server, you will encounter resolution problems.
-
Firewall or Antivirus Restrictions: Security software such as firewalls, antivirus, or network security tools can inadvertently block DNS queries. This usually happens when these tools are overly restrictive or misconfigured, mistakenly identifying legitimate DNS requests as harmful activities, thus blocking access to certain websites.
Step-by-Step Solutions to Fix ERR_NAME_NOT_RESOLVED
1. Double Check the URL
Before diving into technical fixes, ensure the website address you’ve typed is correct. A simple typo in the domain name or an extra space can cause the browser to fail in resolving the site. Even an unnoticed mistake like .co instead of .com or a misplaced character can trigger this error.
Solution: Carefully check the URL for any errors or unnecessary spaces. If possible, try accessing the website using a different device to verify that the issue is not due to a typo.
2. Verify DNS Resolution
-
Check if DNS resolution is functioning correctly by querying it from the command line:
Windows (Command Prompt or PowerShell):
- Using
nslookup: - Using
ping(for basic resolution): - Using
Resolve-DnsName(PowerShell only):Resolve-DnsName example.com
Linux/Mac (Terminal):
- Using
dig(most detailed): - Using
nslookup: - Using
host: - Using
ping(for basic resolution):
- Using
These commands help confirm whether DNS resolution is functioning correctly and can identify if the issue lies with DNS settings or connectivity.
If DNS lookup is successful, the output will display the resolved IP address of the domain (e.g., Name: example.com Address: 93.184.216.34).
If DNS lookup fails, the output will indicate an error such as Non-existent domain, NXDOMAIN, or connection timed out; no servers could be reached.
3. Clear DNS Cache
Your computer stores DNS information in a local cache to speed up future visits to websites. However, if this cache becomes outdated or corrupt, it can cause the ERR_NAME_NOT_RESOLVED error. Clearing the DNS cache forces your device to obtain fresh DNS information from your DNS server.
Solution:
- Windows:
- Press
Windows + Rto open the Run dialog. - Type
cmdand hit Enter to open Command Prompt. - Type
ipconfig /flushdnsand press Enter to clear the DNS cache.
- Press
- macOS:
- Open Terminal (use Spotlight to search for it).
- Type
sudo dscacheutil -flushcacheand press Enter. - You may be asked to enter your administrator password.

After clearing the cache, retry visiting the website.
4. Change DNS Servers
If the default DNS server you are using is slow or unreliable, switching to a different, more reliable DNS provider can help resolve the issue.
Google DNS and
Cloudflare DNS are popular choices that often provide faster and more reliable service.
Solution:
- Windows:
- Go to Control Panel > Network and Internet > Network Connections.
- Right-click on your active network connection, then click Properties.
- Choose “Internet Protocol Version 4 (TCP/IPv4)” and click Properties.
- Select “Use the following DNS server addresses” and enter:
- Preferred DNS server:
8.8.8.8(Google DNS) - Alternate DNS server:
8.8.4.4(Google DNS)
- Preferred DNS server:
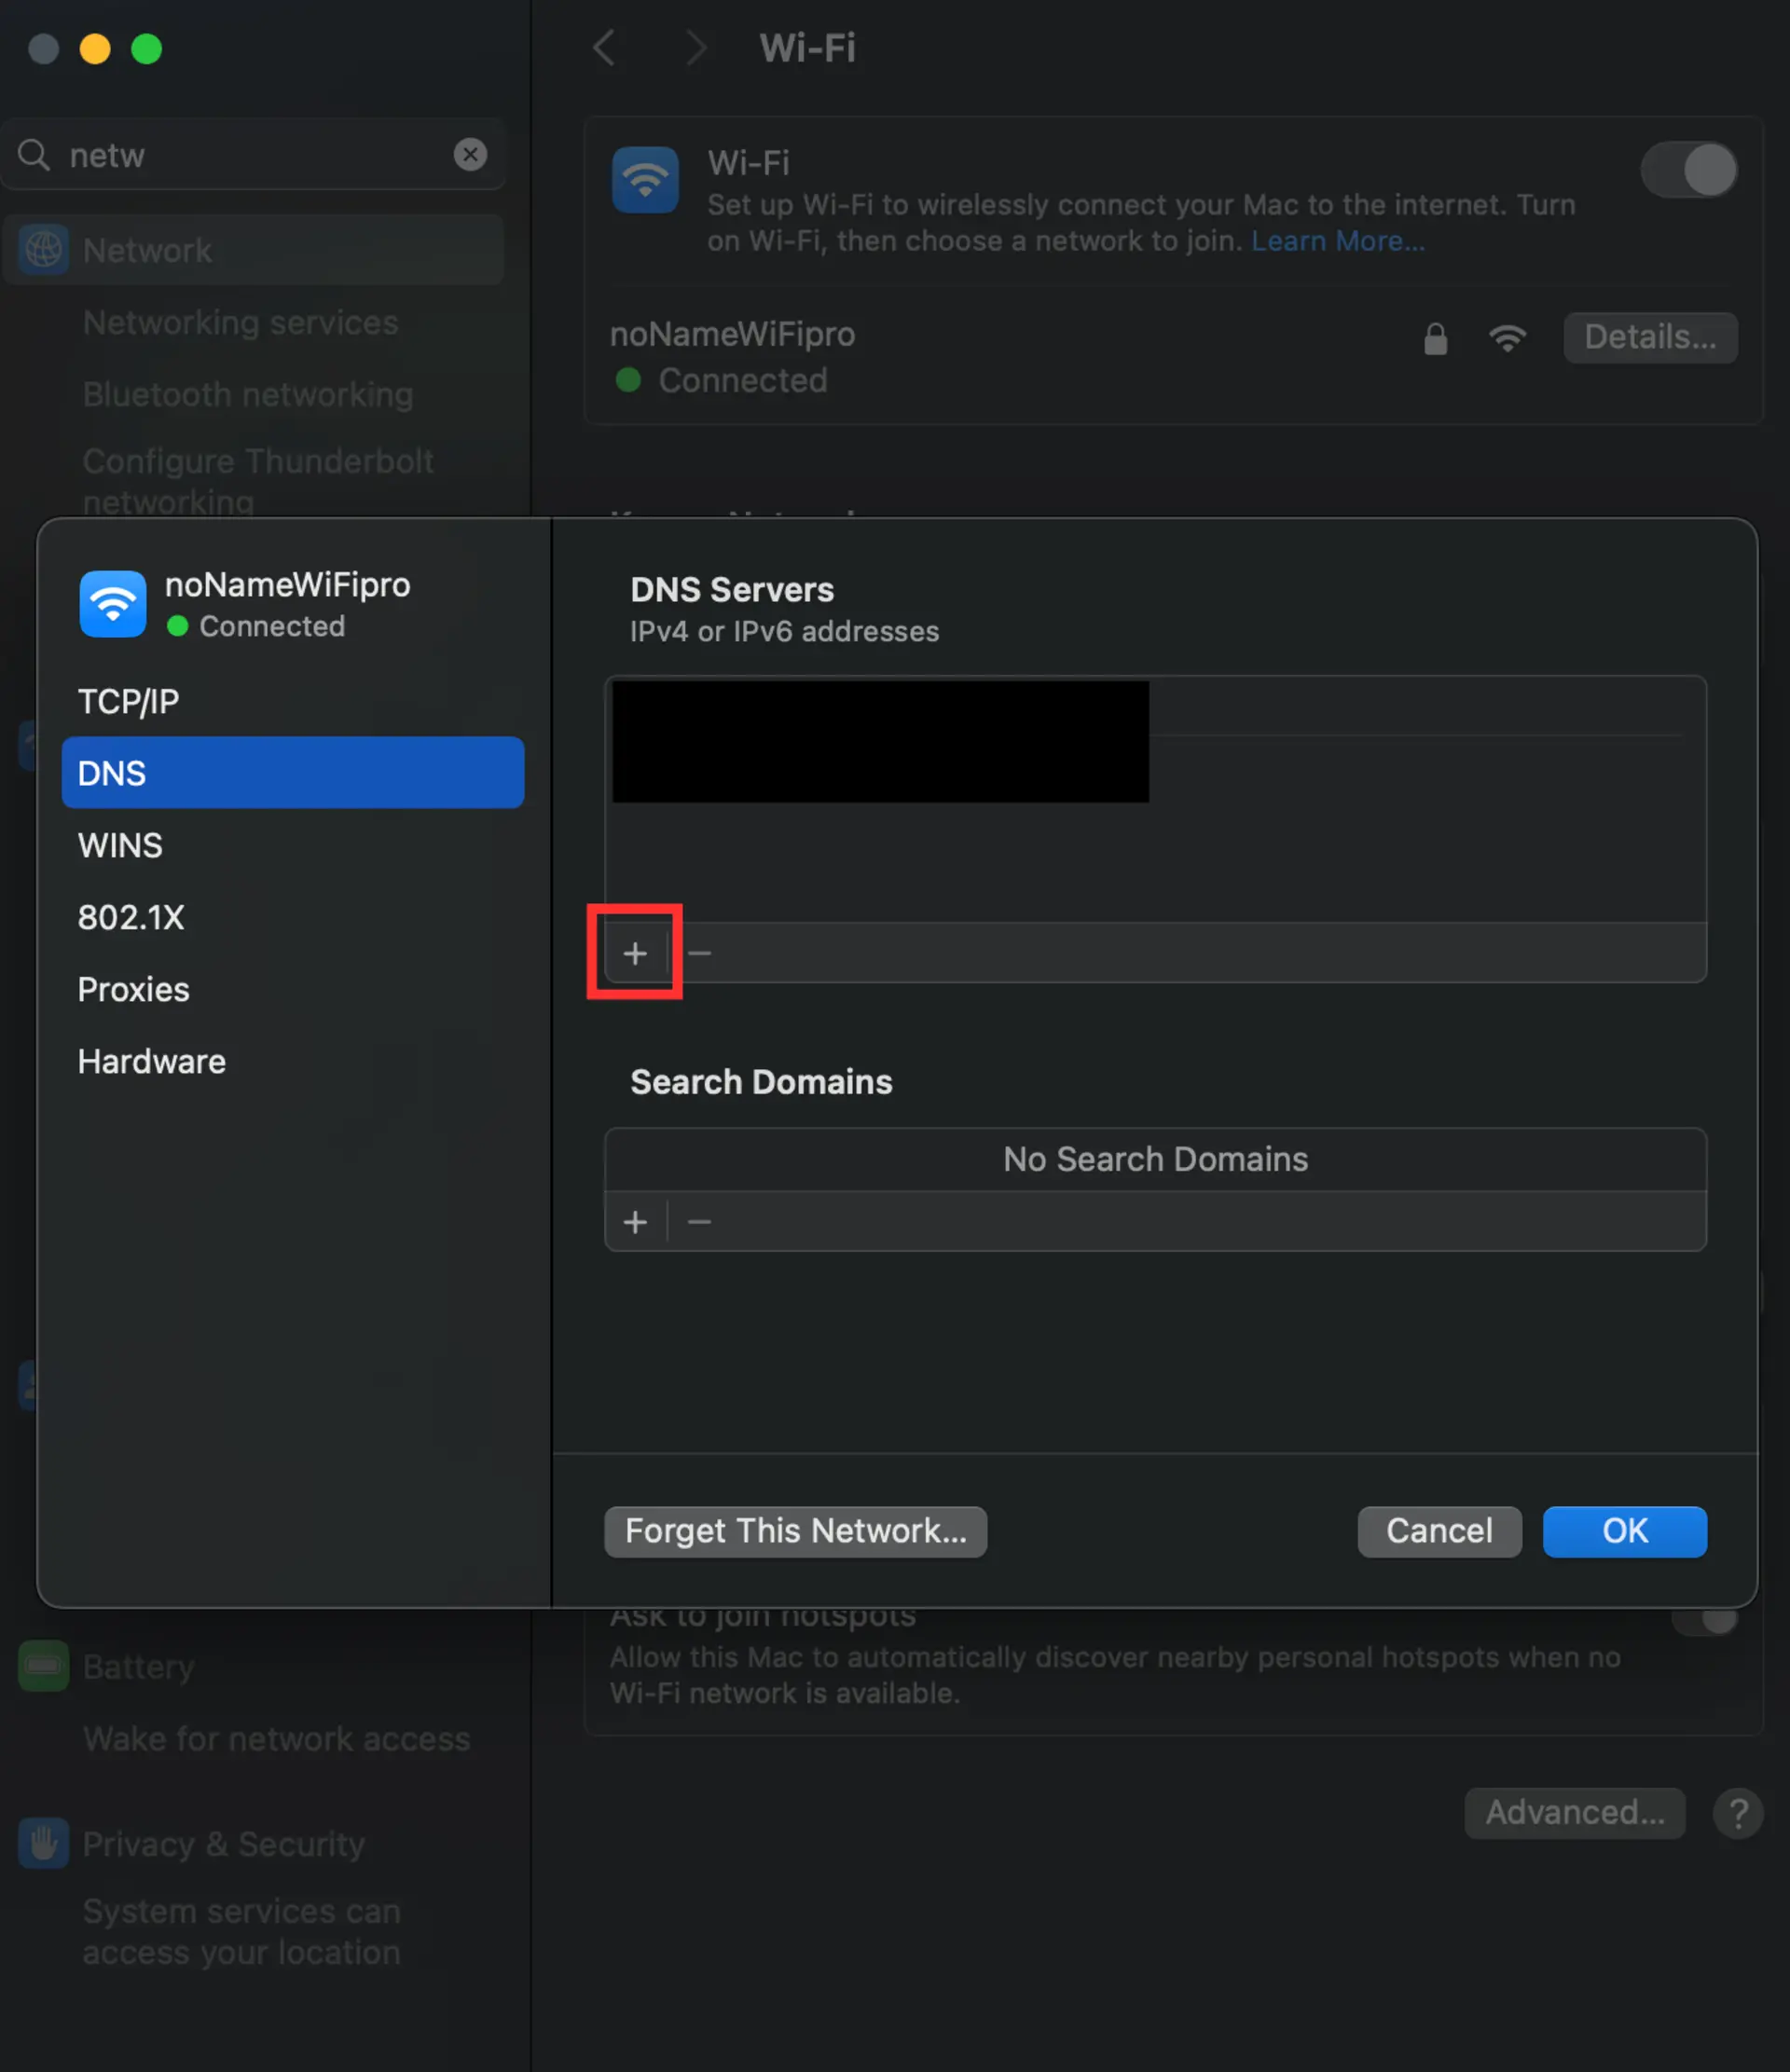
- macOS:
- Go to System Preferences > Network.
- Select your active network connection (Wi-Fi or Ethernet), then click Advanced.
- Go to the DNS tab and click the
+button to add:8.8.8.8(Google DNS)8.8.4.4(Google DNS)
This change forces your device to use a new DNS provider for resolving domain names.
5. Clear Browser Cache and Cookies
Your browser’s cache and cookies can sometimes interfere with DNS resolution. Clearing the cache can help resolve any issues caused by outdated or corrupt files.
Solution:
- Open your browser settings, go to Privacy or History settings, and clear browsing data, including cached images, cookies, and other site data.
- Restart your browser and try to visit the website again.
6. Disable Browser Prediction Services
Browsers like
Chrome use predictive algorithms to preload pages, which can sometimes interfere with DNS resolution. Disabling these services might resolve the error.
Solution:
- Open Chrome and go to Settings.
- Navigate to Privacy and Security.
- Disable the option “Preload pages for faster browsing and searching.”
Disabling this setting can stop
Chrome from attempting to pre-resolve websites that might conflict with DNS settings.

7. Check Your Firewall and Antivirus Settings
In some cases, your firewall or antivirus software might block DNS queries, causing the error. Disabling your firewall or antivirus temporarily can help determine if they are the cause.
Solution:
- Temporarily disable your firewall or antivirus software.
- If the website loads, adjust your firewall or antivirus settings to allow DNS queries, or whitelist the website you’re trying to access.
Make sure to enable your firewall or antivirus again after troubleshooting.
8. Verify Your Hosts File
The hosts file on your computer contains mappings of IP addresses to domain names. If there are incorrect entries in this file, it could block access to certain websites.
Solution:
- Windows:
- Open File Explorer and navigate to
C:\Windows\System32\drivers\etc\hosts. - Open the file in a text editor (e.g., Notepad).
- Remove or correct any incorrect entries.
- Open File Explorer and navigate to
- macOS:
- Open Terminal and type
sudo nano /etc/hosts. - Review the file and remove any incorrect mappings.
- Save the file and exit (press
CTRL + X, thenYto confirm, andEnter).
- Open Terminal and type
Once the hosts file is corrected, try reloading the website.
Step 1: Launch Your Foundry VTT Server Locally
To begin, ensure your Foundry VTT instance is running on your local machine. By default, Foundry operates on port 30000.
-
Start the Foundry VTT Application
Launch the Foundry VTT application as you normally would. -
Check Local Network Access
Navigate toGame > Access > Local Networkwithin the Foundry interface. Here, you’ll see the local network address where Foundry is running, such as:http://10.123.1.136:30000 -
Verify the Server is Running
Open your web browser and go to:If everything is set up correctly, you should see the Foundry VTT login page or welcome screen.
How to Prevent ERR_NAME_NOT_RESOLVED Errors in the Future
Regularly Update Software and Drivers
Keep your browser and network drivers updated to ensure compatibility and stability.
Use Reliable DNS Services
Consider using reputable DNS providers like Google DNS (8.8.8.8, 8.8.4.4) or Cloudflare DNS (1.1.1.1) for reliable performance and better security.
Periodically Clear DNS Cache
Regularly clearing your DNS cache prevents outdated information from causing connectivity issues.
Maintain Proper Security Settings
Regularly review your firewall and antivirus configurations to prevent accidental blocking of legitimate DNS queries.
- Cloudflare DNS (1.1.1.1): A fast, secure, and privacy-focused DNS resolution service.
- Google DNS (8.8.8.8, 8.8.4.4): Widely used and reliable DNS solution.
- DNS Jumper: An easy-to-use tool that helps quickly switch between DNS providers, improving browsing speed and reliability.
By following these comprehensive steps, you’ll effectively resolve and prevent ERR_NAME_NOT_RESOLVED errors, ensuring smooth and uninterrupted internet browsing.
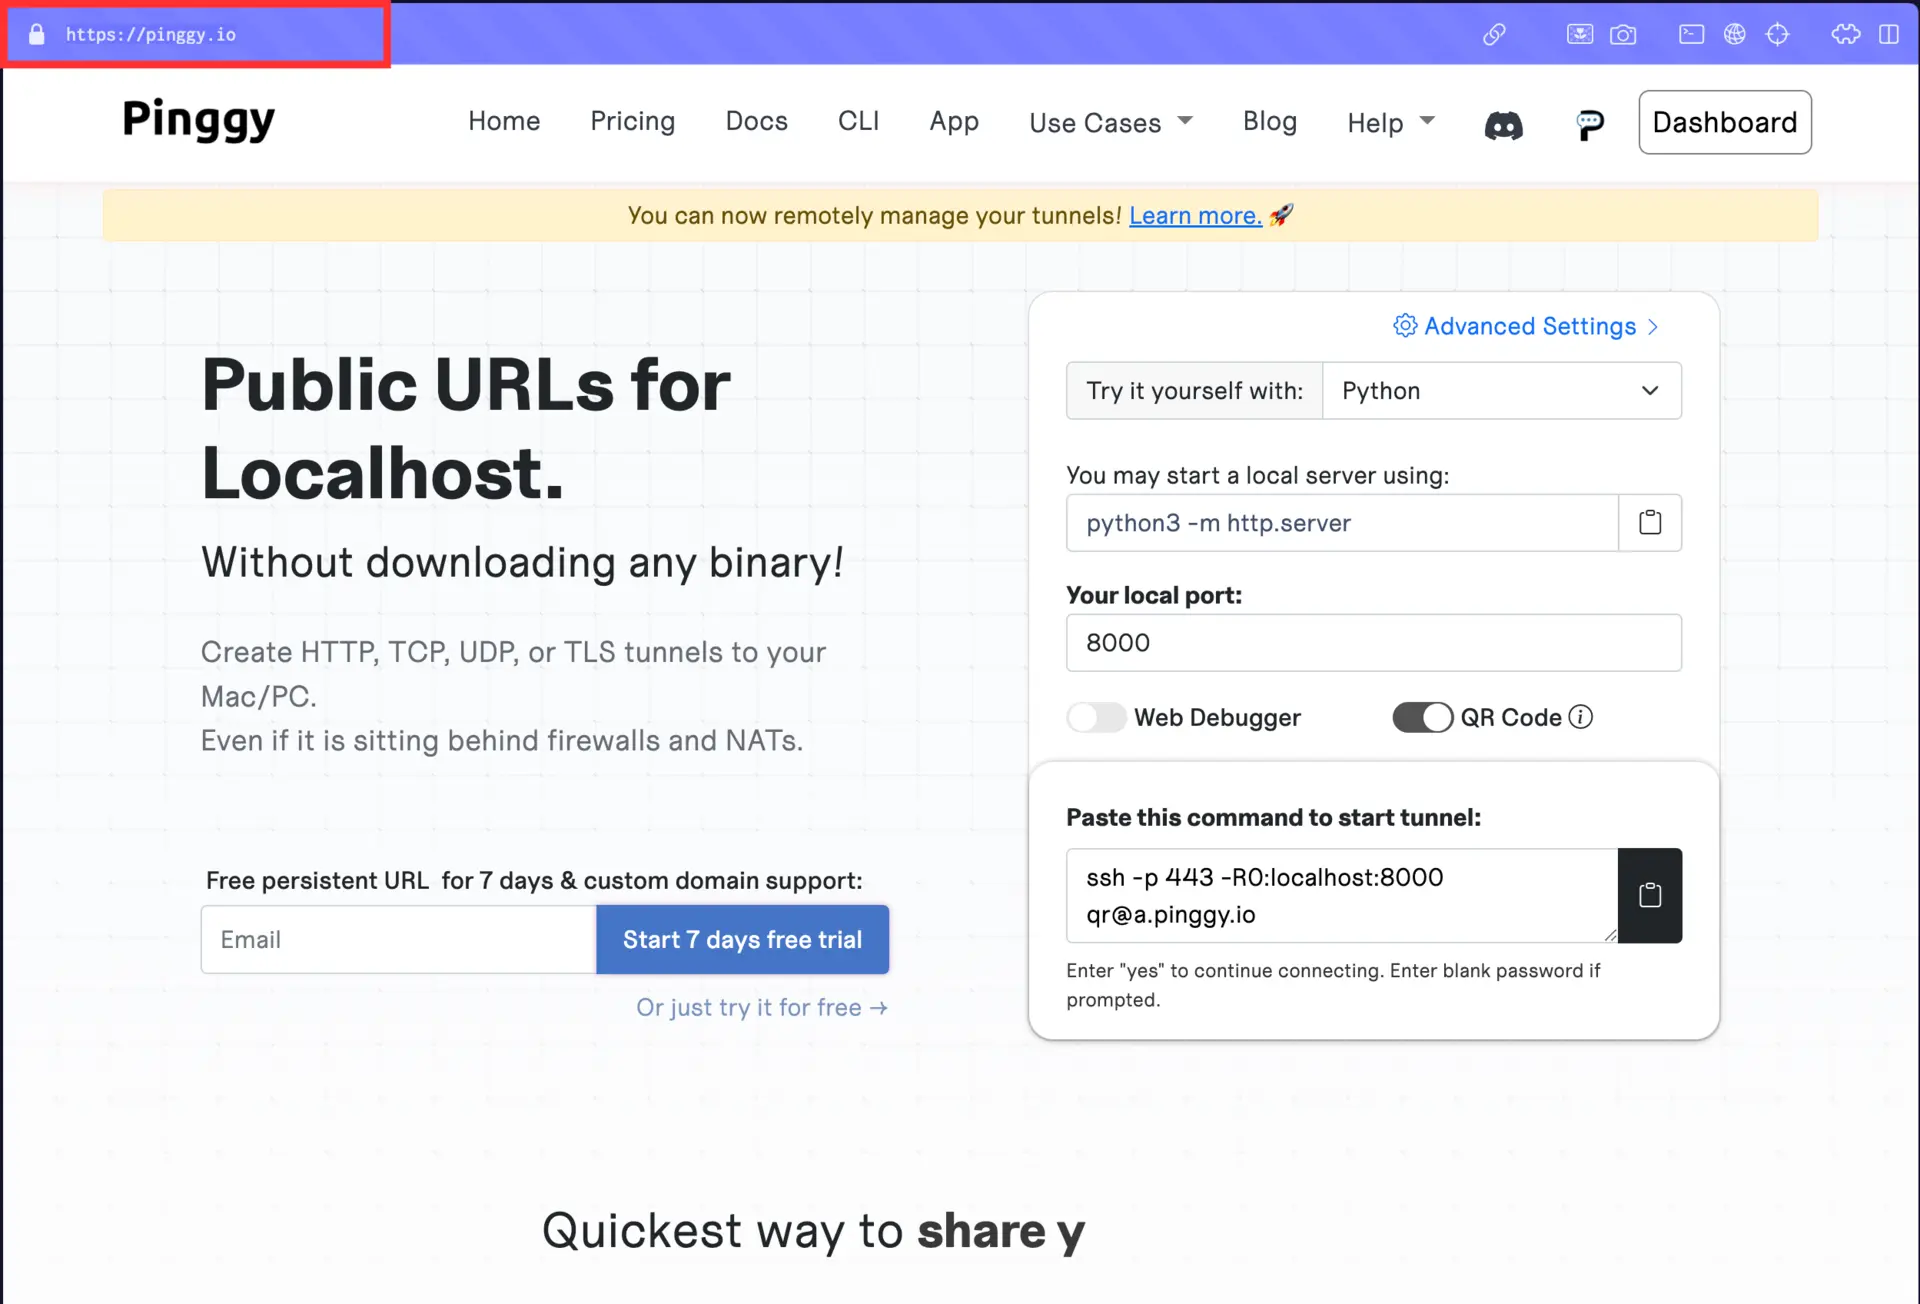
Fixing ERR_NAME_NOT_RESOLVED Errors for Pinggy URLs
Pinggy dynamically assigns DNS records when a tunnel is created. This means that if your browser queries the URL before the tunnel is fully set up, you may encounter the ERR_NAME_NOT_RESOLVED error. However, the Time-To-Live (TTL) for Pinggy’s DNS records is only 10 seconds. As a result, after waiting for around 10 to 15 seconds, refreshing the page should resolve the issue and allow the URL to load successfully.
Conclusion
The ERR_NAME_NOT_RESOLVED error can be caused by a variety of factors, from simple typing mistakes to more complex network or DNS configuration problems. By following the above step-by-step troubleshooting methods, you can resolve most issues and get back to browsing without interruptions.