
Using ERD Commander CD to Boot Your System
What is a Boot Disk?
A boot disk is a CD or USB Flash Drive that contains software which can boot a non-responsive or dead Windows PC in order to perform diagnostics or repair – it is sometimes called a Windows Recovery CD or Windows Recovery Disk
- See also Free ERD Commander Download for Windows XP
- See also Create an ERD Commander Bootable USB Flash Drive
- See also ERD Commander for Vista and Windows 7 – instructional videos at the bottom of the page
- See also Download ERD Commander for Vista and Windows 7 through Microsoft TechNet Subscription
- See also Free Download Windows 7 – Create a Windows 7 Installation DVD or USB Flash Drive
- See also Free Download Hirens Boot CD ISO – ERD Commander Alternative – Create a Bootable USB Flash Drive
ERD stands for “Emergency Recovery Disk” – ERD Commander 2003 was originally released by Winternals in the Winternals Administrator Pack and was available for Windows XP, but when Winternals was taken over by Microsoft in 2006, public availability of ERD Commander was discontinued.
- To boot from the Bootable ERD Commander CD, the boot order needs to be changed, so that the computer will try and boot from the ERD Commander CD before the hard drive
- It is often possible to change the boot order by pressing F12 or F8 just after the system starts to power up.
- If the system won’t boot from the ERD Commander CD – you need to change the boot order in the bios.
- Just after the system starts, press Del or F1 to enter the Bios. The boot order can be set usually from the Advanced Boot Configuration menu.
- If the bios is password protected, open the PC and remove the CMOS battery for a moment or so. This should remove the password protection (and all other bios settings – which will need to be set up again – usually only the Date and Boot order are essential)
- Allow the system to boot up from the disk
- The ERD boot manager will start – select the installation you wish to attach to (i.e. to repair)
- Select the tool or tools you wish to use.
The ERD Commander boot disc can be used to perform the following tasks:
- ERD Registry editor: edit or restore Windows registry
- Run System Restore – to restore the system to a bootable state
- Diagnose and fix problems preventing the system from booting
- Locksmith: reset a password (without knowing the administrator’s password) – great if you’re locked out
- Crash Analyzer: analyze crash dumps
- File Restore: Restore deleted files
- Disk Commander: Repair volumes, MBR, partitions
- Disk Wipe: Erase data from hard disk
- Computer Management: System Information, Autoruns (configure autostarting applications), Event Viewer, Disk Management (format, manage partitions, etc.), Services and Drivers (enable, disable, etc.)
- Explorer: Browse the hard drive
- Move data from the hard drive onto a USB memory key (plug in the key before booting the system with ERD)
- Solution Wizard : Choose the proper repair tool
- TCP/IP Config: Display and set TCP/IP configuration
- Hotfix Uninstall: uninstall hotfixes
- SFC Scan: System file repair
- Search: Search disk for files
- Standalone System Sweeper: Scan your system for malware, rootkits, and potentially unwanted software
Notes:
- I have sometimes found that just booting from the ERD Windows boot CD will fix a non bootable system, even though I didn’t run any repair procedures
- This Article and this article might be worth a look
- This Article covers using System Restore with ERD 2007
- This Article covers using Locksmith to reset a user password (particularly useful if you’ve gotten locked out of your computer)
- This Article covers making a ERD USB bootable Flash Drive.
There are versions of ERD Commander for Windows Vista and Windows 7 – both 32 & 64 bit – see here and here
Using ERD50 (ERD Commander 2007 – XP version) With Vista and Windows 7
You can perform some tasks using ERD50 on Vista and Windows 7 systems
Partial Functionality
With 32Bit systems you should be able to attach to the installation, and use Locksmith (to reset Windows passwords) and use Windows Explorer to move files onto a USB memory key or external hard drive (see here). However attaching to Vista or Windows 7 installations wipes out any System Restore points, so this should be done with caution.
When under partial functionality these features do NOT work:
- Computer Management
- Hotfix Uninstall
- SFC Scan
- PC Backup Restore
- System Restore
- Crash Analyzer
- TCP/IP Config
- Services and Drivers (ERD50 only)
When under partial functionality these features DO generally work (no guarantees though):
- Locksmith
- Memory Diagnostic
- Command Prompt
- Registry Editor
- File Restore
- Disk Commander
- Disk Wipe
- Windows Explorer
- File Search
- Standalone System Sweeper
- Autoruns (ERD50 only)
- File Sharing (ERD50 only)
With 64bit Windows 7 and Vista systems it will not be possible to attach to the installation, but it should still be possible to boot your PC or laptop by not attaching to the installation. You can then use Windows Explorer for Data Recovery – to move files onto a USB memory key or external hard drive, (see here) but none of the other ERD Commander tools will work.
See: https://calmit.org/erd-commander-2010-vista-windows-7/
Живительная флешка
Время на прочтение10 мин
Количество просмотров523K
На данный момент в сети имеется целая куча различных инструкций по созданию дежурной рабочей сисадминской флешки, но, к сожалению, многие из них уже устарели и просто не подходят под современные задачи.
Я не собираюсь описывать процесс установки GRUB4DOS, так как это не изменилось и в сети полно инструкций. Просто скажу, что GRUB4DOS просто должен быть установлен на флешку. Также я НЕ собираюсь выкладывать здесь образы систем (все имеется на торрентах), но, тем не менее, выложу полное меню из LST-файлов со структурой папок. Также необходимо учесть, что все образы ISO необходимо дефрагментировать.
Для тестирования флешки я использую PLOP Boot Manager и виртуальную машины, для меня это самы удобный вариант, хотя существует QEMU и MobaLiveUSB.
Что сможет наша флешка:
1. Установка Windows XP/7/8
2. Установка Linux Mint/Kubuntu/Ubuntu
3. Live Slax, Live XPe, SliTaz 4.0
4. Acronis Suite
5. ERD Commander 5.0-8.0
6. Kaspersky Rescue Disk 10
7. Victoria HDD
8. HDD Regenerator
9. MHDD 4.6
10. PC Check 6.05
11. SystemRescueCD
12. Active Boot Disk Suite 8
13. Active Password Changer
14. MemTest
15. Hiren’s Boot USB
Загрузочная флешка
Установка Windows с флешки
Для установки Windows-систем из образа нужно использовать скрипт, который создаст образ ОС, адаптированный для установки с флешки. По ссылке имеется сам скрипт и инструкция по его использованию.
В итоге получаем несколько образов интересующих нас Windows, которые будут запускаться с флешки.
/Boot/menus/windows.lst
title Windows XP SP3 Russian - Step 1
map --mem (md)+4 (9)
map /Boot/Windows/xp_ru.iso (0xff)
map (hd0) (hd1)
map (hd1) (hd0)
map --rehook
write (9) [FiraDisk]\nStartOptions=cdrom,vmem=find:/Boot/Windows/xp_ru.iso;\n\0
chainloader (0xff)/I386/SETUPLDR.BIN

title Windows XP SP3 Russian - Step 2
map --mem (md)+4 (9)
map (hd0) (hd1)
map (hd1) (hd0)
map --rehook
write (9) [FiraDisk]\nStartOptions=cdrom,vmem=find:/Boot/Windows/xp_ru.iso;\n\0
chainloader (hd0)+1

title Windows XP SP3 English - Step 1
map --mem (md)+4 (9)
map /Boot/Windows/xp_eng.iso (0xff)
map (hd0) (hd1)
map (hd1) (hd0)
map --rehook
write (9) [FiraDisk]\nStartOptions=cdrom,vmem=find:/Boot/Windows/xp_eng.iso;\n\0
chainloader (0xff)/I386/SETUPLDR.BIN

title Windows XP SP3 English - Step 2
map --mem (md)+4 (9)
map (hd0) (hd1)
map (hd1) (hd0)
map --rehook
write (9) [FiraDisk]\nStartOptions=cdrom,vmem=find:/Boot/Windows/xp_eng.iso;\n\0
chainloader (hd0)+1

title Windows XP x64 English+Russian - Step 1
map --mem (md)+4 (9)
map /Boot/Windows/xp_x64.iso (0xff)
map (hd0) (hd1)
map (hd1) (hd0)
map --rehook
write (9) [FiraDisk]\nStartOptions=cdrom,vmem=find:/Boot/Windows/xp_x64.iso;\n\0
chainloader (0xff)/I386/SETUPLDR.BIN

title Windows XP SP3 x64 English+Russian - Step 2
map --mem (md)+4 (9)
map (hd0) (hd1)
map (hd1) (hd0)
map --rehook
write (9) [FiraDisk]\nStartOptions=cdrom,vmem=find:/Boot/Windows/xp_x64.iso;\n\0
chainloader (hd0)+1

title Windows 7 SP1
map --mem (md)+4 (9)
map /Boot/Windows/7.iso (0xff)
map (hd0) (hd1)
map (hd1) (hd0)
map --rehook
write (9) [FiraDisk]\nStartOptions=cdrom,vmem=find:/Boot/Windows/7.iso;\n\0
chainloader (0xff)

title Windows 8 SP1 + Microsoft Office 2013
chainloader /bootmgr

title Windows XP for Legacy PCs
map --mem (md)+4 (9)
map /Boot/Windows/xp_flp.iso (0xff)
map (hd0) (hd1)
map (hd1) (hd0)
map --rehook
write (9) [FiraDisk]\nStartOptions=cdrom,vmem=find:/Boot/Windows/xp_flp.iso;\n\0
chainloader (0xff)/I386/SETUPLDR.BIN

title Windows 7 Thin PC
map --mem (md)+4 (9)
map /Boot/Windows/7_thin.iso (0xff)
map (hd0) (hd1)
map (hd1) (hd0)
map --rehook
write (9) [FiraDisk]\nStartOptions=cdrom,vmem=find:/Boot/Windows/7_thin.iso;\n\0
chainloader (0xff)

title << Back to main menu
configfile /menu.lst
Обратите внимание, что я использую сборку Windows 8 Smokie, которая имеет немного другую структуру, поэтому я просто распаковал образ в корень флешки и запускаю установку с помощью «chainloader /bootmgr». Если же используется образ MSDN, то для простоты лучше использовать скрипт.
Убунтоподобные системы
Здесь все предельно просто. Просто вытягиваем из образа файлы initrd.lz и vmlinuz (из образа с x64 системой это делаем отдельно) и кидаем их в папку /Boot/Linux/Distro/x86 и x64. По .lst файлу, расположенному ниже, можно понять, что и куда копировать.
/Boot/menus/linux.lst
title Linux Mint 17 Cinnamon X86
kernel /Boot/Linux/Mint/x86/vmlinuz iso-scan/filename=/Boot/Linux/Mint/linuxmint-17-cinnamon-dvd-32bit.iso boot=casper initrd=/Boot/Linux/Mint/x86/initrd.lz locale=en_US quiet splash --
initrd /Boot/Linux/Mint/x86/initrd.lz

title Linux Mint 17 Cinnamon X64
kernel /Boot/Linux/Mint/x64/vmlinuz iso-scan/filename=/Boot/Linux/Mint/linuxmint-17-cinnamon-dvd-64bit.iso boot=casper initrd=/Boot/Linux/Mint/x64/initrd.lz locale=en_US quiet splash --
initrd /Boot/Linux/Mint/x64/initrd.lz

title Linux Mint 17 Mate X86
kernel /Boot/Linux/Mint/x86/vmlinuz iso-scan/filename=/Boot/Linux/Mint/linuxmint-17-mate-dvd-32bit.iso boot=casper initrd=/Boot/Linux/Mint/x86/initrd.lz locale=en_US quiet splash --
initrd /Boot/Linux/Mint/x86/initrd.lz

title Linux Mint 17 Mate X64
kernel /Boot/Linux/Mint/x64/vmlinuz iso-scan/filename=/Boot/Linux/Mint/linuxmint-17-mate-dvd-64bit.iso boot=casper initrd=/Boot/Linux/Mint/x64/initrd.lz locale=en_US quiet splash --
initrd /Boot/Linux/Mint/x64/initrd.lz

title Linux Mint 16 KDE X86
kernel /Boot/Linux/Mint/x86/vmlinuz iso-scan/filename=/Boot/Linux/Mint/linuxmint-16-kde-dvd-32bit.iso boot=casper initrd=/Boot/Linux/Mint/x86/initrd.lz locale=en_US quiet splash --
initrd /Boot/Linux/Mint/x86/initrd.lz

title Linux Mint 16 KDE X64
kernel /Boot/Linux/Mint/x64/vmlinuz iso-scan/filename=/Boot/Linux/Mint/linuxmint-16-kde-dvd-64bit.iso boot=casper initrd=/Boot/Linux/Mint/x64/initrd.lz locale=en_US quiet splash --
initrd /Boot/Linux/Mint/x64/initrd.lz

title Linux Mint 16 XFCE X86
kernel /Boot/Linux/Mint/x86/vmlinuz iso-scan/filename=/Boot/Linux/Mint/linuxmint-16-xfce-dvd-32bit.iso boot=casper initrd=/Boot/Linux/Mint/x86/initrd.lz locale=en_US quiet splash --
initrd /Boot/Linux/Mint/x86/initrd.lz

title Linux Mint 16 XFCE X64
kernel /Boot/Linux/Mint/x64/vmlinuz iso-scan/filename=/Boot/Linux/Mint/linuxmint-16-xfce-dvd-64bit.iso boot=casper initrd=/Boot/Linux/Mint/x64/initrd.lz locale=en_US quiet splash --
initrd /Boot/Linux/Mint/x64/initrd.lz

title Kubuntu Linux 14.04 x86
kernel /Boot/Linux/Kubuntu/x86/vmlinuz iso-scan/filename=/Boot/Linux/Kubuntu/kubuntu-14.04-desktop-i386.iso boot=casper initrd=/Boot/Linux/Kubuntu/x86/initrd.lz locale=en_US quiet splash --
initrd /Boot/Linux/Kubuntu/x86/initrd.lz

title Kubuntu Linux 14.04 x64
kernel /Boot/Linux/Kubuntu/x64/vmlinuz iso-scan/filename=/Boot/Linux/Kubuntu/kubuntu-14.04-desktop-amd64.iso boot=casper initrd=/Boot/Linux/Kubuntu/x64/initrd.lz locale=en_US quiet splash --
initrd /Boot/Linux/Kubuntu/x64/initrd.lz

title << Back to main menu
configfile /menu.lst
Live
Просто скачиваем последнии версии SliTaz и Slax, а затем раскладываем их согласно структуре меню. Slax необходимо распаковать в корень флешки (/slax), SliTaz просто образом, не забываем сделать дефрагментацию, с PloPLinux тоже самое, что и со SliTaz.
/Boot/menus/live_usb.lst
title Slax Graphics mode (KDE)
kernel /slax/boot/vmlinuz ramdisk_size=6666 root=/dev/ram0 rw autoexec=xconf;telinit~4 changes=/slax/
initrd /slax/boot/initrfs.img

title Slax Always Fresh
kernel /slax/boot/vmlinuz ramdisk_size=6666 root=/dev/ram0 rw autoexec=xconf;telinit~4
initrd /slax/boot/initrfs.img

title Slax Copy To RAM
kernel /slax/boot/vmlinuz ramdisk_size=6666 root=/dev/ram0 rw copy2ram autoexec=xconf;telinit~4
initrd /slax/boot/initrfs.img

title Slax Graphics VESA mode
kernel /slax/boot/vmlinuz ramdisk_size=6666 root=/dev/ram0 rw autoexec=telinit~4 changes=/slax/
initrd /slax/boot/initrfs.img

title Slax Text mode
kernel /slax/boot/vmlinuz ramdisk_size=6666 root=/dev/ram0 rw changes=/slax/
initrd /slax/boot/initrfs.img

title Slax as PXE server
kernel /slax/boot/vmlinuz ramdisk_size=6666 root=/dev/ram0 rw autoexec=/boot/pxelinux.cfg/start;/boot/pxelinux.cfg/web/start;xconf;telinit~4
initrd /slax/boot/initrfs.img

title SliTaz 4.0
map /Boot/Live/slitaz-4.0.iso (0xff) || map --mem /Boot/Live/slitaz-4.0.iso (0xff)
map --hook root (0xff)
chainloader (0xff)

title PloP Linux 4.2.2
map /Boot/Live/ploplinux-4.2.2-X.iso (0xff)
map --hook root (0xff)
chainloader (0xff)

title << Back to main menu
configfile /menu.lst
Acronis Suite
Можно использовать обычные ISO-образы Acronis, а можно скачать такую вещь, как Acronis BootDVD Grub4Dos Edition и скопировать файлы согласно структуре LST.
/Boot/Acronis/menu.lst
title Acronis Disk Director Server 10.0.2169 Full version
find --set-root /Boot/Acronis/ADDS10/DAT3.DAT
kernel /Boot/Acronis/ADDS10/DAT3.DAT vga=788 ramdisk_size=28672 acpi=off quiet
initrd /Boot/Acronis/ADDS10/DAT2.DAT

title Acronis Disk Director Advanced 11.0.12077
find --set-root /Boot/Acronis/ADDA11/DAT3.DAT
kernel /Boot/Acronis/ADDA11/DAT3.DAT vga=788 ramdisk_size=28672 acpi=off quiet
initrd /Boot/Acronis/ADDA11/DAT2.DAT

title Acronis Disk Director Home Update 2 11.0.2343
find --set-root /Boot/Acronis/ADDH11/DAT4.DAT
kernel /Boot/Acronis/ADDH11/DAT4.DAT vga=788 ramdisk_size=28672 acpi=off quiet
initrd /Boot/Acronis/ADDH11/DAT3.DAT

title Acronis Snap Deploy Server 3.0.3470 with UR Master Image Creator
find --set-root /Boot/Acronis/ASDS3/66A6188E
kernel /Boot/Acronis/ASDS3/66A6188E vga=788 ramdisk_size=28672 acpi=off quiet
initrd /Boot/Acronis/ASDS3/720018DC

title Acronis Snap Deploy Server 3.0.3470 with UR Standalone deployment
find --set-root /Boot/Acronis/ASDS3/3FE01872
kernel /Boot/Acronis/ASDS3/3FE01872 vga=788 ramdisk_size=28672 acpi=off quiet
initrd /Boot/Acronis/ASDS3/98FE18F8

title Acronis Snap Deploy Server 4.0.540 with UR Master Image Creator
find --set-root /Boot/Acronis/ASDS4/DAT5.DAT
kernel /Boot/Acronis/ASDS4/DAT5.DAT vga=788 ramdisk_size=28672 acpi=off quiet
initrd /Boot/Acronis/ASDS4/DAT4.DAT

title Acronis Snap Deploy Server 4.0.540 with UR Standalone deployment
find --set-root /Boot/Acronis/ASDS4/DAT3.DAT
kernel /Boot/Acronis/ASDS4/DAT3.DAT vga=788 ramdisk_size=28672 acpi=off quiet
initrd /Boot/Acronis/ASDS4/DAT2.DAT

title Acronis True Image Home 2011 Plus Pack 14.0.6942
find --set-root /Boot/Acronis/ATIH2011PP/DAT3.DAT
kernel /Boot/Acronis/ATIH2011PP/DAT3.DAT vga=788 ramdisk_size=28672 acpi=off quiet
initrd /Boot/Acronis/ATIH2011PP/DAT2.DAT

title Acronis True Image Home 2012 Plus Pack 15.0.7133
find --set-root /Boot/Acronis/ATIH2012PP/DAT3.DAT
kernel /Boot/Acronis/ATIH2012PP/DAT3.DAT vga=788 ramdisk_size=28672 acpi=off quiet
initrd /Boot/Acronis/ATIH2012PP/DAT2.DAT

title Acronis True Image Home 2013 Plus Pack 16.0.6514
find --set-root /Boot/Acronis/ATIH2013PP/DAT3.DAT
kernel /Boot/Acronis/ATIH2013PP/DAT3.DAT vga=788 ramdisk_size=28672 acpi=off quiet
initrd /Boot/Acronis/ATIH2013PP/DAT2.DAT

title Acronis Backup & Recovery 10.0.13762 with UR
find --set-root /Boot/Acronis/ABR10UR/DAT3.DAT
kernel /Boot/Acronis/ABR10UR/DAT3.DAT vga=788 ramdisk_size=28672 acpi=off quiet
initrd /Boot/Acronis/ABR10UR/DAT2.DAT

title Acronis Backup & Recovery 11.5.32308 with UR (32-bit)
find --set-root /Boot/Acronis/ABR11UR/DAT3.DAT
kernel /Boot/Acronis/ABR11UR/DAT3.DAT vga=788 ramdisk_size=28672 acpi=off quiet
initrd /Boot/Acronis/ABR11UR/DAT2.DAT

title Acronis Backup & Recovery 11.5.32308 with UR (64-bit, with UEFI support)
find --set-root /Boot/Acronis/ABR11UR/DAT5.DAT
kernel /Boot/Acronis/ABR11UR/DAT5.DAT vga=788 ramdisk_size=28672 acpi=off quiet
initrd /Boot/Acronis/ABR11UR/DAT4.DAT

title Acronis vmProtect 8.0.8184
find --set-root /Boot/Acronis/AvmP8/DAT3.DAT
kernel /Boot/Acronis/AvmP8/DAT3.DAT vga=788 ramdisk_size=28672 acpi=off quiet
initrd /Boot/Acronis/AvmP8/DAT2.DAT

title << Back to main menu
configfile /menu.lst
ERD
Скачиваем ERD Commander одним ISO-образом, дефрагментируем его и запускам из menu.lst.
title ERD Commander >>
find --set-root /Boot/ERD/MSDaRT.iso
map /Boot/ERD/MSDaRT.iso (0xFF)
map --hook
root (0xFF)
chainloader (0xFF)
Kaspersky Rescue Disk
Распаковываем в корень флешки, вместо XXXX пишем UUID флешки.
title Kaspersky Rescue Disk 10
uuid () > nul
set UUID=XXXX
echo %UUID%
kernel /rescue/boot/rescue  root=live:UUID=%UUID% rootfstype=auto vga=791 init=/init kav_lang=en udev liveimg splash quiet doscsi nomodeset
initrd /rescue/boot/rescue.igz
Victoria HDD
Запускается из образа ISO.
title Victoria HDD
find --set-root /Boot/Other/vcr35r.iso
map /Boot/Other/vcr35r.iso (0xff) || map --mem /Boot/Other/vcr35r.iso (0xff)
map --hook
chainloader (0xff)
HDD Regenerator
Иногда бывает полезен. Запуск из образа ISO.
UPD. Программа может повредить, использовать на свой страх и риск.
title HDD Regenerator
find --set-root /Boot/Other/hddreg2011.iso
map /Boot/Other/hddreg2011.iso (0xff) || map --mem /Boot/Other/hddreg2011.iso (0xff)
map --hook
chainloader (0xff)
MHDD, PC Check, Active Boot Disk Suite
Запускаются из ISO-образа, как выше.
SystemRescueCD
Скачиваем последнюю версию и распаковываем в корень флешки. Запускаем.
title SystemRescueCD
kernel /sysrcd/rescue32 scandelay=1 setkmap=us subdir=/sysrcd dostartx
initrd /sysrcd/initram.igz
Другие мелкие программы
Остальная мелочь запускается либо с образа дискеты или ISO.
title Active Password Changer
map /Boot/Other/active.ima (fd0)
map --hook
chainloader (fd0)+1
rootnoverify (fd0)
map --floppies=1

title MemTest
find --set-root /Boot/Other/mt420.iso
map /Boot/Other/mt420.iso (0xff) || map --mem /Boot/Other/mt420.iso (0xff)
map --hook
chainloader (0xff)

title Windows Password Changer
map /Boot/Other/ntpw.iso (hd32)
map --hook
root (hd32)
chainloader (hd32)
Hiren’s Boot USB
С сайта HBCD скачиваем образ и распаковываем в корень (/HBCD).
Итог
В итоге мы имеем ассорти из самых нужных программ, которые помогут восстановить компьютер.
Архив со структурой папок
Файл menu.lst, которые стоит замещать в корне флешки.
/menu.lst
title Install Windows >>
configfile /Boot/menus/windows.lst

title Install Linux >>
configfile /Boot/menus/linux.lst

title Live USBs >>
configfile /Boot/menus/live_usb.lst

title Hiren's Boot USB >>
configfile /HBCD/menu.lst

title Acronis Suite >>
configfile /Boot/Acronis/menu.lst

title ERD Commander >>
find --set-root /Boot/ERD/MSDaRT.iso
map /Boot/ERD/MSDaRT.iso (0xFF)
map --hook
root (0xFF)
chainloader (0xFF)

title Kaspersky Rescue Disk 10
uuid () > nul
set UUID=625CEC715CEC4181
echo %UUID%
kernel /rescue/boot/rescue  root=live:UUID=%UUID% rootfstype=auto vga=791 init=/init kav_lang=en udev liveimg splash quiet doscsi nomodeset
initrd /rescue/boot/rescue.igz

title Victoria HDD
find --set-root /Boot/Other/vcr35r.iso
map /Boot/Other/vcr35r.iso (0xff) || map --mem /Boot/Other/vcr35r.iso (0xff)
map --hook
chainloader (0xff)

title HDD Regenerator
find --set-root /Boot/Other/hddreg2011.iso
map /Boot/Other/hddreg2011.iso (0xff) || map --mem /Boot/Other/hddreg2011.iso (0xff)
map --hook
chainloader (0xff)

title MHDD 4.6
find --set-root /Boot/Other/mhdd.iso
map /Boot/Other/mhdd.iso (hd32)
map --hook
root (hd32)
chainloader (hd32)

title PC Check 6.05
find --set-root /Boot/Other/pccheck.iso
map /Boot/Other/pccheck.iso (hd32)
map --hook
root (hd32)
chainloader (hd32)

title SystemRescueCD
kernel /sysrcd/rescue32 scandelay=1 setkmap=us subdir=/sysrcd dostartx
initrd /sysrcd/initram.igz

title Active Boot Disk Suite 8
find --set-root /Boot/Other/active.iso
map /Boot/Other/active.iso (hd32)
map --hook
root (hd32)
chainloader (hd32)

title Active Password Changer
map /Boot/Other/active.ima (fd0)
map --hook
chainloader (fd0)+1
rootnoverify (fd0)
map --floppies=1

title MemTest
find --set-root /Boot/Other/mt420.iso
map /Boot/Other/mt420.iso (0xff) || map --mem /Boot/Other/mt420.iso (0xff)
map --hook
chainloader (0xff)

title Windows Password Changer
map /Boot/Other/ntpw.iso (hd32)
map --hook
root (hd32)
chainloader (hd32)

title Terminal
commandline

title Reboot
reboot

title Halt
halt
Необходимый софт
1. ADWCleaner — удаление рекламного ПО;
2. AVZ — «снайпер» для вирусов;
3. CCleaner, Defraggler — чистка и дефрагментация;
4. InfraRecorder — очень качественный аналог Nero Burning Rom;
5. KMPlayer — проигрыватель;
6. Unchecky — снятие галочек во время установки;
7.
DriverPack Solution — многие драйвера;
Snappy Driver Installer — полный драйвер пак, более удобен, чем DRPSolution
8. SysinternalsSuite — назменимая вещь, утилиты на все случаи жизни;
9. ATF-Cleaner — быстрая очистка системы, не требует установки;
10. Dr.Web CureIT — лечилка;
11. TeamViewer — удаленка;
12. Обновления для Dr.Web, Kaspersky, MSE, AVG и Avast;
13. LibreOffice — офисный пакет.
Мне кажется, что это это именно те вещи, которые должны населять вашу рабочую флешку. Хотел бы услышать ваши варианты наполнения живительной флешки.
Привет коллеги! Возник вопрос. Операционная система Windows XP не загружается, на экране возникает синий экран с ошибкой, которую я расшифровал, но исправить ситуацию не получается, не помогли к сожалению и ваши статьи. Резервное копирование не проводилось. Знаю, что обычно в таких случаях Windows переустанавливают, но к сожалению сейчас нельзя. Есть кстати в моей грустной истории положительный момент — восстановление системы было включено, но как до него добраться, F8 и Загрузка последней удачной конфигурации не удаётся, зайти в безопасный режим не получается, так же не доступен безопасный режим с поддержкой командной строки. Вы подсказали про диск восстановления ERD Commander, но я им к сожалению ни разу не пользовался, мне вообще кажется, что это простой Live CD. Чем он может помочь? Влад.
Аварийный Live CD ERD Commander
В переводе — диск аварийного восстановления и возможностей у него побольше чем у многих Live CD. Хочу сказать друзья, что это довольно серьёзный помощник, прежде чем выйти с утра из дома, я всегда проверяю свой чемодан на присутствие некоторых просто необходимых дисков с программами и кстати ERD Commander всегда находится в их числе.
Давным давно, ERD Commander 5.0 являлся разработкой и собственностью известного и уважаемого мной программиста Марка Руссиновича и Winternals Software, которую в 2006 году приобрёл Microsoft, в дальнейшем ERD Commander 5.0 стал частью средства Microsoft Desktop Optimization Pack и распространялся по подписке Microsoft Diagnostic and Recovery Toolset (MSDaRT).
ERD Commander 5.0 специально разработан для реанимации и восстановления Windows XP, например: изменения забытого пароля администратора, восстановления удалённых файлов, реестра и т.д. Всё это проделывается с большим удобством, с помощью всевозможных инструментов, работу с которыми я опишу ниже.
Существуют ещё версии ERD Commander 6.0 и 6.5 они предназначены для операционных системам Windows Vista и Windows 7. Для Windows 7 и Windows ServerR, в 2011 году вышел новый набор инструментов Microsoft Diagnostic and Recovery Toolset (MSDaRT) 7.0, к сожалению название ERD Commander больше не используется.
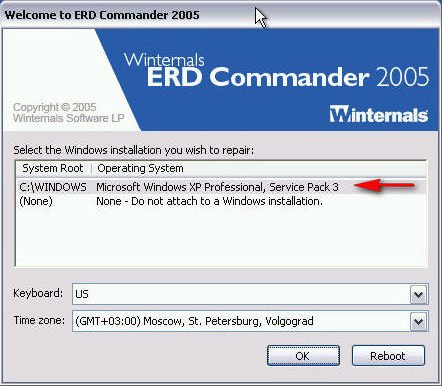
Итак в первую очередь для использования нашего диска восстановления ERD Commander 5.0 нужно выставить загрузку вашего компьютера или ноутбука в BIOS, далее перезагрузка. Бывает довольно редко, что ERD Commander не видит ваш жёсткий диск с системой, значит ему не удалось распознать контроллер SATA вашего винчестера, в таком случае режим AHCI в BIOS необходимо поменять на режим стандартного IDE.
Самое первое окно с сообщением о том, что ERD Commander конфигурирует сетевые службы, если интернет вам при работе не нужен, нажмите на кнопку Skip Network Configuration.
Далее внимание: ERD Commander предложит вам подключиться к вашей операционной системе и использовать себя на 100%, вариант этот мне кажется намного более предпочтительным, чем другой (None), где вы не сможете использовать очень нужное нам восстановление системы или к примеру редактировать реестр, а так же многое другое.
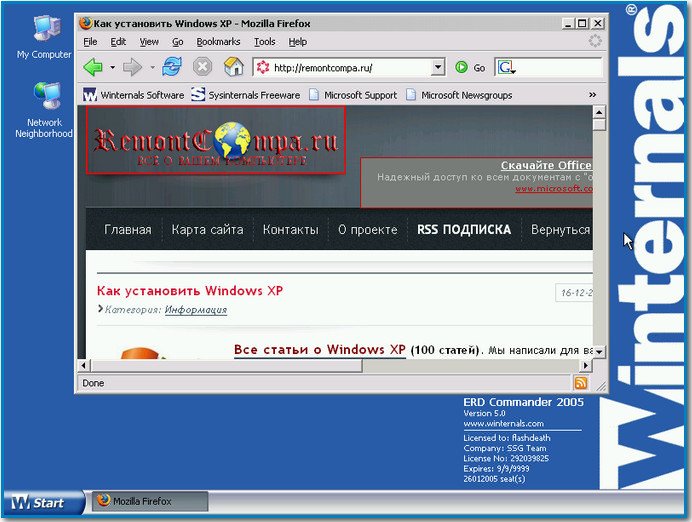
И вот перед нами возникает немного отличающийся от обычного рабочий стол Windows XP. Здесь мы с вами сможем использовать довольно широкий набор инструментов для восстановления нашей системы, а самое главное мы с вами сможем это сделать, даже если она у нас не загружается, здорово правда.
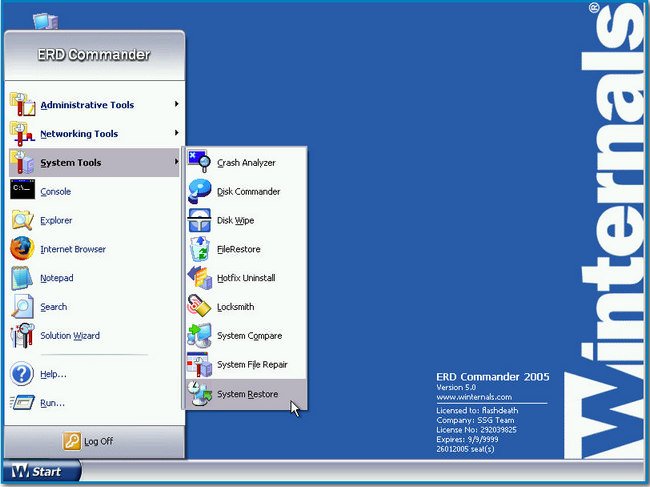
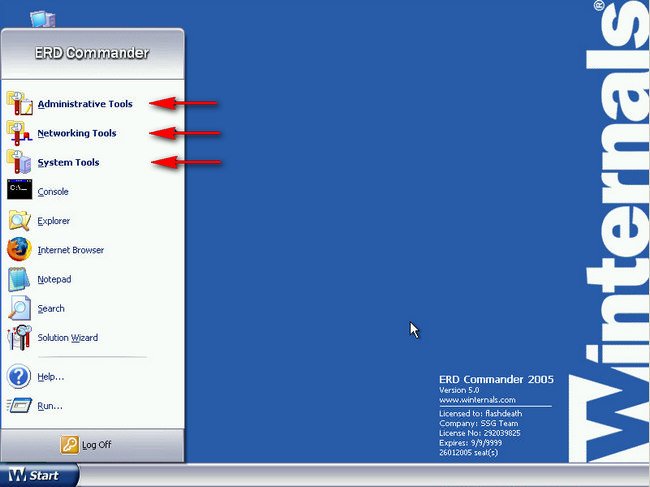
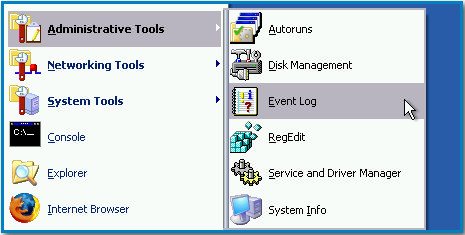
Главные инструменты ERD Commander:
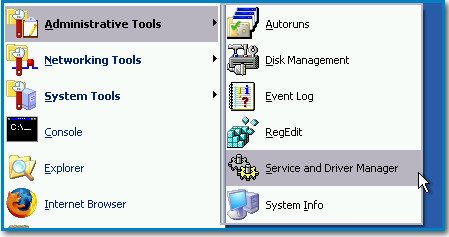
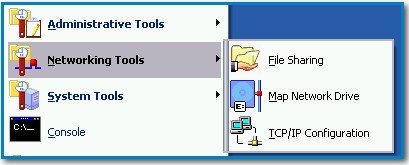
Administrative Tools — инструменты администрирования подключенной вами системы.
Networking Tools — сетевые инструменты.
System Tools — системные инструменты.
Прежде чем рассмотреть все инструменты ERD Commander, предлагаю помочь нашему читателю Владу и запустить восстановление системы, если оно у нас было включено. Жмём старт, далее системные инструменты System Tools->System Restore
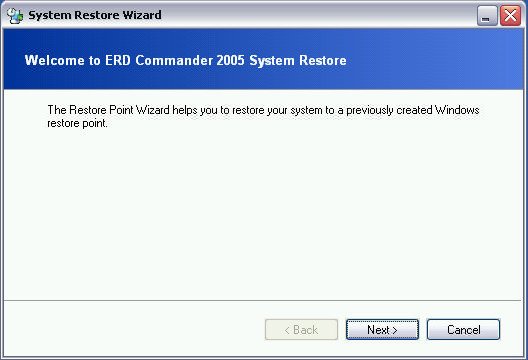
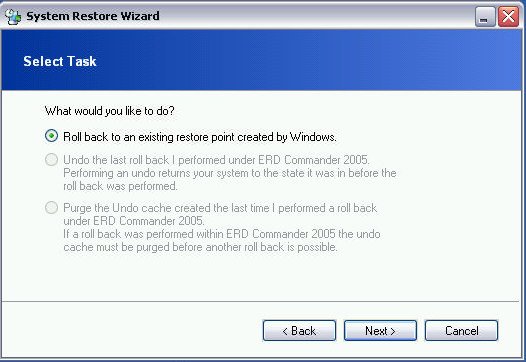
System Restore Wizard здесь мы с вами имеем три варианта развития событий.
Roll Back to an existing restore point created by Windows — Откат на существующую точку восстановления Windows, созданную вами заранее. Всё происходит как при обычном Восстановлении системы, которое вы не в состоянии запустить из-за неисправности загрузки системы.
Undo the last roll back performed under ERD Commander 2005: Отмена произведённого нами отката.
Purge the Undo cache created Если восстановление производилось с помощью ERD Commander,то следующий откат будет возможен только после его отмены или очистки буфера.
Выбираем первый вариант, далее точку восстановления.
Цель достигнута и можно надеяться что наш читатель после перезагрузки компьютер увидит свой нормальный рабочий стол. Так что не стоит друзья отключать Восстановление системы, оно может исправить разные неполадки Windows, много раз подобным и простым способом мне удавалось возвращать к жизни машины заражённые вирусом Winlock или как его ещё зовут «Пошлите смс».
С восстановлением системы разобрались, теперь давайте обратим внимание на другие инструменты ERD Commander.
Log Off – выход. С помощью этой кнопки вы сможете- Restart — перезагрузить компьютер или Logoff Installation – вернуться к выбору подключаемой операционной системы.
Run – запуск приложения
Solution Wizard своеобразный помощник неопытному пользователю, помогающий определить поломку, в данном окне нужно отметить неисправность, нажать далее и запустится нужный по мнению помощника инструмент.
Search — поиск
Notepad — открываем «Блокнот»
Internet Browser — запуск интернет обозревателя
Explorer — запуск Проводника
Console — запуск командной строки
Теперь более подробно рассмотрим что содержат в себе три основные инструмента:
Administrative Tools — инструменты администрирования
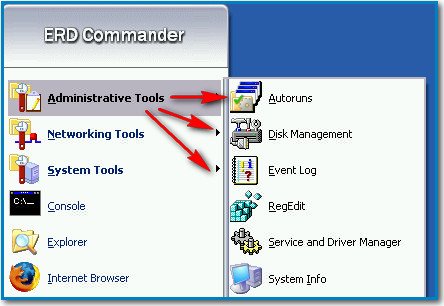
Autoruns — очень хороший, простой и думаю всем известный инструмент отражающий максимум информации о запускающихся процессах принадлежащих как системе (System), так и отдельным пользователям, в моём случае (ALEX).
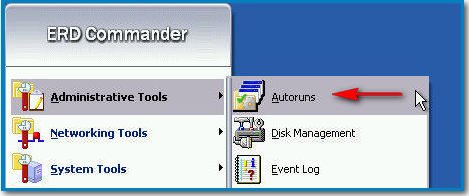
Explore – переходим к файлу процесса
Delete — удаляем процесс из автозапуска

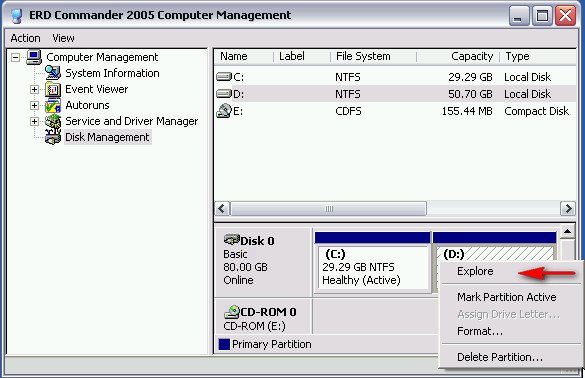
Disk Management — можно сказать Управление дисками, окно говорит само за себя, здесь нужно быть очень осторожным.
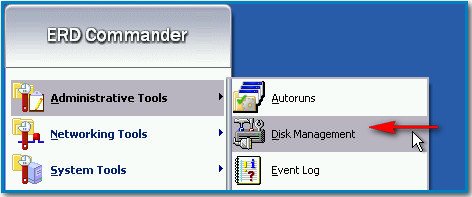
Нажмём на разделе винчестера правой мышкой и в контекстном меню сможем произвести следующие действия:
Explore — просмотр содержимого раздела в проводнике
Mark Partition Active — делаем раздел активным
Assign Drive Letter – присваиваем диску букву
Format — форматировать.
Delete Partition — удаление раздела.
Event Log Просматриваем журнал событий подключенной Windows XP.
Regedit
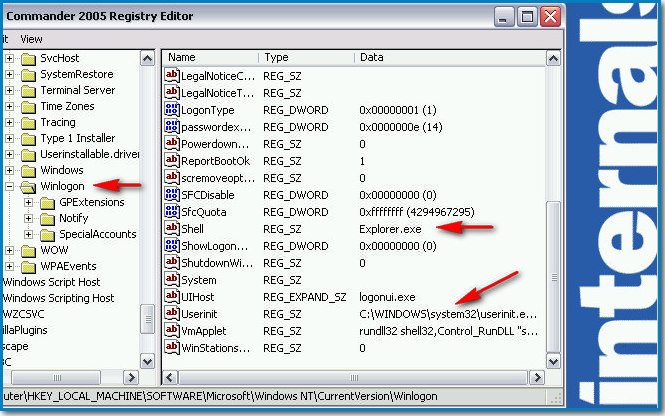
Без комментариев, редактор реестра по моему мнению второй по нужности инструмент в ERD Commander, позволяющий устранять проблемы реестра подключенной Windows.
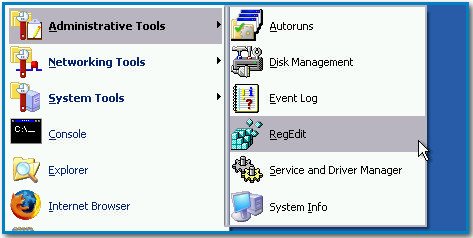
Например все мы знаем, что всевозможные блокировщики экрана Windows изменяют параметры раздела реестра HKEY_LOCAL_MACHINE\SOFTWARE\Microsoft\Windows NT\CurrentVersion\Winlogon, они должны иметь такое значение:
Shell = Explorer.exe
Userinit = C:\WINDOWS\system32\userinit.exe
Если значения изменены или присутствуют другие, то при загрузке Windows у вас могут быть проблемы.
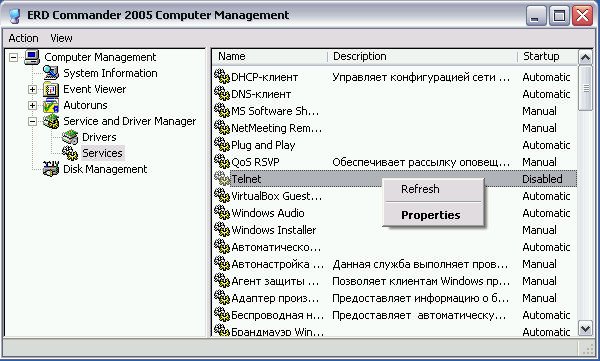
Service and Driver Manager — управление системными службами и драйверами
Контекстное меню:
Refresh — обновить
Properties – название службы и путь к исполняемому файлу
Startup Type — тип запуска если выставить Disabled вы можете отключить службу или драйвер.

Networking Tools — сетевые инструменты
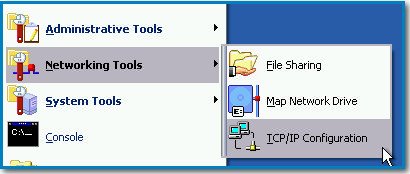
TCP/IP Configuration Вам в процессе работы необходим интернет? Вы можете воспользоваться данным инструментом. Если конфигурация протокола вашей сети TCP/IP настраивается автоматически, то ничего менять не нужно, в противном случае используйте режим Use the following IP address: и назначьте IP адрес вручную.
File Sharing — расшаривание файлов, предоставление общего доступа к файлам данного компьютера в сети.
Map Network Drive— наоборот подключается к другим компьютерам в сети
System Tools Системные инструменты для восстановления удалённых данных, изменения забытого пароля, а так же наше восстановление системы находится здесь.
Crash Analyzer — мастер определения сбойного драйвера, в большинстве случаев информация полученная с помощью него неверная.
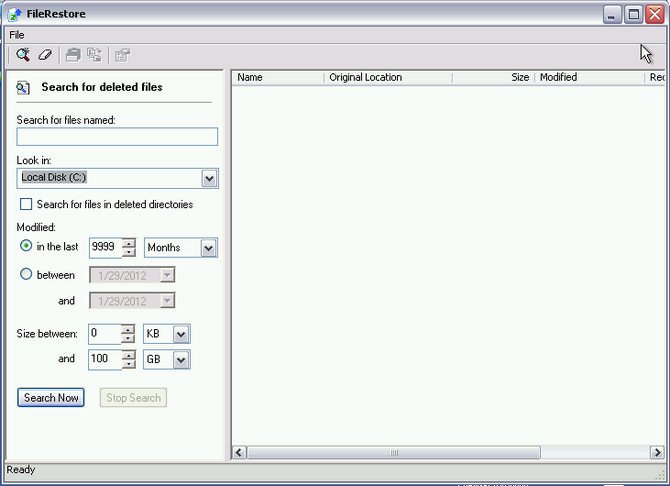
Disk Commander — восстановление данных- потерянных в случае удаления или случайного форматирования, возможна даже работа с полностью удалёнными разделами, восстановленные файлы можно сохранить на USB — носитель подключенный к компьютеру до запуска ERD Commander. Поиск удалённых данных производится с указанием вами буквы диска или другой вариант поиск будет произведён на всех дисках.
(Deleted Files) Выбираем поиск только удалённых файлов.
Disk Wipe — полное уничтожение данных на выбранном диске.
File Restore — расширенный мастер поиска удалённых данных на диске по дополнительным критериям — дате и размеру.
Hotfix Uninstall – позволяет удалять установленные обновления Windows.
Locksmith изменяет пароли администратора и пользователей.

System Compare Wizard сопоставляет системные файлы с оригиналом находящимся например в сети. Лично мною ни разу не использовался.
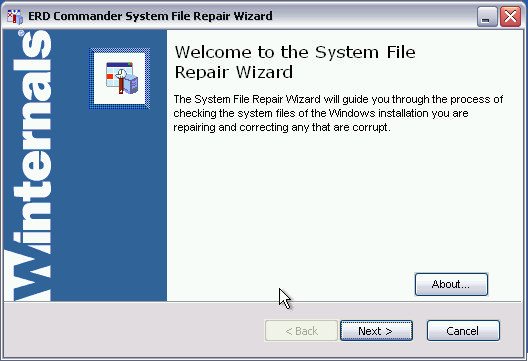
System File Repair Восстановление повреждённых системных файлов.
System Restore Восстановление системы описанное мною со скриншотами в начале статьи.
Оригинальный ISO-образ ERD Commander 5.0 от Марка Руссиновича и Winternals Software.

ERD Commander 2003
User’s Guide
Winternals Software LP
3101 Bee Caves Road, Suite 150
Austin, Texas 78746
(512) 330-9130
(512) 330-9131 Fax
www.winternals.com
Copyright © 2003 Winternals Software LP

ERD Commander 2003
User’s Guide
Table of Contents
1 Introduction ………………………………………………………………………..1
1.1 Overview of Use…………………………………………………………………… 2
1.2 Sample Screen…………………………………………………………………….. 6
2 ERD Commander 2003 Setup……………………………………………….7
2.1 System Requirements…………………………………………………………… 7
2.2 Booting with ERD Commander 2003 ………………………………………. 8
2.3 License……………………………………………………………………………….. 9
2.4 Password Protection …………………………………………………………… 10
2.5 Selecting the Installed Applications……………………………………….. 11
2.6 Adding OEM SCSI Drivers …………………………………………………… 12
2.7 Adding OEM Network Drivers ………………………………………………. 13
2.8 Adding Files to the CD-ROM Image………………………………………. 14
2.9 Image Location…………………………………………………………………… 15
2.10 Burning the ERD Commander 2003 CD-ROM………………………… 16
3 Using ERD Commander 2003……………………………………………..17
3.1 Logon ……………………………………………………………………………….. 19
3.2 Windowing Shell…………………………………………………………………. 22
3.3 System Information …………………………………………………………….. 23
3.4 Explorer…………………………………………………………………………….. 24
3.5 Volume Properties………………………………………………………………. 26
3.6 Folder Properties………………………………………………………………… 27
3.7 Resetting Permissions ………………………………………………………… 28
3.8 Mapping Network Drives ……………………………………………………… 29
3.9 Adding a Domain………………………………………………………………… 30
3.10 Using File Search……………………………………………………………….. 31
3.11 Using FileRestore……………………………………………………………….. 33
3.12 Command Prompt ………………………………………………………………. 35
3.13 Chkdsk ……………………………………………………………………………… 44
3.14 Diskpart …………………………………………………………………………….. 45
3.15 Regsvr32 …………………………………………………………………………… 46
3.16 Notepad…………………………………………………………………………….. 47
3.17 Regedit……………………………………………………………………………… 48
3.18 Using Service and Driver Manager ……………………………………….. 50
3.19 Using Event Log Viewer ………………………………………………………. 52
3.20 Filtering Events ………………………………………………………………….. 53
3.21 Using TCP/IP Configuration …………………………………………………. 54
3.22 Using Disk Management ……………………………………………………… 56
3.23 Locksmith ………………………………………………………………………….. 58
3.24 File Sharing ……………………………………………………………………….. 59
Winternals Software Page i

ERD Commander 2003
User’s Guide
3.25 System Restore………………………………………………………………….. 61
3.26 System Compare ……………………………………………………………….. 63
3.27 Running External Commands ………………………………………………. 64
4 Disk Commander……………………………………………………………….66
4.1 Selecting a Drive Letter to Recover ………………………………………. 66
4.2 Selecting a Target Disk ……………………………………………………….. 68
4.3 Lost Volume Scan ………………………………………………………………. 68
4.4 Partition Table Backup ………………………………………………………… 69
4.5 Volume Recovery……………………………………………………………….. 70
4.6 Salvaging Files…………………………………………………………………… 72
5 Frequently Asked Questions………………………………………………75
6 Sales…………………………………………………………………………………77
7 Technical Support……………………………………………………………..78
8 Index…………………………………………………………………………………79
Winternals Software Page ii

ERD Commander 2003
User’s Guide
1 Introduction
When your Windows NT, Windows 2000, Windows XP or Server 2003
system becomes unbootable and you’ve exhausted the recovery options
available with the operating system, you can rely on ERD Commander 2003
to provide full access to your dead system with a familiar Windows-like
environment. ERD Commander 2003 provides the tools you need to help you
quickly diagnose and repair the problem that is preventing your system from
booting.
Like the Recovery Console of Windows 2000 and Windows XP, as well as
the previous versions of ERD Commander, ERD Commander 2003 makes
any Windows NT/2000/XP/Server 2003 file system accessible, including FAT,
NTFS and CDFS. Unlike those other utilities, ERD Commander 2003 offers
both a graphical windowing environment and a command-line console. In
addition, ERD Commander 2003 includes a service and driver manager,
Registry editor, Explorer-like file system browser, Notepad-like text editor,
Event Viewer, and local password changer so that you can gain access to
accounts to locked accounts. And when you need to save files to another
system on the network or to copy files from another system as part of the
repair process, ERD Commander 2003 gives you full access to network file
shares.
With ERD Commander 2003, repairing your dead systems has never been
easier or more intuitive.
Winternals Software Page 1

ERD Commander 2003
User’s Guide
1.1 Overview of Use
ERD Commander’s built-in tools allow you to perform many different types of
system diagnosis and repair. A few of the ways that ERD Commander 2003
helps you solve problems include:
Removing or Replacing Buggy Drivers
You can use ERD Commander 2003 to delete or replace the image files of
drivers or services that, because of a bug or misconfiguration, prevent
Windows NT/2000 from booting.
Updating Out-of-Date System Files
Incorrectly applying service packs or system software updates can cause
system DLLs to become out of sync with each other. In many cases this can
prevent Windows NT/2000 from booting successfully. ERD Commander 2003
can copy up-to-date versions of old files from floppy disks, CD-ROMs, or
other computers on your network.
Correcting Misconfigured NTFS or Registry Security
If excessively restrictive security attributes are applied to certain system files
or directories on NTFS boot drives, or to some Registry keys, Windows will
become unbootable. Using ERD Commander 2003’s Explorer and Regedit
you can reset permissions on files, directories and Registry keys to regain
access.
Updating Locked Files
Once Windows NT/2000/XP/Server 2003 is up and running many system files
cannot be replaced because the system keeps them locked. ERD
Commander 2003 makes it possible to update such files because it runs
when Windows NT/2000/XP/Server 2003 is off-line and the files are not open.
Winternals Software Page 2

ERD Commander 2003
User’s Guide
Correcting Registry Problems
A significant number of Windows NT/2000/XP/Server 2003 boot problems are
the result of misconfigured Registry values. The ERD Commander 2003
Registry editor has all the capabilities and the same interface as the Windows
NT/2000/XP/Server 2003 Registry editor, making it easy for you to inspect
and change Registry settings.
Recovering Deleted Files
ERD Commander 2003 includes FileRestore, a utility that you can use to find
and restore deleted files from any supported Windows NT/2000/XP/Server
2003 file system format, including FAT, FAT32, and NTFS.
Copying Important Files off of a Dead System
ERD Commander 2003 enables you to access files on a Windows
NT/2000/XP/Server 2003 system that fails to boot. You can copy files to
removable media such as floppy disks, Zip drives, or Jaz drives, or use ERD
Commander 2003’s network capabilities to copy them to another system on
your network.
Regaining Access to a System That You’ve Been Locked Out Of
ERD Commander 2003’s Locksmith utility allows you to list the accounts for a
Windows NT/2000/XP/Server 2003 system and to change their passwords,
including Administrator accounts.
Viewing Event Logs
Since the Event Logs of a system often contain clues that can help you
diagnose a boot problem, ERD Commander 2003 includes an Event Log
Viewer with the same interface as the Windows 2000/XP Event Log Viewer
MMC snap-in, allowing you to inspect logs for relevant records.
Winternals Software Page 3

ERD Commander 2003
User’s Guide
Running CHKDSK on Corrupt Drives
ERD Commander 2003 will let you check the consistency of hard drives.
Enabling and Disabling Services and Drivers
You can list and modify the start types of a system’s drivers and services with
ERD Commander 2003’s Service and Driver Manager utility. The utility
implements an interface similar to the Windows 2000/XP Services MMC
snap-in, which makes it easy to identify services and drivers and to disable
those that are preventing a system from booting.
Restoring Windows XP Restore Points
Windows XP’s Restore Point feature periodically creates snapshots of a
system’s state that includes system files and Registry data. Overcoming a
deficiency of Windows XP’s Restore Point functionality, ERD Commander
2003 allows you to restore unbootable systems to a previous Restore Point.
Comparing a Working System with a Dead System
ERD Commander 2003’s System Compare utility let’s you compare service
and driver configuration and the system files of a dead system with that of a
live system or a Windows installation media to which you direct it. This
enables you to identify differences between working systems and one that
doesn’t boot in order to guide your repair process.
Partitioning and Formatting Disks
The Disk Management MMC snap-in that ERD Commander 2003 includes in
its Computer Management utility has many of the features of the Windows
2000/XP Disk Management MMC snap-in, allowing you to delete, format, and
create partitions and volumes. If you prefer a command-line environment you
can use the corresponding command-line tool, DiskPart, to accomplish the
same tasks.
Winternals Software Page 4

ERD Commander 2003
User’s Guide
Scanning a Dead System for Viruses
With ERD Commander 2003 you can share the drives of a system on the
network so that you can access them from another computer. This allows you
to use tools installed on other systems to aid in the repair process. For
example, if you suspect a virus has attacked a computer you can shut it
down, boot into ERD Commander 2003, share its drives, and then run a virus
scanner on the drives from a different system.
Registering COM/DCOM Server DLLs
A system may become unstable if COM or DCOM registration information is
corrupted or deleted. The standard Windows COM/DCOM server DLL
registration utility, Regsvr32, requires that you be logged into a system into
which you are registering DLLs, but ERD Commander 2003’s Regsvr32 utility
enables you to register COM/DCOM server DLLs into an installation that’s
offline.
Winternals Software Page 5

ERD Commander 2003
User’s Guide
1.2 Sample Screen
This screenshot demonstrates a typical session using ERD Commander 2003
to access the Registry and service configuration of an unbootable system.
Winternals Software Page 6

ERD Commander 2003
User’s Guide
2 ERD Commander 2003 Setup
2.1 System Requirements
ERD Commander 2003 requires that the target system have a bootable CD-
ROM, and one of the following operating systems:
Windows NT 4 •
•
Windows 2000
•
Windows XP
•
Windows Server 2003
Regardless of operating system, ERD Commander 2003 requires a minimum
of 64MB of system memory and an x86 233MHz processor.
Note that ERD Commander 2003 also gives you access to the drives of
Windows 95, 98 and Me systems, although many utilities, such as the
password changer, Registry editor and Event Log viewer do not function
when accessing installations of those operating systems.
The ERD Commander 2003 Boot CD-ROM Wizard runs on Windows 95, 98,
Me, NT, 2000, XP and Server 2003.
Winternals Software Page 7

ERD Commander 2003
User’s Guide
2.2 Booting with ERD Commander 2003
There are two delivery methods for ERD Commander 2003: as a Boot-CD
Wizard and as a bootable CD-ROM. You receive the Boot CD-ROM Wizard
as an executable file when you download ERD Commander 2003 after an on-
line purchase; the version of ERD Commander 2003 that ships as physical
media is a bootable image that also includes an installer for the Boot-CD
Wizard.
Use the Boot CD-ROM Wizard to create a bootable CD-ROM ISO image. A
CD-ROM ISO image is a file that represents the raw contents of a CD-ROM
that you can burn onto a writable CD-ROM with most popular CD-ROM
burning software. You will need several items in addition to successfully
create a bootable CD-ROM from the ISO image the Boot CD-ROM Wizard
creates:
CD-ROM burner •
•
CDR or CDRW disk
•
CD-ROM burning software that supports the formatting of CD-ROMs
from CD-ROM ISO images
This section guides you through the use of the wizard to create a CD-ROM
ISO image using the Boot CD-ROM Wizard.
Winternals Software Page 8

ERD Commander 2003
User’s Guide
2.3 License
After you start the Boot CD-ROM Wizard you will be presented with a page
that requests your licensing information. On-line purchasers receive the
licensing information as an e-mail attachment that you can import into the
Wizard. The Boot CD-ROM Wizard verifies the license information and
embeds it into the ISO image so that, after you create a bootable CD-ROM
from the image and start ERD Commander 2003 from the resultant CD-ROM,
ERD Commander 2003 presents the licensing information when it starts.
Winternals Software Page 9
ERD Commander 2003
User’s Guide
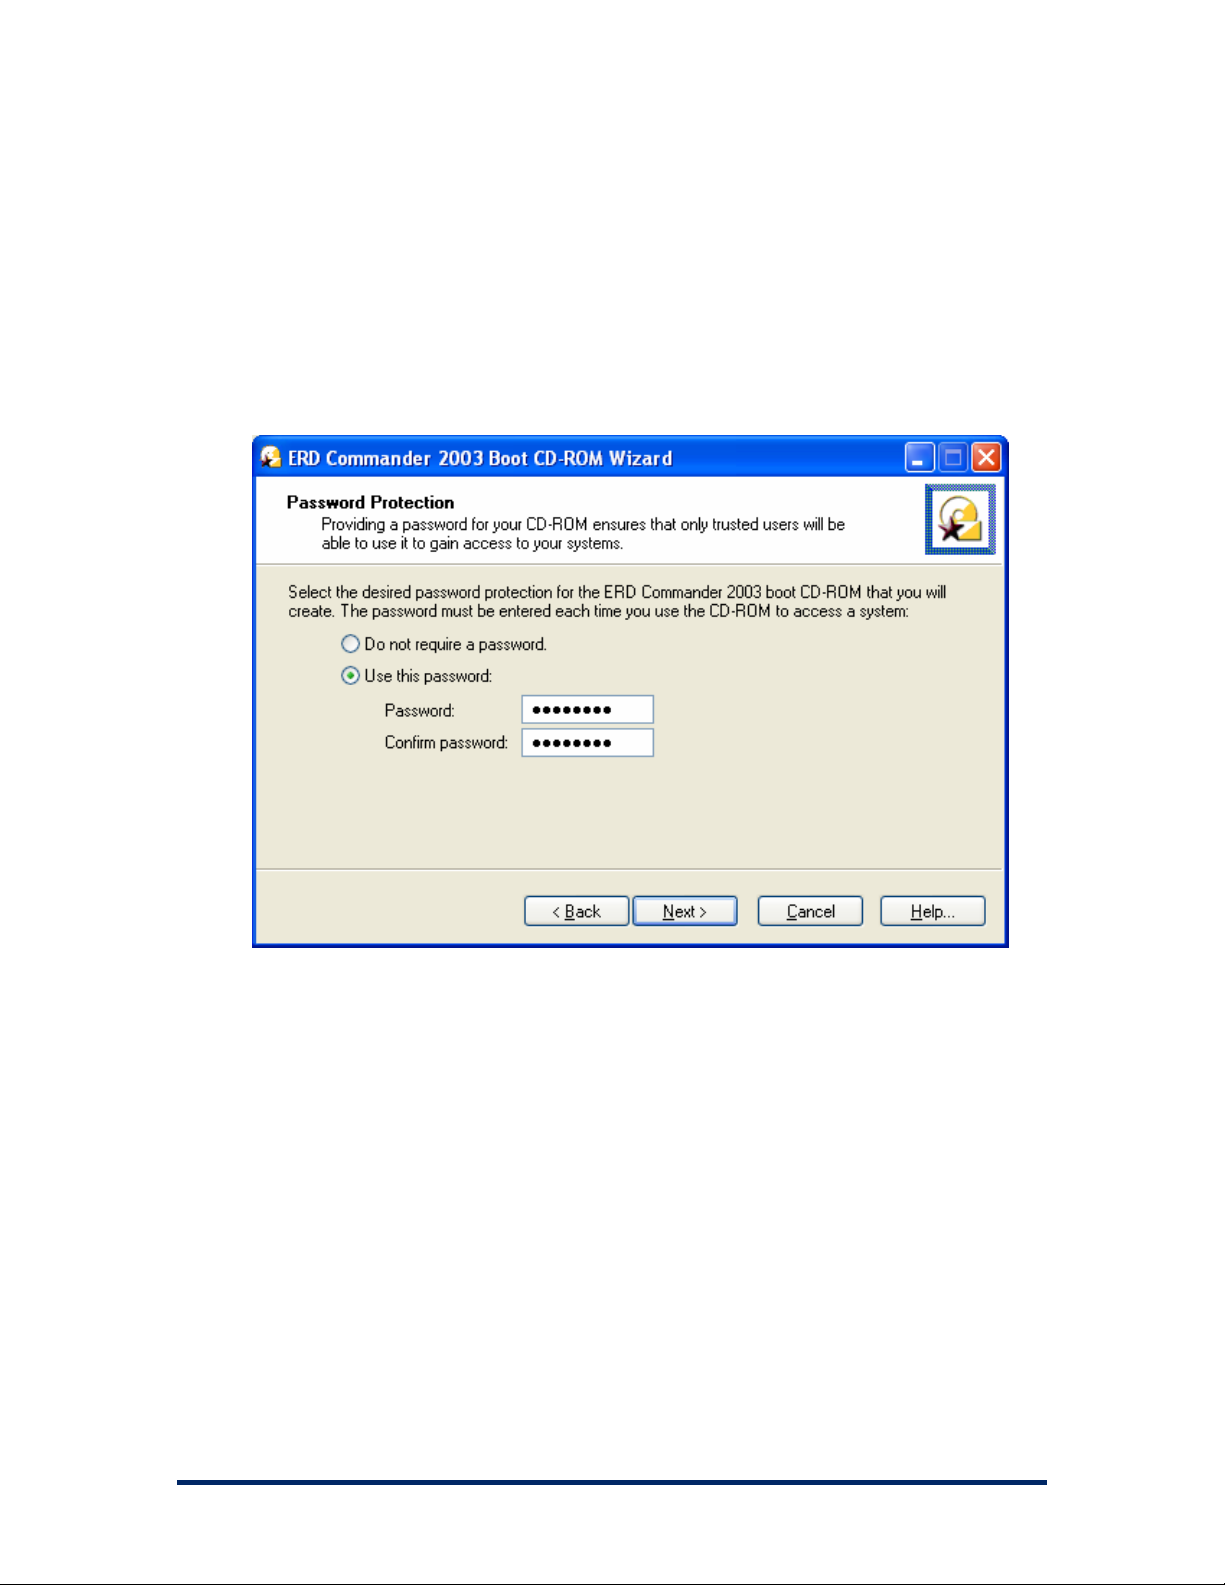
2.4 Password Protection
The Boot CD-ROM Wizard offers you the option to password protect the ERD
Commander 2003 CD-ROM that you create. This is useful if you wish to
restrict use of the ERD Commander 2003 boot CD-ROM to authorized
individuals.
Winternals Software Page 10

ERD Commander 2003
User’s Guide
2.5 Selecting the Installed Applications
You can customize the set of tools included on the ERD Commander 2003
CD. For some deployments you may wish to restrict the power of an ERD
Commander boot CD by omitting certain tools, for example. Tools that you
omit are not included on that instance of the CD-ROM image.
Winternals Software Page 11
ERD Commander 2003
User’s Guide
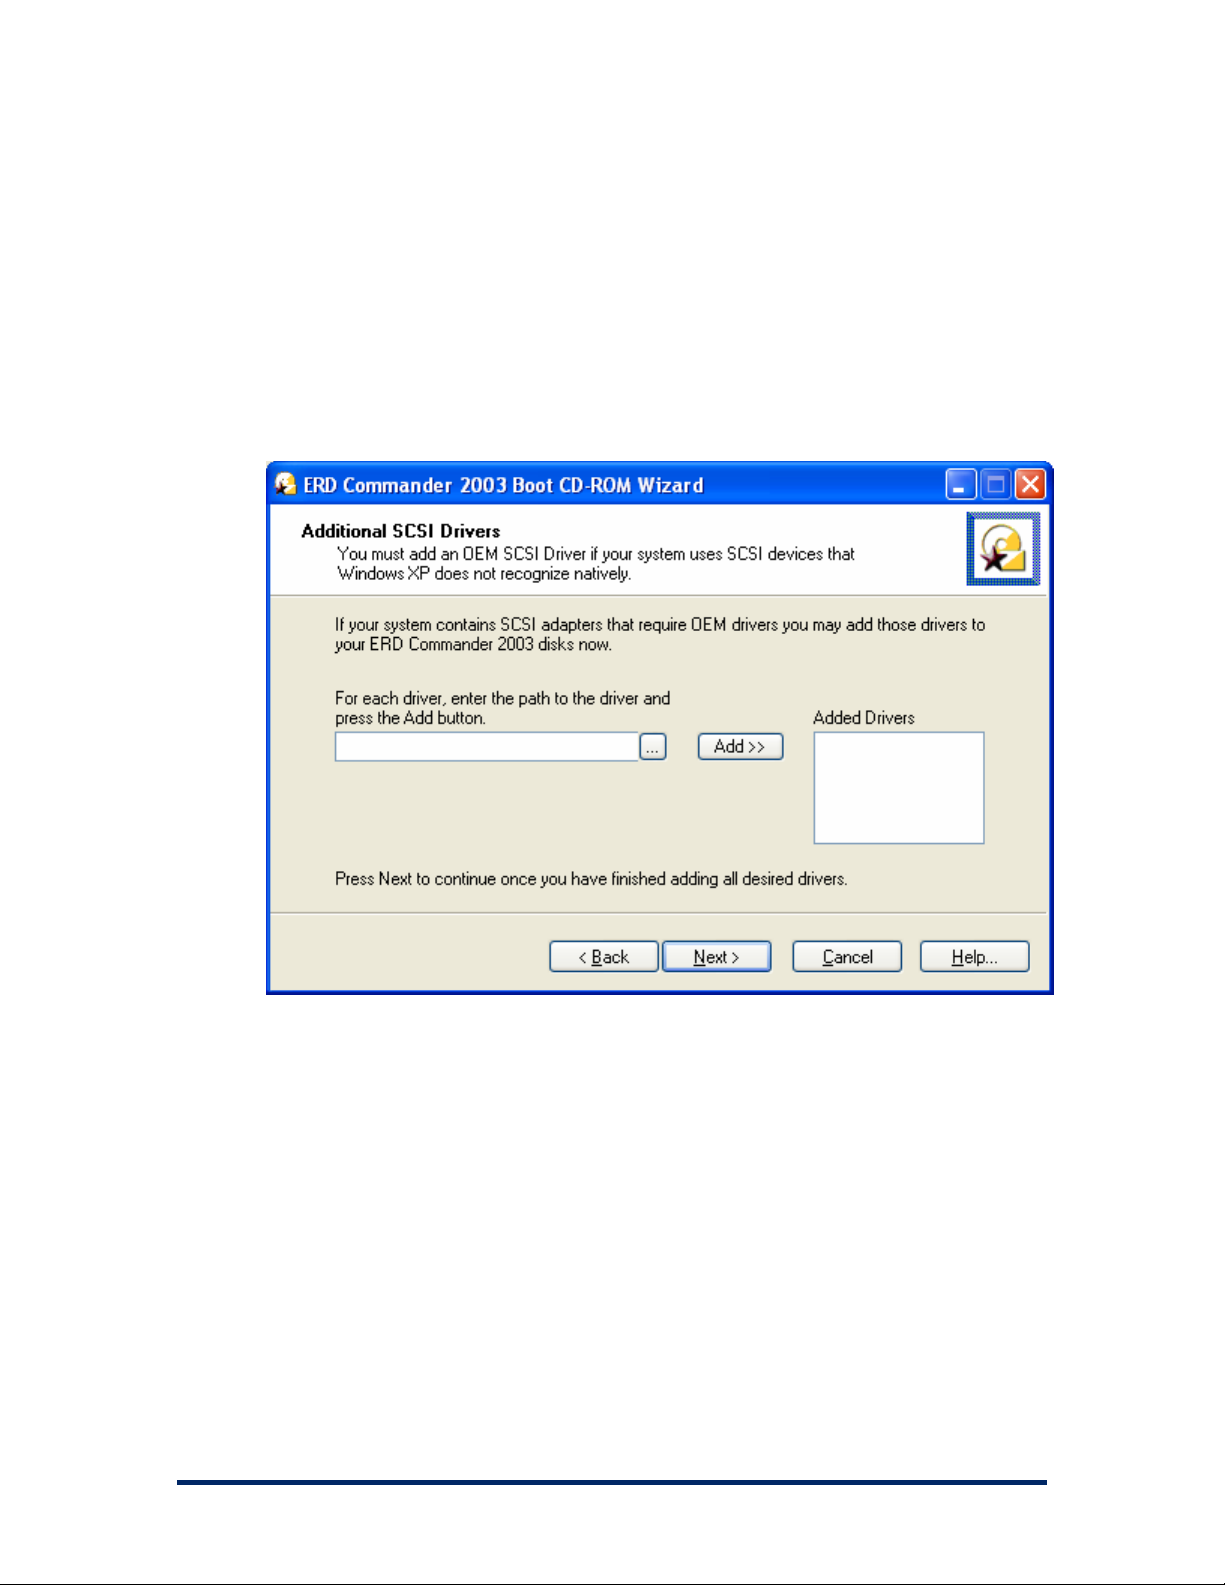
2.6 Adding OEM SCSI Drivers
If you work with systems that use SCSI adapters that Windows XP does not
natively support (i.e., hardware that requires additional drivers to be added for
Windows XP to use it) then you can add those OEM drivers to ERD
Commander 2003. To add an OEM driver, simply enter the path to the driver
(the driver file should end in .SYS) or browse to it, and click the Add button.
Winternals Software Page 12
ERD Commander 2003
User’s Guide
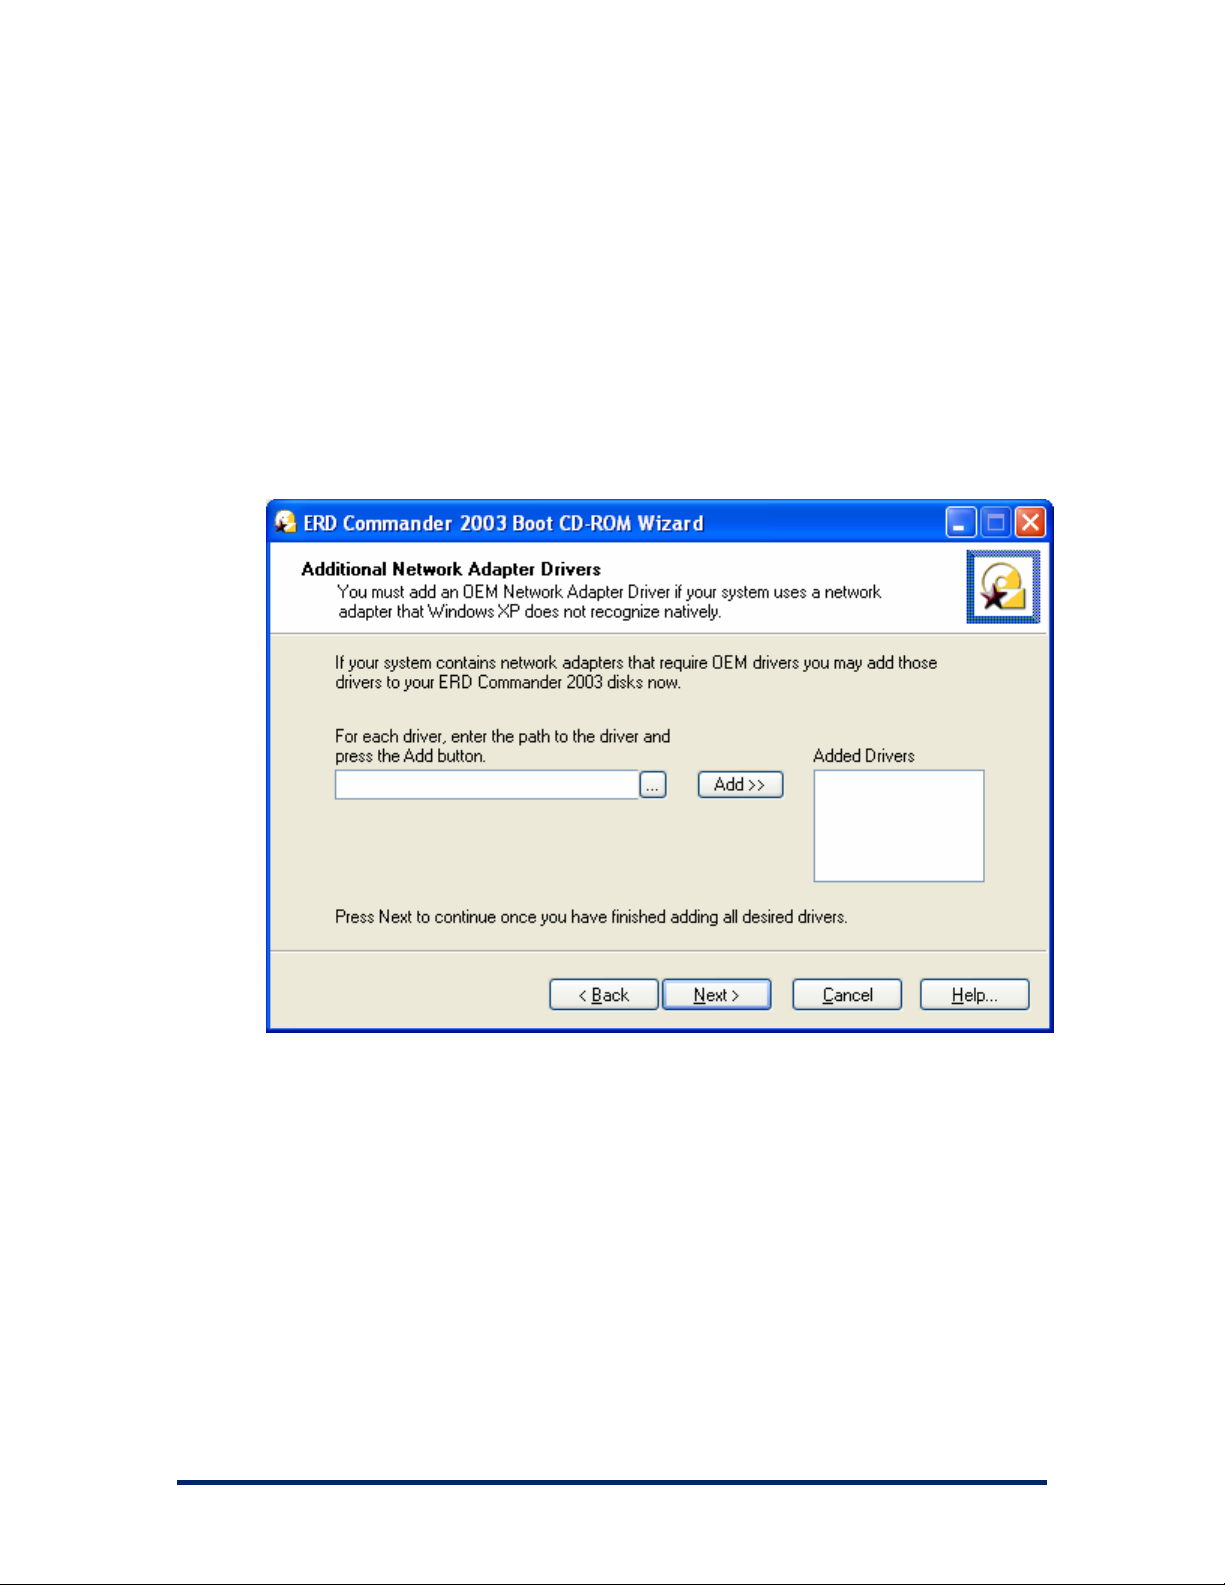
2.7 Adding OEM Network Drivers
If you work with systems that have network drivers that Windows XP does not
natively support (i.e., hardware that requires additional drivers to be added for
Windows XP to use it) then you can add those OEM drivers to ERD
Commander 2003. To add an OEM driver, simply enter the path to the
driver’s installation file (the installation file should end in .INF) or browse to it,
and the Add button.
Winternals Software Page 13
ERD Commander 2003
User’s Guide
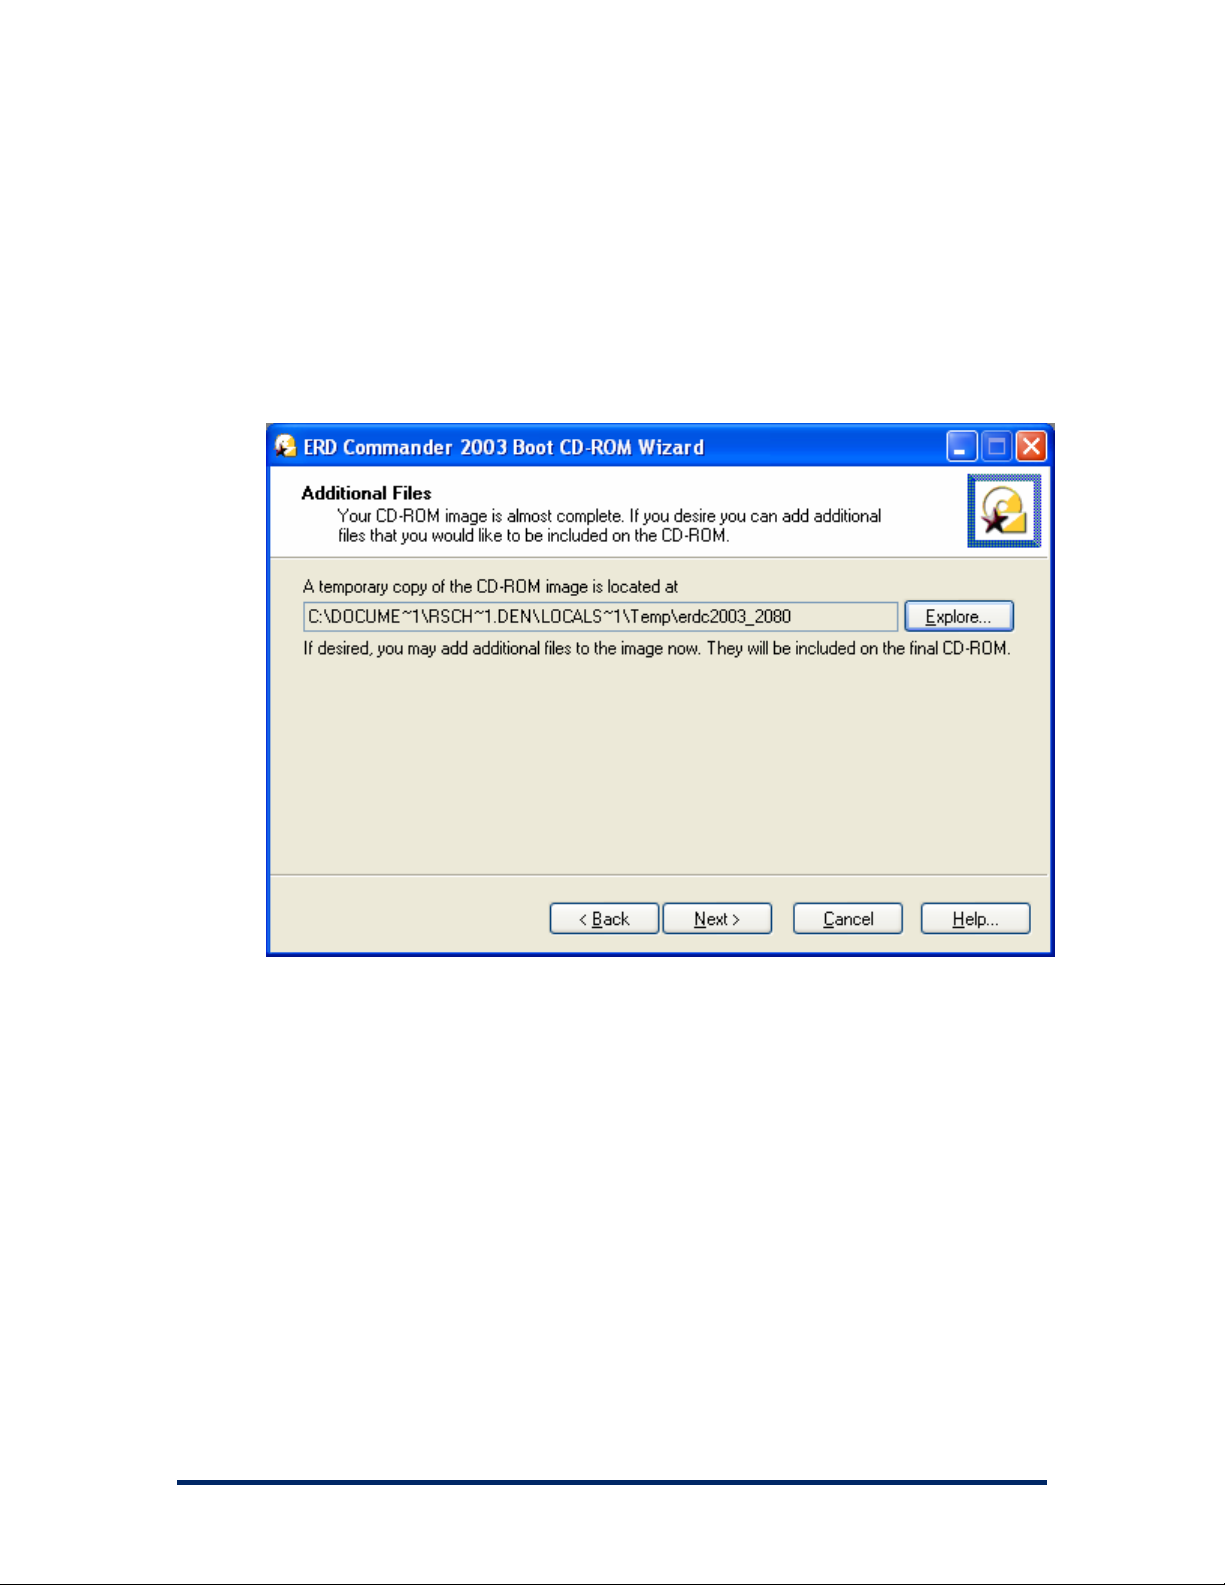
2.8 Adding Files to the CD-ROM Image
Before creating the final ISO image, ERD Commander 2003 gives you the
opportunity to add your own files to the image. The Boot CD-ROM Wizard
informs you of the location of the ERD Commander 2003 directory tree. Files
you add to the tree will be present in the final CD-ROM image.
Winternals Software Page 14
ERD Commander 2003
User’s Guide
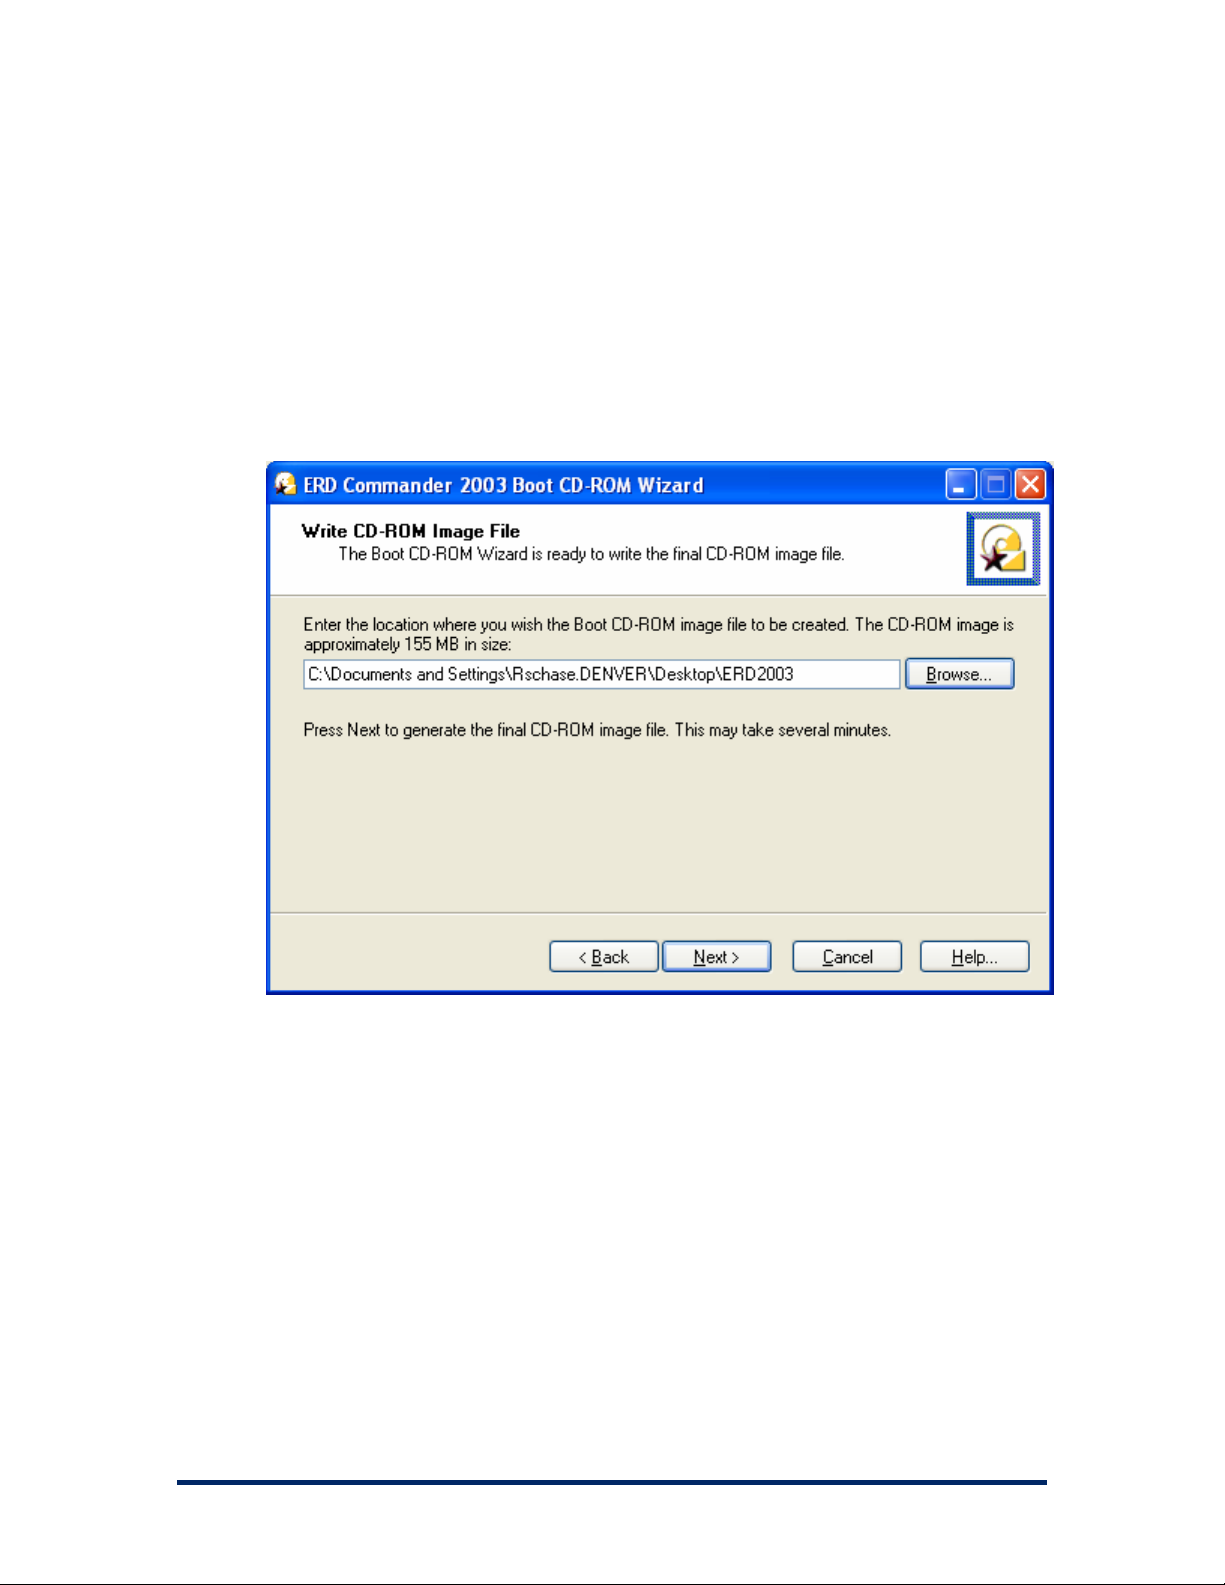
2.9 Image Location
The Boot CD-ROM Wizard’s final interactive step prompts you to specify the
destination of the generated ISO image. The image requires approximately
150 MB of disk storage, and because most CD-ROM burning software
requires ISO images to have a .iso file extension, the Boot CD-ROM Wizard
also requires that extension.
Winternals Software Page 15

ERD Commander 2003
User’s Guide
2.10 Burning the ERD Commander 2003 CD-ROM
Most popular CD-ROM burning applications offer the option to write a CD-
ROM from a CD-ROM ISO file. Check with your software’s documentation for
information on how to do this. For additional tips, please check the
Winternals Product Knowledge Base:
http://www.winternals.com/support/kbfiles/ISOtoCD.pdf
Winternals Software Page 16

ERD Commander 2003
User’s Guide
3 Using ERD Commander 2003
Once ERD Commander 2003 boots, a stripped-down version of Windows XP
will start and run the ERD Commander 2003 windowing environment. It’s
important to keep in mind that, although this graphical environment looks like
Windows and even has similar utilities, it is not Windows code and therefore
behaves slightly differently. Also note that your end-user license agreement
prohibits use of ERD Commander 2003 as a general-purpose operating
system, and the environment is designed to reboot automatically 24 hours
after starting.
NOTE
: it is important that you do not remove the ERD Commander 2003 CD-
ROM from the system while ERD Commander 2003 is running. Doing so
could result in a lock-up of ERD Commander 2003, requiring a reboot.
The ERD Commander 2003 environment provides a number of powerful
utilities that help you identify and repair problems that are preventing a
system from booting. These include:
Logon •
•
Windowing Shell
•
System Information
•
Explorer
•
File Search
•
FileRestore
•
Command Prompt
•
Chkdsk
•
Regsvr32
•
Notepad
•
Regedit
Winternals Software Page 17

ERD Commander 2003
User’s Guide
Service and Driver Manager •
•
Event Log Viewer
•
TCP/IP Configuration
•
Disk Management
•
Locksmith
•
File Sharing
•
System Restore
•
System Compare
•
Disk Commander (available if ERD Commander 2003 is purchased as
part of the Administrator’s Pak)
This section describes the functionality and use of each of these tools. In
addition, you can execute Win32 applications other than those that are part of
the ERD Commander 2003 environment.
Winternals Software Page 18

ERD Commander 2003
User’s Guide
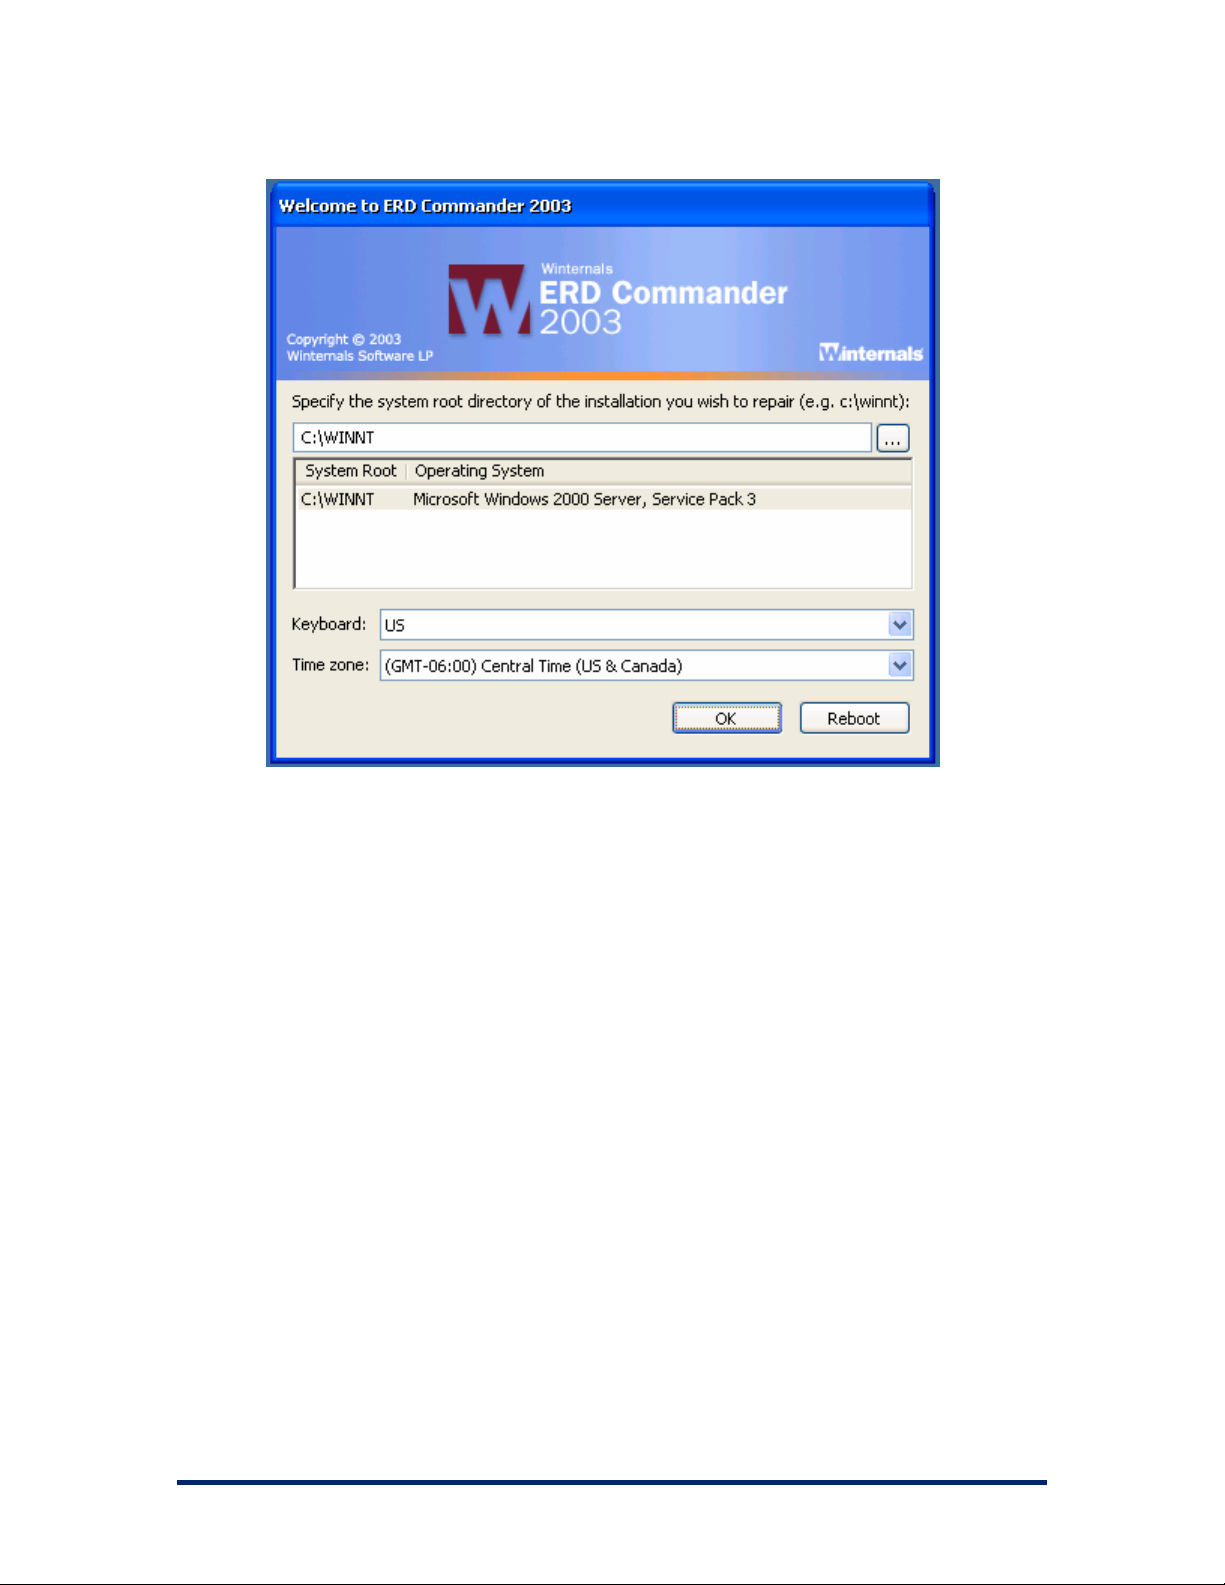
3.1 Logon
When ERD Commander 2003 boots it executes the Winternals Logon
application. The first step performed by the Logon application is to start the
networking services. These services assume that a DHCP server is present
on your network and attempt to obtain an IP address. If your network uses
static IP addresses rather than DHCP you can use the TCP/IP Configuration
utility after logging in to specify a static IP address.
If the ERD Commander 2003 CD was generated by the Boot CD-ROM
Wizard, the Logon application next displays the licensing information entered
during execution of the wizard. Otherwise it will prompt you to enter ERD
Commander 2003 license text or specify a file containing an ERD
Commander 2003 license.
Next, the Logon application scans the system’s hard-disk volumes for
Windows NT, 2000, XP, and Server 2003 installations. It displays the system
root directory of located installations, the type of operating system installed,
and service pack information. It also allows you to specify the language
layout of your keyboard. The default language selection is the one specified
by the operating system installation entered in the edit box of the Logon
application.
Winternals Software Page 19
ERD Commander 2003
User’s Guide
If the system you wish to repair is not in the list or the operating system is
displayed as «unknown», then some or all of the Registry hives for that
installation are damaged, missing, or have restrictive permissions that do not
allow the System account access. Registry hives are the Registry’s on-disk
storage files and are stored under \SystemRoot\System32\Config (where
SystemRoot is the system root directory of a Windows NT, 2000, XP, or
Server 2003 installation).
Choose the installation you wish to repair from the list, by manually entering
the system root path, or by browsing to the system root directory. When you
make a selection the Logon application validates the SYSTEM, SOFTWARE,
SAM and SECURITY Registry hives and notifies you if any of them are
corrupt or missing. Note that in this event the corresponding portions of the
Registry will be inaccessible by the Winternals Registry editor and other ERD
Commander 2003 utilities also have limited functionality.
Winternals Software Page 20

ERD Commander 2003
User’s Guide
The Logon application allows you to choose a keyboard layout and time zone
using the drop down controls. The default selections for keyboard layout and
time zone are taken from the installation you have currently entered into the
installation selection field if the Registry of that installation is accessible.
Clicking the OK button selects the specified installation and starts the ERD
Commander 2003 Windowing Shell, described in the next section. After you
have completed work on an installation and log off the Windowing Shell you
return to this Logon dialog. Clicking the Reboot button performs a clean
shutdown and reboot of the computer.
Winternals Software Page 21

ERD Commander 2003
User’s Guide
3.2 Windowing Shell
The ERD Commander 2003 Windowing Shell closely resembles Microsoft’s
Explorer shell. It has a task bar, Start menu, and desktop shortcuts.
However, you cannot move the Windowing Shell’s task bar, edit the items on
the Start Menu, move or modify existing desktop shortcuts, or create new
desktop shortcuts. The Windowing Shell provides the familiar desktop motif
and allows you to easily access ERD Commander 2003 applications and
manage multiple running applications with taskbar buttons.
NOTE:
a limitation in the ERD Commander 2003 operating environment
prevents concurrent execution of more than approximately 4 applications.
ERD Commander 2003 will inform you when starting another application
might exceed the limit.
Winternals Software Page 22

ERD Commander 2003
User’s Guide
3.3 System Information
The ERD Commander 2003 System Information utility is accessed via the
Administrative Tools folder of the Start menu. The utility reports extensive
information about the system you are repairing, including the operating
system version, service pack, hotfixes, registered owner and organization
and more. It also displays the installation’s computer name as well as the
computer name (listed as the «Real computer name») that ERD Commander
2003 randomly assigns while it is running. The value of the System root,
which represents the root folder of the installation, can be useful to determine
where key system files, such as service and driver files and Registry hives,
reside.
Winternals Software Page 23
Loading…
Что такое Winternals ERD Commander и зачем он нужен
ERD Commander (ERDC) — это наиболее удачный программный инструмент для восстановления работоспособности операционных систем Windows даже в тех случаях, когда система серьезно повреждена и ее загрузка невозможна. Но не только, — набор инструментов ERDC настолько универсален и удобен в использовании, что его можно применять для восстановления работоспособности в случаях блокировки компьютера вирусами — вымогателями, для выборочного восстановления файлов реестра из данных точек восстановления, устранения проблем с использованием полного отката системы и т.п. Для пользователя, освоившего работу с ERD Commander’ом, задача по восстановлению работоспособности Windows становится настолько легко решаемой, что занимает считанные минуты.
Несколько лет назад ERD Commander являлся частью пакета программ администрирования Windows (Winternals Administrator’s Pak) компании Winternals Software. После её приобретения Майкрософтом в 2006 году, ERDC стал частью набора программных средств Microsoft Desktop Optimization Pack, распространяемого по подписке, в виде пакета Microsoft Diagnostics and Recovery Toolset (MS DaRT). Образ загрузочного диска ERDC в формате ISO-9660 несложно найти и скачать в сети. Также, ссылка на скачивание образов ERD версий 5.0, 6.0, 6.5 (ird50.iso, erd60.iso и erd65.iso) одним архивом, имеется в статье Создание загрузочной флешки с ERD Commander . Кроме того, ERD Commander уже несколько лет является практически обязательным компонентом каждого популярного диска аварийного восстановления (Alkid Live CD, Emergency Live CD, Hiren’s BootCD и т.п.).
Сокращенное обозначение «ERD» произошло от термина «Emergency Repair Disk» — диск аварийного восстановления. ERD Commander — это загрузочный диск с операционной системой Windows PE, загружаемой со сменного носителя (CD/DVD, флэшки или внешнего USB диска) , плюс набор специальных программных средств для восстановления работоспособности Windows. Главное преимущество ERDC перед другими подобными средствами восстановления — обширные возможности и простота использования. С помощью ERD Commander легко избавиться от вредоносных программ, в том числе и блокировщиков рабочего стола Windows, восстановить работоспособность системы в случае неудачной установки или неудачного обновления драйверов и системных сервисов, приведшей к аварийному завершению системы с синим экраном смерти, выполнить откат по данным точки восстановления, даже если нет возможности выполнить загрузку ОС и запустить встроенное средство восстановления, или проще говоря, освоив работу с ERD Commander, пользователь, практически в любой ситуации, сможет быстро и легко восстановить работоспособность Windows.
Версии 5.0, 6.0 и 6.5 из состава пакета MS DART отличаются тем, что 5.0 — это классический вариант ERD Commander, в том виде, в каком он известен огромному сообществу грамотных пользователей и системных администраторов. Большинство инструментов и возможностей ERD 5.0 применимы к любой версии ОС Windows и внешне ничем не отличаются от Winternals ERD Commander 2003/2005/2008. Версии ERD 6.0 и 6.5 ориентированы на использование с операционными системами Windows Vista и Windows 7. Версия ERD 7.0 ( DaRT 7 ) от всех предыдущих версий отличается еще и возможностью удаленного подключения к инструментам диска аварийного восстановления системы.
Наиболее распространенной версией ERDC, длительное время, является ERD Commander 2005. Главной его особенностью является то, что им можно воспользоваться, почти с полным функционалом, для любой версии Windows от NT4 до Windows 8 . Последующие версии ERD Commander (2008, 5.0 , 6.5 , 7.0) работают только с той версией Windows, которая заявлена в качестве поддерживаемой, хотя такие инструменты, как просмотр журналов событий и редактирование реестра вполне могли бы быть реализованы в рамках любой редакции ERD Commander, а не поддерживаемые режимы, связанные с особенностями конкретной операционной системы, можно было сделать неактивными. На практике, выяснилось, что ERD Commander 2005 может подключаться к операциооным системам Windows Vista и старше, с потерей некоторого функционала:
— нет возможности отката системы на точку восстановления с использованием мастера System Restore Wizard. Но можно выполнить частичный откат файлов реестра вручную, что позволяет в подавляющем большинстве случаев обойтись без упомянутого мастера.
— нет смысла пользоваться инструментами, ориентированными на удаление критических обновлений, связанными с отличиями используемого менеджера загрузки и с использованием пакета Microsoft Debugging Tools. Инструменты вроде мастера выбора решений ( Solutions Wizard ), или анализатора дампов по критической ошибке ( Crash Analyzer ) и так, при работе с поддерживаемыми версиями Windows, особым спросом не пользуются.
Именно по этой причине, в среде системных администраторов, ERD Commander 2005 пользуется большей популярностью, чем вышедшие позже версии ERDC. Ведь в большинстве случаев, требуется основной функционал — просмотр содержимого жесткого диска, системных журналов, редактирование реестра, изменение паролей пользователей, ручное восстановление реестра по данным точек восстановления Windows, работа с автозапуском, службами и драйверами, — все это можно использовать в среде ERD Commander 2005 для любой, существующей на сегодняшний день, версии операционных систем семейства Windows.
Загрузочный диск Winternals ERD Commander (ERDC) позволяет загрузить, с использованием сменного носителя, упрощенный вариант операционной системы Windows XP PE (Preinstall Edition) и оболочку пользователя, специально созданную для удобства работы с другой операционной системой, выбираемой при загрузке, или через повторную регистрацию (Logoff/Logon) пользователя. Основное предназначение ERDC — восстановление работоспособности системы или сохранение критических данных с помощью специальных наборов программных инструментов (Tools). Схема использования ERD Commander выглядит следующим образом:
— загрузка ERDC с компакт — диска или другого сменного носителя.
— подключение к операционной системе, с которой необходимо работать.
— выполнение необходимых действий с помощью встроенных средств ERDC или другого программного обеспечения.
— Выход из ERDC (перезагрузка)
Хочу добавить, что нет ничего такого, что можно сделать в ERD Commander, и нельзя сделать с использованием других наборов программных средств аварийного восстановления . Использование ERD Commander отличается лишь тем, что реанимация системы и восстановление данных выполняется легко, быстро и надежно. Причем, работа с ERDC вполне по силам даже обычному пользователю домашнего компьютера. Большим плюсом ERDC является не только наличие минимально необходимого набора средств восстановления, но и возможность использования дополнительного переносимого программного обеспечения, запускаемого со сменных носителей — антивирусных сканеров, диагностических программ, файловых менеджеров и т.п..
Как пользоваться ERD Commander
Скачать сие чудо можно с любого торрента.
После скачивания записать на диск — https://www.cyberforum.ru/wind… 43107.html
или на флешку — https://www.cyberforum.ru/wind… 31517.html
0