
Starting with VMware vSphere version 6.7, you have the option to enable virtualization-based security (VBS) for virtual machines with a guest operating system Windows 10 or Windows Server 2016.
- Prerequisites
- Unsupported VMware features
- Configuring the host BIOS
- TPM 2.0 module recognized on Windows 10
- Create a VBS compatible virtual machine
- Install Windows 10 and VMware Tools
- Enable Hyper-V hypervisor
- Enable VBS feature in the guest operating system
1. Prerequisites
To be able to enable this VBS option on your Windows 10 and/or Windows Server 2016 virtual machines, you will have to meet several prerequisites for the host.
In fact, the BIOS of the motherboard of the VMware ESXi host must be configured in such a way as to :
- what your server starts in UEFI mode
- that Secure Boot is enabled. This requires the use of UEFI for booting.
- processor virtualization (Intel VT-x / AMD-V) must be enabled and supported by the processor itself
- I/O virtualization (Intel VT-d / IOMMU) must be enabled and supported by the processor itself
In addition, the host must have a TPM 2.0 (Trusted Platform Module) chip to secure the storage of credentials that Windows will perform through the VBS feature.
Source : Introducing support for Virtualization Based Security and Credential Guard in vSphere 6.7
2. Unsupported VMware features
Important : when you enable the «VBS (Virtualization-based Security)» option on a virtual machine, you will no longer be able to use these features :
- Fault tolerance (vSphere Fault Tolerance or FT) : a copy of the VM is created on a second server and is synchronized in real time to replace the source VM if the source server crashes.
- PCI passthrough : used to pass a physical device to a VM (such as an USB key, an USB controller, a PCI device, …).
- Hot add of CPU or memory : allows you to hot increase the CPU and RAM resources allocated to the VM.
Source : Virtualization-based Security Best Practices
3. Configuring the host BIOS
As mentioned previously, enabling the «Virtualization-based Security (VBS)» option on a virtual machine requires that your VMware ESXi host’s motherboard has a Trusted Platform Module (TPM) 2.0.
This is not the case with all motherboards.
In our case, our «ASUS WS X299 SAGE/10G» motherboard has a secure platform module (TPM 2.0) integrated into it.
If you have an Asus motherboard, you can check its compatibility on the page «[Motherboard] Which ASUS model supports Windows 11 and how to setup TPM 2.0 in BIOS?» of the official Asus website.
To begin, enter the BIOS of your motherboard by pressing the «Del» key at startup.
Then, go to advanced mode by clicking on : Advanced Mode (F7).

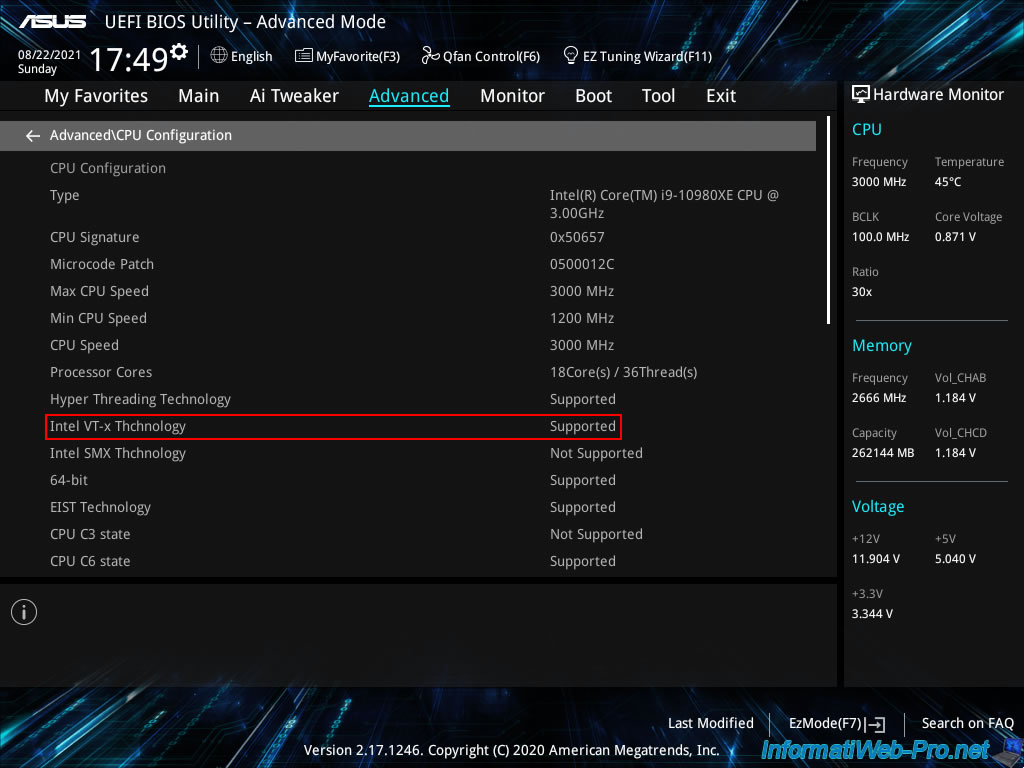
Then, go to «Advanced -> CPU Configuration».

As you can see, in our case, our BIOS tells us that processor virtualization (Intel VT-x Technology) is supported.
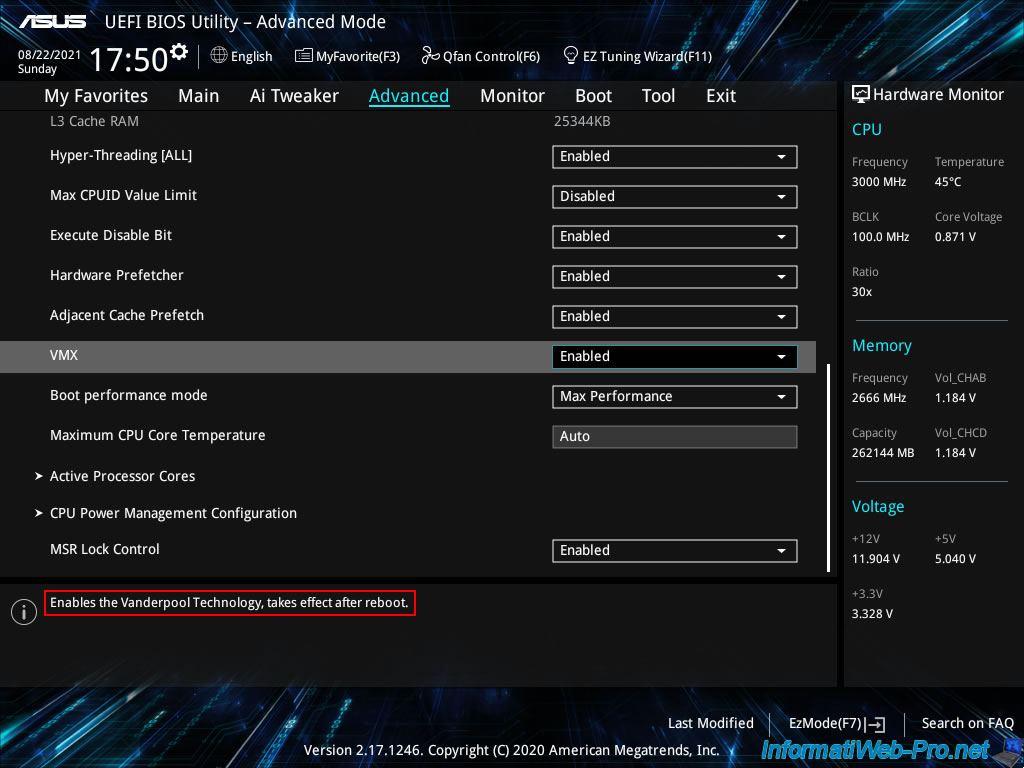
To enable processor virtualization (Intel VT-x / AMD-V) on this Asus motherboard, enable the «VMX» option.
If you look in the description of this option, you will find the «Vanderpool Technology» keyword which is the code name for «Intel Virtualization Technology (Intel VT)» as shown in the «Cover Slide Title — Intel» PDF of Intel.
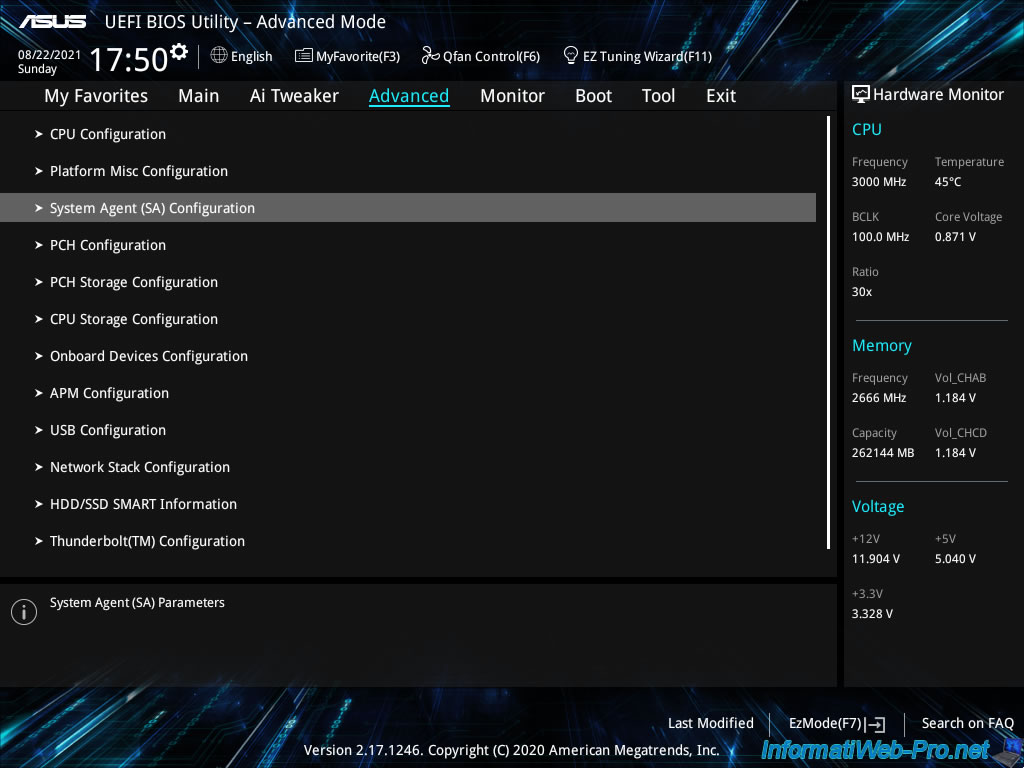
Then, go to «Advanced -> System Agent (SA) Configuration».
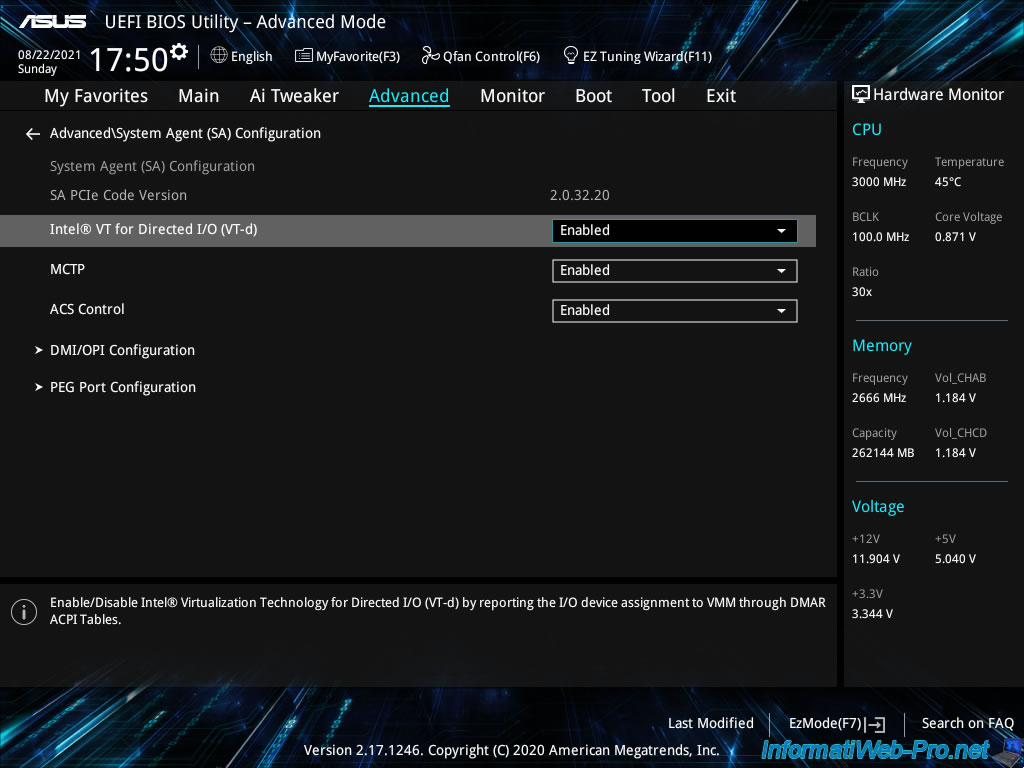
In this «System Agent (SA) Configuration» section, enable I/O virtualization (Intel VT-d / IOMMU) by enabling the «Intel VT for Directed I/O (VT-d)» option.
For the TPM 2.0 module, if your Asus motherboard supports it, you will find a «PCH-FW Configuration» section at the very bottom of the «Advanced» tab.
Note that you have to scroll with the mouse to access it, because it may not be visible on the screen by default.
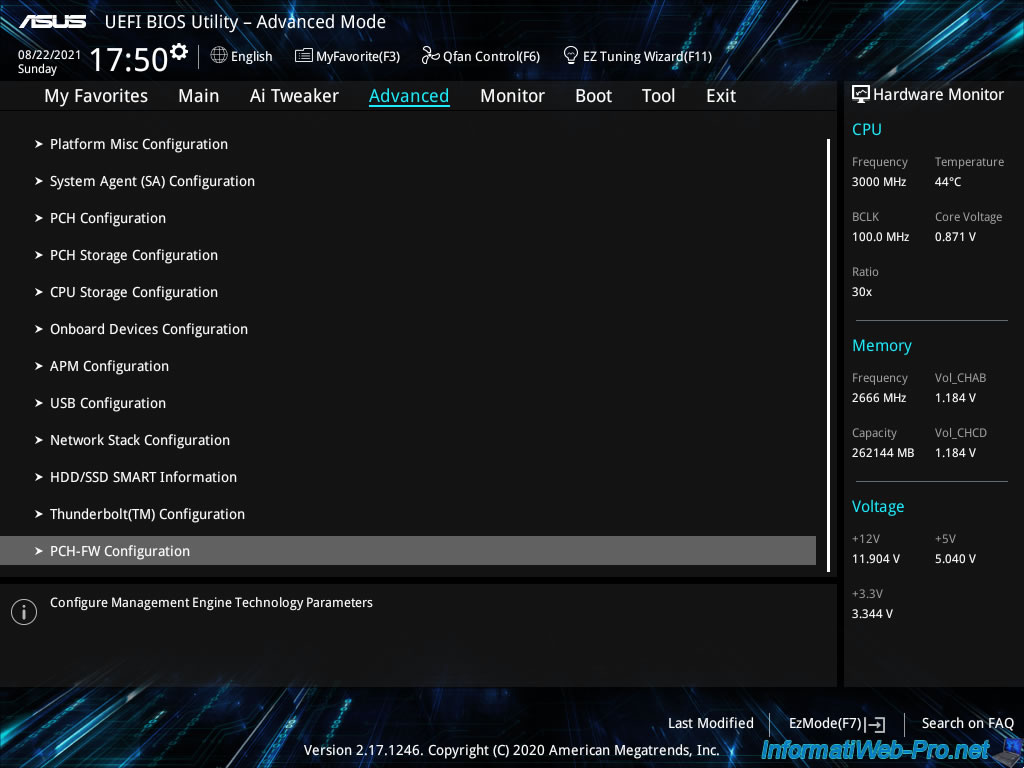
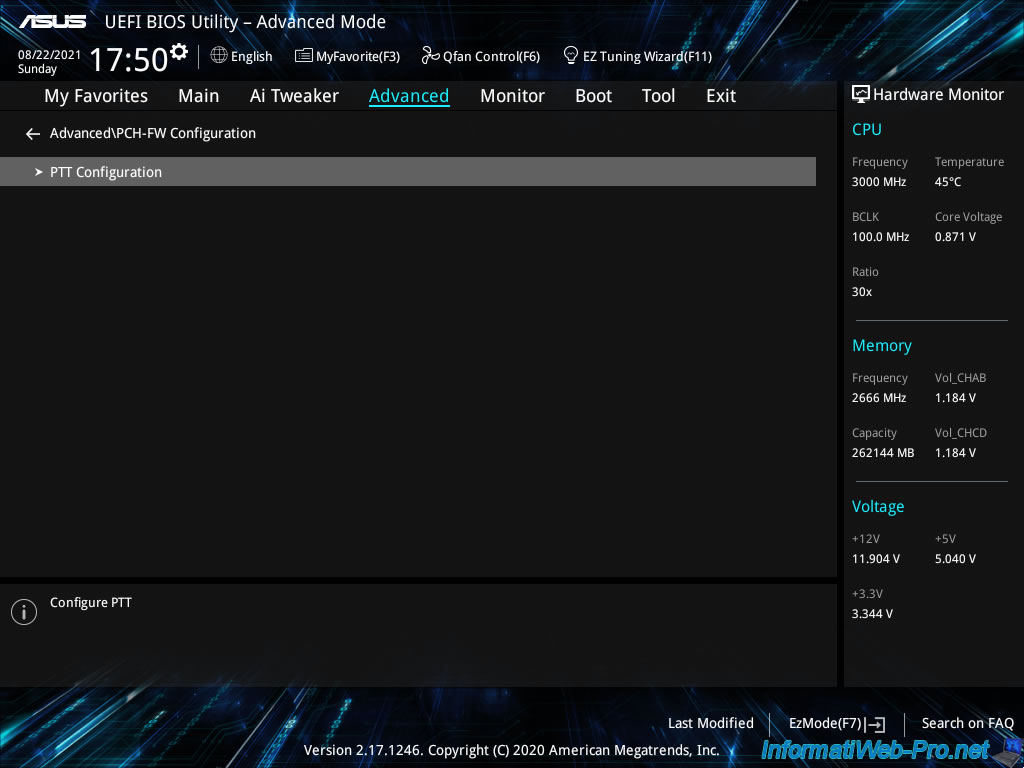
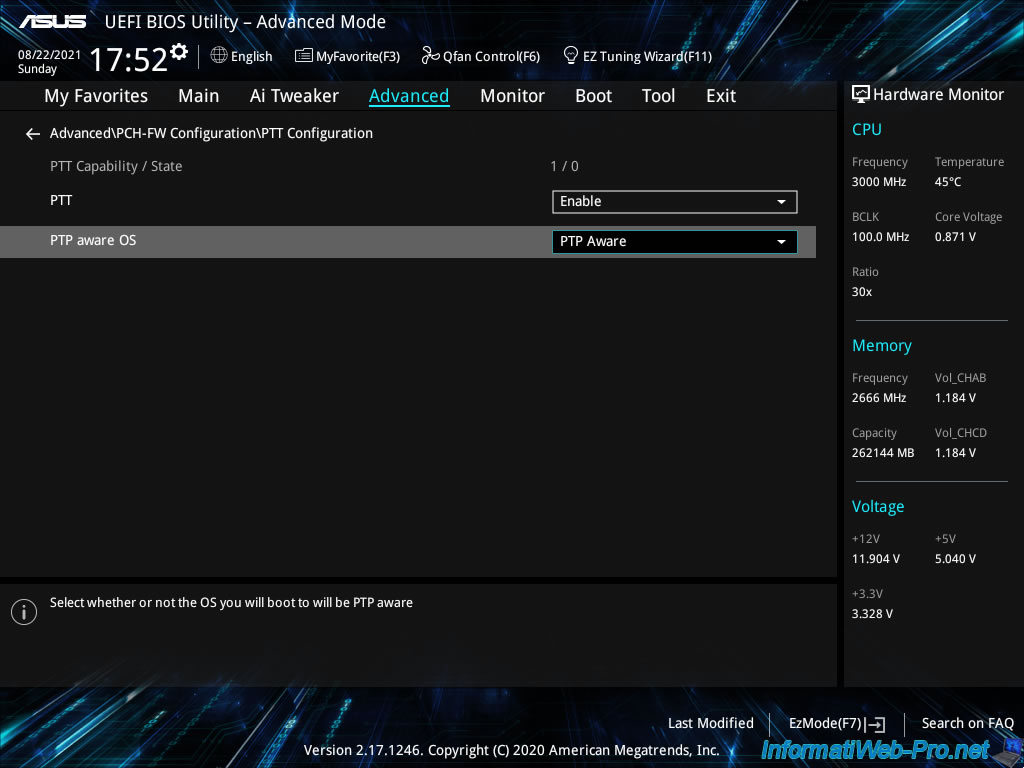
In this section «PCH-FW Configuration», you will find a section «PTT Configuration» in which you must enter.
As you can see, your motherboard supports PTT feature, but this feature is disabled by default.
Plain Text
PTT Capability / State : 1 / 0
PTT : Disable
Intel PTT stands for «Intel Platform Trust Technology», but in other motherboards this option may appear under other names : TPM or Trusted Platform Module.
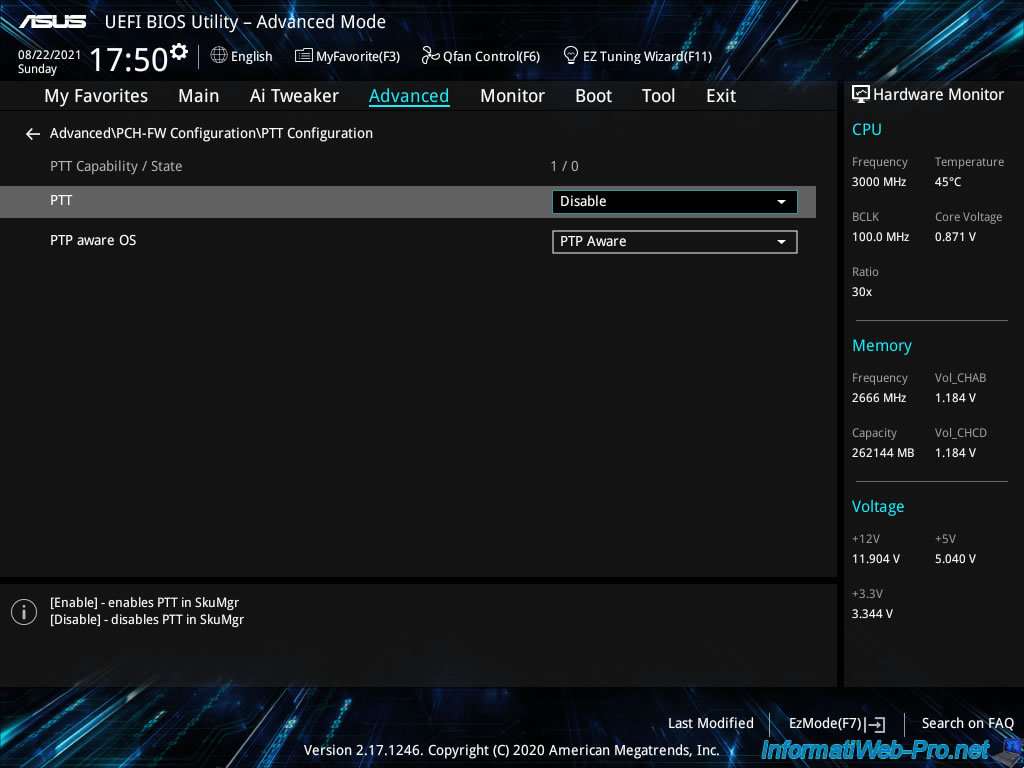
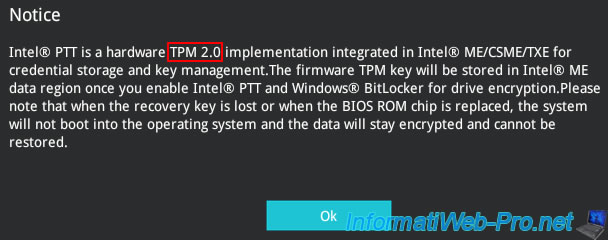
Enable Trusted Platform Module support by selecting «Enable» for the «PTT» option.
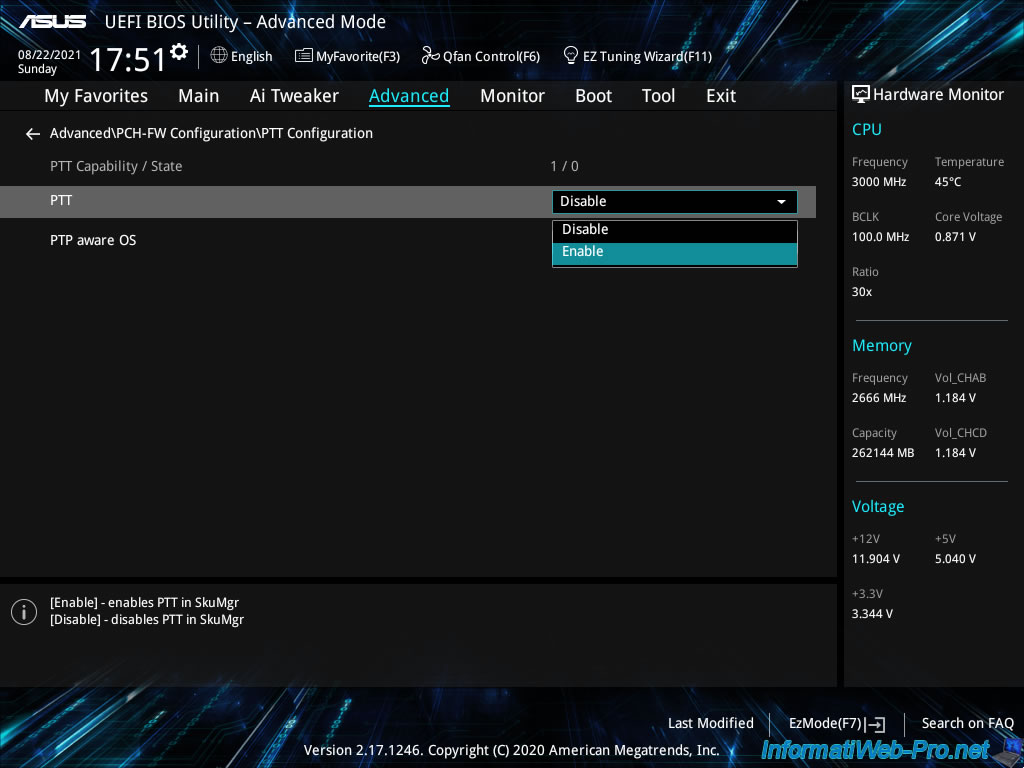
Enabling this «PTT» feature will display this message.
Without going into details, this indicates that the Trusted Platform Module key will be stored in a flash memory chip (Intel ME) located in your processor and that this will allow you to secure the storage of the encryption key required by the processor for the activation of the Windows BitLocker feature.
In addition, the loss of the recovery key or the replacement of the BIOS read-only memory chip will prevent the data from being decrypted and the data will therefore remain encrypted (and therefore lost, because they are unreadable).
For more information about this message, see the «Got a Warning For Enabling Firmware TPM» page.
However, we will not be using BitLocker in this case since it’s VMware ESXi that is installed on our server.
Click on OK.
In our case, we have a second setting named «PTP aware OS» which allows you to indicate if the operating system installed on our server is compatible with PTP.
PTP corresponds to the «TCG PC Client Platform TPM Profile (PTP)» specification and «TCG» stands for «Trusted Computing Group».
This PTP specification defines the use of a TPM (Trusted Platform Module) on any generic platform (computer, server, …).
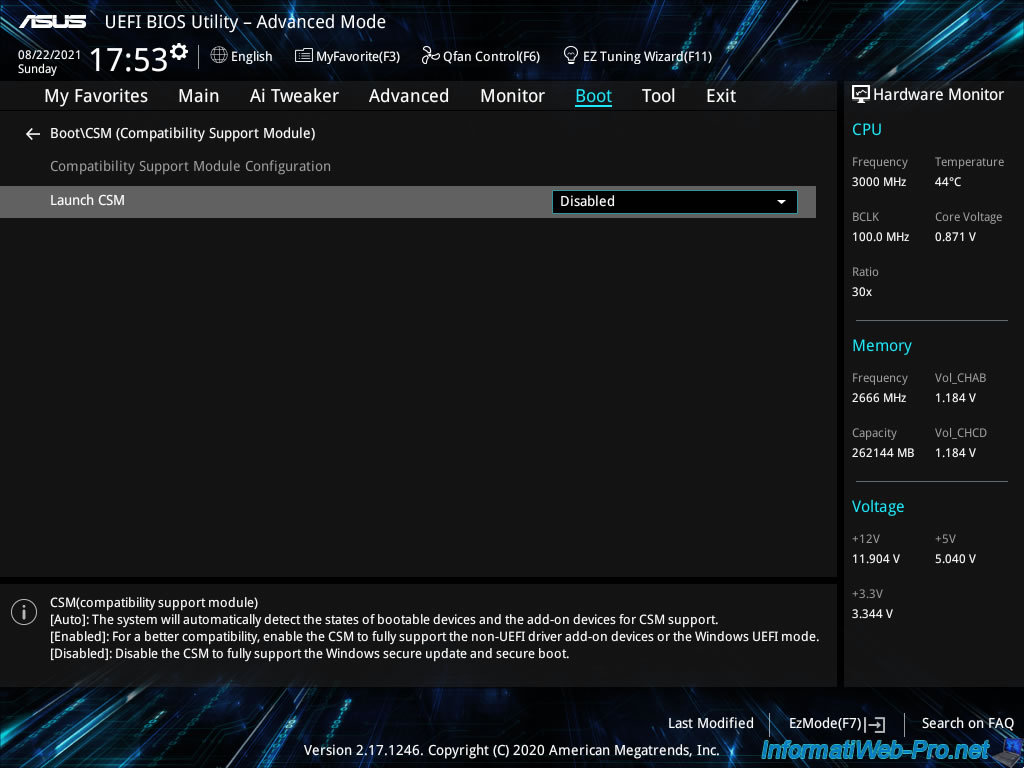
Then go to : Boot -> CSM (Compatibility Support Module).
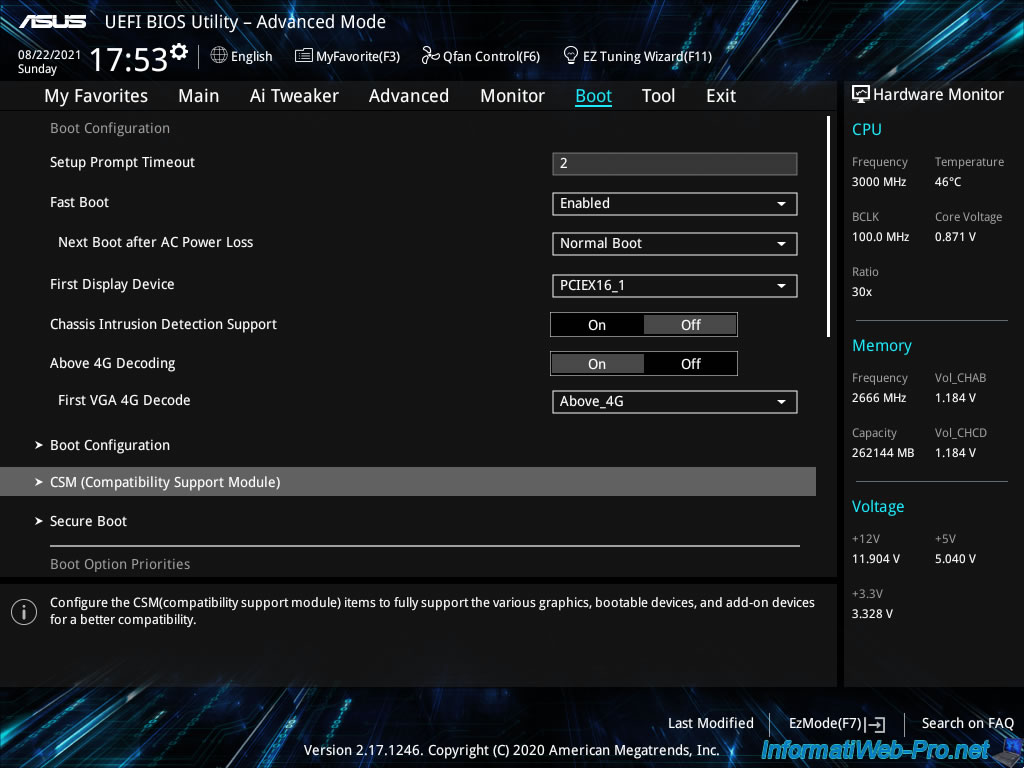
To be sure that your server boots in UEFI mode, you should disable the «CSM» module (which allows you to boot in «old BIOS» or «LEGACY BIOS» mode).
To do this, select «Launch CSM : Disabled».
However, in our case, this posed a compatibility problem with one of the components located in our server.
We therefore left this «CSM» module enabled. Most importantly, the BIOS boot order is configured to boot in UEFI mode on the hard drive or SSD where VMware ESXi is installed.
Note that disabling this «CSM (Compatiblity Support Module)» will display this warning.
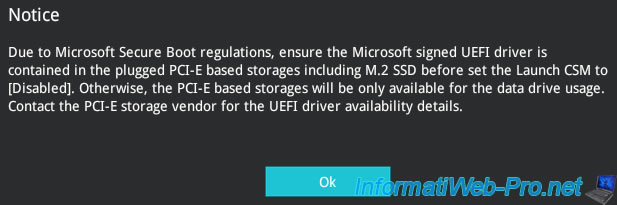
This «CSM (Compatiblity Support Module)» module is disabled.
Now, don’t forget to enable Secure Boot related to this UEFI firmware.
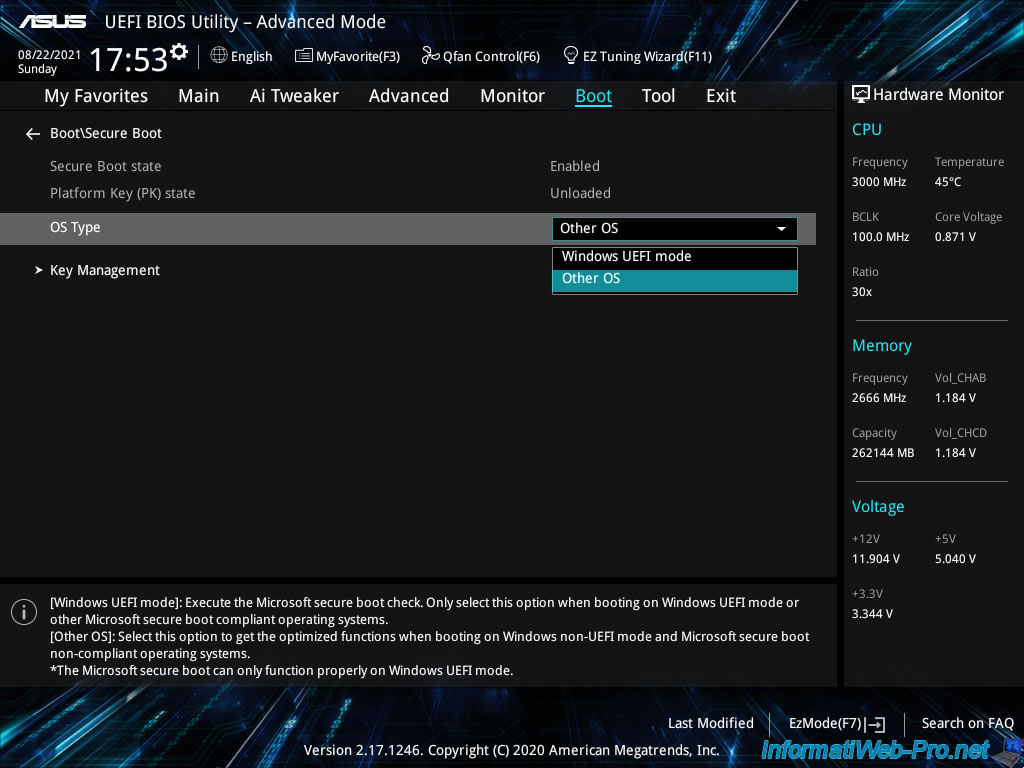
To do this, go to «Boot -> Secure Boot» and locate the «OS Type» option.
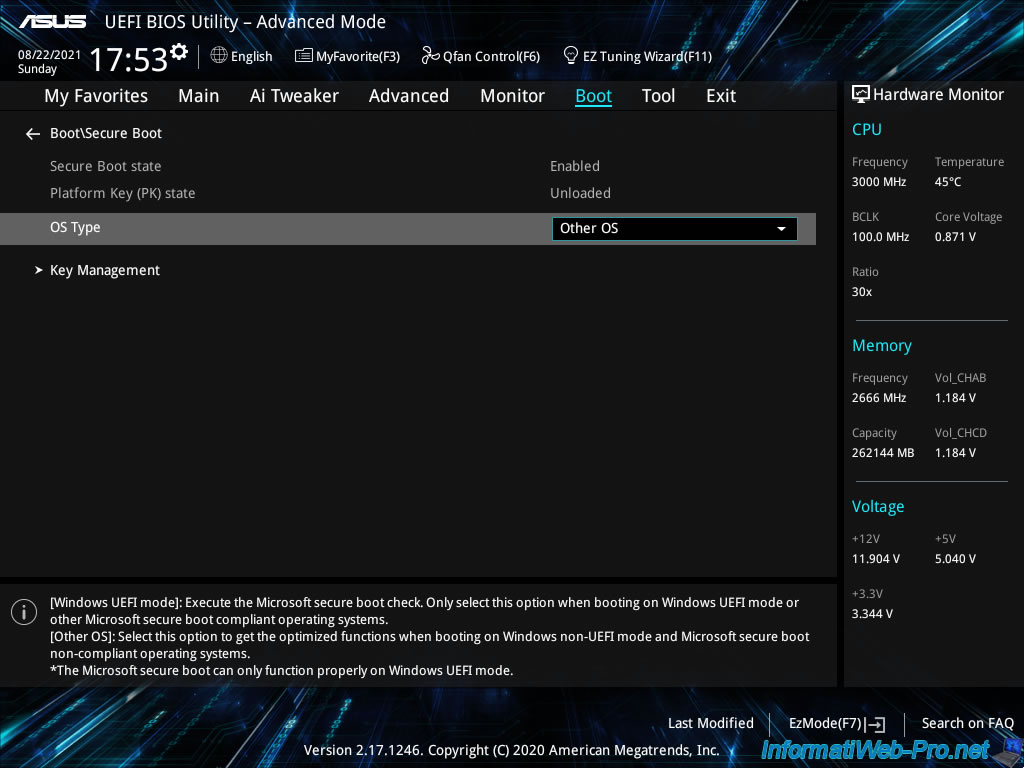
In our case, we can choose between «Windows UEFI mode» or «Other OS».
Since the operating system installed on our server is «VMware ESXi», we select «Other OS».
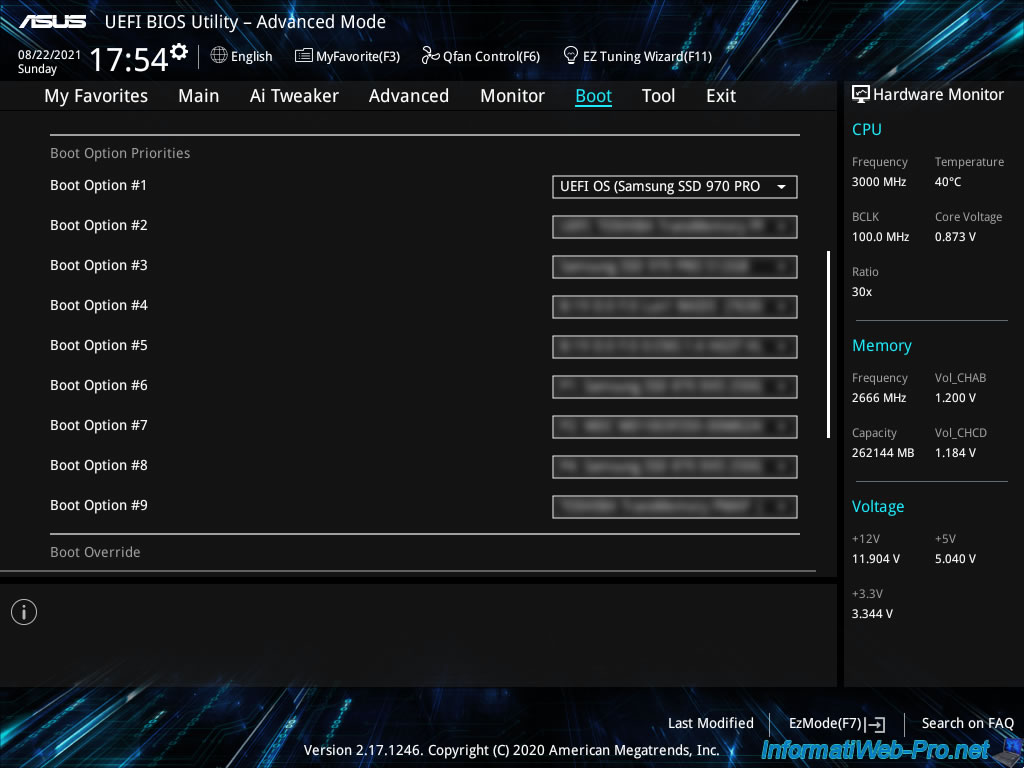
Finally, in the «Boot» tab, locate the «Boot Option Priorities» section and select the UEFI version of the hard drive or SSD where VMware ESXi is installed.
In our case, VMware ESXi is installed on our SSD : Samsung SSD 970 PRO NVMe M.2 512 Go.
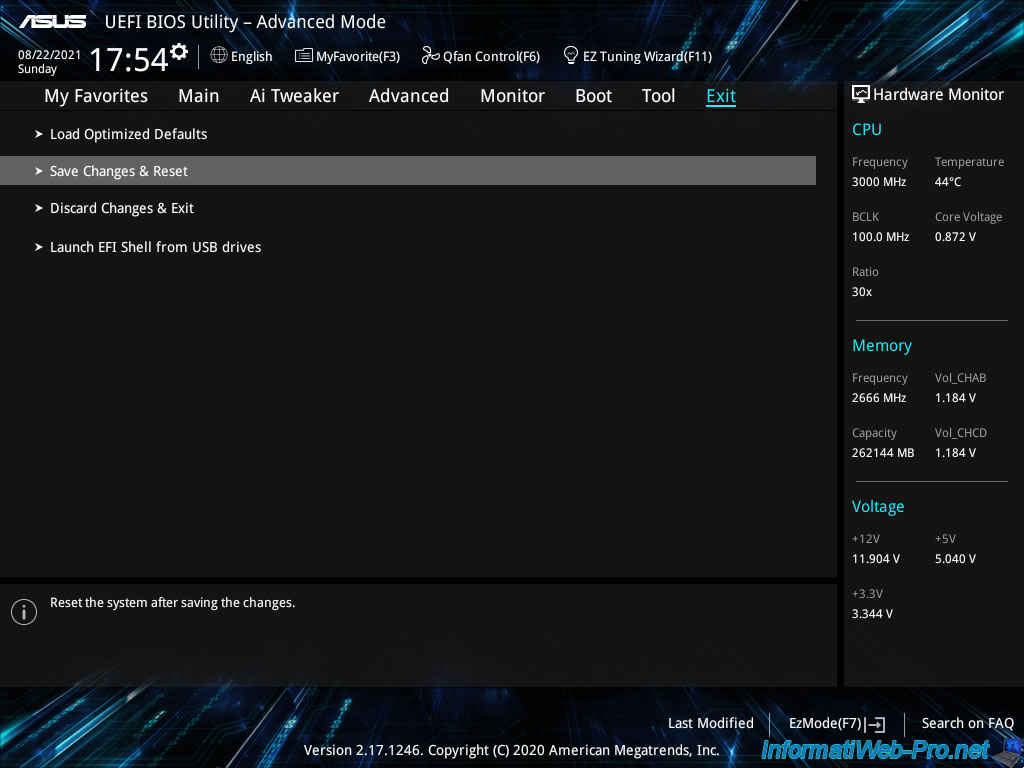
Finally, save the changes made in the BIOS.
To do this, go to the «Exit» tab and click on : Save Changes & Reset.
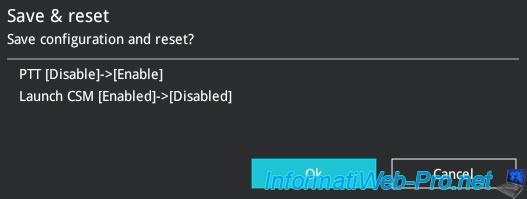
Confirm saving changes by clicking OK.
You can enable Microsoft virtualization-based security (VBS) on existing virtual machines for supported Windows guest operating systems.
Enabling VBS is a process that involves first enabling VBS in the virtual machine then enabling VBS in the guest OS.
Note: New virtual machines configured for Windows 10, Windows Server 2016, and Windows Server 2019 on hardware versions less than version 14 are created using Legacy BIOS by default. If you change the virtual machine’s firmware type from Legacy BIOS to UEFI, you must reinstall the guest operating system.
Prerequisites
See the vSphere Security documentation for information about acceptable CPUs and VBS best practices.
Using Intel CPUs for VBS requires vSphere 6.7 or later. The virtual machine must have been created using hardware version 14 or later and one of the following supported guest operating systems:
- Windows 10 (64 bit) or later releases
- Windows Server 2016 (64 bit) or later releases
Using AMD CPUs for VBS requires vSphere 7.0 Update 2 or later. The virtual machine must have been created using hardware version 19 or later and one of the following supported guest operating systems:
- Windows 10 (64 bit), version 1809 or later releases
- Windows Server 2019 (64 bit) or later releases
Ensure that you install the latest patches for Windows 10, version 1809, and Windows Server 2019, before enabling VBS.
For more information about activating VBS on virtual machines on AMD platforms, see the VMware KB article at https://kb.vmware.com/s/article/89880.
Procedure
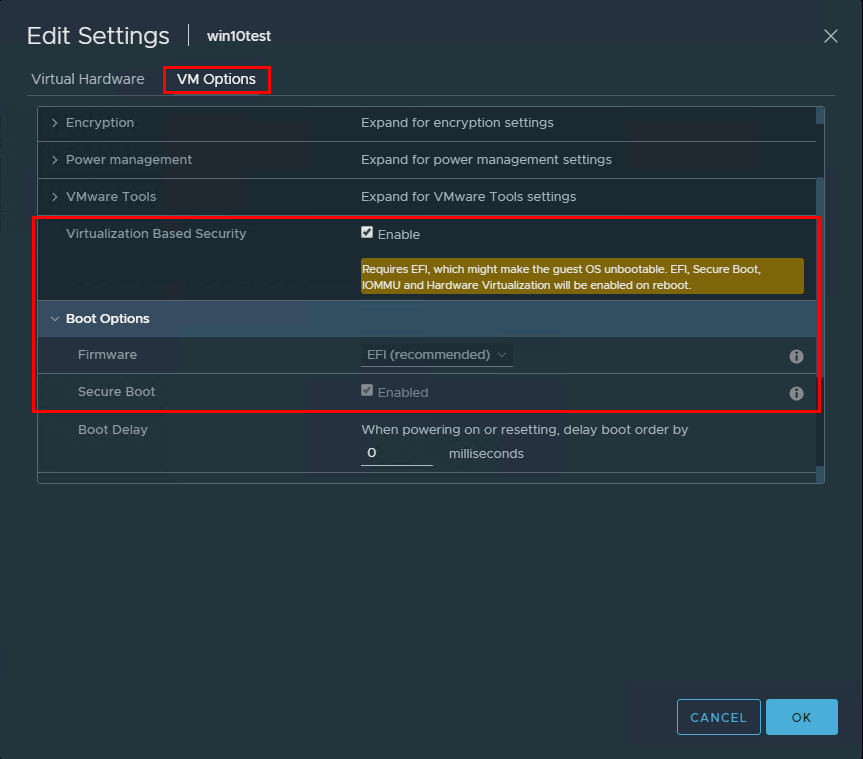
- In the vSphere Client, browse to the virtual machine.
- Right-click the virtual machine and select Edit Settings.
- Click the VM Options tab.
- Select the Enable check box for Virtualization Based Security.
- Click OK.
Results
Confirm that the virtual machine’s Summary tab displays «VBS true» in the Guest OS description.
What to do next
See Enable Virtualization-based Security on the Guest Operating System.
Skip to content
Implementing Virtualization-based Security in VMware vSphere 6.7
In today’s world, malware and other malicious code is getting more and more sophisticated and leverages new technologies that constantly attempt to circumvent security measures in place. Microsoft has done a good job of continuing to innovate with new technologies designed to make it harder for attackers to steal certain kinds of data that exist inside the operating system. These types of highly valuable pieces of information that exist inside the guest operating system can be security assets such as the authenticated user credentials. Microsoft has introduced a type of technology to help circumvent these types of attacks called Virtualization-based security or VBS. VMware has introduced support for running VBS inside of a virtual machine as of VMware vSphere 6.7.
In this post, we will take a closer look at the virtualization-based security mechanism and how this is implemented in VMware vSphere 6.7 and higher by way of virtual machine configuration.
Protect Your Data with BDRSuite
Table of Contents
- What is Virtualization-based Security or VBS?
- Virtualization-based Security Best Practices
- Enabling Virtualization-Based Security in VMware vSphere
- Enable Virtualization-Based Security on the VMware vSphere virtual machine
- Concluding Thoughts
What is Virtualization-based Security or VBS?
In the introduction, virtualization-based security was introduced as a new technology that helps to protect very sensitive information that is normally found inside Windows operating systems, such as hashed credentials.
How does VBS raise the bar of security to make it more difficult for attackers to obtain this type of information?

Virtualization-based security when implemented in Windows 10 or Windows Server 2016 and higher, uses hardware-assisted virtualization capabilities to create an isolated environment, separate from the operating system, to store sensitive system information.
Microsoft implements this feature in a rather ingenious way by utilizing the Hyper-V hypervisor to host the operating system to create this virtual secure mode which allows enforcing restrictions and protecting system and other operating system resources. Additionally, it is able to protect security information such as authenticated user credentials. When thinking about a system being compromised by malware or other malicious code, when virtualization-based security is being used, the damage that can be inflicted and information that can be stolen by the malware infecting the system can be greatly limited. Even if the malware has control of the OS kernel the underlying Hyper-V hypervisor can protect the sensitive areas of the system from being accessed by the malware.
VBS enables the following security mechanisms to harden your system and isolate key system resources from being compromised:
- Credential Guard – With Credential Guard, VBS can isolate and harden key system and user secrets against compromise
- Device Guard – Helps to prevent malware from being able to run on Windows operating systems
- Configurable Code Integrity
- One mechanism that can be enabled with virtualization-based security is Hypervisor-Enforced Code Integrity (HVCI). Many of the effective security mechanisms that help to filter malicious code allow for enforcing code integrity checks. HVCI uses VBS to check all kernel-mode drivers and binaries before they are started and can prevent unsigned drivers or system files from loading into system memory. Similarly, there is a user-mode variant that enforces checks of applications before they are loaded and will only start those applications that are signed by known, approved signers.
- The Hyper-V hypervisor plays the mediator between applications and memory pages and the permissions that applications have to write across system memory. With these mechanisms in place, malware cannot modify memory and code pages cannot be modified or made executable.
The requirements for implementing Virtualization-based security are the following:
- 64-bit CPU
- Second Level Address Translation or SLAT
- Intel VT-D or AMD-Vi, ARM64 SMMUs
- TPM 2.0
- Firmware support for SMM protection
- UEFI Memory Reporting
- Secure Memory Overwrite Request
- Hypervisor Code Integrity or HVCI compatible drivers
Latest info on Pre-requisites:
To enable Virtualization-Based Security (VBS) on Intel CPUs within your vSphere environment, ensure you are using vSphere 6.7 or a more recent version. Additionally, create a virtual machine configured with hardware version 14 or higher, and choose one of the compatible guest operating systems, such as:
- Windows 10 (64 bit) or newer releases
- Windows Server 2016 (64 bit) or newer releases
For VBS deployment on AMD CPUs, your vSphere version must be 7.0 Update 2 or newer. Set up a virtual machine with hardware version 19 or higher, and select one of these supported guest operating systems:
- Windows 10 (64 bit), version 1809 or newer releases
- Windows Server 2019 (64 bit) or newer releases
Remember to apply the latest patches to your Windows 10, version 1809, and Windows Server 2019 installations before enabling VBS.
For additional guidance on enabling VBS on virtual machines using AMD platforms, refer to the VMware Knowledge Base article available here: https://kb.vmware.com/s/article/89880.
Virtualization-based Security Best Practices
What are some best practices when it comes to implementing Windows Virtualization-based security in the context of VMware virtual machines?
The following considerations need to be made.
- VBS Hardware – You need the following Intel hardware for VBS
- Haswell CPU or later
- Not all VBS functionality is available on AMD CPUs
- Windows Guest OS Compatibility – The following operating systems are supported in the context of VBS running inside of vSphere 6.7:
- Windows 10 and Server 2016
- Unsupported VMware Features with Virtual Machines that have VBS enabled
- Fault tolerance
- PCI passthrough
- Hot add of CPU or memory
- Installation and Upgrade considerations:
- If Virtual machine versions less than VM version 14 are used with Windows 10 and Windows Server 2016, you must reinstall the operating system if you change to UEFI from BIOS.
- If migrating virtual machines from previous vSphere releases to vSphere 6.7 and higher and plan on enabling VBS in the future, use UEFI to avoid an OS reinstall after the upgrade.
Enabling Virtualization-Based Security in VMware vSphere
The new virtualization-based security feature that is found in VMware vSphere 6.7 and higher can be enabled at the virtual machine level inside the vSphere client. In fact, you have to enable the feature at the virtual machine level first, and then enable the feature inside of the Windows operating system.
Enable Virtualization-Based Security on the VMware vSphere virtual machine:
When you create a new virtual machine, the step, Select Compatibility needs to be configured for ESXi 6.7 and later to be able to configure the virtualization-based security mechanism.

Configure the compatibility level of the vSphere virtual machine to take advantage of VBS
Once you have created a new virtual machine, go into the properties of the virtual machine and click the VM Options tab. Look for the Virtualization Based Security section. Place a checkbox in the Enable field. Also, make sure the Secure Boot is enabled and UEFI.
Enabling the Virtualization-Based Security feature in VM Options
Now, it is simply a matter of installing the Hyper-V feature and configuring VBS.
Install Hyper-V hypervisor in Windows
Navigate to Computer Configuration >> Administrative Templates >> System > Device Guard >> Turn On Virtualization Based Security
Configure the VBS options as needed in the policy configuration
Concluding Thoughts
Windows Virtualization-based Security is a great new feature found in the latest Windows operating systems, including Windows 10 and Windows Server 2016. The VBS feature allows Windows to have further protection against malware and other malicious code that may attempt to steal credentials or other sensitive system information. It does this by using the Hyper-V hypervisor to provide the protected memory space needed so these types of sensitive data can be protected separately and isolated from the guest operating system.
VMware allows using VBS as of vSphere 6.7. The configuration is made at the VM level first to turn on the capability and then enabled within the Windows operating system by flagging on the Hyper-V feature and then enabling VBS using the policy setting.
In today’s security vulnerable and sensitive world, organizations must use the latest capabilities and security features to stay ahead of attackers and malicious code attempting to circumvent more traditional security. Be sure to check out virtualization-based security in both Windows and VMware vSphere 6.7 and higher.
Ensure the safety of your important data with a reliable VMware backup solution that acts as a strong shield. Explore its capabilities without any financial commitment.
Easily strengthen your VMware environment and gain peace of mind by downloading BDRSuite today.
Follow our Twitter and Facebook feeds for new releases, updates, insightful posts and more.
Try BDRSuite for Free!
Schedule a live demo with one of our product experts
Start your full-featured 30-day free trial
Explore detailed pricing, editions & features

One of the many areas of VMware vSphere 6.7 that has seen fantastic improvements has been in the realm of security. VMware has shown they are diligently committed to continuing to strive for excellence when it comes to tomorrow’s security needs in the enterprise datacenter. There are really big security features with vSphere 6.7 – notably including – TPM 2.0 support for ESXi, Virtual TPM 2.0 for VMs, support for Microsoft Virtualization Based Security, and multiple syslog targets. One of the really cool security features that I have been anxious to try out is the support for Microsoft Virtualization Based Security. What is Microsoft Virtualization Based Security and what are its security benefits? How do we go about enabling Windows 10 Virtualization Based Security with vSphere 6.7 in a virtual machine?
What is Microsoft Virtualization Based Security?
Microsoft Virtualization Based Security or VBS by its definition from Microsoft uses hardware virtualization features to create and isolate a secure region of memory from the normal operating system. In essence, Microsoft is using its hypervisor, Hyper-V, to boot the operating system. Additionally this underlying hypervisor allows Microsoft to be able to protect certain extremely sensitive pieces of information that would normally reside in the operating system itself, such as cached credentials, but instead, with Virtualization Based Security enabled, Microsoft is using the hypervisor as a restricted memory space where sensitive information such as credentials can be stored instead of the operating system itself.
However, as probably stood out in the description above, Virtualization Based Security uses “hardware virtualization features…” to implement this new security layer. If you are running a virtual machine, we are not exposing the hardware virtualization features. However, that is where VMware vSphere 6.7 comes into play here and really shines. With VMware vSphere 6.7, VMware has worked very closely with Microsoft to virtualize these “hardware” features that VBS expects to be present, so that in a virtual machine, these features can be turned on without issue. The ESXi hypervisor presents these features to the underlying guest operating system such as Windows 10 so VBS can successfully run. How cool is that?!
The VBS features are able to run because VMware has enabled the following features in ESXi 6.7 to be presented to the guest operating system in the virtual machine:
- Nested virtualization
- IOMMU
- EFI firmware
- Secure Boot
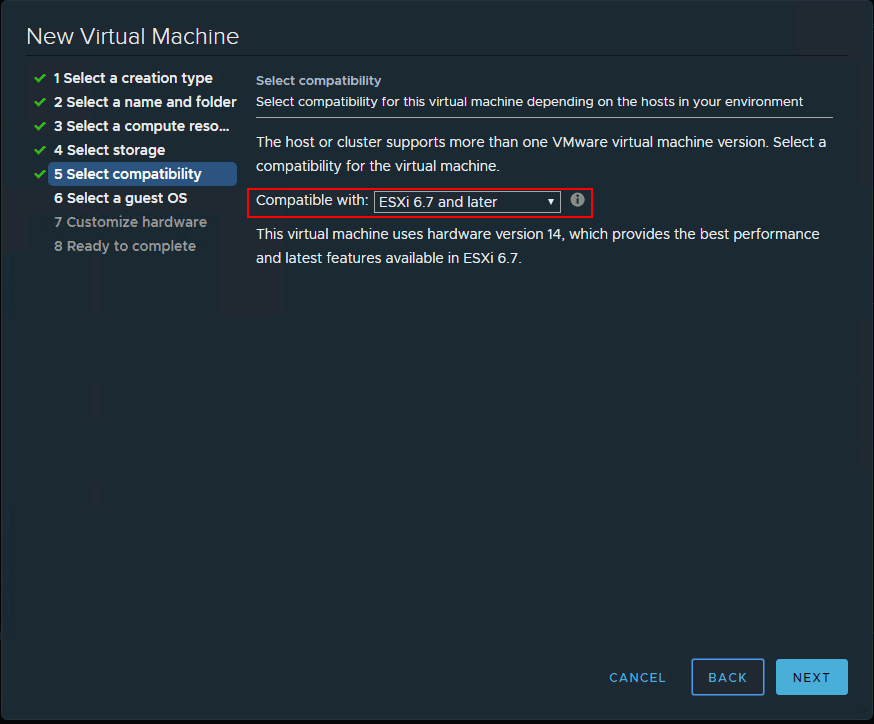
Below, I am creating a Windows 10 Pro virtual machine in a nested ESXi 6.7 vSphere environment. Here I am choosing the ESXi 6.7 and later compatibility level (which I believe is a requirement, however, will update the post if I find otherwise).
After creating the new Windows 10 VM and installing Windows, I powered off the virtual machine (powering off is required to enable the feature) and configured the VM for Virtualization Based Security. This is accomplished with a single checkbox! Right click a virtual machine choose Edit Settings >> VM Options. You will see the Virtualization Based Security option. Click the checkbox to Enable. Note the message that is displayed when the checkbox is enabled.
Requires EFI, which might make the guest OS unbootable. EFI, Secure Boot, IOMMU and Hardware Virtualization will be enabled on reboot.
Now, after booting the Windows 10 Pro 1803 VM back up, let’s go through the steps to enable Virtualization Based Security. The next two steps can be done in either order, however, I like to enable the group policy setting first for VBS and then enable Hyper-V in Windows 10 so that after the feature is enabled, the one reboot is all that needs to take place. In my testing, these appear to be able to be done in either order.
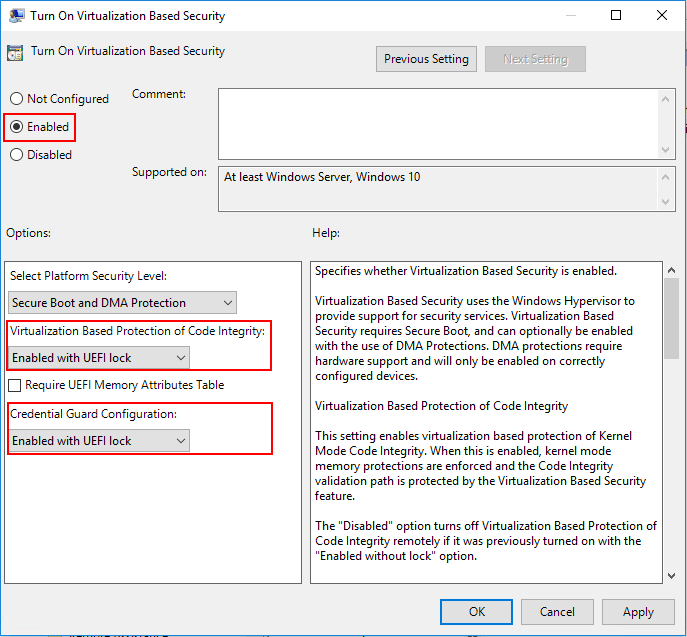
To navigate to the Group Policy setting that needs to be enabled, open up the local group policy editor by typing gpedit.msc in a run menu. Navigate to Computer Configuration >> Administrative Templates >> System > Device Guard >> Turn On Virtualization Based Security. Set the policy to Enabled. We will also set the following settings:
- Select Platform Security level: Secure Boot and DMA Protection
- Virtualization Based Protection of Code Integrity: Enabled with UEFI lock
- Credential Guard Configuration: Enabled with UEFI lock
If you want to be able to enable or disable this setting remotely choose the Enabled without UEFI lock option.
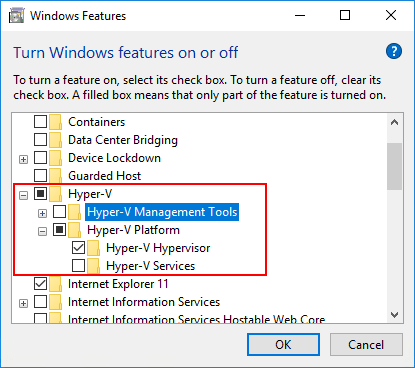
Now that we have the option turned on in vSphere 6.7 and the group policy entry set for the Windows 10 Pro 1803 virtual machine, we enable the Hyper-V hypervisor in Windows. An easy way to get to the Turn Windows features on or off is the appwiz.cpl command. Choose the Hyper-V checkbox then select only the Hyper-V Platform and Hyper-V Hypervisor options. You can enable the Hyper-V Management Tools if you want, however, they are not needed for VBS.

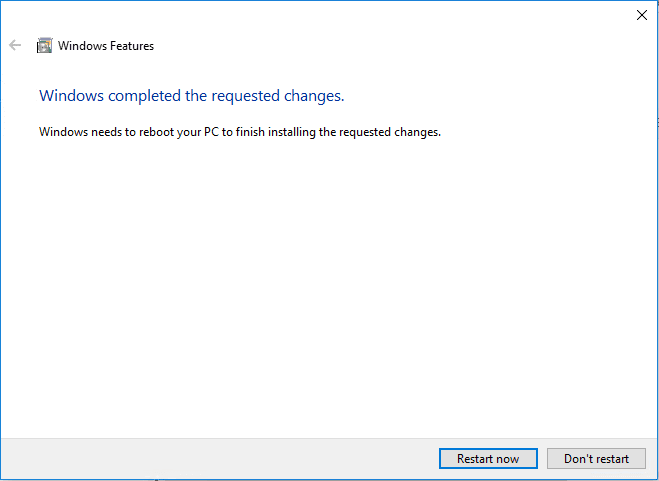
After enabling the Hyper-V feature, you will be asked to restart Windows.

Verifying Virtualization Based Security Is Enabled in Windows 10
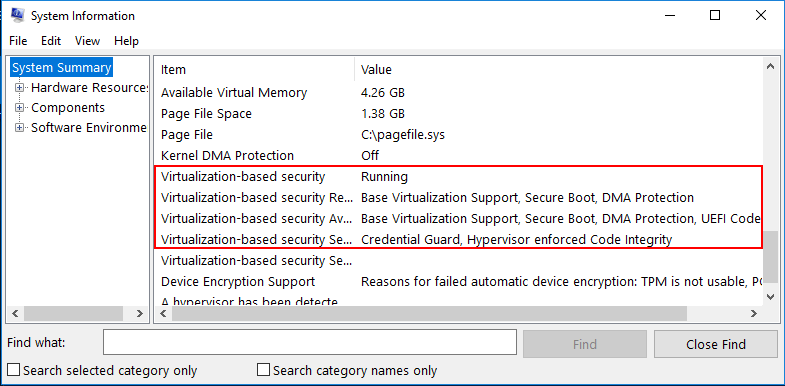
To verify that Virtualization Based Security is enabled in our Windows 10 Pro 1803 workstation, we can use the msinfo32.exe command. Simply type it at a run or search menu and we will take a look at the entries presented. Notice under the System Summary node, if you scroll down, you will see the entries highlighted below. Notably, we want to see the following:
- Virtualization-based security is Running
- Virtualization-based security services configured – Credential Guard, Hypervisor enforced Code Integrity
Takeaways
Enabling Windows 10 Virtualization Based Security with vSphere 6.7 is a great way to make sure that running Windows 10 or Windows Server 2016 virtual machines are even further protected with secure memory areas being restricted. This makes attacks such as “pass the hash” exponentially more difficult to exploit. VMware has made turning this feature on extremely easy with vSphere 6.7. Literally a single checkbox enables all the needed hardware emulated features to allow Windows 10/Server 2016 to be able to setup in VBS mode using Hyper-V in a nested configuration within vSphere 6.7. Check out these and other great security enhancements with vSphere 6.7. A great resource is the VMware security blog with Mike Foley. Check that out here: https://blogs.vmware.com/vsphere/2018/04/introducing-vsphere-6-7-security.html
Brandon Lee is the Senior Writer, Engineer and owner at Virtualizationhowto.com, and a 7-time VMware vExpert, with over two decades of experience in Information Technology. Having worked for numerous Fortune 500 companies as well as in various industries, He has extensive experience in various IT segments and is a strong advocate for open source technologies. Brandon holds many industry certifications, loves the outdoors and spending time with family. Also, he goes through the effort of testing and troubleshooting issues, so you don’t have to.
Reading Time: 7 minutes

VMware vSphere 6.7 offers the ability to enable virtualization-based security (VBS) for virtual machines. Let’s find out what kind of protection this setting provides, what’s needed to get it going and how to configure a virtual Domain Controller to use it.
Virtualization-based Security (VBS) uses virtualization features to create and isolate a secure region of memory from the normal Operating System. Windows Server can use this «virtual secure mode» to host a number of security solutions, providing them with greatly increased protection from vulnerabilities in the operating system, and preventing the use of malicious exploits which attempt to defeat protections.
Benefits of using Virtualization-based Security
Virtualization-based Security (VBS) uses the Windows hypervisor to create this virtual secure mode, and to enforce restrictions which protect vital system and Operating System resources, or to protect security assets such as authenticated user credentials.
With the increased protections offered by Virtualization-based Security, even if malware gains access to the Operating System’s kernel, the possible exploits can be greatly limited and contained because the hypervisor can prevent the malware from executing code or accessing platform secrets.
For Active Directory Domain Controllers, specifically, Virtualization-based Security offers:
Secure Boot
The Secure Boot feature in Windows Server 2016, and up, is designed to protect the virtual machine from malicious boot loaders. In traditional Basic Input/Output System (BIOS)-based systems, a rootkit may replace the Windows boot loader, remaining invisible and undetectable on the Domain Controller.
With Secure Boot, a virtual machine no longer boots with BIOS, but with Unified Extensible Firmware Interface (UEFI). UEFI checks the signature of the boot loader before launching, detecting any malware impersonating, replacing or tampering with the Windows boot loader.
Direct Memory Access (DMA) Protection
Direct Memory Access (DMA) attacks try to grab the memory of a running Operating System to gain access to BitLocker keys and other information from the memory. In vSphere, you can take advantage of an Input/Output Memory Management Unit (IOMMU) to connect a DMA-capable I/O bus to the main memory.
With IOMMU, memory of Windows Server 2016 installations, and up, is protected from malicious devices that are attempting DMA attacks and faulty devices that are attempting errant memory transfers because a device cannot read or write to memory that has not been explicitly allocated (mapped or re-mapped) for it.
Hypervisor-enforced Code Integrity (HVCI)
Kernel-mode Code Integrity enforces kernel-mode memory protections by protecting the Code Integrity validation path with Virtualization-based Security. All drivers in the virtual machine must be compatible with virtualization-based protection of code integrity; otherwise, the virtual machine fails.
Code Integrity (CI) Policies
Historically, most malware has been unsigned. Simply by deploying code integrity policies, organizations can get immediately protection against unsigned malware. By using Code Integrity policies, an enterprise can also select exactly which binaries can run in both user mode and kernel mode. When completely enforced, it will only load specific applications or software with specific signatures.
Note:
Code Integrity policies are independent of Hypervisor-enforced Code Integrity (HVCI). However, when using CI policies without HVCI, the enforcement will not be as strong as when using CI Policies with HVCI.
Note:
Windows Server 2019 expands on the CI policies feature in Windows Server 2016 by offering built-in CI policies for robust yet quick deployment of Code Integrity.
Other features like Application Guard, Credential Guard and Windows Sandbox, operating in their separate memory spaces are features targeted towards Windows-based devices and are not applicable to Domain Controllers. Well… when you adhere to the rule of thumb not to browse the Internet and install all kinds of software on your Domain Controllers, that is.
Note:
Do not configure Credential Guard on Domain Controllers.
Getting Ready
For Virtualization-based Security (VBS) you’ll need to meet the following requirements:
- At least one ESXi host running VMware vSphere 6.7, or up, managed by vSphere
- At least one virtual machine running hardware version 14 (Compatible only with ESXi 6.7 and later), or up, configured with Virtualization Based Security. and installed with Windows Server 2016, or a later version of Windows Server in this virtualization state.
Note:
The Virtualization Base Security option enables CPU virtualization extensions, IOMMU, EFI firmware and Secure Boot.
Configuring Virtualization-based Security
Configuring Virtualization-based Security consists of three steps:
- Configure the right virtual machine settings on vSphere 6.7
- Configure the right security settings in the virtual Domain Controller
- Install the Hyper-V feature on the virtual Domain Controller
Configure the right virtual machine settings
First, we need to create a virtual Domain Controller that meets the requirements.
ESXi 6.7
When creating a new virtual machine for a Domain Controller, on the 2 Select a name and guest OS page of the New virtual machine wizard, make sure as a Compatibility level you pick ESXi 6.7 virtual machine (or up), resulting in hardware version 14. Pick Microsoft Windows Server 2016 or later (64-bit) as the Gues OS version. Then, make sure you select the option Enable Windows Virtualization Based Security:
")
vSphere 6.7
In the vSphere Web Client, when creating a new virtual machine, take care of the following settings:
- On the Select compatibility page of the New Virtual Machine wizard, select ESXi 6.7 and later. The accompanying text below this settings will then indicate that This virtual machine uses hardware version 14, which provides the best performance and latest features available in ESXi 6.7.
- On the Select a guest OS page of the New Virtual Machine wizard, specify Microsoft Windows Server 2016 or later (64-bit) as the Guest OS Version and select the option Enable Windows Virtualization Based Security:
")
Configure the right security settings in the virtual Domain Controller
After installing Windows Server 2016, or up, on the new virtual Domain Controller and configuring it as a Domain Controller for (one of) your Active Directory domain(s), perform the following actions in the virtual machine or on any other domain-joined machine that has the Group Policy Management Console feature installed:
- Sign in with an account that has sufficient permissions in Active Directory to create Group Policy objects and link them to the Domain Controllers Organizational Unit (OU). Typically, a member of the Domain Admins group has these permissions.
- Open the Group Policy Managment console, by either:
- Picking it from the Tools menu in Server Manager.
- Selecting it in the Start Menu from the Windows Administrative Tools folder.
- Clicking the Start button and typing gpmc.msc followed by a press of the Enter button on the keyboard.
- right-clicking the Start button and typing gpmc.msc followed by a click on the OK button.
- The Group Policy Management window appears.
- In the left navigation pane, expand the forest node, then the Domains node, than your domain. Select the Domain Controllers Organizational Unit (OU).
- Right-click Domain Controllers and select the Create a GPO in this domain, and Link it here… menu option.
The New GPO pop-up window appears. - In the New GPO pop-up window, type a name for the Group Policy object.
- Click the OK button.
- In the left navigation pane, expand the Domain Controllers OU and select the newly created Group Policy object.
- Dismiss the Group Policy Management Console pop-up telling you that You have selected a link to a Group Policy Object (GPO). Except for changes to link properties, changes you make here are global to the GPO, and will impact all other locations where this GPO is linked. by clicking the OK button, if it pops up.
- Right-click the Group Policy object and select Edit… from the context menu.
The Group Policy Management Editor window appears. - In the left navigation pane of the Group Policy Management Editor window, expand the Computer Configuration node, then the Policies node, the Administrative Templates node, the System, and finally the Device Guard node.
")
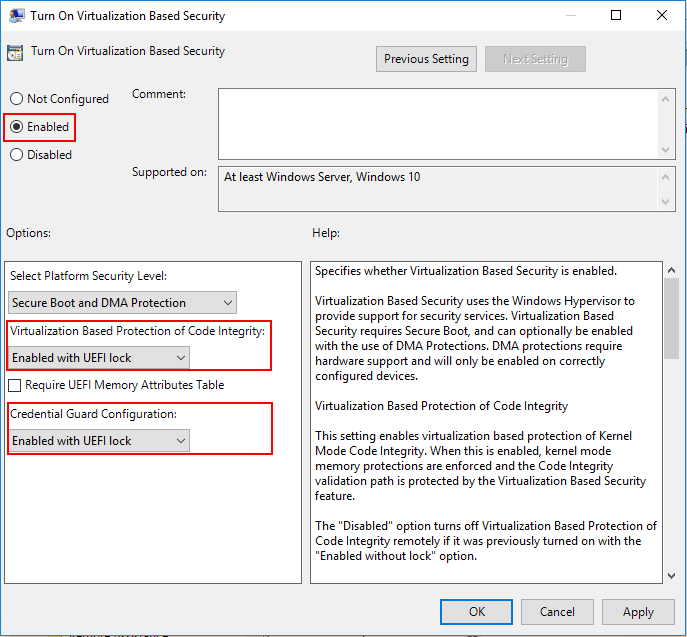
- In the main pane, double-click the Turn on Virtualization Based Security group policy setting.
The Turn on Virtalization Based Security window appears - In the top part of the Group Policy setting, select the Enabled option.
- At the left Options: pane, select the following options:
- For Virtualization Based Protection of Code Integrity:, select Enabled without lock from the drop-down list. As we are configuring Virtualization-based Security through Group Policy, we’d want Group Policy to be able to remove the settings remotely as well, if need be.
- Enable the Require UEFI Memory Attributes Table option.
- For Secure Launch Configuration:, select Enabled from the drop-down list.
- Click the OK button at the bottom of the Turn on Virtualization Based Security window to save the Group Policy settings and close the Turn on Virtualization Based Security window:
- Close the Group Policy Management Editor window.
- In the left navigation pane of the Group Policy Management window, right-click the Domain Controllers OU. Select Group Policy Update… from the context menu.
The Force Group Policy update window appears. - Click the Yes button to answer the question Are you sure you want to update policy for these computers?
The Remote Group Policy update results window appears. - Click the Close button to close the window.
- Close the Group Policy Management window.
Install the Hyper-V feature on the virtual Domain Controller
If you’ve managed the Group Policy settings from another machine than the virtualized Domain Controller running Windows Server 2016, or up, sign into the Domain Controller with an Active Directory account that has administrative privileges on the Domain Controller.
Run the following lines of Windows PowerShell in an elevated PowerShell window on each Domain Controller that you want enabled with Virtualization-based Security:
Install-WindowsFeature Hyper-V
Restart-Computer
Concluding
Virtualization-based Security offers benefits for virtualized Domain Controllers running Windows Server 2016, and up. It uses nested virtualization, where Microsoft Hyper-V offers the secure memory regions and vSphere offers the virtualization platform as it would do for any virtual machine.
Further reading
Virtualization-based Security (VBS)
Introducing support for Virtualization Based Security in vSphere 6.7
Overview of Device Guard in Windows Server 2016
Enabling Windows 10 Virtualization Based Security with vSphere 6.7