
Протокол Remote Desktop Protocol (RDP) позволяет удаленно подключиться к рабочему столу компьютера с Windows и работать с ним, как будто это ваш локальный компьютер. По умолчанию RDP доступ в Windows запрещен. В этой статье, мы покажем, как включить и настроить RDP доступ в Windows 10 и Windows Server 2016/2019.
Содержание:
- Включаем удаленный рабочий стол в Windows 10
- Как включить RDP доступ с помощью PowerShell?
- RDP доступ к Windows Server 2016/2019
- Включение RDP с групповых политик в домене Active Direcrtory
- Как удаленно включить RDP на компьютере Windows?
Включаем удаленный рабочий стол в Windows 10
Самый простой способ включить RDP доступ в Windows – воспользоваться графическим интерфейсом.
Откройте свойства системы через панель управления, или выполнив команду SystemPropertiesRemote.
Перейдите на вкладку Remote Settings (Удаленный доступ), включите опцию Allow remote connection to this computer (Разрешить удалённые подключения к этому компьютеру).
В целях безопасности желательно разрешить подключение только с клиентов RDP с поддержкой протокола NLA (Allow connections only from computers running Remote Desktop with Network Level Authentication/ Разрешить подключение только с компьютеров, на которых работает удаленный рабочий стол с проверкой подлинности на уровне сети).

Сохраните изменения, нажав ОК.
По умолчанию право на подключение к компьютеру через RDP есть только у членов группы локальных администраторов. Если вам нужно разрешить RDP доступ другим пользователям, нажмите кнопку Select Users.
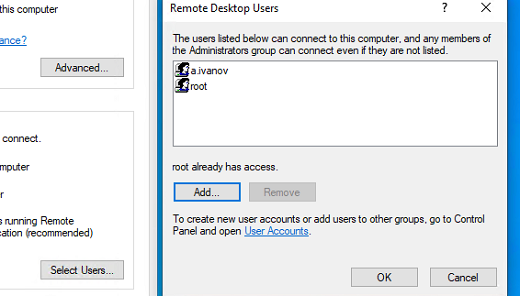
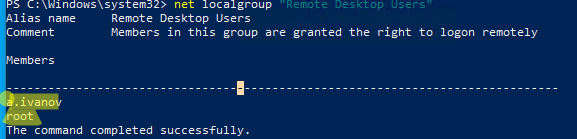
Все пользователи, которых вы укажете здесь будет добавлены в локальную группу Remote Desktop Users. Вы можете в командной строке вывести список пользователей в этой группе:
net localgroup "Remote Desktop Users"
или
net localgroup “Пользователи удаленного рабочего стола”
Чтобы добавить нового пользователя в группу доступа RDP, выполните:
net localgroup "Remote Desktop Users" /add publicuser
В русской версии Windows измените название группы на “Пользователи удаленного рабочего стола”.
В новых билдах Windows 10 классическая панель для включения RDP доступа теперь спрятана и Microsoft рекомендует пользоваться новой панелью Setting.
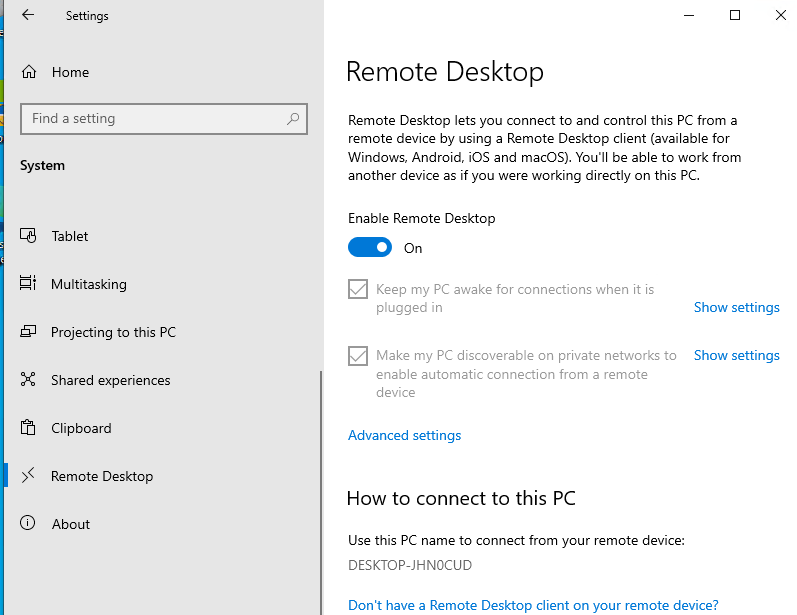
- Перейдите в Settings -> System —> Remote Desktop;
- Включите опцию Enable Remote Desktop;

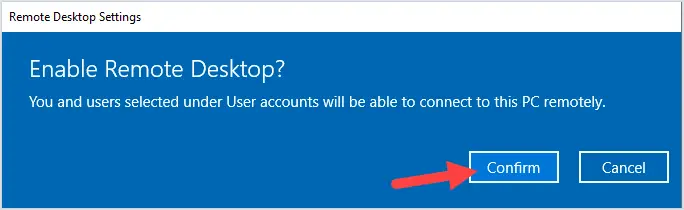
- Подтвердите включение RDP на компьютере.
Обратите внимание, что вы не можете включить RDP доступ к редакции Windows 10 Home. RDP сервер работает только на Windows 10 Pro и Enterprise. Впрочем, есть обходное решение.
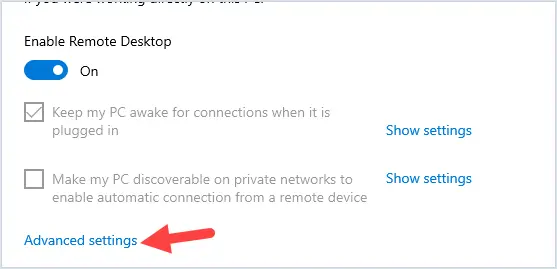
Обратите внимание, что по умолчанию при включении Remote Desktop, включаются две опции:
- Keep my PC awake for connection when it is plugged in ;
- Make my PC discoverable on private networks to enable automatic connection from a remote device
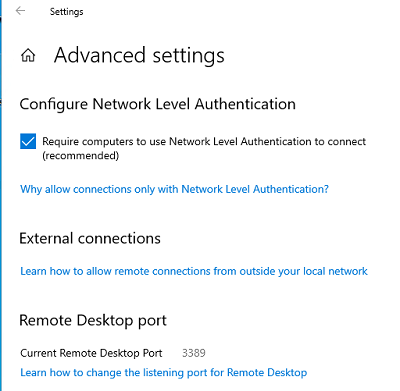
На жмите на ссылку “Advanced settings”. Здесь можно включить использование протокола “Network Level Authentication” для RDP подключений (рекомендуется).
Если на компьютере включен Windows Defender Firewall (брандмауэр), то нужно проверить, что в нем разрешены входящие RDP подключения. По умолчанию для RDP подключений используется порт TCP
3389
, а в последних билдах Windows также используется
UDP 3389
( см. статью про кейс с черным экраном вместо рабочего стола при RDP доступе).
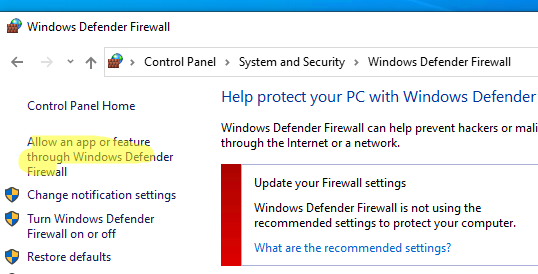
Перейдите в панель управления и выберите элемент Windows Defender Firewall. Откройте список стандартных правил брандмауэра Windows, щелкнув в левом столбце по ссылке Allow an app or feature through Windows Firewall.
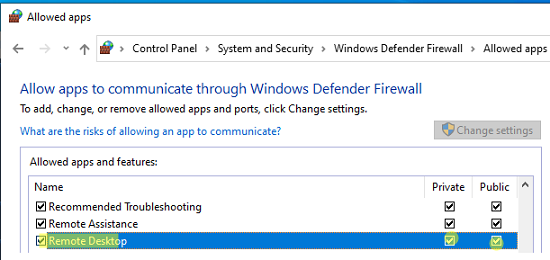
Проверьте, что правило Remote Desktop включено для профиля Private (домашняя или рабочая сеть) и, если необходимо, для профиля Public (общедоступные сети).
Подробнее про типы сетей и профили брандмауэра Windows здесь.
Если нужно, вы можете дополнительно ограничить длительность RDP сессий с помощью GPO.
Теперь к данному компьютеру можно подключится с помощью RDP клиента. Встроенный RDP клиент Windows –
mstsc.exe
. Он сохраняет всю историю RDP подключений с компьютера. Поддерживается копирование файлов между локальным и удаленным компьютером прямо через буфер обмена RDP.
Также вы можете использовать менеджеры RDP подключений, такие как RDCMan или mRemoteNG, или альтернативные клиенты.
Для удобства пользователей пароль для RDP подключения можно сохранить в Windows Credential Manager.
Как включить RDP доступ с помощью PowerShell?
Вы можете включить RDP доступ в Windows с помощью пары PowerShell команд. Это гораздо быстрее:
- Запустите консоль PowerShell.exe с правами администратора;
- Включите RDP доступ в реестре с помощью командлета Set-ItemProperty:
Set-ItemProperty -Path 'HKLM:\System\CurrentControlSet\Control\Terminal Server' -name "fDenyTSConnections" -value 0Чтобы закрыть RDP доступ, измените значение fDenyTSConnections на 1.
- Разрешите RDP подключения к компьютеру в Windows Defender Firewall. Для этого включите предустановленное правило :
Enable-NetFirewallRule -DisplayGroup "Remote Desktop"
- Если нужно добавить пользователя в группу в локальную группу RDP доступа, выполните:
Add-LocalGroupMember -Group "Remote Desktop Users" -Member 'a.petrov'

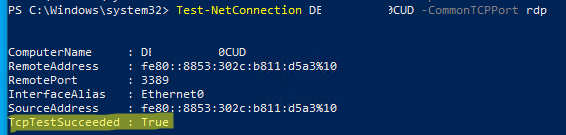
Чтобы проверить, что на компьютере открыт RDP порт, воспользуйтесь командлетом Test-NetConnection:
Test-NetConnection -ComputerName deskcomp323 -CommonTCPPort rdp
RDP доступ к Windows Server 2016/2019
В отличии от десктопной редакции Windows 10, в Windows Server по умолчанию поддерживается два одновременных RDP подключения. Эти подключения используются администраторами для управления сервером.
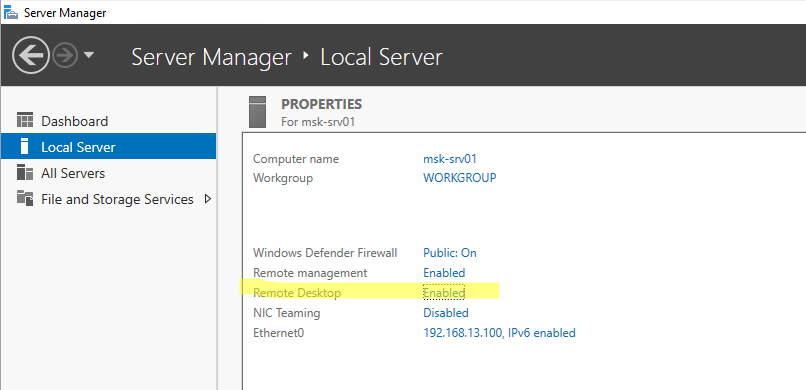
Включается RDP в Windows Server аналогично. Через SystemPropertiesRemote, через Server Manager или командами PowerShell, рассмотренными выше.
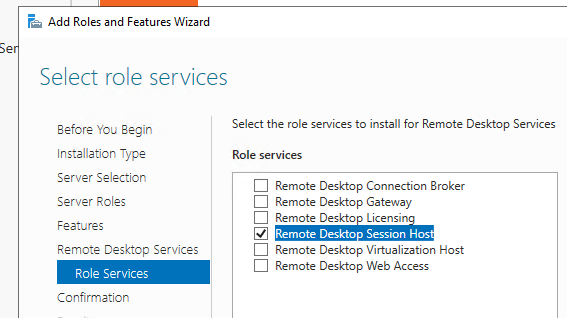
Вы можете использовать Windows Server в качестве терминального сервера. В этом случае множество пользователей могут одновременно подключаться к собственному рабочему столу на сервере. Для этого нужно установить и настроить на сервере роль Remote Desktop Session Host. Это требует приобретения специальных RDS лицензии (CAL). Подробнее о RDS лицензировании здесь.
Для дополнительно защиты RDP сессий можно использовать SSL/TLS сертификаты.
Включение RDP с групповых политик в домене Active Direcrtory
Если вам нужно включить RDP доступ сразу на большом количестве компьютеров, можно воспользоваться групповыми политиками (GPO). Мы подразумеваем, что все компьютеры включены в домен Windows.
- Запустите консоль управления доменными GPO
gpmc.msc
; - Создайте новую (или отредактируйте уже существующую) групповую политику и привяжите ее к целевой OU с компьютерами или серверами;
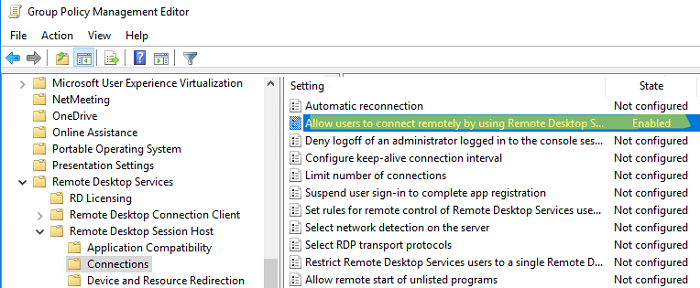
- Переключитесь в режим редактирования политики и перейдите в секцию GPO Computer Configuration -> Administrative Templates -> Windows Components -> Remote Desktop Services -> Remote Desktop Session Host -> Connections;
- Найдите и включите политику Allow Users to connect remotely by using Remote Desktop Services, установив ее в Enable;
- Обновите параметры групповых политик на клиентах;
- После применения данной политики вы сможете подключится ко всем компьютерам по RDP (политика применится как к десктопным клиентам с Windows 10, так и к Windows Server). Если нужно, вы можете более тонко нацелить политики на компьютеры с помощью WMI фильтров GPO.
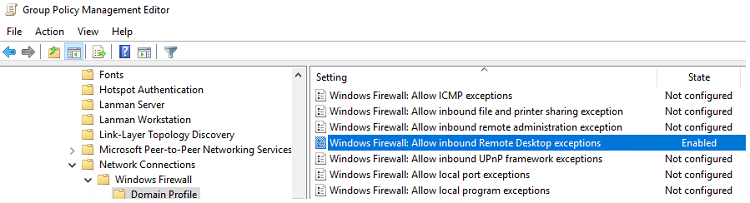
- Если на компьютерах включен Windows Defender Firewall, нужно в этой же GPO разрешить RDP-трафик для доменного профиля. Для этого нужно активировать правило Windows Firewall: Allow inbound Remote Desktop Exceptions (находится в разделе Computer Configuration -> Administrative Templates -> Network -> Network Connections -> Windows Firewall -> Domain Profile).
Подробнее о настройке правил брандмаура Windows через GPO рассказано здесь.
Как удаленно включить RDP на компьютере Windows?
Также вы можете удаленно включить RDP на любом компьютере Windows. Для этого у вас должен быть удаленный доступ к этому компьютеру (через PowerShell или WMI) и ваша учетная запись состоять в группе локальных администраторов на этом компьютере.
Вы можете удаленно включить RDP через реестр. Для этого на удаленном компьютере должна быть включена служба Remote Registry (по умолчанию она отключена). Чтобы запустить службу:
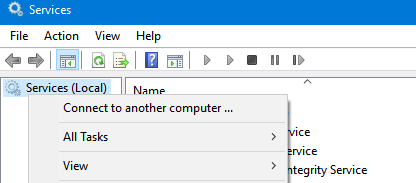
- Запустите консоль управления службами (
services.msc
); - Выберите Connect to another computer и укажите имя удаленного компьютера;
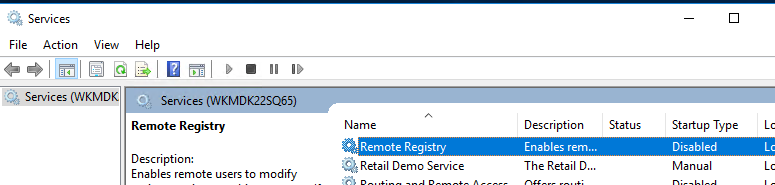
- Найдите в списке службу Remote Registry, измените тип запуска на Manual (ручной) и затем запустите службу – Start.
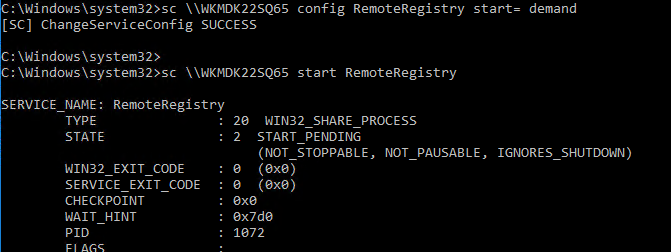
Тоже самое можно выполнить удаленно из командной строки с помощью встроенной утилиты
sc
(позволяет создавать, управлять или удалять службы Windows):
sc \\WKMDK22SQ65 config RemoteRegistry start= demand
sc \\WKMDK22SQ65 start RemoteRegistry
Затем на локальном компьютере
- Запустите редактор реестра
regedit.exe - Выберите в меню Файл пункт Connect Network Registry (Подключить сетевой реестр)
- Укажите имя или IP адрес удаленного компьютера, на котором нужно включить службу RDP;
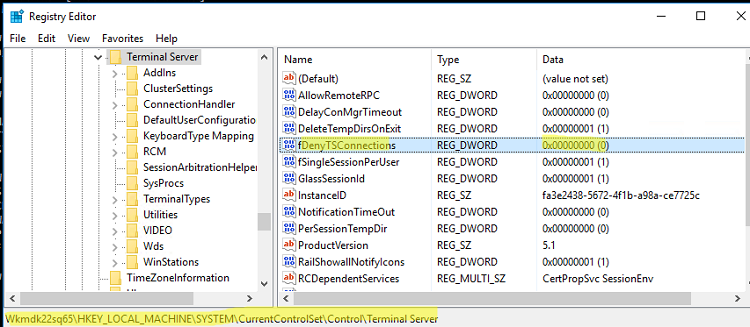
- Перейдите в раздел
HKEY_LOCAL_MACHINE\SYSTEM\CurrentControlSet\Control\Terminal Server
; - Найдите параметр fDenyTSConnections (тип REG_DWORD). Если данный ключ отсутствует – создайте его. Измените его значение на 0, чтобы включить RDP.
Для отключения RDP доступа нужно изменить значение fDenyTSConnections на 1.
Сразу после этого без перезагрузки удаленный компьютер должен стать доступным по RDP.
Но гораздо быстрее можно включить RDP в реестре удаленого компьютера через командную строку:
REG ADD "\\WKMDK22SQ65\HKLM\SYSTEM\CurrentControlSet\Control\Terminal Server" /v fDenyTSConnections /t REG_DWORD /d 0 /f
Если на удаленном компьютере настроен PowerShell remoting, вы можете выполнить на нем удаленную команду через Invoke-Command:
Invoke-Command -Computername WKMDK22SQ65 -ScriptBlock {Set-ItemProperty -Path "HKLM:\System\CurrentControlSet\Control\Terminal Server" -Name "fDenyTSConnections" –Value 0}
Если в Windows установлен OpenSSH сервер, вы можете подключиться к нему любым ssh клиентом и внести изменения в реестр в локальной ssh сессии.
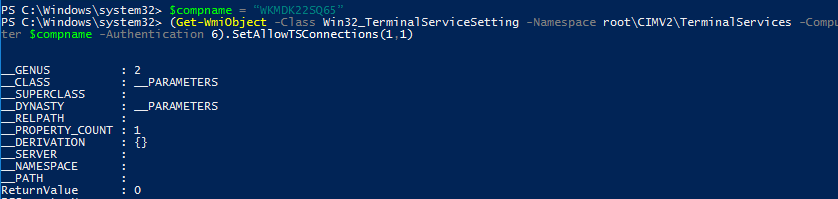
Также вы можете подключиться к удаленному компьютеру и включить RDP через WMI:
$compname = “WKMDK22SQ65”
(Get-WmiObject -Class Win32_TerminalServiceSetting -Namespace root\CIMV2\TerminalServices -Computer $compname -Authentication 6).SetAllowTSConnections(1,1)
Remote Access allows you or someone else to access your computer and take full access of it, like the name says. Using your credentials you or someone else has full access to all your personal files, applications and anything else located on your system. If you only want to give someone access to your computer so they can provide you technical help then consider using Remote Assistence instead of Remote Access.
Remote Access can only be enabled on Windows 10 Pro and Enterprise. If you’re running Windows 10 Home you cannot enable remote access in Windows 10
[symple_box color=”yellow” fade_in=”false” float=”center” text_align=”left” width=””]Enabling Remote Access can be considered a security risk for your computer as everyone with the correct information could potentially access your computer.[/symple_box]
1. Open Control Panel. (Right-click the Start Menu button and then choose Control Panel)
2. Click on System and Security
3. Click on System
4. In the left pane, click on “Remote Settings”

5. Check the box “Allow Remote Connections to this computer” to enable Remote Access Remove the check from the box “Allow Remote Connections to this Computer” to disable Remote Access in Windows 10.

It’s recommended that you enable “Allow connections only from computers running Remote Desktop with Network Level Authentication” to ensure the security of the connection. You can also by clicking on Select Users which users have Remote Access enabled in Windows 10. This way you can block certain people from using Remote Access.
That’s about sums it up. If you have any more questions feel free to visit our forums where we will be happy to assist your personally. We hope this tutorial answered your question: How Do I Enable Remote Access in Windows 10 or Disable It?
В Windows 11, как и в предыдущих версиях системы есть встроенные функции удаленного доступа к компьютеру, одна из них — «Удаленный рабочий стол» или Microsoft Remote Desktop, позволяющая легко подключаться к компьютеру с другого устройства с ОС Windows, MacOS, Android или iOS.
В этой инструкции подробно о том, как включить удаленный рабочий стол в Windows 11, в том числе в Домашней редакции, подключиться к удаленному рабочему столу и решить возможные проблемы с подключением.
Включение удаленного рабочего стола в Windows 11 Pro
Модули удаленного рабочего стола представлены в двух частях:
- Сервер (Хост) — для устройства, к которому выполняется подключение. Есть только в Windows 11 Pro и Enterprise (но есть обходной путь и для Home, который также будет рассмотрен далее). Эта функция по умолчанию отключена и её требуется включить.
- Клиент — для устройства, с которого выполняется подключение. Этот модуль по умолчанию доступен в Windows, независимо от редакции.
Чтобы включить удаленный рабочий стол (возможность подключаться к этому компьютеру) в Windows 11 можно использовать один из следующих способов.
Параметры
Базовый вариант — включение удаленного рабочего стола в Параметрах Windows 11:
- Откройте Параметры — Система — Удаленный рабочий стол.

- Включите переключатель «Удаленный рабочий стол».
- Подтвердите включение удаленного рабочего стола.


Здесь же можно настроить другие параметры: в частности, включить или отключить аутентификацию на уровне сети.
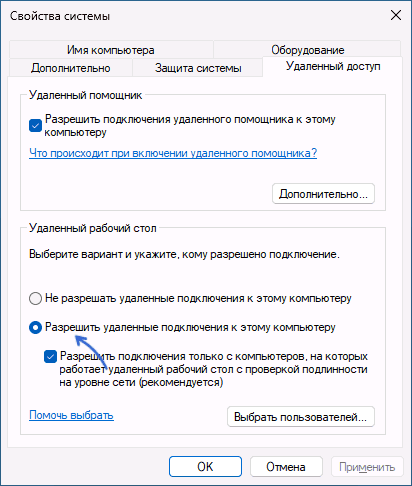
Свойства системы
Второй способ — окно «Свойства системы»:
- Нажмите клавиши Win+R на клавиатуре, введите sysdm.cpl в окно «Выполнить» и нажмите Enter.
- В открывшемся окне перейдите на вкладку «Удаленный доступ».
- Включите опцию «Разрешить удаленные подключения к этому компьютеру», при необходимости задайте пользователей компьютера, под аккаунтами которых возможен вход в систему с использованием удаленного рабочего стола.

Командная строка или PowerShell
Включение удаленного рабочего стола возможно и посредством команд, выполненных от имени администратора.
Далее — команды командной строки и Windows PowerShell соответственно, и в том и другом случае команда изменяет значение параметра реестра, отвечающего за включение и отключение удаленного рабочего стола:
reg add "HKEY_LOCAL_MACHINE\SYSTEM\CurrentControlSet\Control\Terminal Server" /v fDenyTSConnections /t REG_DWORD /d 0 /f
Set-ItemProperty -Path "HKLM:\System\CurrentControlSet\Control\Terminal Server" -name "fDenyTSConnections" -value 0
Как включить удаленный рабочий стол в Windows 11 Home (Домашняя)
Несмотря на то, что в Windows 11 редакции Home или Домашняя отсутствует возможность включить сервер удаленного рабочего стола Microsoft Remote Desktop, сами компоненты для этой функциональности в системе присутствуют. Задача — их активировать. Для этого можно использовать сторонний инструмент RDP Wrapper Library, который можно скачать с GitHub разработчика https://github.com/stascorp/rdpwrap/releases
Достаточно загрузить архив, распаковать в удобное расположение и запустить Install.bat для установки, по завершении которой рекомендуется перезагрузить компьютер.
Удаленный рабочий стол будет включен и подключение к компьютеру с Windows 11 Домашняя станет возможным. Настройки хоста Microsoft RDP будут доступны в утилите RDPConf, находящейся в том же архиве:

Как подключиться к удаленному рабочему столу
Подключение к удаленному рабочему столу возможно:
- Из встроенной утилиты «Подключение к удаленному рабочему столу» в Windows, которую можно найти через поиск на панели задач, либо запустить с помощью Win+R — mstsc.exe
- Для Windows 11 и Windows 10 также можно использовать приложение «Удаленный рабочий стол (Майкрософт)» из магазина Microsoft Store.
- Через приложение Удаленный рабочий стол (Microsoft Remote Desktop), которое доступно бесплатно в официальных магазинах приложений для Android, iPhone или Mac.
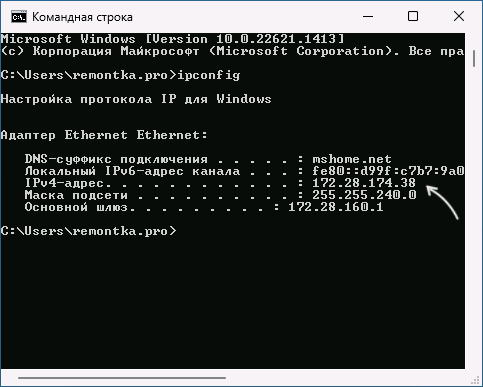
Для подключения к компьютеру в локальной сети потребуется его IP-адрес (IPv4) в этой сети, к которому выполняется подключение (можно посмотреть с помощью командной строки и команды ipconfig), либо имя компьютера, а также учетные данные для входа.
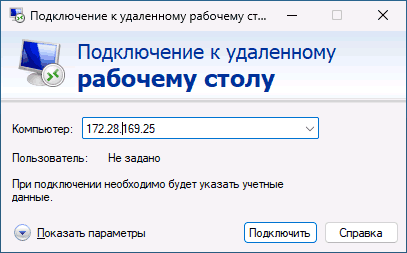
Сам процесс подключения с другого компьютера Windows с использованием встроенного инструмента состоит из следующих шагов:
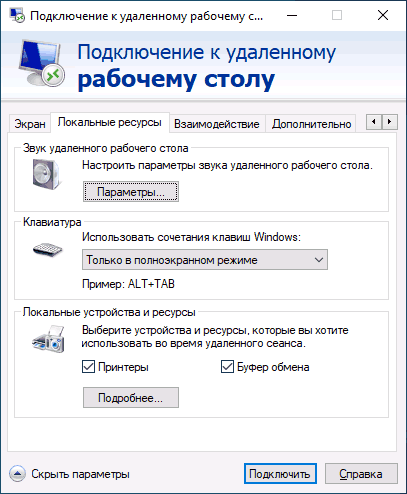
- Запустите подключение к удаленному рабочему столу (Win+R — mstsc) и введите IP-адрес или имя удаленного компьютера.

- При необходимости, нажав кнопку «Параметры» вы можете настроить параметры экрана при удаленном подключении и изменить дополнительные параметры взаимодействия.

- После установки подключения вам будет предложено ввести имя пользователя и пароль для входа в удаленную систему — это должен быть аккаунт пользователя именно на удаленном компьютере, которому разрешен вход через RDP, обязательно с паролем (если пароль у учетной записи отсутствует, создайте его). По умолчанию доступ есть у пользователей группы «Администраторы», других пользователей можно добавить в настройках удаленного доступа в свойствах системы (Win+R — sysdm.cpl).

- Если всё прошло успешно, соединение будет установлено, и вы увидите рабочий стол удаленного компьютера.


Подключение с устройств на других ОС выполняется тем же образом: добавление компьютера, ввод IP-адреса и данных аккаунта для подключения и последующая установка соединения.
Для подключения к удаленному рабочему столу через Интернет вам потребуется:
- Знать ваш IP-адрес в Интернете. Если компьютер подключен кабелем и без роутера, обычно этого достаточно и можно выполнить подключение по этому IP-адресу (однако учитывайте, что он может меняться, если у вас не включена услуга выделенного IP у провайдера).
- Если подключение выполняется через роутер, в настройках роутера, к которому подключен удаленный компьютер потребуется пробросить подключения к порту 3389 на соответствующий порт компьютера, подключенного к этому роутеру по его IP в локальной сети (который тоже имеет смысл сделать статическим в настройках подключения). Более простой метод — настройка виртуальной локальной сети между компьютерами (даже за роутером и в Интернете), например, с помощью Meshnet.
Решение проблем при подключении по RDP к удаленному рабочему столу
Если при подключении к удаленному рабочему столу сообщается об ошибках, подключение выполняется бесконечно или возникают иные проблемы, можно попробовать следующие подходы к решению:
- Проверьте, что служба «Службы удаленных рабочих столов» (Remote Desktop Services) не отключена. Тип запуска для неё следует установить «Вручную».

- Попробуйте снять отметку «Требовать использование устройствами аутентификации на уровне сети для подключения» на хосте (компьютере, к которому выполняется подключение).
- При подключении вы можете увидеть сообщение о том, что не удается проверить подлинность удаленного компьютера из-за проблем с сертификатом безопасности. Если речь идет о вашем компьютере в локальной сети, переживать не о чем — можно выполнять подключение.
- Убедитесь, что порт 3389 открыт в текущем профиле брандмауэра защитника Windows (Как открыть порт в Windows), либо проверьте, чтобы для всех правил группы «Дистанционное управление рабочим столом» в брандмауэре защитника Windows подключение было разрешено. В крайнем случае можно попробовать полностью отключить брандмауэр и посмотреть, решит ли это проблему, а при наличии стороннего ПО для защиты компьютера в сети — проверить, не является ли оно причиной ошибок подключения.
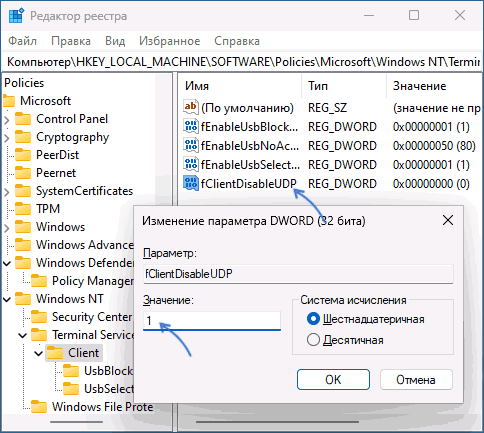
- Попробуйте отключить использование протокола UDP для подключения. Для этого в реестре перейдите к разделу
HKEY_LOCAL_MACHINE\SOFTWARE\Policies\Microsoft\Windows NT\Terminal Services\Client
и создайте параметр DWORD с именем fClientDisableUDP и значением 1

- Подключение по UDP можно отключить в редакторе локальной групповой политики (Win+R — gpedit.msc). В разделе Конфигурация компьютера — Административные шаблоны — Компоненты Windows — Службы удаленных рабочих столов — Клиент подключения к удаленному рабочему столу дважды нажмите по параметру «Отключение UDP на клиенте» и установите значение «Включено» (именно это значение отключит UDP).

- Проверьте используемые для RDP номера портов в разделе реестра
HKEY_LOCAL_MACHINE\SYSTEM\CurrentControlSet\Control\Terminal Server\WinStations\RDP-Tcp
имя параметра — PortNumber на случай, если они по какой-либо причине были изменены и отличаются от стандартного 3389.
- Если проблема возникла после обновлений Windows, можно попробовать удалить обновления, либо использовать точки восстановления системы.


Если остаются вопросы или есть чем поделиться, ниже открыты комментарии. Также в контексте темы может пригодиться: Как отключить удаленный рабочий стол в Windows 11 и 10, Программы для удаленного доступа к компьютеру.
Enabling remote access on Windows 11 allows you to access your computer from anywhere, making it easier to work on your files and applications even when you’re not physically present. To enable this feature, you’ll need to adjust a few settings in the system. Here’s a quick rundown: access the Settings app, navigate to System, then Remote Desktop, and toggle the switch to enable remote access. Make sure you configure any additional settings for security and user permissions to ensure a smooth remote connection.
Enabling remote access on Windows 11 is a straightforward process that allows you to connect to your PC from any location. Follow these steps to get it up and running.
Step 1: Open Settings
First, click the Start button and select the Settings app.
The Settings app is the hub for customizing your Windows 11 experience. You’ll find it by clicking the gear icon after hitting the Start button or by pressing Windows + I on your keyboard.
Step 2: Navigate to System
In the Settings window, click on the System category.
The System section houses a variety of options related to your device’s performance and operation. It’s where you can adjust settings like display, sound, notifications, and, of course, remote access.
Step 3: Open Remote Desktop
Find and select Remote Desktop from the list of options on the left sidebar.
The Remote Desktop option is tucked neatly within the System settings. Clicking on it will reveal all the necessary settings to enable and configure remote access.
Step 4: Enable Remote Access
Toggle the Enable Remote Desktop switch to On.
By flipping this switch, you’re allowing remote connections to your device. Windows 11 will guide you through some prompts to confirm your decision and detail any additional configurations you might need.
Step 5: Configure Security Settings
Set up security options, like requiring network-level authentication.
Security is crucial when allowing remote connections, preventing unauthorized users from accessing your system. Network-level authentication adds an additional layer of protection by ensuring that users must authenticate before establishing a connection.
Once you’ve completed these steps, your Windows 11 PC will be ready for remote access. You’ll be able to connect from other devices using the Remote Desktop app or similar software.
Tips for Enabling Remote Access on Windows 11
- Ensure your PC stays powered on and connected to the internet for uninterrupted remote access.
- Use strong passwords and enable two-factor authentication for added security.
- Limit the users who can connect remotely by setting permissions under the Remote Desktop settings.
- Keep your Windows 11 and all related software updated to protect against vulnerabilities.
- Consider using a VPN for a more secure connection, especially when accessing your PC over public networks.
Frequently Asked Questions
How do I know if my PC supports Remote Desktop?
Most Windows 11 editions support Remote Desktop, but Home editions may require third-party software. You can check this by looking for the Remote Desktop option in the System settings.
Can I use Remote Desktop without an internet connection?
No, a stable internet connection is essential for Remote Desktop to function. Both the device you’re connecting from and the one you’re connecting to must be online.
What should I do if I can’t connect to my PC remotely?
Ensure that the PC is turned on, connected to the internet, and that remote access is enabled. Double-check your firewall settings to ensure they’re not blocking the connection.
Is Remote Desktop secure on public networks?
Public networks can pose security risks, so it’s best to use a VPN or ensure that network-level authentication is enabled when connecting over public Wi-Fi.
Can I enable remote access for multiple users?
Yes, you can set permissions for multiple users in the Remote Desktop settings, allowing them to connect remotely to your PC.
Summary
- Open Settings.
- Navigate to System.
- Open Remote Desktop.
- Enable Remote Access.
- Configure Security Settings.
Conclusion
Enabling remote access on Windows 11 is like giving your laptop or PC a superpower. Suddenly, your device is more flexible and accessible than ever, allowing you to work from anywhere, whether it’s your couch or across the globe. With just a few clicks in the Settings app, your computer can join the 21st-century telecommuting revolution. But remember, with great power comes great responsibility. It’s crucial to maintain strong security practices to protect your data and ensure only authorized users can access your system. After setting it up, you might find yourself wondering how you ever lived without this feature. For further reading, you might want to explore additional security measures like two-factor authentication or using a VPN for your remote connections. If you haven’t enabled remote access on Windows 11 yet, now’s the time to dive in and experience the convenience it offers. The world is your oyster, and your computer is just a click away.
Matthew Burleigh has been writing tech tutorials since 2008. His writing has appeared on dozens of different websites and been read over 50 million times.
After receiving his Bachelor’s and Master’s degrees in Computer Science he spent several years working in IT management for small businesses. However, he now works full time writing content online and creating websites.
His main writing topics include iPhones, Microsoft Office, Google Apps, Android, and Photoshop, but he has also written about many other tech topics as well.
Read his full bio here.
In this guide, you will learn how to enable Remote Desktop on Windows 10, 11, and Windows Server. I’ll also show you on to enable RDP using PowerShell and group policy.
Tip: Use a remote desktop connection manager to manage multiple remote desktop connections. You can organize your desktops and servers into groups for easy access.
Table of contents
- Enable Remote Desktop on Windows 10
- Enable Remote Desktop on Windows 11
- Enable Remote Desktop on Windows Server
- PowerShell Enable Remote Desktop
- Group Policy Configuration to allow RDP
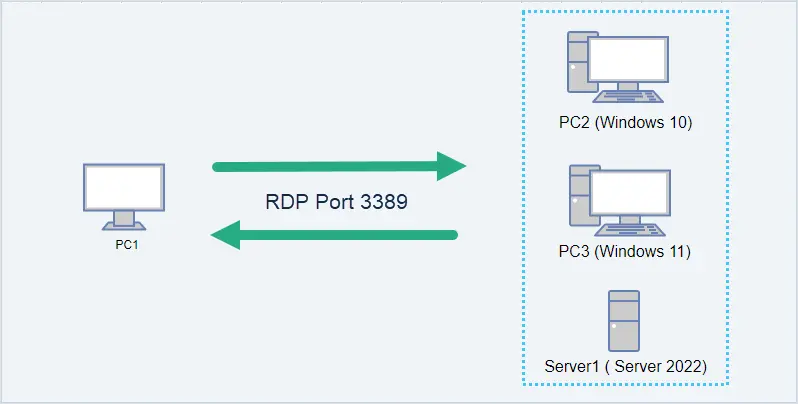
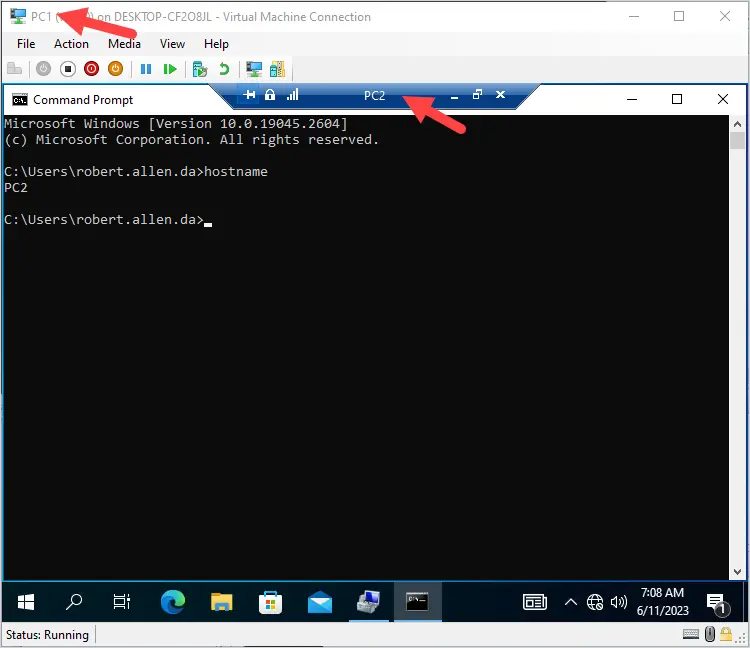
In the diagram below, my admin workstation is PC1. I’m going to enable RDP on PC2, PC3, and Server1 so that I can remotely connect to them. RDP uses port TCP 3389. You can change the RDP listening port by modifying the registry.
In this example, I’m going to enable remote desktop on PC2 that is running windows 10.
Step 1. Enable Remote Desktop
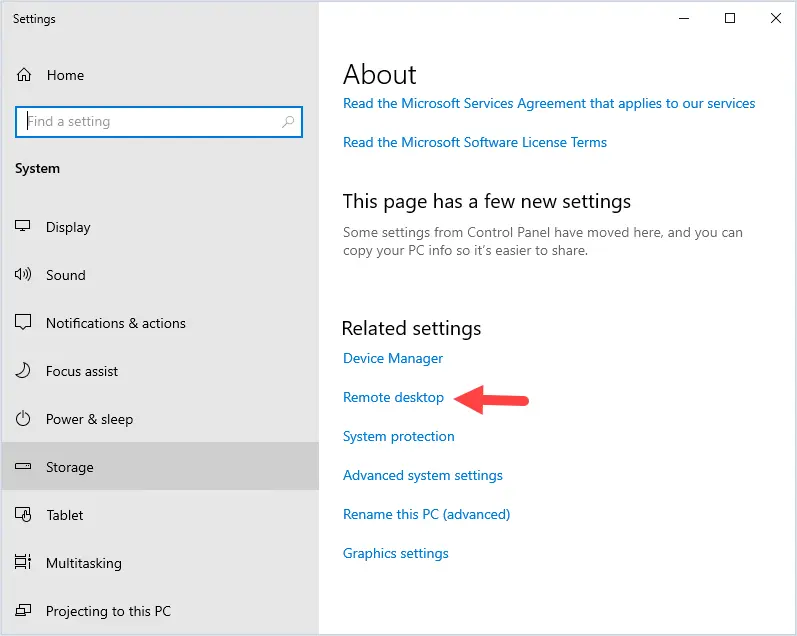
Right click the start menu and select system.
Under related settings click on Remote desktop.
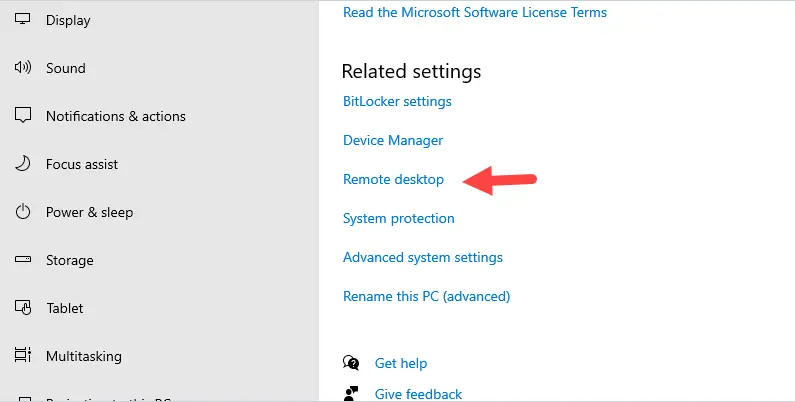
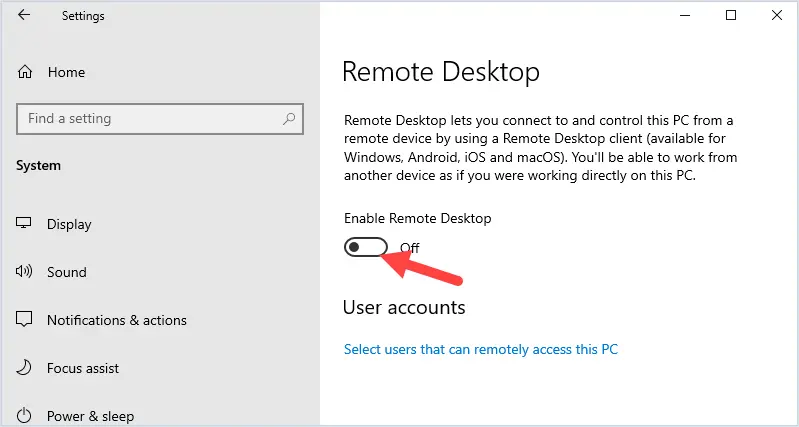
Click the slider button to enable remote desktop.
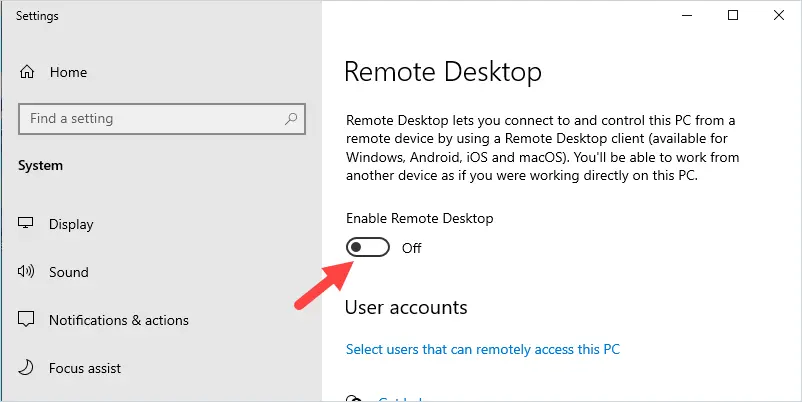
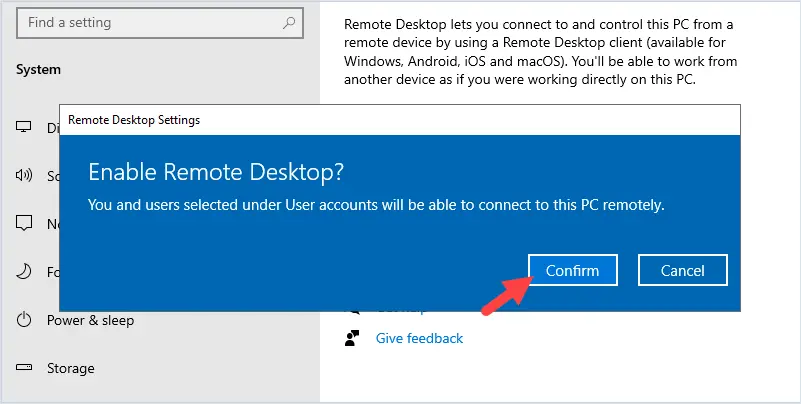
You will get a popup to confirm that you want to enable Remote desktop. Click confirm.
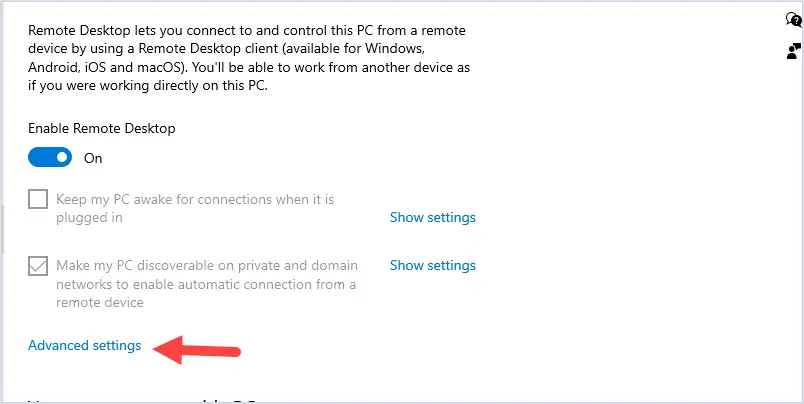
Next, Click on Advanced Settings.
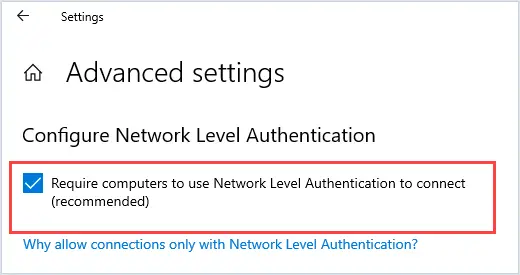
Make sure “Require computers to use Network Level Authentication to connect” is selected.
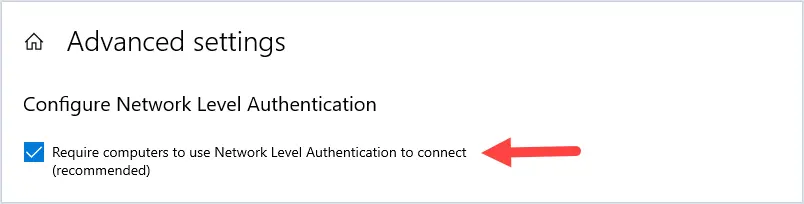
This setting will force the user to authenticate before it will start a remote desktop session. This setting will enable a layer of security and prevent unauthorized remote connections.
Step 2. Select Users Accounts
The next step is to ensure only specific accounts can use RDP.
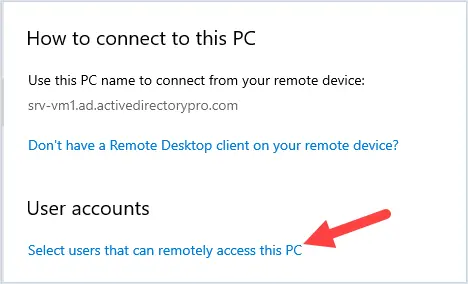
By default, only members of the local administrators group will be allowed to connect using remote desktop.
To add or remove user accounts click on “select users that can remotely access this PC”.
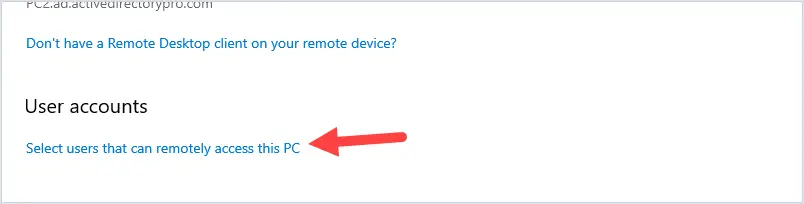
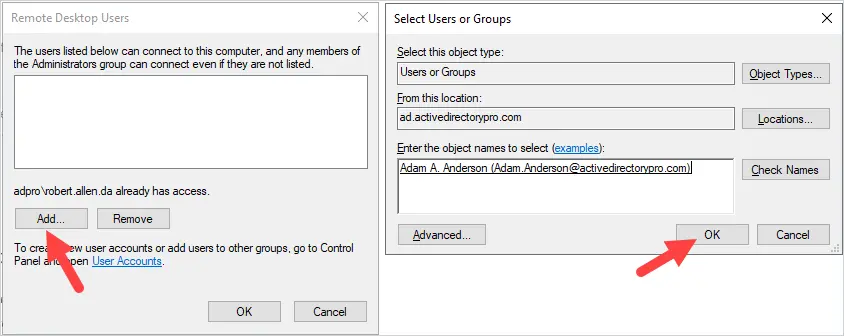
To add a user click the Add button and search for the username.
In this example, I’m going to add a user Adam A. Anderson.
Tip. I recommend creating a domain group to allow RDP access. This will make it easier to manage and audit RDP access.
That was the last step, remote desktop is now enabled.
Let’s test the connection.
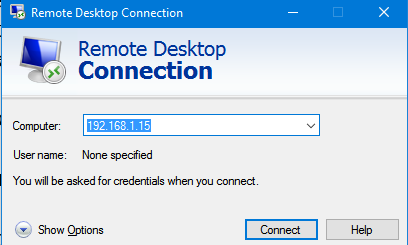
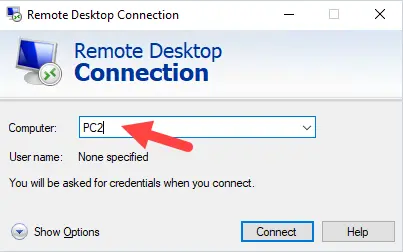
From PC1 I open Remote Desktop Connection and enter PC2.
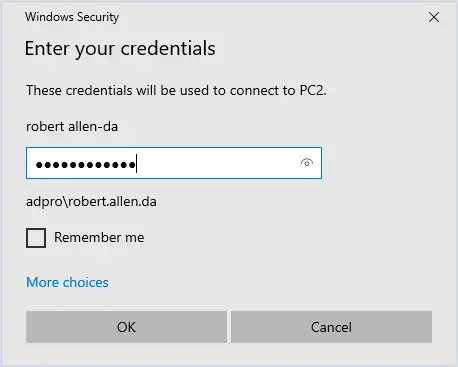
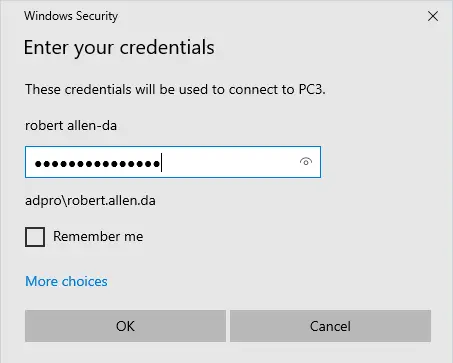
I am prompted to enter credentials.
Success!
I now have a remote desktop connection to PC2.
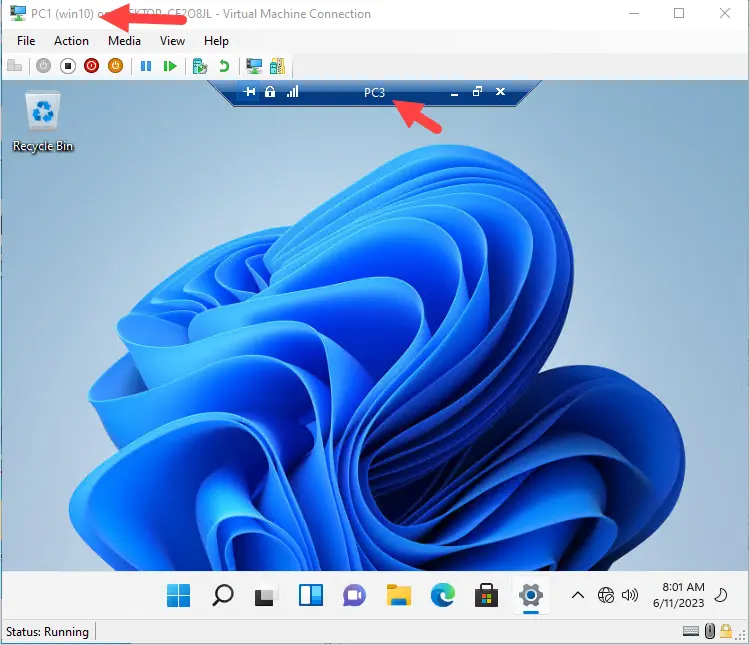
In the screenshot below you can see I’m connected via console to PC1 and I have a remote desktop connection open to PC2.
Damware Mini Remote Control
Multiple monitor support. Reboot and wake sleeping computers remotely.
Remote access to Windows, Linux, and Mac OS X operating systems. In session chat, remote screenshot, file transfer, and more.
Download 14 Day Free Trial
Enable Remote Desktop on Windows 11
In this example, I’ll enable remote desktop on my Windows 11 computer (PC3).
Step 1. Enable Remote Desktop
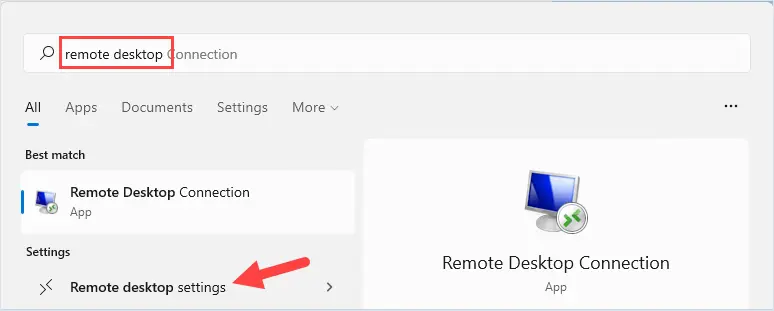
Click on search.

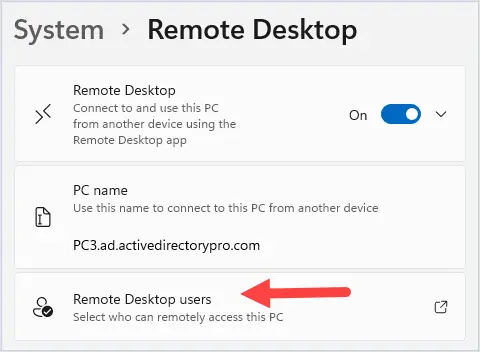
Enter “remote desktop” and click on “Remote desktop settings”
Click the slider to enable remote desktop. You will get a popup to confirm.
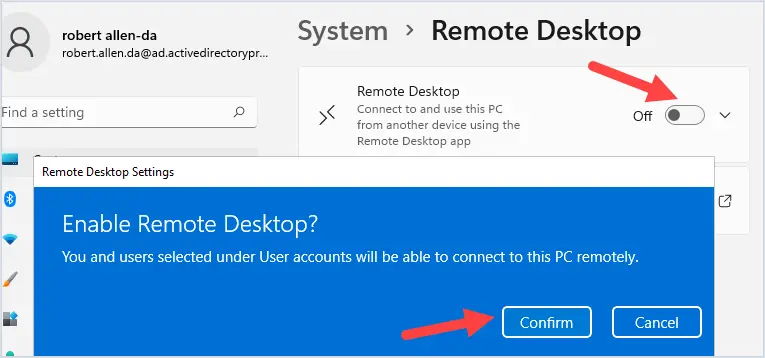
Click the down arrow and verify “Require devices to use Network Level Authentication to connect” is enabled.
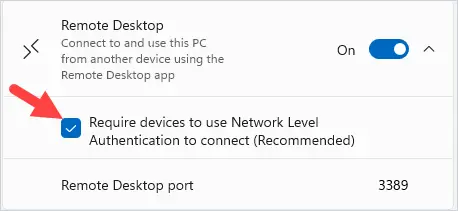
Remote Desktop is now enabled. In the next step, you will select which users are allowed to use remote desktop.
Step 2. Remote Desktop Users
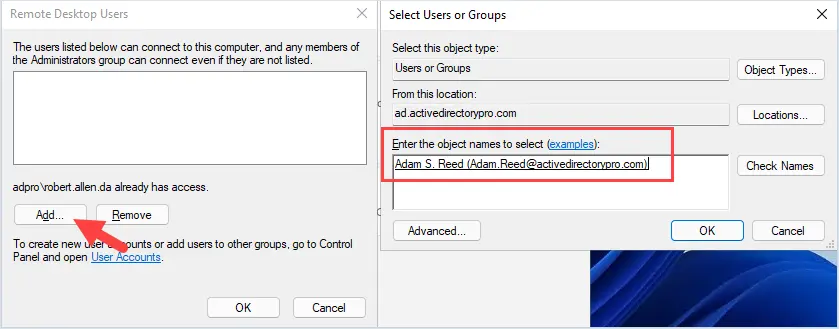
By default, only members of the local administrators group can use remote desktop. To add additional users follow these steps.
Click on “Remote Desktop users”
Click on add and search or enter a user to add. In this example, I’ll add the user adam.reed.
Now I’ll test if remote desktop is working.
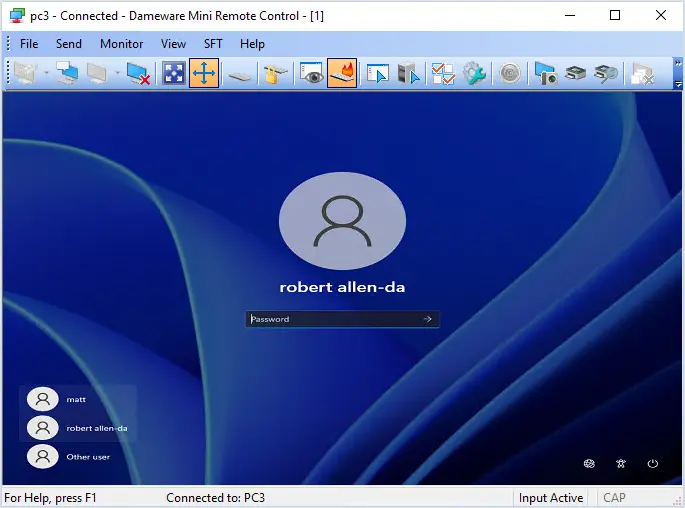
From my workstation PC1 I’ll create a remote desktop connection to PC3 (windows 11).
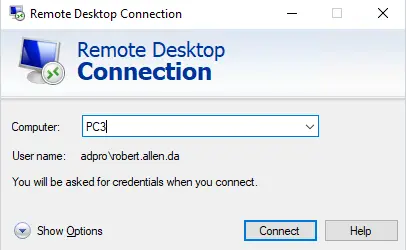
Enter the password to connect.
The connection is good!
You can see in the screenshot below I’m on the console of PC1 and I have a remote desktop connection to PC3 that is running Windows 11.
Enable Remote Desktop on Windows Server
In this example, I’ll enable remote desktop on Windows Server 2022.
Step 1. Enable Remote Desktop.
Right click the start menu and select System.
On the settings screen under related settings click on “Remote desktop”.
Click the slider button to enable remote desktop.
You will get a popup to confirm that you want to enable Remote desktop. Click confirm.
Click on Advanced settings.
Make sure “Require computers to use Network level Authentication to connect” is enabled.
Remote desktop is now enabled, the next step is to select users that can remotely access the PC.
Step 2. Select User accounts
By default, only members of the local administrators group will be allowed to connect using remote desktop.
To add additional users click on click on “select users that can remotely access this pc”.
Next, click add then enter or search for users to add. In this example, I’ll add the user robert.allen. Click ok.
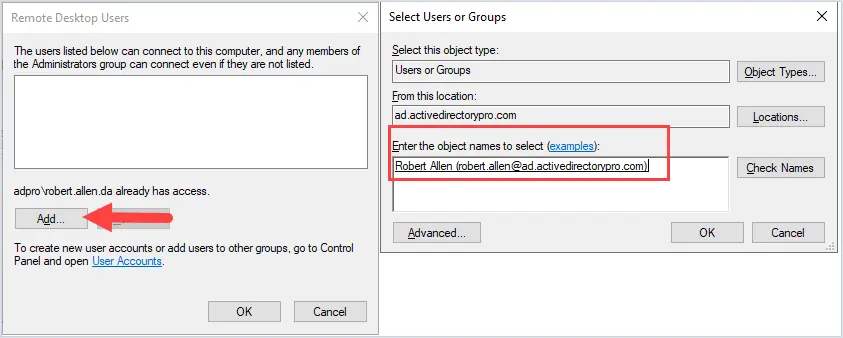
Now I’ll test if remote desktop is working on my Windows 2022 server.
From my workstation (pc2) I open the remote desktop connection client and enter srv-vm1and click connect. Enter my username and password and click ok.
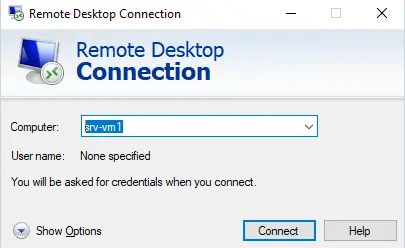
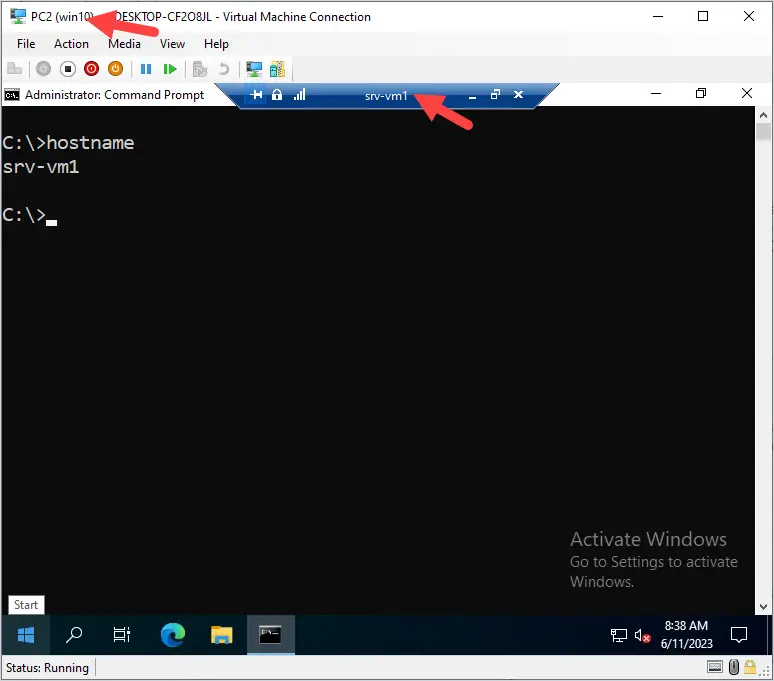
Awesome, it works!
I’ve established a remote session to my Windows 2022 server from my Windows 10 computer.
PowerShell Enable Remote Desktop
To enable Remote Desktop using PowerShell use the command below. This will enable RDP on the local computer.
Set-ItemProperty -Path 'HKLM:\System\CurrentControlSet\Control\Terminal Server' -name "fDenyTSConnections" -value 0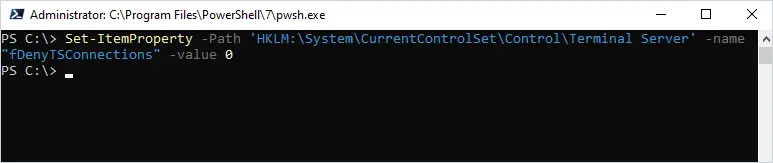
You can use the below PowerShell command to check if remote desktop is enabled.
if ((Get-ItemProperty "hklm:\System\CurrentControlSet\Control\Terminal Server").fDenyTSConnections -eq 0) { write-host "RDP is Enabled" } else { write-host "RDP is NOT enabled" }
To enable remote desktop remotely you can use the invoke-command. This requires PS remoting to be enabled, check out my article on inoke-command examples for more details.
In this example, I’ll enable remote desktop on the remote computer PC2.
invoke-command -ComputerName pc2 -scriptblock {Set-ItemProperty -Path 'HKLM:\System\CurrentControlSet\Control\Terminal Server' -name "fDenyTSConnections" -value 0} 
Group Policy Configuration to allow RDP
If you need to enable and manage the remote desktop settings on multiple computers then you should use Group Policy or intune.
Follow the steps below to create a new GPO.
Step 1. Create a new GPO
Open the group policy management console and right click the OU or root domain to create a new GPO.
In this example, I’m going to create a new GPO on my ADPPRO Computers OU, this OU has all my client computers.
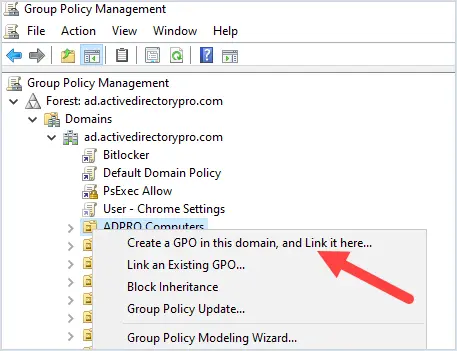
Give the GPO a name.
Edit the GPO and browse to the following policy setting.
Computer Configuration -> Policies -> Administrative Templates -> Windows Components -> Remote Desktop Services -> Remote Desktop Session Host -> Connections;
Enable the policy setting -> Allow users to connect remotely by using Remote Desktop Services
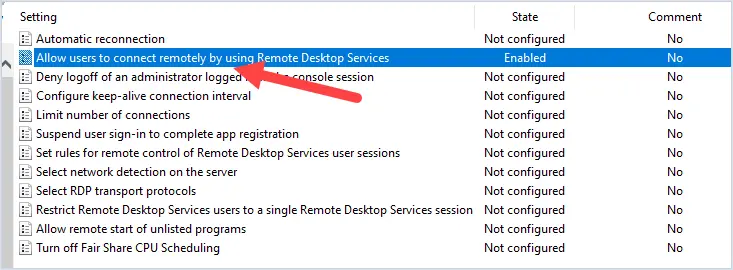
That is the only policy setting that needs to be enabled to allow remote desktop
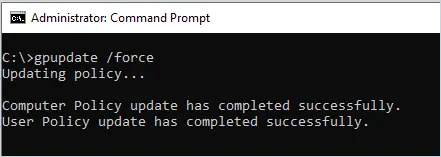
Step 2. Update Computer GPO
The GPO policies will auto refresh on remote computers every 90 minutes.
To manually update GPO on a computer run the gpupdate command.
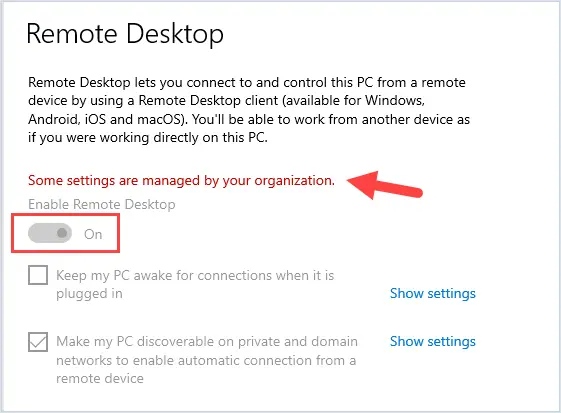
When remote desktop is managed with group policy the settings will be greyed out. This will allow you to have consistent settings across all your computers. It will also prevent users or the helpdesk from modifying the settings.
That’s a wrap.
I just showed you several ways to enable remote desktop on Windows computers. If you are using Active Directory with domain joined computers then enabling RDP via group policy is the best option.
Related Articles
- 5 Best Remote Desktop Connection Managers