

(Last updated on March 18, 2025)
Mozilla recently launched Firefox 60, which now includes official support for configuration via Active Directory Group Policies. For customers using Specops uReset, Specops Authentication, or Specops Password Reset, this means you can now set up your Firefox users to take full advantage of integrated Windows authentication in these solutions.
You will need to install the ESR (Extended Support Release) version of Firefox 60 in order to get full support for GPO settings, as the main release channel of Firefox ignores many of the settings. You can download the ESR version here: https://www.mozilla.org/en-US/firefox/all/
The Group Policy ADMX templates are available to download from Mozilla’s GitHub page (get at least version 1.0): https://github.com/mozilla/policy-templates/releases
Unzip the policy-templates.zip file from GitHub and copy the ADMX and ADML files to the appropriate location: If you have a central store, then copy the files to \\domain\sysvol\<domain>\policies\policydefinitions, otherwise copy the %windir%\policydefinitions on the machine where you’ll be editing your Firefox GPOs.
You should now have a Mozilla/Firefox folder in your group policy editor under Computer Configuration/Administrative templates:
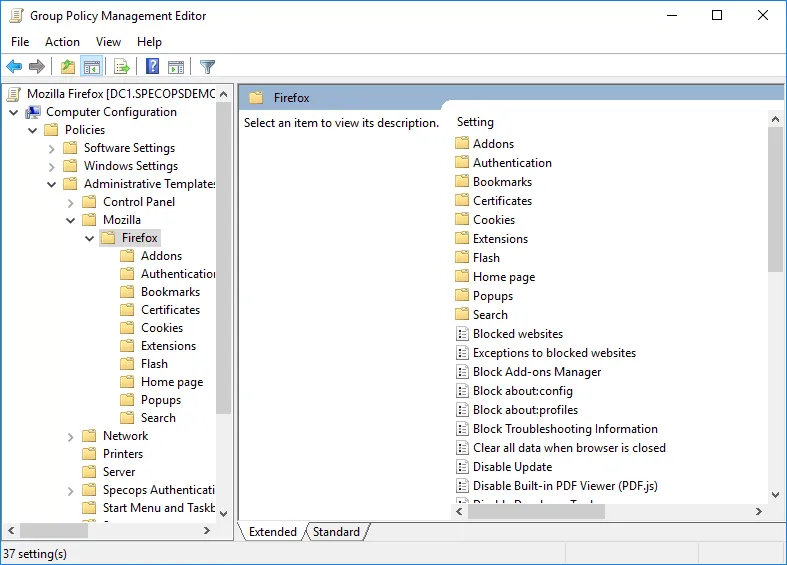
Now you can add settings that will enable Windows integrated authentication.
Specops Password Reset
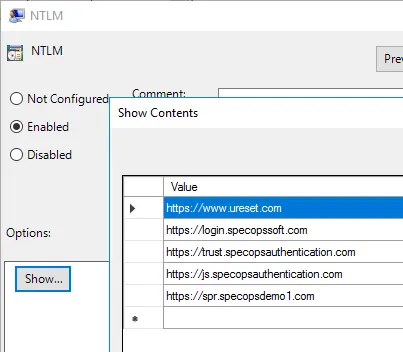
Enable /Authentication/NTLM and add the address used by your users to access your internal SPR server (this corresponds to the network.automatic-ntlm-auth.trusted-uris setting in Firefox).
If you are using a certificate issued by an internal CA, you can also enable the Certificates/Import Enterprise Roots setting (security.enterprise_roots.enabled) so Firefox will automatically use the Trusted Root Certificates from Windows.
Specops uReset
Enable Authentication/NTLM and add https://www.ureset.com to the URL list.
Specops Authentication
Specops Authentication leverages NTLM and Kerberos. Enable Authentication/NTLM and Authentication/SPNEGO (network.negotiate-auth.trusted-uris) and add the following URLs to both settings:
https://login.specopssoft.com
https://js.specopsauthentication.com
https://trust.specopsauthentication.com
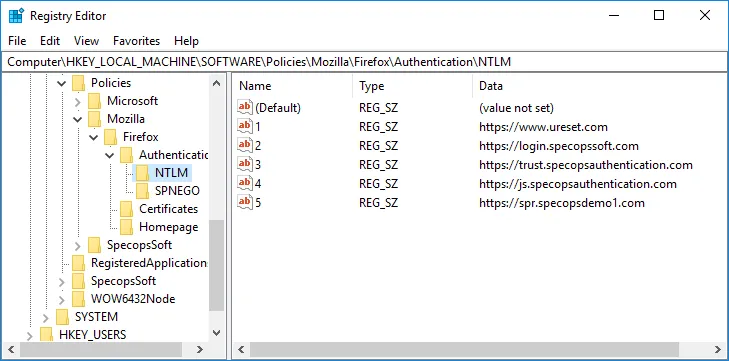
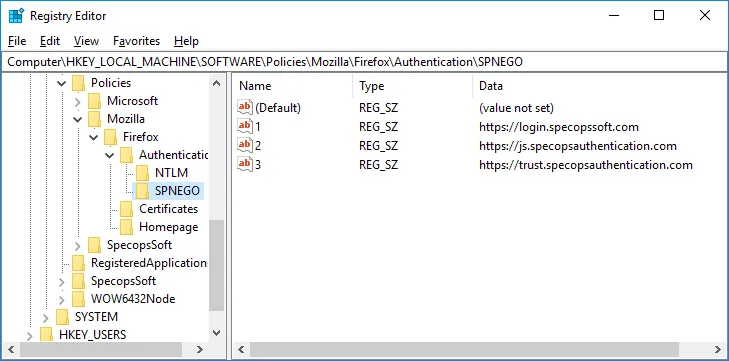
Apply the GPO and run gpupdate. You should see registry keys created under HKLM/Software/Policies/Mozilla
Next, close and re-open Firefox for the settings to take effect. If you want to double-check the policy has applied within Firefox, open a new tab and go to about:config. The settings should be locked and the values should match what you set in your GPO.

Of course, as a final test, try accessing your Password Reset or uReset enrollment page, or try logging into Office 365 using Specops Authentication. Firefox should pass your Windows credentials automatically and you should not see any browser popups asking for a username & password.
(Last updated on March 18, 2025)
Written by
Darren Siegel
Darren Siegel is a cyber security expert at Specops Software. He works as a lead IT engineer, helping organizations solve complex challenges within IT security. Darren has more than 15 years’ experience within Active Directory, IT security, servers, storage, virtualization, cloud, and identity and access management.
Related Articles
-
“Untrusted Connection” error in Firefox & Intermediate Certificates
There are many reasons why you may see an SSL error, some of which will vary by browser. Even if the SSL certificate is installed correctly, you are not necessarily in the clear. One of our password reset customers experienced the dreaded “Untrusted connection” error when browsing to the password reset web on their Android…
Read More
-
Configuring Chrome and Firefox for Windows Integrated Authentication
Windows Integrated Authentication (WIA) comes as standard with Microsoft’s own internet browsers. However, you may want the benefits that comes with it while using the internet browser of your own choosing. Thankfully you can still get the benefits of Windows Integrated Authentication (WIA) with both Chrome and Firefox browsers, but it requires some configuration to…
Read More
-
Alternate Ways to Update Trusted Sites
Internet Explorer assigns all websites to one of four security zones: Internet, Local Intranet, Trusted Sites or Restricted Sites. The security settings that will be used for that site are dictated by the security zone the site is in. Reducing your security settings can result in security risk, but increasing the security setting can reduce…
Read More
Introduction
Recently, many organizations have been migrating their on-premise SharePoint environments. While migrating is a big task itself, we need to ensure the same level of user experience. After migrating our SharePoint Server to a new domain, we encountered an issue where users were repeatedly prompted for their Active Directory (AD) credentials whenever they accessed the SharePoint site or tried to edit documents. This interruption to their workflow was a constant nuisance and impacted productivity.
To resolve this, we implemented a solution using Group Policy to enable Integrated Windows Authentication (IWA) within the most commonly used web browsers. This allows for seamless single sign-on (SSO), eliminating the need for users to manually enter their credentials every time. Here’s how to configure Microsoft Edge, Google Chrome, and Firefox for IWA.
Understanding the Problem
When a SharePoint site resides in a different domain than the user’s computer, browsers often don’t automatically pass the user’s AD credentials for authentication. This requires manual login, and also impacts integrations with Office applications during document editing sessions.
Solution Overview
The solution involves using Group Policy to modify browser settings. This provides a centrally managed approach for enabling Integrated Windows Authentication across your organization.
Microsoft Edge and Google Chrome Configuration
Both Edge and Chrome use similar settings, leveraging the underlying Internet Explorer framework for handling authentication:
Steps:
- Create a New Group Policy Object (GPO)
- Open the Group Policy Management console (gpmc.msc).
- Create a new GPO, naming it something descriptive (e.g., “Enable Integrated Auth for SharePoint”).
- Link this GPO to the appropriate Organizational Unit (OU) containing the computers that will access your SharePoint site.
- Configure Site to Zone Assignment:
- Navigate to: Computer Configuration/Policies/Administrative Templates/Windows Components/Internet xplorer/Internet Control Panel/Security Page
- Locate the policy: Site to Zone Assignment List
- Set the policy to Enabled.
- Click Show… to add your SharePoint URL.
- Under Value Name, enter your SharePoint URL (e.g., https://yoursharepoint.example.com/)
- Under Value, enter 1 (The value “1” corresponds to the Intranet zone).
- *Click OK.
- Configure Automatic Logon (Intranet Zone):
- Navigate to: Computer Configuration/Policies/Administrative Templates/Windows Components/Internet Explorer/Internet Control Panel/Security Page/Intranet Zone
- Locate the policy: Logon options.
- Set the policy to Automatic logon with current username and password.
Explanation:
Site to Zone Assignment List: This setting tells Internet Explorer (and Edge/Chrome) to treat your SharePoint URL as part of the Intranet zone.
Automatic logon with current username and password: This setting allows the browser to automatically pass the user’s current Windows credentials when accessing intranet sites (in our case, SharePoint).
Firefox Configuration
Firefox requires its own set of Group Policy settings, and you will need the Firefox ADMX templates installed in your environment.
Steps:
- Install Firefox ADMX Templates (If you haven’t already):
- Download the latest Firefox ADMX template files for your version of Firefox.
- Copy the .admx files to your central policy store (typically located at %systemroot%\PolicyDefinitions).
- Copy the appropriate .adml files to the matching language subdirectory (e.g., %systemroot%\PolicyDefinitions\en-US).
- Create/Edit the GPO
Use your existing GPO from above, or create a new one. - Configure Firefox Network Settings:
- Navigate to: Computer Configuration/Policies/Administrative Templates/Mozilla/Advanced Options/Options/Locked Settings/Network/Policy
- Configure the following three settings:
- network.automatic-ntlm-auth.trusted-uris: Set this to Enabled and add your SharePoint URL to the list (e.g., https://yoursharepoint.example.com)
- network.negotiate-auth.delegation-uris: Set this to Enabled and add your SharePoint URL to the list (e.g., https://yoursharepoint.example.com)
- network.negotiate-auth.trusted-uris: Set this to Enabled and add your SharePoint URL to the list (e.g., https://yoursharepoint.example.com)
Explanation:
network.automatic-ntlm-auth.trusted-uris: This allows Firefox to automatically use NTLM authentication for the specified URLs.
network.negotiate-auth.delegation-uris: This setting allows Kerberos delegation to be used when the URI is opened in a new window
network.negotiate-auth.trusted-uris: This setting allows Kerberos delegation to be used in HTTP authentication.
Final Thoughts
By applying these Group Policy configurations, users should now be able to seamlessly access your SharePoint site without being prompted for their AD credentials, both in the browser and when opening or editing documents. This improves user experience, enhances productivity, and minimizes the frustrations associated with constant authentication requests. Remember to thoroughly test these changes before deploying them to your production environment.
Key Takeaways:
Integrated Windows Authentication simplifies user access by eliminating the need for manual logins.
Group Policy is the best way to centrally manage browser authentication settings.
Test in a pilot environment before deploying widely.
Содержание
- Настройка Kerberos аутентификации в различных браузерах
- Настройка Kerberos аутентификации в Internet Explorer
- Включаем Kerberos аутентификацию в Google Chrome
- Настройка Kerberos аутентификации в Mozilla Firefox
- Причина сбоя встроенной проверки подлинности Windows Reason integrated windows authentication fails
- Неправильное Настройка имени участника-службы SPN misconfiguration
- Токен привязки канала Channel Binding Token
- Настройка Internet Explorer Internet Explorer configuration
- Параметры групповой политики в проверке подлинности Windows Group Policy Settings Used in Windows Authentication
- Общие сведения о проверке подлинности Windows Windows Authentication Overview
- Описание компонента Feature description
- Практическое применение Practical applications
- Требования к программному обеспечению Software requirements
- Сведения о диспетчере сервера Server Manager information
- Предварительная подготовка
- Процедура
- Exchange Server 2007 с пакетом обновления 1 (SP1)
- Чтобы настроить встроенную проверку подлинности Windows для веб-клиента Outlook с помощью консоли управления Exchange
- Чтобы настроить встроенную проверку подлинности Windows для веб-клиента Outlook с помощью среды управления Exchange
- Окончательная первоначальная (RTM) версия сервера Exchange Server 2007
- Чтобы настроить встроенную проверку подлинности Windows для веб-клиента Outlook с помощью консоли управления Exchange
- Чтобы настроить встроенную проверку подлинности Windows для веб-клиента Outlook с помощью среды управления Exchange
- Дополнительные сведения
Настройка Kerberos аутентификации в различных браузерах
В этой статья, мы рассмотрим, как настроить Kerberos аутентификацию для различных браузеров в домене Windows для прозрачной и безопасной аутентификации на веб-серверах без необходимости повторного ввода пароля в корпоративной сети. В большинстве современных браузерах (IE, Chrome, Firefox) имеется поддержка Kerberos, однако, чтобы она работала, нужно выполнить несколько дополнительных действий.
Чтобы браузер мог авторизоваться на веб-сервере, нужно, чтобы были выполнены следующие условия:
К примеру, мы хотим разрешить клиентам Kerberos авторизацию через браузер на всех веб серверах домена winitpro.ru (нужно использовать именно DNS или FQDN, а не IP адрес веб сервера)
Настройка Kerberos аутентификации в Internet Explorer
Рассмотрим, как включить Kerberos аутентификацию в Internet Explorer 11.
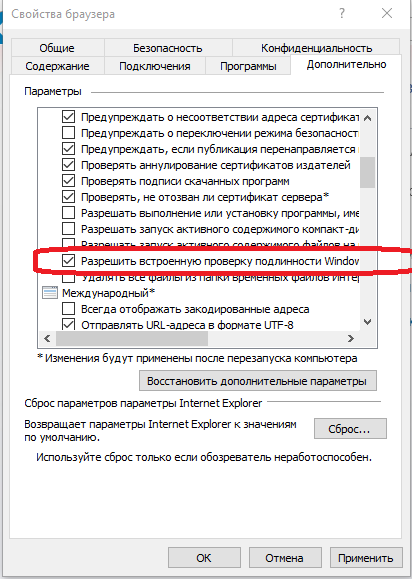
Далее перейдите на вкладку Дополнительно (Advanced) и в разделе Безопасность (Security) убедитесь, что включена опция Разрешить встроенную проверку подлинности Windows (Enable Integrated Windows Authentication).
Включаем Kerberos аутентификацию в Google Chrome
Чтобы SSO работала в Google Chrome, нужно настроить Internet Explorer вышеописанным способом (Chrome использует данные настройки IE). Кроме того, нужно отметить, что все новые версии Chrome автоматически определяют наличие поддержки Kerberos. В том случае, если используется одна из старых версий Chrome (Chromium), для корректной авторизации на веб-серверах с помощью Kerberos, его нужно запустить с параметрами:
Либо эти параметры могут быть распространены через групповые политики для Chrome (политика AuthServerWhitelist) или строковый параметр реестра AuthNegotiateDelegateWhitelist (находится в ветке HKLM\SOFTWARE\Policies\Google\Chrome).
Для вступления изменений в силу нужно перезагрузить браузер и сбросить тикеты Kerberos командой klist purge (см. статью).
Настройка Kerberos аутентификации в Mozilla Firefox
По умолчанию поддержка Kerberos в Firefox отключена, чтобы включить ее, откройте окно конфигурации браузера (в адресной строке перейдите на адрес about:config). Затем в следующих параметрах укажите адреса веб-серверов, для которых должна использоваться Kerberos аутентификация.
Проверить, что ваш браузер работает через аутентифицировался на сервере с помощью Kerberos можно с помощью Fiddler или команды klist tickets.
Источник
Встроенная проверка подлинности Windows позволяет пользователям входить в систему с учетными данными Windows и работать с единым входом (SSO), используя Kerberos или NTLM. Integrated Windows authentication enables users to log in with their Windows credentials and experience single-sign on (SSO), using Kerberos or NTLM.
Причина сбоя встроенной проверки подлинности Windows Reason integrated windows authentication fails
Неправильное Настройка имени участника-службы SPN misconfiguration
Имя участника-службы (SPN) — это уникальный идентификатор экземпляра службы. A service principal name (SPN) is a unique identifier of a service instance. Имена участников-служб используются при проверке подлинности Kerberos для связывания экземпляра службы с учетной записью входа службы. SPNs are used by Kerberos authentication to associate a service instance with a service logon account. Это позволяет клиентскому приложению запросить проверку подлинности учетной записи службы, даже если у клиента нет имени учетной записи. This allows a client application to request that the service authenticate an account even if the client does not have the account name.
Ниже приведен пример использования имени субъекта-службы с AD FS. An example of an how an SPN is used with AD FS is as follows:
Если учетная запись службы AD FS имеет неправильно настроенное или неправильное SPN, это может вызвать проблемы. If the AD FS service account has a misconfigured or the wrong SPN then this can cause issues. Просмотр трассировок сети может привести к ошибкам, например КРБ Error: KRB5KDC_ERR_S_PRINCIPAL_UNKNOWN. Looking at network traces, you may see errors such as KRB Error: KRB5KDC_ERR_S_PRINCIPAL_UNKNOWN.

Имя субъекта-службы можно проверить, просмотрев свойства учетной записи службы AD FS. You can verify the SPN by looking at the properties of the AD FS service account.

Токен привязки канала Channel Binding Token
В текущей версии, если клиентское приложение проходит проверку подлинности на сервере с использованием протокола Kerberos, дайджест-проверку подлинности или проверку NTLM с использованием HTTPS, то сначала устанавливается канал безопасности транспортного уровня (TLS), а проверка подлинности выполняется по этому каналу. Currently, when a client application authenticates itself to the server using Kerberos, Digest, or NTLM using HTTPS, a Transport Level Security (TLS) channel is first established and authentication takes place using this channel.
Токен привязки канала является свойством внешнего канала, защищенного TLS, и используется для привязки внешнего канала к диалогу по внутреннему каналу, прошедшему проверку подлинности клиента. The Channel Binding Token is a property of the TLS-secured outer channel, and is used to bind the outer channel to a conversation over the client-authenticated inner channel.
При возникновении атаки «злоумышленник в середине» и расшифровке и повторном шифровании SSL-трафика ключ не будет совпадать. If there is a «man-in-the-middle» attack occurring and they are decrypting and re-encrypting the SSL traffic, then the key will not match. AD FS определит, что в центре веб-обзора r и самого себя есть что-то другое. AD FS will determine that there is something sitting in the middle between the web browse r and itself. Это приведет к сбою проверки подлинности Kerberos, и пользователю будет предложено диалоговое окно 401 вместо единого входа. This will cause the Kerberos authentication to fail and the user will be prompted with a 401 dialog instead of an SSO experience.
Это может быть вызвано следующим: This can be cause by:
Настройка Internet Explorer Internet Explorer configuration
По умолчанию Internet Explorer будет иметь следующий порядок: By default, Internet explorer will be have the following way:
Существует два основных момента, которые могут помешать этому. There are 2 main things that can prevent this from happening.

Зоны безопасности настроены неправильно Security zones are not configured properly
FQDN не входит в зону интрасети FQDNs are not in the intranet zone
URL-адрес AD FS не входит в зону интрасети. AD FS URL is not in the intranet zone.
Источник
Параметры групповой политики в проверке подлинности Windows Group Policy Settings Used in Windows Authentication
Область применения. Windows Server (Semi-Annual Channel), Windows Server 2016 Applies To: Windows Server (Semi-Annual Channel), Windows Server 2016
В этом справочном разделе для специалистов по ИТ описывается использование и влияние параметров групповая политика в процессе проверки подлинности. This reference topic for the IT professional describes the use and impact of Group Policy settings in the authentication process.
Можно управлять проверкой подлинности в операционных системах Windows, добавляя учетные записи пользователей, компьютеров и служб в группы, а затем применяя политики проверки подлинности к этим группам. You can manage authentication in Windows operating systems by adding user, computer, and service accounts to groups, and then by applying authentication policies to those groups. Эти политики определяются как локальные политики безопасности и как административные шаблоны, также известные как параметры групповая политика. These policies are defined as local security policies and as administrative templates, also known as Group Policy settings. Оба набора могут быть настроены и распределены по всей Организации с помощью групповая политика. Both sets can be configured and distributed throughout your organization by using Group Policy.
Например, можно применить следующие политики к группам в зависимости от их функций в Организации: For example, you can apply the following policies to groups, based on their function in the organization:
Локальный вход в систему или в домен Log on locally or to a domain
Вход по сети Log on over a network
Сброс учетных записей Reset accounts
Создание учетных записей Create accounts
В следующей таблице перечислены группы политик, относящиеся к проверке подлинности, и приведены ссылки на документацию, которая может помочь в настройке этих политик. The following table lists policy groups relevant to authentication and provides links to documentation that can help you configure those policies.
| Группа политик Policy group | Расположение Location | Описание Description |
|---|---|---|
| Политика паролей Password Policy | Локальный компьютер Полици\компутер конфигурация \ параметры безопасности \ политики Сеттингс\аккаунт Local Computer Policy\Computer Configuration\Windows Settings\Security Settings\Account Policies | Политики паролей влияют на характеристики и поведение паролей. Password policies affect the characteristics and behavior of passwords. Политики паролей используются для учетных записей домена или локальных учетных записей пользователей. Password policies are used for domain accounts or local user accounts. Они определяют параметры паролей, такие как принудительное применение и время существования. They determine settings for passwords, such as enforcement and lifetime.
Сведения о конкретных параметрах см. в разделе Политика паролей. For information about specific settings, see Password Policy. |
| Политика блокировки учетной записи Account Lockout Policy | Локальный компьютер Полици\компутер конфигурация \ параметры безопасности \ политики Сеттингс\аккаунт Local Computer Policy\Computer Configuration\Windows Settings\Security Settings\Account Policies | Параметры политики блокировки учетной записи отключают учетные записи после заданного числа неудачных попыток входа. Account lockout policy options disable accounts after a set number of failed logon attempts. Использование этих параметров помогает обнаруживать и блокировать попытки прерывания паролей. Using these options can help you detect and block attempts to break passwords.
Сведения о параметрах политики блокировки учетной записи см. в разделе Политика блокировки учетныхзаписей. For information about account lockout policy options, see Account Lockout Policy. |
| Политика Kerberos Kerberos Policy | Локальный компьютер Полици\компутер конфигурация \ параметры безопасности \ политики Сеттингс\аккаунт Local Computer Policy\Computer Configuration\Windows Settings\Security Settings\Account Policies | Параметры, связанные с Kerberos, включают время существования билета и правила применения. Kerberos-related settings include ticket lifetime and enforcement rules. Политика Kerberos не применяется к локальным базам данных учетных записей, так как протокол проверки подлинности Kerberos не используется для проверки подлинности локальных учетных записей. Kerberos policy does not apply to local account databases because the Kerberos authentication protocol is not used to authenticate local accounts. Таким образом, параметры политики Kerberos можно настроить только с помощью объекта домена по умолчанию групповая политика (GPO), где он влияет на вход в домен. Therefore, the Kerberos policy settings can be configured only by means of the default domain Group Policy Object (GPO), where it affects domain logons.
Сведения о параметрах политики Kerberos для контроллера домена см. в разделе Политика Kerberos. For information about Kerberos Policy options for the domain controller, see Kerberos Policy. |
| Политика аудита Audit Policy | Локальный компьютер Полици\компутер конфигурация \ параметры безопасности \ локальные политики ПолиЦиес\аудит Local Computer Policy\Computer Configuration\Windows Settings\Security Settings\Local Policies\Audit Policy | Политика аудита позволяет контролировать и анализировать доступ к объектам, таким как файлы и папки, а также управлять учетными записями пользователей и групп и входом пользователей и выходом из системы. Auditing policy lets you control and understand access to objects, such as files and folders, and to manage user and group accounts and user logons and logoffs. Политики аудита могут указывать категории событий, подлежащие аудиту, задавать размер и поведение журнала безопасности, а также определять, какие объекты следует отслеживать, а какой тип доступа требуется отслеживать. Auditing policies can specify the categories of events that you want to audit, set the size and behavior of the security log, and determine of which objects you want to monitor access and what type of access you want to monitor. |
| Назначение прав пользователя User Rights Assignment | Локальный компьютер Полици\компутер \ конфигурация \ параметры безопасности \ локальные политики Policies\User назначение прав Local Computer Policy\Computer Configuration\Windows Settings\Security Settings\Local Policies\User Rights Assignment | Права пользователя обычно назначаются на основе групп безопасности, к которым принадлежит пользователь, например администраторов, опытных пользователей или пользователей. User rights are typically assigned on the basis of the security groups to which a user belongs, such as Administrators, Power Users, or Users. Параметры политики в этой категории обычно используются для предоставления или запрета разрешения на доступ к компьютеру на основе метода членства в группах безопасности и доступа. The policy settings in this category are typically used to grant or deny permission to access a computer based on the method of access and security group memberships. |
| Параметры безопасности Security Options | Локальный компьютер Полици\компутер конфигурация \ параметры безопасности \ локальные политики Local Computer Policy\Computer Configuration\Windows Settings\Security Settings\Local Policies\Security Options | Ниже перечислены политики, относящиеся к проверке подлинности. Policies relevant to authentication include:
Источник Общие сведения о проверке подлинности Windows Windows Authentication Overview
В этом разделе для ИТ-специалистов перечислены источники документации по способам проверки подлинности и входа в систему в Windows, которые включают оценку продукта, руководства по началу работы, процедуры, руководства по разработке и развертыванию, технические справочники и справочники по командам. This navigation topic for the IT professional lists documentation resources for Windows authentication and logon technologies that include product evaluation, getting started guides, procedures, design and deployment guides, technical references, and command references. Описание компонента Feature descriptionПроверка подлинности — это процесс проверки удостоверения объекта, службы или пользователя. Authentication is a process for verifying the identity of an object, service or person. Задача проверки подлинности объекта заключается в проверке подлинности объекта. When you authenticate an object, the goal is to verify that the object is genuine. Целью проверки подлинности службы или пользователя является проверка подлинности предоставленных учетных данных. When you authenticate a service or person, the goal is to verify that the credentials presented are authentic. Операционная система Windows реализует набор протоколов проверки подлинности по умолчанию, включая Kerberos, NTLM, безопасность транспортного уровня / SSL ( TLS / SSL ) и дайджест в составе расширяемой архитектуры. The Windows operating system implements a default set of authentication protocols, including Kerberos, NTLM, Transport Layer Security/Secure Sockets Layer (TLS/SSL), and Digest, as part of an extensible architecture. Кроме того, некоторые протоколы объединены в пакеты проверки подлинности, такие как поставщик поддержки согласования и безопасности учетных данных. In addition, some protocols are combined into authentication packages such as Negotiate and the Credential Security Support Provider. Эти протоколы и пакеты обеспечивают выполнение проверки подлинности пользователей, компьютеров и служб; процесс проверки подлинности, в свою очередь, позволяет авторизованным пользователям и службам осуществлять безопасный доступ к ресурсам. These protocols and packages enable authentication of users, computers, and services; the authentication process, in turn, enables authorized users and services to access resources in a secure manner. Дополнительные сведения о проверке подлинности Windows, включая: For more information about Windows Authentication including Практическое применение Practical applicationsПроверка подлинности Windows используется для проверки сведений, поступающих от доверенного источника, пользователя или объекта компьютера, например другого компьютера. Windows Authentication is used to verify that the information comes from a trusted source, whether from a person or computer object, such as another computer. Windows предоставляет множество различных способов достижения этой цели, как описано ниже. Windows provides many different methods to achieve this goal as described below. Дополнительные сведения см. в статье Обзор проверки подлинности Kerberos. For additional resources, see Kerberos Authentication Overview. |
| Безопасная проверка подлинности в сети Secure authentication on the web | /Протокол TLS SSL, реализованный в поставщике поддержки безопасности SChannel TLS/SSL as implemented in the Schannel Security Support Provider | Протоколы ( TLS ) версии 1,0, 1,1 и 1,2, SSL ( ) протоколе SSL, версии 2,0 и 3,0, датаграмма транспорта транспортного уровня версии 1,0 и ( ) протокол шифрования протокола PCT для частного обмена данными, версия 1,0, основаны на криптографии с открытым ключом. The Transport Layer Security (TLS) protocol versions 1.0, 1.1, and 1.2, Secure Sockets Layer (SSL) protocol, versions 2.0 and 3.0, Datagram Transport Layer Security protocol version 1.0, and the Private Communications Transport (PCT) protocol, version 1.0, are based on public key cryptography. ( ) Набор протоколов проверки подлинности поставщика безопасного канала Schannel предоставляет эти протоколы. The Secure Channel (Schannel) provider authentication protocol suite provides these protocols. Все протоколы Schannel используют модель клиента и сервера. All Schannel protocols use a client and server model.
Дополнительные сведения см. в статье Обзор протокола NTLM. For additional resources, see NTLM Overview. |
| Использование многофакторной проверки подлинности Leverage multifactor authentication | Поддержка смарт-карты Smart card support
Биометрия основывается на измерении неизменных физических характеристик человека для его уникальной идентификации. Biometrics relies on measuring an unchanging physical characteristic of a person to uniquely identify that person. Отпечатки пальцев — наиболее часто используемые биометрические характеристики. Существуют миллионы встроенных в персональные компьютеры и периферийные устройства биометрических устройств для снятия отпечатков пальцев. Fingerprints are one of the most frequently used biometric characteristics, with millions of fingerprint biometric devices that are embedded in personal computers and peripherals. Дополнительные ресурсы см. в статье Технический справочник по смарт-картам. For additional resources, see Smart Card Technical Reference. |
|
| Осуществление локального управления, хранения и повторного использования учетных данных Provide local management, storage and reuse of credentials | Управление учетными данными Credentials management
Локальная система безопасности Local Security Authority Требования к программному обеспечению Software requirementsПроверка подлинности Windows совместима с более ранними версиями операционной системы Windows. Windows Authentication is designed to be compatible with previous versions of the Windows operating system. Однако это не значит, что усовершенствования новых выпусков будут работать в более ранних версиях. However, improvements with each release are not necessarily applicable to previous versions. Дополнительные сведения см. в документации по определенным функциям. Refer to documentation about specific features for more information. Сведения о диспетчере сервера Server Manager informationМногие функции проверки подлинности можно настроить с помощью групповой политики, которую можно установить с помощью диспетчера сервера. Many authentication features can be configured using Group Policy, which can be installed using Server Manager. Функция биометрической платформы Windows устанавливается с помощью диспетчера сервера. The Windows Biometric Framework feature is installed using Server Manager. Другие роли сервера, зависящие от методов проверки подлинности, таких как ( IIS ) и службы домен Active Directory, также можно установить с помощью Диспетчер сервера. Other server roles which are dependent upon authentication methods, such as Web Server (IIS) and Active Directory Domain Services, can also be installed using Server Manager. Источник Предварительная подготовкаДля выполнения описанных ниже действий используемой учетной записи необходимо делегировать роль администратора сервера Exchange и членство в локальной группе администраторов целевого сервера. Дополнительные сведения о разрешениях, делегировании ролей и правах, необходимых для администрирования Exchange 2007, см. в разделе Вопросы, связанные с разрешениями. Конкретные действия, производимые при выполнении этой процедуры с использованием консоли управления Exchange, зависят от следующих факторов: ПроцедураExchange Server 2007 с пакетом обновления 1 (SP1)Чтобы настроить встроенную проверку подлинности Windows для веб-клиента Outlook с помощью консоли управления ExchangeВ консоли управления Exchange перейдите к виртуальному каталогу, который необходимо настроить на использование встроенной проверки подлинности Windows с использованием сведений, приведенных в действии 2 или в действии 3. Если на компьютере с установленной ролью сервера клиентского доступа также установлена роль сервера почтовых ящиков, выполните одно из указанных ниже действий. Если на компьютере с установленной ролью сервера клиентского доступа не установлена роль сервера почтовых ящиков, выберите пункты Настройка серверов, Клиентский доступ и откройте вкладку Outlook Web Access. В рабочей области выберите виртуальный каталог, который необходимо настроить на использование встроенной проверки подлинности Windows, и выберите пункт Свойства. Откройте вкладку Проверка подлинности. Выберите вариант Использовать один или несколько стандартных способов проверки подлинности. Выберите Встроенная проверка подлинности Windows. Чтобы настроить встроенную проверку подлинности Windows для веб-клиента Outlook с помощью среды управления ExchangeЧтобы настроить встроенную проверку подлинности Windows для виртуального каталога Outlook Web Access по умолчанию на веб-узле служб IIS локального сервера Exchange, откройте среду управления Exchange и выполните следующую команду: Дополнительные сведения о синтаксисе и параметрах см. в разделе Set-OwaVirtualDirectory. Окончательная первоначальная (RTM) версия сервера Exchange Server 2007Чтобы настроить встроенную проверку подлинности Windows для веб-клиента Outlook с помощью консоли управления ExchangeОткройте консоль управления Exchange. Откройте раздел Конфигурация сервера\Клиентский доступ. На вкладке Outlook Web Access откройте свойства виртуального каталога, который необходимо настроить на использование встроенной проверки подлинности Windows. Откройте вкладку Проверка подлинности. Выберите вариант Использовать один или несколько стандартных способов проверки подлинности. Выберите Встроенная проверка подлинности Windows. Чтобы настроить встроенную проверку подлинности Windows для веб-клиента Outlook с помощью среды управления ExchangeЧтобы настроить встроенную проверку подлинности Windows для виртуального каталога Outlook Web Access по умолчанию на веб-узле служб IIS локального сервера Exchange, откройте командную консоль Exchange и выполните следующую команду: Для получения дополнительных сведений о синтаксисе и параметрах см. раздел Командлет Set-OwaVirtualDirectory (окончательная первоначальная версия). Дополнительные сведенияДополнительные сведения о методах проверки подлинности, которые можно использовать в Outlook Web Access, см. в следующих разделах: Дополнительные сведения о повышении безопасности связи между клиентскими компьютерами и сервером клиентского доступа см. в разделе Управление безопасностью клиентского доступа. Источник Читайте также: Не обновляется windows 10 на ssd |
Integrated Windows Authentication
Integrated Windows Authentication (IWA) is a Trustelem authentication using the Kerberos token of the user Windows session.
The point is to authenticate on Trustelem to access the apps, not to add MFA on Windows login.
For a user point of view, it’s a passwordless authentication:
-
when a user logs in to his computer, he receives a Kerberos token from Active Directory.
-
when the user goes to Trustelem, the browser sends the Kerberos token from the computer to Trustelem.
-
Trustelem sends the Kerberos token to Active Directory in order to validate it.
If everything is ok, the user is logged in, with his identity based on the Kerberos token.
Trustelem admin configuration
The option « Integrated Windows Authentication » under security tab ( https://admin-mydomain.trustelem.com/app#/security) must be enabled.
In addition, you need to check the following points:
-
the IP range of your internal network must be properly set and the user authentication must come from this network (IWA is only enabled on the internal zone).
-
the authentications must be done through
https://mydomain.trustelem.com(Trustelem admin console does not allow IWA). -
a Trustelem ADConnect connector linked to your Active Directory (on a Windows machine) must be active and running.
-
the user whose Windows session is running must have been previously imported from your Active Directory server.
Note: your logs (https://admin-mydomain.trustelem.com/app#/logs) will have a login failure entry with the users identity if a user from your domain is identified by IWA but was not registered with Trustelem.
Server configuration
-
Connect to one of your servers as a domain administrator.
-
Open a command interpreter and enter the following command, after replacing ‘trustelem-user’ with the name of the user running Trustelem ADConnect connector, and ‘mydomain’ by the name of your Trustelem subscription domain:
setspn -s HTTP/mydomain.trustelem.com trustelem-user
Client configuration
Enabling IWA on your clients is a browser-specific operation.
-
Connect to a domain controller as a domain administrator
-
Download the file present in this link https://support.google.com/chrome/a/answer/187202
/!\ if the IWA for Chrome stops working, you may need to redownload the file and reinstall the GPO.
For exemple, Chrome version 86 broke compatibility with the previous Chrome GPO. -
Extract the folder
-
Open the Group Policy Management Console (gpmc.msc)
-
Choose an existing GPO or create a new one
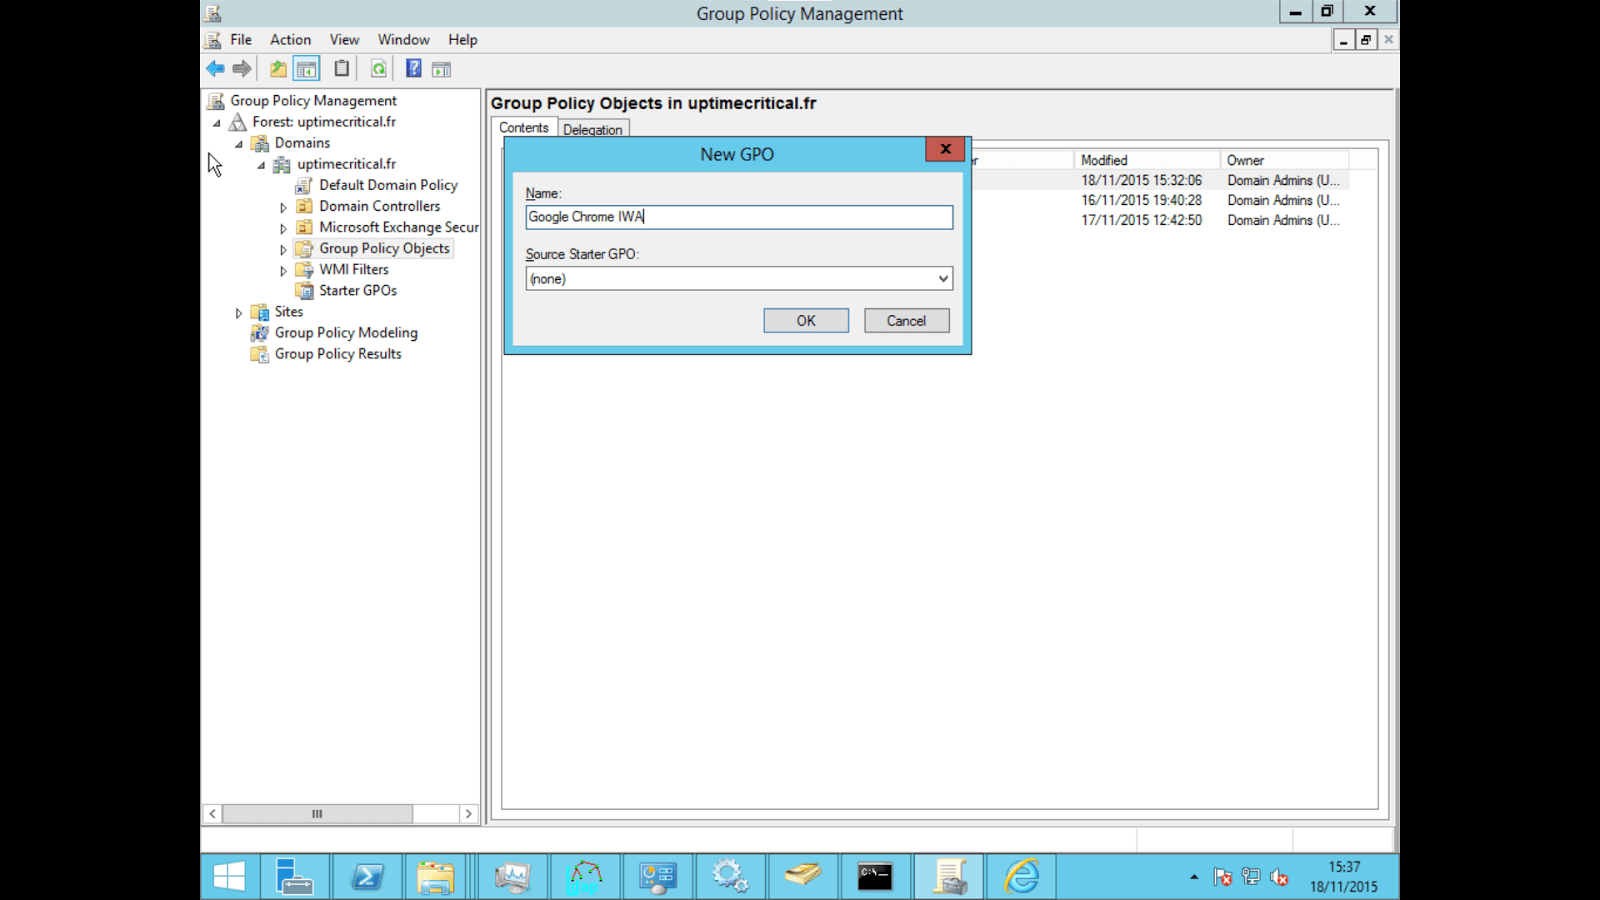
-
Edit the policy (Right click > Edit)
-
Navigate to User Configuration/Policies/Administrative Template, right click > «Add/Remove a template»
-
Click on «Add» and select the file in the previously extracted folder (policy_template/windows/adm/{langue}/chrome.adm)
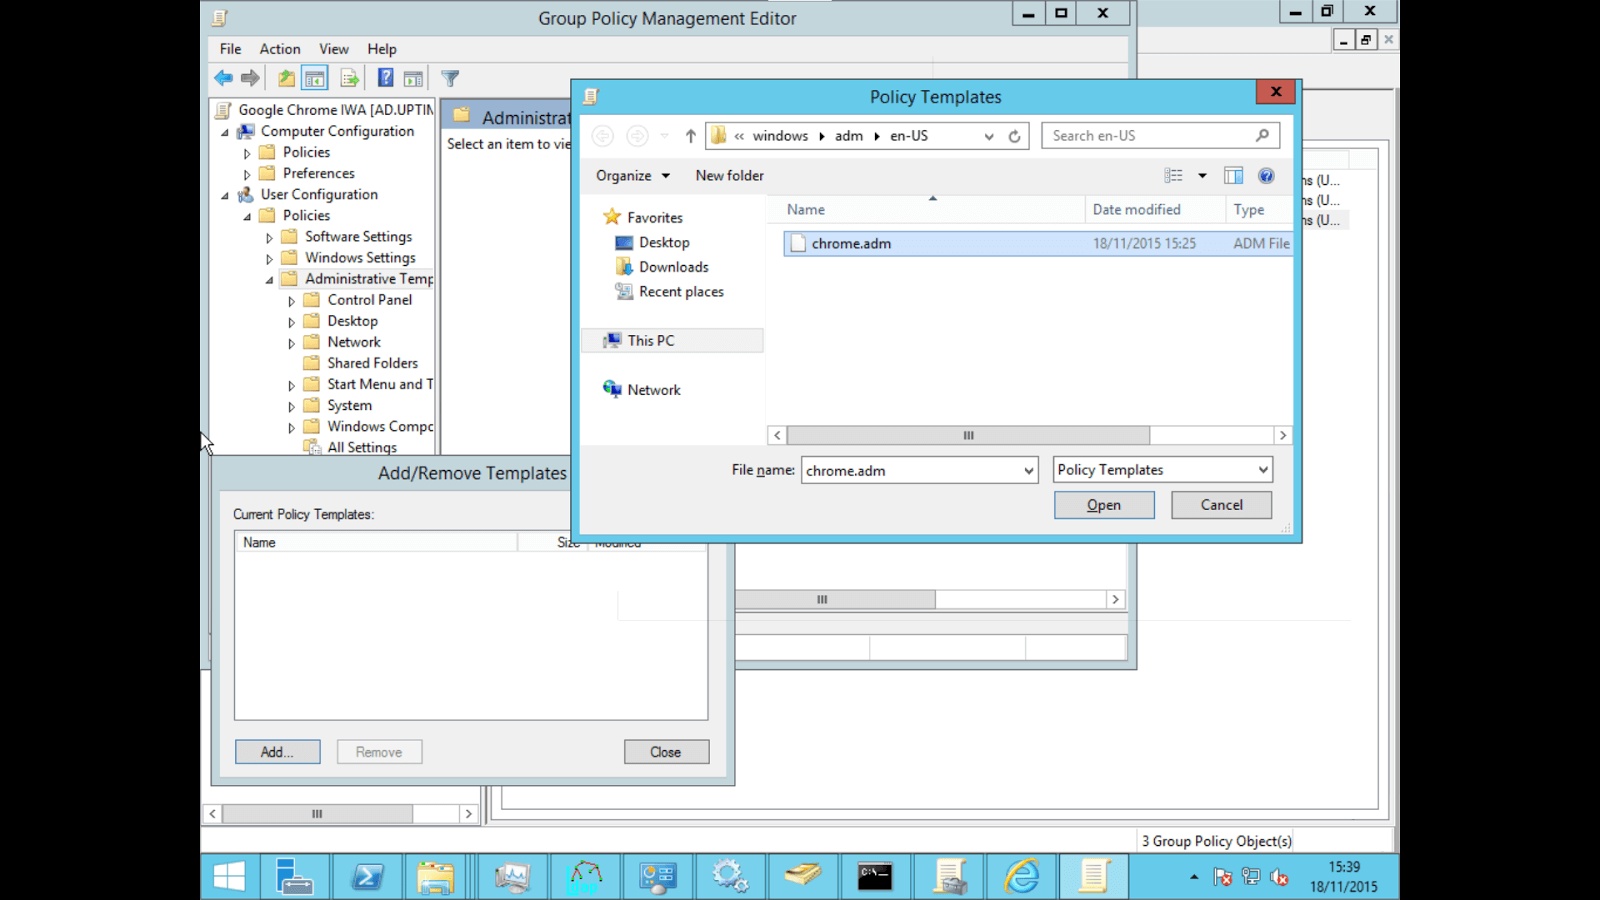
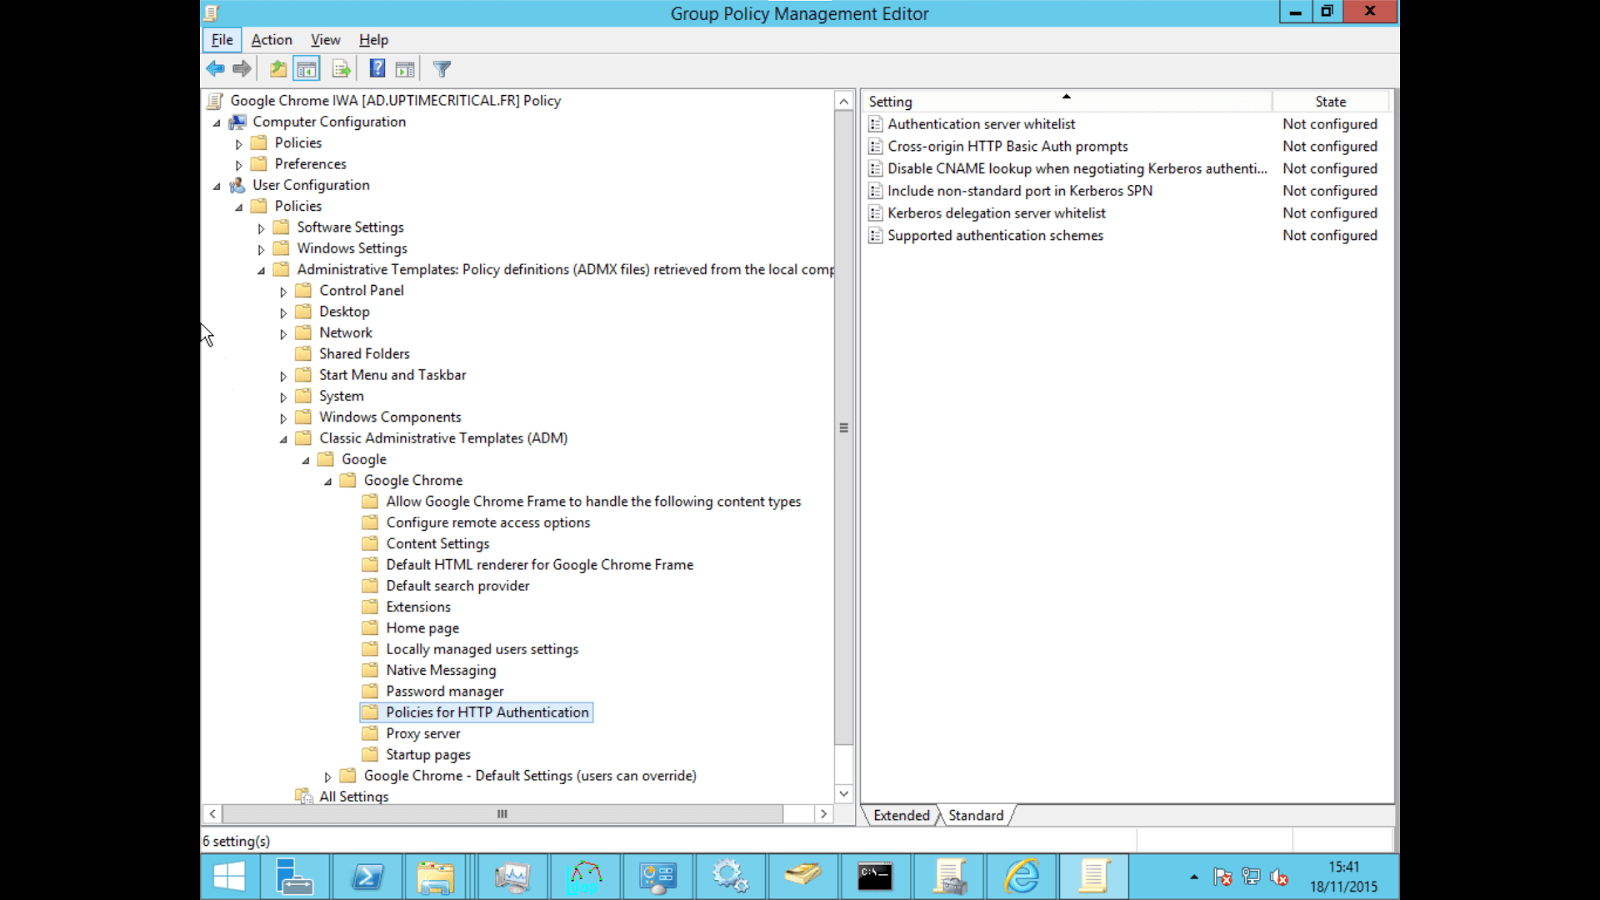
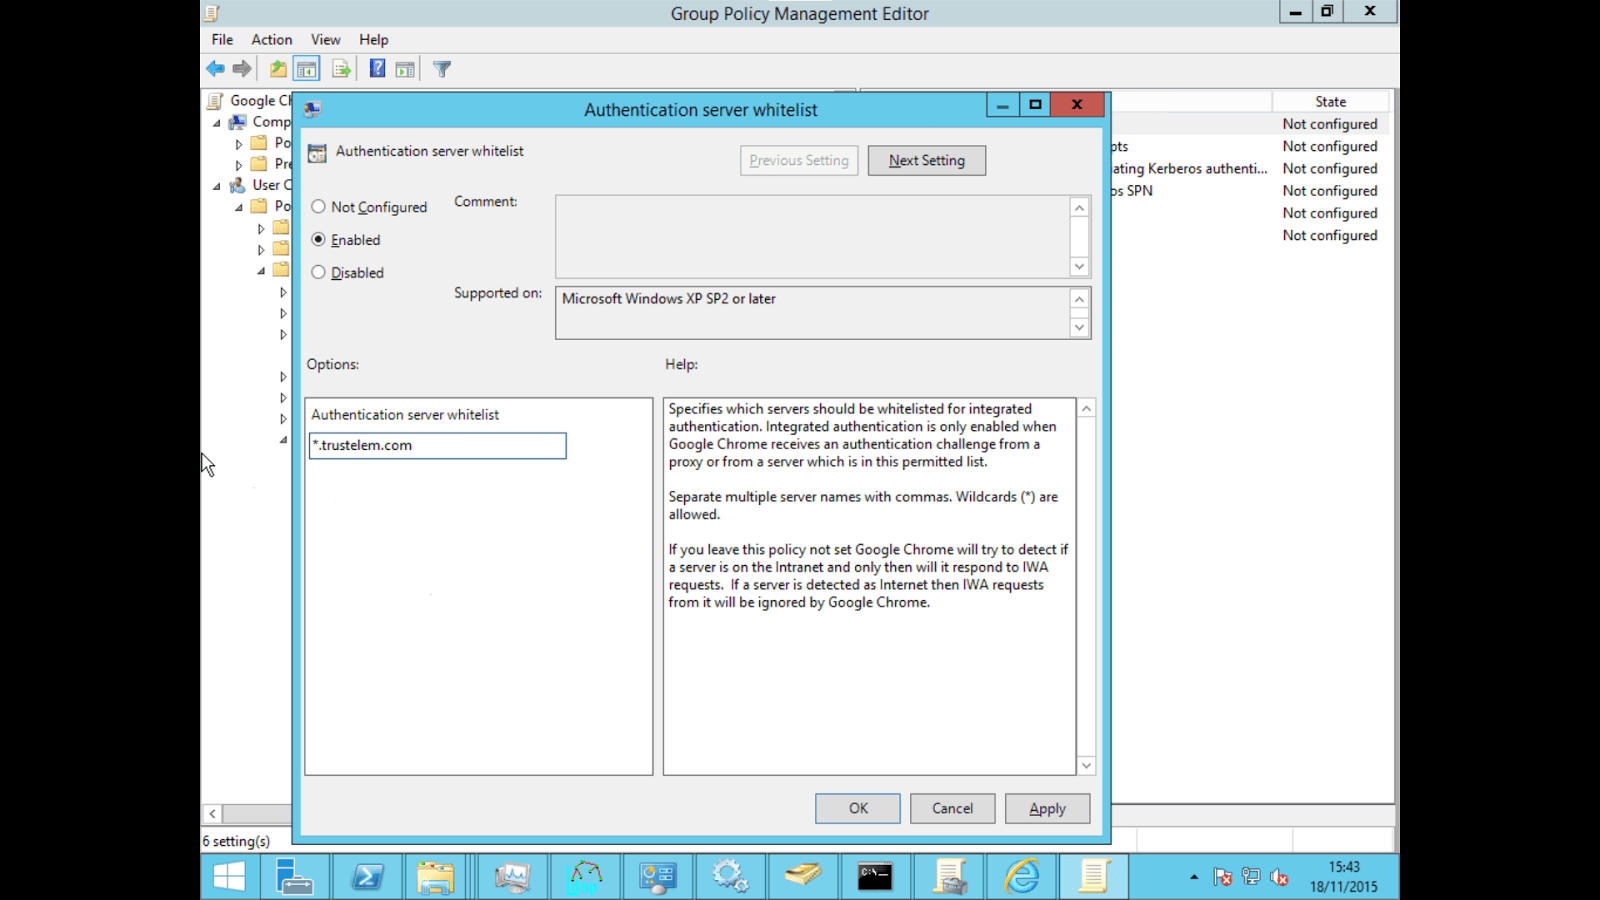
- Navigate to User Configuration/Policies/Administrative Template/Classic Administrative Templates(ADM)/Google/Google Chrome/HTTP Authentication/Authentication server whitelist, right click > «Edit».
- Click on «Enabled» and enter «*.trustelem.com» in the value field
-
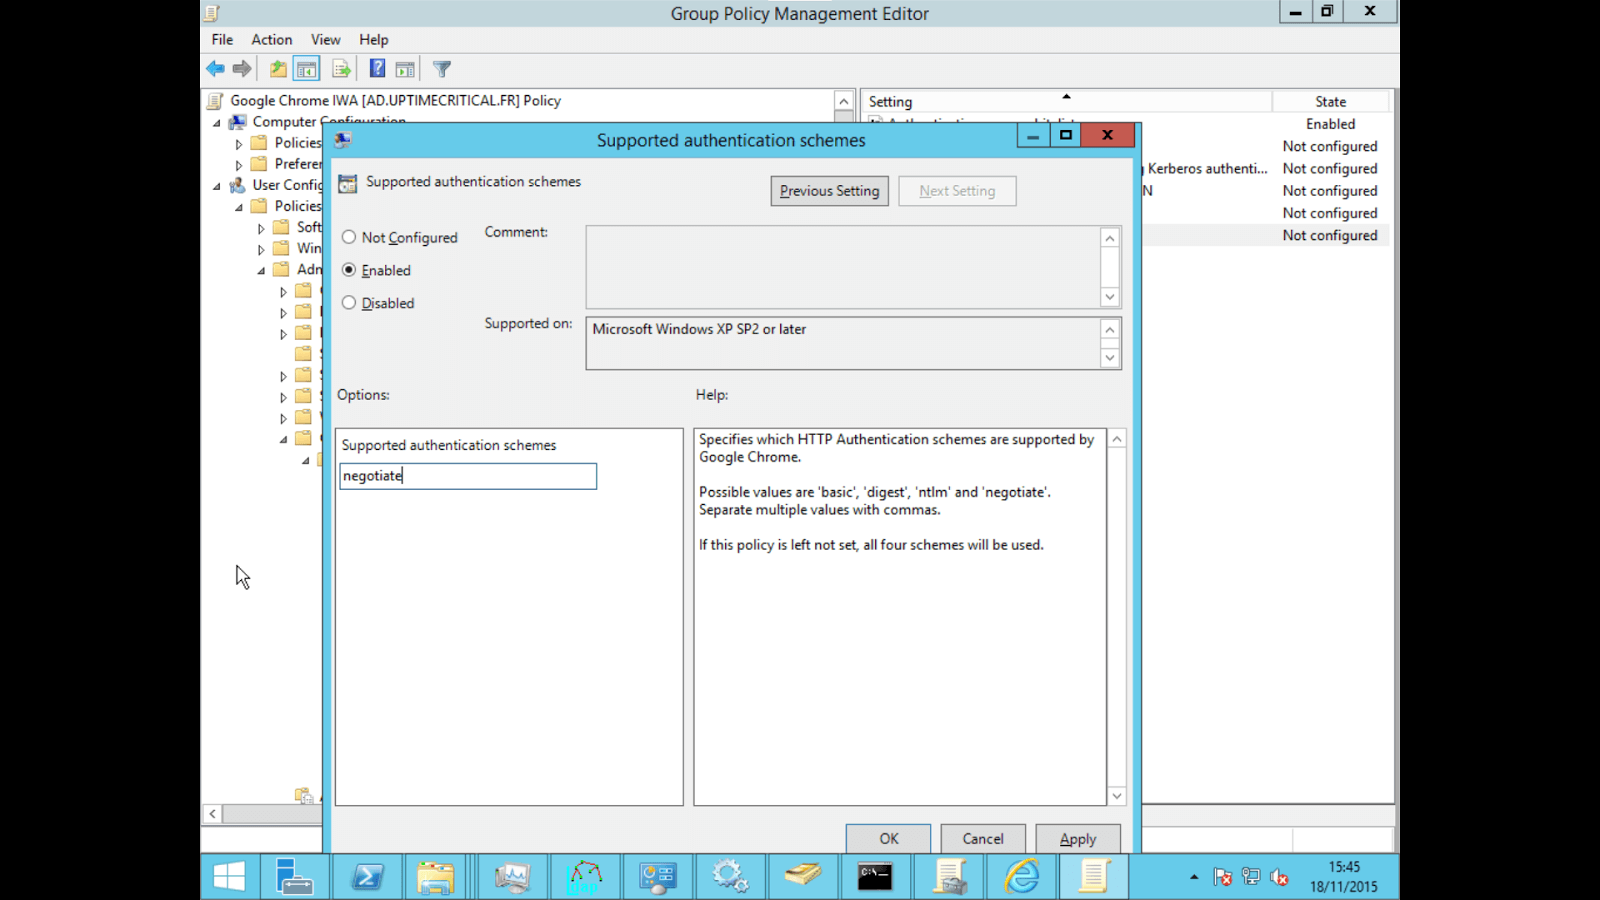
Navigate to User Configuration/Policies/Administrative Template/Classic Administrative Templates(ADM)/Google/Google Chrome/HTTP Authentication/Supported authentication schemes, right click > «Edit»
-
Click on «Enabled» and enter «negotiate» in the value field
- Verify that the GPO is enabled and linked to your domain
Note: with the new Edge based on Chromium, you have to go here: https://www.microsoft.com/en-us/edge/business/download?form=MA13FJ and click on Download Windows XX-bit policy. Then follow the Google GPO process.
-
Connect to a domain controller as a domain administrator
-
Open the Group Policy Management Console (gpmc.msc)
-
Choose an existing GPO or create a new one

-
Edit the policy (Right click > Edit)
-
Navigate to User Configuration/Policies/Administrative Template/Windows Components/Internet Explorer/Internet Control Panel/Security Page/Site to Zone Assignment List, right click > «Edit»
-
Click on «Enabled» and enter «*.trustelem.com» in the first field and «1» (Intranet zone) in the second field
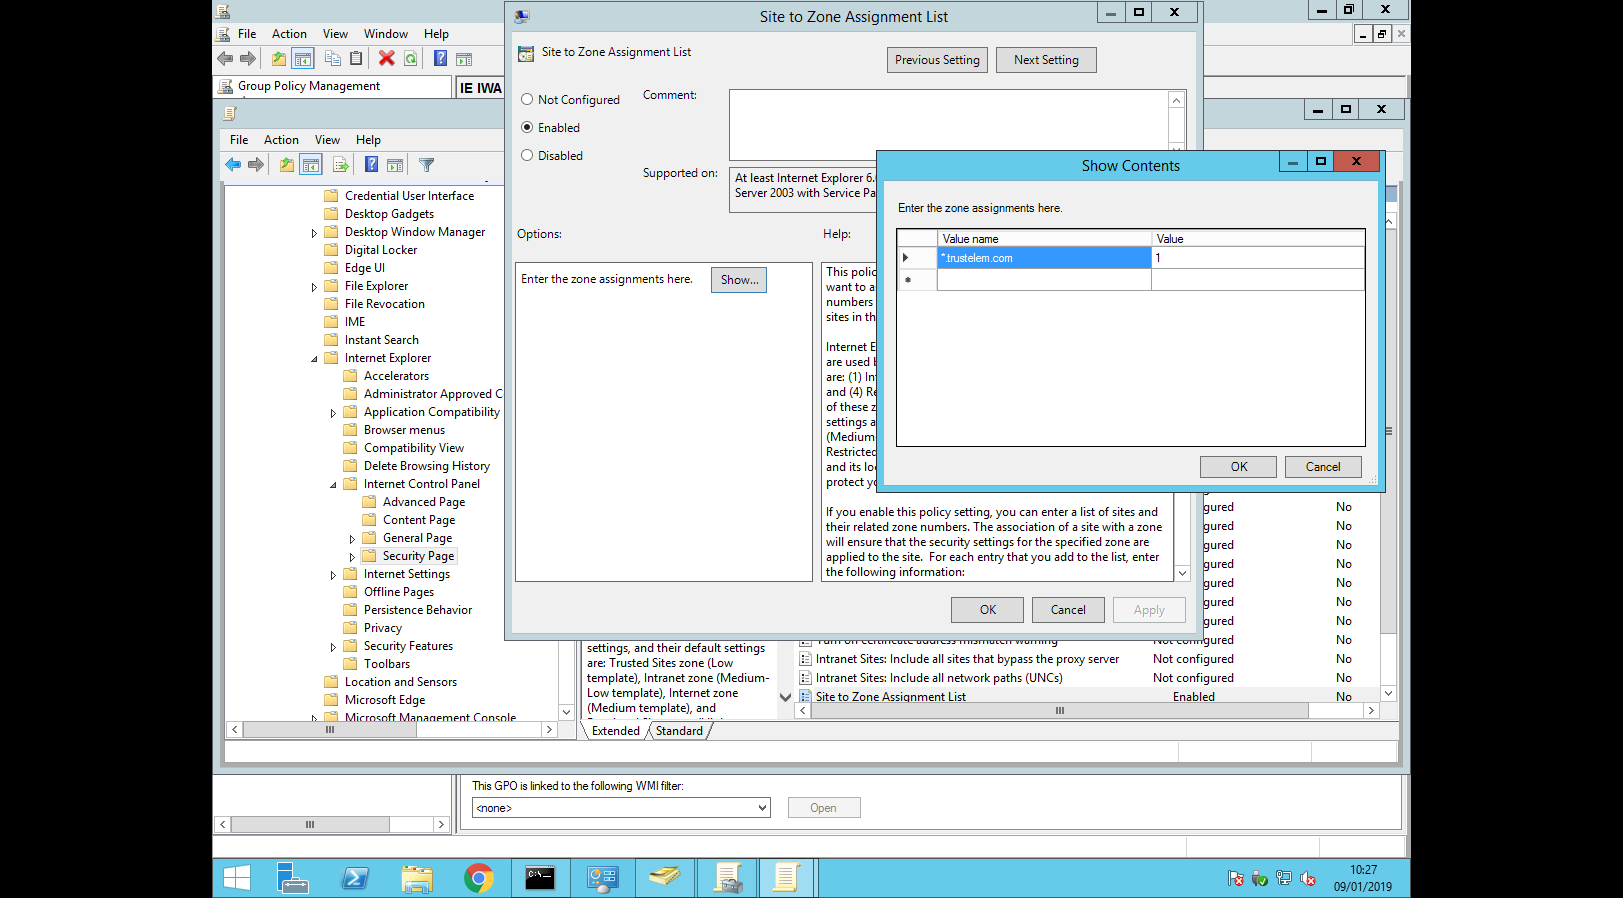
-
Navigate to User Configuration/Policies/Administrative Template/Windows Components/Internet Explorer/Internet Control Panel/Security Page/Intranet Zone/Logon Options, right click > «Edit»
-
Click on «Enabled» and choose «Automatic logon with current username and password»

- Check that the GPO is enabled and linked to your domain
-
Connect to a domain controller as a domain administrator
-
Download the GPO: https://github.com/mozilla/policy-templates/releases
-
Extract the folder, copy firefox.admx and firefox.adml for windows to your policy folder (usually C://Windows/PolicyDefinitions).
-
Open the Group Policy Management Console (gpmc.msc)
-
Choose an existing GPO or create a new one
-
Edit the policy (Right click > Edit)
-
Navigate to User Configuration/Policies/Administrative Templates/Firefox/Authenticaton/SPNEGO, right click > «Edit».
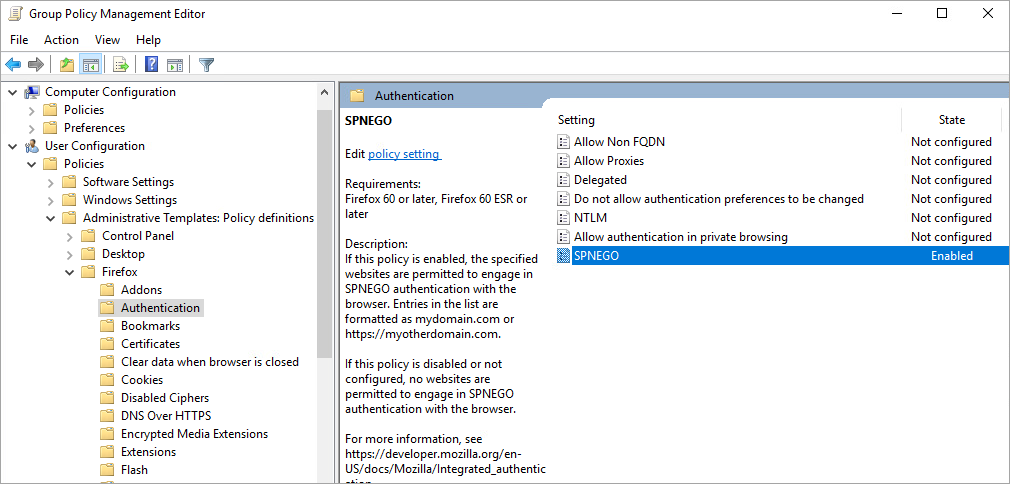
- Click on «Enabled» then «Show» and enter «https://mydomain.trustelem.com» in the value field

- Verify that the GPO is enabled and linked to your domain
-
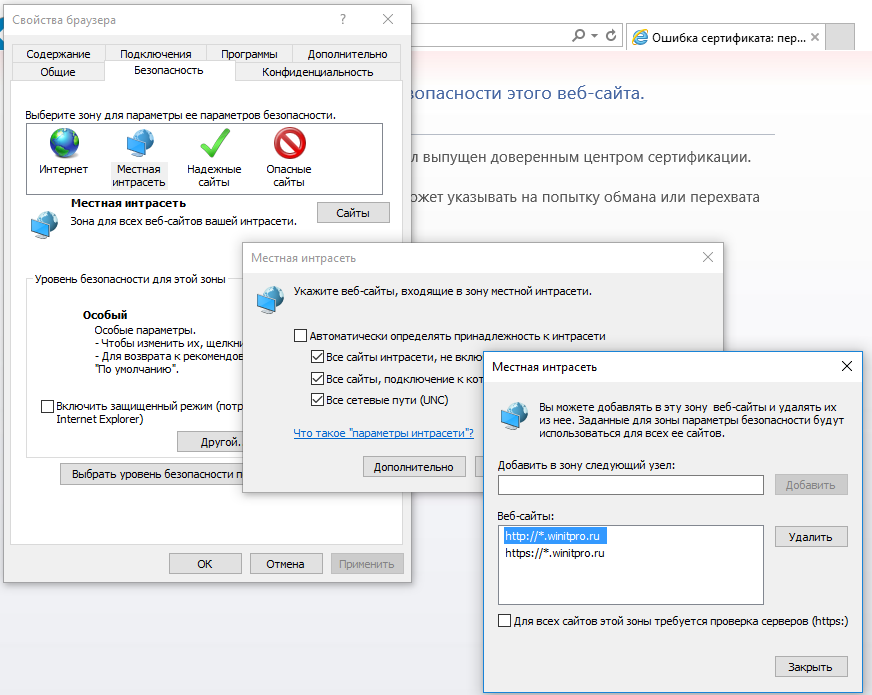
In the Windows start menu, search: Internet Options > Security
-
Select Local Intranet, then click on Sites
-
In the Local Intranet window, make sure that Include all local sites (intranet) not mentioned in other zones is checked, the click on Advanced
-
In the Local Intranet window, enter *.trustelem.com to the zone, so as to activate Single Sign-On. Click on OK, the close the Local Intranet window
-
In the Internet Options > Security > Local Intranet window, click on Custom Level… > User Authentication and choose Automatic logon with current username and password
-
Click on OK. Restart Microsoft Internet Explorer / Edge so as to activate this configuration
-
On user desktops, open an Active Directory-authenticated session
-
Launch Firefox
-
In the address bar, enter about:config
-
Select the network.negotiate-auth.trusted-uris parameter
-
Enter your custom Trustelem hostname: mydomain.trustelem.com or add it to the list, separated by commas
-
Click OK
-
Restart Firefox