
Основная цель, с которой включают режим разработчика обычные пользователи Windows 11 — установка UWP приложений не из магазина Microsoft Store, хотя этим его функциональность не ограничивается.
В этой простой пошаговой инструкции подробно о том, как включить режим разработчика Windows 11 в Параметрах или альтернативными способами: в редакторе реестра, PowerShell или командной строке.
Включение режима разработчика в Параметрах Windows 11
Базовый способ включения режима разработчика — использование соответствующего раздела параметров:
- Откройте Параметры, для этого можно использовать сочетание клавиш Win+I
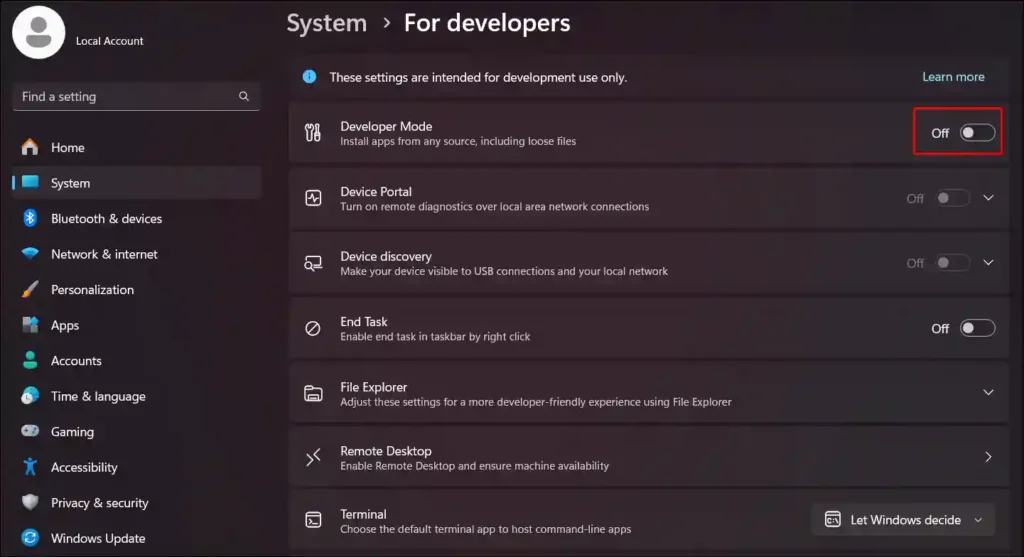
- Перейдите в раздел «Конфиденциальность и защита» и откройте пункт «Для разработчиков».

- В разделе «Режим разработчика» включите переключатель «Установка приложений из любого источника, включая свободные файлы».

- Подтвердите включение режима разработчика.


По сути, на этом действия закончены, хотя на этой же странице настроек представлены и другие опции:
- Портал устройств
- Обнаружение устройств
- Ряд настроек, имеющих отношение к представлению файлов в проводнике, работе удаленного рабочего стола, терминала по умолчанию и возможности выполнения неподписанных скриптов PowerShell
Более подробная информация доступна на официальной странице Майкрософт.
Дополнительные методы включения режима разработчика
За возможность установки приложений из любого источника отвечает соответствующая локальная групповая политика, изменить которую можно в редакторе локальной групповой политики или редакторе реестра.
В Windows 11 Pro и Enterprise удобнее использовать редактор локальной групповой политики:
- Нажмите правой кнопкой мыши по кнопке «Пуск», выберите пункт «Выполнить», введите gpedit.msc и нажмите Enter.
- Перейдите к разделу Конфигурация компьютера — Административные шаблоны — Компоненты Windows — Развертывание пакета приложения.
- В правой панели редактора нажмите дважды по политике «Разрешить разработку приложений Магазина Windows и их установку из интегрированной среды разработки (IDE)».
- Установите «Включено» и примените настройки.


При отсутствии редактора локальной групповой политики (в Windows 11 Домашняя) можно использовать редактор реестра:
- Нажмите клавиши Win+R, введите regedit и нажмите Enter.
- Перейдите к разделу реестра
HKEY_LOCAL_MACHINE\SOFTWARE\Microsoft\Windows\CurrentVersion\AppModelUnlock
а при его отсутствии — создайте этот раздел.
- В этом разделе создайте параметр DWORD32 с именем AllowDevelopmentWithoutDevLicense и значением 1 (если параметр уже присутствует — дважды нажимаем по нему и изменяем значение с 0 на 1). Также может иметь смысл изменить значение параметра AllowAllTrustedApps в этом разделе на 1 (разрешает установку неопубликованных приложений, отдельно от включения режима разработчика).

- Готово, режим разработчика включен.

То же самое можно сделать в командной строке или PowerShell (требуется запуск от имени администратора), по порядку выполнив следующие две команды:
reg add "HKEY_LOCAL_MACHINE\SOFTWARE\Microsoft\Windows\CurrentVersion\AppModelUnlock" /t REG_DWORD /f /v "AllowAllTrustedApps" /d "1"
reg add "HKEY_LOCAL_MACHINE\SOFTWARE\Microsoft\Windows\CurrentVersion\AppModelUnlock" /t REG_DWORD /f /v "AllowDevelopmentWithoutDevLicense" /d "1"
На этом всё. Если остаются вопросы, жду их в комментариях к статье.

Enable Windows 11 Developer Mode : Developer Mode in Windows 11 is a setting that allows users to access features and tools specifically designed for developers. When Developer Mode is enabled, it provides additional capabilities and options to customize the Windows environment for development purposes like Windows Subsystem for Linux(WSL), App Development , Performance Monitoring , and more. Developers can also customize their development environment more extensively, such as enabling additional debugging options, accessing developer-focused settings , and configuring developer-specific features. The following are the simple steps involved in this process.
- Go to Windows Settings using the shortcut Win Key + I.
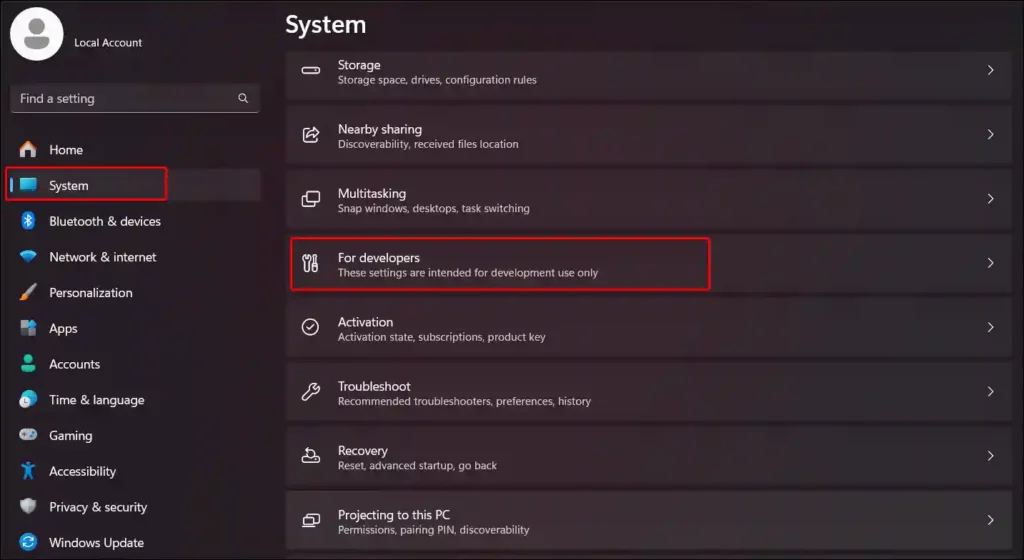
- From the left pane, click on System.

System
- Scroll down and locate the For Developers option.

For Developers
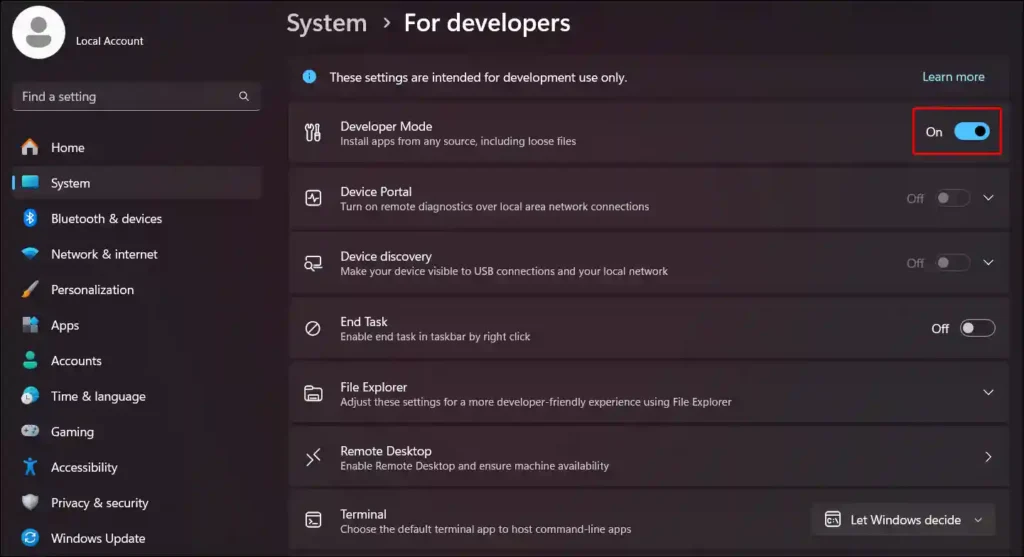
- Toggle the Developer Mode Switch to ON.
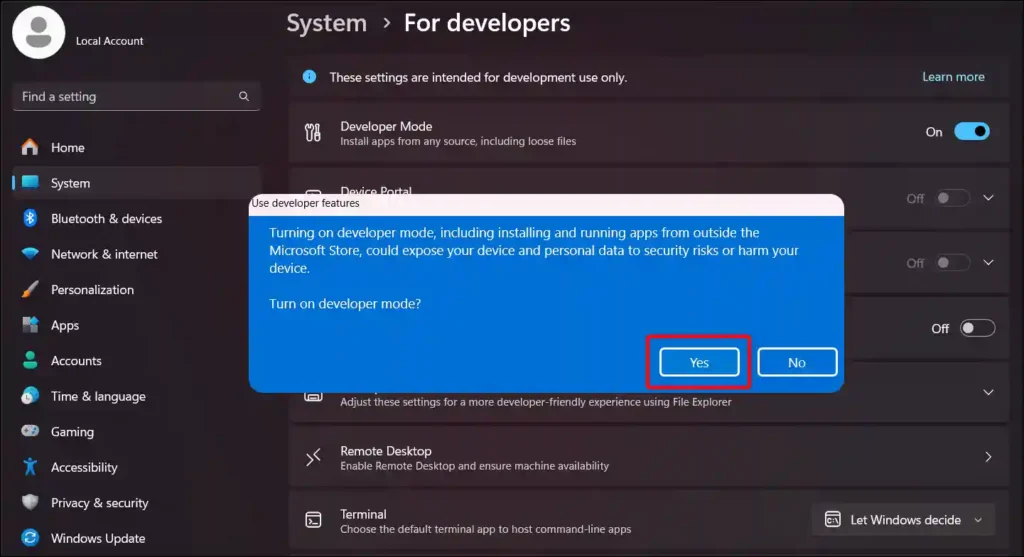
- Use Developer Features dialogue box will display the risks of enabling Developer Mode in Windows 11. If you are okay with the terms, click YES.

Use Developer Features
- That is it. Developer Mode is now enabled in the Windows 11 OS.


IMPORTANT
Turning on developer mode, including installing and running apps from outside the Microsoft Store, could expose your device and personal data to security risks or harm your device.
Exploring Windows 11 Developer Mode:
Developer Mode in Windows 11 empowers developers and IT professionals to create, test, and optimize software applications effectively by providing access to essential tools, developer settings, and performance monitoring capabilities within the Windows 11 operating system.

-
Windows Subsystem for Linux (WSL): With Developer Mode enabled, you can utilize WSL to run a Linux distribution alongside Windows. This feature is valuable for developers who work with Linux-based tools and environments. Check out: How to Enable Windows Subsystem for Linux in Windows 11?
Windows Terminal : It grants access to Windows Terminal, a modern command-line tool that integrates multiple shells and command-line interfaces (CLI) in one application. It provides a more efficient and customizable command-line experience. - Sideload Apps : Developer Mode allows you to install and test apps from sources other than the Microsoft Store, which is useful for app development and testing purposes.
- Developer Settings : It provides access to developer-specific settings and configurations , allowing developers to fine-tune their development environment according to their needs.
- Debugging Options : The mode includes debugging tools and options for troubleshooting and debugging applications, making it easier to identify and resolve issues during development.
- Developer-Focused Features : Enabling Developer Mode unlocks additional features and functionalities that cater specifically to developers, such as advanced networking options, virtualization support, and system configuration tools.
- Custom Environment Setup : Developers can customize their development environment by installing developer tools, SDKs, frameworks, and libraries , creating an environment tailored to their development workflows.
- Integration with Development Tools : It integrates seamlessly with development tools like Visual Studio , Visual Studio Code , and other IDEs , providing a cohesive development experience on Windows 11.
Take away:
Developer Mode in Windows 11 enhances productivity and enables developers to create, test, and optimize software applications efficiently. However, it comes with its own risk, It is advisable to use it accordingly. As the name suggests, this mode is more suitable for Developers, and hence normal users, think twice before you turn this feature in your Windows 11. Happy Coding! Peace out!
Enabling Developer Mode on Windows 11 can unlock a plethora of advanced customization options and access to powerful development tools. Whether you’re a professional developer or simply an enthusiast looking to explore the capabilities of your computer, enabling Developer Mode can provide you with an enhanced Windows experience.
To enable Developer Mode on Windows 11, you can follow a few simple steps. First, open the Settings app by clicking on the Start button and selecting the gear icon. Then, navigate to the «Update & Security» section and click on «For developers» in the left sidebar. Finally, click on the toggle switch to enable Developer Mode. Once enabled, you’ll have the ability to install and run apps from outside the Microsoft Store, access additional development tools, and customize various settings to meet your specific needs.
Enabling Developer Mode on Windows 11 allows users to access advanced settings and features for development purposes. Follow these steps to enable Developer Mode:
- Open the Settings app by pressing Win + I.
- Select «Update & Security» and then click on «For developers.»
- Under the «Use developer features» section, choose the «Developer mode» radio button.
- Windows will prompt you to confirm the action. Click «Yes» to enable Developer Mode.
- Restart your computer.

Introduction
Windows 11 is the latest operating system developed by Microsoft, and it comes with various features and functionalities designed to enhance the user experience. One of the key features available on Windows 11 is the Developer Mode, which allows users to access advanced settings and tools that are specifically designed for developers. Enabling Developer Mode on Windows 11 can provide developers with more control over the system, allowing them to test and debug applications more efficiently. In this article, we will discuss how to enable Developer Mode on Windows 11 and take advantage of its features for development purposes.
What is Developer Mode in Windows 11?
Developer Mode in Windows 11 is a built-in feature that enables developers to access advanced settings and tools that are not available in the regular user mode. When Developer Mode is turned on, it allows developers to install and test unsigned applications, use debugging tools, and access other features that are essential for software development. Enabling Developer Mode grants developers greater control over the system, allowing them to customize and optimize their development environment according to their specific requirements.
With Developer Mode enabled, developers can sideload applications, which means they can install and test applications directly from their local storage or other sources without going through the Microsoft Store. This is particularly useful for developers who want to test their applications in a controlled environment before submitting them to the Microsoft Store or distributing them to others. Developer Mode also provides access to additional diagnostic tools and settings that can help with application troubleshooting and performance optimization.
Enabling Developer Mode on Windows 11
Enabling Developer Mode on Windows 11 is a straightforward process. Here are the steps to enable Developer Mode:
- Open the Settings app by clicking on the Start button and selecting the gear icon in the left-hand side menu.
- In the Settings window, click on the «System» category.
- In the System settings, click on the «About» option in the left-hand side menu.
- Scroll down on the right-hand side until you find the «Developer mode» section.
- Click on the toggle switch to turn on Developer Mode. You may be prompted to confirm your selection.
- Once Developer Mode is enabled, you will have access to additional settings and tools for developers.
It is important to note that enabling Developer Mode requires administrative privileges, so you may be prompted to enter your administrator password or provide confirmation before proceeding.
Benefits of Enabling Developer Mode
Enabling Developer Mode on Windows 11 opens up a range of benefits and additional features for developers. Some of the key benefits include:
- The ability to sideload applications by installing them directly from local storage or other sources without going through the Microsoft Store.
- Access to additional diagnostic tools and settings, which can help with application troubleshooting and optimization.
- The ability to test and debug unsigned applications without restrictions.
- Flexibility in customizing the development environment according to specific requirements.
- Enhanced control over system settings and features for a more efficient development workflow.
By enabling Developer Mode, developers can create a more tailored and versatile development environment, allowing them to streamline their workflows and optimize their applications for Windows 11.
Important Considerations
While Developer Mode provides developers with advanced capabilities, there are a few important considerations to keep in mind:
- Enabling Developer Mode may expose your system to potential security risks since it allows the installation of unsigned applications.
- Be cautious when installing applications from unreliable sources, as they may contain malicious software.
- Always ensure that you have a reliable antivirus software installed and updated to minimize security risks.
By being mindful of these considerations and taking necessary precautions, developers can safely leverage the benefits of Developer Mode without compromising the security and integrity of their systems.
Exploring Additional Developer Mode Features
In addition to enabling Developer Mode, Windows 11 offers various features and tools to enhance the development experience for developers. Let’s explore some of these features:
Windows Subsystem for Linux (WSL) 2
The Windows Subsystem for Linux (WSL) 2 is a powerful feature that allows developers to run a Linux environment directly on Windows 11. With WSL 2, developers can seamlessly develop, run, and test Linux applications without the need for dual-booting or using virtual machines. This feature offers a high-performance Linux kernel, full system call compatibility, and the ability to run both command-line and graphical Linux applications. Developers can leverage the benefits of both Windows and Linux ecosystems, bringing more flexibility and convenience to the development process.
To enable WSL 2, follow these steps:
- Open the Settings app and navigate to the «Apps» category.
- In the Apps settings, click on the «Programs and Features» option.
- In the Programs and Features window, click on the «Turn Windows features on or off» link in the left-hand side menu.
- Scroll down until you find «Windows Subsystem for Linux» and check the box next to it.
- Click on the «OK» button and wait for the installation to complete.
- Once WSL is enabled, you can install your preferred Linux distribution from the Microsoft Store.
After installing a Linux distribution, you can access it through the Windows Terminal or your preferred command-line interface. This allows you to seamlessly switch between Windows and Linux environments for your development needs.
The Power of WSL 2 for Developers
WSL 2 provides developers with several advantages:
- Ability to utilize Linux command-line tools and utilities without leaving Windows 11.
- Improved performance and compatibility compared to WSL 1.
- Access to the vast ecosystem of Linux applications and libraries.
- Seamless integration between Windows and Linux environments.
- Efficient collaboration between cross-platform development teams.
With the Windows Subsystem for Linux 2, developers can leverage the power of both Windows and Linux for their development workflows, enabling them to create robust and efficient applications.
Windows Terminal
The Windows Terminal is a modern and feature-rich command-line interface (CLI) application that provides developers with a unified experience for accessing multiple command-line tools and environments. With the Windows Terminal, developers can have tabs with different profiles, including Command Prompt, PowerShell, Azure Cloud Shell, and various Linux distributions running through WSL. It offers customization options for appearance, key bindings, and other settings, allowing developers to personalize their command-line experience.
To install Windows Terminal, follow these steps:
- Open the Microsoft Store on your Windows 11 system.
- Search for «Windows Terminal.»
- Select the Windows Terminal app from the search results and click on «Install.»
- Once installed, you can launch Windows Terminal from the Start menu or by searching for it.
Windows Terminal provides a unified and powerful command-line experience for developers, making it easier to use different tools and environments from a single interface.
Key Features of Windows Terminal
Windows Terminal offers several key features for developers:
- Support for multiple command-line environments, including Command Prompt, PowerShell, and Azure Cloud Shell.
- Ability to create custom profiles for different command-line tools and services.
- Customization options for appearance, themes, and key bindings.
- Seamless integration with WSL and the Windows command-line ecosystem.
- Tab-based interface for managing multiple command-line sessions.
Windows Terminal enhances productivity and ease of use for developers, simplifying the process of managing and switching between different command-line environments in Windows 11.
Visual Studio Code
Visual Studio Code (VS Code) is a powerful and popular code editor, widely used by developers for various programming languages and projects. It provides a rich set of features such as intelligent code completion, built-in debugging, Git integration, extensions marketplace, and more. Visual Studio Code offers seamless integration with Windows 11, enabling developers to build, test, and debug applications with ease. It supports a wide range of programming languages and frameworks, making it a versatile choice for developers across different domains.
To install Visual Studio Code, follow these steps:
- Visit the Visual Studio Code website at https://code.visualstudio.com/download.
- Click on the download button to download the Visual Studio Code installer for Windows.
- Once downloaded, run the installer and follow the on-screen instructions.
- After the installation is complete, you can launch Visual Studio Code from the Start menu or by searching for it.
Visual Studio Code offers a comprehensive development environment with a range of extensions and features that enhance productivity and improve the coding experience for developers.
Key Features of Visual Studio Code
Visual Studio Code provides developers with numerous features and capabilities:
- Intelligent code completion and suggestions for various programming languages.
- Built-in debugging and testing capabilities.
- Extensive library of extensions for additional functionality and language support.
- Git integration for seamless version control.
- Highly customizable and adaptable to different development workflows.
Visual Studio Code empowers developers with a versatile and efficient code editing environment, enabling them to create high-quality applications with ease.
Conclusion
Enabling Developer Mode on Windows 11 provides developers with enhanced control, flexibility, and access to advanced tools and settings for optimizing their development environment. By following the simple steps to enable Developer Mode, developers can leverage the benefits of sideloading applications, accessing additional diagnostics tools, testing unsigned applications, and customizing their development workflows.

Enabling Developer Mode on Windows 11
Enabling Developer Mode on Windows 11 allows users to access advanced settings and features for app development and debugging purposes. Follow the steps below to enable Developer Mode:
1. Open the Windows Settings by clicking on the Start menu and selecting the gear icon.
2. In the Settings window, click on the «Update & Security» option.
3. Select «For developers» from the left sidebar.
4. Under the «Use developer features» section, click on the dropdown menu and select «Developer mode.»
5. A confirmation prompt will appear. Click «Yes» to enable Developer Mode.
6. After enabling Developer Mode, you will have access to additional developer settings and features on Windows 11.
Please note that enabling Developer Mode should be done carefully as it grants higher permissions and may affect system stability. It is recommended for experienced users and developers.
Key Takeaways for «How to Enable Developer Mode on Windows 11»:
- Developer mode on Windows 11 allows users to access advanced features and tools for software development.
- To enable developer mode on Windows 11, go to the Settings app and navigate to the «Update & Security» section.
- Click on the «For developers» tab and select the «Developer mode» option.
- Enabling developer mode may void some security measures, so it’s important to understand the potential risks before enabling it.
- Once developer mode is enabled, users can install and test applications that are not available on the Microsoft Store.
Frequently Asked Questions
Here are some common questions and answers about enabling Developer Mode on Windows 11:
1. What is Developer Mode on Windows 11?
In Developer Mode, Windows 11 allows developers to test and debug their applications, install unsigned apps, and access advanced development tools and features. It provides more flexibility and control for developers to customize their Windows environment.
Enabling Developer Mode is essential for software developers, programmers, and IT professionals who need to experiment with different settings and configurations.
2. How do I enable Developer Mode on Windows 11?
To enable Developer Mode on Windows 11, follow these steps:
- Open the «Settings» app by clicking on the Start menu and selecting the gear icon.
- In the Settings app, click on «Update & Security» and then select «For developers» in the left sidebar.
- In the For developers settings, click on the «Developer mode» toggle switch to enable it.
- You may be prompted to confirm the action and restart your computer.
Once Developer Mode is enabled, you can access the additional development features and tools in Windows 11.
3. What are the benefits of enabling Developer Mode on Windows 11?
Enabling Developer Mode on Windows 11 offers several benefits, including:
- Ability to install and test unsigned apps that are not available in the Microsoft Store.
- Access to advanced development features and tools for debugging and troubleshooting applications.
- Full control over app permissions and system configurations.
- Faster and easier deployment of applications for testing purposes.
These benefits make Developer Mode a valuable resource for developers and IT professionals working on Windows 11.
4. Is enabling Developer Mode on Windows 11 safe?
Enabling Developer Mode on Windows 11 is generally safe, but it does come with some risks. By enabling Developer Mode, you’re granting more permissions and access to the system, which could potentially increase the risk of malware or other security threats if you install and run unsigned or untrusted apps.
It’s important to only install trusted apps and software when using Developer Mode and to exercise caution when experimenting with system settings. Always keep your system and apps up to date with the latest security patches and updates.
5. Can I disable Developer Mode on Windows 11?
Yes, you can disable Developer Mode on Windows 11 if you no longer need it. To disable Developer Mode, follow these steps:
- Open the «Settings» app.
- Go to «Update & Security» and select «For developers».
- Click on the «Developer mode» toggle switch to disable it.
- Confirm the action if prompted and restart your computer if necessary.
Disabling Developer Mode will remove the additional development features and tools from Windows 11, restoring the system to its default configuration.
Enabling Developer Mode on Windows 11 is a straightforward process that allows users to access advanced settings and tools for app development and customization. By following a few simple steps, you can unlock the full potential of your Windows 11 device and take advantage of features specifically designed for developers.
To enable Developer Mode on Windows 11, start by opening the Settings app, then navigate to the «Update & Security» section. From there, click on the «For developers» tab and select the «Developer mode» option. Once enabled, you can now install and run unsigned apps and access additional development features like the Windows Subsystem for Linux, PowerShell scripting, and more.
Like Android, now you can turn on or off developer mode in Windows 11 running PC or laptop. If you’re a developer and create applications on your computer yourself, then this developer mode is for you. By turning on the developer option in Windows 11, you can access additional options. In this article, I have shared how to enable or disable developer mode on Windows 11 step-by-step.
This developer mode in Windows 11 allows you to bypass the original system restrictions while installing certain applications. Often, computer users download and install the Apps from Microsoft Store for Windows 11. But a developer always develops the app himself and tests it. And for this, they have to turn on developer mode or developer options.
Developer mode allows you to use many additional features in the computer, like the device portal, authentication, debugging, device discovery, etc. So if you also want to turn on or off this developer mode on your Windows 11 PC, then follow the steps given below only after reading carefully.
To turn on developer mode on Windows 11 running PC or laptop:
1. Open Settings on Your Computer by Pressing Windows + I Shortcut Keys on Keyboard.
2. Click on System > For Developers Option.
3. Turn On Toggle Switch Next to Developer Mode.
4. As Soon As You Enable the Toggle Switch, It will Ask for Confirmation. Click on Yes.
As soon as you activate developer mode on your Windows 11 device, the device portal and device discovery options get turned on.
Also read: How to Enable or Disable Recall on Windows 11
How to Disable Developer Mode on Windows 11
To turn off developer mode on Windows 11 running PC or laptop:
Step 1. Press Windows + I on Keyboard to Quickly Access Windows 11 Settings.
Step 2. Now Click on System then For Developers.
Step 3. Turn off Toggle Switch Next to Developer Mode.
As soon as you deactivate Developer Mode on your computer or laptop, you will be unable to access developer features in Windows 11.
Also read: How to Enable or Disable Variable Refresh Rate on Windows 11
FAQs
Q 1. Why is Developer mode not showing on Windows 11?
Answer – Due to a bug or glitch, sometimes developer mode is missing from Windows 11, and you can’t enable it. In this situation, update the Windows 11 OS and restart your PC or laptop.
Q 2. Where to find Developer mode in Windows 11?
Answer- You can find Developer mode in Windows 11 by going to Settings > System > For Developers > Developer Mode.
Q 3. Is developer mode safe in Windows 11?
Answer – Yes! Developer mode is totally safe if you’re a developer and want to test your own developed application. If you’re not a developer, We would recommend not turning on this option.
Also read: How to Disable Snipping Tool on Windows 11
I hope you found this article helpful and learned how to enable or disable developer mode in Windows 11. If you are facing any kind of problem related to Windows 11, then please tell us by commenting below. Share this article as much as possible.
Hey! This is Mr. Rohit, Founder and Author of Techy Snoop. and I write How to guides about iOS, Android, Windows and Social internet and Technology news.
In this tutorial, we’ll show you multiple methods to enable or disable developer mode in Windows 11. We recommend reading this article to better understand what this feature is and who should enable it.
If you are a developer who builds your own applications on your PC, Windows 11 developer mode is for you. You will have additional rights to create, develop, and test your own software after you enable Developer Mode.
Windows 11 users normally install apps from the Microsoft Store, and Microsoft updates these apps regularly. To be honest, most users do not require custom apps because they are designed for a specific purpose.

If you have bought a new laptop or a PC with Windows 11 preinstalled, the developer mode in Windows 11 is disabled by default. However, if you wish to use this feature, we will show you several different ways to enable it.
See Also: Use “Explain with Copilot” in Notepad on Windows 11
What is Developer Mode in Windows 11?
Developer Mode is a feature that lets developers sideload, install, and test third-party apps on Windows 11. Only developers and testers should use this feature since it enables them to create and test programs outside the Microsoft Store.
As per Microsoft, “If you’re using your computer for ordinary day-to-day activities (such as gaming, web browsing, email, or Office apps), you don’t need to activate Developer Mode, and in fact, you shouldn’t activate it.”
Also Read: 3 Ways to Remove OneDrive from File Explorer in Windows 11
When do you enable your device for development?
So, when should you enable developer mode on your Windows 11 device?
- If you’re writing software with Visual Studio on a computer for the first time, you will need to enable Developer Mode on both the development PC and on any devices you’ll use to test your code.
- If you are a developer looking to sideload, install, and test third-party apps on a Windows 11 PC, this feature is useful for you.
Is developer mode safe on Windows 11?
Can enabling Developer Mode pose security risks? Yes, your PC can be at risk if you enable it for development. The option to enable developer mode is provided for development purposes but also serves as a fundamental security measure to restrict exposure to harmful programs.
If you are going to enable your device for development, the best practice is to move all your personal data to a different PC and use the PC solely for developing apps.
You must exercise caution when you enable your device for development. If you have enabled it for testing, we recommend that you avoid downloading third-party apps from untrustworthy sources.
See Also: Enable/Disable End Task in Taskbar on Windows 11
How to Enable Developer Mode in Windows 11
Enabling developer mode in Windows 11 through Settings is the recommended and easy method. You can do that by following the below steps:
Step 1: Sign in to Windows 11 PC and open Settings by pressing Win+I

Step 2: Select System and now choose the option “For developers.”

Step 3: Under System > For developers, the first option that you see is Developer Mode. Move the toggle to the right to enable developer mode.
The following message appears on the screen.
Turning on developer mode, including installing and running apps from outside the Microsoft Store, could expose your device and personal data to security risks or harm your device. Turn on developer mode?
Click Yes to accept the message and activate developer mode. You can now sideload and install software and apps from any source once you have taken these steps.

Turn Developer Mode Off in Windows 11 Settings
To turn developer mode off via Windows 11 settings, perform these steps. Sign in to your Windows 11 PC and open Settings by pressing Win+I. Select System, and now choose the option “For developers.” Switch the toggle under “Developer Mode” to the left to disable it.

Turn on or off developer mode in Windows Registry
Another way to quickly activate the developer mode in Windows 10/11 is via registry. On the Windows PC, open the registry editor by running the command “regedit.exe“.
In the registry editor, navigate to the following path:
Computer\HKEY_LOCAL_MACHINE\SOFTWARE\Microsoft\Windows\CurrentVersion\AppModelUnlock
Double-click the “AllowDevelopmentWithoutDevLicense” DWORD and set the value to 1. This will activate developer mode on your Windows 10/11 PC.

To turn developer mode off in the Windows registry, all you need to do is go to the below registry path and double-click the “AllowDevelopmentWithoutDevLicense” DWORD and set the value to 0.
Computer\HKEY_LOCAL_MACHINE\SOFTWARE\Microsoft\Windows\CurrentVersion\AppModelUnlock

Enable or Disable Developer Mode in Local Group Policy Editor
If the option to turn on developer mode does not work, or you receive the error message “Developer mode is disabled on this device by system policy,” we recommend that you enable developer mode using the Group Policy Editor.
You can enable developer mode in Windows 11 Home, but we recommend using Windows 11 Pro and Enterprise. Also, make sure you are an administrator to make the below changes.
Launch the local group policy editor by running the command “gpedit.msc“. In the GP editor, navigate to Computer Configuration\Administrative Templates\Windows Components\App Package Deployment.
Edit the policy setting “Allows development of packaged Microsoft Store applications and installing them from an integrated development environment.“
- Policy Enabled: If you enable this setting and enable the “Allow all trusted apps to install” group policy, you can develop Microsoft Store apps and install them directly from an IDE.
- Policy Disabled: If you disable or do not configure this setting, you cannot develop Microsoft Store apps or install them directly from an IDE.
To turn on the developer mode, select Enabled. Click Apply and OK.

If you wish to permanently disable the developer mode option in Windows 11, you can do that using the Local Group Policy Editor.
Launch the local group policy editor by running the command “gpedit.msc“. In the GP editor, navigate to Computer Configuration\Administrative Templates\Windows Components\App Package Deployment.
Edit the policy setting “Allows development of packaged Microsoft Store applications and installing them from an integrated development environment.” Select Disabled and click Apply and OK.

Fix: Windows 11 Developer Mode is greyed out
On some Windows 11 PCs, you may notice that the developer mode option is greyed out. If that is the case, you cannot enable developer mode. Listed below are recommended solutions that you can try to resolve this issue.
- The first requirement to enable developer mode on Windows is account permissions. If you are logged in with a guest account, you cannot activate the developer mode. You’ll need to be logged in with an administrator account on Windows 11 to enable or disable developer mode.
- If your Windows 11 PC is joined to an Active Directory domain, your organization may have restricted enabling developer mode via policies. To enable developer mode, request that your organization exclude your device from the group policy.

Still Need Help?
If you need further assistance on the above article or want to discuss other technical issues, check out some of these options.