
Режим AHCI работы жестких дисков SATA позволяет задействовать технологию NCQ (Native Command Queing), DIPM (Device Initiated Power Management) и другие возможности, такие как горячая замена SATA-накопителей. В общих чертах включение режима AHCI позволяет повысить скорость работы жестких дисков и SSD в системе, в основном, за счет преимуществ NCQ.
В этой инструкции — о том, как включить режим AHCI в Windows 10 уже после установки системы, если по какой-то причине переустановка с предварительно включенным в БИОС или UEFI режимом AHCI не представляется возможной, а система была установлена в режиме IDE. Также может быть полезным: Как узнать, включен ли TRIM на SSD и включить функцию.
Нужно ли включать AHCI и как узнать режим работы дисков
Отмечу, что практически для всех современных компьютеров с предустановленной ОС данный режим уже включен, а само изменение особенно актуально для SSD накопителей и ноутбуков, так как режим AHCI позволяет повысить производительность SSD и, одновременно (хоть и незначительно) понизить энергопотребление.
И еще одна деталь: описываемые действия в теории могут привести и к нежелательным последствиям, таким как невозможность запуска ОС. А потому беритесь за них лишь в том случае, если знаете, для чего это делаете, умеете попасть в БИОС или UEFI и готовы в случае чего к исправлению непредвиденных последствий (например, путем переустановки Windows 10 с самого начала в режиме AHCI). Также может иметь смысл предварительно создать точку восстановления системы.
Узнать, включен ли режим AHCI в текущий момент, можно заглянув в настройки UEFI или БИОС (в параметрах SATA устройств) или прямо в ОС:

Также можно открыть свойства диска в диспетчере устройств и на вкладке Сведения посмотреть путь к экземпляру оборудования.

Если он начинается с SCSI — диск работает в режиме AHCI.
Включение AHCI с помощью редактора реестра Windows 10
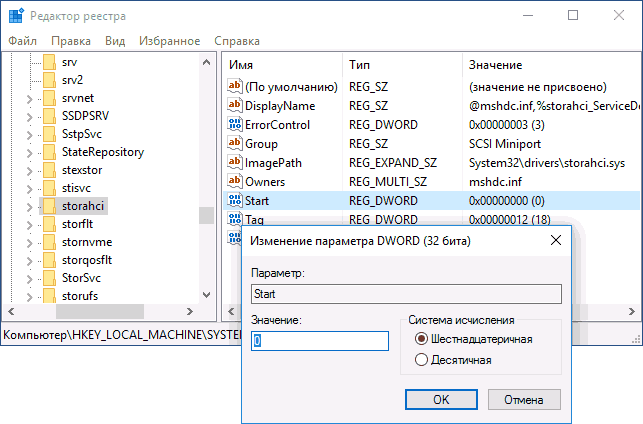
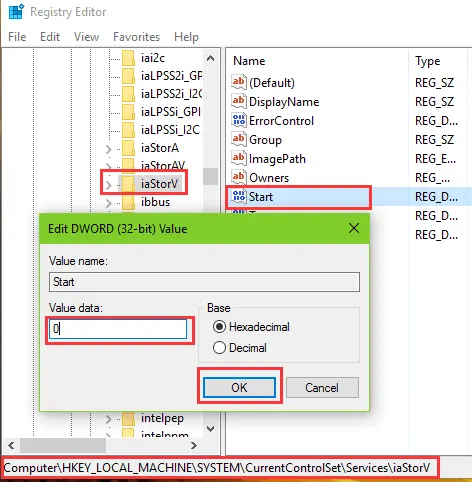
Для того, чтобы задействовать работу жестких дисков или SSD нам потребуются права администратора Windows 10 и редактор реестра. Для запуска реестра нажмите клавиши Win+R на клавиатуре и введите regedit.
- Перейдите к разделу реестра
HKEY_LOCAL_MACHINE\SYSTEM\CurrentControlSet\Services\iaStorV
, дважды кликните по параметру Start и установите его значение равным 0 (ноль).

- При наличии раздела реестра
HKEY_LOCAL_MACHINE\SYSTEM\CurrentControlSet\Services\iaStorAV\StartOverride
для параметра с именем 0 установите значение 0 (ноль).

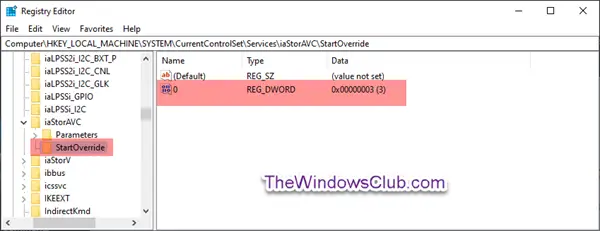
- Если в реестре присутствует раздел
HKEY_LOCAL_MACHINE\SYSTEM\CurrentControlSet\Services\iaStorAVC\StartOverride
проделайте в нём то же самое — измените значение параметра с именем 0 на 0.

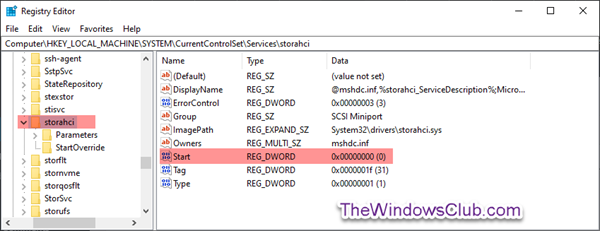
- В разделе
HKEY_LOCAL_MACHINE\SYSTEM\CurrentControlSet\Services\storahci
для параметра Start установите значение 0 (ноль).

- В подразделе
HKEY_LOCAL_MACHINE\SYSTEM\CurrentControlSet\Services\storahci\StartOverride
для параметра с именем 0 установите значение ноль.

- Закройте редактор реестра.


Следующий шаг — перезагрузить компьютер и войти в UEFI или БИОС. При этом первый после перезагрузки запуск Windows 10 лучше провести в безопасном режиме, а потому рекомендую заранее включить безопасный режим с помощью Win+R — msconfig на вкладке «Загрузка» (Как зайти в безопасный режим Windows 10).
Если у вас UEFI, рекомендую в данном случае сделать это через «Параметры» (Win+I) — «Обновление и безопасность» — «Восстановление» — «Особые варианты загрузки». Затем зайдите в «Устранение неполадок» — «Дополнительные параметры» — «Настройки ПО UEFI». Для систем с БИОС — используйте клавишу F2 (обычно на ноутбуках) или Delete (на ПК), чтобы зайти в настройки БИОС (Как зайти в БИОС и UEFI в Windows 10).
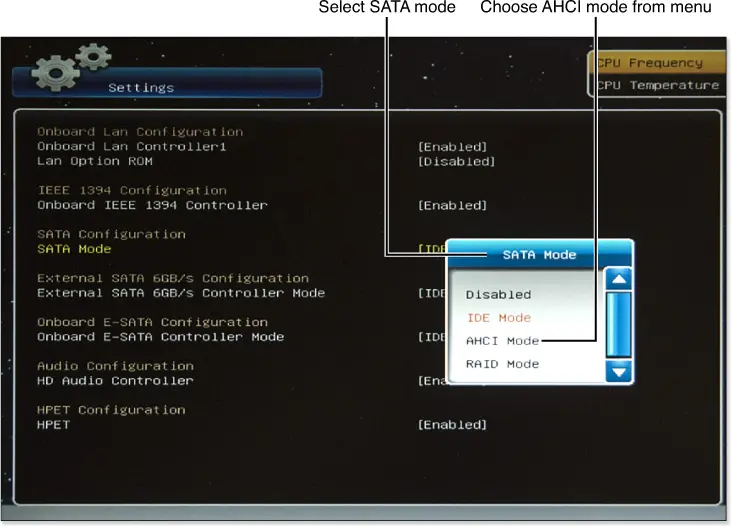
В UEFI или БИОС найдите в параметрах SATA выбор режима работы накопителей. Установите его в AHCI, после чего сохраните настройки и перезагрузите компьютер.
Сразу после перезагрузки ОС начнет устанавливать драйвера SATA, а по завершении вам будет предложено перезагрузить компьютер. Сделайте это: режим AHCI в Windows 10 включен. Если по какой-то причине способ не сработал, обратите внимание также на первый вариант, описанный в статье Как включить AHCI в Windows 8 (8.1) и Windows 7.
Most current motherboards (MOBOs) have AHCI enabled in UEFI or BIOS by default. However, some older motherboards may have IDE enabled by default instead. In this post, we are going to learn how to enable AHCI in Windows 11/10 even after installing the operating system.

What is AHCI?
The Advanced Host Controller Interface (AHCI) specifies the operation of Serial ATA (SATA) host controllers in a non-implementation-specific manner in its motherboard chipsets. The specification describes a system memory structure for computer hardware vendors to exchange data between host system memory and attached storage devices.
What is IDE?
Integrated Drive Electronics (IDE) is an interface for connecting a motherboard to hard drives and other storage devices. Its development increased Data Transfer Rate speed and reduced storage device and controller issues. It has its own circuitry and includes an integrated disk drive controller
Difference between AHCI and IDE
AHCI and IDE are two modes in which a hard drive communicates with the rest of the computer system using a SATA storage controller. SATA hard drives can operate in a backward-compatible PATA/IDE mode, a standard AHCI mode, or vendor-specific RAID.
Essentially, IDE is considered adequate for the average computer user and is the most compatible with other technology, particularly older devices. However, it lacks support for new technologies. AHCI supports some important new features that IDE does not, such as native command queuing and hot-plugging hard drives. It also offers an improved performance (speed) over IDE.
Before you begin, create a system restore point and backup your Registry first so that if things do not work out, you can always go back.
Press the Windows + R, in the Run dialog box, type regedit, and hit Enter to launch Registry Editor.
On the left pane of Registry Editor, navigate to the location-
HKEY_LOCAL_MACHINE\SYSTEM\CurrentControlSet\Services\iaStorV
In the right pane, double-click the Start DWORD to modify it. In the box that pops up, type 0 in the Value data field. Click OK.

Again, on the left pane of Registry Editor, navigate to the location-
HKEY_LOCAL_MACHINE\SYSTEM\CurrentControlSet\Services\iaStorAVC\StartOverride
On the right pane, double-click the 0 DWORD to modify it. In the box that pops up, type 0 in the Value data field. Click OK.
Now, on the left pane of Registry Editor, navigate to the location-
HKEY_LOCAL_MACHINE\SYSTEM\CurrentControlSet\Services\storahci
On the right pane, double-click the Start DWORD to modify it. In the box that pops up, type 0 in the Value data field. Click OK.
While still on the left pane of Registry Editor, navigate to the location-
HKEY_LOCAL_MACHINE\SYSTEM\CurrentControlSet\Services\storahci\StartOverride
Check if you have the StartOverride there.
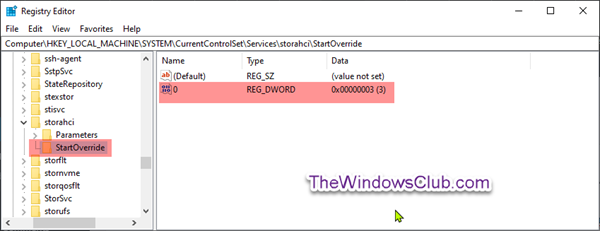
If the StartOveride folder is not present, exit Registry Editor.
But if the folder is present as shown above in the screenshot, on the right pane, double click the 0 DWORD to modify it. In the box that pops up, type 0 in the Value data field. Click OK.
Next, navigate to this key:
HKEY_LOCAL_MACHINE\SYSTEM\CurrentControlSet\Services\storahci
Double-click the Start key, and set its value to 0.
Now, navigate to this key:
HKEY_LOCAL_MACHINE\SYSTEM\CurrentControlSet\Services\iaStorV
Double-click the Start value on the right. Set its value to 0.
Finally, Navigate to this key:
HKEY_LOCAL_MACHINE\SYSTEM\CurrentControlSet\Services\iaStorAV\StartOverride
If this key is not present, look for this key instead:
HKEY_LOCAL_MACHINE\SYSTEM\CurrentControlSet\Services\iaStorAVC
Select the StartOveride key.
Change the value of the 0 value to 0 if you have the iaStorAV key. Set its value to 3 if you have the iaStorAVC key.
Now proceed to boot the computer to your BIOS or UEFI firmware settings.
In your BIOS or UEFI firmware settings, enable AHCI, and save & exit to apply and restart the computer.
Note: The settings will vary depending on the brand and model number of the motherboard. Refer to your motherboard manual for more specific details about how to change SATA settings for it.
On boot, Windows will automatically install AHCI drivers.
When the drivers’ installation completes, you’ll receive a prompt to restart.
Restart the computer and you are all done.
Read: Fix AHCI Port0 Device Error on Windows computer
How to enable AHCI in BIOS Windows 11?
After making the registry changes mentioned earlier, boot into BIOS, then look for the SATA Operation option and change it to AHCI if it is set to RAID. Finally, save the settings and start your computer. Your computer will detect the change in BIOS and install all the required drivers.
How do I know if my SSD is in AHCI mode Windows 11?
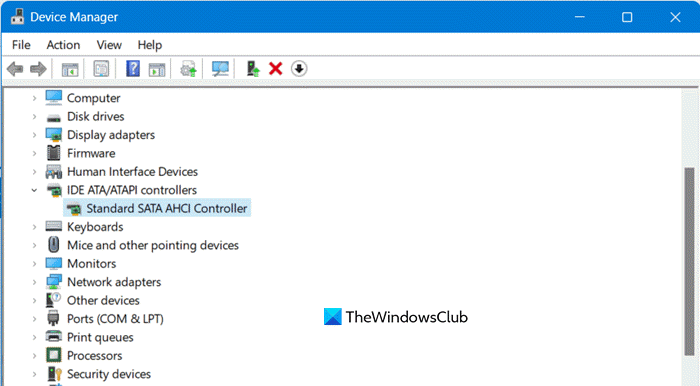
To check if your SSH is in AHCI mode, open the Device Manager by Win + X > Device Manager. Then, look for IDE ATA/ATAPI controllers, expand it, and see if you have a Standard SATA AHCI Controller. If you can see that option, AHCI is enabled on your system.
Also Read: Slow SSD Read or Write Speed on Windows 11.
-
Home
-
Partition Magic
- 2 Ways to Enable AHCI After Windows 10 Installation
By Vicky |
Last Updated
You may wonder about the reasons for enabling Advanced Host Controller Interface (AHCI) in Windows 10. In this post, MiniTool shows you the reasons and how to enable AHCI after Win 10 installation.
What Is AHCI?
For many general users, AHCI is a strange term. But it is necessary to learn about this term due to the quick development of hard disk.
Short for Advanced Host Controller Interface, AHCI is an Intel technical standard that specifies the operation of SATA host bus adapters.
The top benefit of enabling AHCI mode for hard disk is that the disk can run at a higher speed than the disk adopting IDE mode. In other words, the performance of the hard disk will be greatly reduced if not using this mode.
Further reading:
AHCI and IDE are two modes. Under one of the modes, a hard drive communicates with the computer system adopting a SATA storage controller.
Basically, IDE is for average computer uses and is the most compatible with other technology, especially older devices. But it lacks support for new technologies. While AHCI supports some important new features that IDE dies not, like hot-plugging hard drives, Furthermore, AHCI offers an improved performance over IDE.
The reason why the disk performance can be improved by enabling the AHCI mode is that using this mode can greatly minimize the travel of data seek (the read/write speed of a SATA hard drive can be increased by about 30%). So, you can effectively use your hard disk under multitasks after enabling AHCI.
Till now, you may be eager to know to enable AHCI. But please note that you need to set up AHCI mode in BIOS before installing Windows. But cheer up even if you have finished Windows 10 installation. There is also some chance to enable AHCI after Windows 10 installation. Let’s see how to do that.
Note: Before carrying out the following steps, it is highly suggested you create a system restore point in case that something goes wrong.
Enable AHCI After Win 10 Installation via Registry Editor
Step 1: Press Windows + R to call out the Run window. Once getting the window, please type regedit in the search zone and then hit the OK button to open Registry Editor.
Step 2: Navigate to the following path to find the folders below mand modify them one by one.
HKEY_LOCAL_MACHINESYSTEMCurrentControlSetServices
1. iaStorV
In the right pane, double-click the Start DWORD to modify it. Then change the value of the DWORD to 0 and click the OK button to confirm.

2. StartOverride included in iaStorV
Expand StartOverride and then double-click the 0 DWORD. Type 0 in the Value data field and click the OK button.
3. storahci
Expand storahci and double-click the Start DWORD and set its value as 0.
4. StartOverride included in storahci
Expand StartOverride and double-click the 0 DWORD to modify its value to 0.
Step 3: Boot your PC to BIOS or UEFI firmware settings.
Step 4: Enable AHCI in BIOS or UEFI firmware settings, save and exit this change, and restart your computer. On boot, Windows 1ill automatically install AHCI drivers.
Enable AHCI After Win 10 Installation via CMD
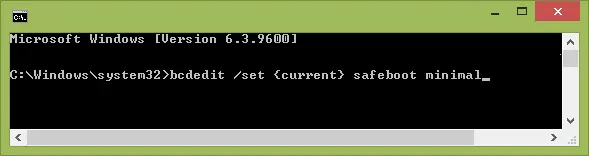
Step 1: Type Command Prompt in the Cortana’s search box and run Command Prompt as administrator.
Step 2: Type the bcdedit /set {current} safeboot minimal command and then hit Enter.
Step 3: Boot your computer into BIOS and then enable AHCI mode.
Step 4: Save changes then exit BIOS. Reboot your computer.
Step 5: Enter Safe Mode and then reopen Command Prompt. Type the bcdedit /deletevalue {current} safeboot command and hit the Enter key.
Step 6: Restart your computer and Windows will automatically install AHCI drivers.
About The Author
Position: Columnist
Vicky is a website editor who has been writing tech articles since she was graduated from university. Most of her articles talk about Windows PC and hard disk issues. Some of her articles also touch on YouTube usage and issues.
During her spare time, she likes to spend time reading, watching videos, and sitting on her Yoga mat to relax.
This guide explains how to activate AHCI mode on Intel-based systems running Windows 8/8.1 or Windows 7 post-installation. While enabling AHCI during OS setup is ideal, these methods bypass the 0x0000007B INACCESSIBLE_BOOT_DEVICE error (BSOD) without reinstalling Windows.
Purchase genuine Windows 7 and Windows 8.1 keys:
Windows 7 – from 8 €
Windows 8.1 – from 9 €
Why Use AHCI?
AHCI enables NCQ (Native Command Queuing) for HDDs/SSDs, boosting performance. It also supports hot-swapping for storage devices.
Method 1: Enable AHCI via Safe Mode (Windows 8/8.1)
Step-by-Step Guide
1. If AHCI causes boot errors, revert to IDE ATA mode in BIOS.
2. Open Admin Command Prompt (Win+X > Command Prompt (Admin)).
3. Run:
bcdedit /set {current} safeboot minimal
4. Reboot, enable AHCI in BIOS/UEFI (SATA Mode section), and save changes.
5. Windows boots into Safe Mode and installs AHCI drivers.

6. Reopen Admin Command Prompt and run:
bcdedit /deletevalue {current} safeboot
7. Reboot again. Windows 8/8.1 now runs with AHCI enabled.
Method 2: Intel Driver Workaround
For Systems with Intel Chipsets
1. Download AHCI drivers (f6flpy) from Intel’s official site (match OS bitness).
2. Extract SetupRST.exe from the same download.
3. In Device Manager, update the SATA controller driver to the f6 AHCI driver.
4. Reboot, enable AHCI in BIOS.
5. Install SetupRST.exe post-reboot.
Method 3: Enable AHCI in Windows 7 via Registry
Manual Configuration
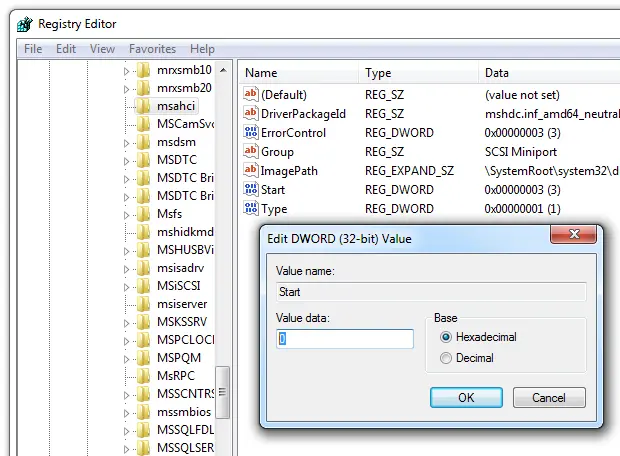
1. Open Registry Editor (Win+R > regedit).
2. Navigate to:
HKEY_LOCAL_MACHINE\SYSTEM\CurrentControlSet\services\msahci
3. Set the Start value to 0 (default: 3).
4. Repeat for:
HKEY_LOCAL_MACHINE\SYSTEM\CurrentControlSet\services\IastorV
5. Close Registry Editor, reboot, enable AHCI in BIOS.
6. Windows 7 installs drivers and reboots again.
Troubleshooting: Fixing BSOD 0x0000007B
Manual Workaround
Microsoft’s Fix It tool is discontinued, but manual methods resolve the INACCESSIBLE_BOOT_DEVICE error. Follow the steps above for your OS version.
Enabling AHCI improves HDD/SSD performance but requires precise steps. Use the method matching your OS version to avoid errors.
Buy Windows 8.1 product key from
You are probably trying to install your new SATA SSD or extended storage in your Windows PC, but you are constantly getting an error.
It is because your storage configuration is still using the old IDE method, which doesn’t support Solid State Drives. You have to change your settings to AHCI to be able to use your SSD.
In this guideline, I am going to assist you in switching on AHCI mode on your windows 10.
So keep reading till to turn on AHCI on Windows 10!
Follow our guide how to turn on auto login in Windows 10.
What Is AHCI?
The SATA interface supports a connection method known as the Advanced Host Controller Interface (AHCI). It is the most up to dated data transfer host, as the use of IDE connection is no longer in use. With the new AHCI mode, SATA connections may quickly transmit data.
The AHCI standard was first produced by Intel in 2004 and defines the AHCI’s operational behavior and software interface.
Intel’s Advanced Host Controller Interface (AHCI) is a non-implementation-specific interface standard for Serial ATA (SATA) host controllers on its motherboard chipsets. To facilitate communication between the host, onboard storage and associated storage devices, SATA details a memory management structure for use by computer hardware manufacturers.
AHCI provides a uniform technique for identifying SATA/AHCI adapters and configuring and reprogramming them for use by software and hardware makers. AHCI is not part of the SATA 3 Gbit/s standard, although it does allow host computers to take advantage of SATA’s more sophisticated features, including hot swapping and native command queuing.
Find out how to enable BitLocker in Windows 10 Home.
How To Setup AHCI Mode In Windows 10
To enable Advanced Host Controller(AHCI), first of all, you need to turn on the mode in your BIOS settings. Then you have to re-install a fresh Windows 10 on your PC. However, if you want to enable AHCI After installing Windows 10, you can do that using the registry editor or command prompt.
You cannot enable AHCI without turning it on from the BIOS settings. Also, if you are changing the BIOS settings, then you have to install a new Windows 10 on your PC to prevent possible data crashes.
And if you don’t want to install fresh windows, then you can turn on AHCI using the registry editor or command prompt.
Now that you know the procedure let’s get into the troubleshooting steps.
Follow the steps to enable AHCI In Windows 10:
1. Enable AHCI Mode In BIOS
First, you have to change the settings in BIOS mode. If you can configure the storage settings in the BIOS mode, then your next step would be installing Windows 10.
Follow the steps to enable AHCI mode:
- Reboot your PC.
- Press F2 to enter BIOS settings.
- Choose Advance Settings.
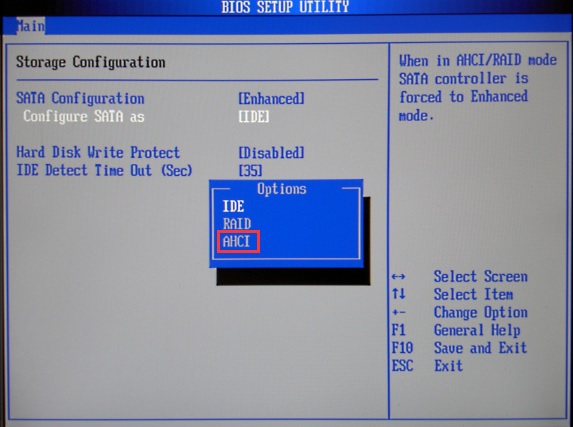
- Go to Storage Configuration.
- Select SATA Configuration
- Set SATA Configuration to AHCI.

After the Storage configuration, you have to install a fresh Windows 10 then you will be able to use SSD storage in windows 10.
Here’s a complete guide on how to sign out of Windows 10.
2. Install Windows 10
A fresh Windows 10 installation is mandatory in order to activate the AHCI mode, or else there is a big possibility of crashing the whole storage system. It will be preferable if you get a bootable pendrive to install Windows 10. And while you are installing the fresh Windows, make sure you choose the professional X64 edition.
Follow the steps to install windows 10:
- Insert the Bootable FAT32 USB pendrive into your PC.
- Restart your PC.
- Press any key to enter the installation process.
- Follow the on-screen instructions.
Windows 10 installation would take around 30-35 mins. Sometimes the installation process might take more than that. Your PC will take reboot automatically for few times. And eventually, when the installation is done, you will be able to set up your username and password.
Now that you have installed windows 10, you will be able to use any SSD storage via AHCI on your PC.
Follow our guide step-by-step to fix Windows 10 searching index problem.
3. Enable AHCI Using Registry Editor
You can easily turn on the AHCI mode using the Registry Editor if you don’t want to install a new Windows.
Follow the steps to enable AHCI using the registry editor:
This should allow you to use your SSD drive without any error; if you are facing issues enabling the AHCI via this method, then follow the next method.
4. Turn on AHCI Using Command Prompt
Enabling AHCI via the using command prompt is a bit easier than the last method. As the PC does the whole work for you, you just have to write the command and change the BIOS settings from your PC.
Follow the steps to turn on AHCI using the command prompt:
- Click “Start” and then type “cmd.”
- Run As Administrator by right-clicking.
- Enter the command: bcdedit /set {current} safeboot minimal.
- Turn the computer back on and go to the BIOS Setup.
- Change the SATA configuration mode from IDE to AHCI.
- Save your changes, and Windows will automatically start up in Safe Mode.
- Turn on Command Prompt as Admin.
- Type in the command: bcdedit /deletevalue {current} safeboot.
- Hit Enter.
After the reboot, your PC will automatically boot in the AHCI mode. Check your storage device and local directory to see if all the drives are enlisted properly.
Should I Activate AHCI Mode?
You Should Activate AHCI mode as it allows you to use Solid State Drive on your Windows PC and boost the transfer rate significantly. With the IDE mode, you will only be able to use the HDD. Also, not many motherboards come with any newer support for IDE as it is no longer in use.
The Advanced Host Controller Interface (AHCI) feature is activated in the default setting of the Unified Extended Firmware Interface (UEFI) or BIOS on most motherboards. The IDE mode on some older motherboards must be changed to the AHCI mode before the OS can be installed.
Input/Output Device Express is a legacy SATA interface option that is very identical to its predecessor, PATA. This kind of operation was commonplace until AHCI became widely available and unleashed the full power of today’s drives in terms of performance and functionality.
Hot-swapping and Native Command Queuing are only two of the many innovative SATA capabilities made possible by AHCI (NCQ). Through the use of hot swapping, SATA drives may be replaced without powering down the machine.
By reducing the amount of time spent moving the read-write units and boosting the AHCI protocol’s access time, NCQ improves the responsiveness of SSDs and storage devices to many data requests at once. NCQ boosts the speed of massive file transfers on SSDs.
When using a fast hard drive, using AHCI mode can enhance your computer’s writing speed by 10-20%, providing a noticeable performance gain. When AHCI is turned on, users should expect to spend less time copying and pasting data into files.
Final Thoughts
Before installing Windows 10, you must go into the BIOS and turn on AHCI. However, if you have already installed Windows 10, you may turn on AHCI mode by going into the registry editor or the command prompt. This will allow your computer to recognize your hard drive as having an AHCI interface.
Though a clean installation of windows 10 is preferable as, without a clean installation, your storage device might crash, creating more hassle for you.
Adnan
Ciao! I am Adnan Alam, and I am currently going through law school. I grew up playing video games from the OG Mario era to today’s Elden Ring! My favorite pastime is amassing video game systems. I’ve owned every generation of PlayStation, Xbox, and Nintendo. Each day, I devote many hours to researching cutting-edge gadgets and testing them out for myself. Outside of that, I’m a huge Arsenal supporter.