
Weylus
Weylus turns your tablet or smart phone into a graphic tablet/touch screen for your computer!
Weylus in action with Xournal++:

Table of Contents
- Features
- Installation
- Packages
- Running
- Fullscreen
- Keyboard Input
- Automation
- Linux
- Wayland
- Hardware Acceleration
- Weylus as Second Screen
- Intel GPU on Xorg with Intel drivers
- Dummy Plugs
- Other Options
- Encryption
- macOS
- Hardware Acceleration
- Windows
- Hardware Acceleration
- Building
- Docker
- How does this work?
- Stylus/Touch
- Screen mirroring & window capturing
- FAQ
Features
- Control your mouse with your tablet
- Mirror your screen to your tablet
- Send keyboard input using physical keyboards
- Hardware accelerated video encoding
The above features are available on all Operating Systems but Weylus works best on Linux. Additional
features on Linux are:
- Support for a stylus/pen (supports pressure and tilt)
- Multi-touch: Try it with software that supports multi-touch, like Krita, and see for yourself!
- Capturing specific windows and only drawing to them
- Faster screen mirroring
- Tablet as second screen
Installation
Just grab the latest release for your OS from the
releases page and install it on your computer. No apps
except a modern browser (Firefox 80+, iOS/iPadOS 13+) are required on your tablet. If you run
Linux make sure to follow the instructions described here to enable uinput for features
like pressure sensitivity and multitouch!
Packages
AUR packages for Weylus are available here:
- From source: weylus
- Prebuilt binary: weylus-bin
Running
Start Weylus, preferably set an access code in the access code box and press the Start button. This
will start a webserver running on your computer. To control your computer with your tablet you need
to open the url http://<address of your computer>:<port set in the menu, default is 1701>, if
possible Weylus will display to you the url you need to open and show a QR code with the encoded
address. If you have a firewall running make sure to open a TCP port for the webserver (1701 by
default) and the websocket connection (9001 by default).
On many Linux distributions this is done with ufw:
sudo ufw allow 1701/tcp
sudo ufw allow 9001/tcp
Please only run Weylus in networks you trust as there is no encryption to enable minimal latencies.
Fullscreen
You may want to add a bookmark to your home screen on your tablet as this enables running Weylus in
full screen mode (on iOS/iPadOS this needs to be done with Safari). If you are not on iOS/iPadOS
there is a button to toggle full screen mode.
Keyboard Input
Weylus supports keyboard input for physical keyboards, so if you have a Bluetooth keyboard, just
connect it to your tablet and start typing. Due to technical limitations onscreen keyboards are not
supported.
Automation
Weylus provides some features to make automation as convenient as possible. There is a command-line
interface; --no-gui for example starts Weylus in headless mode without a gui. For more options see
weylus --help. If you want to run a specific script e.g., once a client connects to your computer
you can do so by parsing the log Weylus generates. You may want to enable more verbose logging by
setting the environment variable WEYLUS_LOG_LEVEL to DEBUG or TRACE as well as
WEYLUS_LOG_JSON to true to enable easily parseable JSON logging.
Linux
Weylus uses the uinput interface to simulate input events on Linux. To enable stylus and
multi-touch support /dev/uinput needs to be writable by Weylus. To make /dev/uinput
permanently writable by your user, run:
sudo groupadd -r uinput
sudo usermod -aG uinput $USER
echo 'KERNEL=="uinput", MODE="0660", GROUP="uinput", OPTIONS+="static_node=uinput"' \
| sudo tee /etc/udev/rules.d/60-weylus.rules
Then, either reboot, or run
sudo udevadm control --reload
sudo udevadm trigger
then log out and log in again. To undo this, run:
sudo rm /etc/udev/rules.d/60-weylus.rules
This allows your user to synthesize input events system-wide, even when another user is logged in.
Therefore, untrusted users should not be added to the uinput group.
Wayland
Weylus offers experimental support for Wayland. Installing pipewire and xdg-desktop-portal as
well as one of:
xdg-desktop-portal-gtkfor GNOMExdg-desktop-portal-kdefor KDExdg-desktop-portal-wlrfor wlroots-based compositors like Sway
is required.
There are still some things that do not work:
- input mapping for windows
- displaying proper window names
- capturing the cursor
Hardware Acceleration
On Linux Weylus supports hardware accelerated video encoding through the Video Acceleration API
(VAAPI) or Nvidia’s NVENC. By default hardware acceleration is disabled as quality and stability of
the hardware encoded video stream varies widely among different hardware and sufficient quality can
not be guaranteed. If VAAPI is used it is possible to select a specific driver by setting the
environment variable LIBVA_DRIVER_NAME. You can find possible values with the command
ls /usr/lib/dri/ | sed -n 's/^\(\S*\)_drv_video.so$/\1/p'. On some distributions the drivers may
not reside in /usr/lib/dri but for example in /usr/lib/x86_64-linux-gnu/dri and may not be found
by Weylus. To force Weylus to search another directory for drivers, the environment variable
LIBVA_DRIVERS_PATH can be set.
Additionally you can specify the VAAPI device to use by setting WEYLUS_VAAPI_DEVICE; by default
devices can be found in /dev/dri. On some systems this is not optional and this variable must be
set. If VAAPI doesn’t work out of the box for you, have a look into /dev/dri, often setting
WEYLUS_VAAPI_DEVICE=/dev/dri/renderD129 is already the solution. Note that you may need to install
the driver(s) first.
Nvidias NVENC is very fast but delivers a video stream of noticeably lower quality (at least on my
GeForce GTX 1050 Mobile GPU) but more recent GPUs should provide higher quality. For this to work
nvidia drivers need to be installed.
Weylus as Second Screen
There are a few possibilities to use Weylus to turn your tablet into a second screen.
Intel GPU on Xorg with Intel drivers
Intel’s drivers support creating virtual outputs that can be configured via xrandr.
But first a word of warning: The following configuration may break starting the X server. This means
you might end up without a graphical login or X may get stuck and just display a black screen. So
make sure you know what you are doing or are at least able to recover from a broken X server.
You will need to install the xf86-video-intel driver and create the file
/etc/X11/xorg.conf.d/20-intel.conf with the following contents:
Section "Device"
    Identifier "intelgpu0"
    Driver "intel"

    # this adds two virtual monitors / devices
    Option "VirtualHeads" "2"

    # if your screen is flickering one of the following options might help
    # Option "TripleBuffer" "true"
    # Option "TearFree"     "true"
    # Option "DRI"          "false"
EndSection
After a reboot xrandr will show two additional monitors VIRTUAL1 and VIRTUAL2 and can be used
to configure them. To activate VIRTUAL1 with a screen size of 1112×834 and a refresh rate of 60
fps the following commands can be used:
> # this generates all input parameters xrandr needs
> #from a given screen resolution and refresh rate
> gtf 1112 834 60

  # 1112x834 @ 60.00 Hz (GTF) hsync: 51.78 kHz; pclk: 75.81 MHz
  Modeline "1112x834_60.00"  75.81  1112 1168 1288 1464  834 835 838 863  -HSync +Vsync
> # setup the monitor
> xrandr --newmode "1112x834_60.00"  75.81  1112 1168 1288 1464  834 835 838 863  -HSync +Vsync
> xrandr --addmode VIRTUAL1 1112x834_60.00
> xrandr --output VIRTUAL1 --mode 1112x834_60.00
> # check if everything is in order
> xrandr
Now you should be able to configure this monitor in your system setting like a regular second
monitor and for example set its position relative to your primary monitor.
After setting up the virtual monitor start Weylus and select it in the capture menu. You may want to
enable displaying the cursor in this case. That is it!
Dummy Plugs
Weylus detects if you use multiple monitors and you can select the one you want to mirror. So if you
want to use Weylus as a second screen you could just buy another monitor. Obviously this is
pointless as if you already bought that monitor, there is no need to use Weylus! This is where so
called HDMI/Displayport/VGA Dummy Plugs come in handy. These are small devices that pretend to
be a monitor but only cost a fraction of the price of an actual monitor.
Once you have bought one and plugged it into your computer you can configure an additional screen
just like you would do with an actual one and then use Weylus to mirror this virtual screen.
Other Options
The following is untested/incomplete, feel free to do more research and open a pull request to
expand documentation on this!
- On Wayland with sway there is
create_outputwhich can be used to create headless
outputs, unfortunately it is not documented how
to actually do that: swaywm/sway#5553 - On Wayland with GNOME recently there has been added an option to create virtual monitors with
mutter
Encryption
By default Weylus comes without encryption and should only be run on networks you trust. If this is
not the case it’s strongly advised to set up a TLS proxy. One option is to use
hitch, an example script that sets up encryption is located at
weylus_tls.sh.
But any TLS proxy should work just fine.
Note that the mentioned script works by creating a self-signed certificate. This means your browser
will most likely display a scary looking but completely unfounded message telling you how incredibly
dangerous it is to trust the certificate you yourself just created; this can be safely ignored!
In case you are using Firefox: There is a bug
that prevents users from accepting self-signed certificates for websocket connections. A workaround
is to directly open the websocket connection via the URL bar and accept the certificate there. After
accepting the connection will of course fail as the browser expects https and not wss as protocol.
Sadly this solution is anything but frictionless and I am unhappy with the current state of affairs.
This is also another reason why encryption is not enabled by default, self-signed certificates are
just too painful to handle nowadays. I’d gladly welcome any proposals to improve the situation!
macOS
Weylus needs some permissions to work properly, make sure you enable:
- Incoming connections
- Screen capturing
- Controlling your desktop
Hardware Acceleration
Weylus can make use of the Videotoolbox framework on macOS for hardware acceleration. In my tests
the video quality has been considerably worse than that using software encoding and thus
Videotoolbox is disabled by default.
Windows
Hardware Acceleration
Weylus can make use of Nvidias NVENC as well as Microsoft’s MediaFoundation for hardware accelerated
video encoding. Due to widely varying quality it is disabled by default.
Building
To build Weylus you need to install Rust, Typescript, make, git, a C compiler, nasm and bash. cargo build builds the project. By default Weylus is build in debug mode, if you want a release build run
cargo build --release. On Linux some additional dependencies are required to build Weylus. On
Debian or Ubuntu they can be installed via:
apt-get install -y libx11-dev libxext-dev libxft-dev libxinerama-dev libxcursor-dev libxrender-dev \
libxfixes-dev libxtst-dev libxrandr-dev libxcomposite-dev libxi-dev libxv-dev autoconf libtool-bin \
nvidia-cuda-dev pkg-config libdrm-dev libpango1.0-dev libgstreamer1.0-dev \
libgstreamer-plugins-base1.0-dev libdbus-1-dev
On Fedora, they can be installed via:
sudo dnf install libXext-devel libXft-devel libXinerama-devel libXcursor-devel libXrender-devel \
libXfixes-devel libXtst-devel libXrandr-devel libXcomposite-devel libXi-devel libXv-devel autoconf libtool \
pkg-config libdrm-devel pango-devel gstreamer1-devel \
gstreamer1-plugins-base-devel dbus-devel nasm npm
After npm is installed, typescript must be installed by:
sudo npm install typescript -g
Note that building for the first time may take a while as by default ffmpeg needs to be built. On
Windows only msvc is supported as C compiler; it is, however, possible to cross compile on Linux for
Windows using minGW.
In case you do not want to build ffmpeg and libx264 via the supplied build script you can create the
directory deps/dist yourself and copy static ffmpeg libraries built with support for libx264 and a
static version of libx264 into deps/dist/lib. Additional deps/dist/include needs to be filled
with ffmpeg’s include header files. For hardware acceleration to work ffmpeg needs to be built with
additional flags depending on your OS: Consult the variable FFMPEG_EXTRA_ARGS in deps/build.sh
for details. Furthermore, for VAAPI on Linux a static version of libva is required as well.
The build script will only try to build ffmpeg if the directory deps/dist does not exist.
Alternatively passing --features ffmpeg-system to cargo will build Weylus using the system’s
version of ffmpeg. This is disabled by default for compatibility reasons, on newer systems this
should not pose a problem and using the system libraries is advised.
Docker
It is also possible to build the Linux version inside a docker container. The Dockerfile used is
located at docker/Dockerfile. This is also how the official release is built.
Building works like
this:
docker run -it hhmhh/weylus_build bash
root@f02164dbfa18:/# git clone https://github.com/H-M-H/Weylus
Cloning into 'Weylus'...
remote: Enumerating objects: 10, done.
remote: Counting objects: 100% (10/10), done.
remote: Compressing objects: 100% (7/7), done.
remote: Total 827 (delta 1), reused 6 (delta 0), pack-reused 817
Receiving objects: 100% (827/827), 5.38 MiB | 7.12 MiB/s, done.
Resolving deltas: 100% (431/431), done.
root@f02164dbfa18:/# cd Weylus/
root@f02164dbfa18:/Weylus# cargo deb
   Compiling
   ...
Once the build is finished you can for example copy the binary from the container to your file
system like this:
docker cp f02164dbfa18:/Weylus/target/release/weylus ~/some/path/weylus
The .deb is located at /Weylus/target/debian/. Please note that the container ID will most likely
not be f02164dbfa18 if you run this yourself, replace it accordingly.
How does this work?
Stylus/Touch
Modern browsers expose so called
PointerEvents that can convey not
only mouse but additionally stylus/pen and touch information. Weylus sets up a webserver with the
corresponding javascript code to capture these events. The events are sent back to the server using
websockets.
Weylus then processes these events using either the generic OS independent backend, which only
supports controlling the mouse or on Linux the uinput backend can be used. It makes use of the
uinput Linux kernel module which supports creating a wide range of input devices including mouse,
stylus and touch input devices.
Screen mirroring & window capturing
Either the generic backend is used which is less efficient and only captures the whole screen or on
Linux xlib is used to connect to the X-server and do the necessary work of getting window
information and capturing the window/screen. To make things fast the «MIT-SHM — The MIT Shared
Memory Extension» is used to create shared memory images using XShmCreateImage. If Wayland instead
of X11 is running, PipeWire and GStreamer is used to capture the screen. The images captured are
then encoded to a video stream using ffmpeg. Fragmented MP4 is used as container format to enable
browsers to play the stream via the Media Source Extensions API. The video codec used is H.264 as
this is widely supported and allows very fast encoding as opposed to formats like AV1. To minimize
dependencies ffmpeg is statically linked into Weylus.
FAQ
Q: Why does the page not load on my tablet and instead I get a timeout?
A: There probably is some kind of firewall running, make sure the ports Weylus uses are opened.
Q: Why do I get the error ERROR Failed to create uinput device: CError: code...?
A: uinput is probably misconfigured, have you made sure to follow all instructions and logged out
and in again? You may also be running a very old kernel that does not support the required features.
In that case try to upgrade your system or use a newer one.
Q: Why is the «Capture» drop down empty and the screen not mirrored?
A: It is possible that only the port for the webserver but not the websocket has been opened, check
that both ports have been opened.
Q: Why can I not select any windows in the «Capture» drop down and only see the whole screen.
A: If you are running Weylus on MacOS or Windows this feature is unfortunately not implemented. On
Linux it is possible that your window manager does not support
Extended Window Manager Hints or that you
need to activate them first, like for XMonad.
Q: Do I have to follow the instructions to setup Weylus as second screen too?
A: No, this is strictly optional.
Q: Why am I unable to connect my tablet to the URL displayed by Weylus?
A: It is possible that your computer and WiFi connected tablet are on different networks, make sure
they are on the same network.
Q: Why does this not run on Firefox for Android?
A: Actually it does, just make sure Firefox version 80+ is installed.
Q: Why does this not run under Chrome on my iPad?
A: Chrome lacks some features for video streaming on iPadOS/iOS, try Firefox or Safari.
Q: Why won’t my cursor move in osu! ?
A: Try disabling raw input.
Q: Can I use Weylus even if there is no WiFi?
A: Probably yes! Most tablets permit setting up a WiFi hotspot that can be used to connect your
computer and tablet. Alternatively there is USB tethering too, which can be used to setup a peer to
peer connection between your tablet and computer over USB. Another method for Android devices is to
setup a socket connection with
adb:
adb reverse tcp:1701 tcp:1701
adb reverse tcp:9001 tcp:9001
Like that you can connect from your Android device to Weylus with the URL: http://127.0.0.1:1701.
Weylus only requires that your devices
are connected via the Internet Protocol and that doesn’t necessarily imply WiFi.
Несмотря на масштабную работу Microsoft по оптимизации Windows и программ под использование сенсорного экрана, на сегодняшний день далеко не всё ПО адаптировано для планшетов и трансформеров на Windows 10. То и дело встречаются маленькие элементы управления, обращаться с которыми без мыши весьма затруднительно. До выхода Windows 10 Creators Update пользователи могли устанавливать различные приложения, вроде TouchMousePointer, чтобы вывести на экран виртуальный тачпад. В Windows 10 1703 разработчики избавили нас от этой необходимости и теперь виртуальная панель встроена непосредственно в систему.
Как включить виртуальный тачпад в Windows 10
Иконку виртуального тачпада можно разместить в системном трее, рядом с кнопкой сенсорной клавиатуры и Windows Ink.
- Кликните по панели задач правой клавишей мыши или нажмите и удерживайте на ней палец.
- Нажмите Показать кнопку сенсорной панели.

- Соответствующая иконка появится в области уведомлений.
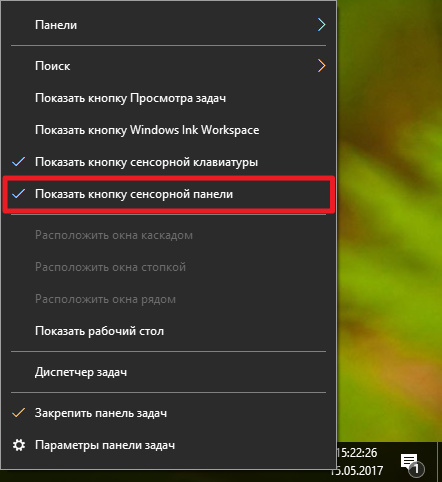
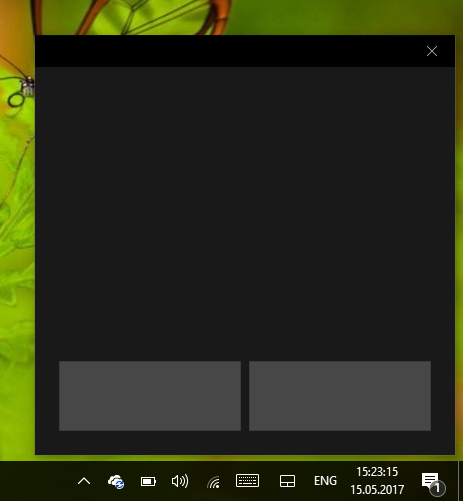
Для открытия тачпада достаточно нажать на эту кнопку. Панель можно перемещать по всему экрану, а закрывается она с помощью крестика справа сверху. Если вы захотите убрать кнопку из трея, достаточно снять галочку в контекстном меню панели задач.
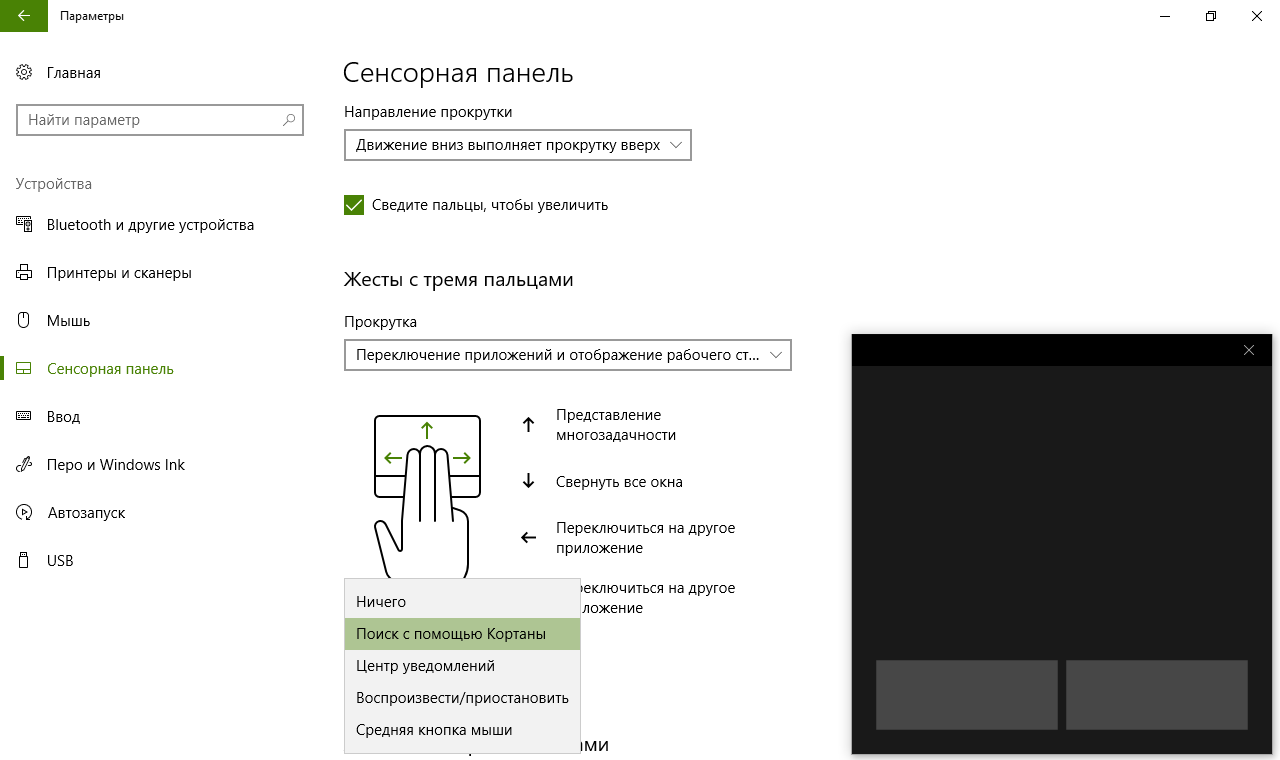
Как настроить виртуальный тачпад в Windows 10
Для виртуального тачпада доступны все настройки высокоточных физических панелей. Отметим, что перед настройкой тачпада надо разместить его на экране, а не просто активировать иконку в трее. В ином случае настройки панели просто не появятся.
- Откройте Параметры.

- Пройдите в раздел Устройства и выберите категорию Сенсорная панель.


Вы можете активировать автоматическое выключение тачпада при подключении мыши, изменить его чувствительность и скорость курсора. Можно настроить по своему желанию жесты двумя, тремя и четырьмя пальцами. Среди доступных действий отметим переключение рабочих столов, изменение громкости, открытие поиска или центра уведомлений.
Виртуальный тачпад позволит вам работать с Windows гораздо удобнее, и теперь вы знаете, как его включить и настроить.
18.03.2017, 22:08. Показов 3375. Ответов 4
Не знаю, может лучше было написать в раздел win 10, проблема вот в чём…
Я искал программу как в заголовке, но не смог найти полностью подходящую и поэтому возник вопрос, что если написать такую самому.
Во первых, найденные программы не устраивают тем, что они работают как виртуальный тачпад в углу экрана, а мне надо чтобы курсор всегда был под пальцем, и ещё, работают они не во всех приложениях (играх). При чем, есть те, которые работают в одних играх, но не работают в других, есть наоборот.
Мой опыт программирования в основном ограничивается c# в Unity3d. Можете что-то посоветовать? Изучить что-то узкоспециализированное, или хотя бы объясните почему это до сих пор не сделано?
А может у вас есть инфа, что майкрософт в своём creators update сами запилят такую фичу, и тогда наверное можно не заморачиваться.
Добавлено через 2 часа 52 минуты
Я что, непонятно изложил проблему? Вы можете хотя бы ответить что я ошибся разделом.
Я конечно могу для начала погуглить «windows 10 touch example c#» , но что гугл выдаёт? всё что он выдаёт, требует установки дополнительных библиотек к visual studio и при этом не гарантирует, что это именно то, что нужно. Я надеялся что в этом форуме люди смогут меня сориентировать.
Scrcpy
для Windows
Scrcpy — бесплатная и простая в использовании утилита, которая позволяет управлять мобильными Android-устройствами с компьютере при помощи клавиатуры и мыши. Присутствует возможность запускать приложения, работать с файлами, печатать сообщения и многое другое. Для работы необходимы установленные драйвера ADB и включенная отладка по USB.
Для работы сперва необходимо подключить смартфон по кабелю к компьютеру и запустить программу. При наличии всех необходимых драйверов сразу же начнется трансляция экрана смартфона на ПК, после чего можно начать управлять своим мобильным устройством. Нажатия мыши будут имитировать нажатия пальцами, а на клавиатуре можно печатать текст.
Из дополнительных преимуществ программы – она не требует установки в систему, не устанавливает дополнительных файлов на смартфон, поддерживает разрешение Full HD и выше. Также следует отметить наличие низкой задержки и высокой производительности до 60 кадров в секунду.
Особенности Scrcpy:
- отображает только экран устройства;
- высокая производительность: 30~120 кадров в секунду, в зависимости от устройства;
- качество: 1920×1080 или выше;
- низкая задержка: 35~70 мс;
- малое время запуска: ~1 секунда для отображения первого изображения;
- запись экрана;
- зеркалирование при выключенном экране Android-устройства;
- копирование-вставка в обоих направлениях;
- настраиваемое качество;
- Android устройство в качестве веб-камеры (V4L2) (только для Linux);
- имитация физической клавиатуры (HID);
- имитация физической мыши (HID);
- режим OTG;
- и многое другое…
ТОП-сегодня раздела «Менеджеры»
3uTools 3.19.021
Программное обеспечение для управления, передачи, резервного копирования всех данных на…
Scrcpy 3.1
Небольшая бесплатная программа, отображающая экран мобильного Android-устройства на ПК и…
Nokia PC Suite 7.1.180.94
Nokia PC Suite — Сборник фирменных приложений, в состав которого входят различные программы для использования их совместно с мобильными телефонами Nokia…
Nokia Suite 3.8.54
Nokia Ovi Suite — приложение для синхронизации мобильных телефонов Nokia с ПК с помощью…
Отзывы о программе Scrcpy
Анатолий про Scrcpy 2.4 [08-07-2024]
Установил. Изображение телефона на мониторе есть , а управлять мышкой и клавиатурой не могу.Чего не хватает? Драйвера?
17 | 10 | Ответить
PREVISITION про Scrcpy 2.4 [08-07-2024]
И многое другое… нет на этом всё вообще-то.
последний пунк вообще не к чему.
4 | | Ответить
Баке про Scrcpy 2.4 [23-04-2024]
клавиатуру и мышь не поддерживает…просто показывает что происходит на экране смартфона
4 | 1 | Ответить
10 BASES PVP про Scrcpy 2.1.1 [06-04-2024]
у меня вопрос? а можно играть игры с этой програмы
8 | 28 | Ответить
Дахуя умни в ответ 10 BASES PVP про Scrcpy 2.4 [12-06-2024]
Если количество курсоров на нужную игру у вас есть)
2 | | Ответить
Это приложение для Windows под названием Automatic Touchscreen (AutoTouch), последний выпуск которого можно загрузить как AutoTouch_1_0.zip. Его можно запустить онлайн в бесплатном хостинг-провайдере OnWorks для рабочих станций.
Загрузите и запустите онлайн это приложение под названием Automatic Touchscreen (AutoTouch) с OnWorks бесплатно.
Следуйте этим инструкциям, чтобы запустить это приложение:
— 1. Загрузил это приложение на свой компьютер.
— 2. Введите в нашем файловом менеджере https://www.onworks.net/myfiles.php?username=XXXXX с желаемым именем пользователя.
— 3. Загрузите это приложение в такой файловый менеджер.
— 4. Запустите любой онлайн-эмулятор OS OnWorks с этого сайта, но лучше онлайн-эмулятор Windows.
— 5. В только что запущенной ОС Windows OnWorks перейдите в наш файловый менеджер https://www.onworks.net/myfiles.php?username=XXXXX с желаемым именем пользователя.
— 6. Скачайте приложение и установите его.
— 7. Загрузите Wine из репозиториев программного обеспечения вашего дистрибутива Linux. После установки вы можете дважды щелкнуть приложение, чтобы запустить его с помощью Wine. Вы также можете попробовать PlayOnLinux, необычный интерфейс поверх Wine, который поможет вам установить популярные программы и игры для Windows.
Wine — это способ запустить программное обеспечение Windows в Linux, но без Windows. Wine — это уровень совместимости с Windows с открытым исходным кодом, который может запускать программы Windows непосредственно на любом рабочем столе Linux. По сути, Wine пытается заново реализовать Windows с нуля, чтобы можно было запускать все эти Windows-приложения, фактически не нуждаясь в Windows.
Автоматический сенсорный экран (AutoTouch)
ОПИСАНИЕ
AutoTouch — это набор инструментов, который выполняет стандартный набор преобразований пользовательского интерфейса веб-системы, чтобы его можно было использовать с сенсорным экраном. Он также предоставляет API для разработчиков, которые хотят добавить преобразования, специфичные для своей системы.
Аудитория
Продвинутые конечные пользователи, разработчики
Интерфейс пользователя
Project — это система пользовательского интерфейса (UI), основанная на веб-интерфейсе.
Язык программирования
JavaScript
Это приложение также можно загрузить с https://sourceforge.net/projects/autotouch/. Он размещен в OnWorks, чтобы его можно было легко запускать в Интернете с помощью одной из наших бесплатных операционных систем.