
Установите DS4 Windows на ПК/ноутбук (Windows 10/11/8.1/7)
Если вы загрузили инструмент и драйверы, такие как драйвер ViGEmBus, драйвер 360 (для пользователей Windows 7), драйвер HidHide, драйвер FakerInput, давайте начнем с процедуры установки.
- Извлеките файл DS4Windows_3.3.3_x64.zip в папку с помощью инструмента WinRar или 7zip.
- Дважды коснитесь файла DS4Windows.exe, как показано на изображении выше. Это отдельное программное обеспечение, которое не нужно устанавливать на свой компьютер. Если при запуске вы увидите экран «Windows защитила ваш компьютер» , нажмите кнопку «Выполнить в любом случае» , и все готово.
- В нем говорится, что вам необходимо установить драйвер ViGEmBus в качестве первого шага. Прочтите, как установить драйвер ViGEmBus.
- Только для пользователей Windows 7: необходимо установить драйвер 360. Прочтите, как установить драйвер 360.
- После выполнения вышеуказанных шагов вы можете подключить контроллер DualShock 4 или контроллер Dualsense к ПК с помощью Bluetooth или проводного соединения (например, USB-соединения).
- Чтобы подключить его через USB, подключите кабель Micro-USB к ПК и контроллеру PS 3/4/5.
- Чтобы подключить его через Bluetooth, удерживайте кнопку PS и «Поделиться» в течение 3 секунд. Световая панель начнет мигать дважды, выберите ее в устройствах Bluetooth на вашем компьютере и готово.
DS4Windows
для Windows
DS4Windows — портативная программа, которая позволяет получить максимальный экспириенс при использовании геймпада Sony DualShock 4 на ПК, что достигается благодаря эмуляции контроллера Xbox 360, что в свою очерель предоставляет доступ к гораздо большему количеству игр.
Пользователю доступен полностью настраиваемый пользовательский интерфейс, система профилей, позволяющие быстро менять различные настройки контроллера, возможность переключать контроллеры на различные профили автоматически при запуске определенных программ, а также множество параметров конфигурации — от отображения элементов управления, чувствительности сенсорной панели, макросов, радужной световой панели, управления движением, специальных действий, вызываемых нажатием нескольких кнопок, до запуска программы с помощью профилей.
Особенности DS4Windows:
- Одно приложение для отображения DualShock 4, DualSense, Switch Pro и JoyCon.
- Эмуляция контроллера Xbox 360 для использования DS4 во многих компьютерных играх, которые не поддерживают его напрямую.
- Эмуляция DualShock 4 v.1 для игр, которые в некоторых ситуациях поддерживают только Sony DS4 v.1.
- Возможность играть в компьютерные игры, которые поддерживают только KB+M ввод, эмулируя действия KB+M.
- Настройка реакции ввода и вывода с помощью множества модификаторов.
- Возможность использовать сенсорную панель DS4 в качестве мыши или сопоставление с другими элементами управления на выходе.
- Возможность играть в игры с гироскопическим управлением, эмулируя мышь или похожий на мышь выход RS при эмуляции контроллера Xbox 360.
- Управление цветом лайтбара: проверка уровня заряда батареи, назначение номеров слотов определенным цветам, профиль управляемого цвета лайтбара.
- Автоматическое переключение профилей, когда в фокусе находятся различные программы.
- Переключение режимов, позволяющее использовать больше маппингов, чем количество кнопок на устройстве.
- Автоматическая проверка и загрузка будущих обновлений приложений.
ТОП-сегодня раздела «Эмуляторы»
DS4Windows 3.3.3
Эмулятор контроллера Xbox 360 для использования геймпада Sony DualShock 4 во многих компьютерных…
Android SDK 35.0.0
Android SDK — универсальная оболочка для моделирования и разработки различных программных продуктов под операционную систему Android…
Отзывы о программе DS4Windows
Владимир про DS4Windows 3.2.9 [15-04-2024]
Очень классная программа! Она эмулирует геймпад Dualshock 4 (геймпад от Playstation 4) и возможно Dualsence (от Playstation 5) как Xbox 360, а это значит, что 99% геймпад будет распознан в игре, НО только будут кнопки в играх от Xbox 360, то есть, например A это X и так далее. Рекомендую!
16 | 15 | Ответить
«Xbox 360 Controller Emulator» allows your controller (gamepad, joystick, wheel, etc.) to function as an Xbox 360 controller. For example, it lets you play games such as «Grand Theft Auto» (GTA) or «Mafia II» using a Logitech Wheel.
Download
IMPORTANT: Please download and run digitally signed files only! If someone asks to disable antivirus or exclude X360CE app from anti-virus — DON’T! Report any suspicion in Issues and we will try to resolve any false positive with anti-virus developers.
On 2022-07-14 some malicious people updated the «Beta Testing» WIKI page with a link to a file which was not signed by developers of X360CE.
The «Beta Testing» WIKI page has been restored and all WIKI pages have been locked for project contributors only, to ensure this does not happen again.
Download v4.x
Digitally Signed Application v4.17.15.0 (2020-11-15) and Virtual Gamepad Emulation Bus 1.16.112.0
Download — x360ce.zip — for All games
Note: version 4.x use Virtual Gamepad Emulation. Instructions can be found here: https://github.com/x360ce/x360ce/wiki/Beta-Testing
Download v3.x
Digitally Signed Application v3.3.6.0 (2018-07-06) and Libraries 3.4.1.1357 (2015-08-27)
32-bit Download — x360ce_x86.zip — for 32-bit games
64-bit Download — x360ce_x64.zip — for 64-bit games
DInput.dll Plugin (required for some games):
32-bit Download — dinput_x86.dll — for 32-bit games
64-bit Download — dinput_x64.dll — for 64-bit games
Reporting Issues
!!! Denuvo protected games are not supported !!!
List of denuvo protected games is here
Report only crashes or other bugs, note that the Issue tracker is not a help desk!
DO NOT ASK FOR HELP IN INSTALLATION OR CONFIGURATION!!!
If you have questions about installation or configuration, please go to our forum @NGemu
Guides [OUTDATED!]
x360ce Libraries Tutorial
x360ce Application Tutorial
Various x360ce Guides
Compatibility
Games that work with x360ce can be found on the Compatibility List. If you would like to add to that list or provide updated information place see Reporting Compatibility.
System Requirements
- Windows Vista or newer.
- .NET 3.5 (also installs 2.0 and 3.0) (included in Windows 7)
- .NET 4.0 (link to 4.6, also installs 4.0) (included in Windows 8 and 10)
- DirectX End-User Runtime (June 2010) (required regardless of OS)
- Visual C++ Redistributable for Visual Studio 2013 (for x64 systems install both x86 and x64 redistributables)
- If you upgraded to Windows 10, you must Uninstall and Reinstall the Visual C++ Redistributable
Notes:
- Most game’s executables are 32-bit and require x86 x360ce and also the x86 redistributable.
- Vista users can obtain .NET 3.5 from the above link, and Windows 8 users can enable it in Programs and Features — Turn Windows Features on and off.
- .NET MUST be installed prior to the DirectX webupdate as it checks that .NET 2.0/3.0/3.5 is installed and skips the Managed DirectX framework if it is not.
- The full DirectX Redistributable will always install the file, however it’s best to have .NET 3.5 installed anyhow as quite a few XInput titles utilize .NET for internal dependencies.
Files
xinput1_3.dll (Wrapper Library) — Translates XInput calls to DirectInput calls — supports old, non-XInput compatible GamePads.
x360ce.exe — (Application) — Allows for editing and testing of Library settings.
x360ce.ini — (Configuration) — Contain Library settings (button, axis, slider maps).
x360ce.gdb — (Game Database) Includes required hookmasks for various games).
Dinput8.dll — (DirectInput 8 spoof/wrapping file to improve x360ce compatibility in rare cases).
Installation
Run this program from the same directory as the game executable. XInput library files exist with several different names and some games require a change in its name. Known names:
- xinput1_4.dll (Windows 8 / metro apps only)
- xinput1_3.dll
- xinput1_2.dll
- xinput1_1.dll
- xinput9_1_0.dll
Game Database (GDB) and Configuration (INI) files can be copied to %ALLUSERSPROFILE%\X360CE on NT6 (Vista/7/8) or %ALLUSERSPROFILE%\Application Data\X360CE on NT5.1 (XP), or be left in the same directory as the game’s executable (.EXE)
Note:
- In most cases games based on the Source engine have the DLL placed inside the /Bin/ sub folder, as it is loaded by inputsystem.dll instead of the game executable.
- The DLL is not currently fully supported by the App, recent versions incorporate HookMasks and fully remove HookModes, and requires placing Version=1 under [options] in the x360ce.ini to quieten a warning about incorrect version.
Uninstallation
Delete x360ce.exe, x360ce.ini and all XInput DLLs from the game’s executable directory.
How to remove HID Guardian if access to your Mouse and Keyboard is lost (X360CE v4.x)
Instructions: https://github.com/x360ce/x360ce/wiki/HID-Guardian
Troubleshooting
Some games have control issues when Dead Zone is reduced to 0%.
You may need to increase the Anti-Dead Zone value if there is gap between the moment when you start to push the axis-related button and the reaction in game.
Wheel doesn’t work in the game, but it works inside x360ce Application.
Some controllers will only operate in game if they are set as «GamePad». Try to:
- Run x360ce.exe
- Select the [Controller #] tab page corresponding to your controller.
- Open [Advanced] tab page.
- Set «Device Type» drop down list value to: GamePad.
- Click [Save] button.
- Close x360ce.exe.
- Run the game.
Only one controller, mapped to PAD1, may work correctly in some games. Try to:
- Run x360ce.exe
- Select the [Controller #] tab page corresponding to your controller.
- Open the [Direct Input Device] tab page (visible when the controller is connected).
- Set «Map To» drop down list value to: 1.
- Set «Map To» drop down list values (repeat steps 2. to 4.) for other controllers, if you have them, to: 2, 3 or 4.
- Click [Save] button.
- Close x360ce.exe.
- Run the game.
To use more than one controller in game, you may need to combine them. Try to:
- Run x360ce.exe
- Select the [Controller #] tab page corresponding to your additional controller.
- Open the [Advanced] tab page.
- Set «Combine Into» drop down list value to: One.
- Select [Options] tab page.
- Check «Enable Combining» check-box. (Note: Uncheck «Enable Combining» check-box when you want to configure the controller.)
- Click [Save] button.
- Close x360ce.exe.
- Run the game.
Do I need to run x360ce Application during the game?
The x360ce.exe application can be closed before launching the game; the game doesn’t need it and it uses your computer’s resources. The x360ce.exe application is just a GUI for editing x360ce.ini and testing your controller.
Warning — Configuration file version does not match x360ce version.
This occurs because the current version of the application is not completely compatible with the DLL just yet.
You can resolve this by adding Version=1 under the [Options] section in x360ce.ini
Controller tab won’t turn green / Red light on Controller 1, 2 etc.
This can occur for a number of reasons:
- The configuration utility DOES NOT work with the 64-bit library, it will only work with the 32-bit version, This is the case regardless of whether your Windows is 32-bit or 64-bit.
- The DInput state of the controller might be incorrect due to an application crashing previously and not unloading the controller or some other reason. Opening up Joy.cpl (Set Up USB Game Controllers) and clicking the Advanced button, and then Okaying out of the window that appears can fix it.
- The controller profile loaded may match the name of the controller but not actually be for the controller you own — in this case you might see button numbers or axes mapped that do not appear in the Joy.cpl test page.
- The controller profile might have PassThrough set. A growing number of profiles have been uploaded that do this, I have no idea why as it disables x360ce and just bloats the list of available profiles.
- There just might not be a profile for your control at all — The light should turn green at least once the 2 sticks, triggers and D-pad are assigned. Sometimes the application needs to be restarted after assigning these for the light to turn green.
Screenshots

Xpadder allows you to play your computer games with your favorite controller that only allow keyboard and mouse input. Xpadder acts as an interface between your controller and keyboard input, mapping each button press to a keyboard key, allowing the video game to be played. Xpadder has been available for 10 years and has been downloaded over 4 million times.
Features:
- Map controller buttons to keyboard keys
- Map mouse movement to controller sticks
- Input combinations, toggles, sequences, triggers
- Features support for multiple controllers
- Software upgrades for life
Xpadder detects all modern controllers and allows you to individually map each button to a keyboard press or a movement of the mouse. Xpadder includes a variety of profiles to support each of those controllers. Each button mapping is easily selectable with a simple drop-down menu. The software shows you a preview of exactly how your controller is configured, allowing you to easily adjust your settings and see how you will be playing your game. Xpadder even includes a variety of advanced options that all gamers love to configure such as inverting controller axes for easier movement, enabling eight-way movement, configuring stick dead zone for more precise aiming, and axis prioritization.
You can play your favorite games the way you want to.
Xpadder even allows you to save various profiles, allowing gamers to have customized settings for every different game. The software allows you to easily check that your configuration is working correctly prior to starting your game. Xpadder supports Windows 10, 8.1, 8, 7, Vista, and XP, meaning it supports games back to the start of the millennium. The software supports controllers communicating via both XInput and DirectInput, meaning it supports all gaming controllers from the Xbox, PlayStation, Nintendo, 8BitDo, and even generic Bluetooth controllers.
Compatible with Windows 10, 8.1, 8, 7, Vista, and XP
Supports controllers communicating via XInput and DirectInput
Requires a controller for mapping to keyboard inputs
Supports a wide variety of game controllers and configurations.
Makes keyboard-based games accessible for console players.
User friendly with a straightforward interface.
Not fully compatible with all gaming systems and controllers.
May require frequent updates and troubleshooting.
The interface can be confusing for new users.
Liam
Sun, Jan 28, 2024
Xpadder is an application for configuring a game controller. It is aimed at providing the best user experience to the console users in computers.Xpadder can provide joystick support to DOS, emulated, or internet games. Users can even control video or music players, web browsers, or any typical Windows application by applying the custom configuration using this application.
Xpadder is an extremely lightweight application. It has a lot of languages to choose from. It also contains a lot of shortcuts. It is also compatible with a lot of gamepads.
However, this application does not have a free version. It only offers the paid version which contains all of the features bundled with it.
👨💻️ USER REVIEWS AND COMMENTS 💬
image/svg+xmlBotttsPablo Stanleyhttps://bottts.com/Florian Körner
Josh
Xpadder is something every gamer could use to make their gaming more enjoyable and more convenient. Xpadder allows you to use your favorite controller while playing computer games that usually would require mouse and keyboard only. Allowing this could help gamers have better aim and stability in certain games that a keyboard or mouse just simply wouldn’t allow. Xpadder is a product that I am truly interested in for my boys who are always playing games on the xbox. I know they would love to be able to use their controllers to play computer games as well, with something they are already familiar with.
image/svg+xmlBotttsPablo Stanleyhttps://bottts.com/Florian Körner
Murray
Xpadder is used as a gamepad for Xbox or Playstation. It is beginner-friendly as well. A gamepad is used for someone playing a console game on a PC.
image/svg+xmlBotttsPablo Stanleyhttps://bottts.com/Florian Körner
Lucas
Ulrich
This one is for all the gamers out there. It emulates your keyboard and mouse with a game controller. Using this feature, you can easily attach a controller to your PC and play any PC game, even if it doesn’t support a controller. You can easily download Xpadder for free and install this app on a Windows PC. I really like it and definetely recomend
image/svg+xmlBotttsPablo Stanleyhttps://bottts.com/Florian Körner
Caleb
This emulator is really recommended for people like me that enjoy playing on consoles and gaming controllers, more than on a keyboard and mouse. There are a lot of PC games that can’t be played with a controller, but this can be fixed using Xpadder, because with it you can now map certain keys or mouse clicks onto various buttons on a chosen controller. I use this all the time as I have a preference for gaming controllers, and you can even use it to remap functions for games that do support controllers as well.
image/svg+xmlBotttsPablo Stanleyhttps://bottts.com/Florian Körner
Jayden
I used this to increase the speed and efficiency of my pc keyboard as it simulate the keyboard and mouse movement. This tool is awesome for web browser, mp3 mp4 player etc.. Also it is a free software. I used to play games as it support controller. I recommend it to everyone.
image/svg+xmlBotttsPablo Stanleyhttps://bottts.com/Florian Körner
Aaron
Xpadder is a pc emulation software for gamepads. It controls your pc keyboard and mouse with a game console. The main thing is we can sync the keyboard and mouse with joystick commands.
image/svg+xmlBotttsPablo Stanleyhttps://bottts.com/Florian Körner
Alexander
Xpadder is a transparent and highly competent keyboard emulator that you can use for your PC. This software allows you to get control over any type of game that doesn’t feature any support for your gamepad. Simple tools and visuals anyone who has some time to spare and can easily set up the gamepad to emulate the keyboard and their mouse in all the games they play. They do have a free version but after years of this software being here they have come up with a premium version. It’s available on all the Windows versions.
Overall, I would recommend this for gamers but ofcourse for anyone else who are also interested in games.
image/svg+xmlBotttsPablo Stanleyhttps://bottts.com/Florian Körner
Jamie
Xpadder for windows is application to control the pc,keyboard and mouse. It is freeware program. It is also safe and secure to download and use the program. It is lightweight program and have control over the games. It is capable keyboard emulator for pc. It is simple and compact software program. It is hassle free software. It is supported in the windows program.
image/svg+xmlBotttsPablo Stanleyhttps://bottts.com/Florian Körner
Blair V.
Xpadder is a Windows application that allows users to map keyboard and mouse inputs to game controller buttons. It is used to simulate key strokes, mouse movements, and other game controller button presses in order to play games with poor or no game controller support. It is compatible with Windows XP, Vista, 7, 8 and 10.
image/svg+xmlBotttsPablo Stanleyhttps://bottts.com/Florian Körner
Jake Goncher
Xpadder is a great software for gamers who lack controllers. It allows users to create custom profiles that can be used with any game. The interface is easy to understand and use. I have found it to be very helpful in creating custom profiles for games that don’t have controller support. The program is also very affordable. The ability to create multiple profiles for different games is a great feature. The software runs well and is lightweight, so it doesn’t take up much resources. Overall, it is a great program for gamers who need to customize their gaming experience.
image/svg+xmlBotttsPablo Stanleyhttps://bottts.com/Florian Körner
Evan Oge
Xpadder software is relatively easy to use and provides a great way to control games with a gamepad. The interface is intuitive, and the configuration options are fairly comprehensive. I found it useful to save custom button configurations, however some games had compatibility issues. The price is also quite reasonable.
image/svg+xmlBotttsPablo Stanleyhttps://bottts.com/Florian Körner
Theo B********o
Xpadder is a very usefull tool for gamers who want to customize their gamepad controls. I’ve been using it for a while and I find it quite convienient.
image/svg+xmlBotttsPablo Stanleyhttps://bottts.com/Florian Körner
Andrew X*******i
Xpadder is a helpful tool for mapping keyboard and mouse inputs to gamepad buttons, but it can be a bit finicky and time-consuming to set up correctly.
image/svg+xmlBotttsPablo Stanleyhttps://bottts.com/Florian Körner
Callum Mislang
Xpadder software allows users to map keyboard keys and mouse movements to gamepad buttons, making it easier to play games on a PC with a gamepad.
image/svg+xmlBotttsPablo Stanleyhttps://bottts.com/Florian Körner
Mason
Xpadder is a versatile software tool that enables users to play PC games with a joystick or gamepad. The key feature of Xpadder is its ability to map keyboard keys and mouse actions to the game controller. Thus, users can enhance their PC gaming experience, making it more immersive and true to a console gaming feeling.
image/svg+xmlBotttsPablo Stanleyhttps://bottts.com/Florian Körner
Luke
Absolutely brilliant for mapping keyboard keys and mouse movements to a gamepad, providing seamless control for games without native gamepad support.
image/svg+xmlBotttsPablo Stanleyhttps://bottts.com/Florian Körner
Charlie
Effortlessly maps gamepad inputs to keyboard strokes.
image/svg+xmlBotttsPablo Stanleyhttps://bottts.com/Florian Körner
Finn
Intuitive, customizable gamepad mapping.
Awesome for gaming with controller, makes playing way easier!
Если у вас есть в наличии геймпад DualShock 4, вы можете подключить его к вашему компьютеру или ноутбуку с Windows 10 или предыдущими версиями системы и использовать его в самых разных играх, эмуляторах, а при желании — и для управления компьютером вместо мыши.
В этой инструкции подробно о подключении DualShock от PlayStation 4 в Windows 10 кабелем или по Bluetooth, а также о том, как сделать так, чтобы геймпад эмулировал контроллер XBox 360 и о том, зачем это может потребоваться.
- Подключение DualShock 4 к компьютеру
- Использование геймпада PlayStation для игр в Windows 10
- DS4Windows
- InputMapper
Подключение DualShock 4 к компьютеру или ноутбуку
Подключить контроллер вы можете просто USB кабелем — он будет автоматически определен как «Wireless Controller» в диспетчере устройств и в списке устройств в «Параметрах».
Второй метод — подключение по Bluetooth. Для этого выполните следующие действия:
- Нажмите на контроллере кнопку Share и, удерживая её, нажмите и удерживайте кнопку «PlayStation». Через некоторое время геймпад перейдет в режим сопряжения по Bluetooth, а индикатор на нем начнет мигать белым цветом.

- В Windows 10 зайдите в Параметры — Устройства — Bluetooth и другие устройства и добавьте новое устройство Bluetooth с именем Wireless Controller. Если появится запрос кода, введите 0000 (четыре нуля).


После этого DualShock 4 будет подключен к Windows 10 по Bluetooth. Внимание: по отзывам пользователей Bluetooth подключение с DualShock на компьютере или ноутбуке не всегда работает стабильно. Иногда помогает установка оригинальный драйверов BT-адаптера и отключение функций энергосбережения для контроллера в его свойствах в диспетчере устройств (в разделе Bluetooth и Устройства HID), но не всегда.
Использование геймпада от PlayStation для игр в Windows 10
В некоторых случаях какая-то дополнительная настройка DualShock 4 может не потребоваться: например, геймпады от PS4 поддерживаются и настраиваются в Steam. Некоторые эмуляторы консолей позволяют настроить управление с подключенного геймпада в соответствующих параметрах управления (бывает, что настройка успешно проходит при USB-подключении, но не работает по Bluetooth). Но в некоторых других играх для ПК и эмуляторах подключенный DualShock 4 может быть просто не виден, а нажатия не регистрируются.
В этом случае нам поможет эмуляция геймпада Xbox 360. Если мы сделаем так, чтобы игры «считали», что подключен геймпад от Xbox, то большинство из них начнут исправно работать с контроллером, при условии, что они в принципе поддерживают такой тип управления. Для эмуляции геймпада Xbox на DualShock 4 можно использовать различные сторонние программы. Самые популярные и работоспособные — DS4Windows и InputMapper.
DS4Windows
Бесплатная программа DS4Windows доступна для загрузки на официальной старице https://github.com/Jays2Kings/DS4Windows/releases. После скачивания распакуйте программу в удобное расположение, запустите файл DS4Windows.exe (переда началом следующих действий лучше отключить геймпад от компьютера):
- После запуска будет задан вопрос о том, куда сохранять параметры — в папку с программой или AppData. Выбирайте на ваше усмотрение, но я рекомендую папку с программой.
- При первом запуске вам предложат установить драйвер DS4 для Windows 10, 8.1 или Windows 7 (кнопка вверху окна), а для Windows 7 — также потребуется отдельный драйвер контроллера Xbox 360. Установите необходимые драйверы.
- Подключите ваш DualShock 4 по USB или Bluetooth, как это было описано в начале инструкции.
- Если всё прошло успешно, в главном окне DS4Windows вы увидите статус подключения вашего контроллера и, в общем-то он уже будет готов к работе с профилем по умолчанию. И его можно будет использовать в играх и эмуляторах.

- В Диспетчере устройств появится контроллер Xbox 360 для Windows.
- При желании вы сможете выполнить настройки профиля управления в DS4Windows, создать несколько профилей, изменить параметры подсветки и другие настройки. Если настройки вам не понятны, обычно достаточно оставить значения по умолчанию.


Учитывайте, что при закрытии программы (по умолчанию, она не закрывается, а сворачивается в область уведомлений Windows) геймпад перестает быть «контроллером Xbox 360», а становится обычным DualShock 4.
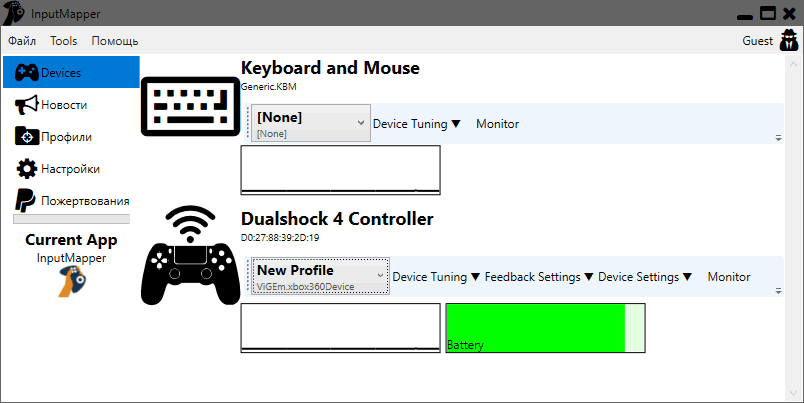
InputMapper
Программа InputMapper (официальный сайт https://inputmapper.com/) более продвинутая, но, при этом может показаться и более сложной для некоторых пользователей. В общих чертах её первоначальная настройка выглядит следующим образом:
- Устанавливаем программу, запускаем её.
- Если DualShock 4 подключен, вы увидите сообщение о том, что найдено новое поддерживаемое устройство. Нажмите кнопку «Begin Configuration» (начать настройку).

- В следующем окне нужно будет выбрать, какое устройство будет эмулироваться. Для большинства игр требуется выбрать 360 Controller (но, при желании, вы можете эмулировать клавиатуру и мышь на вашем DualShock 4, такой пункт доступен и в некоторых случаях, например, для игр, не поддерживающих геймпады, может оказаться полезным).
- На этом процесс будет завершен, в главном окне InputMapper вы увидите ваш геймпад и используемый им профиль. Пока программа запущена или свернута в область уведомлений, для игр ваш геймпад будет работать как контроллер Xbox.

- Настройку существующих профилей (переназначение кнопок и элементов управления геймпада) или создание новых можно произвести в соответствующем разделе программы.


В моем тесте оба варианта работали исправно и каких-либо проблем при подключении DualShock 4 как кабелем, так и с использованием Bluetooth не возникло.
Если инструкция оказалась полезной и всё работает ожидаемым образом, поделитесь в комментариях, во что играете, по Bluetooth или USB подключились, были ли проблемы и как были решены. Если же остаются вопросы, задавайте их — постараемся найти ответ.